


Intel Galileo Board: Key Features, Supported Languages, and Practical Projects
Are you looking for a Certified board that allows you to connect standard MPCle modules like Bluetooth and Wi-Fi? Do you want a board that works with wireless projects and synchronize in real-time? Then, it would help if you had the Intel Galileo Board.
Want to learn more about the device?
This article will give you a breakdown of the device’s features, specifications, projects, benefits, and more.
Let’s cut to the chase!
What Are The Features of the Galileo Board?
Ethernet
The Galileo board has a portion at the top with a UART label. At this portion, you’ll find an Ethernet port that permits the connection of Intel Galileo to wired networks.
Arduino

Arduino boards
This board is the first Arduino board that has its foundation in Intel design. Also, the portion on the board that you can connect jumper cables to is similar to the Arduino 1.0 pinout model on Arduino Uno R3 boards.
As a result, you can use modules that plug into headers to extend the board’s functionality. Likewise, the Uno has a serial port, 14 digital I/O pins, an ICSP header for serial programming, and 6 analog inputs.
RTC (Real Time Clock)
With the board-integrated RTC, you can synchronize data between modules. Additionally, you can use the Arduino time library to include timekeeping configuration in your program.
Also, working with wireless projects makes it easy to integrate real-time using GPS (Global Positioning System) time data and NTP (Network Time Protocol). Further, you can include a coin-cell battery on the Intel Galileo board to save time between system resets.
Quark
The Galileo board comes with an Application Processor (Quark SoC X1000). And this feature is for the Internet of Things. Furthermore, this application processor is small and has more power efficiency than the Intel Atom Processor. So, it works perfectly for small, low-powered projects.
Linux
It’s possible to access Wi-Fi, serial ports, and board pins with the Linux image for Intel Galileo and programming languages. So, it is easy to capitalize on the Intel Quark processing average power to create something.
Linux dashboard
Mini-PCle
This slot allows you to connect standard mPCle modules like SIM card adapters for cell phones, Wi-Fi, and Bluetooth.
Micro SD
With the SD (Secure Digital) library, you can access the alternate onboard micro SD card. In contrast to regular Arduinos, the Intel Galileo doesn’t save programs without an SD card. Hence with an SD card, the board can save up to 32 GB of data.
Key Components of the Arduino Intel Galileo Board
- Eth PHY: Ethernet Physical layer transceiver.
- USB 2.0 Client: USB Client connector (Micro-USB Type B).
- Micro SD slot: it can handle micro SD cards up to 32GB.
- ICSP: 6-pin in-circuit serial programming (ICSP) header.
- Voltage regulator: it produces a 3.3V supply.
- JTAG Debug Port: 10-pin standard JTAG header for debugging.
- 5V power: the board uses an AC-to-DC adapter.
- Ethernet Port: 10/100 Ethernet connector.
- GPIO Expander: a single I2F I/O expander offers GPIO pulse width modulation.
- ADC: Analog to Digital converter.
- Arduino Interface: follows Arduino Uno Revision 3 pinout.
- Intel Quark SoCX1000: 400 MHz 32-bit Intel Pentium processor.
- 256MB DDR3 RAM: 256Mbyte DRAM, firmware enables by default.
- Shield interface: follows Arduino Uno Revision 3 shield pinout.
- RS-232 Serial Port: 3-pin 3.5mm jack.
- SPI Flash: 8 Mbyte Legacy SPI Flash to save the bootloader or firmware and the latest sketch.
- USB 2.0 Host: USB 2.0 Host connector (Micro-USB Type AB).
- RS-232: RS-232 transceiver.
- SPI Flash Program Port: 7-pin header for Serial Peripheral Interface (SPI) programming.
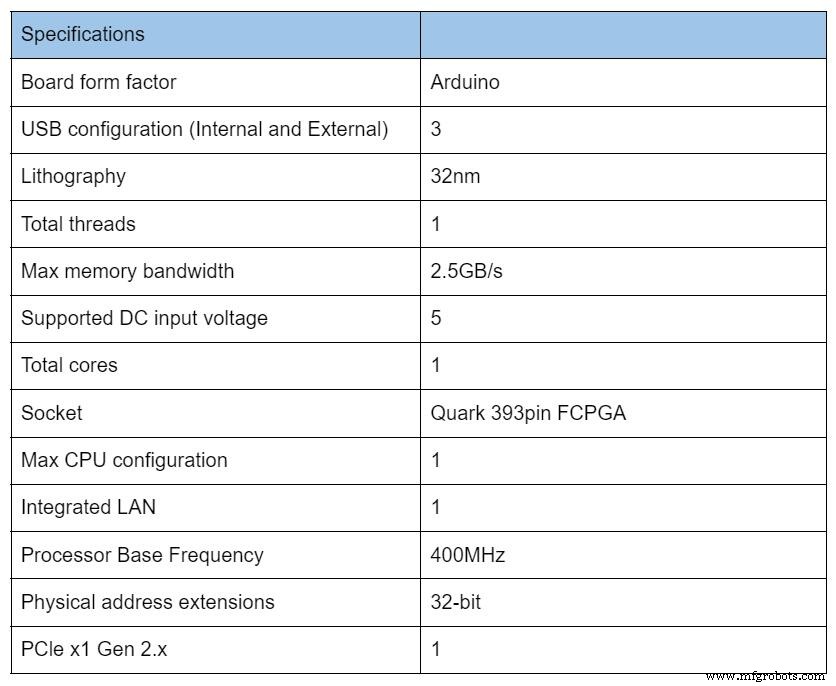
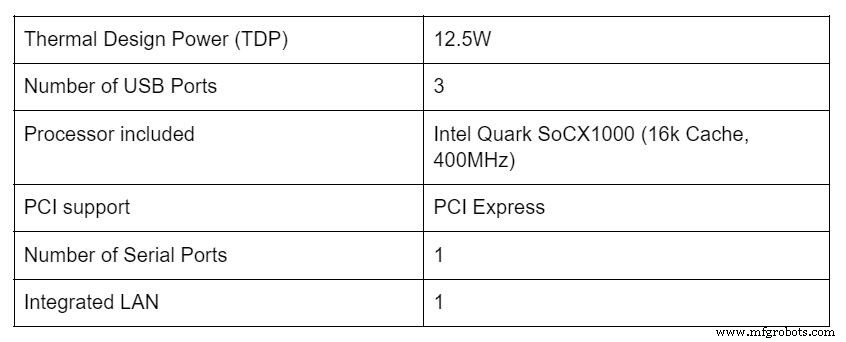
Intel Galileo Specs
Intel Galileo Projects
DIY Galileo Motion Activated Lights
Materials Needed
- Intel Galileo board
- Wires
- PIR sensor
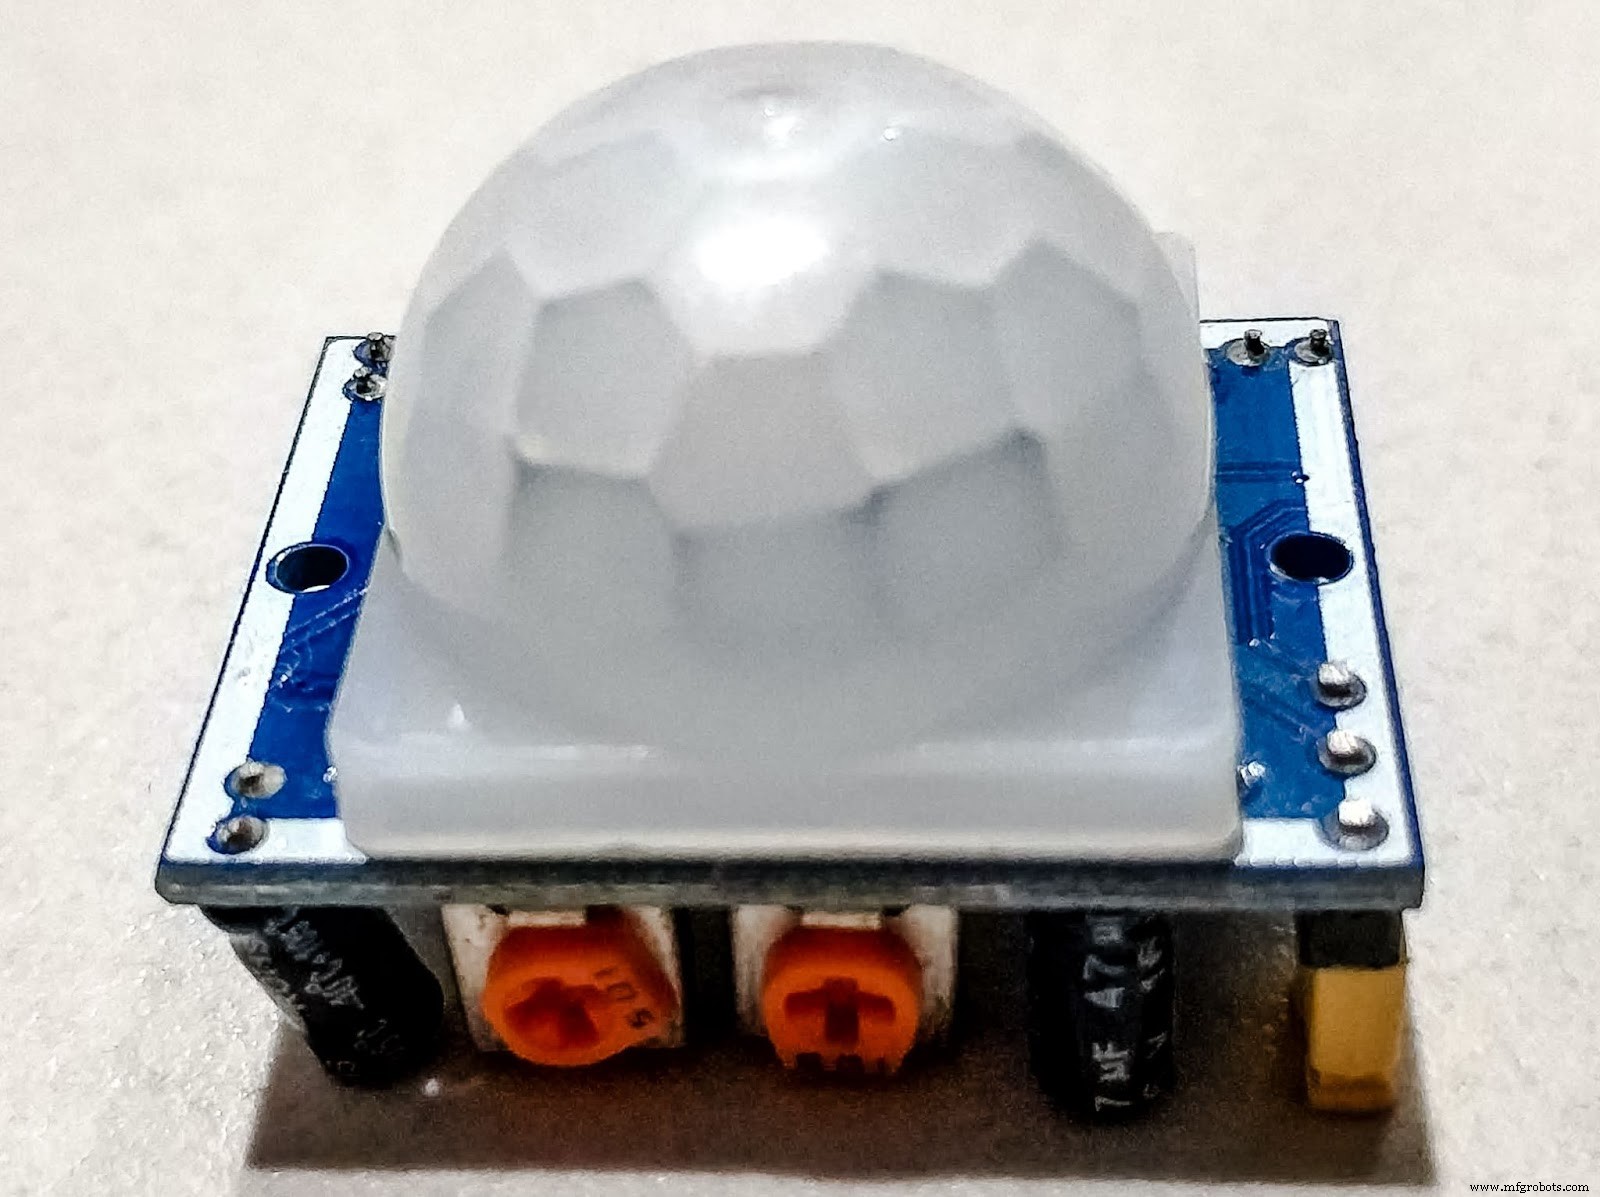
Arduino PIR sensor
Source: Wikimedia Commons
- Bulb socket
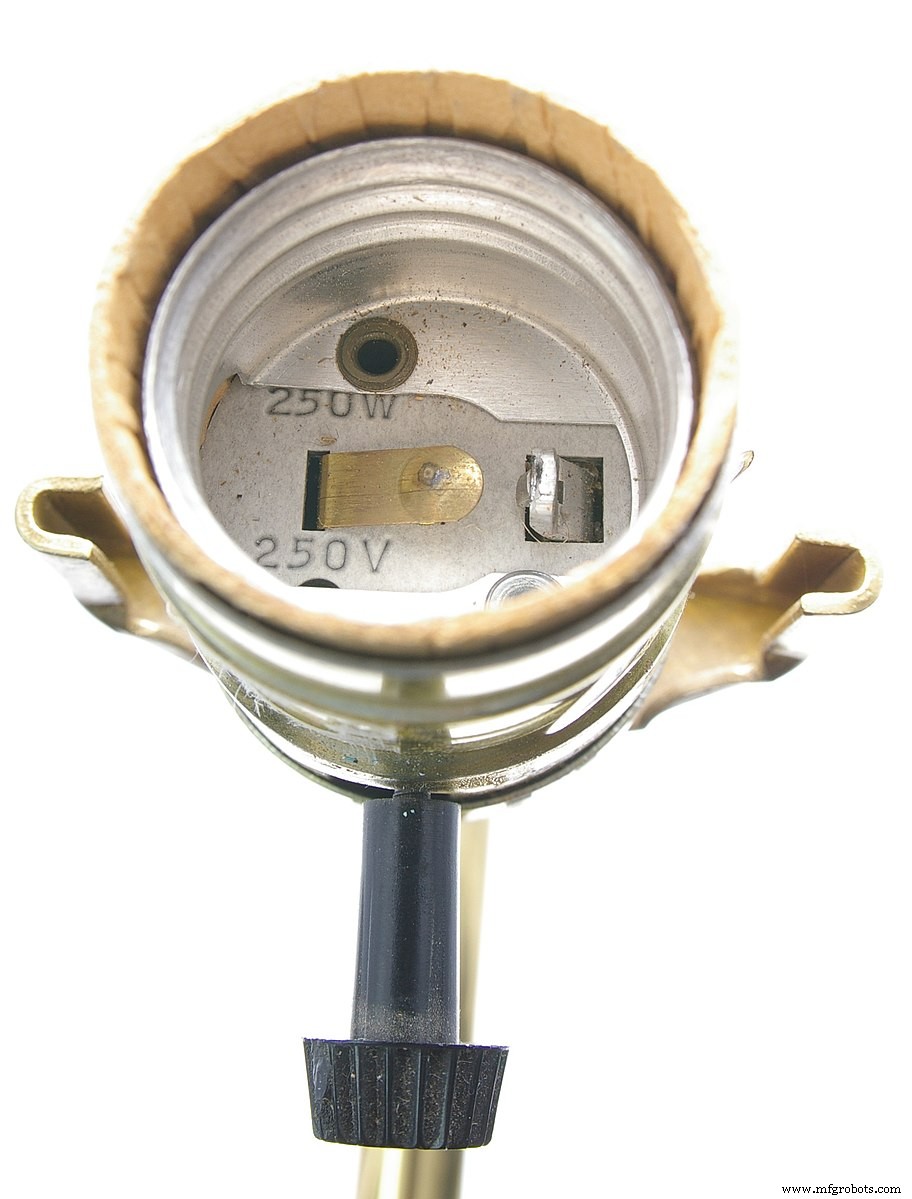
Light bulb socket
Source: Wikimedia Commons
- Screwdriver
Yellow screwdriver
- Relay
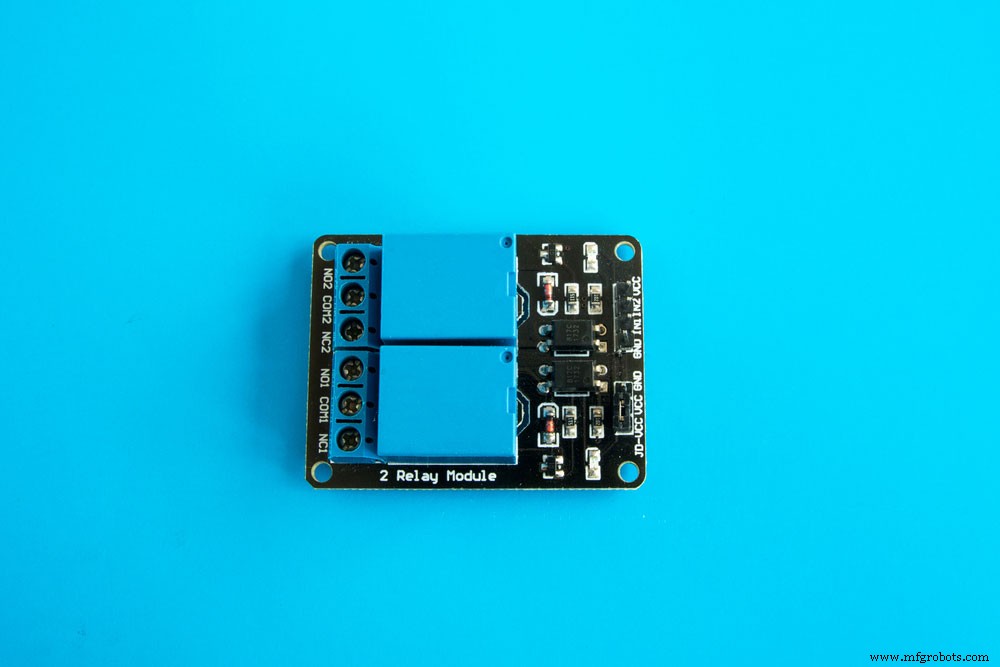
Relay for Arduino
- Light bulb

Light bulb
Steps
1. Get your Galileo and connect the PIR sensor to the device. You can do this by linking the Ground cable from the sensor to Galileo’s Ground. Then, connect the sensor’s VCC to Galileo’s 3.3 Pin. Afterward, join the sensor’s output to Galileo’s digital pin 0.
2. Next, get the three wires and connect each to the relay IN, VCC, and ground. In other words, the IN wire connect to Galileo’s digital Pin 7. Then, the VCC wire goes to Galileo’s 5V pin the ground wire goes to Galileo’s ground.
3. Opt for an open-end power cord. Then, connect one end to the bulb’s socket middle wire. Afterward, connect the two wires to the relay.
4. The power cord’s open wire connects to the Relay’s COM pin. So, you can put the bulb socket’s wire in the Relay’s NO (normally open) pin. Then, keep the wires in place on the relay by tightening the screws.
5. Put the bulb in the socket to arrange the system. Further, plug all the necessary wires and USB connections. If the connection is accurate, connect your power cord to the wall.
6. Upload this source code.
Intel Galileo Programming Language
The programming languages include the following:
- Secure Shell (SSH)
- Advanced Linux Sound Architecture (ALSA)
- OpenCV
- Python
- Node.js
- Video4Linux (V4L2)
What Are the Uses Of Intel Galileo Board?
The Intel Galileo board is a developmental device that allows you to create a wide range of custom projects. And it’s an open-source that allows you to get instructions for different projects online. Some of the projects include the following:
Greeny the Smart Greenhouse
This project is a complex one that involves building a remotely monitored mini greenhouse. The project requires different electronic components, an acrylic box, Galileo Gen 2, a water pump, and Arduino Uno.
Simple Weather Station
It involves using a DHT11 sensor and Galileo to measure humidity and temperature.
Sigma Reading Watch
This project is another complex one that involves creating a wearable e-reader. The materials you need for this project are e-ink, 3-D printing, and Galileo Gen 2.
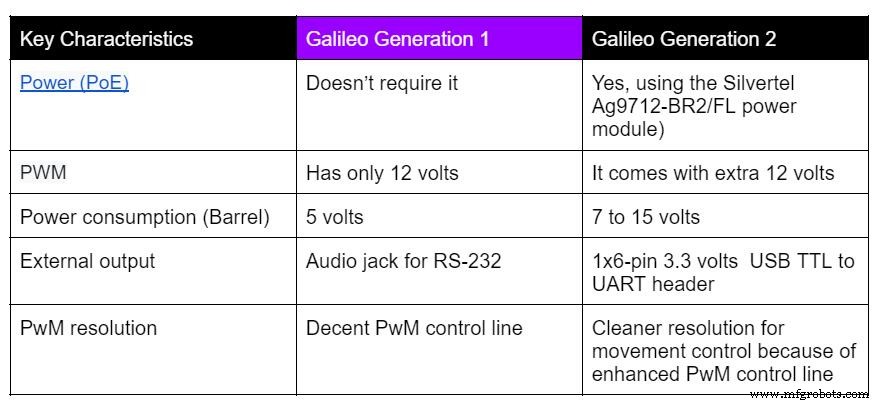
What Are the Differences Between Intel Galileo Generation One vs. Generation Two
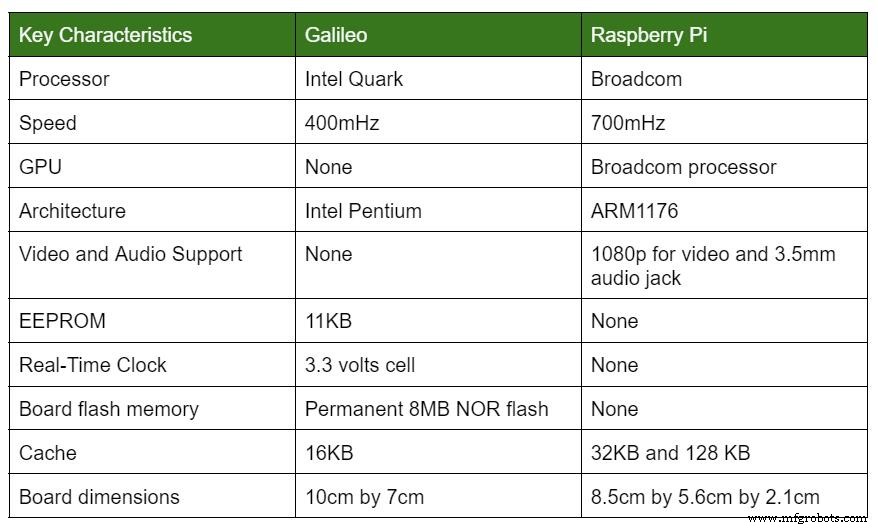
Raspberry Pi vs. Intel Galileo
FAQs
- What processor does Galileo use?
Intel Quark X1000.
- What OS works for Galileo?
Linux.
- How much does it cost to get the intel galileo board?
A minimum of $70 for starters.
Wrapping Up
The Galileo board is the way to go if you need a low-power embedded system-on-a-chip with a 32-bit processor that runs about 400MHz. Also, this developmental board supports numerous external peripherals, which makes it an ideal choice for various bespoke projects.
Have you used Intel Galileo before? Do you have questions about the board? Please let us know.
Industrial Technology
- Precision Thermocouple Measurement and Logging for Lab and Science Experiments
- Arduino Explained: What It Is and How to Program It
- Mastering PWM in Arduino: Comprehensive Guide & Key Functions
- Mastering G and M Codes: A Comprehensive Guide to CNC Programming
- CNC Programming Demystified: G‑Code vs M‑Code
- Maximize Efficiency: Inventory Management Software Features & Benefits
- Reliable Flex Board Manufacturing: Tested and Trusted Solutions
- 14 Expert Tips for Designing, Programming, and Testing PCBs
- AT89C51 Microcontroller: Overview, Pinouts, Programming Tips & Alternatives
- Mastering CNC Programming: G-Code & M-Code Essentials