


RFID-Pass Through System with Contactless Temperature Screening for Secure Employee Access
Components and supplies
 |
| × | 1 | |||
| × | 1 | ||||
| × | 1 | ||||
| × | 1 |
Apps and online services
 |
| |||
|
About this project
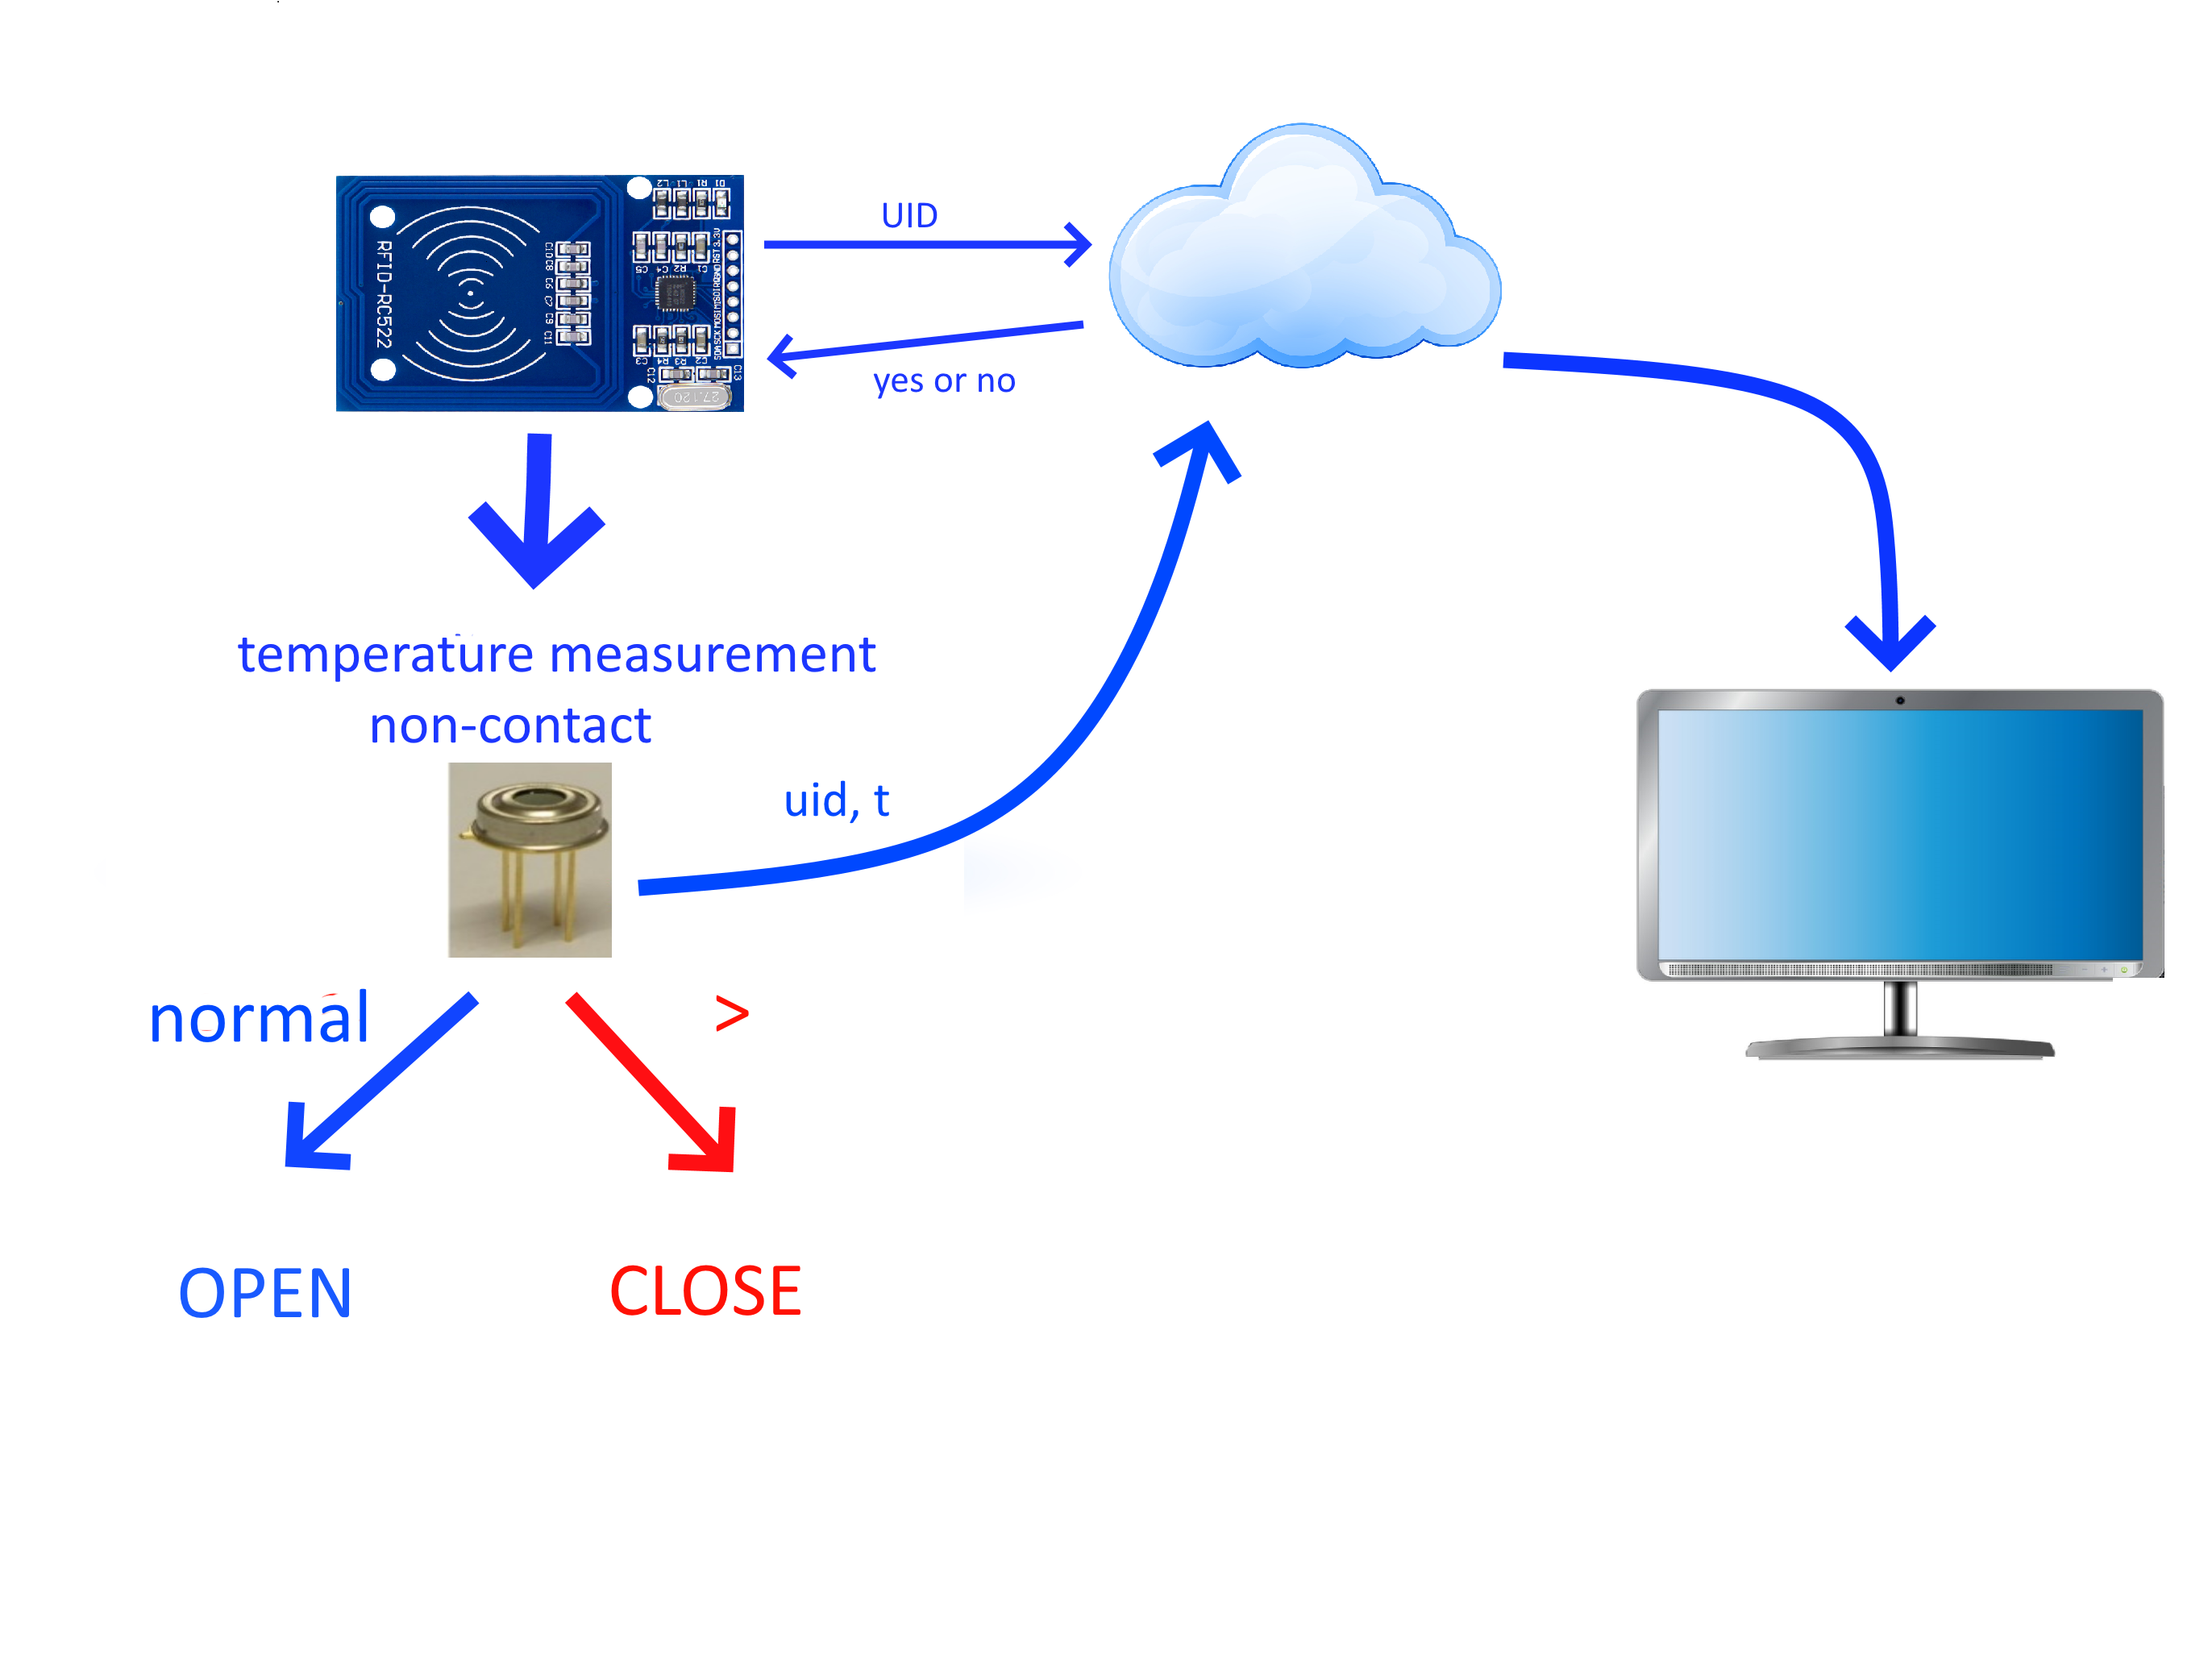
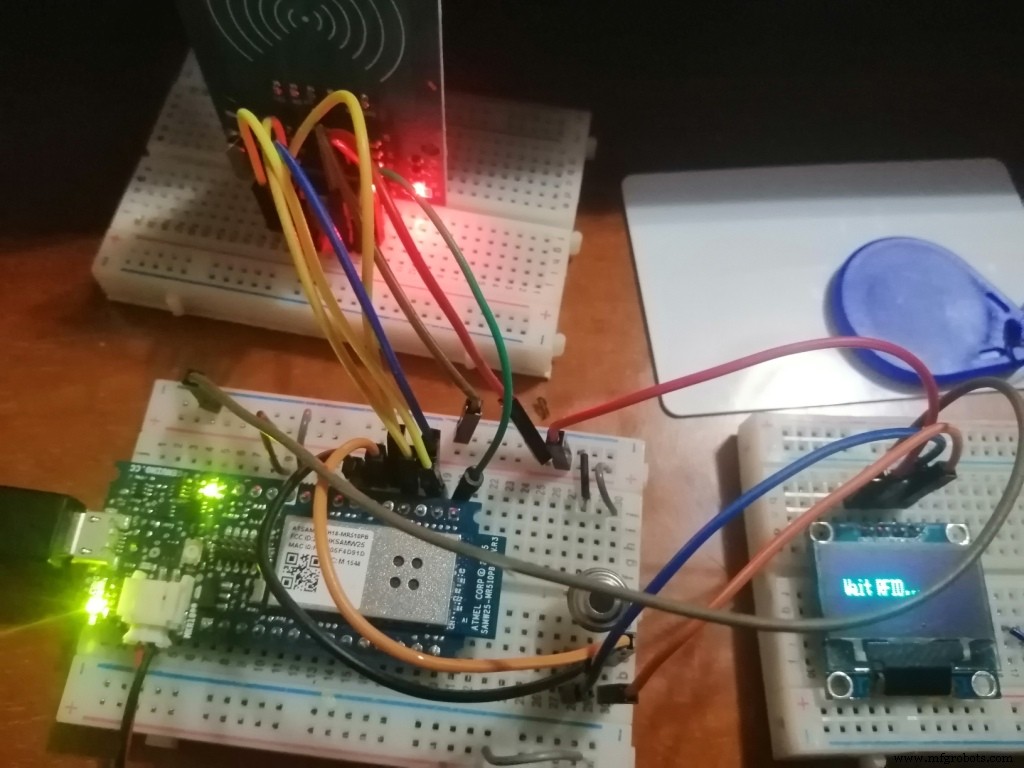
When employees access the enterprise using RFID tags, we additionally measure the body temperature of employees with a non-contact infrared thermometer. If there is an elevated temperature (one of the symptoms of COVID19), access is blocked. In addition, all data (employee identification via RFID) go to the website of the company that monitoring data time of arrival to work and body temperature (employee identification for UID RFID) tags.
Entering the office using RFID with temperature control (test)
Viewing sent data from the cloud

Entering the office using RFID with temperature control
video2
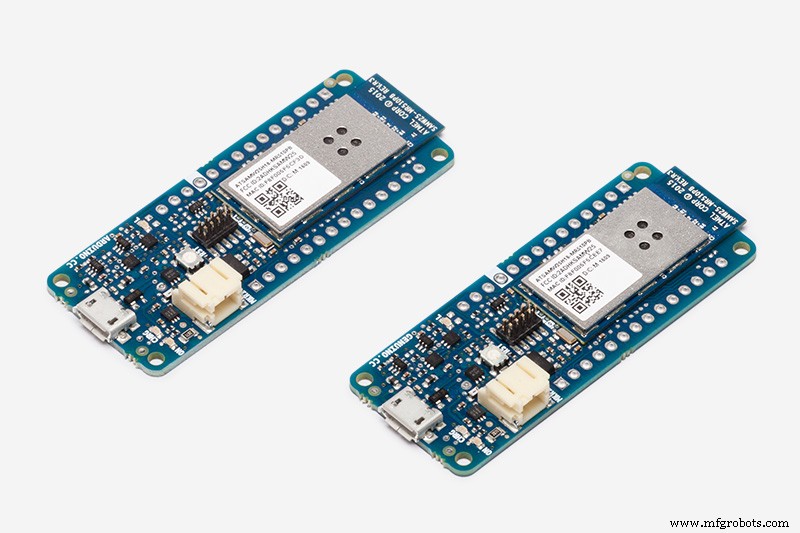
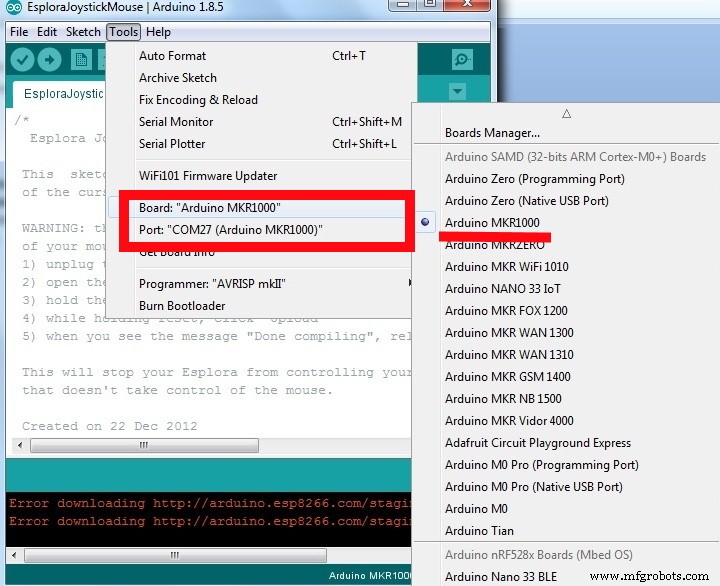
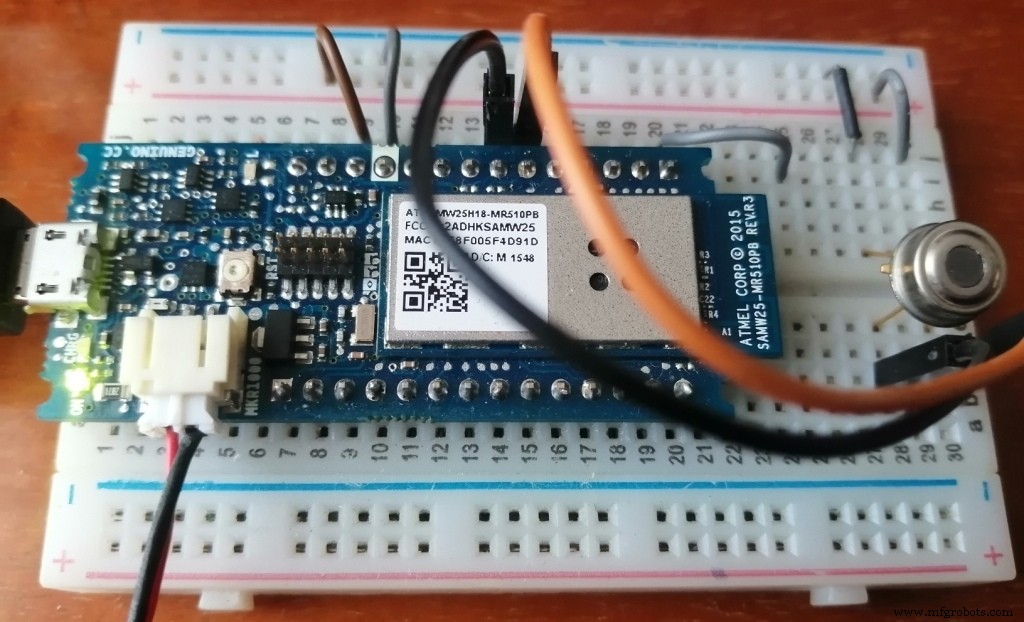
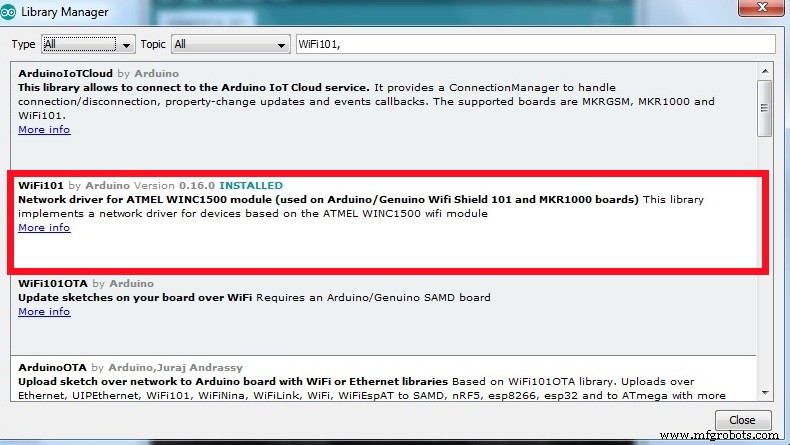
Step 1. Software installationWe use the Arduino MKR 1000 WiFi Board as the controller. We will program in the Arduino IDE. By default, the Arduino IDE is configured only for AVR boards. To work with the Arduino MK Wi-Fi 1000 platform, you need to add support for the Arduino SAMD (32bit ARM Cortex-M0+) in the card Manager. In the Board Manager (Tools > Board > Boards manager), find the Arduino SAMD and click the Install button.

After installing the software in the Arduino IDE, the Tools Board menu will support the Arduino Zero and MKR boards, including the MKR 1000 WiFi Board). Connect the MKR 1000 card to your computer using a USB cable. The driver should be installed automatically.
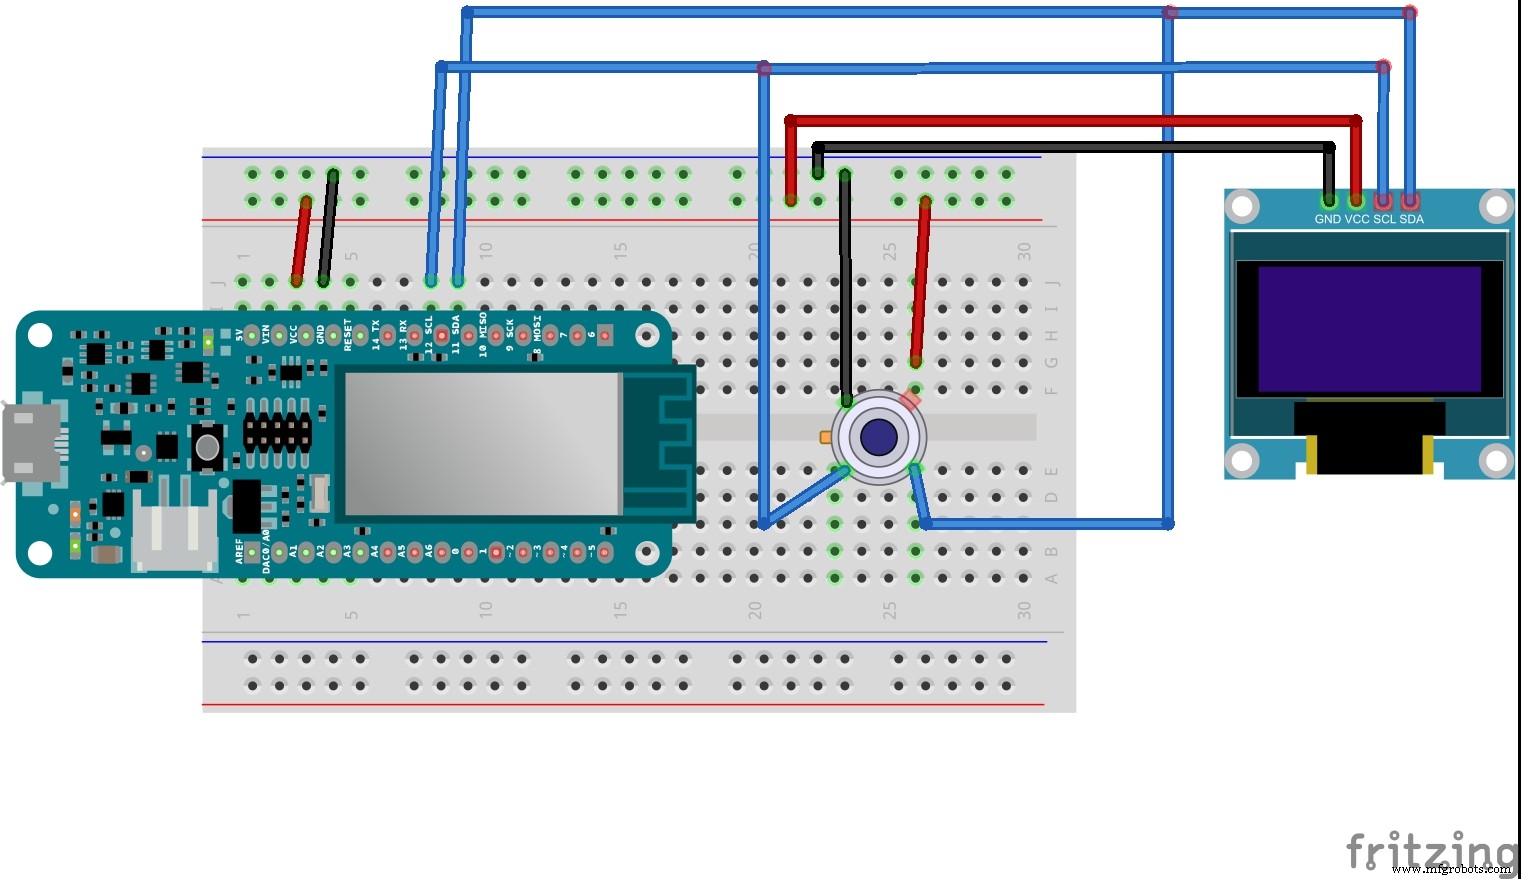
The MLX90614 is an infrared sensor for non-contact temperature measurement. It can measure temperatures in the range of -70 to 380 degrees Celsius with an accuracy of about 0.5°C. I had MLX90614DAA in stock
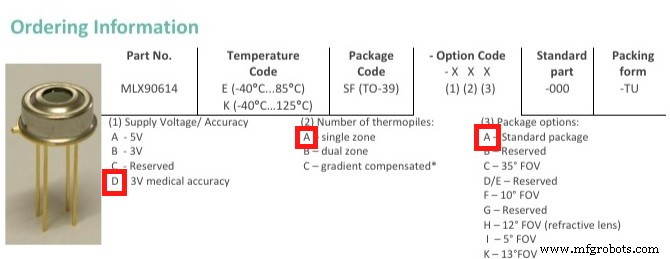
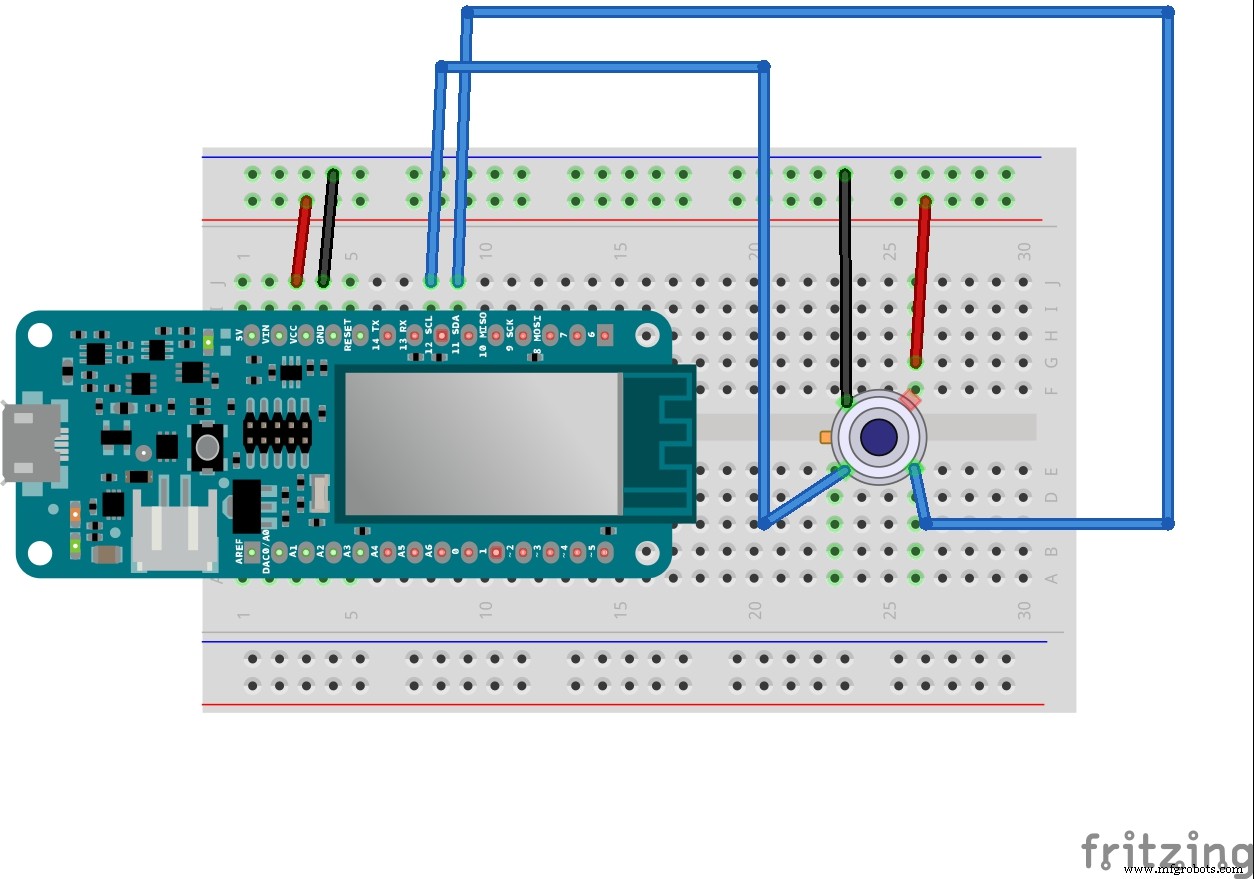
The sensor uses the I2C Protocol. Assign contacts
Connection diagram to the Arduino MKR WiFi Board
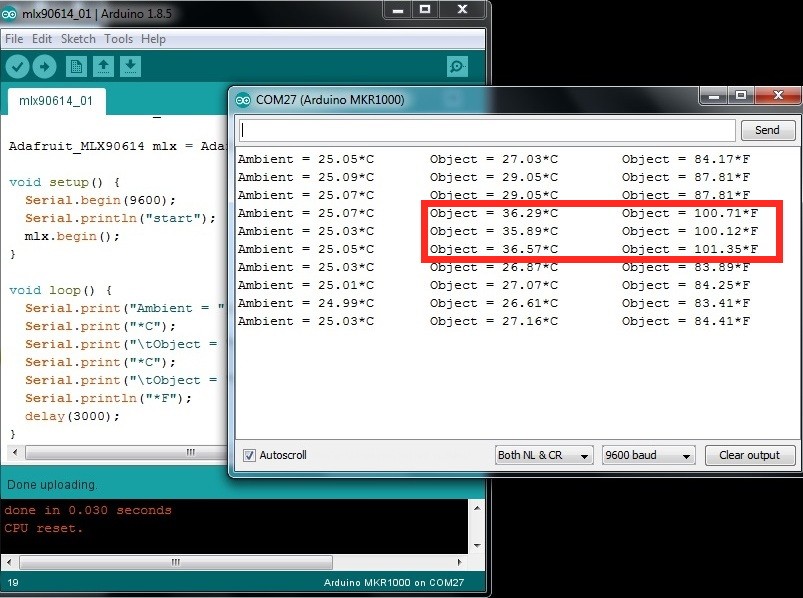
For programming, we use the Adafruit_MLX90614.h library, which must be installed via Manager Libraries (Sketch > Include library > Manager Libraries). Upload a sketch to the Arduino Board (mlx90614_01.ino)
// Connecting libraries
#include <Wire.h>
#include <Adafruit_MLX90614.h>
// Creating an instance of an object
Adafruit_MLX90614 mlx = Adafruit_MLX90614();
void setup() {
Serial.begin(9600);
Serial.println("start");
// starting the MLX90614 sensor
mlx.begin();
}
void loop() {
Serial.print("Ambient = "); Serial.print(mlx.readAmbientTempC());
Serial.print("*C");
Serial.print("\tObject = "); Serial.print(mlx.readObjectTempC());
Serial.print("*C");
Serial.print("\tObject = "); Serial.print(mlx.readObjectTempF());
Serial.println("*F");
delay(3000);
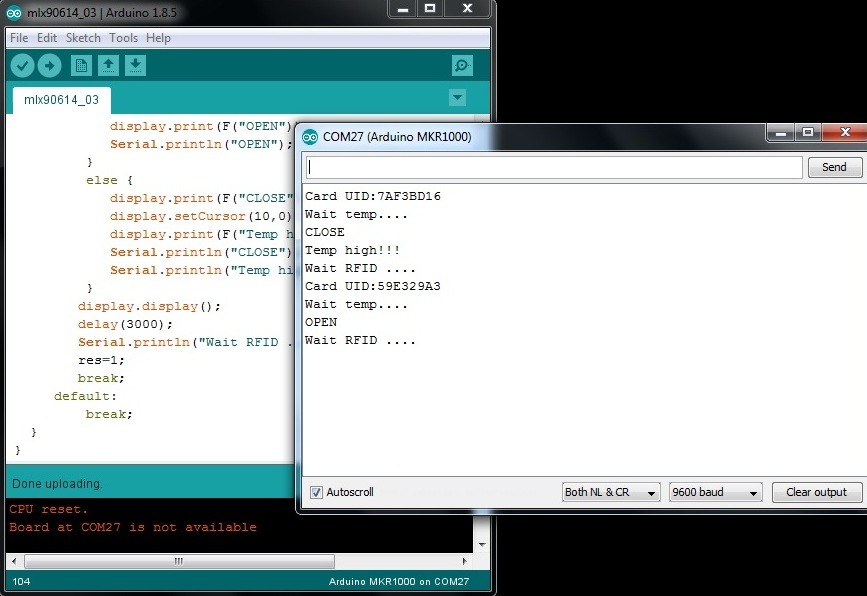
}And open the serial port monitor. The ambient temperature and object temperature are output to the serial port every 3 seconds
The project uses a 12x32 monochrome OLED display in the form of a module with the necessary binding on the SSD1306 chip. These modules run on the I2C interface. Connection diagram to the Arduino Board
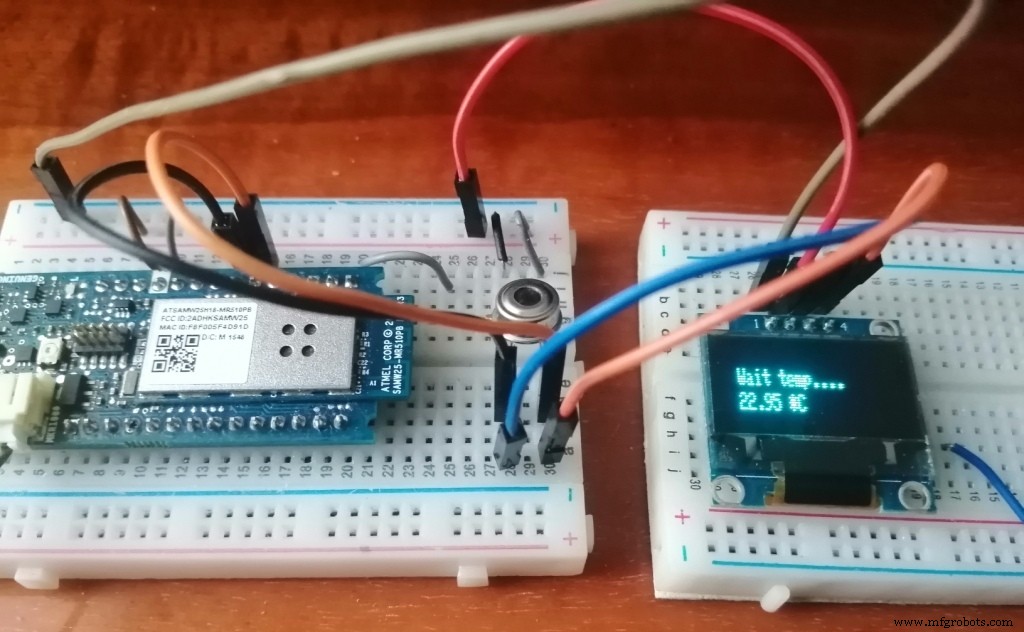
When programming, we use the Adafruit SSD1306 library. Loading a sketch of the temperature output to the display. We measure the temperature every 3 seconds (mlx90614_02.ino).
// Connecting libraries
#include <Wire.h>
#include <Adafruit_MLX90614.h>
#include <Adafruit_GFX.h>
#include <Adafruit_SSD1306.h>
// Creating an instance of an object
Adafruit_MLX90614 mlx = Adafruit_MLX90614();
Adafruit_SSD1306 display(128, 32, &Wire, -1);

float temp;
unsigned long millis1=0;

void setup() {
   Serial.begin(9600);
   // starting display
   display.begin(SSD1306_SWITCHCAPVCC, 0x3C);
   display.setTextSize(1);
   display.setTextColor(WHITE);
   // options display
   display.clearDisplay();
   display.display();
   // starting the MLX90614 sensor
   mlx.begin();
   // start
   Serial.println("start");
}

void loop() {
   if(millis()-millis1 >= 3000) {
      display.clearDisplay();
      display.setCursor(10,10);
      display.println(F("Wait temp...."));
      temp=mlx.readObjectTempC();
      display.setCursor(10,20);
      display.print(temp);
      display.print(F(" *C"));
      display.display();
      //
      millis1=millis();
   }
}
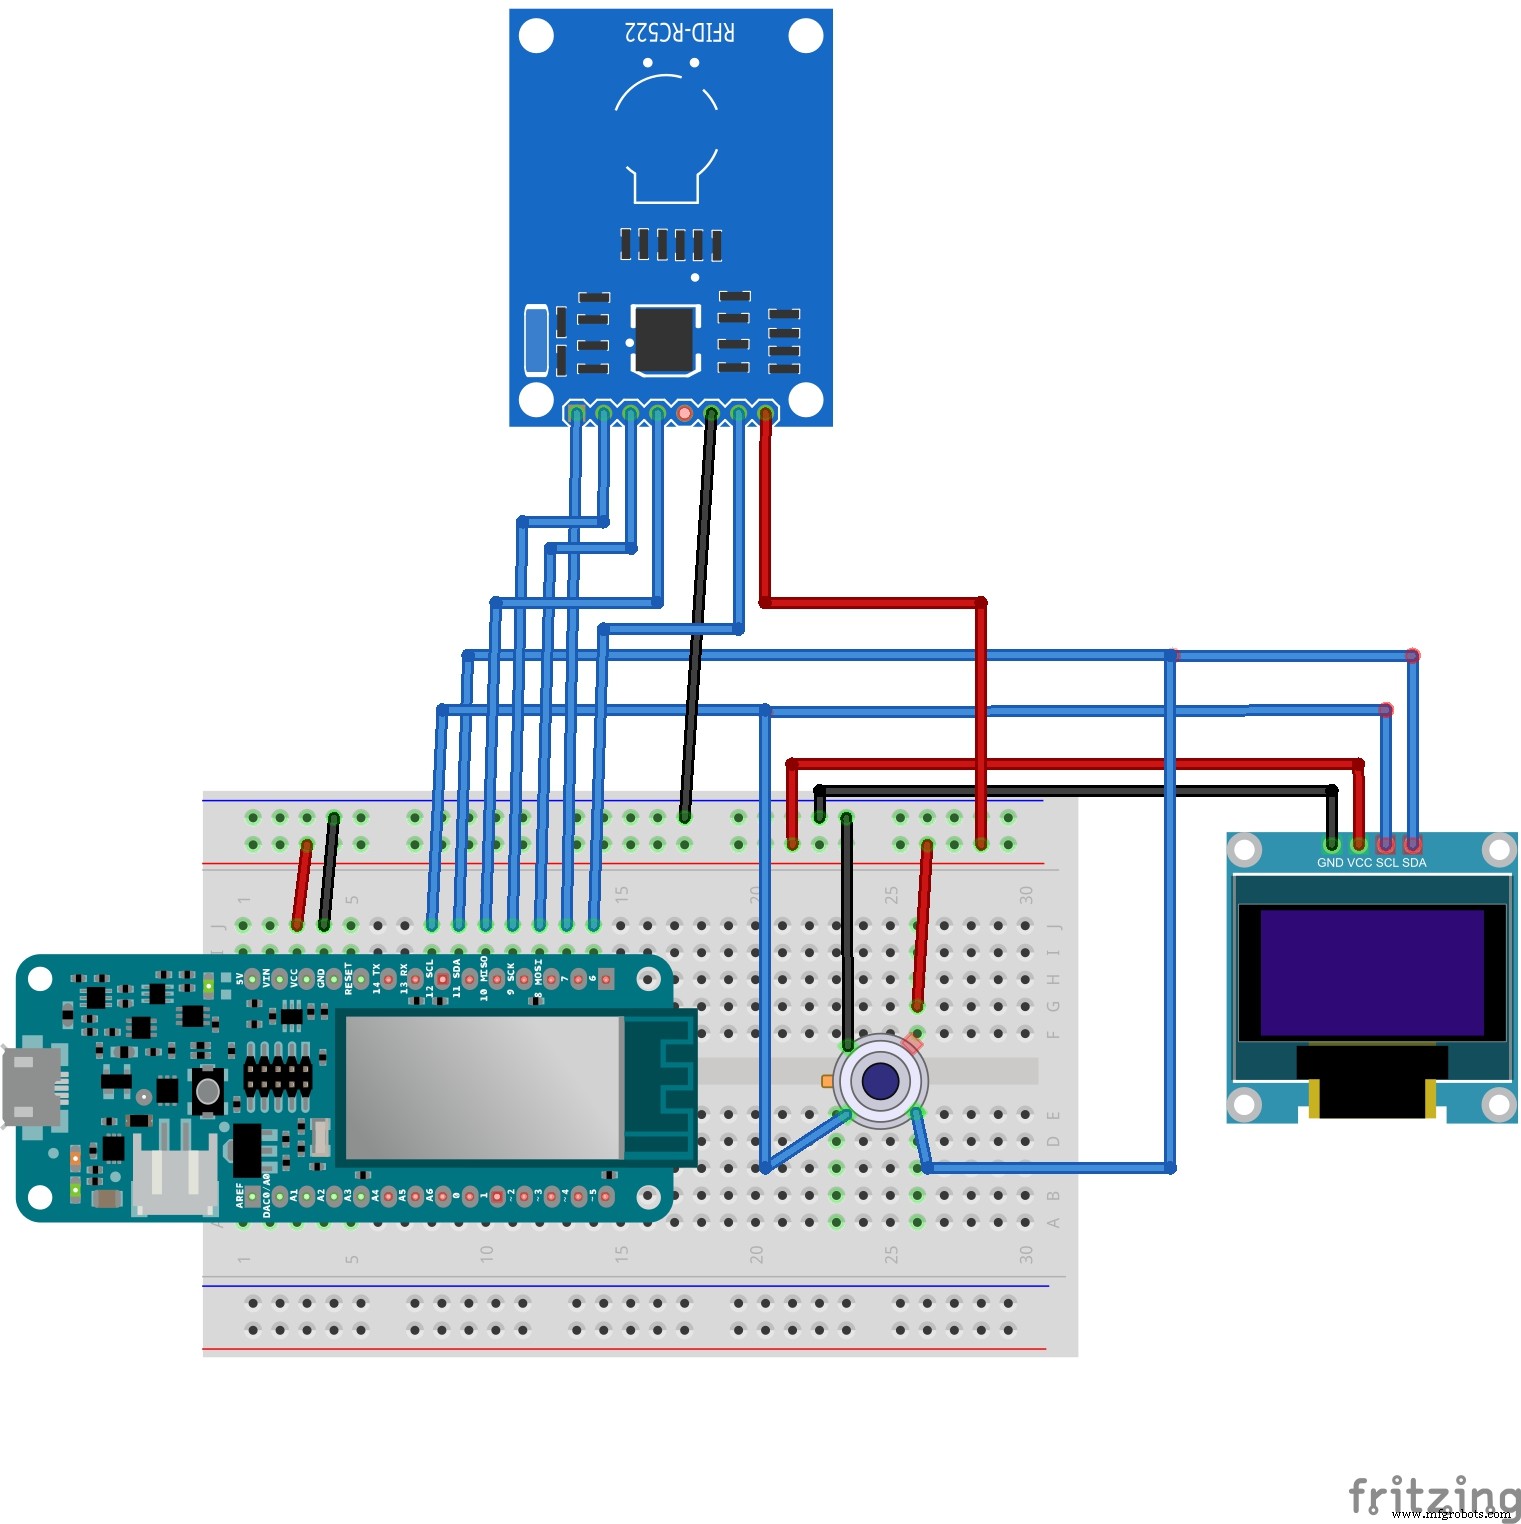
There is a wide variety of RFID tags. Tags are active and passive (without a built-in power source, powered by a current induced in the antenna by a signal from the reader). Tags work at different frequencies: LF (125 - 134 kHz), HF (13.56 MHz), UHF (860 - 960 MHz). Devices that read information from tags and write data to them are called readers. In Arduino projects, the RFID-RC522 module is very often used as a reader. The module is made on the MFRC522 chip of the NSP company, which provides work with RA tags (at a frequency of 13.56 MHz).

Connecting to the Arduino MCF 1000 WiFi card via SPI Protocol
Sketch of UID detection for an RFID card, temperature measurement, and messages about opening or closing the input with output to the serial port (mlx90614_03.ino).
// Connecting libraries
#include <Wire.h>
#include <Adafruit_MLX90614.h>
#include <Adafruit_GFX.h>
#include <Adafruit_SSD1306.h>
#include <SPI.h>
#include <MFRC522.h>
// Creating an instance of an object
Adafruit_MLX90614 mlx = Adafruit_MLX90614();
Adafruit_SSD1306 display(128, 32, &Wire, -1);
MFRC522 mfrc522(7, 6);

byte cardUID[4] = {0,0,0,0};
int res=1;
float temp;
unsigned long millis1=0;

void setup() {
   Serial.begin(9600);
   // starting display
   display.begin(SSD1306_SWITCHCAPVCC, 0x3C);
   display.setTextSize(1);
   display.setTextColor(WHITE);
   display.clearDisplay();
   display.display();
   // starting the MLX90614 sensor
   mlx.begin();
   // запуск SPI
   SPI.begin();
   // initializing MFRC522
   mfrc522.PCD_Init();
   Serial.println("start");
   Serial.println("Wait RFID ....");
}

void loop() {
   switch(res) {
      case 1: // waiting for RFID
         display.clearDisplay();
         display.setCursor(10,10);
         display.print(F("Wait RFID...."));
         // Checking whether the card is attached
         if ( mfrc522.PICC_IsNewCardPresent()) {
            // Reading the map info.
            if ( mfrc522.PICC_ReadCardSerial()) {
               // save UID
               Serial.print(F("Card UID:"));
               display.setCursor(10,20);
               for (byte i = 0; i < 4; i++) {
                  cardUID[i]=mfrc522.uid.uidByte[i];
                  Serial.print(cardUID[i],HEX);
                  display.print(cardUID[i],HEX);
               }
            Serial.println();
            Serial.println("Wait temp....");
            res=3;
            }
         mfrc522.PICC_HaltA();
         mfrc522.PCD_StopCrypto1();
         }
         display.display();
         break;
      case 2: // request to the UID server from the database
         break;
      case 3: // waiting for temperature measurement
         delay(2000);
         display.clearDisplay();
         display.setCursor(10,10);
         display.println(F("Wait temp...."));
         temp=mlx.readObjectTempC();
         display.setCursor(10,20);
         display.print(temp);
         display.print(F(" *C"));
         display.display();
         if(temp>34.0 && temp<42.0) {
            res=5;
         }
         break;
      case 4: // sending temperature data to the server
         break;
      case 5: // open or close
         display.clearDisplay();
         display.setCursor(10,10);
         display.print(F("Temp="));
         display.print(temp);
         display.print(F("*C"));
         display.setCursor(10,20);
         if(temp<37.5) {
            display.print(F("OPEN"));
            Serial.println("OPEN");
         }
         else {
            display.print(F("CLOSE"));
            display.setCursor(10,0);
            display.print(F("Temp high!!!"));
            Serial.println("CLOSE");
            Serial.println("Temp high!!!");
         }
         display.display();
         delay(3000);
         Serial.println("Wait RFID ....");
         res=1;
         break;
      default:
         break;
      }
}
To connect the Arduino MKR1000 to a Wi-Fi network, we will use the WiFi101 library, which we will install using the library Manager (Sketch Include library Manager Libraries).
Download a sketch of connecting the Arduino MK R 1000 Wi-Fi Board to the necessary access point. Upload an example from the connectWithWPA.ino library to the Board by entering the data for your WiFi hotspot in the tab:
#define SECRET_SID "my_D Link"
#define SECRET_PASS "********"
After downloading the sketch, open the serial port monitor, where you can watch the process of connecting the Arduino MKR1000 Wi-Fi Board to the access point.
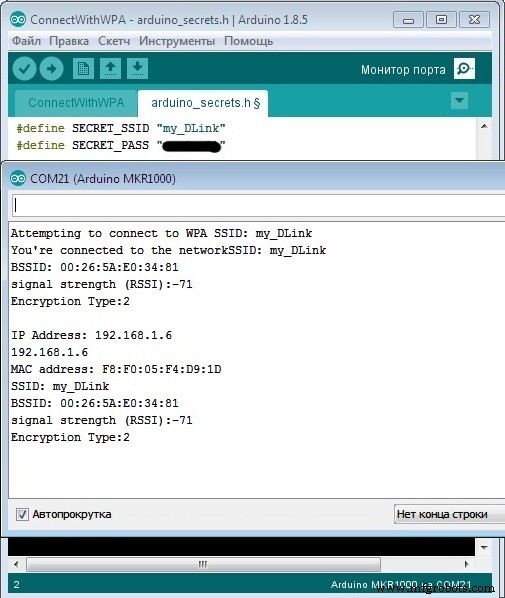
If the connection is successful, go ahead.
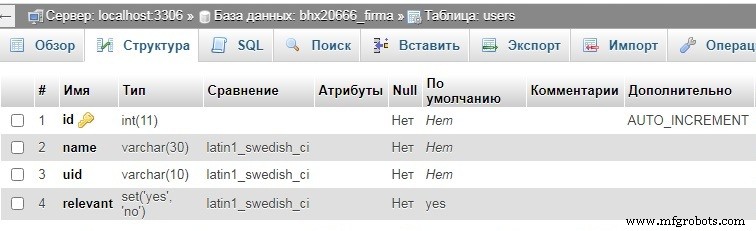
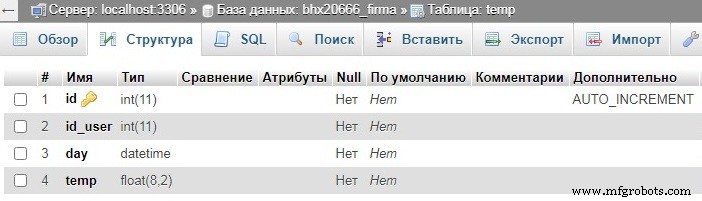
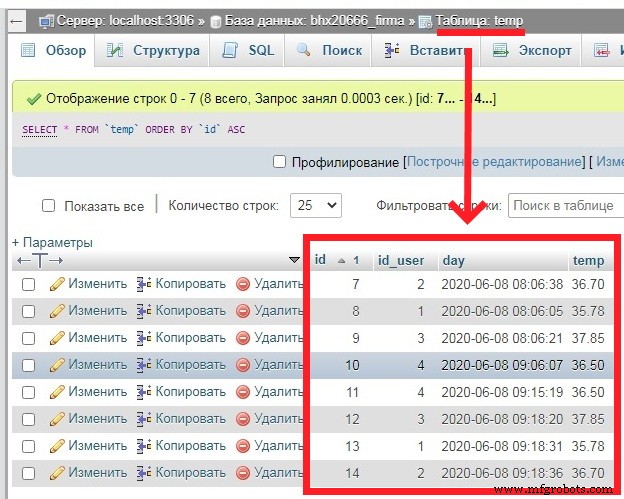
Step 6. Creating a database of employees on the company's website and a database for collecting daily temperature readings at the entranceCreating a database on hosting (MySQL) and two tables in it:
- users - employee data and their uid;
- temp - for collecting data of the body temperature measured at the input.
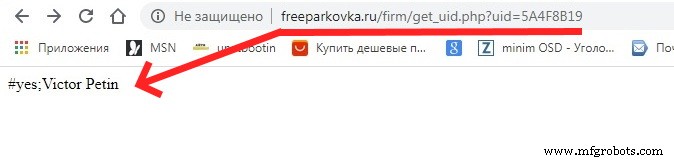
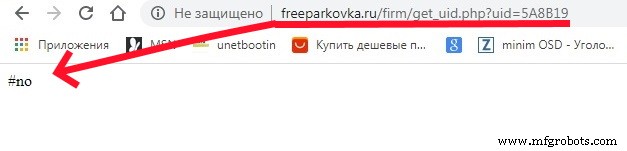
Now on the hosting we create 2 scripts for processing data sent by Arduino MKR 1000 WiFi. Script get_uid.php checks for an ID in the database and returns in the response:
• #no – if the uid is not in the database
• #yes;<name> - if the uid is in the database
The contents of the script get_uid.php
<?php
//
$location="localhost";
$user="************";
$pass="************";
$db_name="************";
// connect db
if(! $db=mysqli_connect($location,$user,$pass,$db_name))
   {echo "connect error";}
else
   {;}
$query0=" SELECT * FROM users WHERE uid='".$_GET['uid']."' ";
$rez0=mysqli_query($db,$query0);
if(mysqli_num_rows($rez0)>0) {
   $row0=mysqli_fetch_assoc($rez0);
   echo "#yes".";".$row0[name];
}
else {
   echo "#no";
}
?>
You can test the script by sending requests from the browser:

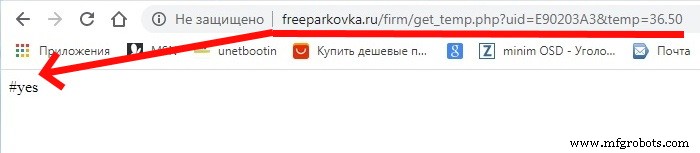
Script get_temp.php sends the employee's temperature to the database
The contents of the script get_temp.php
<?php
//
$location="localhost";
$user="************";
$pass="************";
$db_name="************";
// connect db
if(! $db=mysqli_connect($location,$user,$pass,$db_name))
   {echo "connect error";}
else
   {;}
$query0=" SELECT * FROM users WHERE uid='".$_GET['uid']."' ";
$rez0=mysqli_query($db,$query0);
if(mysqli_num_rows($rez0)>0) {
   $row0=mysqli_fetch_assoc($rez0);
   $query1=" INSERT INTO temp SET
      id_user='".$row0['id']."',
      temp='".$_GET['temp']."',
      day='".date('Y-m-d H:i:s')."' ";
   mysqli_query($db,$query1);
   echo "#yes";
}
else {
   echo "#no";
}
?>
You can test the script by sending requests from the browser:
Let's write 2 functions:
• send_uid_to_server () - sending the uid to the server;
• send_temp_to_server () - sending the temperature to the server.
Function send_uid_to_server()
int send_uid_to_server() {
   int ret=3;
   unsigned long previos;
   int x=0;int f=0;
   char s;
   client.stop();
   if (client.connect(server, 80)) {
      //// sending data to the server
      // forming a string
      // uid per line
      String str="/firm/get_uid.php?uid=";
      for (byte i = 0; i < 4; i++) {
         str+=String(cardUID[i],HEX);
      }
      Serial.print("str=");Serial.println(str);
      client.println("GET "+str+" HTTP/1.1");
      client.println("Host: freeparkovka.ru");
      client.println("User-Agent: ArduinoWiFi/1.1");
      client.println("Connection: close");
      client.println();
      // получение ответа
      previos=millis();
      for(int i=0;i<40;i++)
         response[i]=0;
      do {
         if(client.available() > 0) {
            // get data from the server
            s = client.read();
            if(s=='#')
               f=1;
            if(f==1) {
               response[x]=s;
               x++;
            }
         Serial.write(s);
         }
      }
      while((millis() - previos) < 5000);
      if(response[0]='#') {
         ret=command(response);
      }
      Serial.println(response);
      //client.stop();
      return ret;
   }
   else {
      // no connection
      Serial.println("connection failed");
      //client.stop();
      return 3;
   }
}
Function send_temp_to_server()
void send_temp_to_server() {
   client.stop();
   if (client.connect(server, 80)) {
      //// sending data to the server
      // forming a string
      // uid per line
      String str="/firm/get_temp.php?uid=";
      for (byte i = 0; i < 4; i++) {
         str+=String(cardUID[i],HEX);
      }
      str+="&temp="+String(temp);
      Serial.print("str=");Serial.println(str);
      client.println("GET "+str+" HTTP/1.1");
      client.println("Host: freeparkovka.ru");
      client.println("User-Agent: ArduinoWiFi/1.1");
      client.println("Connection: close");
      client.println();
      Serial.println(response);
      delay(10); }
   else {
      // no connection
      Serial.println("connection failed");
   }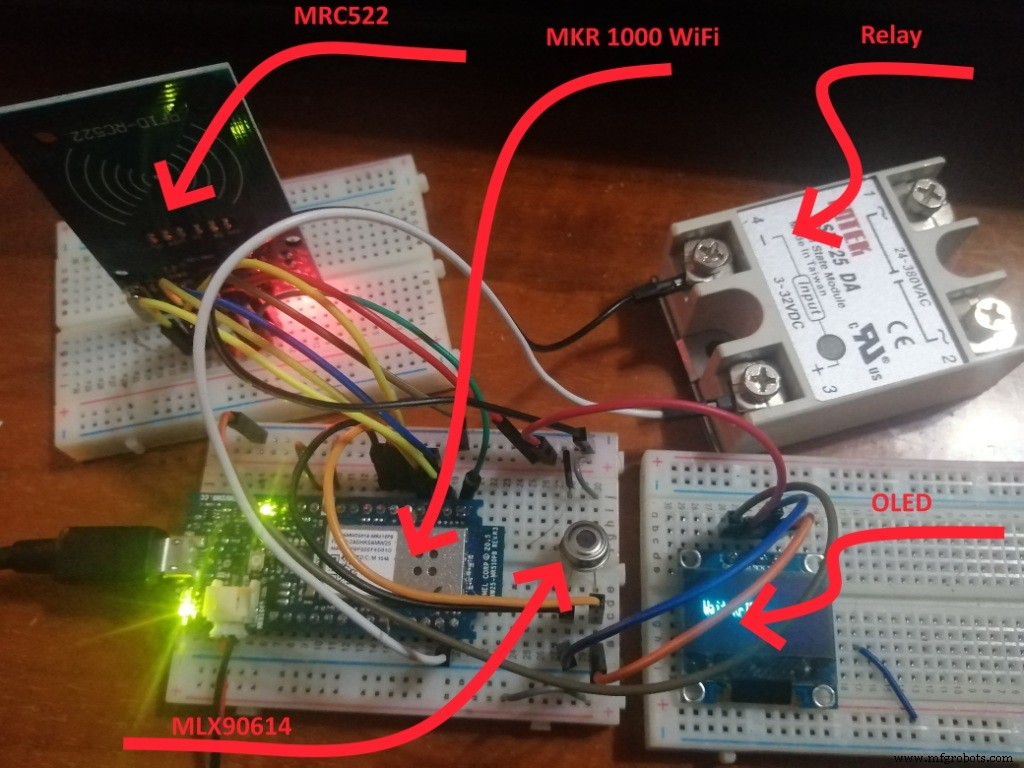
}Adding a relay to enable / disable the entrance to the enterprise, depending on the temperature value. Connection diagram:
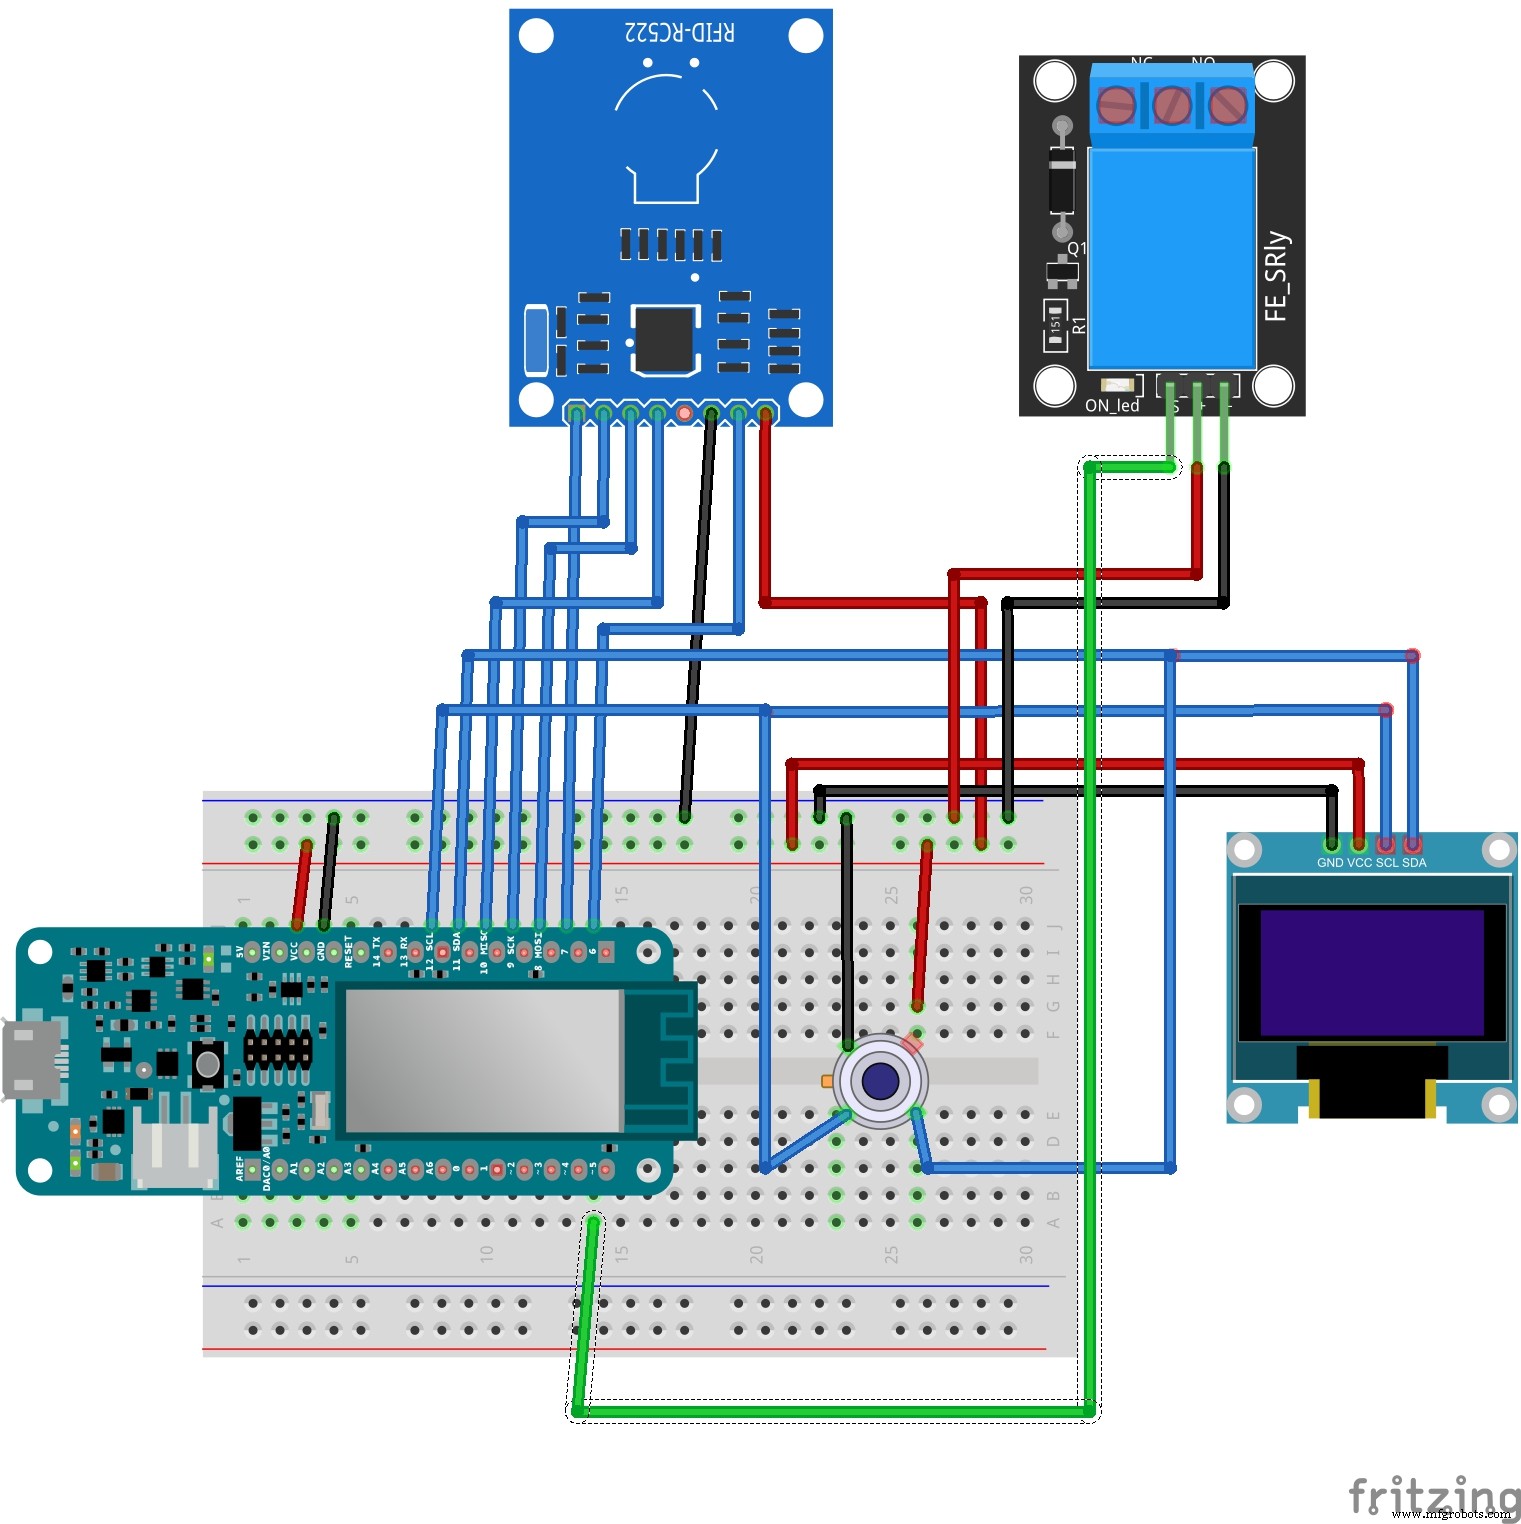
And add to the code enabling/disabling the relay to open or close the input, depending on the temperature data.
if(temp<37.5) { // OPEN
   display.setCursor(10,0);
   display.print(F("OPEN"));
   Serial.println("OPEN");
   digitalWrite(pinRelay,HIGH);
}
else { // CLOSE
   display.print(F("CLOSE"));
   display.setCursor(10,0);
   display.print(F("Temp high!!!"));
   Serial.println("CLOSE");
   Serial.println("Temp high!!!");
   digitalWrite(pinRelay,LOW);
}
And the entire sketch code ((mlx90614_07.ino))
// Connecting libraries
#include <Wire.h>
#include <Adafruit_MLX90614.h>
#include <Adafruit_GFX.h>
#include <Adafruit_SSD1306.h>
#include <SPI.h>
#include <MFRC522.h>
#include <WiFi101.h>
// Creating object instances
Adafruit_MLX90614 mlx = Adafruit_MLX90614();
Adafruit_SSD1306 display(128, 32, &Wire, -1);
MFRC522 mfrc522(7, 6);
WiFiClient client;
// your network SSID (name)
// and password (WPA)
char ssid[] = "my_DLink";
char pass[] = "********";
// name address
char server[] = "www.freeparkovka.ru";
int pinRelay=5;
int status = WL_IDLE_STATUS;
char response[40];
byte cardUID[4] = {0,0,0,0};
int res=0;
int rr;
float temp;
unsigned long millis1=0;
unsigned long millis2=0;
unsigned long millis3=0;

void setup() {
   Serial.begin(9600);
   // relay
   pinMode(pinRelay,OUTPUT);
   digitalWrite(pinRelay,LOW);
   // display
   display.begin(SSD1306_SWITCHCAPVCC, 0x3C);
   display.setTextSize(1);
   display.setTextColor(WHITE);
   display.clearDisplay();
   display.display();
   // starting the sensor MLX90614
   mlx.begin();
   // запуск SPI
   SPI.begin();
   // initializing MFRC522
   mfrc522.PCD_Init();
   Serial.println("connect WiFi ....");
   display.setCursor(10,10);
   display.print(F("Connect WiFi"));
   display.display();
   // check for the presence of the shield:
   if (WiFi.status() == WL_NO_SHIELD) {
      Serial.println("WiFi shield not present");
      // don't continue:
      while (true);
   }
   // attempt to connect to WiFi network:
   while ( status != WL_CONNECTED) {
      Serial.print("Attempting to connect to WPA SSID: ");
      Serial.println(ssid);
      // Connect to WPA/WPA2 network:
      status = WiFi.begin(ssid, pass);
      // wait 5 seconds for connection:
      delay(5000);
   }
   display.setCursor(30,20);
   display.print(F("ok"));
   display.display();
   printWiFiStatus();
   delay(2000);
   Serial.println("Wait RFID ....");
}

void loop() {
   switch(res) {
      case 0:  //
         send_display("Wait RFID....");
         res=1;
         break;
      case 1:  // waiting for RFID
         // Check whether the card is attachedа
         if ( mfrc522.PICC_IsNewCardPresent()) {
            // Reading the map info
            if ( mfrc522.PICC_ReadCardSerial()) {
               // save UID
               Serial.print(F("Card UID:"));
               display.setCursor(10,20);
               for (byte i = 0; i < 4; i++) {
                  cardUID[i]=mfrc522.uid.uidByte[i];
                  Serial.print(cardUID[i],HEX);
                  display.print(cardUID[i],HEX);
               }
               Serial.println();
               res=2;
               display.display();
               delay(2000);
               Serial.println("send uid to server....");
            }
            mfrc522.PICC_HaltA();
            mfrc522.PCD_StopCrypto1();
         }
         display.display();
         break;
      case 2:  // request to the UID server from the database
         send_display("Send server...");
         rr=send_uid_to_server();
         if(rr==1) {
            res=3;
            display.setCursor(10,0);
            display.print(F("uid ok"));
            millis3=millis();
         }
         else if(rr==2) {
            res=0;
            display.setCursor(10,0);
            display.print(F("incorrect"));
         }
         else  {
            res=0;
            display.setCursor(10,0);
            display.print(F("error 404"));
         }
         display.display();
         delay(3000);
         break;
      case 3:  // waiting for temperature measurement
         if(millis()-millis3<10000) {
            send_display("Wait temp....");
            temp=mlx.readObjectTempC();
            display.setCursor(10,20);
            display.print(temp);
            display.print(F(" *C"));
            display.display();
            if(temp>34.0 && temp<42.0) {
               res=4;
               delay(2000);
            }
         }
         else {
            res=0;
         }
         break;
      case 4:  // sending temperature data to the server
         send_display("Wait temp....");
         send_temp_to_server();
         res=5;
         delay(2000);
         break;
      case 5:  // open or close
         display.clearDisplay();
         display.setCursor(10,10);
         display.print(F("Temp="));
         display.print(temp);
         display.print(F("*C"));
         display.setCursor(10,20);
         if(temp<37.5) { // OPEN
            display.print(F("OPEN"));
            Serial.println("OPEN");
            digitalWrite(pinRelay,HIGH);
         }
         else {  // CLOSE
            display.print(F("CLOSE"));
            display.setCursor(10,0);
            display.print(F("Temp high!!!"));
            Serial.println("CLOSE");
            Serial.println("Temp high!!!");
            digitalWrite(pinRelay,LOW);
         }
         display.display();
         delay(3000);
         Serial.println("Wait RFID ....");
         res=0;
         break;
      default:
         break;
   }
}

//
void printWiFiStatus() {
   // print the SSID of the network you're attached to:
   Serial.print("SSID: ");
   Serial.println(WiFi.SSID());
   // print your WiFi shield's IP address:
   IPAddress ip = WiFi.localIP();
   Serial.print("IP Address: ");
   Serial.println(ip);
   // print the received signal strength:
   long rssi = WiFi.RSSI();
   Serial.print("signal strength (RSSI):");
   Serial.print(rssi);
   Serial.println(" dBm");
}
//
int send_uid_to_server() {
   int ret=3;
   unsigned long previos;
   int x=0;int f=0;
   char s;
   client.stop();
   if (client.connect(server, 80)) {
      //// sending data to the server
      // forming a string
      // uid per line
      String str="/firm/get_uid.php?uid=";
      for (byte i = 0; i < 4; i++) {
         str+=String(cardUID[i],HEX);
      }
      Serial.print("str=");Serial.println(str);
      client.println("GET "+str+" HTTP/1.1");
      client.println("Host: freeparkovka.ru");
      client.println("User-Agent: ArduinoWiFi/1.1");
      client.println("Connection: close");
      client.println();
      // получение ответа
      previos=millis();
      for(int i=0;i<40;i++)
         response[i]=0;
      do {
         if(client.available() > 0) {
            // get data from the server
            s = client.read();
            if(s=='#')
               f=1;
            if(f==1) {
               response[x]=s;
               x++;
            }
         Serial.write(s);
         }
      }
      while((millis() - previos) < 5000);
      if(response[0]='#') {
         ret=command(response);
      }
      Serial.println(response);
      //client.stop();
      return ret;
   }
   else {
      // no connection
      Serial.println("connection failed");
      //client.stop();
      return 3;
   }
}
//
void send_temp_to_server() {
   client.stop();
   if (client.connect(server, 80)) {
      //// sending data to the server
      // forming a string
      // uid per line
      String str="/firm/get_temp.php?uid=";
      for (byte i = 0; i < 4; i++) {
         str+=String(cardUID[i],HEX);
      }
      str+="&temp="+String(temp);
      Serial.print("str=");Serial.println(str);
      client.println("GET "+str+" HTTP/1.1");
      client.println("Host: freeparkovka.ru");
      client.println("User-Agent: ArduinoWiFi/1.1");
      client.println("Connection: close");
      client.println();
      Serial.println(response);
      delay(10); }
   else {
      // no connection
      Serial.println("connection failed");
   }
}
// checking commands that came from the server
int command(char* arr) {
   String str(arr);
   //
   if(str.indexOf("yes")!=-1) {
      return 1;
   }
   else if(str.indexOf("no")!=-1) {
      return 2;
   }
   return 3;
}
// display output
void send_display(String str) {
   display.clearDisplay();
   display.setCursor(10,10);
   display.print(str);
   display.display();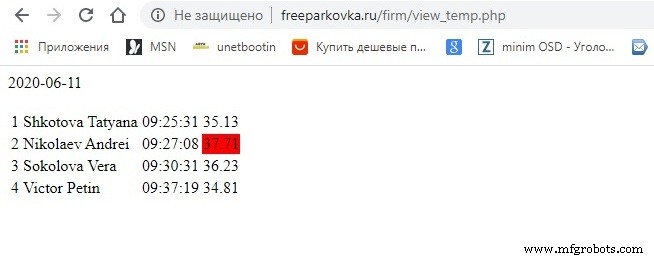
}To view the data sent to the server, open the site page. The contents of the script to output a page file view_temp.php
<?php
//
$location="localhost";
$user="********";
$pass="********";
$db_name="********";
// connect db
if(! $db=mysqli_connect($location,$user,$pass,$db_name))
{echo "connect error";}
else
{;}
$query0=" SELECT * FROM temp WHERE uid='".$_GET['uid']."' ";
$rez0=mysqli_query($db,$query0);
$content1.=date('Y-m-d')."<br><br>";
$content1.="<table>";
$query1="SELECT * FROM temp WHERE day >= CURDATE() ";
$rez1=mysqli_query($db,$query1); $i=1;
while($row1=mysqli_fetch_assoc($rez1)) {
   $content1.="<tr>";
   $content1.="<td>".$i."</td>";
   $rez2=mysqli_query($db,"SELECT name FROM users WHERE id =".$row1['id_user']." ");
   $row2=mysqli_fetch_assoc($rez2);
   $content1.="<td>".$row2['name']."</td>";
   $content1.="<td>".mb_substr($row1['day'],10,9)."</td>";
   if($row1['temp']>37.5)
      $content1.="<td style='background-color:red'>".$row1['temp']."</td>";
   else
      $content1.="<td>".$row1['temp']."</td>";
   $content1.="</tr>";
   $i++;
}
$content1.="</table>";
echo $content1;
?>
Code
- Scetch Arduino
- Step 2. Connecting an IR temperature sensor MLX90614 to an Arduino MKR 1000 Wi Fi Board
- Step 3. Connecting an OLED display to an Arduino MKR 1000 WiFi Board
- Step 4. Connecting the rc522 RFID reader module to the Arduino MKR 1000 WiFi Board
- Step 6. Creating a database of employees on the company's website and a database for collecting dail
- Step 6. Creating a database of employees on the company's website and a database for collecting dail
- Step 9. Page for remote viewing of employee temperature data
Scetch ArduinoArduino
//
#include <Wire.h>
#include <Adafruit_MLX90614.h>
#include <Adafruit_GFX.h>
#include <Adafruit_SSD1306.h>
#include <SPI.h>
#include <MFRC522.h>
#include <WiFi101.h>
//
Adafruit_MLX90614 mlx = Adafruit_MLX90614();
Adafruit_SSD1306 display(128, 32, &Wire, -1);
MFRC522 mfrc522(7, 6);
WiFiClient client;
// your network SSID (name)
// and password (WPA)
char ssid[] = "my_DLink";
char pass[] = "marina11";
// name address
char server[] = "www.freeparkovka.ru";

int pinRelay=5;
int status = WL_IDLE_STATUS;
char response[40];
byte cardUID[4] = {0,0,0,0};
int res=0;
int rr;
float temp;
unsigned long millis1=0;
unsigned long millis2=0;
unsigned long millis3=0;

void setup() {
  Serial.begin(9600);
  // relay
  pinMode(pinRelay,OUTPUT);
  digitalWrite(pinRelay,LOW);
  //
  display.begin(SSD1306_SWITCHCAPVCC, 0x3C);
  display.setTextSize(1);
  display.setTextColor(WHITE);
  display.clearDisplay();
  display.display();
  //   MLX90614
  mlx.begin();
  //  SPI
  SPI.begin();
  //  MFRC522
  mfrc522.PCD_Init();
  Serial.println("connect WiFi ....");
  display.setCursor(10,10);
  display.print(F("Connect WiFi"));
  display.display();

  // check for the presence of the shield:
  if (WiFi.status() == WL_NO_SHIELD) {
    Serial.println("WiFi shield not present");
    // don't continue:
    while (true);
  }

  // attempt to connect to WiFi network:
  while ( status != WL_CONNECTED) {
    Serial.print("Attempting to connect to WPA SSID: ");
    Serial.println(ssid);
    // Connect to WPA/WPA2 network:
    status = WiFi.begin(ssid, pass);

    // wait 10 seconds for connection:
    delay(5000);
  }
  display.setCursor(30,20);
  display.print(F("ok"));
  display.display();
  printWiFiStatus();
  delay(2000);
  Serial.println("Wait RFID ....");

}

void loop() {


  switch(res) {
     case 0:  //
        send_display("Wait RFID....");
        res=1;
        break;
     case 1:  //  RFID
        //
        if ( mfrc522.PICC_IsNewCardPresent()) {
           //    .
           if ( mfrc522.PICC_ReadCardSerial()) {
              //  UID
              Serial.print(F("Card UID:"));
              display.setCursor(10,20);
              for (byte i = 0; i < 4; i++) {
                 cardUID[i]=mfrc522.uid.uidByte[i];
                 Serial.print(cardUID[i],HEX);
                 display.print(cardUID[i],HEX);
              }
           Serial.println();
           res=2;
           display.display();
           delay(2000);
           Serial.println("send uid to server....");
           }
        mfrc522.PICC_HaltA();
        mfrc522.PCD_StopCrypto1();
        }
        display.display();
        break;
     case 2:  //    UID
        send_display("Send server...");
        rr=send_uid_to_server();
        if(rr==1) {
           res=3;
           display.setCursor(10,0);
           display.print(F("uid ok"));
           millis3=millis();
        }
        else if(rr==2) {
           res=0;
           display.setCursor(10,0);
           display.print(F("incorrect"));
        }
        else  {
           res=0;
           display.setCursor(10,0);
           display.print(F("error 404"));
        }
        display.display();
        delay(3000);
        break;
     case 3:  //
        if(millis()-millis3<10000) {
           send_display("Wait temp....");
           temp=mlx.readObjectTempC();
           display.setCursor(10,20);
           display.print(temp);
           display.print(F(" *C"));
           display.display();
           if(temp>34.0 && temp<42.0) {
              res=4;
              delay(2000);
           }
        }
        else {
          res=0;
        }
        break;
     case 4:  //
         send_display("Wait temp....");
         send_temp_to_server();
         res=5;
         delay(2000);
         break;
     case 5:  //
         display.clearDisplay();
         display.setCursor(10,10);
         display.print(F("Temp="));
         display.print(temp);
         display.print(F("*C"));
         display.setCursor(10,20);
         if(temp<37.5) { // OPEN
            display.print(F("OPEN"));
            Serial.println("OPEN");
            digitalWrite(pinRelay,HIGH);
         }
         else {  // CLOSE
            display.print(F("CLOSE"));
            display.setCursor(10,0);
            display.print(F("Temp high!!!"));
            Serial.println("CLOSE");
            Serial.println("Temp high!!!");
            digitalWrite(pinRelay,LOW);
         }
        display.display();
        delay(3000);
        Serial.println("Wait RFID ....");
        res=0;
        break;
     default:
        break;
  }
}

//
void printWiFiStatus() {
  // print the SSID of the network you're attached to:
  Serial.print("SSID: ");
  Serial.println(WiFi.SSID());

  // print your WiFi shield's IP address:
  IPAddress ip = WiFi.localIP();
  Serial.print("IP Address: ");
  Serial.println(ip);

  // print the received signal strength:
  long rssi = WiFi.RSSI();
  Serial.print("signal strength (RSSI):");
  Serial.print(rssi);
  Serial.println(" dBm");
}
//
int send_uid_to_server() {
   int ret=3;
   unsigned long previos;
   int x=0;int f=0;
   char s;
   client.stop();
   if (client.connect(server, 80)) {
     ////     narodmon.ru
     //
     // uid
     String str="/firm/get_uid.php?uid=";
     for (byte i = 0; i < 4; i++) {
        str+=String(cardUID[i],HEX);
     }
     Serial.print("str=");Serial.println(str);
     client.println("GET "+str+" HTTP/1.1");
     client.println("Host: freeparkovka.ru");
     client.println("User-Agent: ArduinoWiFi/1.1");
     client.println("Connection: close");
     client.println();
     //
     previos=millis();
     for(int i=0;i<40;i++)
        response[i]=0;

     do{
        if(client.available() > 0) {
           //
           s = client.read();
           if(s=='#')
              f=1;
           if(f==1) {
              response[x]=s;
              //Serial.print(response[x]);
              x++;
           }
           Serial.write(s);
        }
     }
     while((millis() - previos) < 5000);
     if(response[0]='#') {
        ret=command(response);
     }
     Serial.println(response);
     //client.stop();
     return ret;
  }
  else {
    //
   Serial.println("connection failed");
   //client.stop();
   return 3;
  }
}
//
void send_temp_to_server() {
   client.stop();
   if (client.connect(server, 80)) {
     ////     narodmon.ru
     //
     // uid
     String str="/firm/get_temp.php?uid=";
     for (byte i = 0; i < 4; i++) {
        str+=String(cardUID[i],HEX);
     }
     str+="&temp="+String(temp);
     Serial.print("str=");Serial.println(str);
     client.println("GET "+str+" HTTP/1.1");
     client.println("Host: freeparkovka.ru");
     client.println("User-Agent: ArduinoWiFi/1.1");
     client.println("Connection: close");
     client.println();
     Serial.println(response);
     delay(10);
     //client.stop();
  }
  else {
    //
   Serial.println("connection failed");
   //client.stop();
  }
}
//
int command(char* arr) {
    String str(arr);
    //
    if(str.indexOf("yes")!=-1) {
       return 1;
    }
    else if(str.indexOf("no")!=-1) {
       return 2;
    }
    return 3;
}
//
void send_display(String str) {
   display.clearDisplay();
   display.setCursor(10,10);
   display.print(str);
   display.display();
}
Step 2. Connecting an IR temperature sensor MLX90614 to an Arduino MKR 1000 Wi Fi BoardArduino
#include <Wire.h>
#include <Adafruit_MLX90614.h>

Adafruit_MLX90614 mlx = Adafruit_MLX90614();

void setup() {
  Serial.begin(9600);
  Serial.println("start");
  mlx.begin();
}

void loop() {
  Serial.print("Ambient = "); Serial.print(mlx.readAmbientTempC());
  Serial.print("*C");
  Serial.print("\tObject = "); Serial.print(mlx.readObjectTempC());
  Serial.print("*C");
  Serial.print("\tObject = "); Serial.print(mlx.readObjectTempF());
  Serial.println("*F");
  delay(3000);
}
Step 3. Connecting an OLED display to an Arduino MKR 1000 WiFi BoardArduino
#include <Wire.h>
#include <Adafruit_MLX90614.h>
#include <Adafruit_GFX.h>
#include <Adafruit_SSD1306.h>

Adafruit_MLX90614 mlx = Adafruit_MLX90614();
Adafruit_SSD1306 display(128, 32, &Wire, -1);

float temp;
unsigned long millis1=0;

void setup() {
  Serial.begin(9600);
  //
  display.begin(SSD1306_SWITCHCAPVCC, 0x3C);
  display.setTextSize(1);
  display.setTextColor(WHITE);
  //
  display.clearDisplay();
  display.display();
  //
  mlx.begin();
  //
  Serial.println("start");
}

void loop() {
  if(millis()-millis1 >= 3000) {
     display.clearDisplay();
     display.setCursor(10,10);
     display.println(F("Wait temp...."));
     temp=mlx.readObjectTempC();
     display.setCursor(10,20);
     display.print(temp);
     display.print(F(" *C"));
     display.display();
     //
     millis1=millis();
  }
}
Step 4. Connecting the rc522 RFID reader module to the Arduino MKR 1000 WiFi BoardArduino
//
#include <Wire.h>
#include <Adafruit_MLX90614.h>
#include <Adafruit_GFX.h>
#include <Adafruit_SSD1306.h>
#include <SPI.h>
#include <MFRC522.h>
//
Adafruit_MLX90614 mlx = Adafruit_MLX90614();
Adafruit_SSD1306 display(128, 32, &Wire, -1);
MFRC522 mfrc522(7, 6);

byte cardUID[4] = {0,0,0,0};
int res=1;
float temp;
unsigned long millis1=0;

void setup() {
  Serial.begin(9600);
  //
  display.begin(SSD1306_SWITCHCAPVCC, 0x3C);
  display.setTextSize(1);
  display.setTextColor(WHITE);
  display.clearDisplay();
  display.display();
  //   MLX90614
  mlx.begin();
  //  SPI
  SPI.begin();
  //  MFRC522
  mfrc522.PCD_Init();
  Serial.println("start");
  Serial.println("Wait RFID ....");
}

void loop() {
  switch(res) {
     case 1:  //  RFID
        display.clearDisplay();
        display.setCursor(10,10);
        display.print(F("Wait RFID...."));
        //
        if ( mfrc522.PICC_IsNewCardPresent()) {
           //    .
           if ( mfrc522.PICC_ReadCardSerial()) {
              //  UID
              Serial.print(F("Card UID:"));
              display.setCursor(10,20);
              for (byte i = 0; i < 4; i++) {
                 cardUID[i]=mfrc522.uid.uidByte[i];
                 Serial.print(cardUID[i],HEX);
                 display.print(cardUID[i],HEX);
              }
           Serial.println();
           Serial.println("Wait temp....");
           res=3;
           }
        mfrc522.PICC_HaltA();
        mfrc522.PCD_StopCrypto1();
        }
        display.display();
        break;
     case 2:  //    UID

         break;
     case 3:  //
        delay(2000);
        display.clearDisplay();
        display.setCursor(10,10);
        display.println(F("Wait temp...."));
        temp=mlx.readObjectTempC();
        display.setCursor(10,20);
        display.print(temp);
        display.print(F(" *C"));
        display.display();
        if(temp>34.0 && temp<42.0) {
           res=5;
        }
        break;
     case 4:  //

         break;
     case 5:  //
         display.clearDisplay();
         display.setCursor(10,10);
         display.print(F("Temp="));
         display.print(temp);
         display.print(F("*C"));
         display.setCursor(10,20);
         if(temp<37.5) {
            display.print(F("OPEN"));
            Serial.println("OPEN");
         }
         else {
            display.print(F("CLOSE"));
            display.setCursor(10,0);
            display.print(F("Temp high!!!"));
            Serial.println("CLOSE");
            Serial.println("Temp high!!!");
         }
        display.display();
        delay(3000);
        Serial.println("Wait RFID ....");
        res=1;
        break;
     default:
         break;
  }
}
Step 6. Creating a database of employees on the company's website and a database for collecting dailPHP
get_uid.php checks for an ID in the database and returns in the response:<?php
//Параметры MySQL
$location="localhost";
$user="bhx20666_parking";
$pass="parking12345678";
$db_name="bhx20666_firma";
// connect db
if(! $db=mysqli_connect($location,$user,$pass,$db_name))
{echo "connect error";}
else
{;}
$query0=" SELECT * FROM users WHERE uid='".$_GET['uid']."' ";
$rez0=mysqli_query($db,$query0);
if(mysqli_num_rows($rez0)>0) {
$row0=mysqli_fetch_assoc($rez0);
echo "#yes".";".$row0['name']."$";
}
else {
echo "#no"."$";
}
?>
Step 6. Creating a database of employees on the company's website and a database for collecting dailPHP
get_temp.php sends the employee's temperature to the database<?php
//Параметры MySQL
$location="localhost";
$user="bhx20666_parking";
$pass="parking12345678";
$db_name="bhx20666_firma";
// connect db
if(! $db=mysqli_connect($location,$user,$pass,$db_name))
{echo "connect error";}
else
{;}
$query0=" SELECT * FROM users WHERE uid='".$_GET['uid']."' ";
$rez0=mysqli_query($db,$query0);
if(mysqli_num_rows($rez0)>0) {
$row0=mysqli_fetch_assoc($rez0);
$query1=" INSERT INTO temp SET
id_user='".$row0['id']."',
temp='".$_GET['temp']."',
day='".date('Y-m-d H:i:s')."' ";
mysqli_query($db,$query1);
echo "#yes";
}
else {
echo "#no";
}
?>
Step 9. Page for remote viewing of employee temperature dataPHP
view_temp.php<?php
//
$location="localhost";
$user="**********";
$pass="**********";
$db_name="**********";
// connect db
if(! $db=mysqli_connect($location,$user,$pass,$db_name))
{echo "connect error";}
else
{;}
$query0=" SELECT * FROM temp WHERE uid='".$_GET['uid']."' ";
$rez0=mysqli_query($db,$query0);
$content1.=date('Y-m-d')."<br><br>";
$content1.="<table>";
$query1="SELECT * FROM temp WHERE day >= CURDATE() ";
$rez1=mysqli_query($db,$query1); $i=1;
while($row1=mysqli_fetch_assoc($rez1)) {
$content1.="<tr>";
$content1.="<td>".$i."</td>";
$rez2=mysqli_query($db,"SELECT name FROM users WHERE id =".$row1['id_user']." ");
$row2=mysqli_fetch_assoc($rez2);
$content1.="<td>".$row2['name']."</td>";
$content1.="<td>".mb_substr($row1['day'],10,9)."</td>";
if($row1['temp']>37.5)
$content1.="<td style='background-color:red'>".$row1['temp']."</td>";
else
$content1.="<td>".$row1['temp']."</td>";
$content1.="</tr>";
$i++;
}
$content1.="</table>";
echo $content1;
?>
Schematics
24_pAT1JQdrD1.fzz05_ZnJZPiMYsB.fzz08_RyXONO1VtK.fzz12_jyWaOQUelW.fzzManufacturing process
- Birth Control Pills: History, Benefits, Risks, and Production
- The Thermometer: From Galileo’s Thermoscope to Modern Digital Sensors
- Integrated QR, RFID, and Temperature Verification Access Control System
- Temperature‑Controlled Fan: DIY Relay System for Media Furniture Cooling
- LM35‑Based Temperature Control System Using AT89S52 Microcontroller
- Hysteresis-Based Arduino Temperature Control System
- Common Cooling Mistakes in Industrial Control Panels: Avoiding Overheating and Equipment Failure
- Mastering Quality Control: Strategies for Consistent Excellence
- Temperature Control Circuits: Design, Build, and Real-World Applications
- How Film Tech Upgraded Temperature Control for a Blown Film Line