


Home Pregnancy Test: How It Works, Design, and Future
Home pregnancy tests enable women to quickly and accurately determine pregnancy status by detecting the hormone human chorionic gonadotropin (hCG) in urine. The test relies on an immunoassay that triggers a visible color change when hCG binds to specific antibodies on a test strip.
Background
The presence of hCG in urine has long been a reliable indicator of pregnancy. During a normal pregnancy, hCG levels double roughly every two days and can be detected in urine as early as seven days after conception. Early methods involved animal bioassays—urine was injected into a frog or rabbit, and the animal’s reproductive response was observed. Although sensitive, these procedures were time‑consuming and required veterinary expertise. The advent of immunoassays replaced animal testing with a protein‑based technique that is both faster and more sensitive. Initially, blood samples were used because they offered the highest sensitivity, but they still required clinical personnel. Advances in antibody technology eventually led to urine‑based kits that can be self‑administered at home.
Modern home tests employ monoclonal antibodies that bind to hCG, causing a color change that indicates pregnancy. A positive result can be obtained as early as two weeks after conception or a few days after a missed period. The test strip contains three zones: the first has “anti‑a” hCG antibodies and an IgG control; the second contains “anti‑b” hCG antibodies that form a sandwich complex; and the third hosts an IgG‑binding antibody that confirms the test has worked.
By the mid‑1990s, immunoassay technology had been commercialized in more than two dozen retail products. According to the October 1994 issue of Pharmacy Times, the home pregnancy test market generated nearly $200 million in annual sales. Leading brands include EPT, Advance, ClearBlue Easy, and Answer Plus.
Design
Home‑test kits vary mainly in how the user collects and applies urine. Some kits—such as Advance, Confirm, ClearBlue Easy, Answer, and EPT—feature a direct‑urine stick. The user holds the stick, urinates onto the absorbent pad, and the fluid travels by capillary action to the test strip. Other kits, like Fact Plus, Precise, and Be Sure, require the user to collect urine in a separate cup and then dispense a measured drop onto a test well with a dropper. A few brands, including Q Test and Answer Plus, mandate mixing urine with a reagent before application.
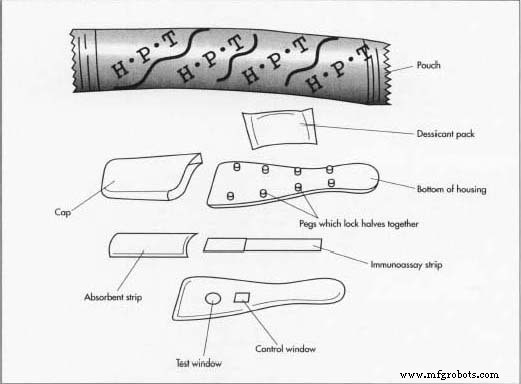
Components
A typical home pregnancy test contains the following elements:
Immunoassay Strip
The strip is produced by compressing non‑woven fibers into a narrow band and coating them with reactive antibodies. When hCG is present, the antibodies form a complex that ultimately produces a visible color change.
Absorbent Pad
Direct‑application tests incorporate an absorbent pad that captures urine and draws it onto the immunoassay strip.
Plastic Housing
The strip and pad are housed in a two‑piece, injection‑molded plastic case. A clear, leak‑proof window protects the strip from splashes and allows the user to read the test and control zones.
Urine Collection Cup / Reagents
Kits that require separate urine collection include a plastic cup and, when necessary, pre‑measured reagent vials that must be mixed with the urine before it contacts the strip.
The Manufacturing Process
Forming the Non‑woven Fiber Strip/Pad
- Pharmaceutical suppliers manufacture the immunoassay strips by compressing rayon‑polyester blends into a narrow strip and coating them with monoclonal antibodies. The pads may be latex‑coated and then treated with liquid assay agents. Up to four different antibodies can be applied across three distinct zones on the strip.
 A home pregnancy test is comprised of two basic components: the immunoassay strip/pad and the housing. The immunoassay strip is coated with a protein called a monoclonal antibody (MAb), which will react with any hCG present in the urine. This reaction causes a color change if the level of hCG is consistent with known pregnancy levels.
After drying, the pads are cut to the appropriate size for the test kit.
A home pregnancy test is comprised of two basic components: the immunoassay strip/pad and the housing. The immunoassay strip is coated with a protein called a monoclonal antibody (MAb), which will react with any hCG present in the urine. This reaction causes a color change if the level of hCG is consistent with known pregnancy levels.
After drying, the pads are cut to the appropriate size for the test kit.
Forming the Plastic Housing
- The housing is produced by injection molding. Plastics, colorants, resin modifiers, and plasticizers are blended, heated, and injected into a mold under pressure. Once cooled, two halves of the housing are ejected and snap‑fitted together using interlocking pins. A separate molding step creates a clear plastic window that protects the strip and provides a view of the test and control areas. A plastic cap that covers the absorbent pad is molded in a third operation.
Assembly, Packaging, and Shipment
- In the assembly line, immunoassay strips are inserted into the housing along with the absorbent pad. The clear window is affixed with adhesive, and the two halves are snapped together. The cap is then locked in place.
- Assembled kits are sealed in a foil/plastic laminate pouch containing a silica‑gel desiccant, which absorbs excess moisture and extends shelf life. The pouch is crimped tightly, then placed in a cardboard box along with a detailed instruction booklet. One or two kits are packed per box, depending on the manufacturer. Each box is encoded with the manufacturing date, expiration date, and lot number via an ink‑jet printer and then shrink‑wrapped for protection before shipping.
Quality Control
Every test includes a built‑in quality control area. A colored line in the control zone confirms the test functions correctly. During manufacturing, random kits are activated to verify performance. To prevent false results, the reaction pack is wrapped in foil and should not be removed more than five minutes before use. After the test, a positive result’s colored line remains visible for at least 24 hours, while a negative result should be read within five minutes; readings after 30 minutes may appear weakly positive.
The Future
Continued advances in biotechnology and immunology promise even more sensitive home tests that detect pregnancy earlier and are easier to produce. Improvements in antibody production could lower manufacturing costs, making reliable pregnancy testing even more accessible.
Manufacturing process
- Why Cloud Mastery Is the Only Path Forward in 2017
- Advanced Glucometer Test Kit: Design, History, and Future of Blood Glucose Monitoring
- Crash Test Dummy: The High-Tech Human Replica That Saves Lives
- Testing the DS18B20 Temperature Sensor on Raspberry Pi
- Build a Raspberry Pi‑Powered Home Automation System for Remote Control
- Essential Test & Measurement Gear for a Professional Home Lab
- Robust Physical Interface for Home Automation Control
- Advanced Home Monitoring System with Arduino Mega and IoT Sensors
- Smart Home System: Build a Low‑Cost Raspberry Pi & MediaTek Linkit Setup
- WARAN Home Automation Kit: Raspberry Pi, Arduino, Sensors & Components