


Master Toolpath Modifications in Fusion 360 Machining Extension
The Fusion 360 Machining Extension offers toolpath modifications to help you avoid hairy situations when machining complex parts.
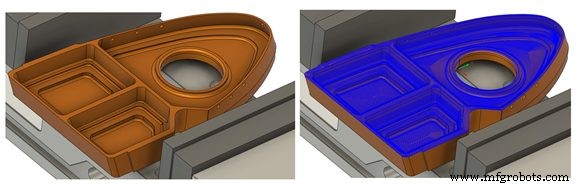
Very few objects are as easy to machine as a square block. Today’s complex products require a far greater array of shapes. Shapes can be curvy, doubly curvy, and have undercuts, vertical walls, holes, etc. Needless to say, machining advanced features can become quite a challenge.
CAM programmers often have a few tools up their sleeves to tackle more advanced circumstances for more advanced circumstances. However, surprises can happen. For example, what if the model data to generate a toolpath is less than ideal? Situations like this often involve third-party CAD data imports, poor design techniques, inadequate surfacing, and hybrid design problems. These methods can result in toolpaths not respecting contact point boundaries and bleeding into adjacent areas. Without addressing these issues could result in scrapped parts, tool damage, or even worse — machine damage.
Autodesk Fusion 360 has introduced helpful toolpath modification tools to address this problem. This article will cover some examples of how unlocking toolpath modifications in Fusion 360 can help during some hairy situations.
What is “toolpath modification”?
Toolpath modifications allow users to modify, delete, and remove segments to make toolpaths safer, more efficient and reduce programming time. They are a collective for a range of different tools. These include trimming the toolpath, deleting passes or segments, replacing tools, and modifying tool entry positions. Toolpath modifications are part of the Fusion 360 Machining Extension.
How to access toolpath modifications in Fusion 360
After purchasing the Fusion 360 Machining Extension, create a valid toolpath. Once you create a valid toolpath, the Modify tab will display in the toolbar, and a range of toolpath modifications will become accessible.

A range of toolpath modifications is now accessible.
Most toolpath types support toolpath modifications. However, the following toolpath types do not support toolpath modifications: 2D toolpaths, 2D/3D Adaptive toolpaths, 2D/3D Pocket toolpaths, 2D Slot toolpaths, 2D Thread toolpaths, 2D Bore toolpaths, 2D Circular toolpaths, 2D Chamfer toolpaths, Drilling toolpaths, and Turning toolpaths.
This is mainly because all of the 2D toolpaths are not model-aware (non-associative). In theory, they could create dangerous leads/links as a result of applied modifications. Also, when roughing toolpaths, the trimming of a roughing operation may have safety implications on the tool’s remaining stock entry and exit positions.
When should you use toolpath modifications?
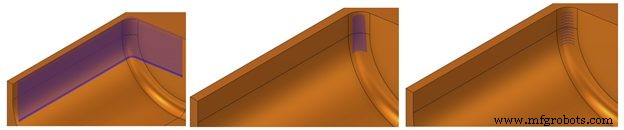
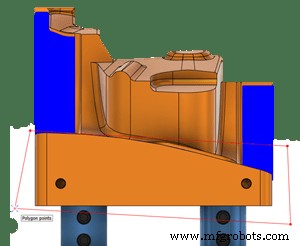
Example 1
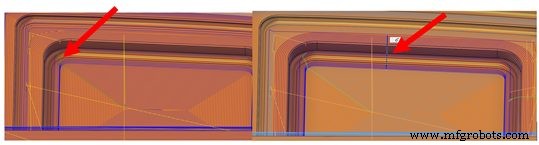
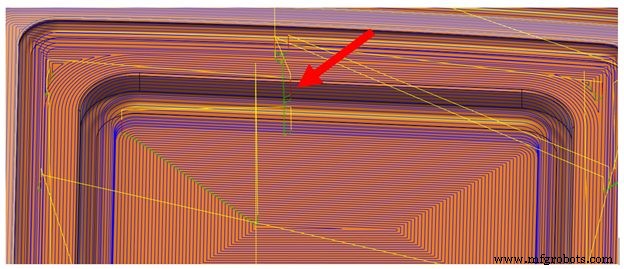
In this example, the sloping face demonstrates an opportunity to use toolpath modifications to avoid a-r cutting moves.
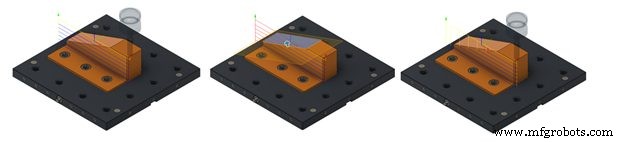
The real power here is that the face selection is associative with the model. If the design changes, the trimmed toolpath will also update to reflect the change. As you can see from the image above, the air-cutting moves disappear to leave a more efficient toolpath.
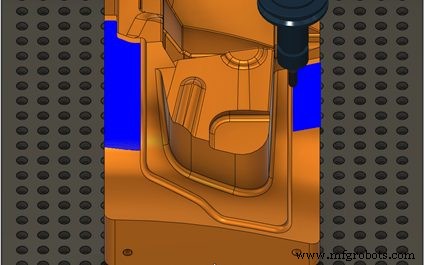
Example 2
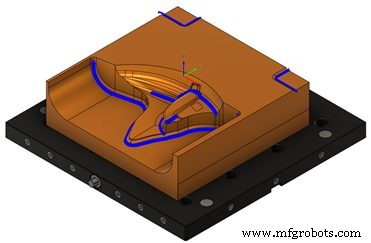
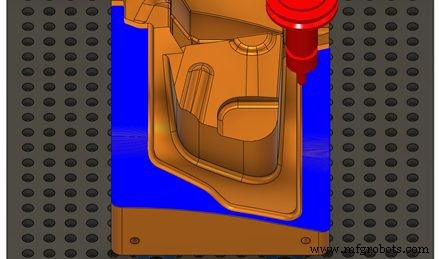
This example features a mold for a headlight on a car. We can see that in some cases, the parallel strategy does not respect the contact point boundaries:
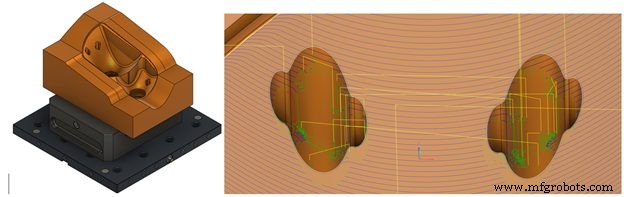
In some circumstances, we can try to overcome this problem by editing the strategy to include touch/avoid surfaces. However, this doesn’t always give an acceptable result. It often results in lengthy delays in the surface selection and calculation time. Toolpath editing aims to make this process significantly more efficient.
It’s important to note that recalculated leads and links are only applied to the areas that have been trimmed. Meanwhile, the remainder of the original toolpath remains unchanged. As shown above, the resulting toolpath is more efficient and safer, resulting in an overall better quality surface finish.
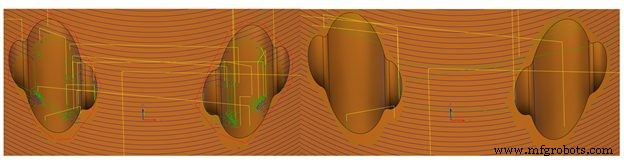
Example 3
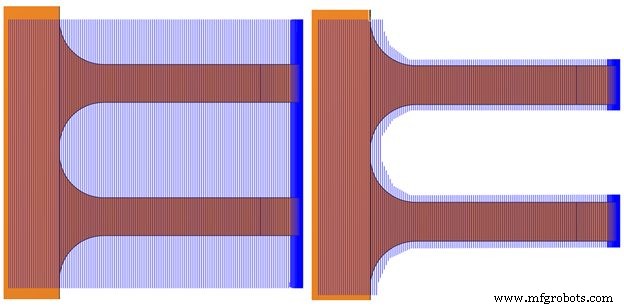
The third example presents a situation where we may want to remove inefficiencies in the toolpath. In this example, we’re machining the lugs with the tool approaching from the side. This will reduce the risk of rounding off the sharp aspect of the lugs. Some geometry has been created to help get a good quality toolpath across the two lugs. However, this results in an inefficient strategy with loads of air cutting.
Toolpath editing allows for the trimming away of all the excess toolpath while keeping the required portions to machine the lugs. In the images below, you can see the trimmed-out portion of the toolpath, removing air-cutting moves and leaving behind a more efficient toolpath. This dramatically reduced the machining time for this set of lugs from over 18 min to just over 13 min. That’s a huge saving in machining time for a part with four sets of lugs over a production run of 20-50 parts.
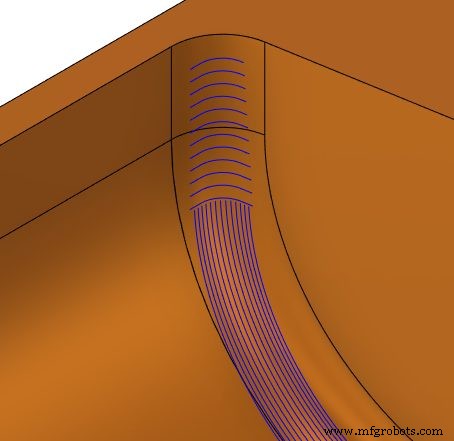
Example 4
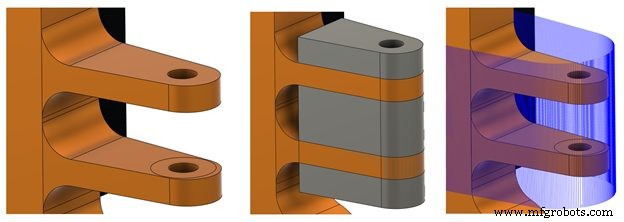
In this fourth example below, let’s look at how we can combine the best of two toolpaths together.
Here a pencil toolpath is used to machine this internal radius of the fillet area. However, when the tool approaches the vertical region of the toolpath, it starts to fragment.
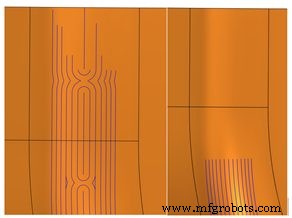
The other problem is that running a toolpath vertically down a vertical fillet can jeopardize cutter life and part quality. This results in possible tool damage and a poor-quality surface finish. Toolpath editing can help trim off the top portion of the fragmented toolpath, leading to a good pencil trace toolpath.
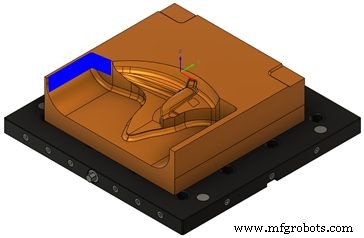
A Steep and Shallow toolpath is also present in the model. It uses a contour toolpath to machine the vertical walls with a constant step down. Here, you can utilize toolpath trimming functionality to only keep the inside portion of the polygon sketch around the area of the previously fragmented pencil toolpath.
The trim results in a well-positioned set of horizontal segments. However, many programmers will often tweak the step-downs to ensure the correct surface finish is achieved. Fortunately, the trimmed toolpath remembers the trim applied while consuming any toolpath parameter changes made on the fly. A good solution can be seen in the image below:
Example 5
The following example presents two problems. First, the tool rolls over the corner, going further down the part than is required. This means that the toolpath is potentially plunging into the remaining stock that’s yet to be removed, damaging the tool and the resulting surface finish.
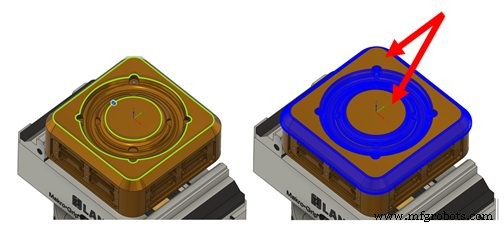
Secondly, it’s impractical to machine flat surfaces with ball-end mills. The tool rotation speed at the tip is almost zero, while machining with the bottom of the tool can often create a poor-quality surface finish.
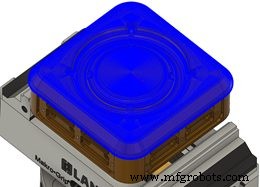
Here, the boundary trimming tool can be used to quickly identify regions to be excluded for subsequent machining later with a flat-bottomed tool resulting in more efficient toolpaths, better surface finishes, and longer-lasting tools.
Example 6
In the following example below, we have a toolpath machining the steep and shallow areas of these pockets. It’s worth noting that it’s very common for the tool to leave minor marks on the part as it’s engaging in the lead-in and lead-out moves. Unfortunately, depending on where the lead-in and lead-outs are, this can result in a poorer surface quality finish and more manual polishing as a post-machining operation.
Another problem occurs when a tool enters a pocket in an area where the tool is under greater loads. For instance, in corners, the tool life can decrease because of the shock loading on the tool.
Here, toolpath modifications allow the entry positions on all the closed segment passes to move. This is particularly useful in reducing the need for manual polishing, resulting in a better surface finish and extending the life of the cutting tool. It’s also beneficial in situations involving machining of multi-axis undercuts regions where the tool then has safer and easier access to the overhang/undercut areas.
It’s important to stress that one of the biggest positives of toolpath modifications is that the toolpath you are modifying doesn’t need to be entirely regenerated. Fusion 360 only regenerates the impacted leads and links, saving programming time and allowing more time for making parts.
Example 7
In this final example, we have a situation where the holder or shank of the tool is colliding with the stock or part on the steeper wall areas.
The simulation shows that the tool holder collides with the part as it traverses up the wall. Toolpath trimming allows you to split the toolpath into both steeper and shallower regions. This effectively keeps both split toolpath segments.
In the steeper areas, you can use the Change Tool functionality to substitute for a longer tool with the same cutting geometry. This ensures that the tool and model remain collision-free.
The benefit here is that no re-calculation is necessary on the toolpath when substituting a longer tool (assuming that the cutting geometry remains unchanged from the original tool).
Again, changing the tool for portions of a toolpath means more efficient cycle times, more efficient programming, and only changing to a longer tool when required.
Learn more about toolpath modifications in Fusion 360
As you can see, the toolpath modifications offer the flexibility to machine parts more accurately with less machining time, resulting in better quality surface finishes and parts.
To learn more about toolpath modifications in Fusion 360, visit this help topic. There are also some useful video resources on the Fusion 360 YouTube channel that help explain some of the functionality described in this article.
Try the Fusion 360 Machining Extention for free today to unlock toolpath medications in Fusion 360:

Industrial Technology
- Enhance Product Design Security with Fusion 360 Manage Extension
- Master 5‑Axis Machining with Autodesk Fusion 360
- Conturo Prototyping Accelerates CNC Production with Fusion 360 Machining Extension
- Master Change Management in Fusion 360 with the New Manage Extension
- Boost Efficiency with Fusion 360 Machining Extension: Toolpath Automation (Part 3)
- Master Fusion 360 Machining: Rotary Strategy – Part 2
- Enhance Your Workflow with Fusion 360 Machining Extension – Part 1: In-Process Inspection
- Mastering Fusion 360's Machining Extension: Advanced Features for Precision Manufacturing
- Effortless Data Management & Design Control with Fusion 360 Manage Extension
- Master 5‑Axis Machining with Fusion 360: Collision Avoidance, Multi‑Axis Control & Fast Toolpaths