


Comprehensive Pool Controller Kit – Raspberry Pi 2 + Arduino, Relay Boards, Temperature Sensors & Accessories
Components and supplies
 |
| × | 1 | |||
| × | 1 | ||||
 |
| × | 1 | |||
| × | 1 | ||||
| × | 1 | ||||
| × | 1 | ||||
| × | 1 | ||||
| × | 1 | ||||
| × | 1 | ||||
| × | 1 | ||||
| × | 1 | ||||
| × | 2 | ||||
| × | 1 |
Necessary tools and machines
| ||||
|
Apps and online services
 |
| |||
 |
| |||
| ||||
 |
| |||
| ||||
| ||||
|
About this project
Automated Pool ControllerTwice, in three months time, the timer for my pool pump failed. This inspired me to create this project. The cost of replacing those timers was over $120 and all I had to show forit was a timer that gave me very little control and a high failurerate. I also suffered a failure of thetemperature sensor on my solar water heater that cost an additional $30.
I knew that I could create a cost-effective automatedpool controller that gave me much more control over when my pool pump ran. I wanted to have more variables as to when the pump ran instead of the simple time and day of the existing timer. I also wanted to be able to not only automatemy pool pump, but also monitor the status of various aspects of my pool environment. A further goal was to be able toaccomplish these tasks from anywhere using any device.
The project I have created is very cost-effective as it utilizesa Raspberry Pi running Windows 10 IoT Core, Relays, Arduino Mini Pro as well astemperature sensors, wiring and 3D printed components. I completed this project for far less moneythan I had paid for the two prior timers and solar temperature sensor.
Pool Pump Control (AC Components)

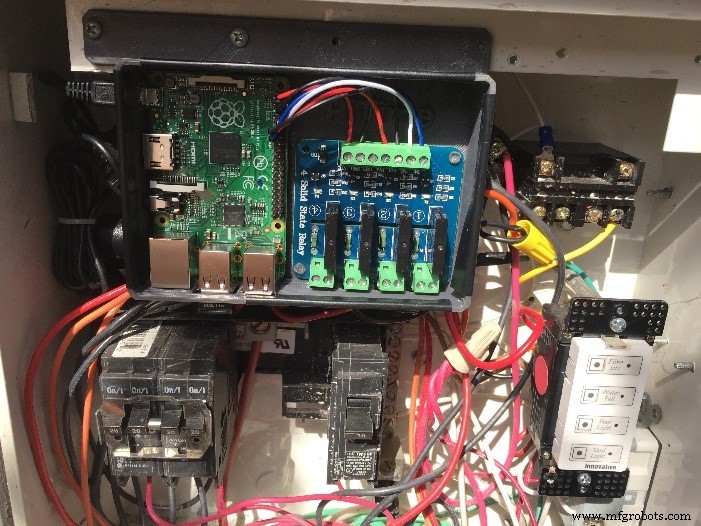
I started my project by controlling solid state relays frommy Raspberry Pi running Windows 10 IoT Core. These relays allow meto control my AC (Alternating Current) components such as the pool pump. The solid state relays control the existing 30Amp AC relays that the old timer had utilized. After designing and testing the circuit for the pool pump, I created additional functionality to control other AC components such as my pool waterfall, and my pool and yard lights. With this portion of the project designed, I could control all of these elements remotely. No longer would my family members or I need to physically open the controlbox in order to turn on the waterfall, turn on the pool or yard lights or set the timerfor the pool pump.
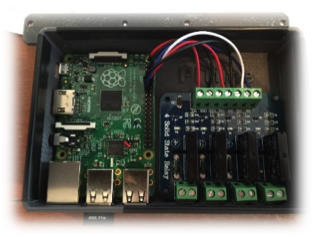
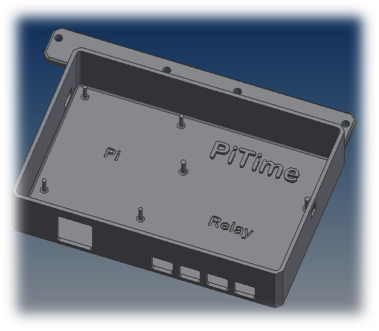
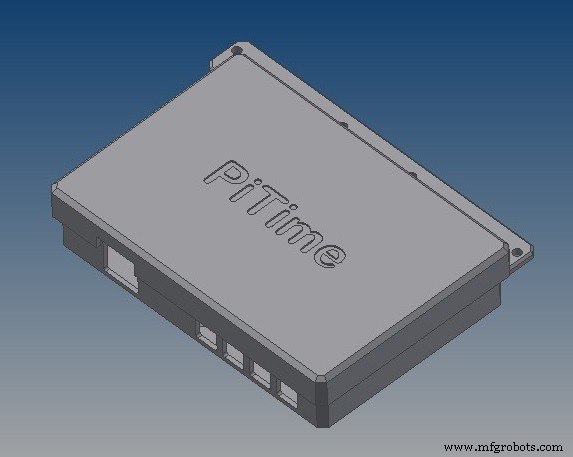
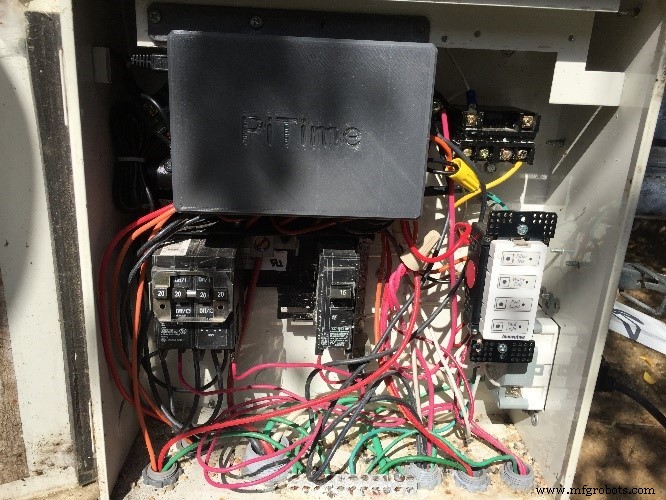
My son designed the Pool Controller enclosure and created it using our3D printer and ensured that both the Raspberry Pi and solid state relays hada secure fit within the controller box.
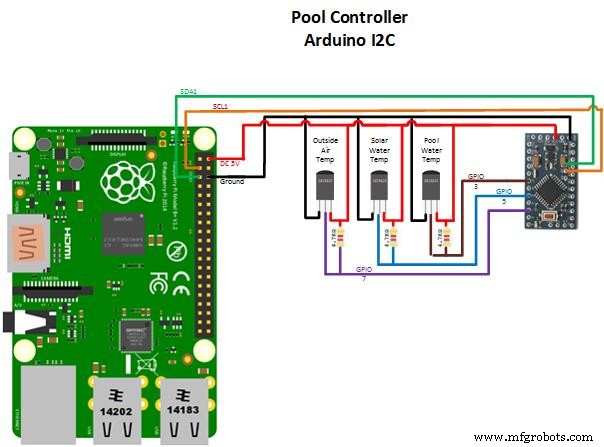
One of the design goals for myproject was to allow control based on variables in addition to Day and Time. I wanted to be able to take into account outside airtemperature as well as solar water heater and pool watertemperatures to determine when the pump should run and when it should be atrest. One example of when this type ofoperation would be crucial is when the outside air temperature is very cold andnear freezing. If the pool watertemperature is also close to freezing I need to ensure my pool and waterfallpumps are running to prevent pipes from freezing and damaging the systems. Using this project I will be able toaccomplish this even when I am not at home. In order to implement this, I incorporated temperature sensors into myproject. I read those sensors utilizing an Arduino Mini Pro which sends thatdata to the same Raspberry Pi that controls the pool and waterfall pumps via I2Cinterface.
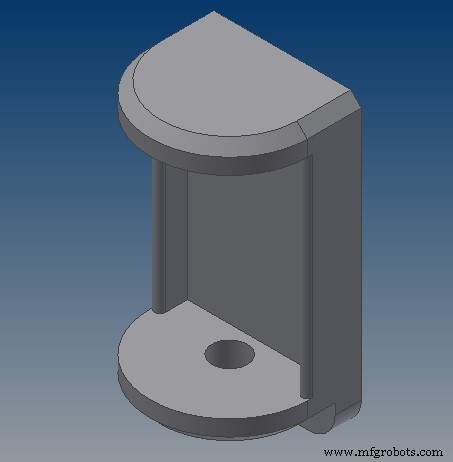
Outside Air Temperature SensorThe outside air temperature sensor was the first sensor I incorporated. Again, my son designed and printed the sensor mount on our 3D printer. He tried both PLA and ABS, ABS actually works better as it is more weather resistant and has a higher glass transition temperature making it more heat resistant. Ensure that you print with at least 75% infill. The sensor was connected as described above in the schematic.
I then incorporated the pool water and solar heater temperature sensors. This would allow the project to gather water temperature data that would be displayed to a user as well as provide further variables to determine when certain components ran or were at rest. First, a sensor mount was designed and 3D printed. As mentioned earlier, ABS actually works better due to better weather and heat resistance. Also ensure that you use at least 75% infill.
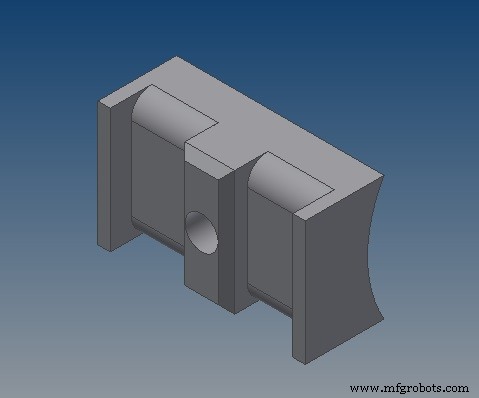
After printing the Water temperature sensor mount, I used a countersink drill bit to create a 45 degree area around the sensor hole. This would allow the JB Weld to have more surface area to adhere to. I prefered to use a drill bit to do this over changing the 3D print design as the rough cut of the drill bit seemed to give the JB Weld better holding power.
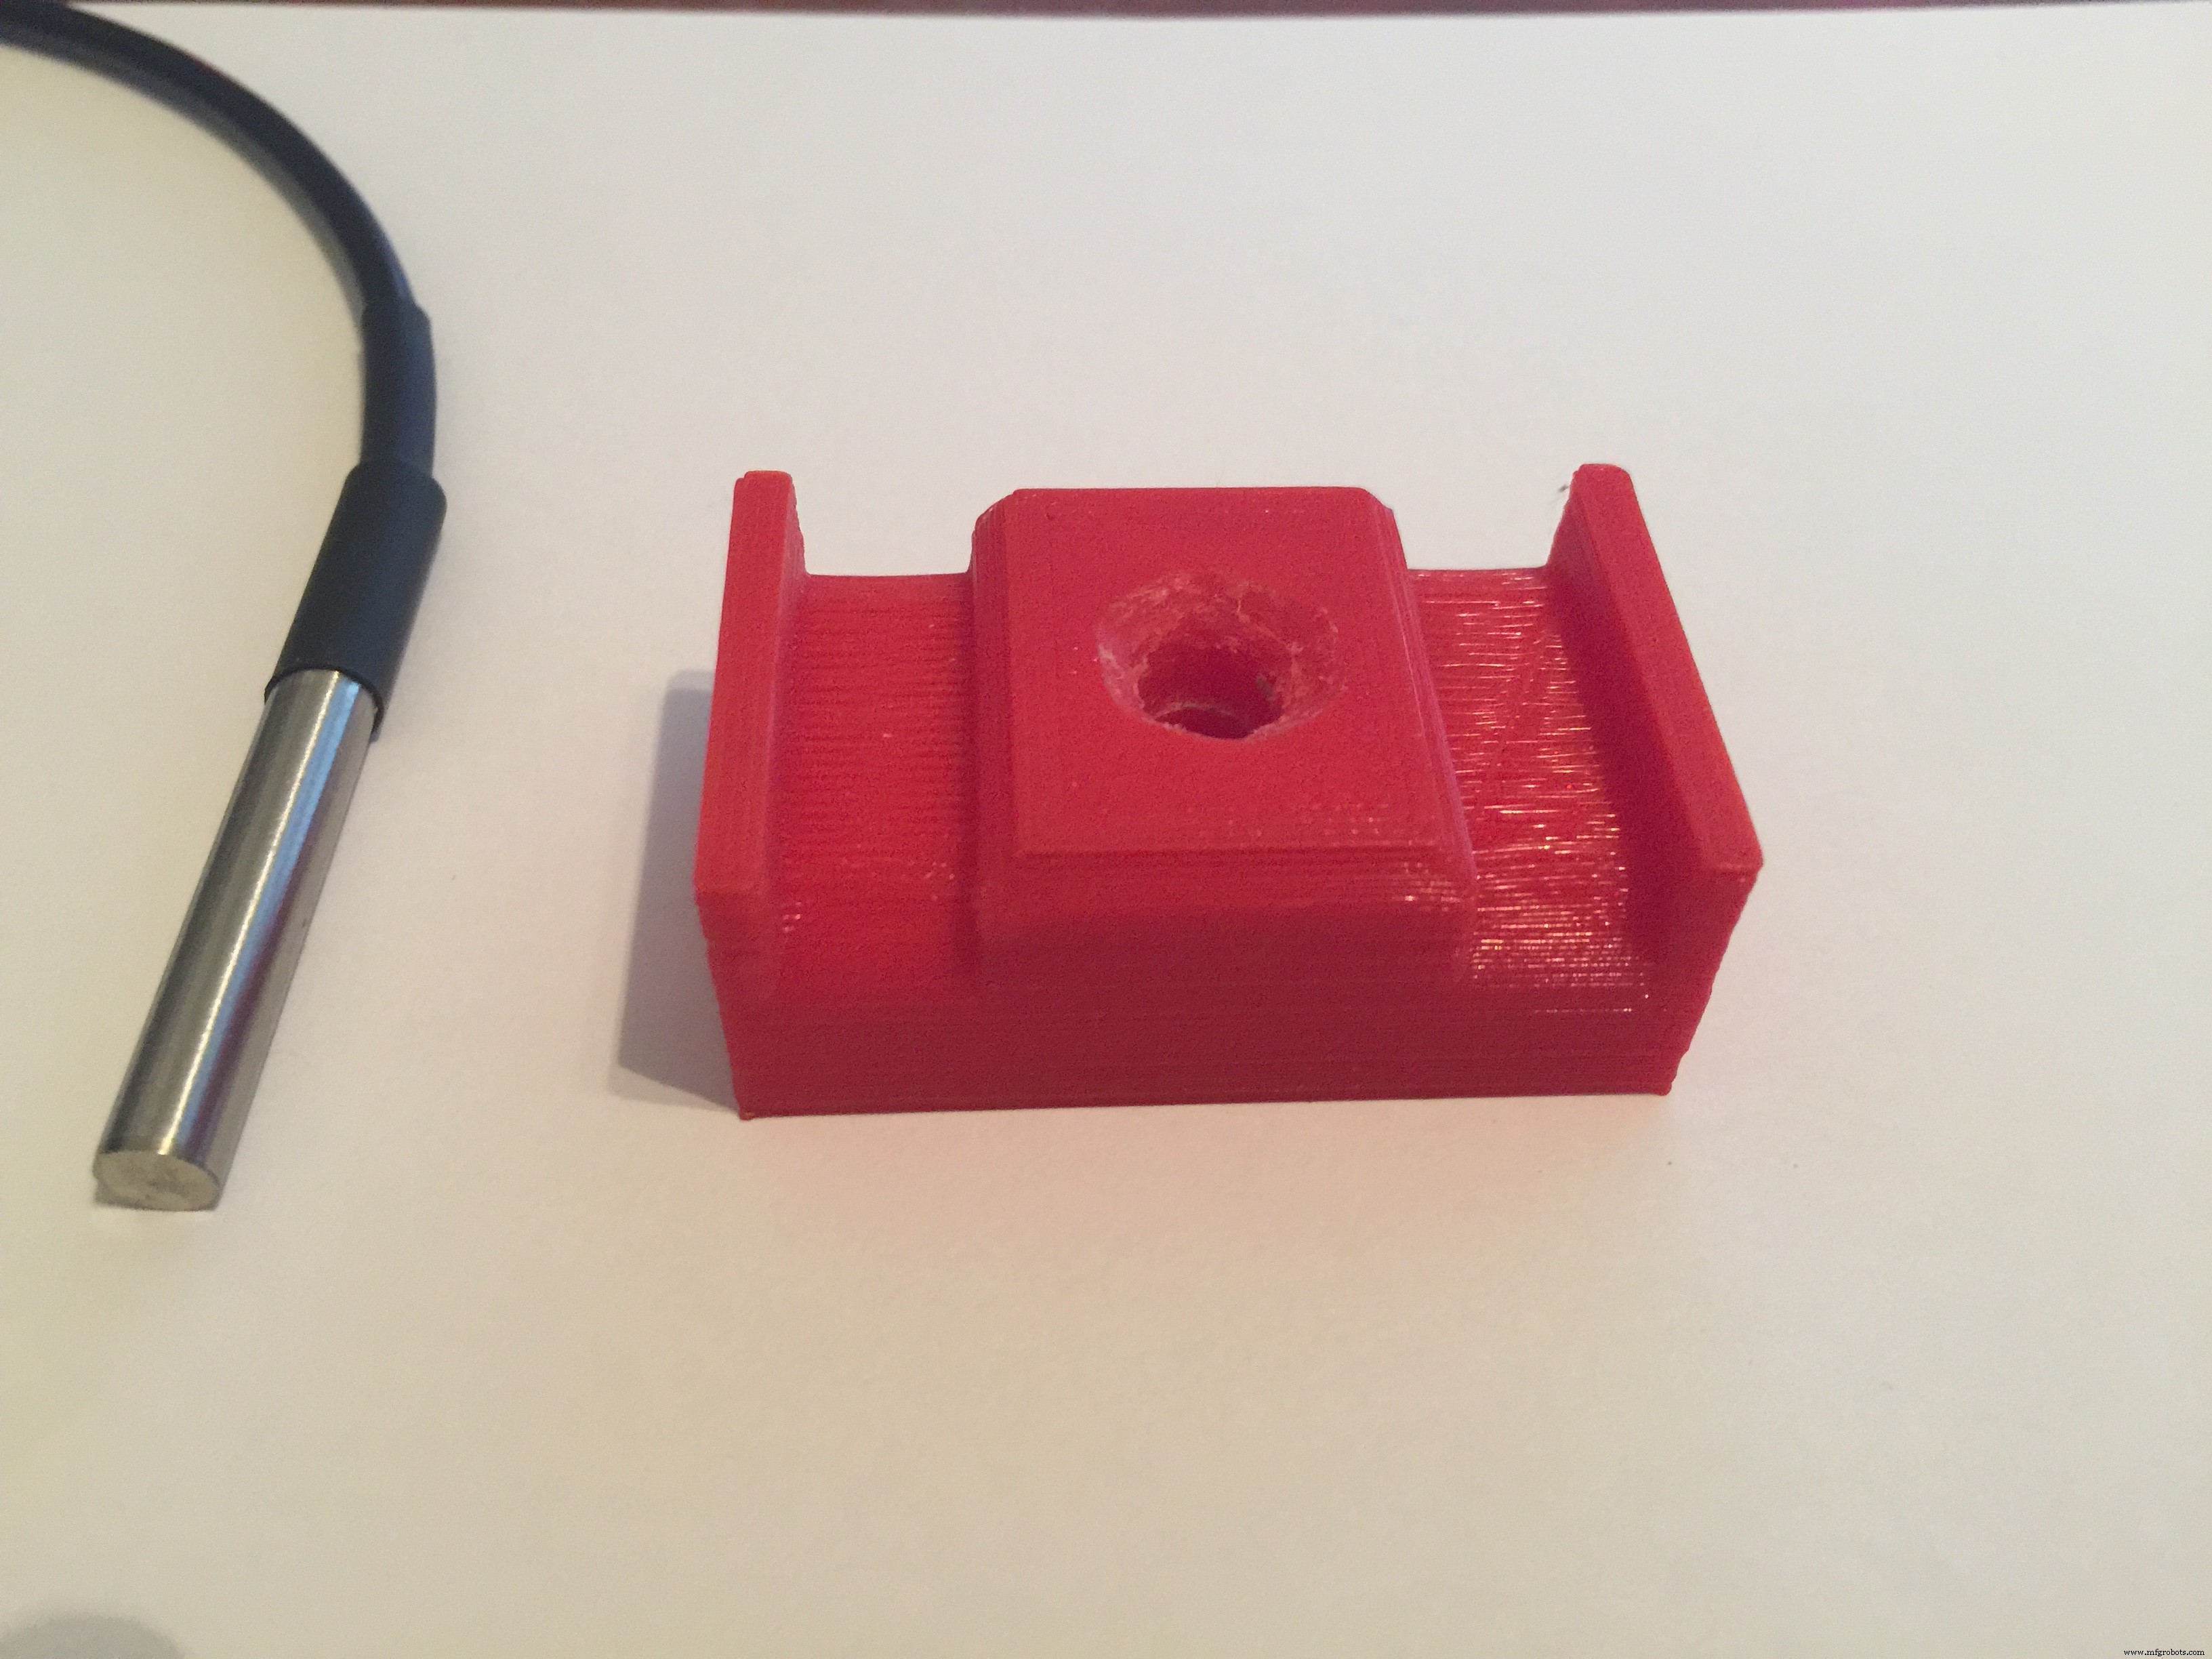
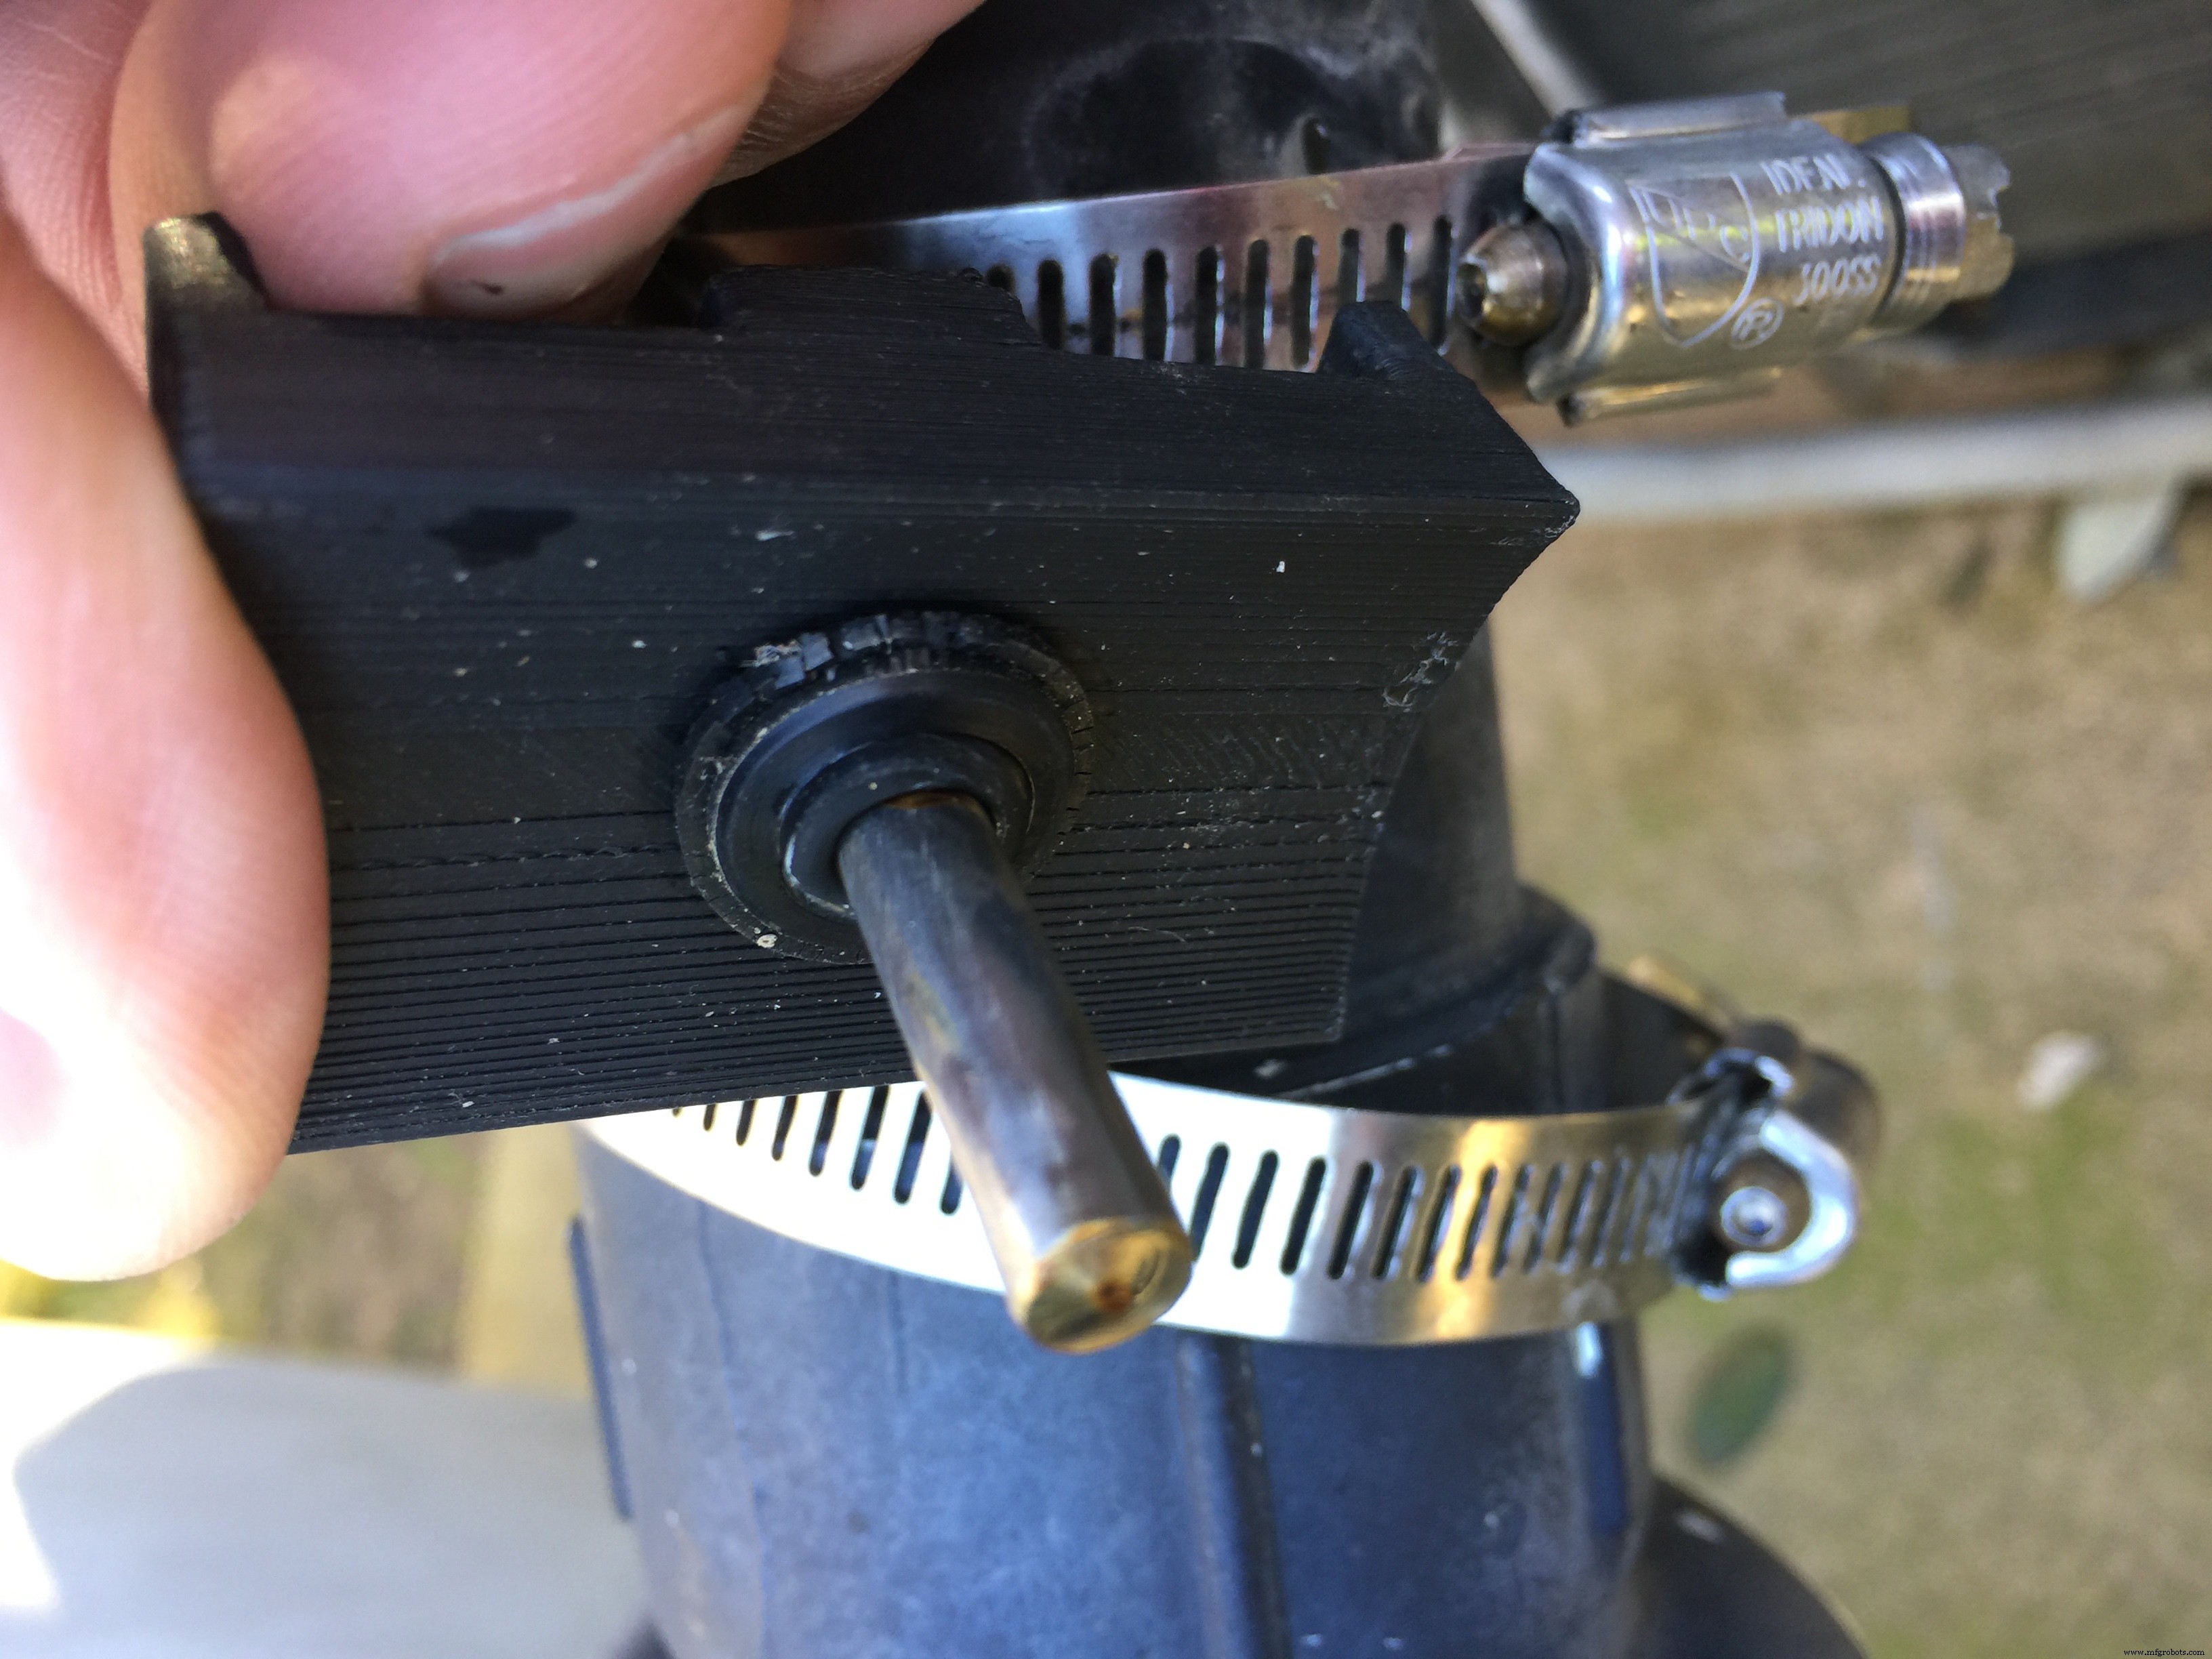
The next step was to insert the temperature sensor into the mount until it extends about 3/4" out of the bottom of the mount. Add the seat washer to hold it into place.
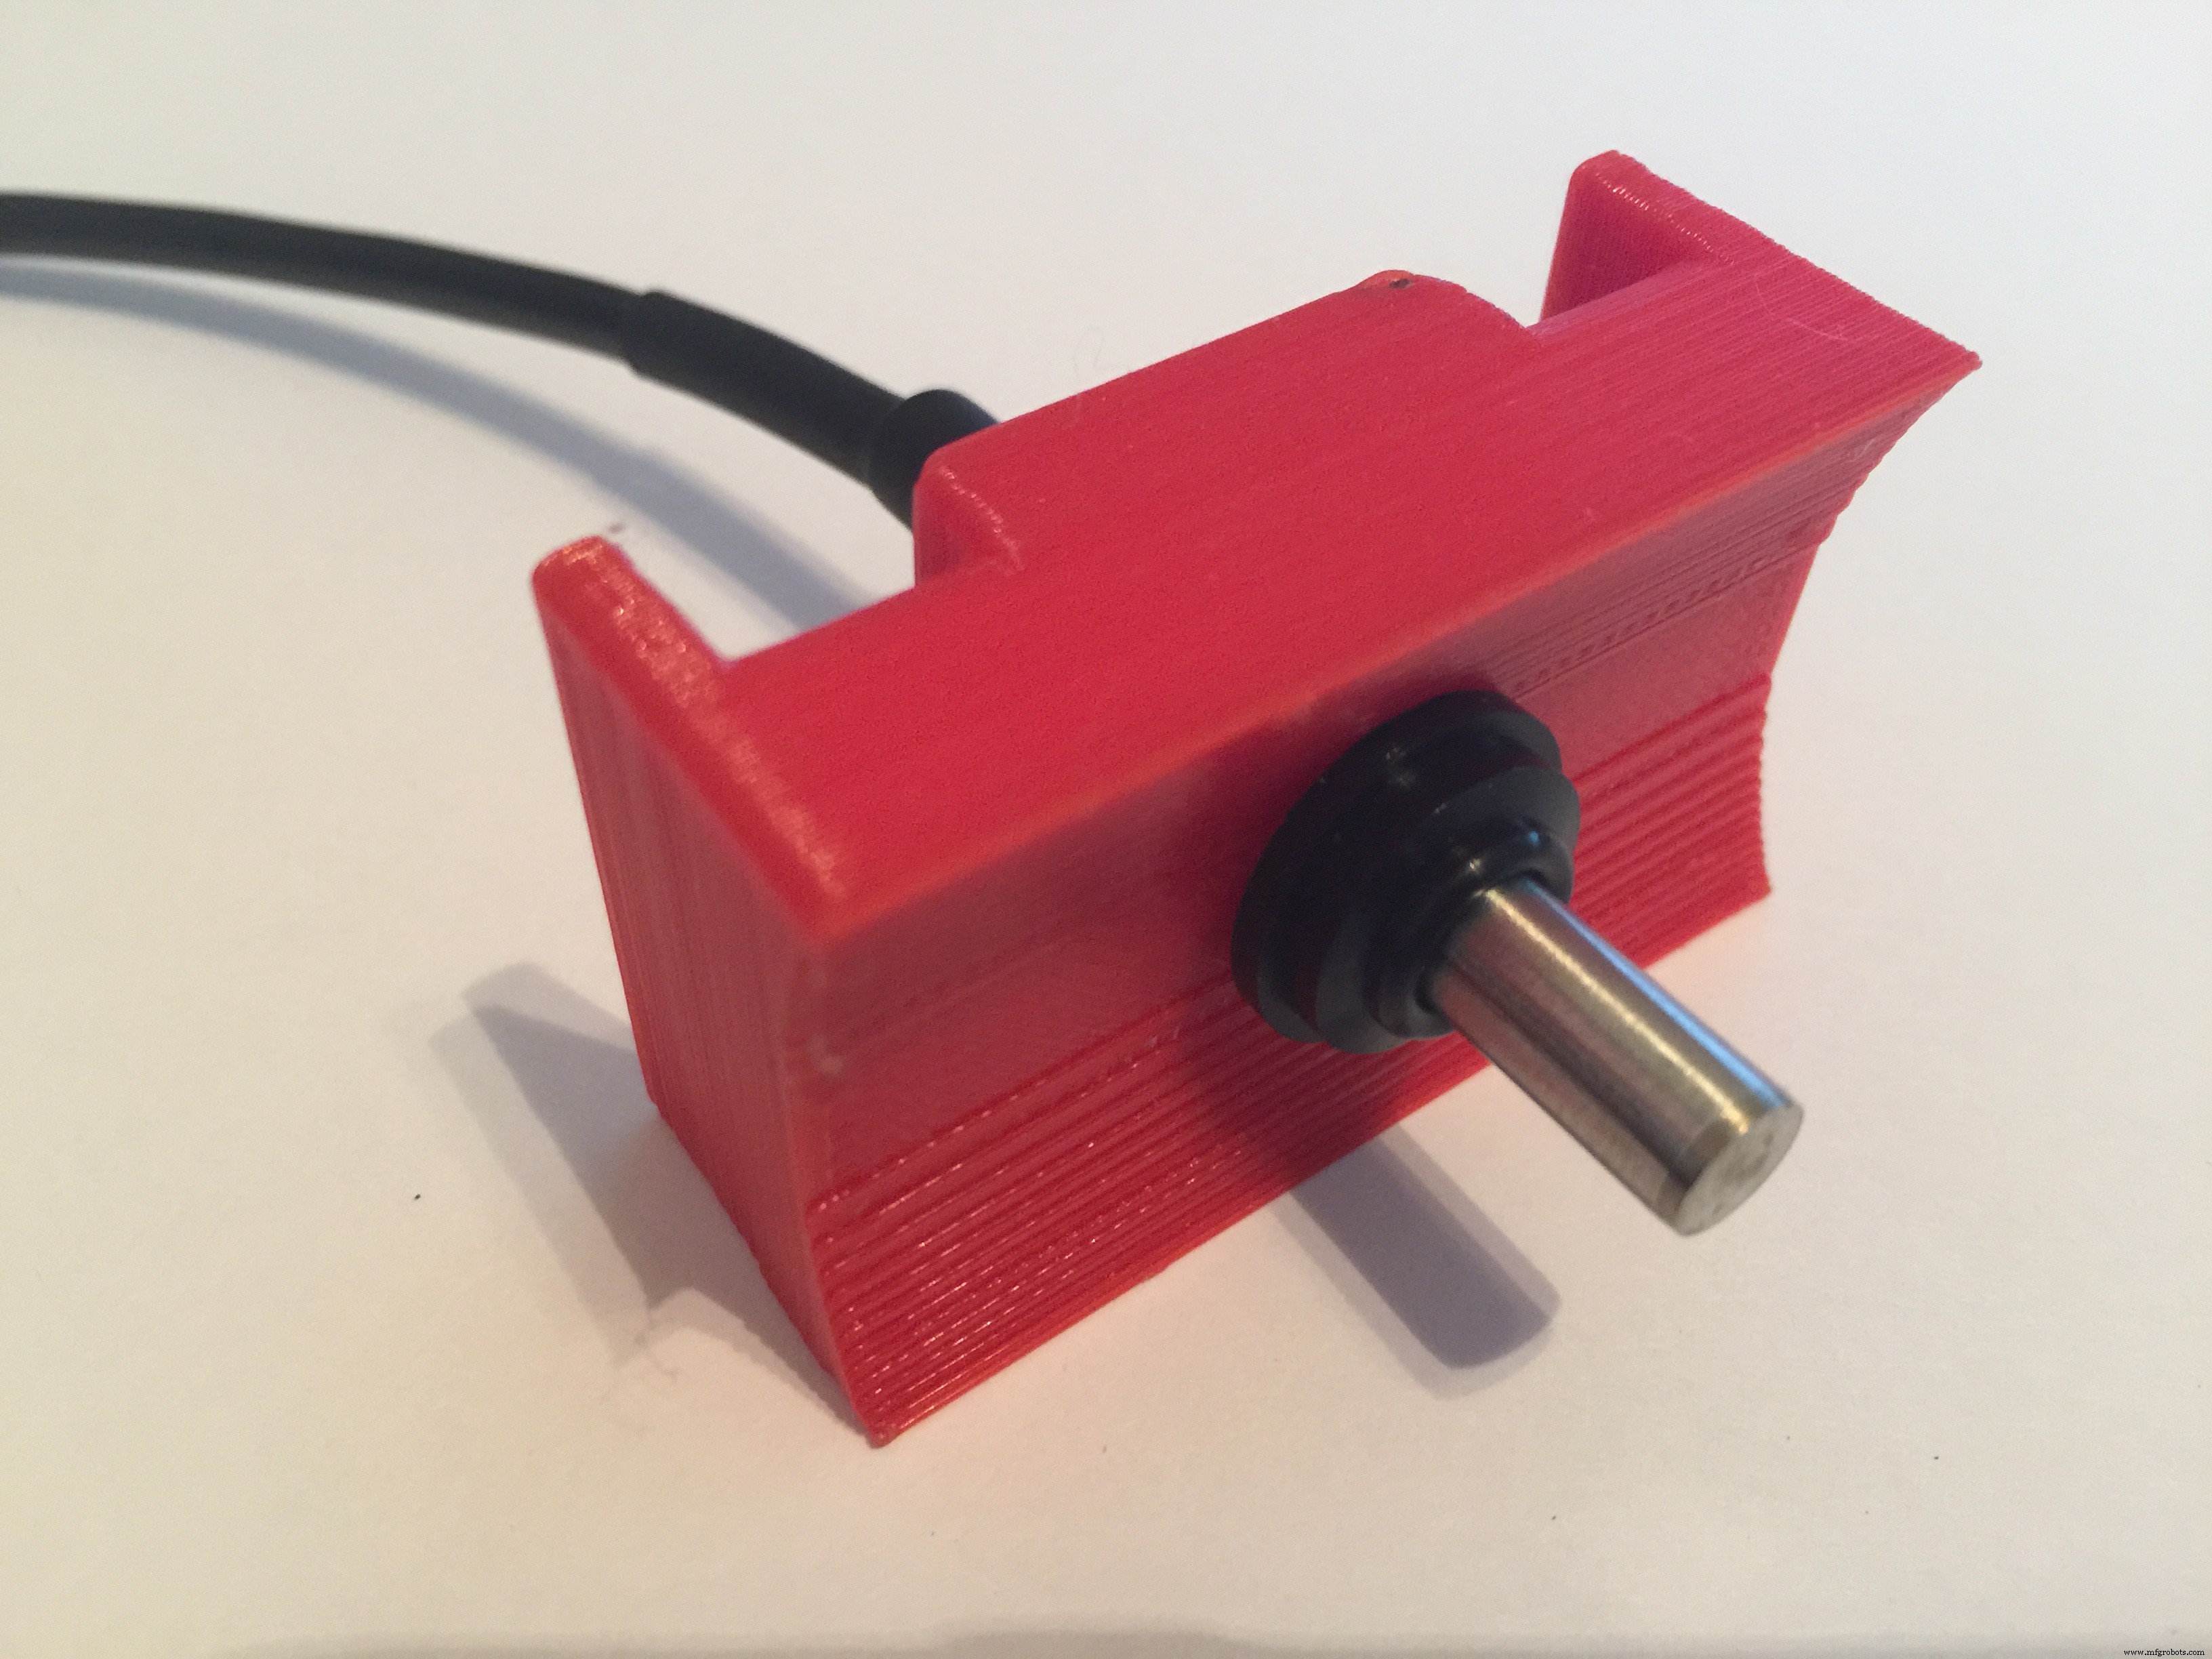
Next, fill the top of the mount with JB Weld and allow 24 hours to dry.
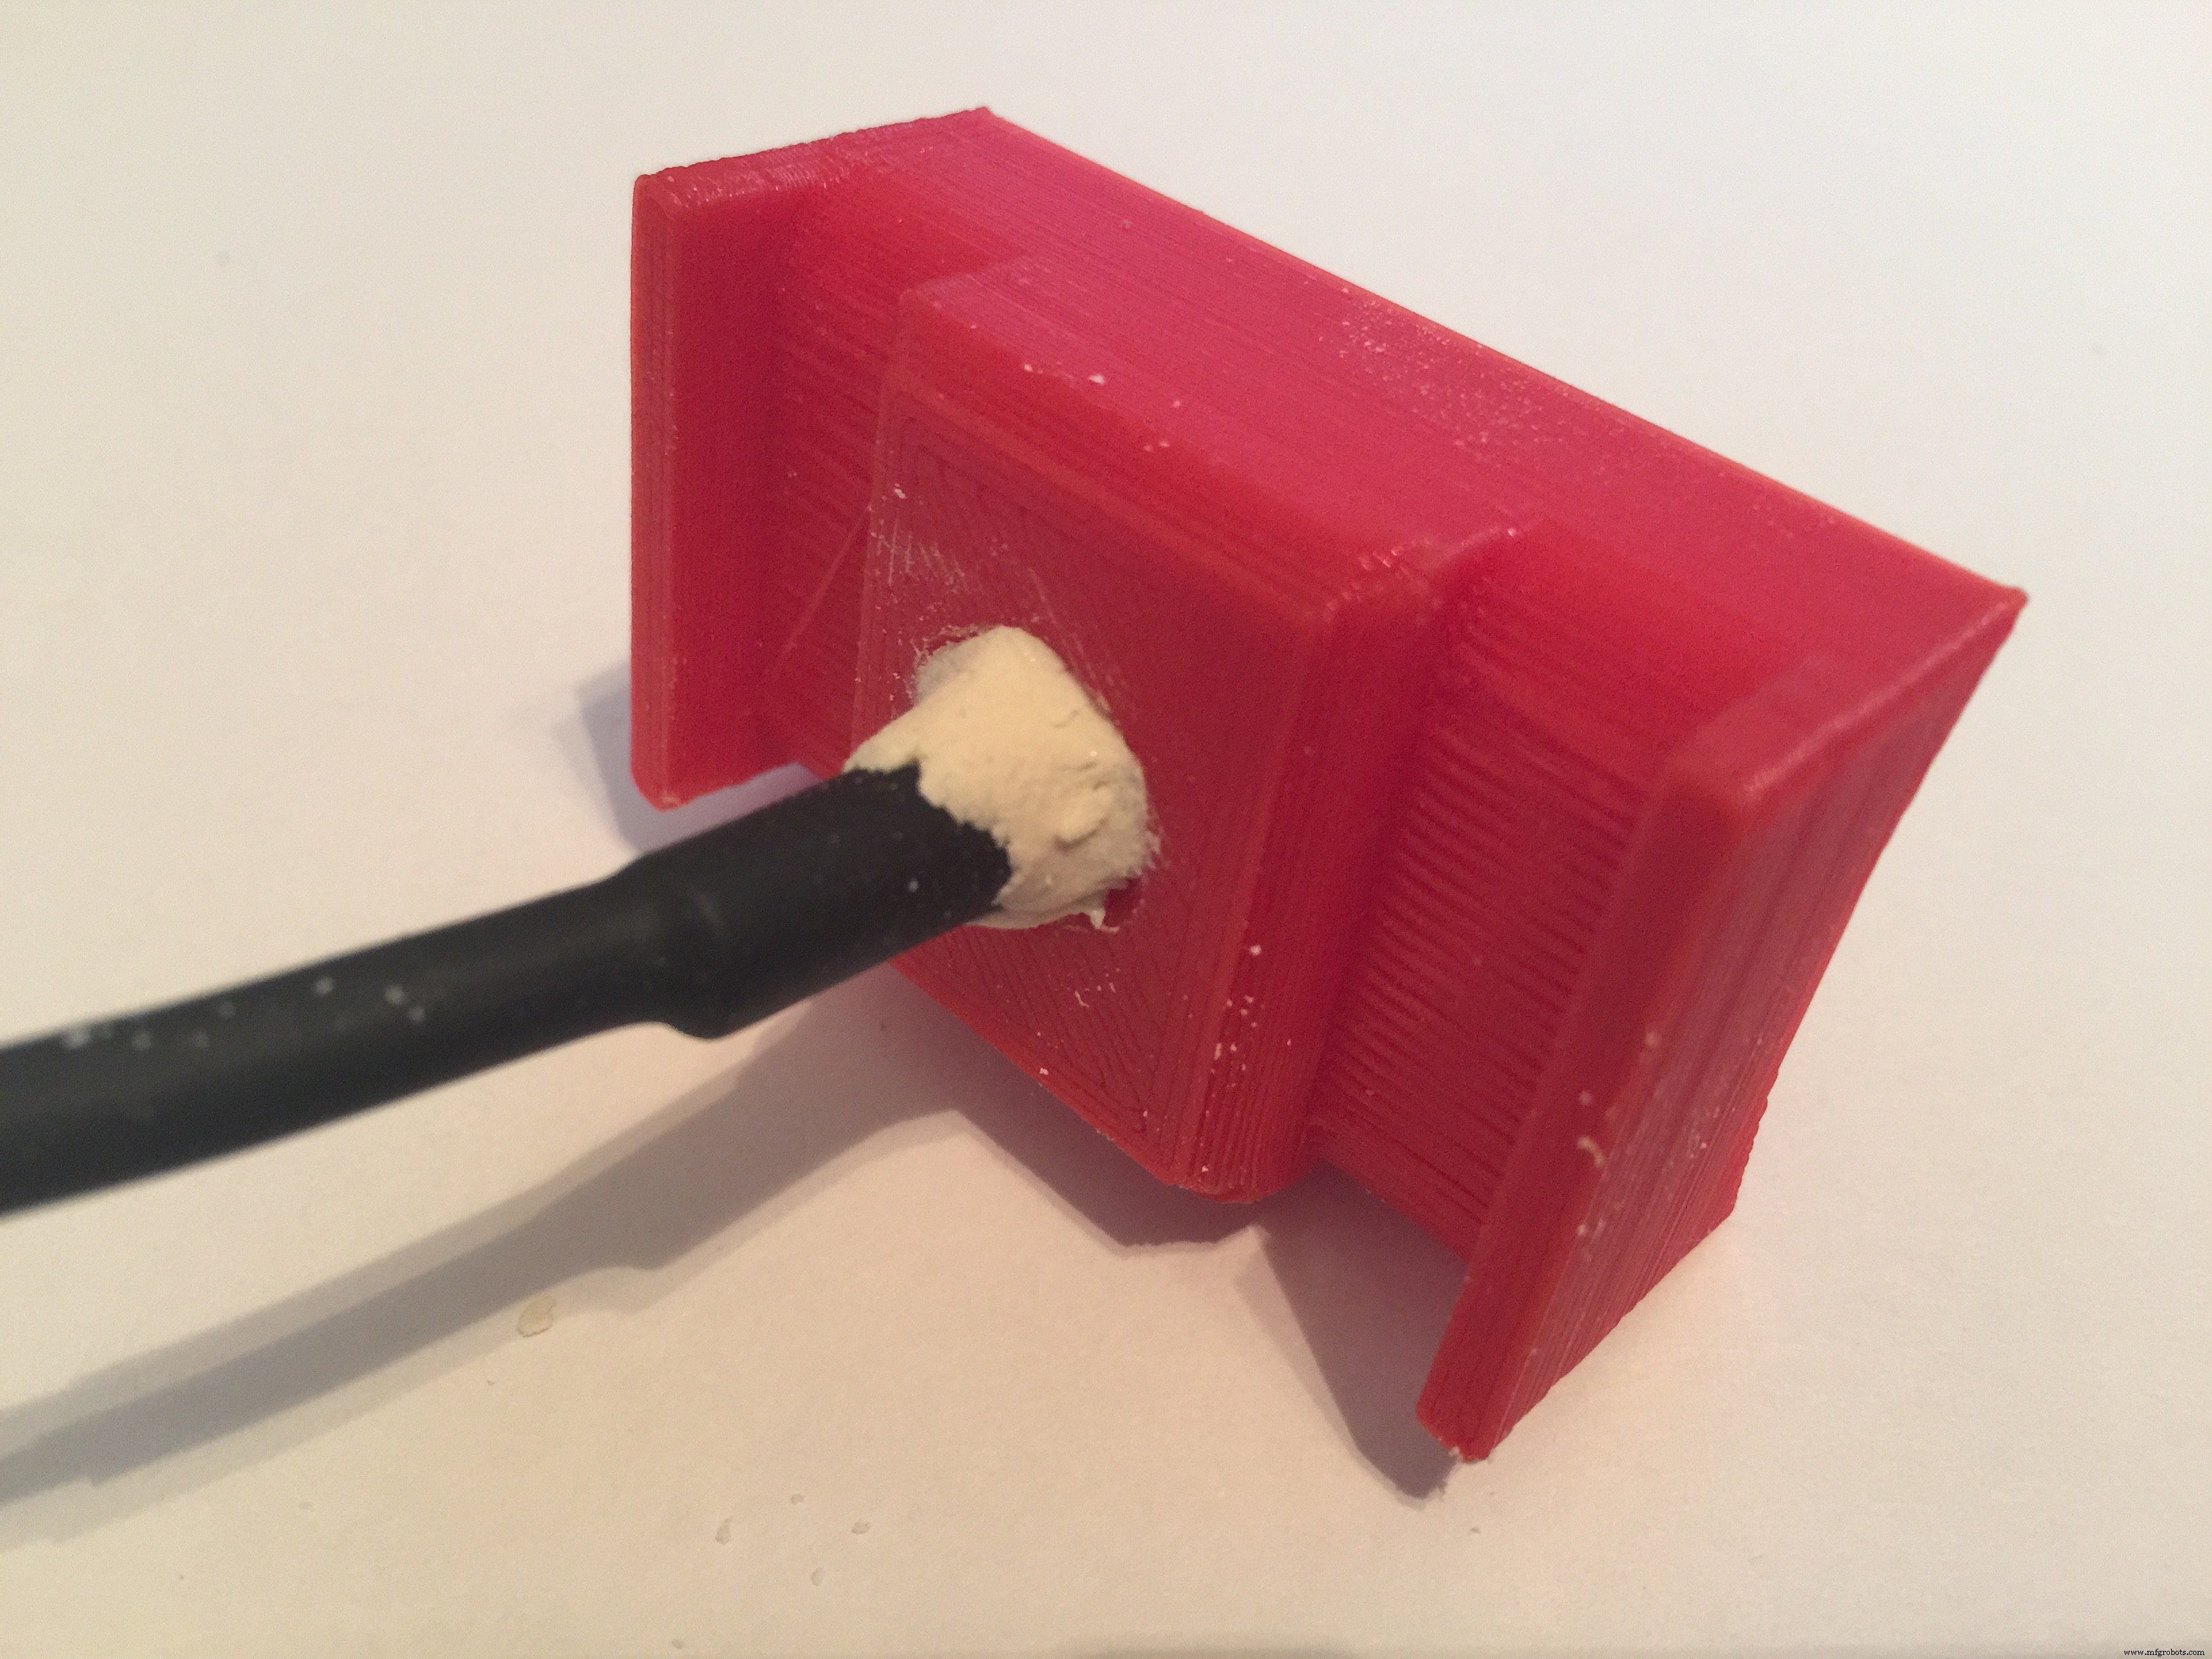
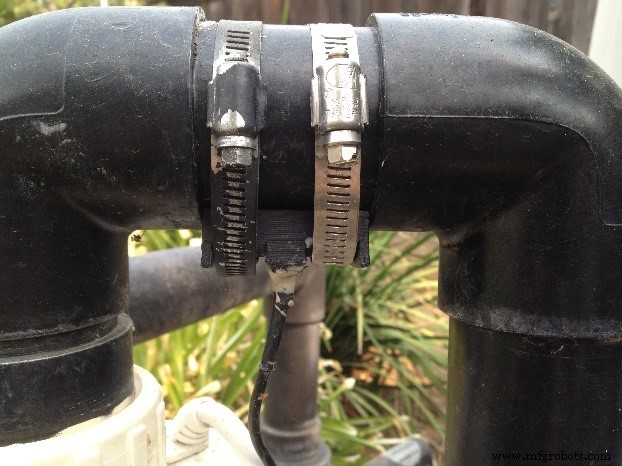
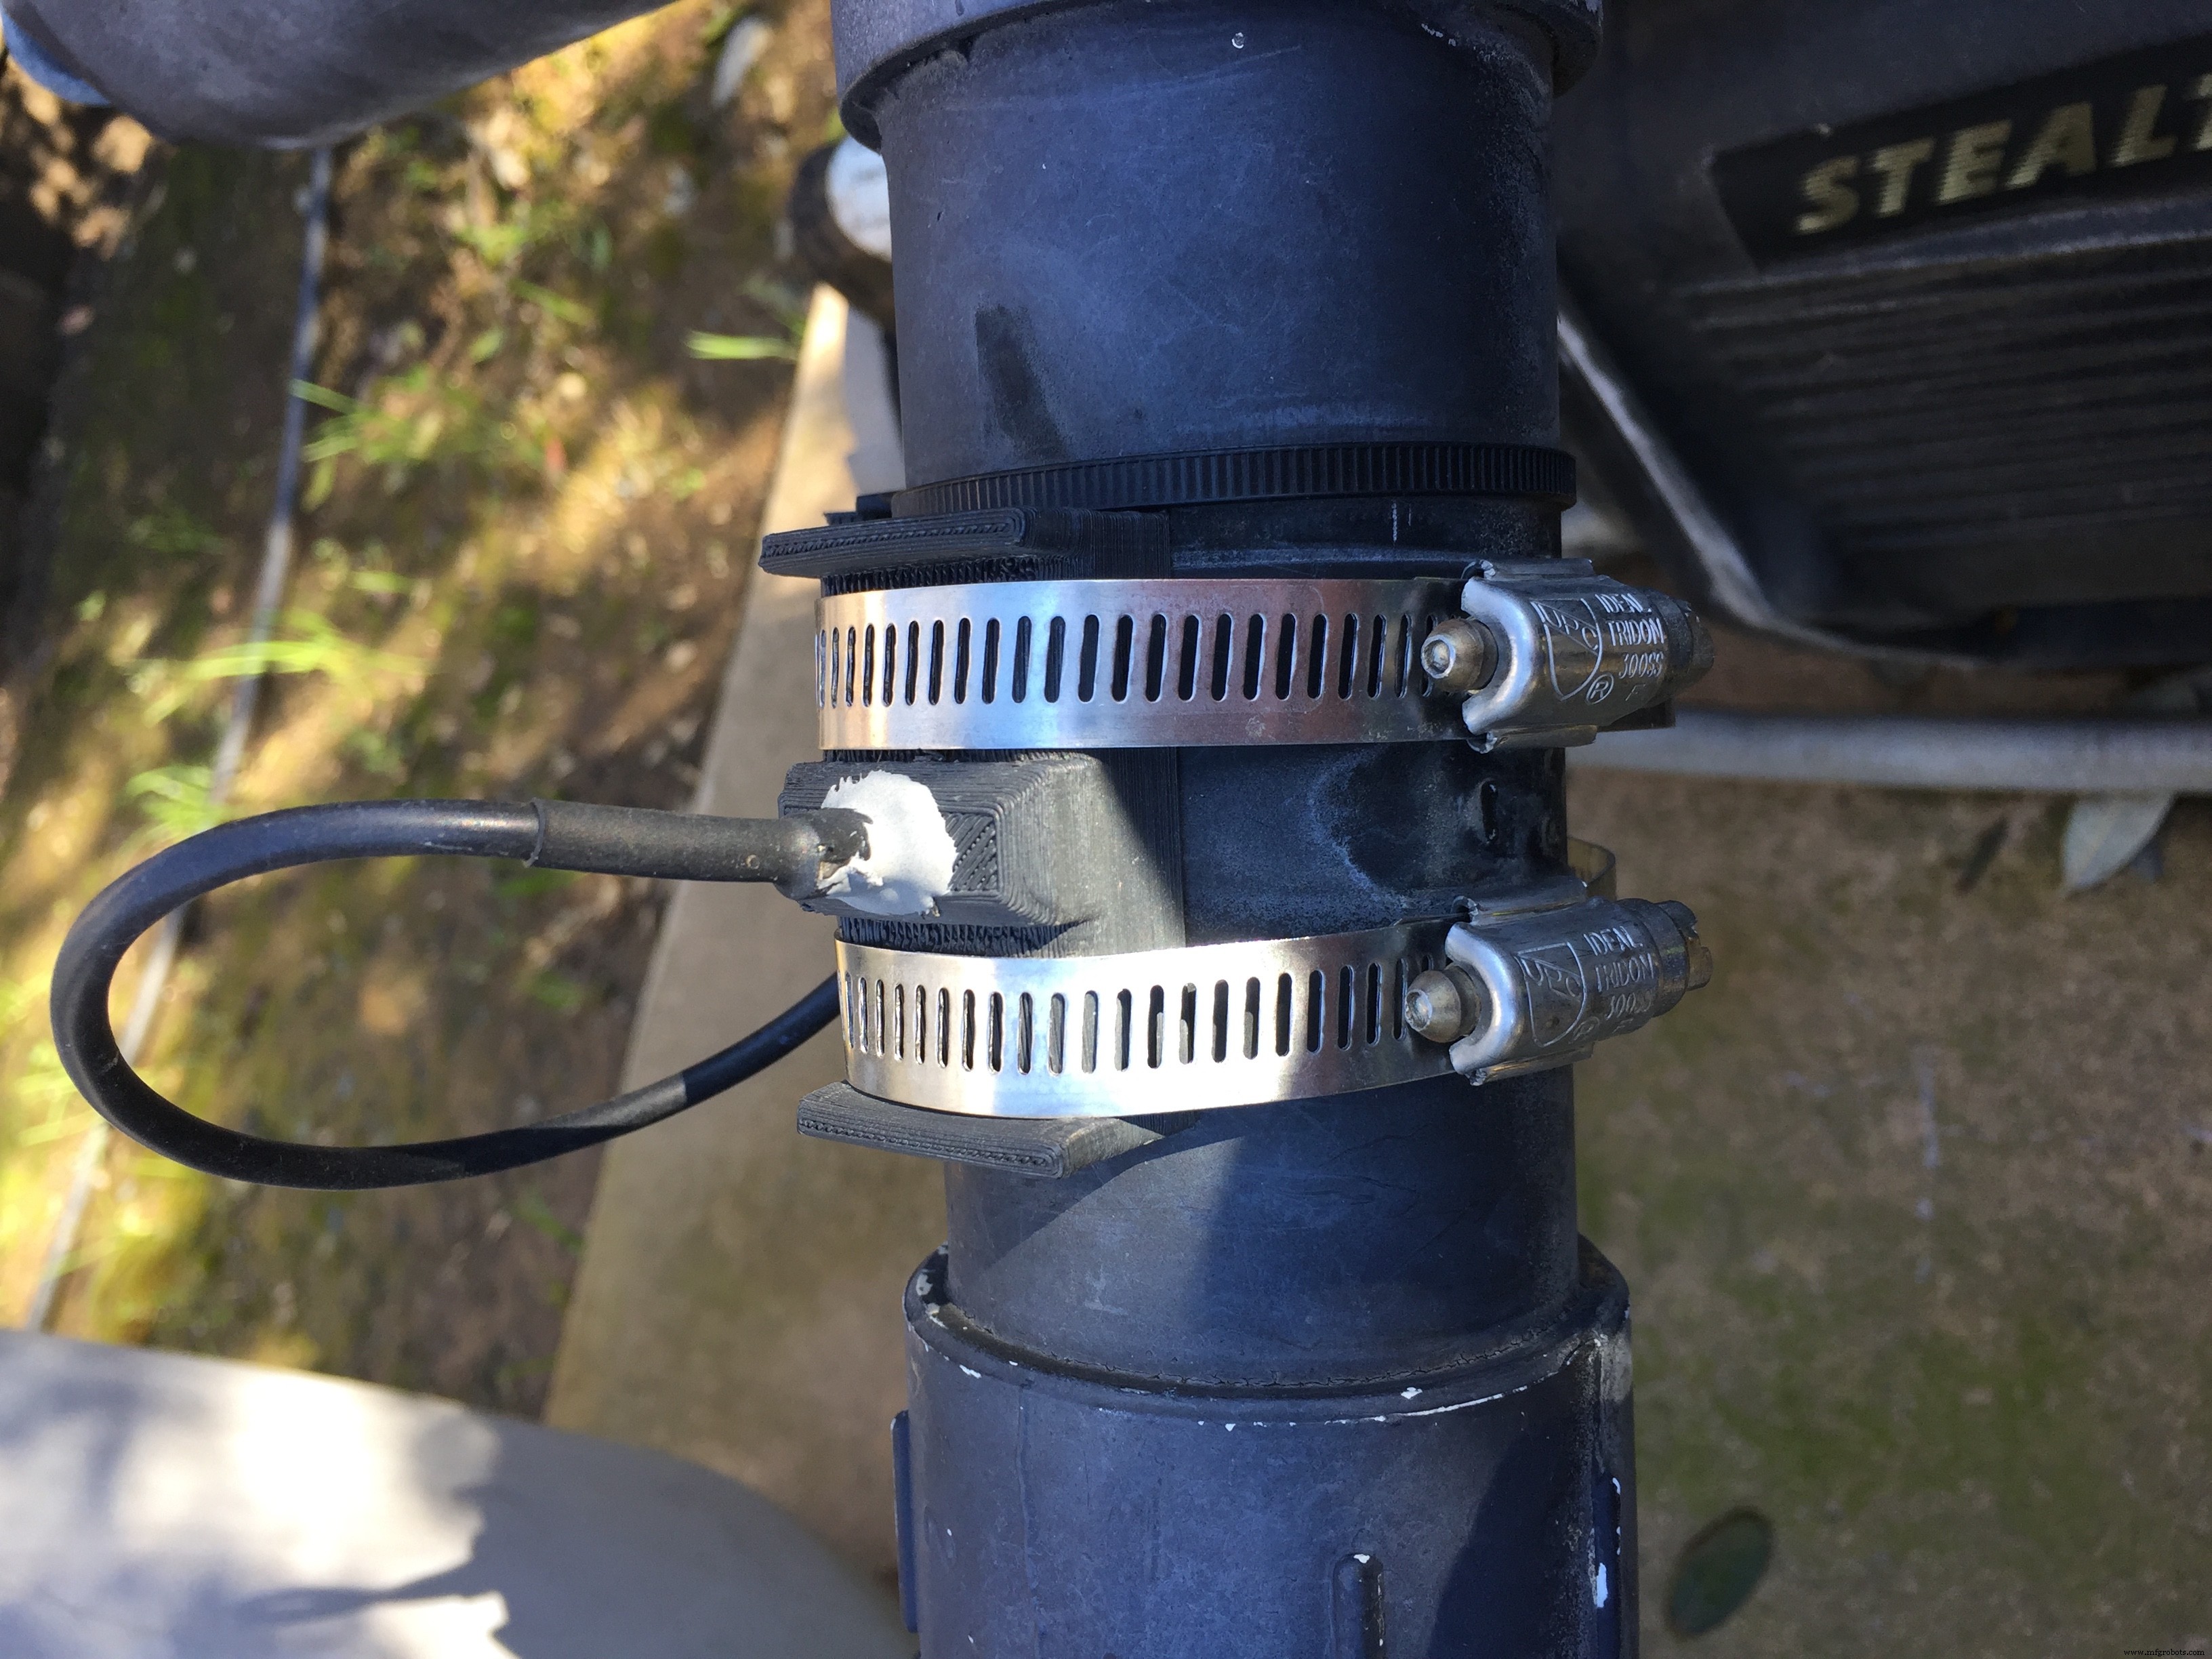
After waiting at least 24 hours for the JB Weld to dry, it was time to install the water temperature sensors.
IMPORTANT Note: Ensure that all pumps are off before attempting to install the water temperature sensors!
After ensuring that all water pumps are off, it is a good idea to open any valves that can remove water pressure from the area you are installing the water temperature sensors in. This will ease installation greatly (and keep you dry as well).
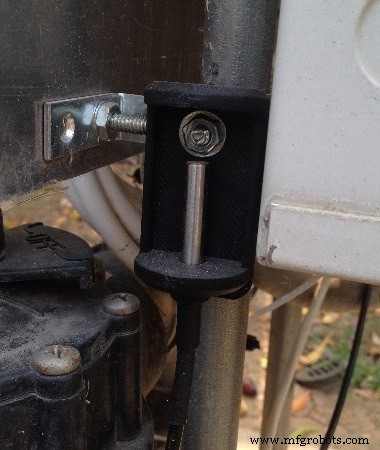
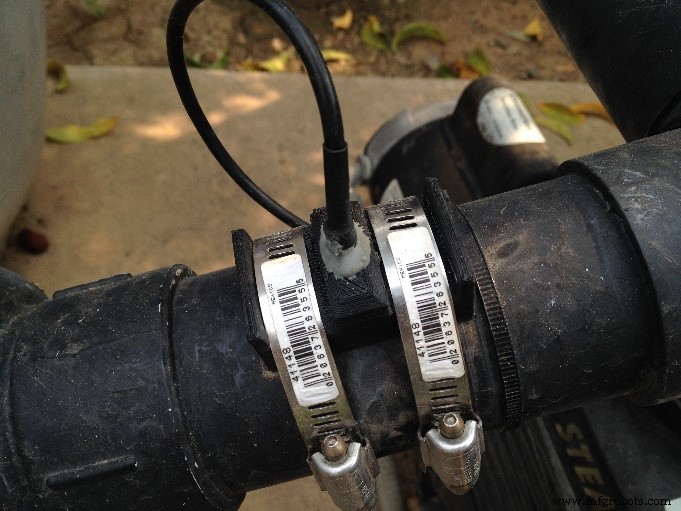
Drill a 5/16" hole in the pool piping. Install the water temperature sensor and utilize 2 clamps to firmly hold it in place. Do not make the same mistake I did and overtighten the clamps, over tightening will crush the sensor mount. Close valves and turn on pumps. Check for leaks.
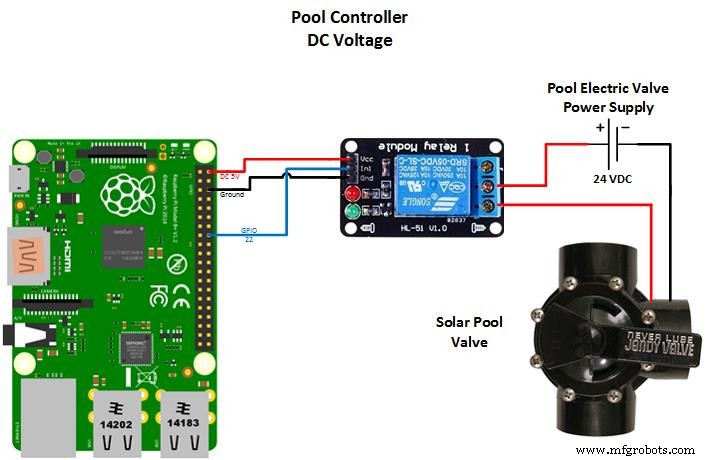
After having the temperature sensors in place, I could then design and install the Solar Water heater valve control. The Solar Heater utilizes DC voltage as opposed to the AC voltages used with the other pool components mentioned earlier. This required me to control a DC relay instead of an AC relay. The concept is similar, but the required relays are different. Ensure that the relays that you use for your project will control the correct type of voltages used by the device you are controlling.
This control allows me to direct pool water up to the Solar panels on my roof. I only want to direct water to the panels when the outside air temperature is above 60 degrees. Once water is being diverted to the panels, ensure that the returning water is at least 2 degrees warmer than the pool water. Otherwise, it is a waste of energy to pump the water to the panels.
The wiring and connections of this control is provided in the Pool Controller DC Components schematic.
Application DevelopmentAfter installing Windows 10IoT Core on my Raspberry Pi, I realized it has a built in web server that is used tomanage it. I wondered if this was a strippeddown version of IIS? If so, I could just writesome restful services on IIS and call them for this project. After many web searches and lots of research, it didn't appear to be possible. That approach would be one that I would prefer, but it doesn't seem feasible at this point in time.
Taking a different approach, I reviewed the example ”Blinky Web Server" and an article on ”Druss Blog”. I decided to build a headless Windows 10 IoT Core Background Application that acts as a simple HTTP Web Server responding to HTTP GET and POST requests.
Within a few days, I had a workingprototype. This gave me a lot of confidence that my project could be successful. So I decided to move forward with this architecture. After thoroughlytesting my code via the Visual Studio 2015 debugger, I was under the impression that I was could easily deploy myapplication.
Deploying the ApplicationThis is a point that I struggled with, so I hope to show you how to avoid such difficulty. Because my Application was thoroughly tested in the Visual Studio 2015 debugger, I was under the impression that I could just change the mode from Debug to Release to deploy my application. I tried this approach and it did in fact deploy my application and start it in Debug mode. I then stopped debug and attempted to run the application from AppX Manager. I had no success when I attempted this, I would just get a generic error that stated, "Application failed to initialize."
The solution to this issue is to delete the current deployment and then install the application from the AppX Manager instead. This cost me a lot of time, so I hope this helps you avoid that issue.
Even though the application ran flawlessly in Visual Studio 2015 debug mode, it would die after receiving the first HTTP request. I spent a lot of time trying to troubleshoot this and still do not know why this occurs.
Feeling pressure to get this project completed, I decided to change my project to be just like the “Blinky Web Server” example. In my implementation, I didn’t see the need for a Windows 10 IoT Core screen application due to the fact that I planned for the web server to control the GPIO pins and read the I2C interface (not a screen application). What I did in my project was to have the screen application start the web server. The Web Server then sends messages back to the screen application so I can see what HTTP call was received by my server. This approach seems to be rock solid and it’s exactly the same code I used in my original attempt.
User InterfaceFinally, I built an HTML control program that will run onvirtually any device. This allows me tonot only control the pool pump, waterfall and pool lights, but also monitor theadditional sensors from anywhere.
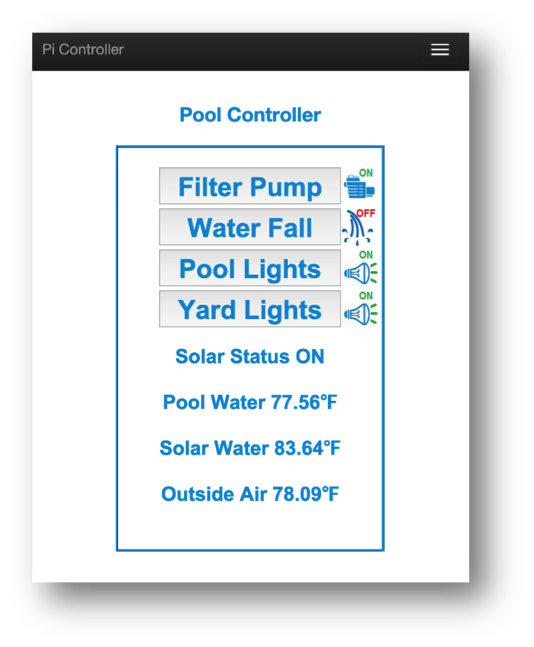
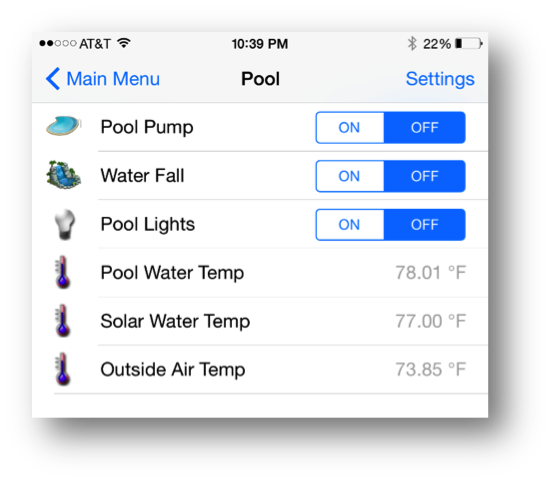
Later, I utilized OpenHAB and created a site map that gave methis additional interface.
I hope you enjoyed reading about my project as much as I didcreating it. Thank You.
YouTube, Vimeo or Vine link, and press Enter
Code
- Arduino Sketch for Temperature Sensors using I2C
- PoolWebServer - BackgroundTask.cs
- PoolWebServer - Devices.cs
- PoolWebServer - Sensors.cs
- PoolWebService- MainPage.xaml.cs
- PoolWebService - App.xaml.cs
- OpenHAB Sitemap
- OpenHAB Items
Arduino Sketch for Temperature Sensors using I2C Java
Code to read the DS18b20 temperature sensors and send data when requested over the I2C interface.#include <OneWire.h>
#include <DallasTemperature.h>
#include <Wire.h>
#define SLAVE_ADDRESS 0x40
//Define GPIO pin constants
const int POOL_PIN = 3;
const int SOLAR_PIN = 5;
const int OUTSIDE_PIN = 7;
//Define the length of our buffer for the I2C interface
const int I2C_BUFFER_LEN = 24; //IMPORTANT MAX is 32!!!
//Load OneWire - proprietary dallas semiconductor sensor protocol - no license required
OneWire poolTemp(POOL_PIN);
OneWire solarTemp(SOLAR_PIN);
OneWire outsideTemp(OUTSIDE_PIN);
//Load Dallas - proprietary dallas sensor protocol utilizing onewire - no license required
DallasTemperature poolSensor(&poolTemp);
DallasTemperature solarSensor(&solarTemp);
DallasTemperature outsideSensor(&outsideTemp);
//Define I2C buffer
char data[I2C_BUFFER_LEN];
String temperatureData;
//Define variable for timer
long prevMillis = 0;
long interval = 1000;
void setup(void) {
//Connect to temperature sensor buses
poolSensor.begin();
solarSensor.begin();
outsideSensor.begin();
//Start the I2C interface
Wire.begin(SLAVE_ADDRESS);
Wire.onRequest(requestEvent);
}
void loop(void) {
//Monitor time to read temperature sensors once every defined interval
//Don't read them faster than every 1 second. they can't respond that fast
unsigned long currMillis = millis();
if (currMillis - prevMillis > interval) {
prevMillis = currMillis;
readTemperatures();
}
}
void readTemperatures() {
//Read all three temperature sensors
poolSensor.requestTemperatures();
solarSensor.requestTemperatures();
outsideSensor.requestTemperatures();
//Store temperature data in a string
//We pad right to the full length of the buffer to make sure to overwrite old data
//Data is in the format "88.99|78.12|100.00" where "PoolTemp|SolarTemp|OutsideTemp"
temperatureData = padRight(String(poolSensor.getTempFByIndex(0)) + "|" +
String(solarSensor.getTempFByIndex(0)) + "|" +
String(outsideSensor.getTempFByIndex(0)), I2C_BUFFER_LEN);
}
String padRight(String inStr, int inLen) {
while (inStr.length() < inLen)
inStr = inStr + " ";
return inStr;
}
void requestEvent() {
//sends data over I2C in the format "88.99|78.12|100.00" where "PoolTemp|SolarTemp|OutsideTemp"
temperatureData.toCharArray(data,I2C_BUFFER_LEN);
Wire.write(data);
}
PoolWebServer - BackgroundTask.csC#
Defines the HTTP Server that responds to HTTP POST and GET requests// Copyright (c) Microsoft. All rights reserved.
using System;
using System.Collections.Generic;
using System.Linq;
using System.Text;
using System.Net.Http;
using Windows.Foundation.Collections;
using Windows.ApplicationModel.Background;
using Windows.ApplicationModel.AppService;
using Windows.System.Threading;
using Windows.Networking.Sockets;
using System.IO;
using Windows.Storage.Streams;
using System.Threading.Tasks;
using System.Runtime.InteropServices.WindowsRuntime;
using Windows.Foundation;
using Windows.Devices.Gpio;
namespace WebServerTask
{
public sealed class WebServerBGTask : IBackgroundTask
{
public void Run(IBackgroundTaskInstance taskInstance)
{
// Associate a cancellation handler with the background task.
taskInstance.Canceled += OnCanceled;
// Get the deferral object from the task instance
serviceDeferral = taskInstance.GetDeferral();
var appService = taskInstance.TriggerDetails as AppServiceTriggerDetails;
if (appService != null && appService.Name == "App2AppComService")
{
appServiceConnection = appService.AppServiceConnection;
appServiceConnection.RequestReceived += OnRequestReceived;
}
}
//Processes message resquests sent from PoolWebService App
private async void OnRequestReceived(AppServiceConnection sender, AppServiceRequestReceivedEventArgs args)
{
var message = args.Request.Message;
string command = message["Command"] as string;
switch (command)
{
case "Initialize":
{
Sensors.InitSensors();
Devices.InitDevices();
var messageDeferral = args.GetDeferral();
//Set a result to return to the caller
var returnMessage = new ValueSet();
//Define a new instance of our HTTPServer on Port 8888
HttpServer server = new HttpServer(8888, appServiceConnection);
IAsyncAction asyncAction = Windows.System.Threading.ThreadPool.RunAsync(
(workItem) =>
{ //Start the Sever
server.StartServer();
});
//Respond back to PoolWebService with a Status of Success
returnMessage.Add("Status", "Success");
var responseStatus = await args.Request.SendResponseAsync(returnMessage);
messageDeferral.Complete();
break;
}
case "Quit":
{
//Service was asked to quit. Give us service deferral
//so platform can terminate the background task
serviceDeferral.Complete();
break;
}
}
}
private void OnCanceled(IBackgroundTaskInstance sender, BackgroundTaskCancellationReason reason)
{
//Clean up and get ready to exit
}
BackgroundTaskDeferral serviceDeferral;
AppServiceConnection appServiceConnection;
}
//Class to define the HTTP WebServer
public sealed class HttpServer : IDisposable
{
//Create a buffer to read HTTP data
private const uint BufferSize = 8192;
//Port to listen on
private int port = 8888;
//Listener to
private readonly StreamSocketListener listener;
//Connection to send status information back to PoolControllerWebService
private AppServiceConnection appServiceConnection;
public HttpServer(int serverPort, AppServiceConnection connection)
{
listener = new StreamSocketListener();
port = serverPort;
appServiceConnection = connection;
//Add event handler for HTTP connections
listener.ConnectionReceived += (s, e) => ProcessRequestAsync(e.Socket);
}
//Call to start the listner
public void StartServer()
{
#pragma warning disable CS4014
listener.BindServiceNameAsync(port.ToString());
#pragma warning restore CS4014
}
public void Dispose()
{
listener.Dispose();
}
private async void ProcessRequestAsync(StreamSocket socket)
{
try
{
StringBuilder request = new StringBuilder();
//Get the incomming data
using (IInputStream input = socket.InputStream)
{
byte[] data = new byte[BufferSize];
IBuffer buffer = data.AsBuffer();
uint dataRead = BufferSize;
//Read all the incomming data
while (dataRead == BufferSize)
{
await input.ReadAsync(buffer, BufferSize, InputStreamOptions.Partial);
request.Append(Encoding.UTF8.GetString(data, 0, data.Length));
dataRead = buffer.Length;
}
}
//Got the data start processing a response
using (IOutputStream output = socket.OutputStream)
{
string requestMethod = request.ToString();
string[] requestParts = { "" };
if (requestMethod != null)
{
//Beakup the request into it parts
requestMethod = requestMethod.Split('\n')[0];
requestParts = requestMethod.Split(' ');
}
//We only respond HTTP GETS and POST methods
if (requestParts[0] == "GET")
await WriteGetResponseAsync(requestParts[1], output);
else if (requestParts[0] == "POST")
await WritePostResponseAsync(requestParts[1], output);
else
await WriteMethodNotSupportedResponseAsync(requestParts[1], output);
}
}
catch (Exception) { }
}
//Handles all HTTP GET's
private async Task WriteGetResponseAsync(string request, IOutputStream os)
{
bool urlFound = false;
byte[] bodyArray = null;
string responseMsg = "";
//See if the request it matches any of the valid requests urls and create the response message
switch (request.ToUpper())
{
case "/SENSORS/POOLTEMP":
responseMsg = Sensors.PoolTemperature;
urlFound = true;
break;
case "/SENSORS/SOLARTEMP":
responseMsg = Sensors.SolarTemperature;
urlFound = true;
break;
case "/SENSORS/OUTSIDETEMP":
responseMsg = Sensors.OutsideTemperature;
urlFound = true;
break;
case "/DEVICES/POOLPUMP/STATE":
responseMsg = Devices.PoolPumpState;
urlFound = true;
break;
case "/DEVICES/WATERFALLPUMP/STATE":
responseMsg = Devices.PoolWaterfallState;
urlFound = true;
break;
case "/DEVICES/POOLLIGHTS/STATE":
responseMsg = Devices.PoolLightsState;
urlFound = true;
break;
case "/DEVICES/YARDLIGHTS/STATE":
responseMsg = Devices.YardLightsState;
urlFound = true;
break;
case "/DEVICES/POOLSOLAR/STATE":
responseMsg = Devices.PoolSolarValveState;
urlFound = true;
break;
default:
urlFound = false;
break;
}
bodyArray = Encoding.UTF8.GetBytes(responseMsg);
await WriteResponseAsync(request.ToUpper(), responseMsg, urlFound, bodyArray, os);
}
//Handles all HTTP POST's
private async Task WritePostResponseAsync(string request, IOutputStream os)
{
bool urlFound = false;
byte[] bodyArray = null;
string responseMsg = "";
//See if the request it matches any of the valid requests urls and create the response message
switch (request.ToUpper())
{
case "/DEVICES/POOLPUMP/OFF":
Devices.PoolPumpPinValue = GpioPinValue.Low;
bodyArray = Encoding.UTF8.GetBytes("OFF");
responseMsg = "OFF";
urlFound = true;
break;
case "/DEVICES/POOLPUMP/ON":
Devices.PoolPumpPinValue = GpioPinValue.High;
bodyArray = Encoding.UTF8.GetBytes("ON");
responseMsg = "ON";
urlFound = true;
break;
case "/DEVICES/WATERFALLPUMP/OFF":
Devices.PoolWaterfallPinValue = GpioPinValue.Low;
bodyArray = Encoding.UTF8.GetBytes("OFF");
responseMsg = "OFF";
urlFound = true;
break;
case "/DEVICES/WATERFALLPUMP/ON":
Devices.PoolWaterfallPinValue = GpioPinValue.High;
bodyArray = Encoding.UTF8.GetBytes("ON");
responseMsg = "ON";
urlFound = true;
break;
case "/DEVICES/POOLLIGHTS/OFF":
Devices.PoolLightsPinValue = GpioPinValue.Low;
bodyArray = Encoding.UTF8.GetBytes("OFF");
responseMsg = "OFF";
urlFound = true;
break;
case "/DEVICES/POOLLIGHTS/ON":
Devices.PoolLightsPinValue = GpioPinValue.High;
bodyArray = Encoding.UTF8.GetBytes("ON");
responseMsg = "OFF";
urlFound = true;
break;
case "/DEVICES/YARDLIGHTS/OFF":
Devices.YardLightsPinValue = GpioPinValue.Low;
bodyArray = Encoding.UTF8.GetBytes("OFF");
responseMsg = "OFF";
urlFound = true;
break;
case "/DEVICES/YARDLIGHTS/ON":
Devices.YardLightsPinValue = GpioPinValue.High;
bodyArray = Encoding.UTF8.GetBytes("ON");
responseMsg = "OFF";
urlFound = true;
break;
case "/DEVICES/POOLSOLAR/OFF":
Devices.PoolSolarValvePinValue = GpioPinValue.Low;
bodyArray = Encoding.UTF8.GetBytes("OFF");
responseMsg = "OFF";
urlFound = true;
break;
case "/DEVICES/POOLSOLAR/ON":
Devices.PoolSolarValvePinValue = GpioPinValue.High;
bodyArray = Encoding.UTF8.GetBytes("ON");
responseMsg = "ON";
urlFound = true;
break;
default:
bodyArray = Encoding.UTF8.GetBytes("");
urlFound = false;
break;
}
await WriteResponseAsync(request.ToUpper(), responseMsg, urlFound,bodyArray, os);
}
//Write the response for unsupported HTTP methods
private async Task WriteMethodNotSupportedResponseAsync(string request, IOutputStream os)
{
bool urlFound = false;
byte[] bodyArray = null;
bodyArray = Encoding.UTF8.GetBytes("");
await WriteResponseAsync(request.ToUpper(), "NOT SUPPORTED", urlFound, bodyArray, os);
}
//Write the response for HTTP GET's and POST's
private async Task WriteResponseAsync(string RequestMsg, string ResponseMsg, bool urlFound, byte[] bodyArray, IOutputStream os)
{
try //The appService will die after a day or so. Let's try catch it seperatly so the http server will still respond
{
var updateMessage = new ValueSet();
updateMessage.Add("Request", RequestMsg);
updateMessage.Add("Response", ResponseMsg);
var responseStatus = await appServiceConnection.SendMessageAsync(updateMessage);
}
catch (Exception) {}
try
{
MemoryStream bodyStream = new MemoryStream(bodyArray);
using (Stream response = os.AsStreamForWrite())
{
string header = GetHeader(urlFound, bodyStream.Length.ToString());
byte[] headerArray = Encoding.UTF8.GetBytes(header);
await response.WriteAsync(headerArray, 0, headerArray.Length);
if (urlFound)
await bodyStream.CopyToAsync(response);
await response.FlushAsync();
}
}
catch(Exception) {}
}
//Creates the HTTP header text for found and not found urls
string GetHeader(bool urlFound, string bodyStreamLength)
{
string header;
if (urlFound)
{
header = "HTTP/1.1 200 OK\r\n" +
"Access-Control-Allow-Origin: *\r\n" +
"Content-Type: text/plain\r\n" +
"Content-Length: " + bodyStreamLength + "\r\n" +
"Connection: close\r\n\r\n";
}
else
{
header = "HTTP/1.1 404 Not Found\r\n" +
"Access-Control-Allow-Origin: *\r\n" +
"Content-Type: text/plain\r\n" +
"Content-Length: 0\r\n" +
"Connection close\r\n\r\n";
}
return header;
}
}
}
PoolWebServer - Devices.csC#
Class the defines all devices and what GPIO pins they are connected tousing System;
using System.Collections.Generic;
using System.Linq;
using System.Text;
using System.Threading.Tasks;
using Windows.Devices.Gpio;
namespace WebServerTask
{
//Class the defines all devices and what GPIO pins they are connected to.
public static class Devices
{
//Define the GPIO pins numbers
private const int POOL_PUMP_PIN = 12;
private const int POOL_WATERFALL_PIN = 13;
private const int POOL_LIGHTS_PIN = 16;
private const int YARD_LIGHTS_PIN = 18;
private const int POOL_SOLAR_VALVE_PIN = 22;
//Define the GPIO pins
private static GpioPin poolPumpPin;
private static GpioPin poolWaterfallPin;
private static GpioPin poolLightsPin;
private static GpioPin yardLightsPin;
private static GpioPin poolSolarValvePin;
//Property for GPIO Pin assigned to the Pool Pump
public static GpioPinValue PoolPumpPinValue
{
get
{
return poolPumpPin.Read(); //Read the Pin returns High or Low
}
set
{
if (poolPumpPin.Read() != value) //Only set the pin if is changing
poolPumpPin.Write(value);
}
}
//Property to read status of the Pool Pump ON or OFF
public static string PoolPumpState
{
get
{
return GetState(PoolPumpPinValue, GpioPinValue.High); //Get the state
}
}
//Property for GPIO Pin assigned to the Waterfall Pump
public static GpioPinValue PoolWaterfallPinValue
{
get
{
return poolWaterfallPin.Read();
}
set
{
if (poolWaterfallPin.Read() != value)
poolWaterfallPin.Write(value);
}
}
//Property to read status of the Waterfall Pump ON or OFF
public static string PoolWaterfallState
{
get
{
return GetState(PoolWaterfallPinValue, GpioPinValue.High);
}
}
//Property for GPIO Pin assigned to the Pool Lights
public static GpioPinValue PoolLightsPinValue
{
get
{
return poolLightsPin.Read();
}
set
{
if (poolLightsPin.Read() != value)
poolLightsPin.Write(value);
}
}
//Property to read status of the Pool Lights ON or OFF
public static string PoolLightsState
{
get
{
return GetState(PoolLightsPinValue, GpioPinValue.High);
}
}
//Property for GPIO Pin assigned to the valve to turn Solar on and off
public static GpioPinValue PoolSolarValvePinValue
{
get
{
return poolSolarValvePin.Read();
}
set
{
if (poolSolarValvePin.Read() != value)
poolSolarValvePin.Write(value);
}
}
//Property to read status of the Solar valve ON or OFF
public static string PoolSolarValveState
{
get
{
return GetState(PoolSolarValvePinValue, GpioPinValue.High);
}
}
//Property for GPIO Pin assigned to the Yard Lights
public static GpioPinValue YardLightsPinValue
{
get
{
return yardLightsPin.Read();
}
set
{
if (yardLightsPin.Read() != value)
yardLightsPin.Write(value);
}
}
//Property to read status of the Yard Lights ON or OFF
public static string YardLightsState
{
get
{
return GetState(YardLightsPinValue, GpioPinValue.High);
}
}
//Intialize all GPIO pin used
public static void InitDevices()
{
var gpio = GpioController.GetDefault();
if (gpio != null)
{
//These pins are on an active high relay. We set everything to OFF when we start
poolPumpPin = gpio.OpenPin(POOL_PUMP_PIN);
poolPumpPin.Write(GpioPinValue.Low);
poolPumpPin.SetDriveMode(GpioPinDriveMode.Output);
poolWaterfallPin = gpio.OpenPin(POOL_WATERFALL_PIN);
poolWaterfallPin.Write(GpioPinValue.Low);
poolWaterfallPin.SetDriveMode(GpioPinDriveMode.Output);
poolLightsPin = gpio.OpenPin(POOL_LIGHTS_PIN);
poolLightsPin.Write(GpioPinValue.Low);
poolLightsPin.SetDriveMode(GpioPinDriveMode.Output);
yardLightsPin = gpio.OpenPin(YARD_LIGHTS_PIN);
yardLightsPin.Write(GpioPinValue.Low);
yardLightsPin.SetDriveMode(GpioPinDriveMode.Output);
poolSolarValvePin = gpio.OpenPin(POOL_SOLAR_VALVE_PIN);
poolSolarValvePin.Write(GpioPinValue.Low);
poolSolarValvePin.SetDriveMode(GpioPinDriveMode.Output);
}
}
//Gets the state of a device based upon it ActiveState
//ActiveState means what required to turn the device on High or Low on the GPIO pin
private static string GetState(GpioPinValue value, GpioPinValue ActiveState)
{
string state = "OFF";
if (value == ActiveState)
state = "ON";
return state;
}
}
}
PoolWebServer - Sensors.csC#
Class that defines all temperature sensors and the I2C interface used to read themusing System;
using System.Collections.Generic;
using System.Linq;
using System.Text;
using System.Threading;
using System.Threading.Tasks;
using Windows.Devices.Enumeration;
using Windows.Devices.I2c;
namespace WebServerTask
{
//Class that defines all temperature sensors and the I2C interface used to read them them
public static class Sensors
{
private static I2cDevice Device;
private static Timer periodicTimer;
//How often to read temperature data from the Arduino Mini Pro
private static int ReadInterval = 4000; //4000 = 4 seconds
//Variables to hold temperature data
private static string poolTemperature = "--.--";
private static string solarTemperature = "--.--";
private static string outsideTemperature = "--.--";
//Property to expose the Temperature Data
public static string PoolTemperature
{
get
{ //Lock the variable incase the timer is tring to write to it
lock (poolTemperature)
{
return poolTemperature;
}
}
set
{ //Lock the variable incase the HTTP Server is tring to read from it
lock (poolTemperature)
{
poolTemperature = value;
}
}
}
//Property to expose the Temperature Data
public static string SolarTemperature
{
get
{ //Lock the variable incase the timer is tring to write to it
lock (solarTemperature)
{
return solarTemperature;
}
}
set
{ //Lock the variable incase the HTTP Server is tring to read from it
lock (solarTemperature)
{
solarTemperature = value;
}
}
}
//Property to expose the Temperature Data
public static string OutsideTemperature
{
get
{ //Lock the variable incase the timer is tring to write to it
lock (outsideTemperature)
{
return outsideTemperature;
}
}
set
{ //Lock the variable incase the HTTP Server is tring to read from it
lock (outsideTemperature)
{
outsideTemperature = value;
}
}
}
//Initilizes the I2C connection and starts the timer to read I2C Data
async public static void InitSensors()
{
//Set up the I2C connection the Arduino
var settings = new I2cConnectionSettings(0x40); // Arduino address
settings.BusSpeed = I2cBusSpeed.StandardMode;
string aqs = I2cDevice.GetDeviceSelector("I2C1");
var dis = await DeviceInformation.FindAllAsync(aqs);
Device = await I2cDevice.FromIdAsync(dis[0].Id, settings);
//Create a timer to periodicly read the temps from the Arduino
periodicTimer = new Timer(Sensors.TimerCallback, null, 0, ReadInterval);
}
//Handle the time call back
private static void TimerCallback(object state)
{
byte[] RegAddrBuf = new byte[] { 0x40 };
byte[] ReadBuf = new byte[24];
//Read the I2C connection
try
{
Device.Read(ReadBuf); // read the data
}
catch (Exception) { }
//Parse the response
//Data is in the format "88.99|78.12|100.00" where "PoolTemp|SolarTemp|OutsideTemp"
char[] cArray = System.Text.Encoding.UTF8.GetString(ReadBuf, 0, 23).ToCharArray(); // Converte Byte to Char
String c = new String(cArray).Trim();
string[] data = c.Split('|');
//Write the data to temperature variables
try
{
if (data[0].Trim() != "")
PoolTemperature = data[0];
if (data[1].Trim() != "")
SolarTemperature = data[1];
if (data[2].Trim() != "")
OutsideTemperature = data[2];
}
catch (Exception) { }
}
}
}
PoolWebService- MainPage.xaml.csC#
Main page of app that starts the WebServer// Copyright (c) Microsoft. All rights reserved.
using System;
using Windows.ApplicationModel.AppService;
using Windows.Devices.Gpio;
using Windows.Foundation.Collections;
using Windows.UI.Core;
using Windows.UI.Xaml.Controls;
using Windows.UI.Xaml.Media;
namespace PoolWebService
{
public sealed partial class MainPage : Page
{
AppServiceConnection appServiceConnection;
public MainPage()
{
InitializeComponent();
InitializeAppSvc();
}
private async void InitializeAppSvc()
{
string WebServerStatus = "PoolWebServer failed to start. AppServiceConnectionStatus was not successful.";
// Initialize the AppServiceConnection
appServiceConnection = new AppServiceConnection();
appServiceConnection.PackageFamilyName = "PoolWebServer_hz258y3tkez3a";
appServiceConnection.AppServiceName = "App2AppComService";
// Send a initialize request
var res = await appServiceConnection.OpenAsync();
if (res == AppServiceConnectionStatus.Success)
{
var message = new ValueSet();
message.Add("Command", "Initialize");
var response = await appServiceConnection.SendMessageAsync(message);
if (response.Status != AppServiceResponseStatus.Success)
{
WebServerStatus = "PoolWebServer failed to start.";
throw new Exception("Failed to send message");
}
appServiceConnection.RequestReceived += OnMessageReceived;
WebServerStatus = "PoolWebServer started.";
}
await Dispatcher.RunAsync(CoreDispatcherPriority.Normal, () =>
{
txtWebServerStatus.Text = WebServerStatus;
});
}
private async void OnMessageReceived(AppServiceConnection sender, AppServiceRequestReceivedEventArgs args)
{
var message = args.Request.Message;
string msgRequest = message["Request"] as string;
string msgResponse = message["Response"] as string;
await Dispatcher.RunAsync(CoreDispatcherPriority.Normal, () =>
{
txtRequest.Text = msgRequest;
txtResponse.Text = msgResponse;
});
}
}
}
PoolWebService - App.xaml.csC#
// Copyright (c) Microsoft. All rights reserved.


using System;
using System.Collections.Generic;
using System.IO;
using System.Linq;
using System.Runtime.InteropServices.WindowsRuntime;
using Windows.ApplicationModel;
using Windows.ApplicationModel.Activation;
using Windows.Foundation;
using Windows.Foundation.Collections;
using Windows.UI.Xaml;
using Windows.UI.Xaml.Controls;
using Windows.UI.Xaml.Controls.Primitives;
using Windows.UI.Xaml.Data;
using Windows.UI.Xaml.Input;
using Windows.UI.Xaml.Media;
using Windows.UI.Xaml.Navigation;

namespace PoolWebService
{
    /// <summary>
    /// Provides application-specific behavior to supplement the default Application class.
    /// </summary>
    sealed partial class App : Application
    {
        /// <summary>
        /// Initializes the singleton application object.  This is the first line of authored code
        /// executed, and as such is the logical equivalent of main() or WinMain().
        /// </summary>
        public App()
        {
            InitializeComponent();
            Suspending += OnSuspending;
        }

        /// <summary>
        /// Invoked when the application is launched normally by the end user.  Other entry points
        /// will be used such as when the application is launched to open a specific file.
        /// </summary>
        /// <param name="e">Details about the launch request and process.</param>
        protected override void OnLaunched(LaunchActivatedEventArgs e)
        {

#if DEBUG
            if (System.Diagnostics.Debugger.IsAttached)
            {
                DebugSettings.EnableFrameRateCounter = true;
            }
#endif

            Frame rootFrame = Window.Current.Content as Frame;

            // Do not repeat app initialization when the Window already has content,
            // just ensure that the window is active
            if (rootFrame == null)
            {
                // Create a Frame to act as the navigation context and navigate to the first page
                rootFrame = new Frame();
                // Set the default language
                rootFrame.Language = Windows.Globalization.ApplicationLanguages.Languages[0];

                rootFrame.NavigationFailed += OnNavigationFailed;

                if (e.PreviousExecutionState == ApplicationExecutionState.Terminated)
                {
                    //TODO: Load state from previously suspended application
                }

                // Place the frame in the current Window
                Window.Current.Content = rootFrame;
            }

            if (rootFrame.Content == null)
            {
                // When the navigation stack isn't restored navigate to the first page,
                // configuring the new page by passing required information as a navigation
                // parameter
                rootFrame.Navigate(typeof(MainPage), e.Arguments);
            }
            // Ensure the current window is active
            Window.Current.Activate();
        }

        /// <summary>
        /// Invoked when Navigation to a certain page fails
        /// </summary>
        /// <param name="sender">The Frame which failed navigation</param>
        /// <param name="e">Details about the navigation failure</param>
        void OnNavigationFailed(object sender, NavigationFailedEventArgs e)
        {
            throw new Exception("Failed to load Page " + e.SourcePageType.FullName);
        }

        /// <summary>
        /// Invoked when application execution is being suspended.  Application state is saved
        /// without knowing whether the application will be terminated or resumed with the contents
        /// of memory still intact.
        /// </summary>
        /// <param name="sender">The source of the suspend request.</param>
        /// <param name="e">Details about the suspend request.</param>
        private void OnSuspending(object sender, SuspendingEventArgs e)
        {
            var deferral = e.SuspendingOperation.GetDeferral();
            //TODO: Save application state and stop any background activity
            deferral.Complete();
        }
    }
}
OpenHAB SitemapJavaScript
Sample sitemap used in openHAB configurationsitemap default label="Windows 10 IoT"
{
Frame label=""
{
Text label="Pool" icon="swimmingpool" {
Switch item=PoolPump mappings=[ON="ON", OFF="OFF"]
Switch item=WaterFall mappings=[ON="ON", OFF="OFF"]
Switch item=PoolLights mappings=[ON="ON", OFF="OFF"]
Text item=pooltemp
Text item=solartemp
Text item=outsidetemp
}
}
}
OpenHAB ItemsPlain text
Sample items openHAB configurationSwitch PoolPump "Pool Pump" <swimmingpool> (grp1) {http=">[ON:POST:http://<YOUR_IP_ADDRESS_AND_PORT>/DEVICES/POOLPUMP/ON] >[OFF:POST:http://<YOUR_IP_ADDRESS_AND_PORT>/DEVICES/POOLPUMP/OFF] <[http://<YOUR_IP_ADDRESS_AND_PORT>/DEVICES/POOLPUMP/STATE:1500:REGEX((.*?))]", autoupdate="true"}
Switch WaterFall "Water Fall" <waterfall> (grp1) {http=">[ON:POST:http://<YOUR_IP_ADDRESS_AND_PORT>/DEVICES/WATERFALLPUMP/ON] >[OFF:POST:http://<YOUR_IP_ADDRESS_AND_PORT>/DEVICES/WATERFALLPUMP/OFF] <[http://<YOUR_IP_ADDRESS_AND_PORT>/DEVICES/WATERFALLPUMP/STATE:1500:REGEX((.*?))]", autoupdate="true"}
Switch PoolLights "Pool Lights" (grp1) {http=">[ON:POST:http://<YOUR_IP_ADDRESS_AND_PORT>/DEVICES/POOLLIGHTS/ON] >[OFF:POST:http://<YOUR_IP_ADDRESS_AND_PORT>/DEVICES/POOLLIGHTS/OFF] <[http://<YOUR_IP_ADDRESS_AND_PORT>/DEVICES/POOLLIGHTS/STATE:1500:REGEX((.*?))]", autoupdate="true"}
Number pooltemp "Pool Water Temp [%.2f F]" <temperature> (grp1) {http="<[http://<YOUR_IP_ADDRESS_AND_PORT>/SENSORS/POOLTEMP:30000:REGEX((.*?))]"}
Number solartemp "Solar Water Temp [%.2f F]" <temperature> (grp1) {http="<[http://<YOUR_IP_ADDRESS_AND_PORT>/SENSORS/SOLARTEMP:30000:REGEX((.*?))]"}
Number outsidetemp "Outside Air Temp [%.2f F]" <temperature> (grp1) {http="<[http://<YOUR_IP_ADDRESS_AND_PORT>/SENSORS/OUTSIDETEMP:30000:REGEX((.*?))]"}
GitHub project repository
Full Visual Studio 2015 Pool Controller projecthttps://github.com/mmackes/Windows-10-IoT-PoolControllerCustom parts and enclosures
Mount to hold DS18B20 waterproof sensor to monitor air temperatureMount to hold DS18B20 waterproof sensor on to standard pool pipingEnclosure for Raspberry Pi and RelaysEnclosure for Raspberry Pi and RelaysSchematics
Schematic showing how to connect Raspberry Pi to AC relays. Controls pool pump, waterfall, pool lights and AC yard lights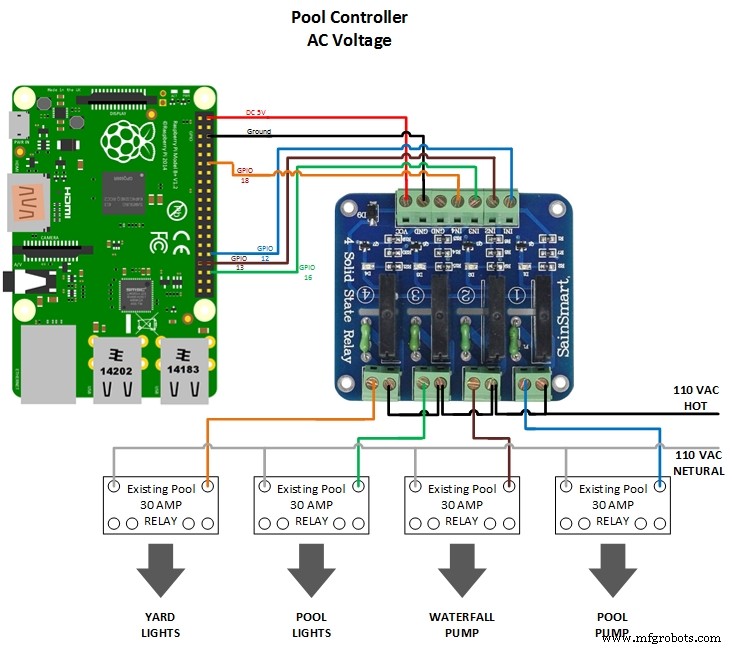 Schematic showing how to connect Raspberry Pi to DC relay. Controls the solar water valve.
 Schematic showing how to connect Raspberry Pi to Arduino Mini Pro and temperature sensors. Monitors pool water, solar heater water and outside air temperatures.
Manufacturing process
- Comprehensive Guide to In‑Ground and Above‑Ground Swimming Pool Design & Construction
- Pool Table – Design, History, and Construction Standards
- Build a 433 MHz Smart Home Controller with Sensorflare and Raspberry Pi
- Build a Professional Raspberry Pi Universal Remote with LIRC
- Converting RF to DC with a Raspberry Pi: Building and Troubleshooting an Envelope Detector
- Cycle Chaser: Transform Your Bike into a Nighttime Light Show with Raspberry Pi
- Build a Raspberry Pi‑Based Thief Detector – Step‑by‑Step Guide
- Build a Raspberry Pi Home Temperature Monitor with MCP9808, InfluxDB & Grafana
- Build a Raspberry Pi‑Powered Home Automation System for Remote Control
- DIY Wall‑E Inspired Raspberry Pi CD‑Box Robot