


Surfboard Construction and Design: From Polynesian Roots to Modern Innovation
Background
A surfboard is the essential tool for surfing, enabling a rider to glide on the face of a breaking wave. Standard dimensions range from 18–24 inches (46–61 cm) in width to 72–120 inches (183–305 cm) in length, with thicknesses that vary by style. The core is a lightweight, buoyant polyurethane foam, wrapped in a hard fiberglass shell. Riders lie face‑down, paddle into the swell, then launch onto an incoming wave, standing up as the board rides the wave’s face. Variants such as sail‑boards—equipped with a mast and sail for wind surfing—and body‑boards—shorter and ridden prone—expand the sport’s versatility.
Surfing traces its origins to Polynesia as early as A.D. 400. Polynesian Hawaiians introduced the sport to the islands, carving wooden boards from native trees, finishing them with plant oils. The largest traditional boards, called ‘olos, measured 144–240 inches (3.6–6 m) and weighed up to 200 pounds (91 kg). In the 1920s–1930s, experimentation with hollow designs and redwood or balsa laminates reduced weight while maintaining strength.
The first fiberglass board appeared in 1946, featuring two molded halves with a redwood stringer. Bob Simmons pioneered the 1949 prototype with a styrofoam core sandwiched between plywood veneers and resin.
Modern surfboard manufacturing began in 1958 when Hobie Alter introduced polyurethane foam cores, later pairing them with polyester resin fiberglass shells—an approach that remains standard today.
Raw Materials
Typical boards consist of a rigid polyurethane foam core and a fiberglass cloth exterior bonded with polyester resin. When a stringer is used, it is often made of redwood, basswood, or spruce, though colored fiberglass stringers are also available. The fin (or skeg) is usually constructed from wood or laminated fiberglass‑resin layers.
Design
Design has evolved through constant experimentation. While the 1960s saw a brief push toward standardized, mass‑produced boards, most boards are still hand‑crafted by skilled builders. Over the past four decades, board lengths have fluctuated, and fin configurations have shifted from single to twin, triple, and even multi‑fin layouts, each iteration aiming to enhance maneuverability. Some builders incorporate lengthwise channels on the bottom to improve stability.
Today, builders experiment with channel geometry, rocker profiles, and rocker‑edge combinations to deliver the “perfect board.” Advanced surfers may carry five to ten boards tailored to their style and local surf conditions.
The Manufacturing Process
Most surfboards are built one at a time in small workshops. While techniques vary, the following steps represent a typical workflow.
Forming the Foam Core
- 1. The foam core, or blank, is cast in a two‑half cement mold lined with special paper to prevent sticking. The mold is heated, and liquid polyurethane chemicals are poured in. Heat initiates a chemical reaction that produces a dense, white foam—known in the trade as “blowing the blank.” After 25 minutes, the mold opens and the core is removed, then allowed to finish hardening.
Adding the Stringer
- 2. Once hardened, the core is bisected vertically. A thin stringer is glued between the halves and clamped to dry, providing stiffness and preventing split.
Shaping the Blank
- 3. Using a wooden template, the builder traces the board outline onto the core, then cuts it with a saber saw. The bottom is planed with a power planer, smoothed, and contoured to the desired shape. The board is flipped, the top is shaped, and ridges are removed with a power sander. The stringer is hand‑planed, the rails are shaped with rough sandpaper, and the blank is fine‑sanded. The fin pocket is marked and the builder signs the board with a unique design or signature.
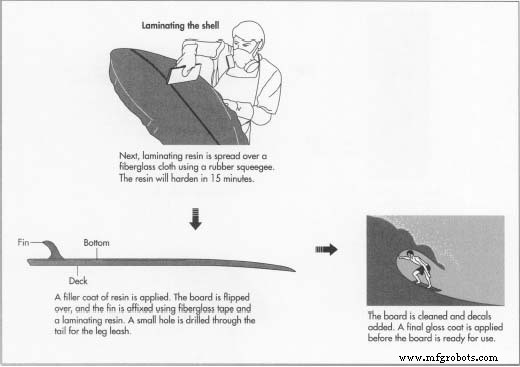
Laminating the Outer Shell
- 4. The blank is cleaned with compressed air. If a color or graphic is desired, acrylic paint is sprayed or air‑brushed onto the foam. Fiberglass cloth is then cut to fit. The deck is laminated first using a polyester resin mixed with a catalyst, initiating a 15‑minute curing cycle. Resin is spread evenly with a rubber squeegee—this is called “glassing.” After the deck is cured, the process repeats on the bottom, followed by a second deck layer for added strength and wear resistance.
Applying the Filler Coat and Adding the Fin
- 5. A second resin coat, known as the filler coat or sanding resin, fills any imperfections. The deck is coated first, then the board is flipped. The fin is secured with fiberglass tape and laminating resin, and a filler coat is applied to both the bottom and fin. Once dry, a small hole is drilled in the tail to attach a leg leash—an elastic cord that prevents the board from drifting away when a surfer falls.
Sanding the Board
- 6. Excess resin is removed with a power sander for large surfaces and hand‑sanded for rails and sharp contours to protect the fiberglass layer.
Final Finishing
- 7. The board is blown clean of sanding dust. Decals or color graphics may be added. A final gloss resin is brushed on, mixed with a catalyst, and cures in 15 minutes. The board then rests for at least 12 hours to fully harden. Optionally, the board is wet‑sanded with fine sandpaper, rubbed, buffed, and polished to a high shine.
Quality Control
Inspection occurs at multiple stages: after mold release to detect voids, during shaping to catch imperfections, and after finishing to ensure the board meets the builder’s standards.
Toxic Materials and Safety Considerations
Surfboard construction involves hazardous chemicals. Polyurethane foam precursors are toxic and flammable, requiring explosion‑proof fume extraction, controlled temperature, and humidity. Foam dust from shaping can irritate the lungs—dust masks are mandatory. Resin fumes from laminating are poisonous; respirators are essential during glassing. Proper safety gear and ventilation are non‑negotiable for all builders.
The Future
Innovation continues to reshape surfboard manufacturing. Computer‑aided design (CAD) systems allow builders to model boards in 3‑D, adjust dimensions, and print precise templates—greatly accelerating the design cycle. Some artisans now experiment with styrofoam cores and epoxy resins, achieving lighter weight, greater strength, and lower toxic fumes, though these materials raise cost and processing complexity. Graphite fiber reinforcement offers superior stiffness but limits color options to black and further increases cost.
Emerging technologies such as CNC shaping machines can process a blank in about 25 minutes versus several hours of hand shaping, but the high upfront cost and need for reprogramming limit widespread adoption. Mold‑based duplication methods can produce a board in roughly 4.5 hours but also rely on an existing board as a template.
Despite these advances, demand for custom‑built boards at reasonable prices is expected to persist, ensuring that small, artisanal surfboard shops remain the primary source for high‑quality boards.
Manufacturing process
- Ironing Board Manufacturing: Design, Materials, and Production Process
- Printed Circuit Boards: Design, Manufacture, and Future Trends
- RasPiRobot Board V2: Expand Your Raspberry Pi Into a Powerful Robot Controller
- DIY Arduino Word Clock – Build a Sleek Real-Time Display
- Build a Stunning 5x5x5 LED Cube with Arduino Mega
- Upgrade Your Home: Smart Touch Switch Board with Temperature Monitoring
- Build a Basic Calculator with Arduino UNO – Easy Project
- Transforming a Human Head into a Robot Head: An Arduino-Driven DIY Project
- SerialDebug: Boost Arduino Debugging with Advanced Serial Logging
- What Is Waferboard? A Comprehensive Guide to OSB and Its Applications