


Using Digital Signatures to Verify Binary File Integrity on Linux
Introduction
In a world where data can be intercepted or altered, confidence in the authenticity of received files is paramount. For example, if User A sends a binary file to User B via email, how can B be certain that the file was not tampered with? Digital signatures (DS) provide a reliable solution by binding the data to the sender’s unique credentials.
- The signature must be derived from the signed message.
- It should incorporate the sender’s unique information.
- Creation should be straightforward.
- It must be computationally infeasible to forge.
- The signature size should remain small.
This article demonstrates a practical DS implementation for verifying the integrity of 64‑bit ELF binaries on Linux. The approach uses a direct signature scheme (no third‑party arbitrator) and relies on a private key for signing and a public certificate for verification.
DS Implementation Example
Implementing the signature involves the following steps:
- Generate an MD5 hash of the source binary.
- Create a private key and a self‑signed public certificate.
- Sign the binary:
- Encrypt the MD5 hash with the private key.
- Store the encrypted hash in a new
.sigsection of the ELF file. - Save the certificate in
~/.sshfor later verification.
The entire process can be scripted using openssl, objcopy, and md5sum. Below is a sample script, sign_elf.sh, that automates signing ELF binaries. (The source code without line numbers appears at the end of this article.)
#!/bin/bash
KEY_DIR="$HOME/.ssh"
PRIVATE_KEY="$KEY_DIR/priv.key"
CERTIFICATE="$KEY_DIR/pub.crt"
SUBJECT="/C=RU/ST=Nizhni Novgorod/L=Nizhniy Novgorod/O=Auriga/OU=DEV/CN=www.auriga.com"

if [ "$#" = "0" ]; then
    echo "Usage: sign_elfs.sh [ELF files]"
    exit 1
fi

[ ! -d "$KEY_DIR" ] && mkdir "$KEY_DIR"

# Generate private key and certificate
openssl req -nodes -x509 -sha256 -newkey rsa:4096 -keyout "$PRIVATE_KEY" -out "$CERTIFICATE" -days 365 -subj "$SUBJECT"

for ELF_BIN in "$@"; do
    ELF_BASE_NAME="${ELF_BIN##*/}"
    ELF_BIN_SIGNATURE="$ELF_BASE_NAME.sha256"
    ELF_BIN_MD5="$ELF_BASE_NAME.md5"

    if [ ! -f "$ELF_BIN" ]; then
        echo "Error: no such file $ELF_BIN"
        exit 103
    fi

    # Remove existing .sig section
    objcopy --remove-section=.sig "$ELF_BIN"

    # Add a 512‑byte zero‑filled .sig section
    rm -f dummy.txt
    touch dummy.txt
    truncate --size=512 dummy.txt
    objcopy --add-section .sig=dummy.txt --set-section-flags .sig=noload,readonly "$ELF_BIN"

    # Compute MD5 hash of the binary (with .sig section)
    md5sum "$ELF_BIN" | awk '{ print $1 }' > "$KEY_DIR/$ELF_BIN_MD5"

    # Sign the MD5 hash with the private key
    openssl dgst -sha256 -sign "$PRIVATE_KEY" -out "$KEY_DIR/$ELF_BIN_SIGNATURE" "$KEY_DIR/$ELF_BIN_MD5"

    # Verify the signature immediately (optional)
    openssl dgst -sha256 -verify <(openssl x509 -in "$CERTIFICATE" -pubkey -noout) -signature "$KEY_DIR/$ELF_BIN_SIGNATURE" "$KEY_DIR/$ELF_BIN_MD5"

    # Embed the encrypted hash into the .sig section
    objcopy --update-section .sig="$KEY_DIR/$ELF_BIN_SIGNATURE" --set-section-flags .sig=noload,readonly "$ELF_BIN"

    # Display the contents of the .sig section for inspection
    objdump -sj .sig "$ELF_BIN"

done

rm -f dummy.txt
ls -ls ~/.ssh
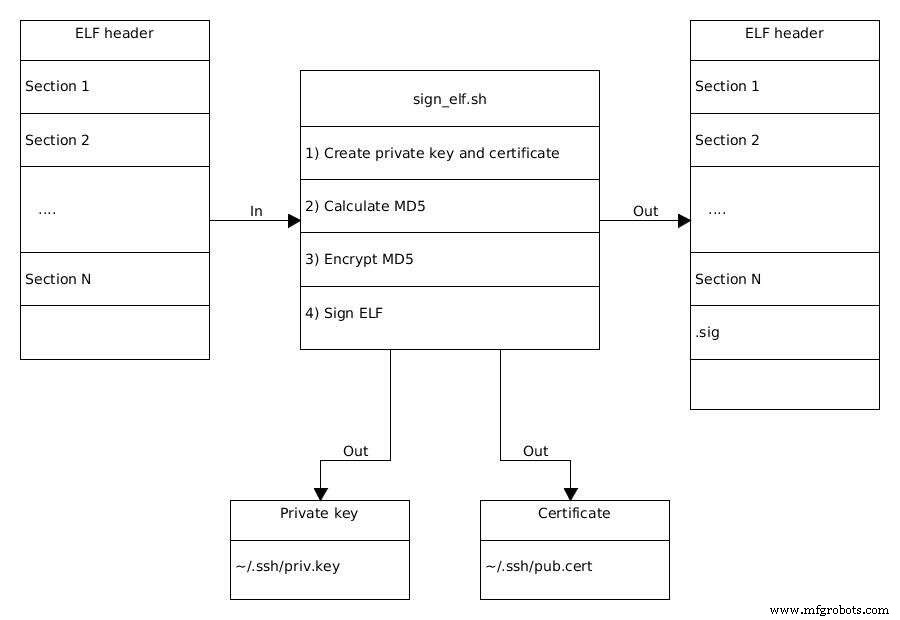
Figure 1. The process of signing an ELF binary. (Source: Auriga)
The script performs the following tasks in detail:
Line 19 – Certificate Generation
openssl req -nodes -x509 -sha256 -newkey rsa:4096 -keyout "$PRIVATE_KEY" -out "$CERTIFICATE" -days 365 -subj "$SUBJECT"
reqcreates a certificate signing request.-nodesproduces a plain‑text private key.-x509outputs a self‑signed certificate.-sha256selects SHA‑256 for hashing.-newkey rsa:4096generates a 4096‑bit RSA key.- The
SUBJECTfield follows RFC 5280 format, e.g.,/C=RU/ST=…/CN=….
After this step, ~/.ssh/priv.key holds the private key and ~/.ssh/pub.crt holds the certificate. The private key encrypts data; the certificate contains the public key needed for verification.
Loop over ELF files (Line 21)
Each binary specified on the command line is processed sequentially. The script ensures that any pre‑existing .sig section is removed before signing afresh.
Section Management (Lines 33–40)
- The existing
.sigsection is removed withobjcopy --remove-section=.sig. - A 512‑byte placeholder file is created and added as a read‑only, non‑loadable
.sigsection.
Hash Calculation (Line 42)
md5sum "$ELF_BIN" | awk '{ print $1 }' > "$KEY_DIR/$ELF_BIN_MD5"
MD5 is computed over the binary, including the placeholder .sig section, and stored in binary_name.md5.
Signing the Hash (Line 45)
openssl dgst -sha256 -sign "$PRIVATE_KEY" -out "$KEY_DIR/$ELF_BIN_SIGNATURE" "$KEY_DIR/$ELF_BIN_MD5"
The MD5 hash is encrypted with the private key, producing a signature file (e.g., binary_name.sha256).
Verification (Optional) (Line 48)
openssl dgst -sha256 -verify <(openssl x509 -in "$CERTIFICATE" -pubkey -noout) -signature "$KEY_DIR/$ELF_BIN_SIGNATURE" "$KEY_DIR/$ELF_BIN_MD5"
This step confirms that the signature matches the hash using the public key extracted from the certificate.
Embedding the Signature (Line 52)
objcopy --update-section .sig="$KEY_DIR/$ELF_BIN_SIGNATURE" --set-section-flags .sig=noload,readonly "$ELF_BIN"
The encrypted hash replaces the placeholder, finalizing the signed ELF binary.
Running the script on a set of ELF files will produce signed binaries that can be safely distributed. The recipient can verify integrity by extracting the .sig section, decrypting it with the public certificate, and comparing the resulting hash to a freshly computed hash of the received file.
Internet of Things Technology
- Designing an IoT Data Product UI: 9 Essential Considerations
- Symphony Link: Reliable Water Leak Detection for Data Centers
- Preparing Your Manufacturing Operations for AI with IoT
- Mastering Digital Asset Management: A Comprehensive Strategy for Data‑Driven Asset Excellence
- Western Digital Launches Rugged 64‑Layer 3D NAND Storage for Industrial IoT and Edge Computing
- Western Digital Launches Rugged 64‑Layer 3D NAND Storage for Industrial IoT
- Optimizing File Data for Cloud Data Lakes: A Practical Guide
- Why Cloud Computing Is Essential for Storing IoT Data
- Neural Networks Accelerate X‑Ray Imaging Reconstruction
- Harnessing Digital Twin Technology to Boost Manufacturing Efficiency and Cost Savings