


Optimizing 3D Printer Retractions: Configuration Tips & Best Practices
During printing, the extruder pushes the filament into the hotend, where it will be melted and extruded through the nozzle orifice. During this process, pressure is created inside the nozzle which forces the plastic out through the nozzle.
However, once the extruder stops pulling the filament, the pressure in the nozzle is maintained, causing a small amount of molten plastic to continue to flow out until the pressure inside and outside the nozzle equalises.
This phenomenon causes a small amount of material to continue to come out during displacement movements in which no material should be extruded. This causes small droplets and fine threads to appear on the surface of the part.
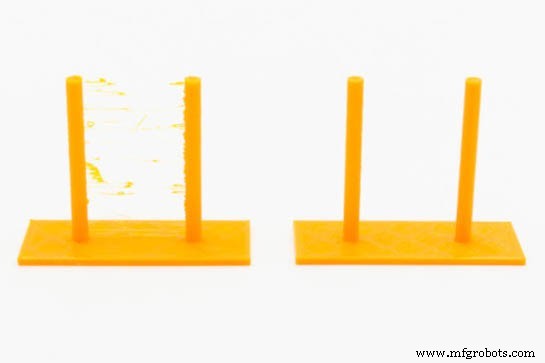
Image 1: Effect of a bad shrinkage configuration (left) and a correct one (right) Source: Filament2print
To avoid this, FFF 3D printers employ a mechanism known as retraction. Before performing a displacement movement, the extruder retracts a small amount of filament, releasing the pressure inside the nozzle. When the displacement movement ends and an extrusion movement begins, the extruder pushes back another small amount of filament until the nozzle is primed and the pressure inside the nozzle is restored.
In order to optimise the printing quality to the maximum, it is very important to set the retraction parameters for each material.
Shrinkage parameters
The basic shrinkage parameters are:
- Retraction distance: This is the length of filament that the extruder will retract. Its value, in addition to the type of material, will depend on the length between the extruder and the hotend. In direct extruders its value will be in the range of 0.4 mm to 1.2 mm, while in bowden systems the range will be from 2 mm to 10 mm. A rule of thumb for calculating an initial value of shrinkage distance in a bowden system is to use 1% of the length of the bowden tube. For example, for a bowden system with a 40 cm tube, a shrinkage distance of 4 mm will be used. It is important to consult the specifications of the hotend, as many manufacturers indicate a maximum retraction distance for their hotend. Exceeding this value will most likely result in clogging.
- Retraction speed: This is the speed at which the extruder motor will retract the filament. Very low speeds will not prevent droplets on the surface of the part, while very high speeds may cause bites in the filament. The value of this speed, in general, will be between 25 mm/s and 45 mm/s, being 30 mm/s the most usual value in direct systems and 40 mm/s in Bowden systems.
- Distance of deretraction: This is the amount of filament that the extruder will extrude after retraction of the filament. Usually the same value as the filament retraction distance is used. Sometimes it may be necessary to use a different value, especially in Bowden systems. If, after a retraction, a small drop is observed on the surface of the part, this value should be reduced, while if a small gap is observed, it will be necessary to increase it. In general, it should be increased or decreased by about 5-10 %. Some software uses the term reset distance, where this value is the increase or decrease from the shrinkage value. For example, a reset distance of 0 would use the same retraction and shrinkage distance, whereas a value of -0.2 would take the shrinkage distance minus 0.2 mm as the shrinkage distance.
- Retraction speed: This is the speed at which the filament is extruded during movement. In general, the same value as the retraction speed or a slightly lower value will be taken.
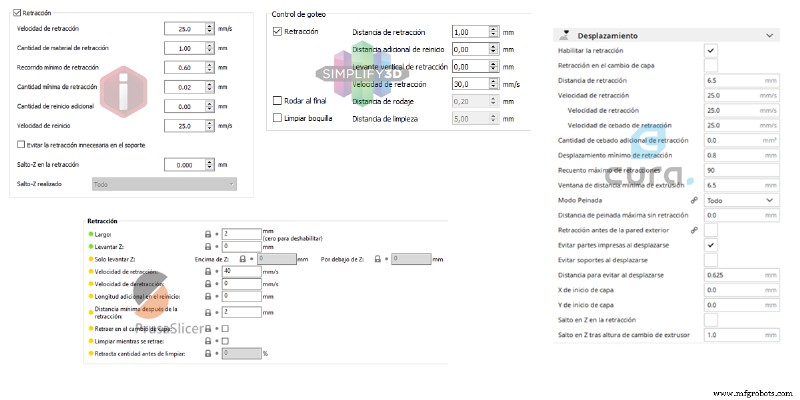
Image 2: Shrinkage configuration section in different laminating software. Source: Filament2print
In addition to these basic parameters, there are others that influence the quality of the piece:
- Minimum distance after retraction: This is the minimum displacement distance before which a retraction will be performed. It avoids unnecessary retractions when the offset is very small.
- Lift, Z-Lift or Z-Hop: If a value other than 0 is set, the hotend will lift the indicated distance while performing the retraction and then lower again after the offset. This function helps to avoid marks on the surface of the workpiece and prevents the appearance of threads. A value between 100% and 200% of the layer height is usually sufficient.
- Clean while retracting, run-in, nozzle cleaning: Performs a small movement of the hotend during retraction to clean the nozzle and hide the seam. In some software this is an activatable checkbox, in others the value can be set.
Not all software includes all these parameters, and some of these parameters may behave differently from one software to another. Before modifying values of the retraction parameters, the software manual should be consulted to understand how each of them behaves.
Calibrate the shrinkage parameters
Because there are multiple parameters, it is complex to obtain a suitable combination in a straightforward manner. For this, it will be necessary to carry out multiple tests in stages until the right values are obtained. It will be necessary to adjust the shrinkage parameters independently for each material, and for this we must have previously determined the appropriate printing temperature for each material.
First of all, the appropriate retraction distance and retraction speed must be obtained, so the rest of the parameters must be left deactivated or with their pre-set values.
The optimum values for retraction speed and retraction distance are the lowest values that avoid the appearance of threads during the displacement movements. The following steps shall be taken to determine these values:
- A low retraction speed shall be set, preferably 25 mm/s.
- An intermediate shrink distance value shall be set: 0.8 mm for direct extruders, 0.75% of the pipe length for bowden extruders.
- A shrinkage test will then be printed. It is possible to find several created in well-known file repositories.
- The result will be checked:
- If no threads appear, the shrink distance will be reduced by half.
- If threads appear, increase the retraction distance by 50%.
- Repeat the process as many times as necessary until a satisfactory result is obtained.
In any case, distances of no more than 3 mm should be used for direct extruders and no more than 5% of the pipe length for bowden systems. If it is not possible to obtain an acceptable result within this range, the shrink rate should be increased by 5 mm/s and the process repeated. It is not recommended to use shrink speeds above 40 mm/s, so if a satisfactory result is still not achieved once this has been reached, the combination that gives the best results should be selected.
With some printers and filaments it may not be possible to completely remove the threads, even with the best combination of speed and shrink distance. In these cases it is advisable to activate other functions such as "Z-lift", "Clean while retracting", "Run-in" or "Nozzle cleaning", which will help to minimise or eliminate yarns.
Problems associated with poor retraction settings
The consequences of excessively high or low values of the shrinkage parameters are very different. While too low values of retraction speed and retraction distance have purely aesthetic consequences (appearance of threads and droplets on the parts), setting too high values often leads to jamming inside the heatbreak. This is because if the retraction is too long, the molten tip of the filament will reach the cold zone of the heatbreak, expanding and blocking it.
If, after setting the retractions, jamming occurs, especially on long prints, the retraction distance should be reduced slightly.
3D printing
- Topology Optimisation + 3D Printing: Revolutionizing Design and Production
- Python Variables, Constants, and Literals – A Comprehensive Guide
- Optimizing Maintenance Cost Benchmarks: Why 4.9% MC/ERV May Be Misleading
- Comprehensive Guide to Machinery & Equipment Appraisal
- Warehouse Pallet Racking Design & Configuration: Maximize Space & Efficiency
- LM335 Temperature Sensor: Complete Guide to Specs, Setup, and Real-World Uses
- MOC3021 Optocoupler Datasheet – Detailed Configuration & Practical Applications
- High-Speed CNC Machining Center: Key Configurations & Requirements
- DIN 1.5217 Quenched & Tempered Steel: Key Properties & Performance Data
- Understanding Retraction in 3D Printing: Definition, Settings, and Best Practices