


Optimizing Ejector Pins for Superior Injection Molding Performance
Ejector pins are critical components of the injection molding cycle, propelling finished parts out of the mold cavity immediately after cooling. Together with ejector blades and blocks, they ensure swift, reliable part release.
Selecting the appropriate ejector pin is pivotal, as it directly impacts part integrity and surface quality. This guide explains ejector pin fundamentals, types, common defects, and best‑practice selection.
In injection molding, the ejector pin mechanism removes cooled parts from the die, significantly boosting cycle efficiency.
The mold comprises two halves: a movable side A and a stationary side B that houses the ejector system. After the cavity cools and opens, the ejector pin pushes the hardened plastic out of the mold.
Note: The force of the ejector can leave a shallow dent on the part.
Types of Ejector Pins Used During Injection Molding
Manufacturers offer several ejector pin configurations tailored to specific materials and part geometries. Below are the most common options used in rapid tooling.
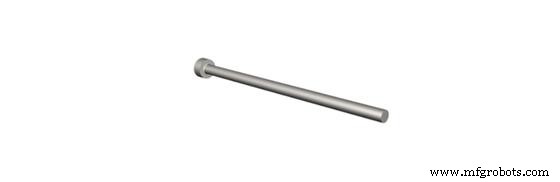
Ejector Pin #1: Through‑Hard Ejector
Through‑hard pins undergo heat treatment to increase diameter strength, enabling use with polymers below 200 °C.
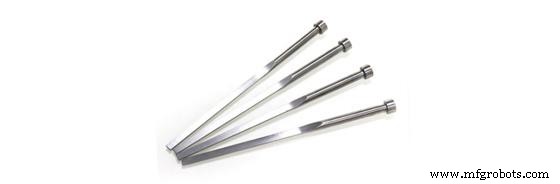
Ejector Pin #2: Nitride H13 Ejector
Case‑hardened H13 pins can withstand temperatures up to 600 °C. They are drillable or tapable but are softer and more prone to chipping than higher‑grade variants.

Ejector Pin #3: Black Ejector
Black ejector pins replace nitride H13 in high‑temperature applications. Their self‑lubricating surface tolerates up to 1,000 °C, making them ideal for automotive components, albeit at a higher cost.
Other Ejection Systems
- Ejector Sleeves are hollow pins that protect and guide the core pin.
- Ejector Plates work with the pins by holding the pin head, preventing accidental disengagement during molding.
- Ejector Blocks feature lubricating grooves and are used on thin parts to reduce pin marks, improving surface finish.
How Does an Ejector Pin Work?
Understanding the ejector pin cycle—comprising injection, cooling, and part release—helps select the right machine and avoid defects.
- Injection phase: Molten plastic is introduced into the die cavity.
- Cooling phase: Plastic solidifies into a hardened part.
- Part release phase: The ejector system pushes the part out of the cavity, either manually or automatically.
Automatic ejector pins deliver a single axial push, guided by clamp plates and the ejector box, ensuring consistent release.
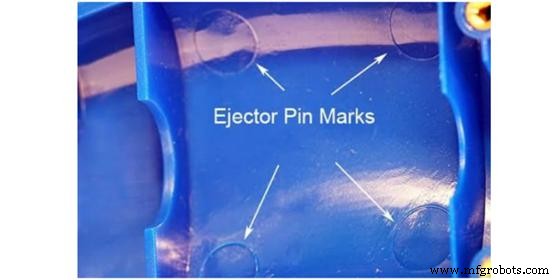
Causes and Solutions of Ejector Pin Marks
While pin marks are inevitable, they can be minimized with proper process control. Common causes and remedies include:
Less Cooling Time
Insufficient cooling allows the pin to embed into the part, creating deep dents. Ensure the part fully solidifies before ejection.
Thin Product and Other Characteristics
Very thin parts (≤ 2.5 mm wall thickness) are more prone to visible marks. For high‑surface‑finish parts, consider ejector blades or blocks instead of pins.
Dwell Time and Dwell Temperature
Excessive dwell time raises the glass‑transition temperature, leading to premature ejection and weak parts. Reduce dwell time to match the polymer’s thermal profile.
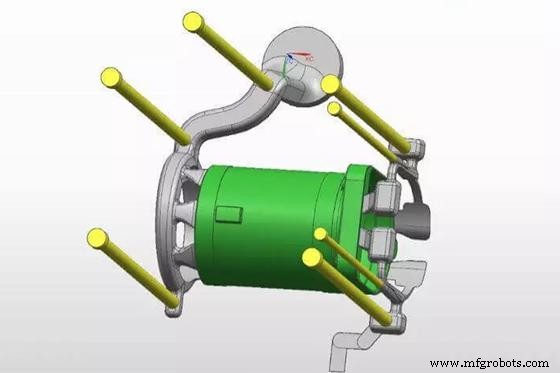
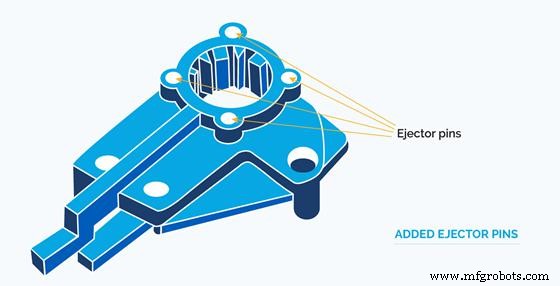
Ejector Pin Placement and Arrangement
- Complex parts may need more pins.
- Place pins on flat surfaces—steps or slopes reduce support and increase marks.
- Keep pins a safe distance from cooling channels to avoid interference.
- Target high‑force areas such as cores and ribs.
Machine Selection
Large‑capacity machines can generate excessive pressure for small, low‑volume molds, creating internal stress and marks. Match machine capacity to mold size.
Holding Pressure
Adjust holding pressure to balance part integrity and ease of ejection; too high pressure makes removal difficult.
Other Methods of Reducing Ejection Pin Marks
- Use abrasion‑resistant polymers like nylon, polyoxyethylene, or UHMWPE.
- Apply a mold release agent for smoother ejection.
- Incorporate draft angles to reduce ejection force.
How to Choose the Right Ejector Pins in Injection Molding?
Selecting the right pins involves evaluating material, size, and process parameters. Key considerations are:
Large Pin Diameter for Large Parts
A larger diameter reduces penetration force, minimizing dents. Use integer values to avoid manufacturing irregularities.
Pin Size Relative to Part Size
While the diameter should be large, the overall pin size must match the part dimensions to prevent over‑penetration.
Strength Requirements
Ensure the pin can withstand injection pressure—diameters of at least 2.5 mm are recommended. For undercuts, consider shoulder pins.
Also factor in material type and cost; a robust pin reduces long‑term maintenance expenses.
Conclusion
Ejector pins are essential for efficient part release in injection molding. Understanding their types, operation, and best‑practice selection can significantly improve part quality and process reliability.
Looking for rapid tooling and injection molding services? Contact WayKen for high‑quality mold parts delivered quickly and cost‑effectively.
FAQs
What is a pin mark?
Ejector pin marks are shiny or white impressions left on the component’s class‑A surface by the pin. They can lead to surface cracking if not managed.
How can I spot ejector pin marks?
Pin marks appear as glossy or whitish dents in the exact locations where the pins contact the part.
What material are ejector pins made of?
Common materials include steel, H‑13, M‑2, and 420 stainless steel, often heat‑treated for enhanced strength.
Industrial Technology
- AI Revolutionizes Global Supply Chains: Enhancing Resilience & Profitability
- Computer‑Aided Manufacturing (CAM): How It Drives Modern Production
- Mastering 3D Printed Lattice Structures: Design, Properties, and Performance Insights
- Maximize Construction Efficiency: 4 Questions to Unlock Live Field Data
- Understanding Active-Mode Operation in IGFETs: Design, Performance, and Applications
- Designing Precision Voltmeter Ranges: From Sensitive Movements to Full‑Scale Readings
- Top 6 Objectives for Successful Maintenance Management
- Precision Meets Automation: Vision‑Guided Robotics Transforming Manufacturing
- Node‑Locked vs Floating Licenses: How to Choose the Right One for Your Engineering Software
- Revolutionary Smartphone Algorithm Enables Accurate Disease Diagnosis