


Understanding & Eliminating Flash in Injection Molding
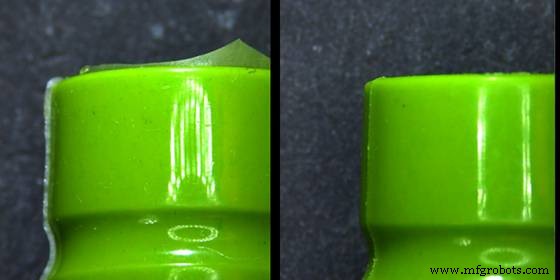
Flash—an unwanted thin film of molten plastic that escapes the mold cavity—diminishes part quality and can damage the mold itself. Knowing why it happens and how to stop it is essential for any injection‑molding operation.
What Triggers Flash?
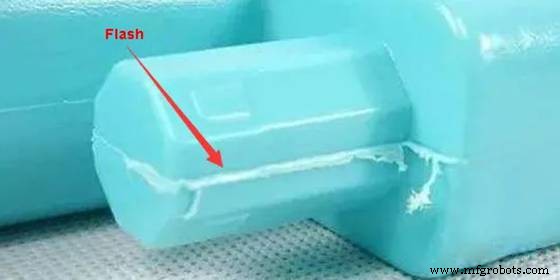
Flash most often originates at the parting line, but it can also appear elsewhere in the cavity. Common culprits include:
1. Parting‑Line Mismatch
If the two halves of the mold do not meet perfectly—due to debris, wear, or a design flaw—the seal is incomplete, letting molten plastic escape.
2. Inadequate Venting
Vents that are too small, clogged, or worn prevent air from escaping, raising cavity pressure and forcing material out of the mold.
3. Insufficient Clamping Pressure
Even with a flawless parting line, a weak clamping force allows the mold to open under high injection pressure, creating flash.
4. Low Viscosity
Plastic that flows too easily—due to high temperature or low pressure—tends to seep past the seal before it solidifies.
5. Overfilling the Mold
Excess material increases cavity pressure beyond what the clamp can contain, leading to leakage.
How to Fix Flash After It Occurs
When flash has already formed, several remediation techniques are available:
1. Hot‑Air Deflashing
Blowing heated air over the part melts thin flash layers back into the surface. It works best for fine flashes; for thicker ones, combine with mechanical removal.
2. Cryogenic Deflashing
Rapidly cooling the part with liquid nitrogen makes the flash brittle and easy to peel off without affecting the finish. Although effective, the equipment can be costly.
3. Manual Deflashing
Trained operators use scissors, knives, or grinders to trim flash along the parting line. This method offers high precision and immediate visual inspection.
4. Flame‑Deflashing
Applying a controlled flame can remove flash, but it risks altering the surface texture and complicating downstream processing such as painting.
Proactive Measures to Prevent Flash
Prevention is always preferable to correction. Key strategies include:
1. Maintain a Clean Mold
Use a clean rag, mold cleaner, and compressed air to remove debris, plastic residue, and hidden fragments before each run.
2. Apply Optimal Clamp Tonnage
Balance clamping force to hold the mold closed without over‑stressing the parts or the mold itself.
3. Design for Manufacturability (DFM)
Incorporate industry‑accepted design rules: proper gate placement, uniform wall thickness, and clear parting‑line locations to eliminate flash risk.
4. Employ Flash‑Free Molds
High‑precision molds with tight tolerances are ideal for critical parts where aesthetics and functionality matter most.
5. Control Injection Parameters
Slowing the injection rate reduces peak pressure. Pair this with adequate temperature and pressure settings to keep the material’s viscosity in check.
Other Common Injection‑Molding Defects
Flash is just one of many imperfections that can compromise a part. Typical issues include:
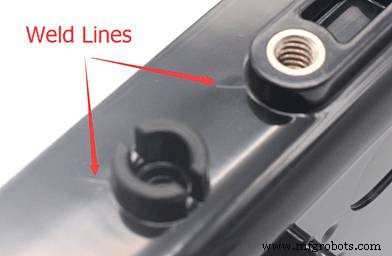
1. Weld Lines
When two flow fronts meet prematurely, a visible line appears. Increase temperature and pressure, or adjust wall thickness to mitigate.
2. Surface Delamination
Moisture or contaminants cause the surface to peel, especially near the gate. Use dry, compatible materials.
3. Jetting
Early solidification of the initial jet creates a skin on the part. Raising the material temperature or reducing pressure helps.
4. Cracking
Stress from cold molds or low injection speeds can crack the part. Higher injection speed and temperature, plus proper mold conditioning, reduce risk.
5. Flow Lines
Patterned lines from varying cooling rates. Maintain steady injection pressure and adequate cooling before filling.
Conclusion
Flash not only lowers product quality but can also shorten mold life. By understanding its causes and applying both corrective and preventive measures, manufacturers can produce flawless parts while protecting their equipment. For more insights into rapid injection molding and flash‑free solutions, contact WayKen.
FAQ
What’s the most effective way to stop flash?
Slowing the injection rate reduces pressure, and increasing clamp tonnage ensures the mold stays closed.
Hot air vs. cryogenic deflashing?
Cryogenic is ideal for large, thick flashes because it avoids heat damage, while hot air is best for thin, fine flash removal.
Primary cause of flash?
Leakage along the parting line due to high injection pressure and a poorly designed or worn parting line.
Industrial Technology
- Proven Solutions to Common CNC Machining Defects
- Discover the Key Benefits of Stainless Steel for Fabrication Projects
- Digitalizing Supply Chains: 5 Proven Strategies to Overcome Current Headwinds
- PCB Computers: Key Applications Across Industries
- PepsiCo Partners with Digital Startups to Navigate the End of Third-Party Cookies
- Enhance Fusion 360 Manufacturing Efficiency with Derived Operations
- ICS Advantage: Optimized Production Scheduling for Swift, Reliable Delivery
- Generator Rewind vs. Overhaul: Understanding the Key Differences
- Boost Electric Motor Efficiency: 4 Proven Strategies
- Benefits of High-Speed Dynamic Balanced Cutting Tools