


Effortlessly Control and Synchronize Hundreds of Relays with IO Expanders
Components and supplies
| × | 2 | ||||
| × | 2 | ||||
| × | 2 | ||||
 |
| × | 1 |
About this project
Need to control and synchronize hundreds of relays all at the same time? Then connect your Arduino, ESP8266, Pi, PC or Mac to an IO Expander with Relay Expanders and use the new External Latching feature.
This allows you to send the new relay settings in a very compact bit format ready to be latched. Then using a single GPIO line from your MCU or from the IO Expander output all the latched data at the same time.
See our Control Up to 65, 280 Relays with Your Arduino project!
So what does it take to setup the IO Expander for External Latching? Using the simple command structure of the IO Expander let's setup a simple use case of controlling a x16 Relay Board with External Latching.
Set the [g]pio pin [4] as an [o]utput with a high [1] level,on [g]pio pin [10] we enable the [n]egative edge detection andfinally we enable the relay [e]xpander external [l]atch on pin [10].
>g4o1;g10n;el10
ok
ok
10
>
Now we can turn the relay [e]xpanders [o]n/o[f]f/[s]et and then using the external latch enable it by setting [g]pio pin [4] as an [o]utput with a low [0] level for [1] ms. We want pin 4 to return to a high state so that it will be ready to latch again.
>e1o;e10o;e16o
ok
ok
ok
>g4o0,1
ok
>
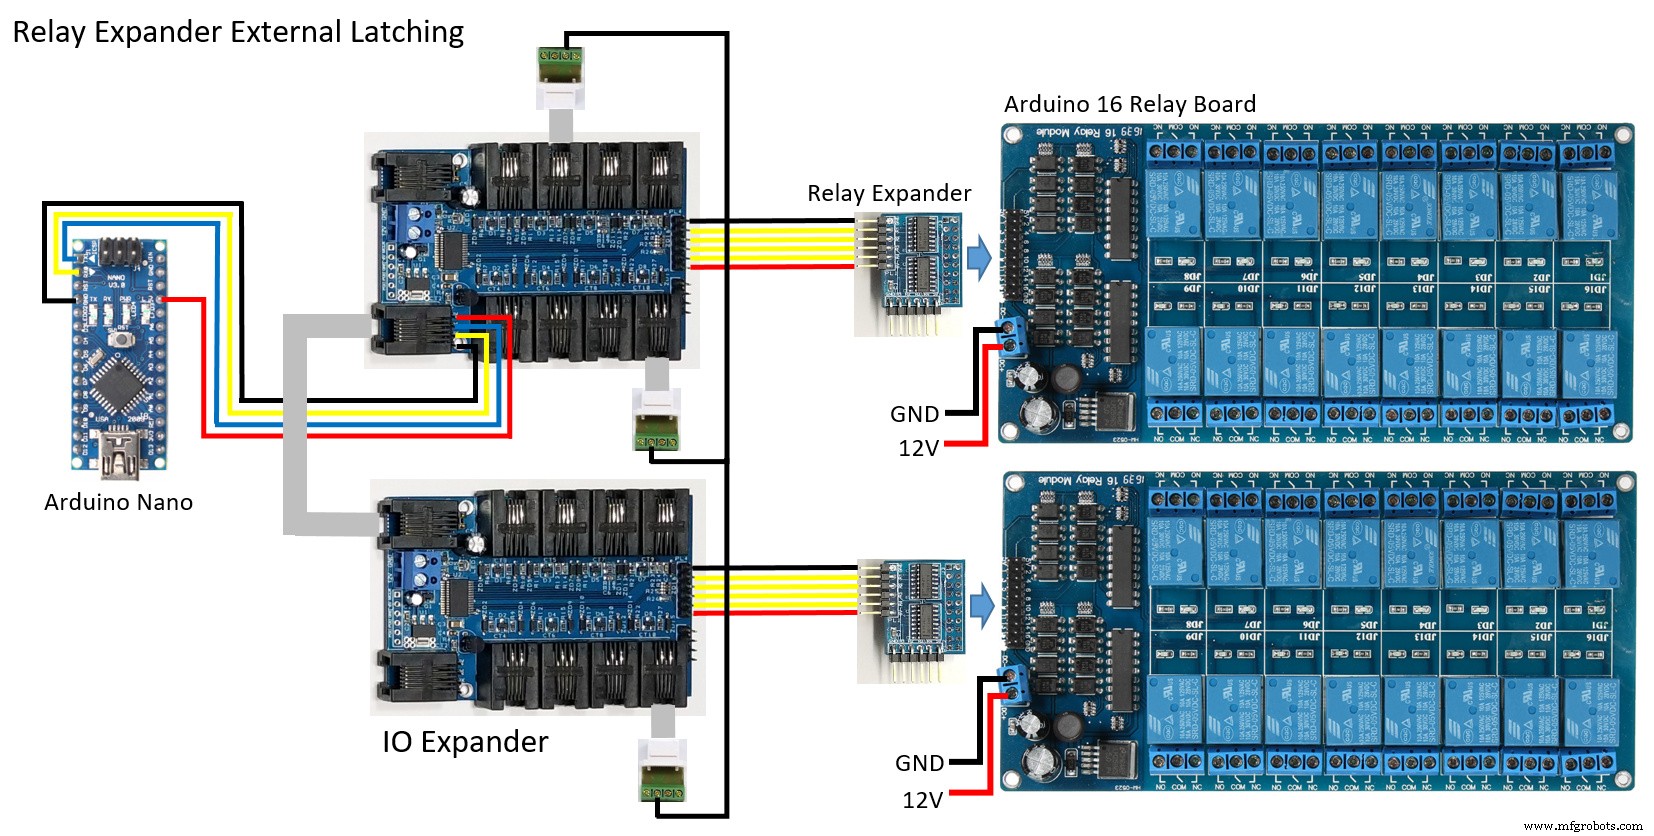
Let's now expand this project to x2 IO Expanders, x2 Relay Expanders and x2 16 Relay Boards using an Arduino Nano. The x2 IO Expanders are connected together using a multidrop 9-bit protocol with a maximum of 255 IO Expanders.
IO Expander External Latching Diagram
/* IO Expander
 *
 * Relay Expander External Latching
 *
 */

#include <HardwareSerial9Bit.h>
#include "IOExpander9Bit.h"
#include <avr/wdt.h>

//#define SERIAL_DEBUG
#define MAX_BOARDS    2

#ifdef SERIAL_DEBUG
SoftwareSerial swSerial(8,7);
#endif

void setup()
{
  Serial9Bit.begin(115200, SERIAL_9N1);
  Serial9Bit.write(0);  // Set IO Expanders to 9-bit
#ifdef SERIAL_DEBUG
  swSerial.begin(115200);
  swSerialEcho = &swSerial;
#endif
  wdt_enable(WDTO_8S);

  for (uint8_t board = 1; board <= MAX_BOARDS; board++)
    SerialCmdDone(board, "eb1");

  SerialCmdDone(1, "g4o1;g10n;el10");   // Setup GPIO for external latch of relays
  SerialCmdDone(2, "g10n;el10");
}

void loop()
{
  static uint16_t i = 0;
  uint8_t r[2];

  r[0] = ~(uint8_t)(i >> 8);
  r[1] = ~(uint8_t)i++;
  SerialWriteRelayExpander(1, r, 2);
  delay(50);
  r[0] = ~r[0];   // Invert all the relays on board 2
  r[1] = ~r[1];
  SerialWriteRelayExpander(2, r, 2);
  delay(50);

  SerialCmdDone(1, "g4o0,1");   // Latch all the relays

  wdt_reset();
}So get your IO Expander today and build your system!
Code
- IO Expander External Latching
IO Expander External LatchingArduino
/* IO Expander
 *
 * Relay Expander External Latching
 *
 */

#include <HardwareSerial9Bit.h>
#include "IOExpander9Bit.h"
#include <avr/wdt.h>

//#define SERIAL_DEBUG
#define MAX_BOARDS    2

#ifdef SERIAL_DEBUG
SoftwareSerial swSerial(8,7);
#endif

void setup()
{
  Serial9Bit.begin(115200, SERIAL_9N1);
  Serial9Bit.write(0);                      // Set IO Expanders to 9-bit
#ifdef SERIAL_DEBUG
  swSerial.begin(115200);
  swSerialEcho = &swSerial;
#endif
  wdt_enable(WDTO_8S);

  for (uint8_t board = 1; board <= MAX_BOARDS; board++)
    SerialCmdDone(board, "eb1");

  SerialCmdDone(1, "g4o1;g10n;el10");     // Setup GPIO for external latch of relays
  SerialCmdDone(2, "g10n;el10");
}

void loop()
{
  static uint16_t i = 0;
  uint8_t r[2];

  r[0] = ~(uint8_t)(i >> 8);
  r[1] = ~(uint8_t)i++;
  SerialWriteRelayExpander(1, r, 2);
  delay(50);
  r[0] = ~r[0];                         // Invert all the relays on board 2
  r[1] = ~r[1];
  SerialWriteRelayExpander(2, r, 2);
  delay(50);

  SerialCmdDone(1, "g4o0,1");           // Latch all the relays

  wdt_reset();
}

External Latchi
Schematics
Manufacturing process
- Robotics in the 21st Century: Distributed Systems, Telepresence, and Space Exploration
- Solid‑State Relays: Advantages, Limitations, and Practical Insights
- Ensuring Continuous WiFi Connectivity for Your IoT Devices
- Control 65,280 Relays with Arduino: Expandable IO & Relay Solutions
- Boosting Efficiency with a Responsive Robot at Energy Dynamics
- Regain Control of Your Buying Cycle: Proven Strategies for Manufacturers
- Choosing the Right Relay: Types, Functions, and Applications
- How an Automobile's Brainbox (ECU) Controls Modern Vehicles
- Automotive Relays Explained: Purpose, Types, and How They Protect Your Vehicle
- Essential Guide to Relays: Types, Applications, and History