


Build a Contactless Automatic Door Opener Using Temperature Detection
Components and supplies
 |
| × | 1 | |||
| × | 1 | ||||
| × | 1 | ||||
| × | 1 | ||||
| × | 1 | ||||
| × | 1 |
About this project
The purpose of this project is to automatically open the door by detecting body temperature. In fact, this project is to prevent patients with new coronary pneumonia from entering their homes. To a certain extent, guarantee the safety of the living environment.
The following parts were used in this project:
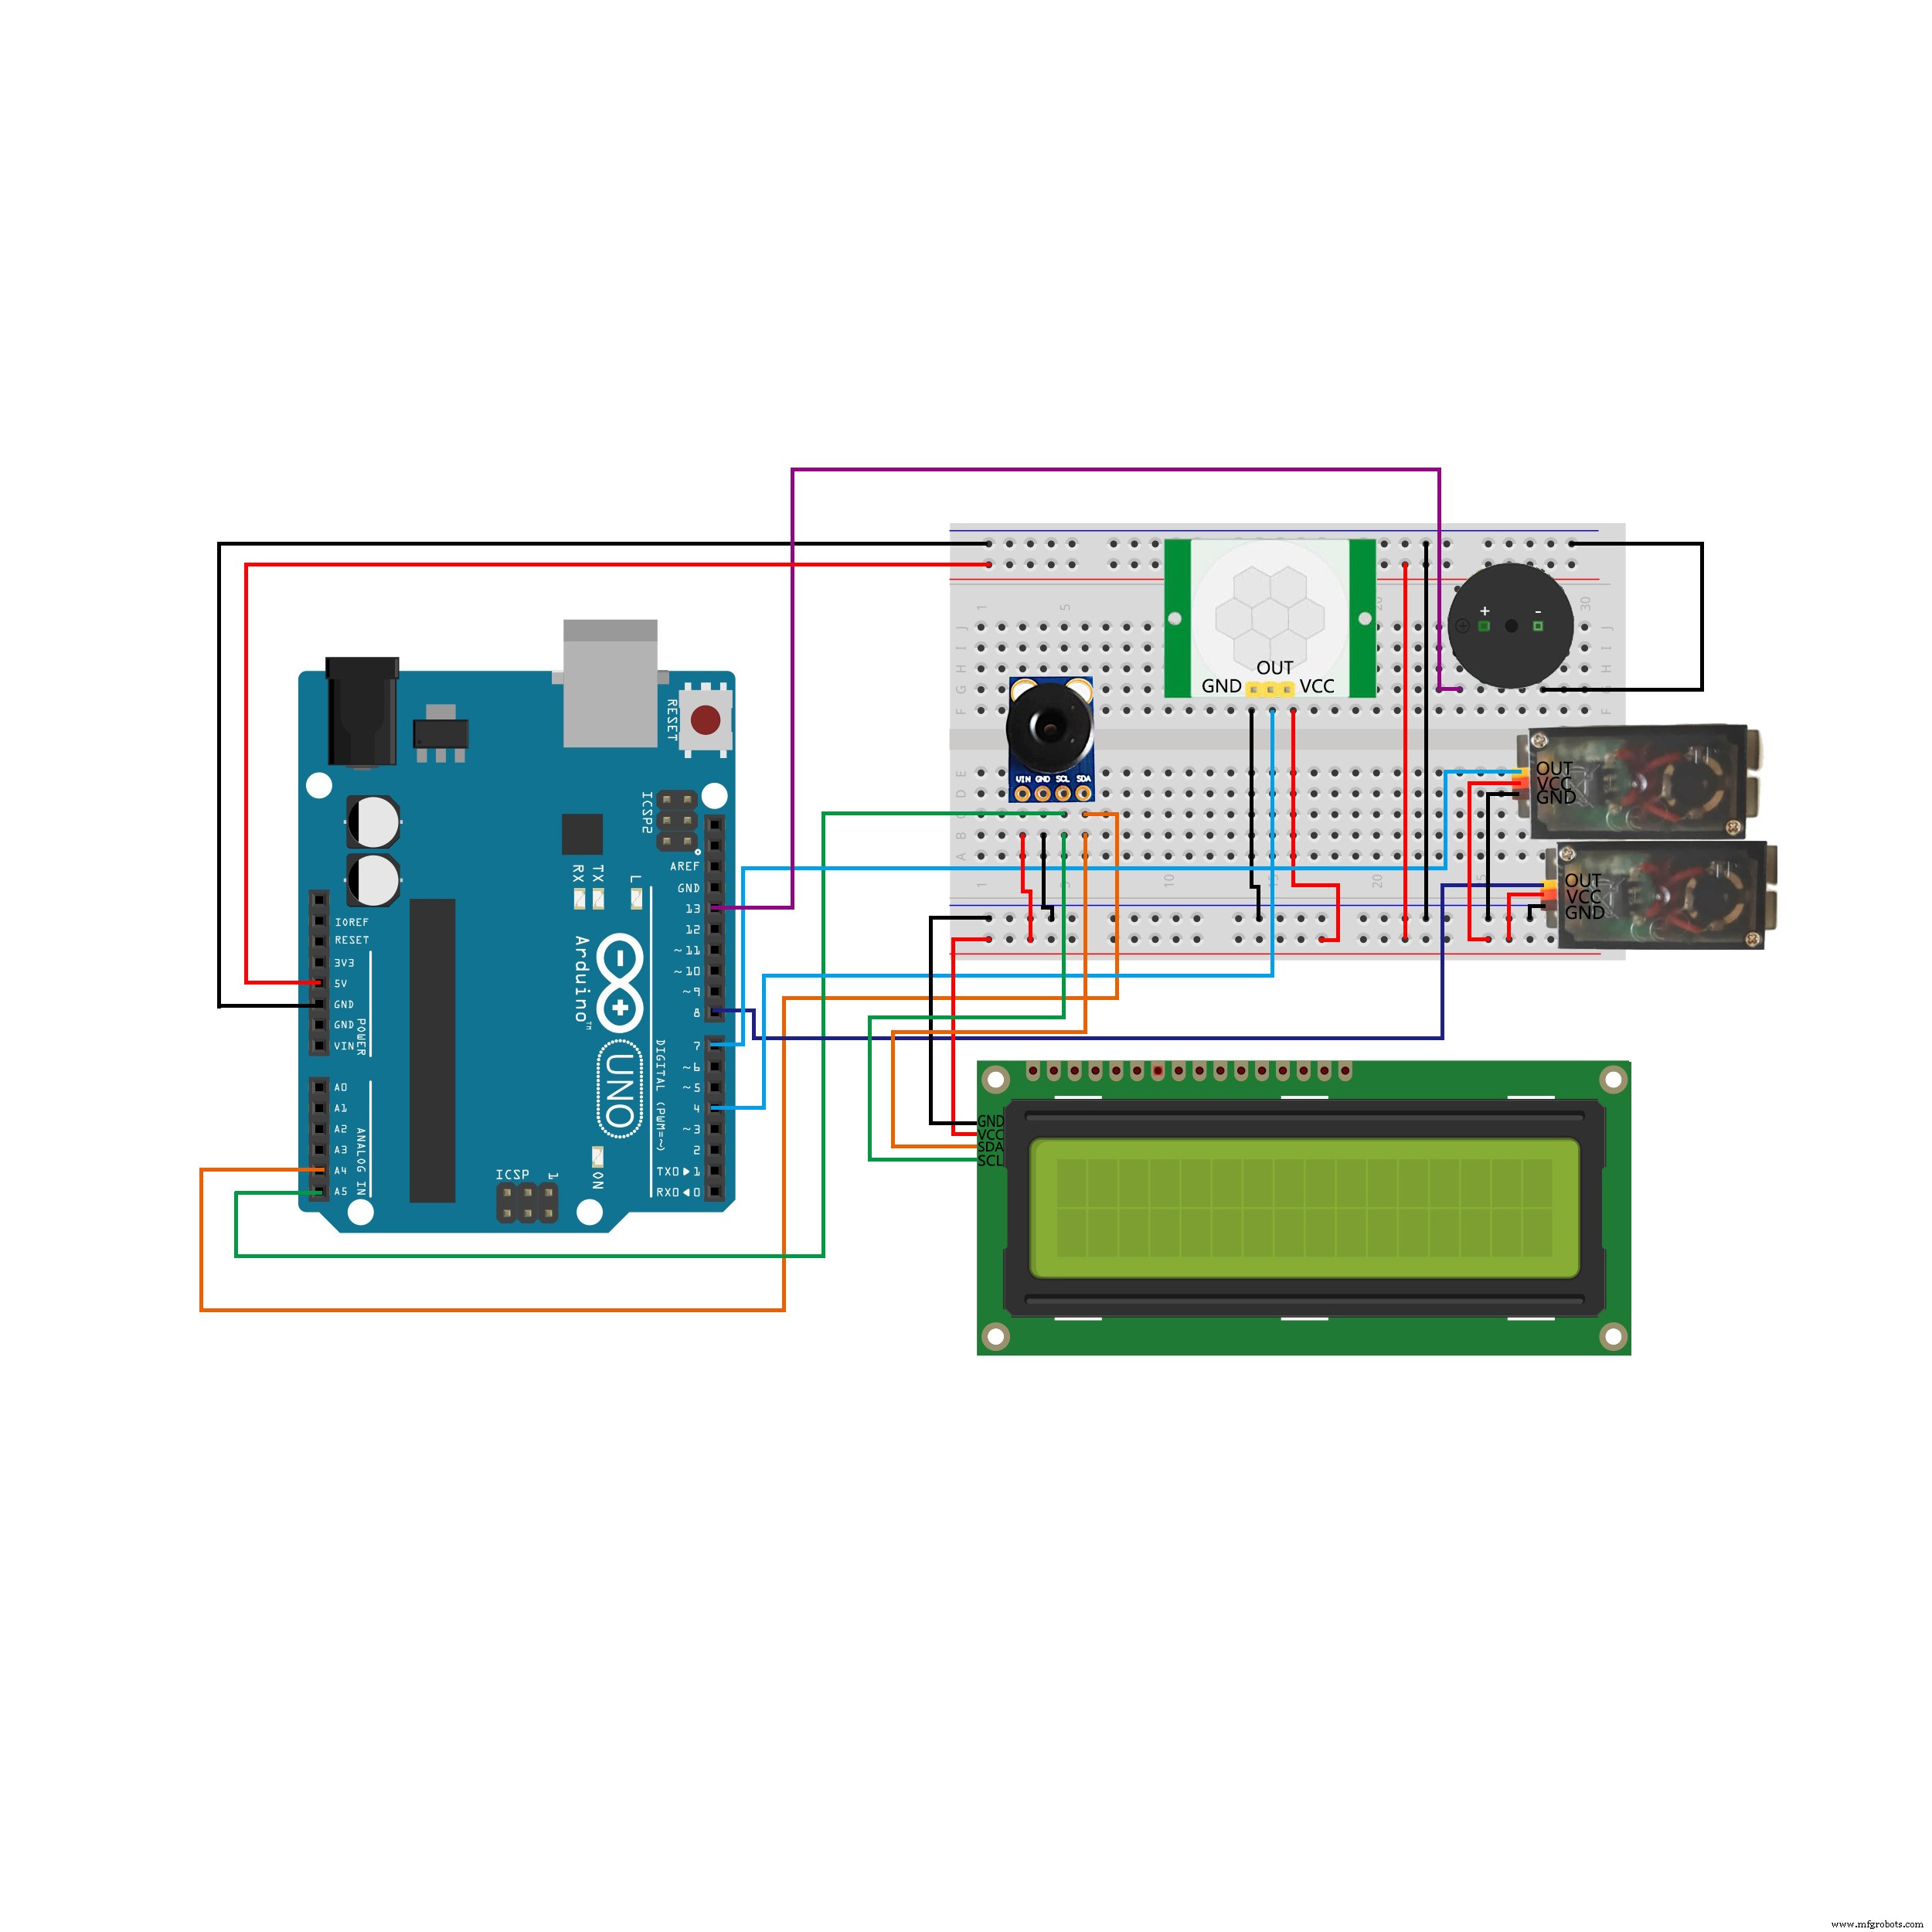
Arduino UNO, https://amzn.to/3ihYFBl
2004 I2C LCD, https://amzn.to/3gTMZnW
GY-906-BCC IR Infrared Thermometry Module
Two Tower Pro MG90S Servos
Buzzer, https://amzn.to/2BeYzu3
HC-SR501 Human infrared sensor, https://amzn.to/3aJAOHX
Code: https://github.com/DKARDU/AutomaticDoor
Thanks for watching, Stay home and Be safe...Have a great day! #Arduino #Arduinoproject #Covid-19
Code
- autodoor.ino
autodoor.inoArduino
#include <LiquidCrystal_I2C.h>

#include <Servo.h>
#include <Wire.h>
#include <Adafruit_MLX90614.h>

Adafruit_MLX90614 mlx = Adafruit_MLX90614();
LiquidCrystal_I2C lcd(0x27,20,4);

Servo myservo1;
Servo myservo2;

#define red 13
#define haha 4
int pos1,pos2;

void setup() {
  Serial.begin(9600);
  pinMode(red,OUTPUT);
  pinMode(haha,INPUT);
  myservo1.attach(7);
  myservo2.attach(8);
  myservo1.write(90);
  myservo2.write(90);
  mlx.begin();

  lcd.init();
  lcd.backlight();


}

void loop() {

        int montion = digitalRead(haha);

        if(montion == 1){

          Serial.print("made");
          Serial.print("\n");
          lcd.setCursor(0,0);
          lcd.print("ObjectTemp:");
          lcd.setCursor(13,3);
          lcd.print("-DKARDU");

          kaiguan();
          }
}

void kaiguan(){

   int temp_obj = mlx.readObjectTempC();
   Serial.print(temp_obj);
   Serial.print("\n");
          if(temp_obj < 31){
           lcd.setCursor(0,1);
           lcd.print(temp_obj);
           lcd.setCursor(0,2);
           lcd.print("Not detected,retest!");

          }if(temp_obj > 30 && temp_obj <38){

           lcd.setCursor(0,1);
           lcd.print(temp_obj);
           lcd.setCursor(0,2);
           lcd.print("body temperature ok ");
           for(pos1 = 90; pos1 <= 180; pos1 += 1)
          {
            myservo1.write(pos1);
            myservo2.write(180-pos1);
            delay(15);
          }
            delay(5000);

           for(pos1 = 180; pos1>=90; pos1 -=1)
           {
            myservo1.write(pos1);
            myservo2.write(180-pos1);
            delay(15);
           }

          }
          if(temp_obj>37){
            digitalWrite(red,HIGH);
            lcd.setCursor(0,1);
            lcd.print(temp_obj);
            lcd.setCursor(0,2);
            lcd.print("     Keep out!       ");
            delay(500);

  }
  digitalWrite(red,LOW);
}
Schematics
Bluetooth-Enabled Temperature Monitor with Arduino Nano
Wi-Servo: Control Servomotors Over Wi‑Fi Using a Web Browser
Manufacturing process
- Building an Arduino‑Powered Robot with Raspberry Pi: A Step‑by‑Step Guide
- Arduino Blood Oxygen & Body Temperature Monitor – Build a Dual‑Sensor System
- Build a Stunning NeoPixel LED Matrix with Arduino Nano: Step-by-Step Guide
- Create Musical Tones with Arduino: A Step‑by‑Step Guide
- Build an Arduino‑Powered Automatic Door with Ultrasonic Sensor
- Smart Arduino-Driven Automatic Watering System
- Build an Arduino RFID Door Lock – Master RFID Technology with a Step‑by‑Step Guide
- Boost Efficiency of Your Air Compressor Systems: Proven Tips & Strategies
- A Comprehensive Guide to Automatic Transmission Systems
- Automatic Lubrication Systems: How They Work and Why They Matter