


Smart Pill Dispenser: Precision Medication Management System
Components and supplies
 |
| × | 1 | |||
 |
| × | 1 | |||
 |
| × | 4 | |||
 |
| × | 1 | |||
| × | 1 | ||||
 |
| × | 1 | |||
| × | 4 | ||||
| × | 4 | ||||
 |
| × | 1 | |||
| × | 1 | ||||
| × | 1 |
Necessary tools and machines
 |
| |||
 |
| |||
 |
|
Apps and online services
 |
| |||
 |
| |||
 |
| |||
 |
| |||
 |
| |||
 |
| |||
 |
| |||
 |
|
About this project
Why this project?Currently there are on the market two types of pill dispensers: non-electric and automatic ones. Although the majority of them have a reminder mechanism (not always suitable for people with visual or sensory impairments), both types normally require a person who organizes the pills daily or weekly in different compartments, making the patient a dependent person. Nowadays due to Covid-19, family members or assistants to the elderly have more difficulties to take care of dependent persons.
That is why we saw the necessity to create a smart pill dispenser which doesn’t need a handmade pill organization, accessible to disabled people, and has the capacity to help the patients be more independent.
Here below we show you the 10 best pill dispensers of 2020:
As you can see, there is much to improve in the world of pillboxes. And this is exactly what SmartPill is going to solve.
How it works?SmartPill system is composed by 2 subsystems:
- Smartpill Dispenser: Physical device that will organize, store and dispense the pills. It will act as the main interface for the patient.
- Smartpill Web App: Web user interface that will allow the doctor or responsible person for the patient to configure and track patient intakes.
With the help of the web application with a nice friendly user interface, the doctor can configure up to 4 different pills for each Smartpill Dispenser and will select up to 3 intakes per day for each pill. This allows the doctor to change the dosage remotely whenever is needed without the intervention of the patient itself.
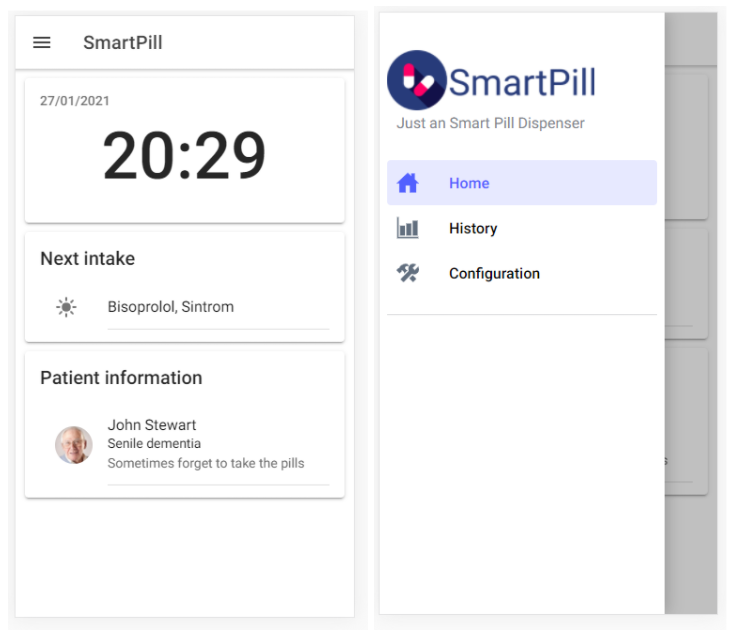
SmartPill system has been designed taking into account the difficulties that a patient with senile dementia, Alzheimer or visual or audible impairments can have. For this reason, the dispenser has a large format screen that will allow the patient to fill the pills in a comfortable way as well as an audible and light feedback that will remind the patient to take the pills just at the right time.
The user doesn’t have to worry about where or how the different pills have to be put. That’s because there is a smart mechanism which distributes the pills inside the pill dispenser and dispenses the necessary dose at the right time.
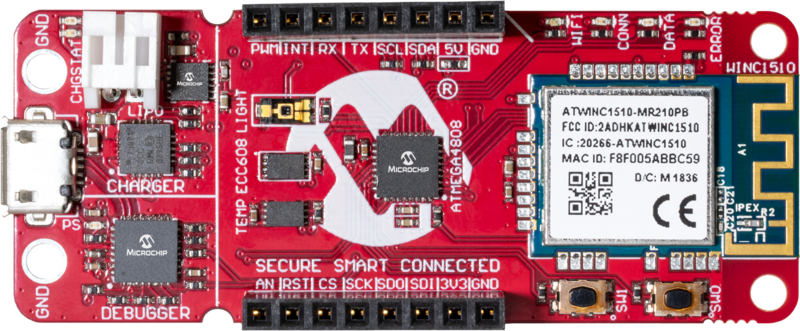
SmartPill Dispenser has a wireless Internet connection to the AWS Cloud thanks to the WiFi connection of the Microchip AVR-IoT board, so that can be remotely monitored and configured through the web application.
The app will also show when the pills have been taken and will notify the family member if the pill is not taken.
SmartPill DispenserDispensing System
You may be wondering, how does the dispensing system work? This section shows all of the different parts and explains their functionality.
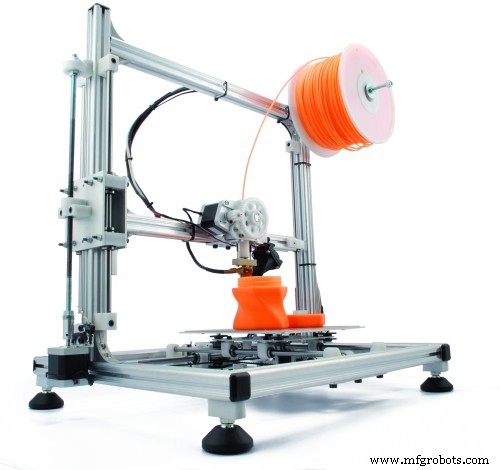
We must clarify that besides the screen, everything has been 3D printed with PLA Plastic. You can also check the .STL file of the whole dispenser available down below.
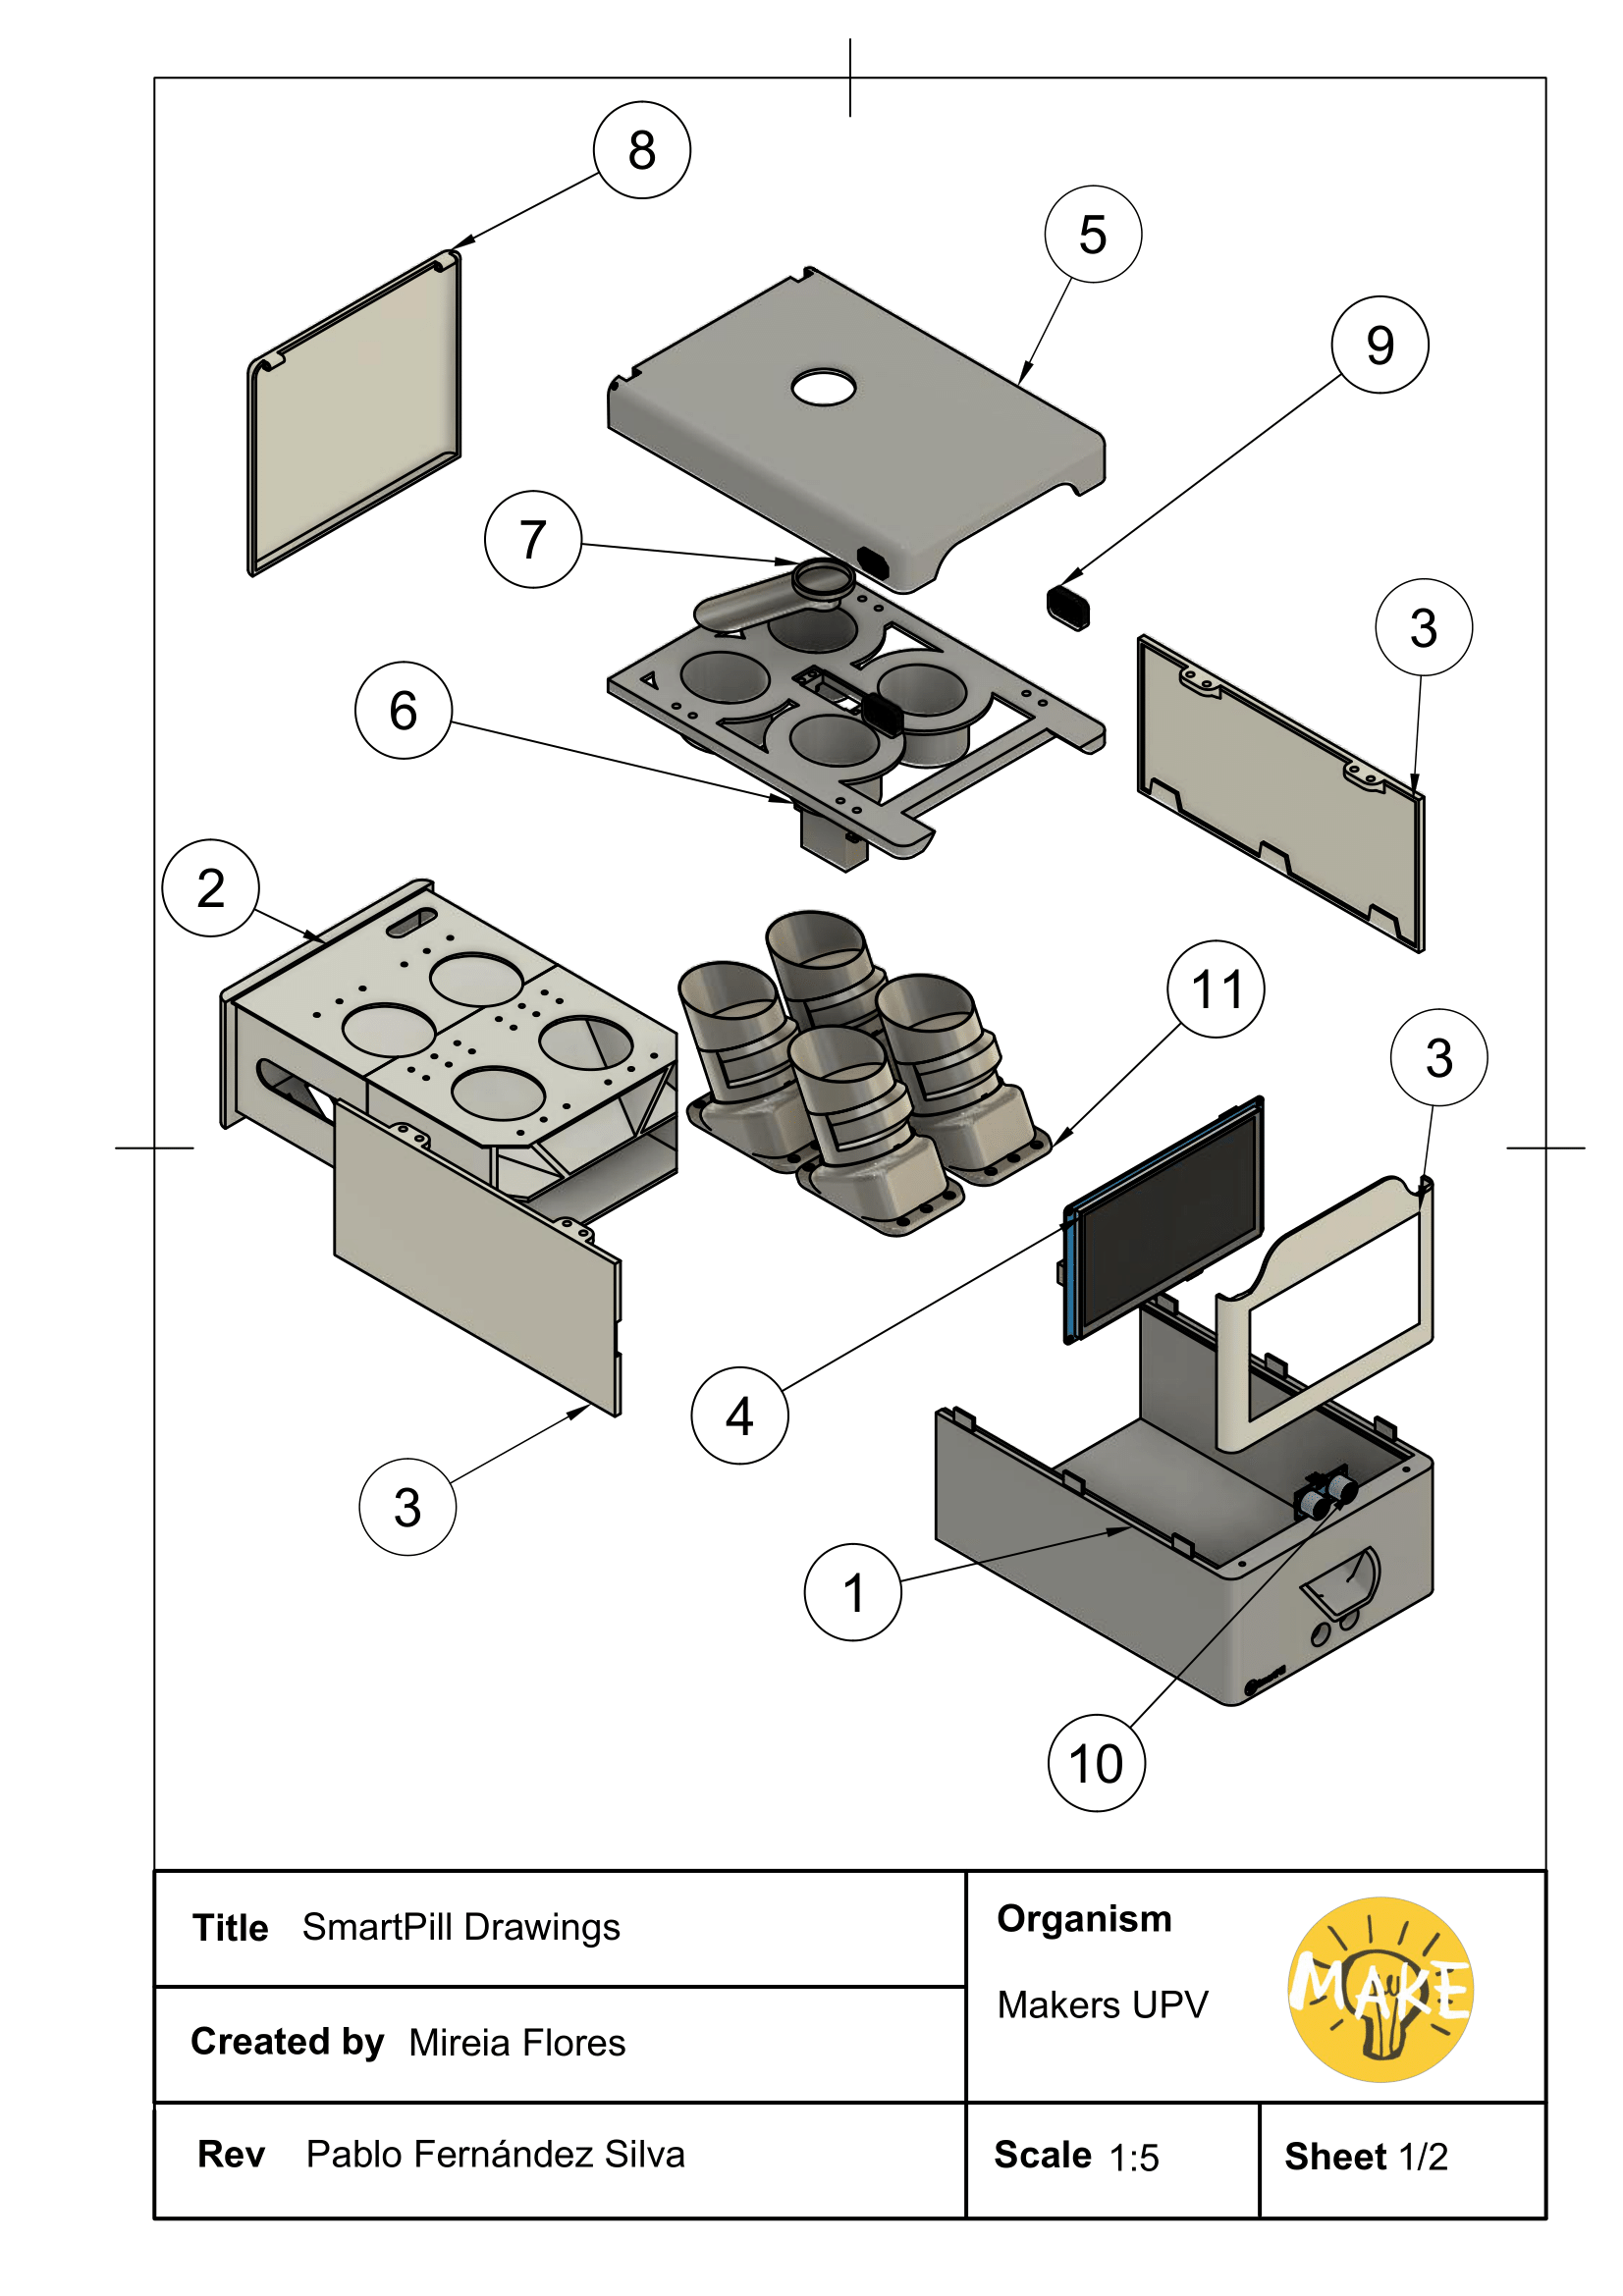
1. Base: It supports the rest of the dispenser. It has two holes in order to make the motion sensor functional. It contains a flap which brings the pills into the cup.
2. Slider: The top of the slider supports the pill containers. Underneath there is a slope in which the pills go all the way down to the flap. On the bottom there is a gap prepared to put all the electronics in it.
3. Side parts: Used to protect the hardware and pills from humidity, temperatures, dirt and dust.
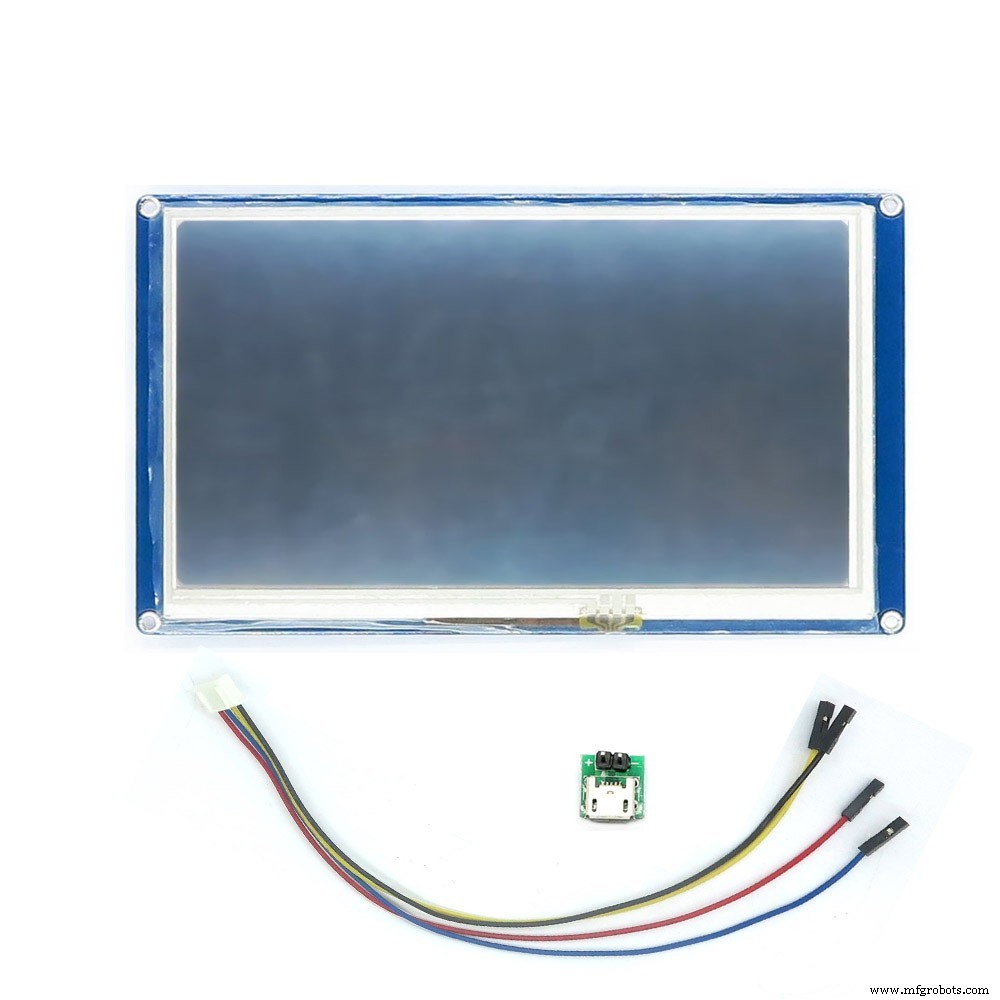
4. Nextion NX8048T070: Screen used as an interface between the dispenser and the user.
5. Top parts:
- Used to protect the hardware and pills from humidity, temperatures, dirt and dust (Top).
- Separates the drum from the pill containers (Bottom).
6. Parallax Servo 900-0005: 360º electric motor which puts in the right position part number 7.
7. Drum: Connection tube between the outside and the pill containers. It rotates in order to get to the right container.
8. Back door: Needed to get in and out the pill containers with the slider.
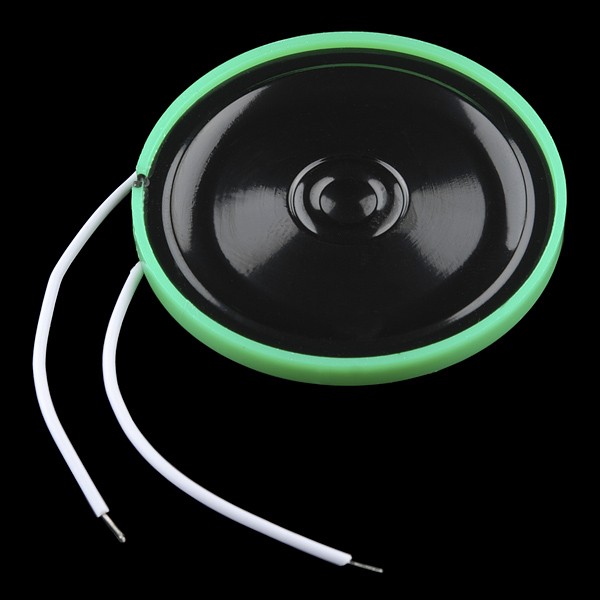
9. Speakers: They will communicate to the user all the information needed.
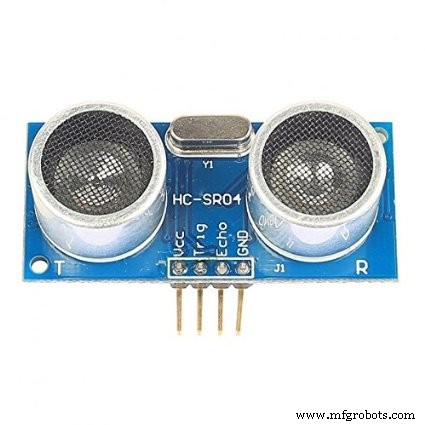
10. Ultrasonic Sensor - HC SR04 : This device will detect if the cup has been moved away.
11. Pill containers: They contain the pills and they dispense them at the right moment with the right quantity. As a prototype, we have designed the pill dispenser with 4 containers. However, it can be adapted to a larger capacity.
Do you want your own SmartPill Dispenser? Go download the STL files at the bottom and print all the parts with your 3D printer! The project is completely open-source.
In the next section we will explain step by step how to assembly the dispensing system.
Assembly
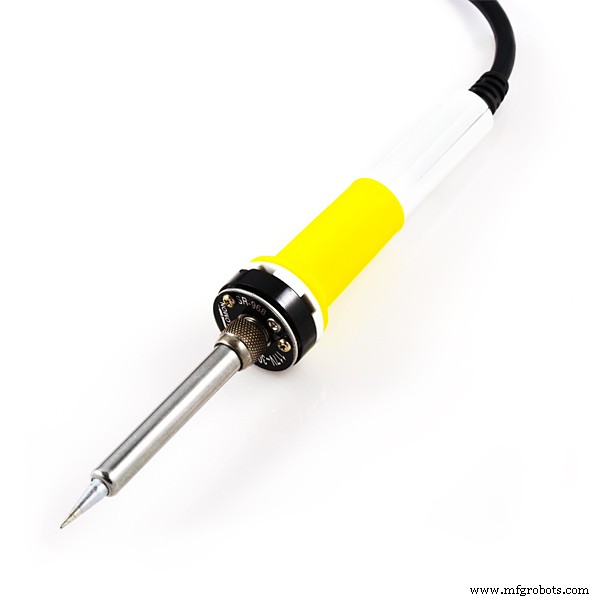
- In order to 3d print the Slider (Part 2 - General drawing) we have split it in thre parts. So, first of all we assembly it. Pick the nuts (2.3.2 - Slider Drawing) and fit them in the Slider (2.2 - Slider Drawing) with a welder. Then screw both parts (2.3.1 & 2.2 - Slider Drawing). Wait to put the cap (2.4 - Slider Drawing) until the electronic is wired up.
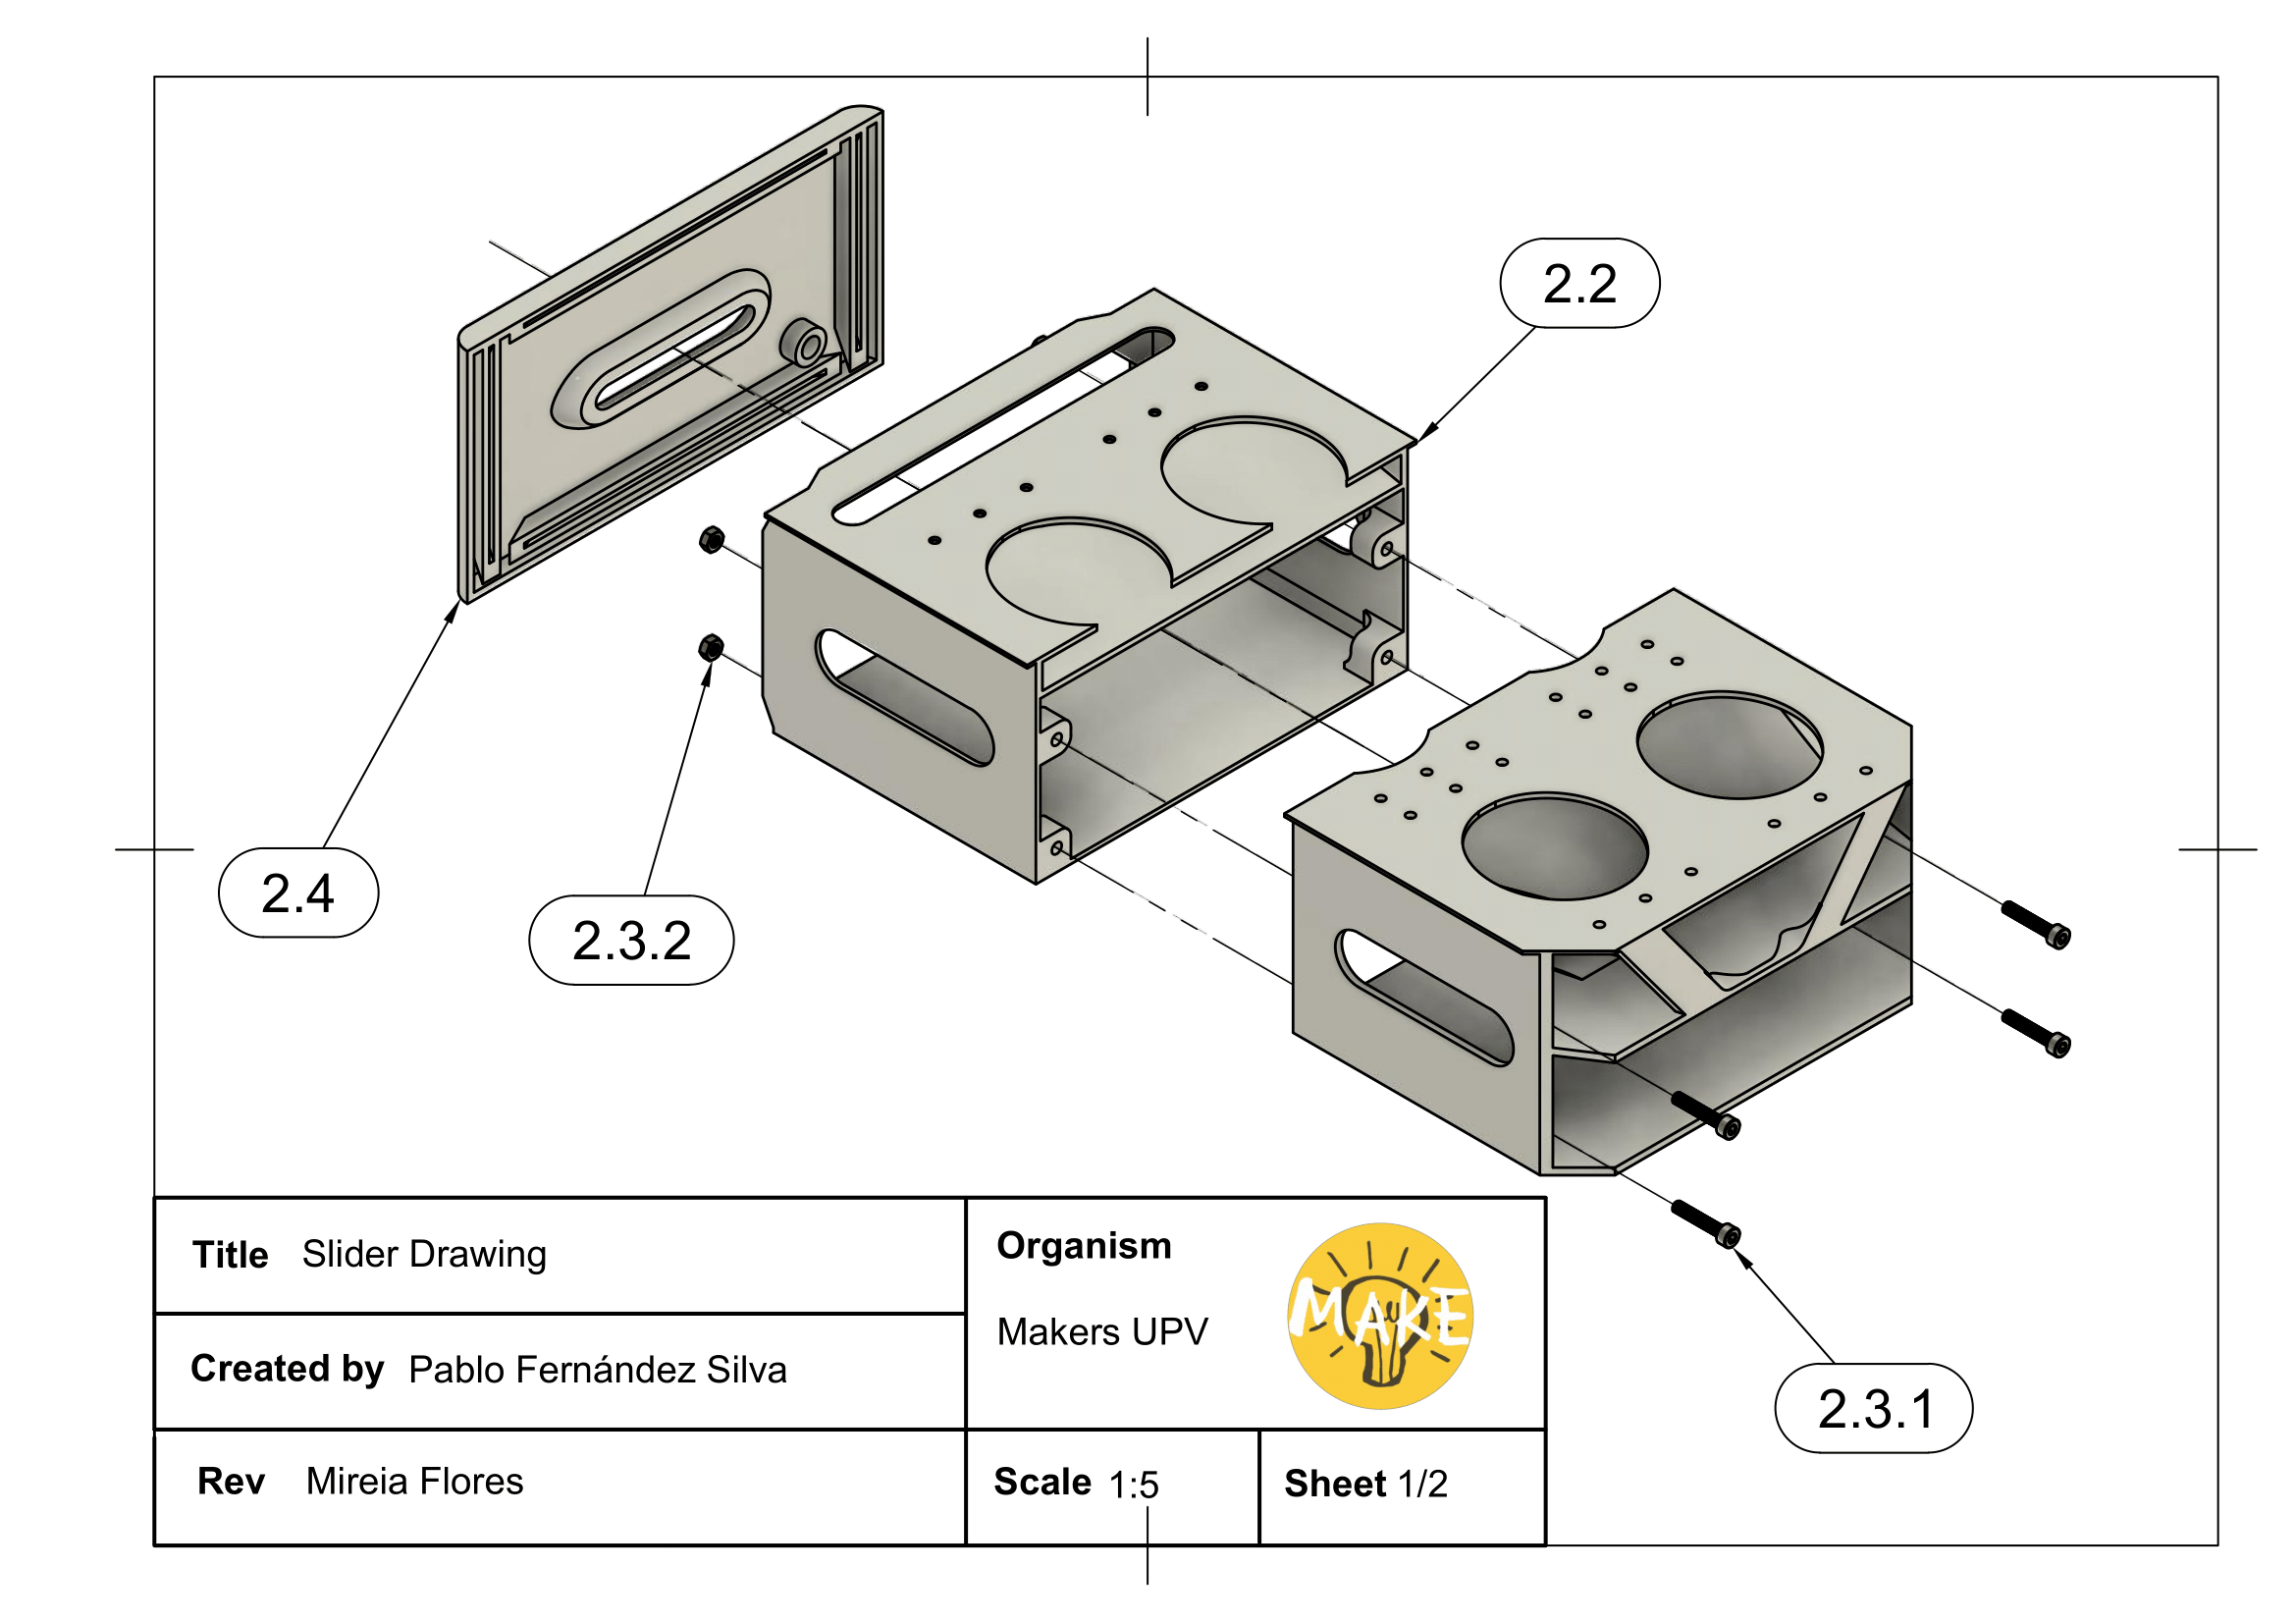
- Put the electronics inside the slider's gap, including the Ultrasonic Sensor - HC SR4 (Part 10- General Drawing) and screw the slider's cover (2.4).
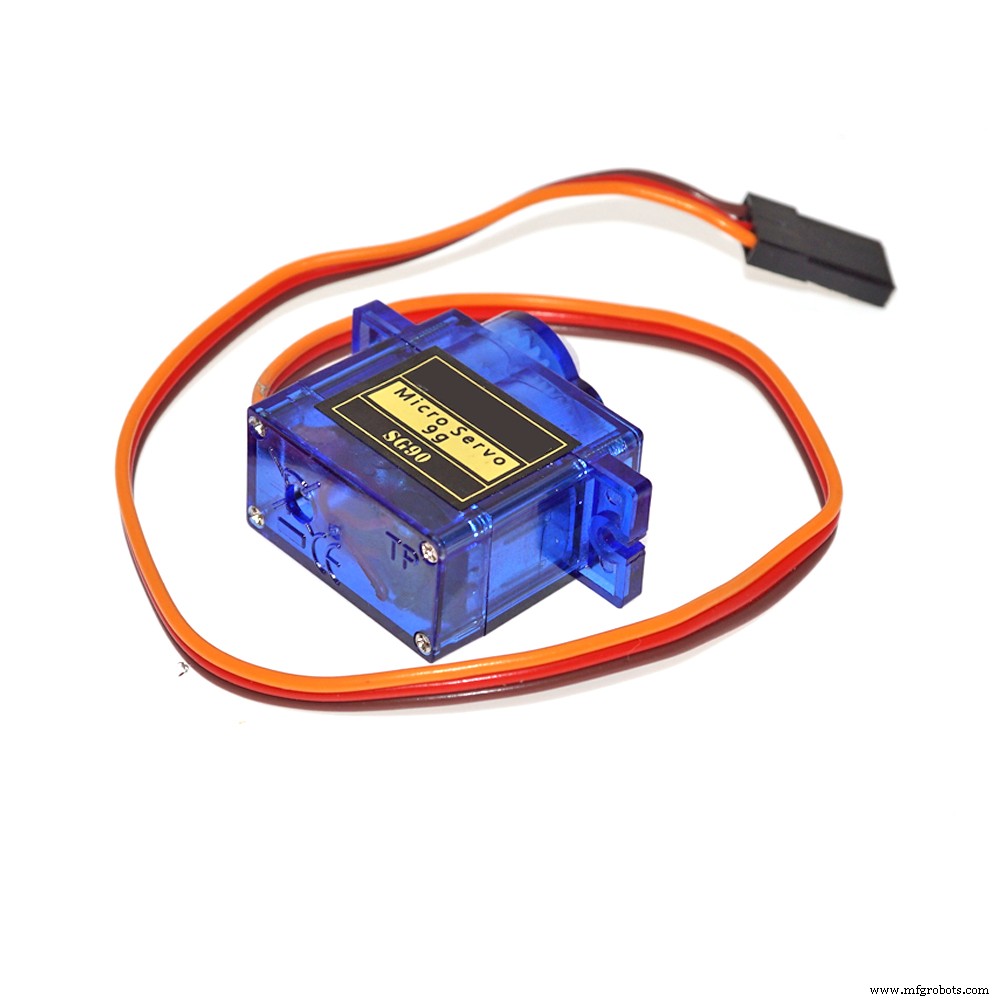
- Assembly the Pill containers (Look at Pill Containers Drawing) with a SG90 servo each. First join Part 1 with Part 7 and screw the SG90 to Part 7. Then join Part 3 with Part 4 (Wheel bearing) and finally add Part 2. Then screw the pill containers to the Slider's top (Part 2 - General drawing).

- Screw the Screen (Part 4 - General drawing). to the proper side part and fit the plug. And then fit together the Sider parts (Part 3 - General drawing) to the base until they click.
- There are two Top parts ( (Part 5 - General drawing). We assembly them by picking again the nuts and fitting them in the parts. This time no welder is needed. Fit the Drum (Part 7 - General drawing) and the Parallax Servo (Part 6- General drawing) between them and we screw both top parts together.
- Finally screw the Back door (Part 8 - General drawing) to the top part's assembly.
Electronics
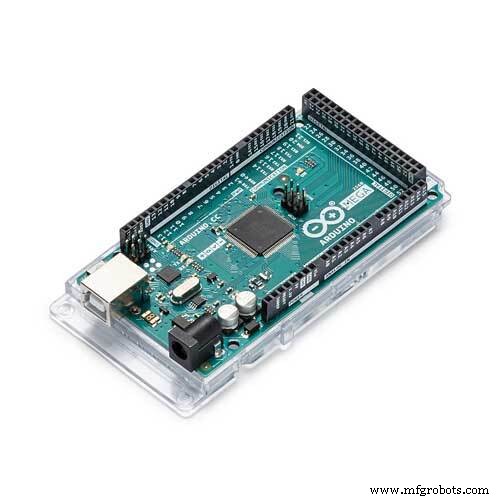
The main electronics brain is an Arduino Mega that will take care of controlling the servo motors that dispense the pills, as well as the Nextion touch screen, the Real-Time Clock (RTC), the sound effects and the AVR-IoT communications board.
- AVR-IoT is connected to the Arduino Mega by means of a Serial UART connection.
- Servo motors are controlled by PWM.
- RTC is connected to the Arduino Mega by I2C.
- IR barrier Sensor for detecting the pills are connected to the analog pins of the Arduino board.
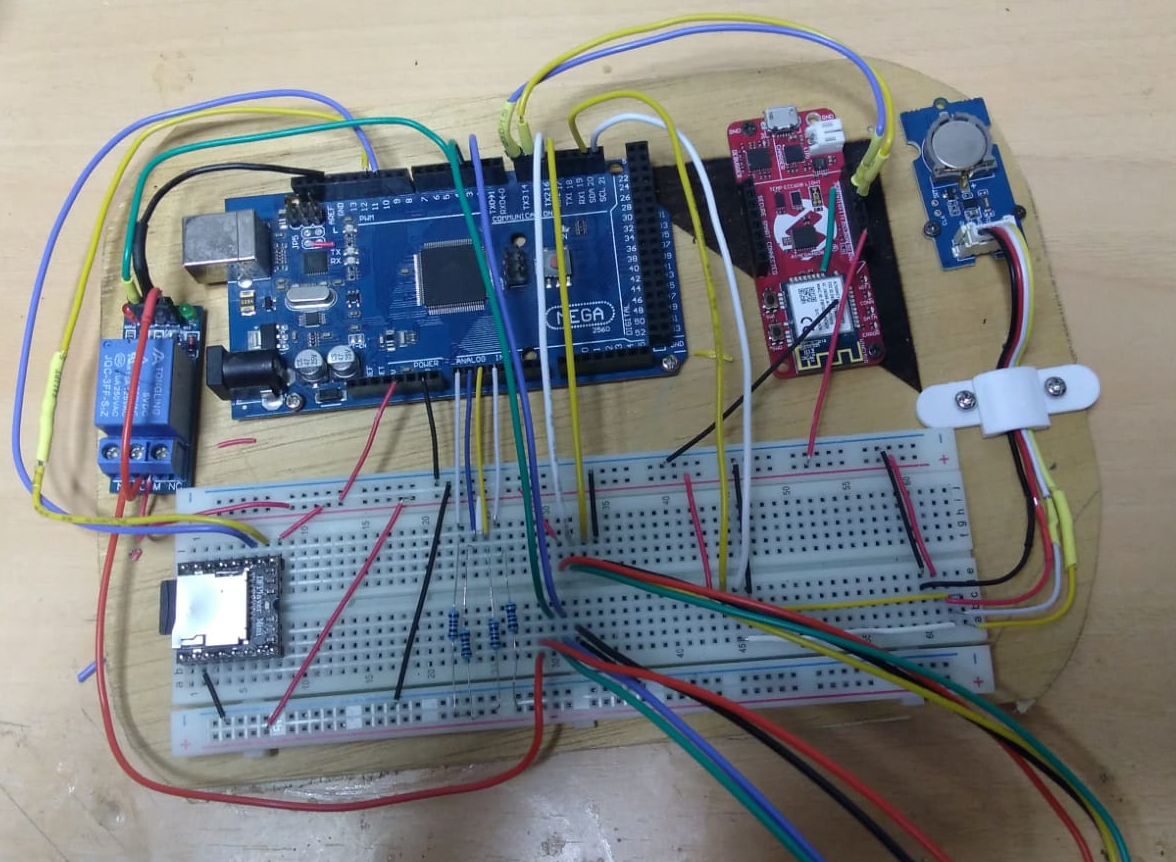
In order to replicate the project, you should do all connections as described in the schematic with the help of a protoboard or self-made PCB. We strongly recommend mounting the circuit in a kind of wood plate as inthe picture above.
The schematic can be found at the end of the page.
SmartPill Web AppThe SmartPill Web App aims to facilitate the experience that entails setting up an electronic device and controlling someone's else medication.
- An easy SmartPill Dispenser set up, with the patient's information, the pills that must be taken, the dosage needed, and the time interval.
- Monitoring the pills intake.
How it has been developed?
To develop a web from the start you work with the fundamental areas of programming: backend and frontend. The Smartpill WebApp has been created with:
- Backend. AWS API Gateway (HTTT API Rest).
- Frontend. Ionic & Angular. To develop a web from the start you work with the fundamental areas of programming: backend and frontend.
Ionic is a completely free and opensource NodeJS framwork based on AngularJS which provides platform-specific UI elements through a library of native components for iOS and Android. It uses front-end technologies like HTML, CSS, JavaScript, and Angular for application development. Ionic can use Angular CLI (Command-Line Interface) to create fully functional mobile applications.
Take in mind that before starting your web with Ionic, Node.js has to be installed to function, as Ionic is part of a large JavaScript ecosystem.
Ionic Framework Documentation page can guide you without problem within the start of your app. However I will briefly mention the first steps followed for the creation of the Smartpill app:
1. Go to the command line of your code editor and install ionic CLI with npm:
$ npm install -g @ionic/cli2. Create a new app:
$ ionic start smartpill-webui blank3. Go to the folder of your frontend and run it:
$ cd smartpill-webui
$ ionic serve
Running your app means that you can test it in your device’s browser. This Ionic function is essential for debugging and testing.
Smartpill Web App basic structure.
The Smartpill Web App is organized in a simple manner, to simplify the navigation. Inside the app’s folders we can find the app routing module, the app components files, a “services” folder and a folder for each route.
If you have never touched frontend technologies, you will notice in the overview of this code how the different languages interact with each other. But if we were to describe briefly how it works, the part of the web you will see is the html file of the folder, while the typescript file are the functions that run when the user interacts with the page. The modules.ts are for routing purposes.
The most essential files of the Smartpill app are:
- app-routing.module.ts. It allows the user to navigate through all different routes available. Certain paths allow the web developer to carry variables from one route to another.
const routes: Routes = [
  {
    path: '',
    redirectTo: 'page-login',
    pathMatch: 'full'
  },
  {
    path: 'page-config',
    loadChildren: () => import('./page-config/page-config.module').then( m => m.PageConfigPageModule)
  },
  {
    path: 'page-status',
    loadChildren: () => import('./page-status/page-status.module').then( m => m.PageStatusPageModule)
  },
...- post.service.ts. It communicates with the API. Here the main interfaces are defined (Post, Dep and Log), along with the class PostService. PostService has the main basic functions to communicate with the API: get function, to receive information from the API; post, to create a new article in the API; delete, to delete an article; and put, to edit an existing article in the interface, but deleting the previous data it contained.
getPosts() {
return this.http.get<Post[]>(this.API);
}
getDeposit() {
return this.http.get<Dep[]>(this.DEPOSIT);
}
getLogs(){
return this.http.get<Log[]>(this.LOGS);
}
createPost(pill: string, deposit: string, weight: string, morning: boolean, afternoon: boolean, night: boolean) {
return this.http.post<Post[]>(this.API, {
pill,
deposit,
weight,
morning,
afternoon,
night,
});
}
removePost(id: string) {
return this.http.delete<Post>(`${this.API}/${id}`);
}
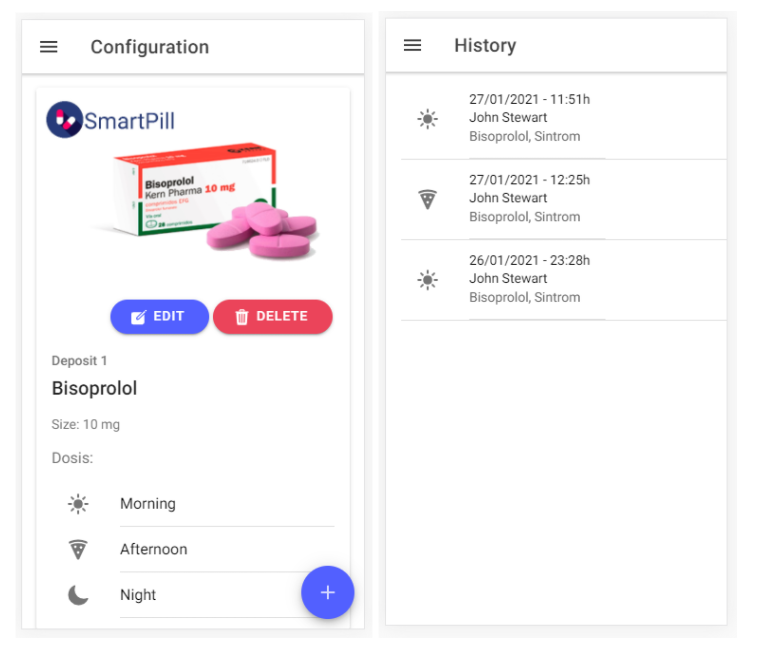
...Configuration and edit pill page.
Smartpill has a route dedicated to show all the posts programmed called “page-config”. To create a new post to configure the pills, the user has to press a button at the bottom right corner which will reroute them to the edit page “page-edit-pill”. However if they do not want to create but to edit, by pressing on the edit button of an already created post, the web will also redirect them to the “page-edit-pill” but carrying the id of the post. Those two statements are defined as follows:
- Create a new post button
<ion-fab routerLink="/page-edit-pill" vertical="bottom" horizontal="end" slot="fixed">
    <ion-fab-button>
        <ion-icon name="add"></ion-icon>
    </ion-fab-button>
</ion-fab>- Edit post Button
<ion-button [routerLink]="['/','pill','edit', post.id]" shape="round">
    <ion-icon slot="start" name="create"></ion-icon>
    Edit
</ion-button>
The “page-edit-pill” page recognizes whether the user has entered the route with or without an id, and performs the corresponding functions with help of simple ifs.
- Path with Id defined in route module
{
  path:'pill/edit/:postId',
  loadChildren:() => import('./page-edit-pill/page-edit-pill.module').then( m => m.PageEditPillPageModule)
},- Reading if the route carries an Id
ngOnInit() {
    this.actiavtedRoute.paramMap.subscribe((paramMap) => {
        if(ParamMap.get("postId")) {
            this.postService
                .getPostById(paramMap.get("postId"))
                .subscribe((res) => {
                    this.post = res;
                    this.editing = true;
                });
        }
    });
}- If display example
<ion-card-header>
    {{editing?
    'Update Your':
    'Create your'
    }} Deposit
</ion-card-header>- If button example
<ion-button expand="full" (click)="editing? updatePost(): savePots()" class="ion-margin-top">
{{editing ? 'Update': 'Submit'}}
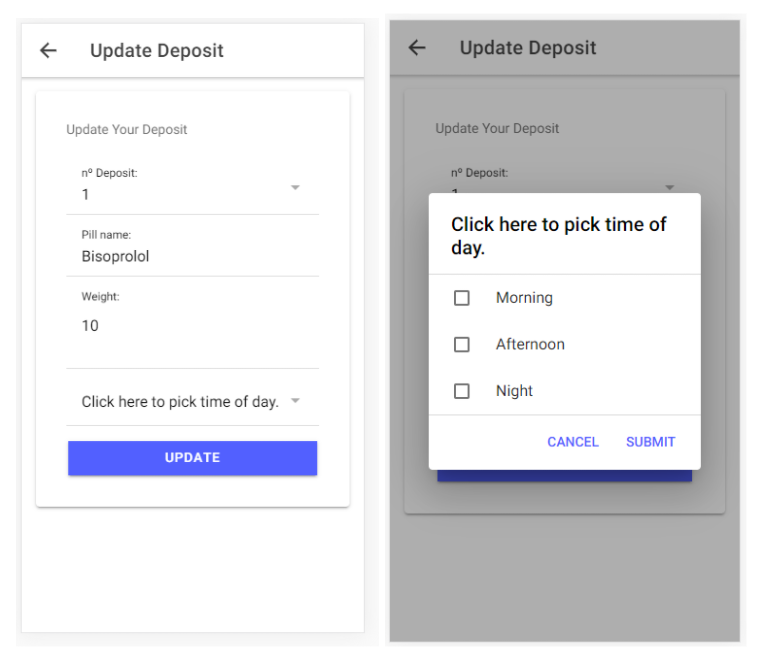
</ion-button>The “edit-pill-page” interacts with the user with ionic UI components such as inputs and selects, which will be sent later to the API:
- Time multiple select
<ion-item>
    <ion-label position="floating">Click here to pick time of day.</ion-label>
    <ion-select [(ngModel)]="time" (ionChange)="onChange($event)" multiple="true"
        cancelText="Cancel" okText="Submit">
        <ion-select-option value="morning">Morning</ion-select-option>
        <ion-select-option value="afternoon">Afternoon</ion-select-option>
        <ion-select-option value="night">Night</ion-select-option>
    </ion-select>
</ion-item>- Pill input
<ion-item>
    <ion-label position="floating">Pill name: </ion-label>
    <ion-input [(ngModel)]="post.pill"></ion-input>
</ion-item>
The “config-page” has been programmed with Angular Life Cycle, so when you return from the “page-edit-pill” or from any other, the page will be refreshed and the posts will reload, updating the changes automatically.
- Load Post Function
loadPosts(){
    this.postService.getPosts().subscribe(
        (res) => {
            this.posts = res;
        },
        (err) => console.log(err)
    );
    this.postService.getDeposit().subscribe(
        (res) => {
            this.dep = res;
            console.log(this.dep);
        };
        (err) => console.log(err)
    );
The “config-page” has also a button that allows the user to delete any pill. It is an async function that displays a message alarm to verify if they are sure of this action.
- Deliting a Post
async removePost(id: string){
    const alert= await this.alertController.create({
        header: "Alert",
        subHeader: "Are you sure you want to delete this deposit?",
        message: "You won't be able to recover it.",
        buttons: [
            "Cancel",
            {
              text: "Yes",
              handler: () => {
                this.postService.removePost(id).subscribe(
                    (res) => {
                        console.log(res);
                        this.loadPosts();
                    },
                    (err) => console.log(err)
                );
              },
            },
        ],
 });
 await alert.present();
}
Logs page
The logs page gets the information of the pills dispensed and displays it as a log on the history route. It works similar to “config-page” but it only loads the information located in the API:
- Getting Logs
loadPosts() {
    this.postService.getLogs().subscribe(
        (res) => {
            this.log = res;
            console.log(this.log);
        },
        (err) => console.log(err)
    );
}

ngOnInit() {
    this.loadPosts();
}

ionViewWillEnter(){
    this.loadPosts();
}- Displaying logs
<ion-content>
<ion-list>
   <ion-item *ngFor="let log of log">
     <ion-item>
       <ion-icon *ngIf="log.time == 'morning'" name="sunny" slot="start"></ion-icon>
       <ion-icon *ngIf="log.time == 'afternoon'" name="pizza" slot="start"></ion-icon>
       <ion-icon *ngIf="log.time == 'night'" name="moon" slot="start"></ion-icon>
       <ion-label>
         <h4>{{ log.date | date: 'dd/MM/yyy' }} - {{ log.date | date: 'HH_mm' }}h</h4>
         <h3>{{log.patient_name}}</h3>
         <p>{{log.pills}}</p>
       </ion-label>
     </ion-item>
   </ion-item>
</ion-list>
</ion-content>AWS is the service provider chosen to deploy SmartPill System as it offers a wide range of services within the same ecosystem allowing us to go for a completely serverless approach. This permits the application to escalate to the user's needs and only pay for what it is used.
Smartpill Cloud Architecture
Smartpill system uses a completely serverless architecture using Amazon Web Services. This permits the application to scale up and down in order to be adapted to the user's needs. The architecture is described in the diagram below:
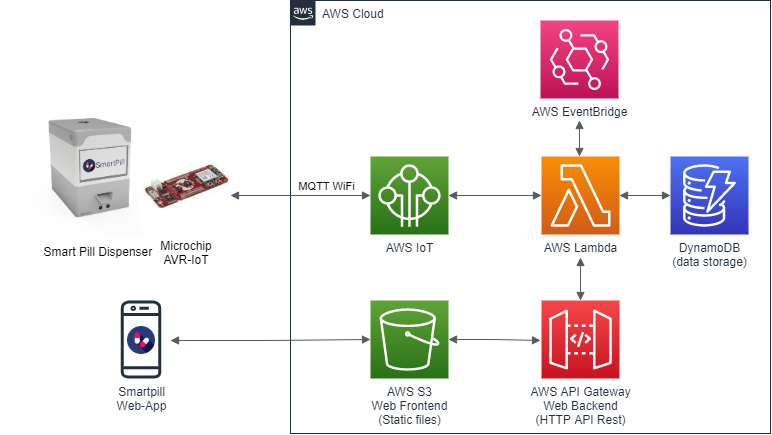
The Smartpill Dispenser uses a Microchip AVR-IoT board with WiFi capabilities to communicate with the AWS ecosystem. AVR-IoT is connected through AWS IoT Core by MQTT protocol. This allows bidirectional connectivity between the Cloud ecosystem and the hardware itself. This communication is used to send the dispense message to the Dispenser as well as the confirmation events from the dispenser to the cloud.
The web application frontend developed using Ionic Angular NodeJS framework is compiled, and their static files are uploaded to AWS S3 storage service. The backend of the web application is a HTTT API Rest service developed with AWS API Gateway that calls Lambda functions. These Lambda functions communicate with the DynamoDB database that stores the pills configuration and intake logs.
AWS Event bridge is used as a scheduler in order to trigger the dispense events at the correct time. This event triggers a Lambda function that will search the database for the pills that are needed in each intake and will send this information to the SmartPill Dispenser by means of the IoT Core.
AWS-IoT Core
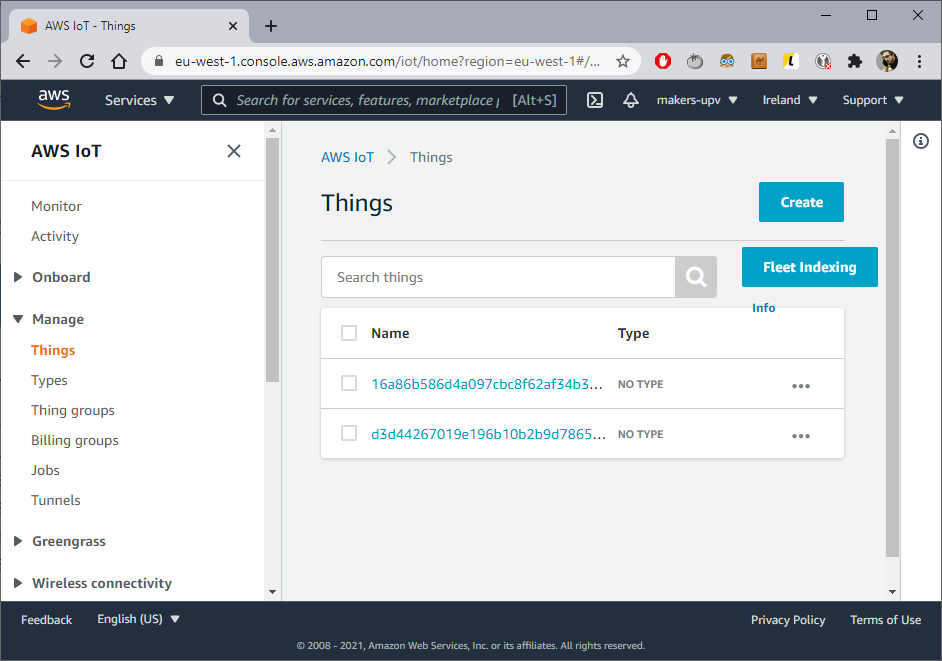
The first thing you need to do in order to get up running the AVR-IoT board with AWS IoT Core is to connect to the board to your AWS Account. This process is described by Microchip in the IoT Developer Guides for AWS
With this, you will have your AVR-IoT Board ready to go in your AWS account. You can see this in AWS IoT Core under the Manage → Things tab.
Then make sure your AVR-IoT board has Internet access by configuring it with your WiFi credentials as described in the Getting Started Guide:
AWS DynamoDB
Then you will want to configure the web application, for this, the first thing you need to do is to register the DynamoDB tables that the web app needs:
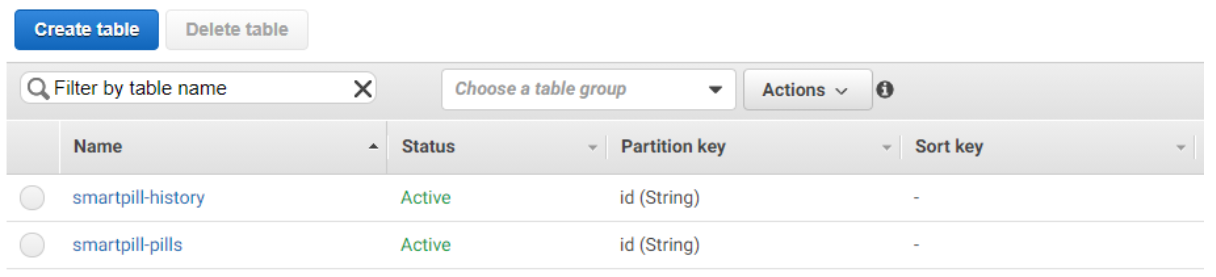
- smartpill-history: Will store all the logs for taken pills
- smartpill-pills: Will store your configured pills
Click on create table:
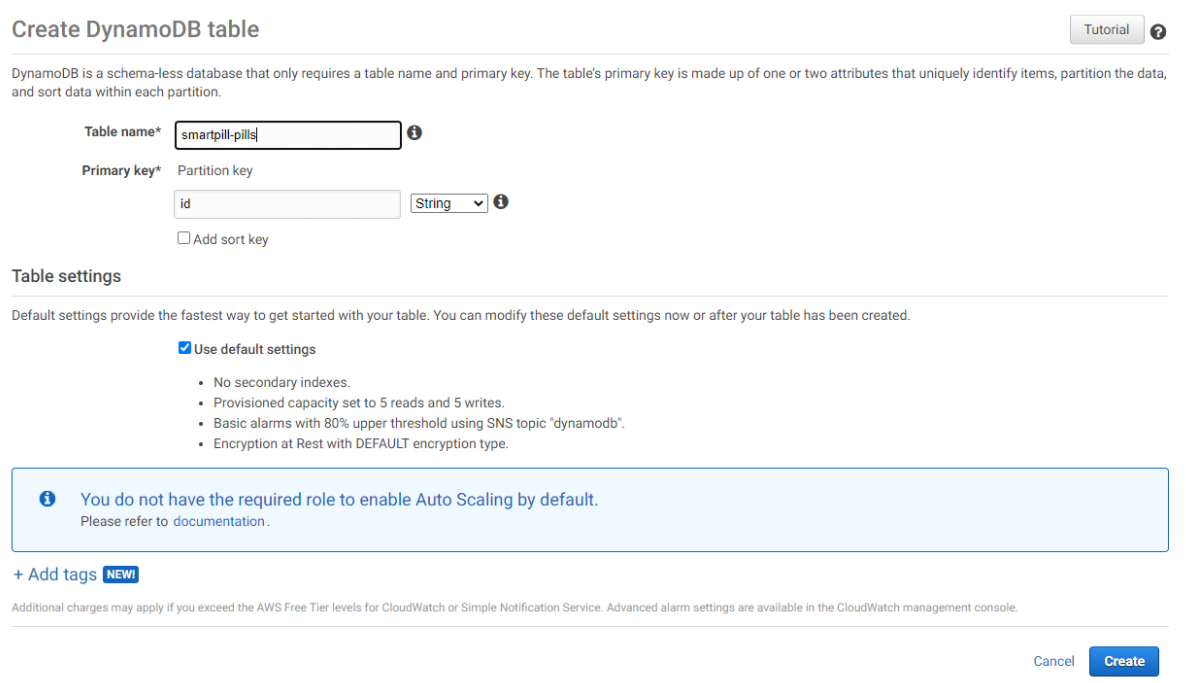
Give it the exact name and Select "id" as theprimary key.
AWS Lambda
Make sure you have AmazonDynamicDBFullAccess attached. So that Lambda function can Read/Write from the DynamoDB Database. For this, go to the Permissions tab:
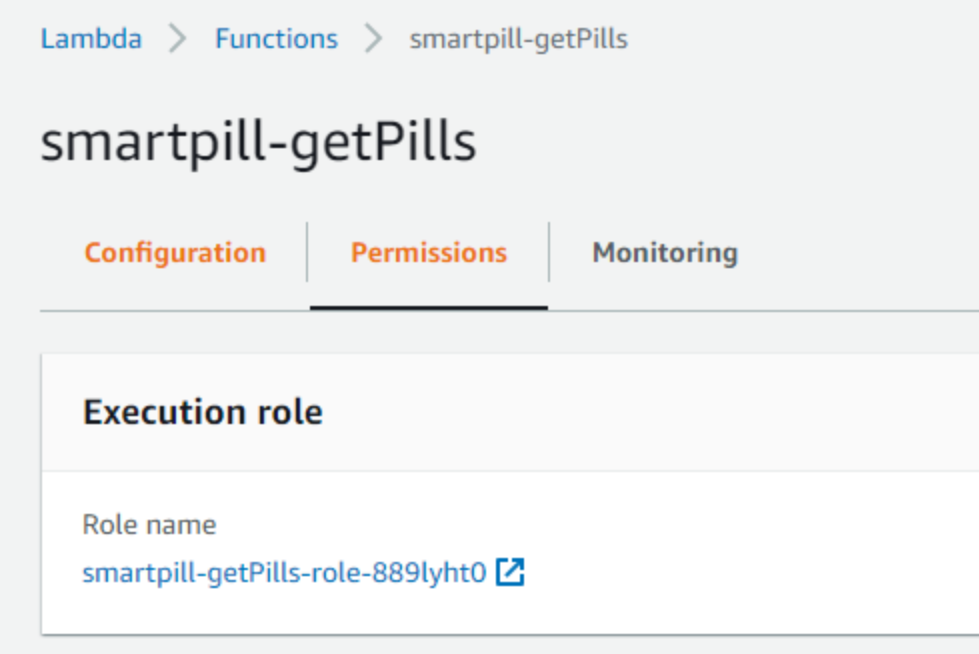
And click de Role Name. This will redirect you to the Execution Role for this Lambda function. We recommend that each Lambda function has its own Execution Role.
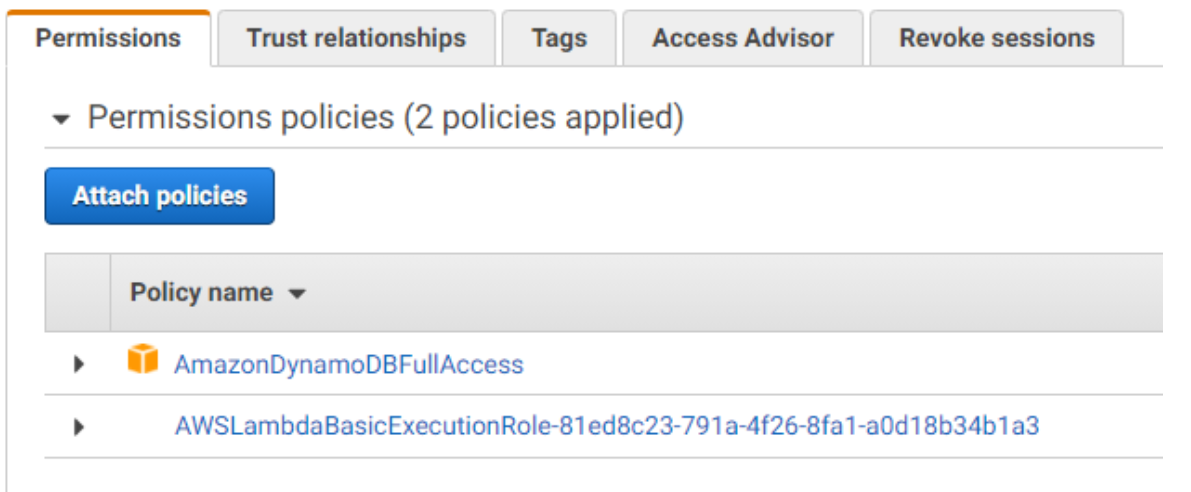
AmazonDynamoDBFullAccess must appear, if not click on Attach policies and Search for "dynamodb":
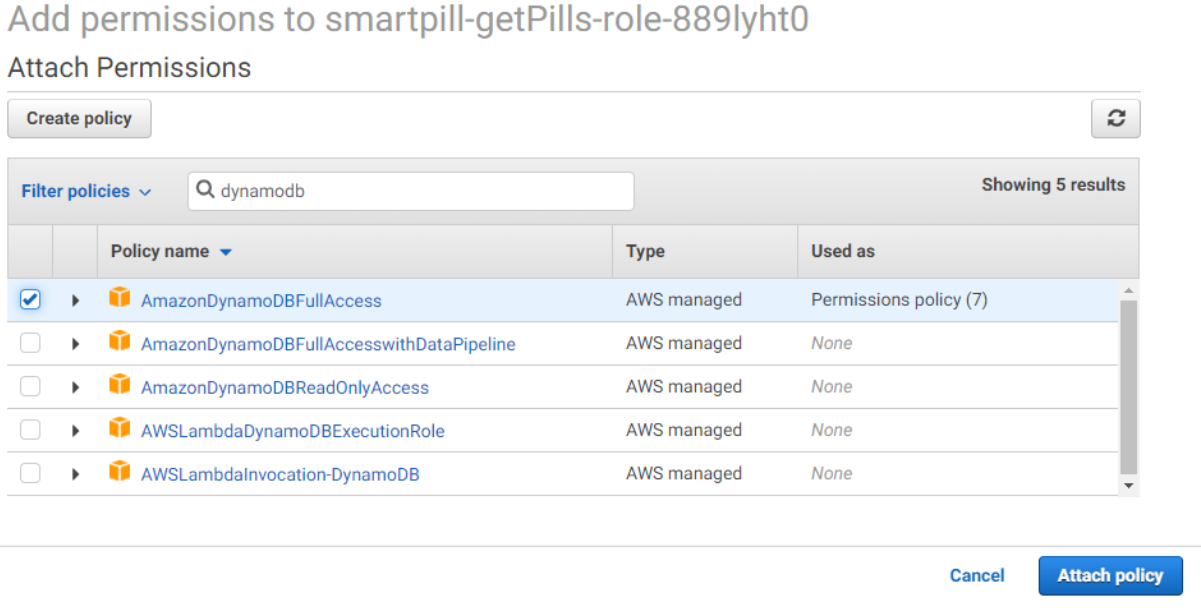
Giving the Lambda function full DynamoDB access is only safe for the purpose of this tutorial, not to be done for a production environment.
Now go to configuration and add the function code from the Github repository (link below):
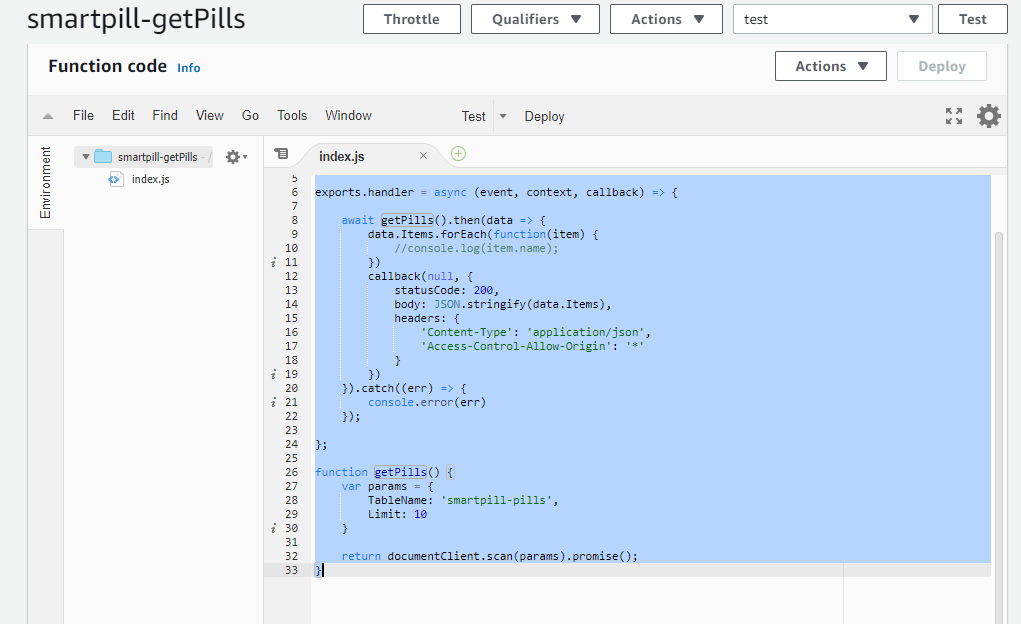
Repeat this for all the Lambda functions on the repository.
Then, we will configure the integrations between Lambda and IoT Core so that the proper function is executed when the message is send by the board.
We will configure the confirmation of dispensing message sent by the AVR-IoT so that the corresponding log entry and notification can be generated on the database.
We go to AWS-IoT Core, click on Add and Rules to configure a Rule:

Click on Create new Rule a give a name: smartpill_confirmationpill and a short description
Then enter the following query statement:
SELECT * FROM 'confirmationpill'and configure a 'Send a message to a Lambda function' action to point to the 'smartpill-confirmationpill' previously created:
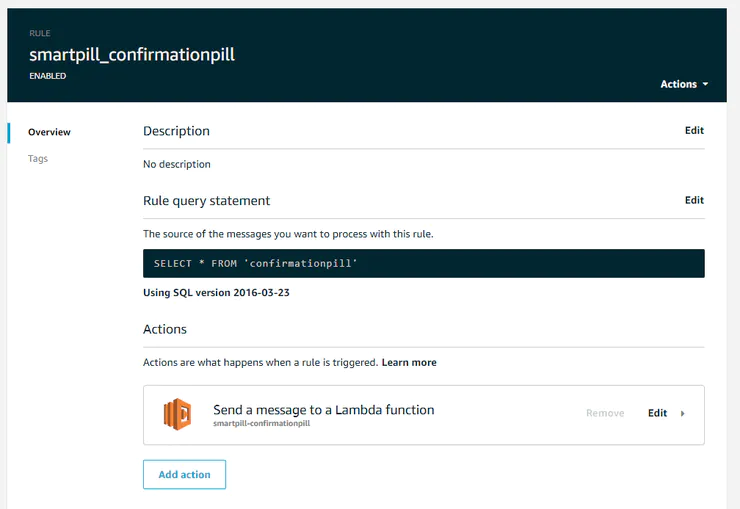
You are ready to go to the next part.
AWS Event Bridge
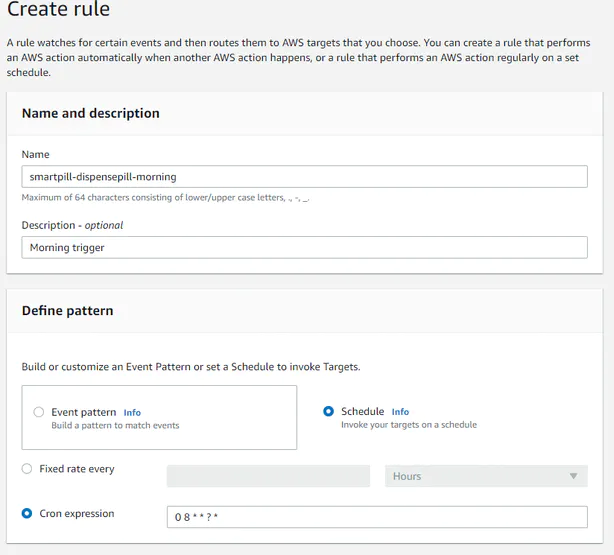
Event Bridge will take care of launching the lambda function that will send the message to the SmartPill Dispenser in order to dispense the pill at the correct time. We will configure 3 trigger scheduled events to do that. One for the morning, one for the afternoon and one for the night intakes.
Go to AWS Event Bridge service and click on "Create a Rule".
Give it a name and configure de Schedule event pattern as a cron expression:
NOTE: Take into account that these cron expressions are in UTC time.
Select the 'smartpill-dispensepill' Lambda function as a Target:
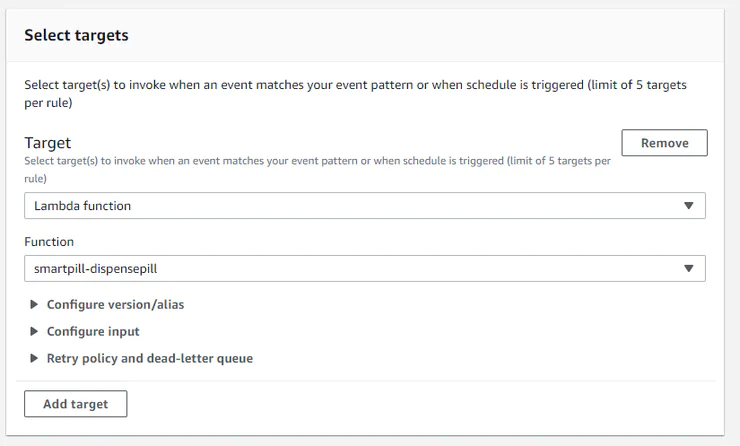
This Lambda function will be executed at the defined time.
Define two more Rules for the desired time on morning, afternoon and night intakes.
AWS API Gateway
Go to AWS API Gateway and click on Create API. Choose HTTP API and click on Build:
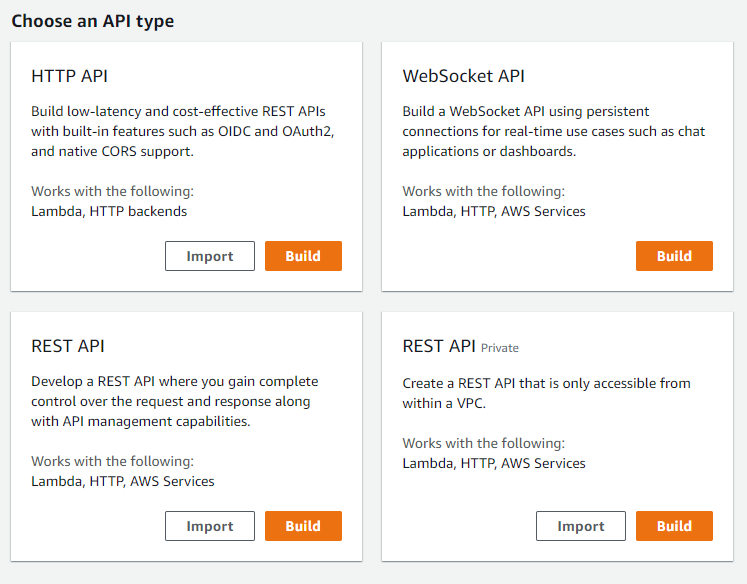
Give it "smartpill-webui" as a name (or whatever you want, this do not really matters)
And configure all the Lambda functions as Integrations:
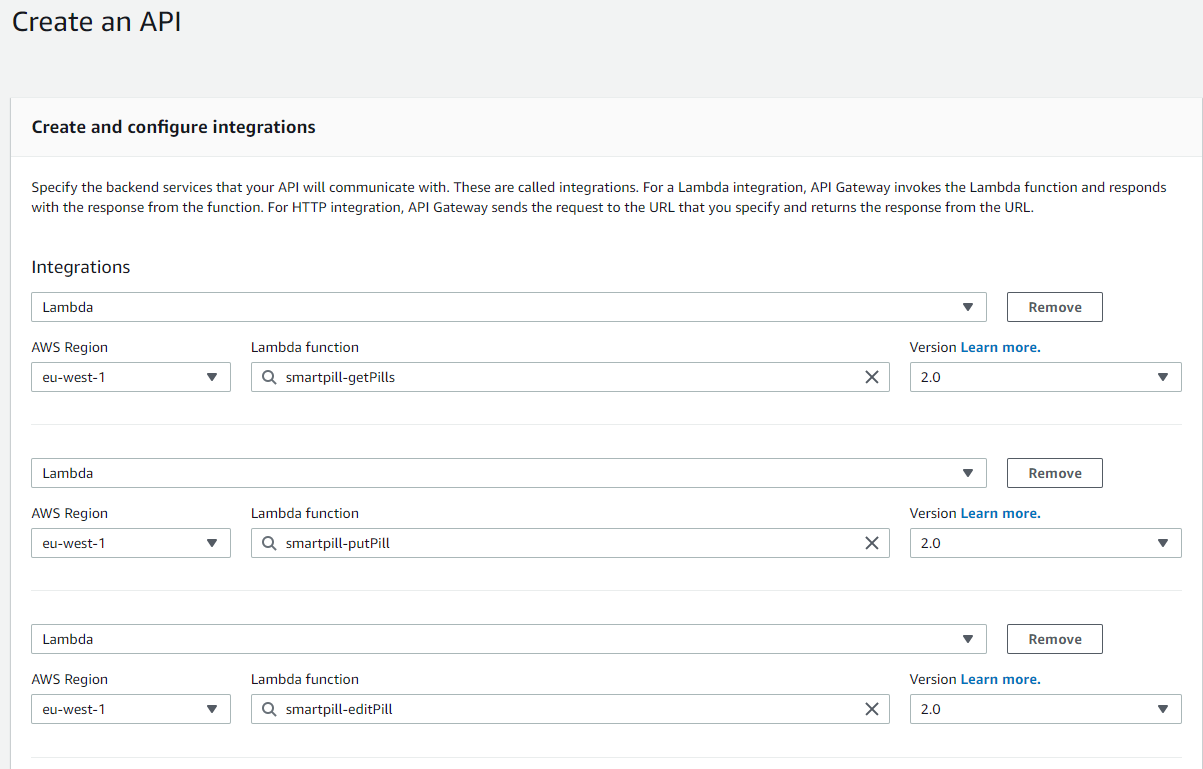
Click Next and configure all the routes as specified in table below:
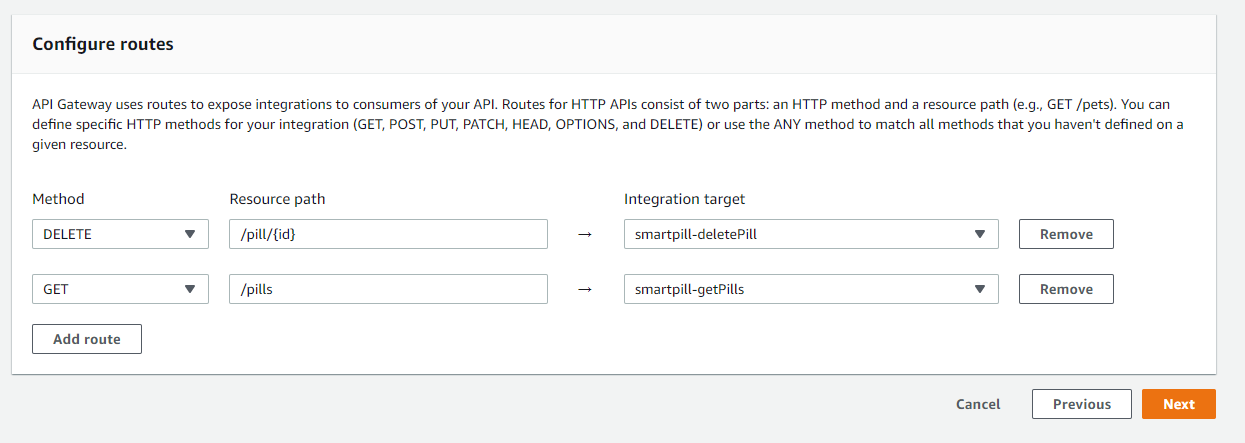

Finally, deploy the API to get a HTTP endpoint.
Alternatively you can import the JSON file 'smartpill-api.json' on the repository down below.
AWS S3
AWS S3 storage service is made for storing files but it can also act as a static web server for example a web page. In order to do so, you first need to create a Bucket.
Go to S3 and Click on "Create a Bucket":
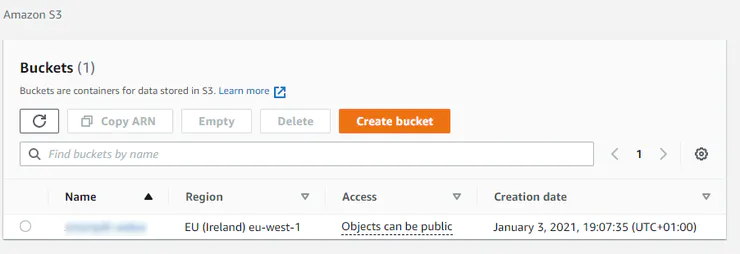
Give a friendly name (this will be your DNS).
Now you will have to activate Static website hosting feature. Go to properties and go straight to the bottom. You will find this:
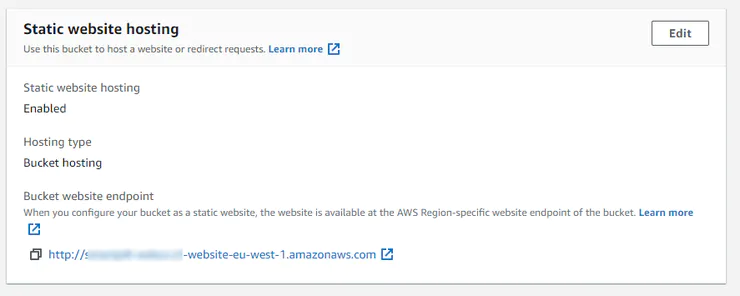
Click on "Edit" and Enable the Static website hosting feature and select 'index.html' as your index and error document:
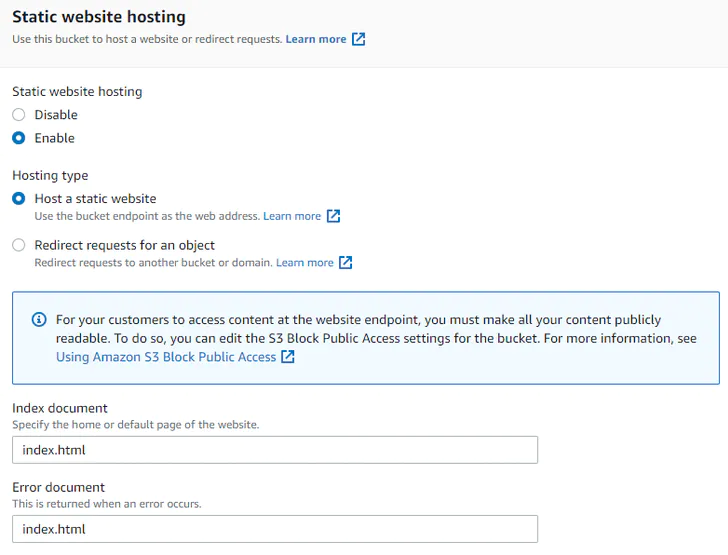
Then upload your website static files that Angular has compiled and access your DNS. You are ready to go!
AVR-IoT BoardAVR-IoT board from Microchip is used as a communication interface in order to provide connectivity to the Cloud to the Dispenser. It is connected to the Main Arduino Board by means of a Serial interface.
Firmware for the AVR-IoT WA Development Board based on the original example
The already implemented CLI have been extended including the command "pill" , its corresponding callback pill_command() that parses the message and sends th confirmation JSON by MQTT to the topic "confirmationpill". Also, the message in case of unknown message is customized as well as in the callback in case of incorrect parameter.
The original CLI used the USART2, which is connected to the debugger by the PCB but is not accessible. For this version, the CLI structure and the funtionality printf() are now implemented on the USART1, which is avaliable with the pin conectors RX and TX. This alows us to use this CLI with any external device, taking into account the following configuration:

We have also managed to add a custom MQTT topic subscription with a JSON parser. On the aplication_manager.c could be found the modified version of subscribeToCloud() to subscribe to "dispensepill" custom topic and how it is linked to a custom callback receiveddispenseFromCloud() in which the data from the JSON is extracted.
On IoTPill.h header are defined the main structures used to control the data received and sent.
In order to enable communication between the Main Arduino board and the AVR-IoT we have developed a simple communication bidirectional protocol that has two messages.
- dispensepill: Will be triggered by AWS Event Bridge at the right time and will send the event to the Dispenser to dispense a pill
- confirmationpill: Will be send by the AVR-IoT board when the pill has been correctly dispensed in order to announce it to the AWS, which will log into the database.
'dispensepill' message (AWS → IoT Board → Arduino)
Event Bridge will trigger the smartpill-dispensepill Lambda function to send by MQTT to IoT Board a JSON formated string that has this fields:
{
    "cmd": "dispensepill",
    "npills": 2,
    "intake": {
        "time": "morning"
    },
    "pills": {
        "1": {
            "pill": "Ibuprofeno",
            "qty": 1,
            "deposit": 1,
            "weight": 200
        },
        "2": {
            "pill": "Paracetamol",
            "qty": 2,
            "deposit": 2,
            "weight": 500
        }
    }
}
and the IoT board will send by USART to the Arduino:
D Ibuprofeno 1 1 200 D Paracetamol 2 2 500 \n'confirmationpill' messageArduino → IoT Board → AWS
The arduino will send to the command "pill " and, if the delivery was incorrect or correct, it will add a ' 1 ' if it was okay:
pill 1This message will be processed by the custom CLI of the IoT Board taking into account the intake previusly send ( specifying the corresponding "time") and it will send the following JSON to AWS:
{
   "time":"morning",
   "state": "ok"
}
AWS will send the log with Lambda functions triggered to the Web service
Any questions? Leave a comment below and we will do our best to help you!
Code
Smartpill Web Application
Frontend code for the webapp user interfacehttps://github.com/makers-upv/smartpill-webuiSmartpill Backend Lambda functions
https://github.com/makers-upv/smartpill-lambdaSmartpill AVR-IoT Code
https://github.com/makers-upv/smartpill-avriotSmartpill Arduino Code
https://github.com/makers-upv/smartpill-arduinofwCustom parts and enclosures
Thingiverse Repository
Thingiverse Repository for SmartPill DispenserCAD file on thingiverse.com Pill Dispenser Mechanism that will take care of dispensing the correct quantity of pills. It is controlled by a servo.SmartPill Dispenser enclousureThe full assembly of the project. It's in STEP format so it can be modified by everyone.smartpill_full_assembly_ybV7DD7ehX.stepSchematics
SmartPill Electronics HW connectionsManufacturing process
- The Science and Manufacturing of Sleeping Pills: From Ancient Remedies to Modern Pharmacology
- Birth Control Pills: History, Benefits, Risks, and Production
- Smart Bartender: Build Your Own Raspberry Pi‑Powered Cocktail Station
- Smart Traffic Light: Adaptive Street Lighting Powered by IoT
- Intelligent Smart Waste Bin: Optimising Waste Collection with IoT Sensors
- UnifiedWater v1 – Complete Arduino Water Quality Sensor Kit
- Smart Blinds: Automated Light Control with Arduino & Solar Power
- KITtyBot: DIY Smart Robot Kit with Arduino Pro Mini, Servos, IR Control & Power Supply
- Build a Reliable FM Radio with SparkFun & Arduino Components
- Track ME: Arduino Mega 2560 Car Tracker Prototype with GPS & GPRS