


Track ME: Arduino Mega 2560 Car Tracker Prototype with GPS & GPRS
Components and supplies
 |
| × | 1 | |||
| × | 1 | ||||
| × | 1 | ||||
| × | 1 | ||||
| × | 1 | ||||
| × | 1 | ||||
 |
| × | 1 | |||
 |
| × | 1 | |||
| × | 1 | ||||
| × | 1 |
About this project
A while back I decided to build a Car/Personal tracker.
This was my first prototype on this direction.
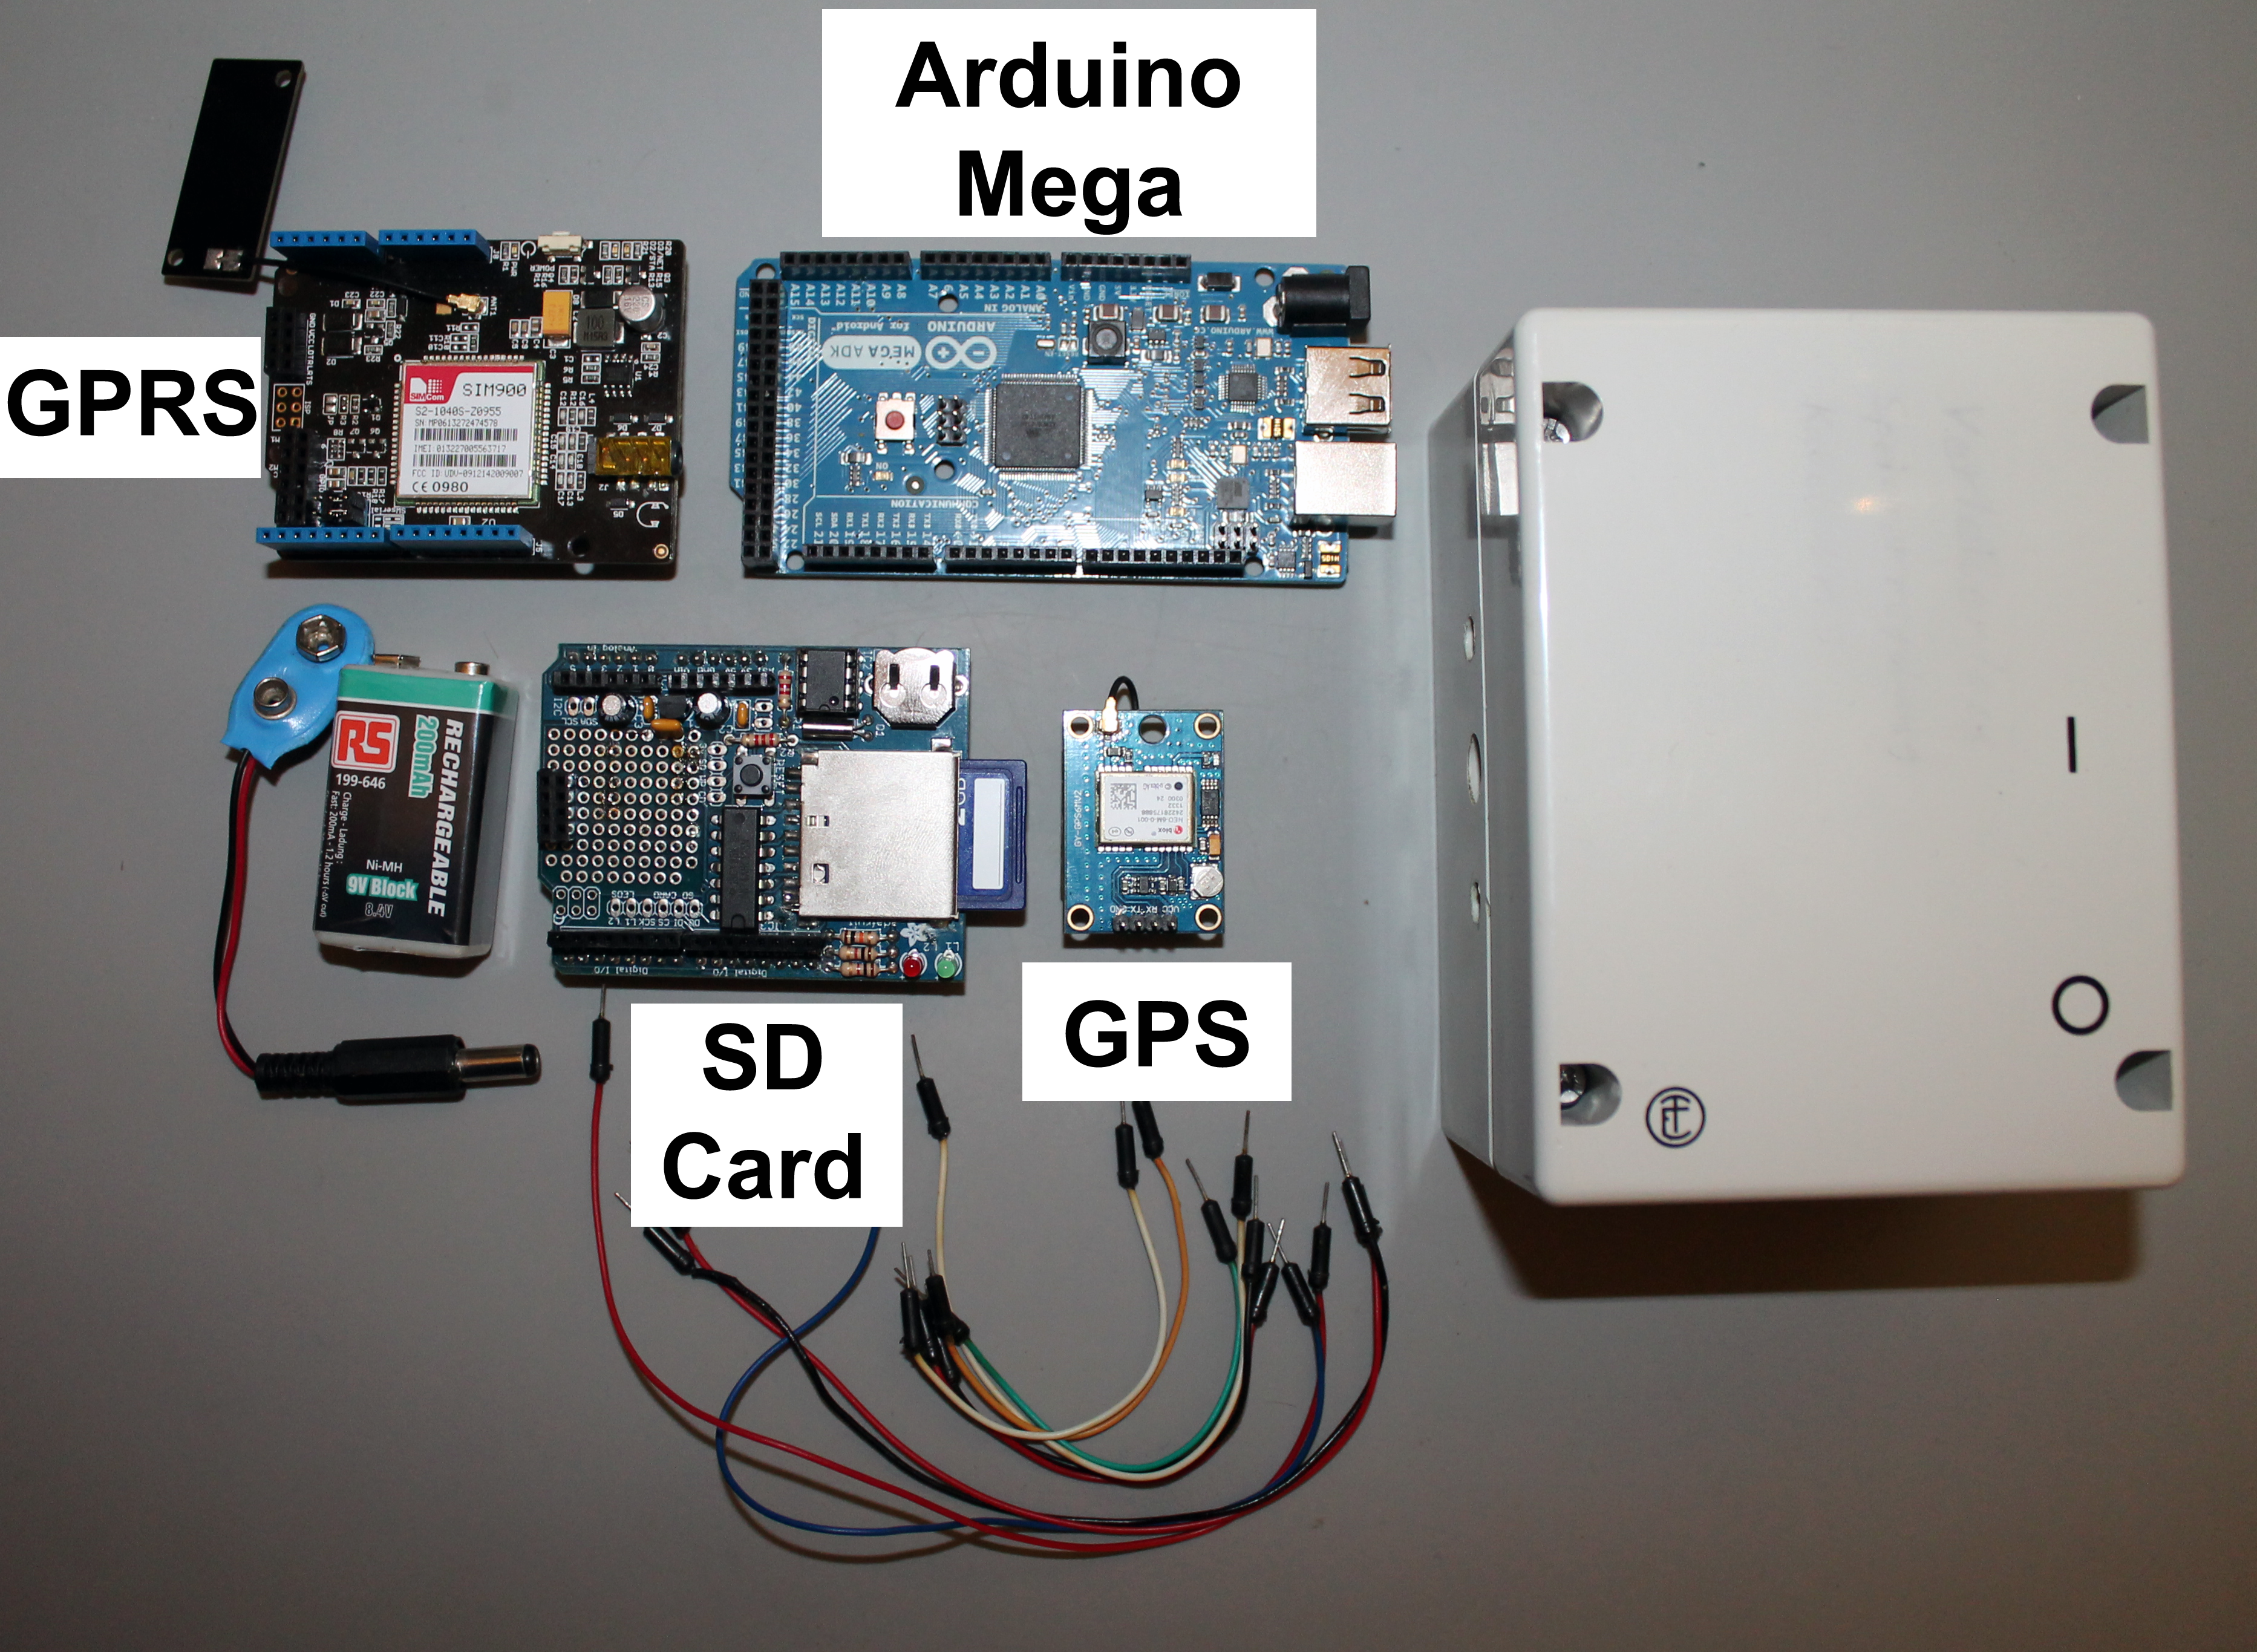
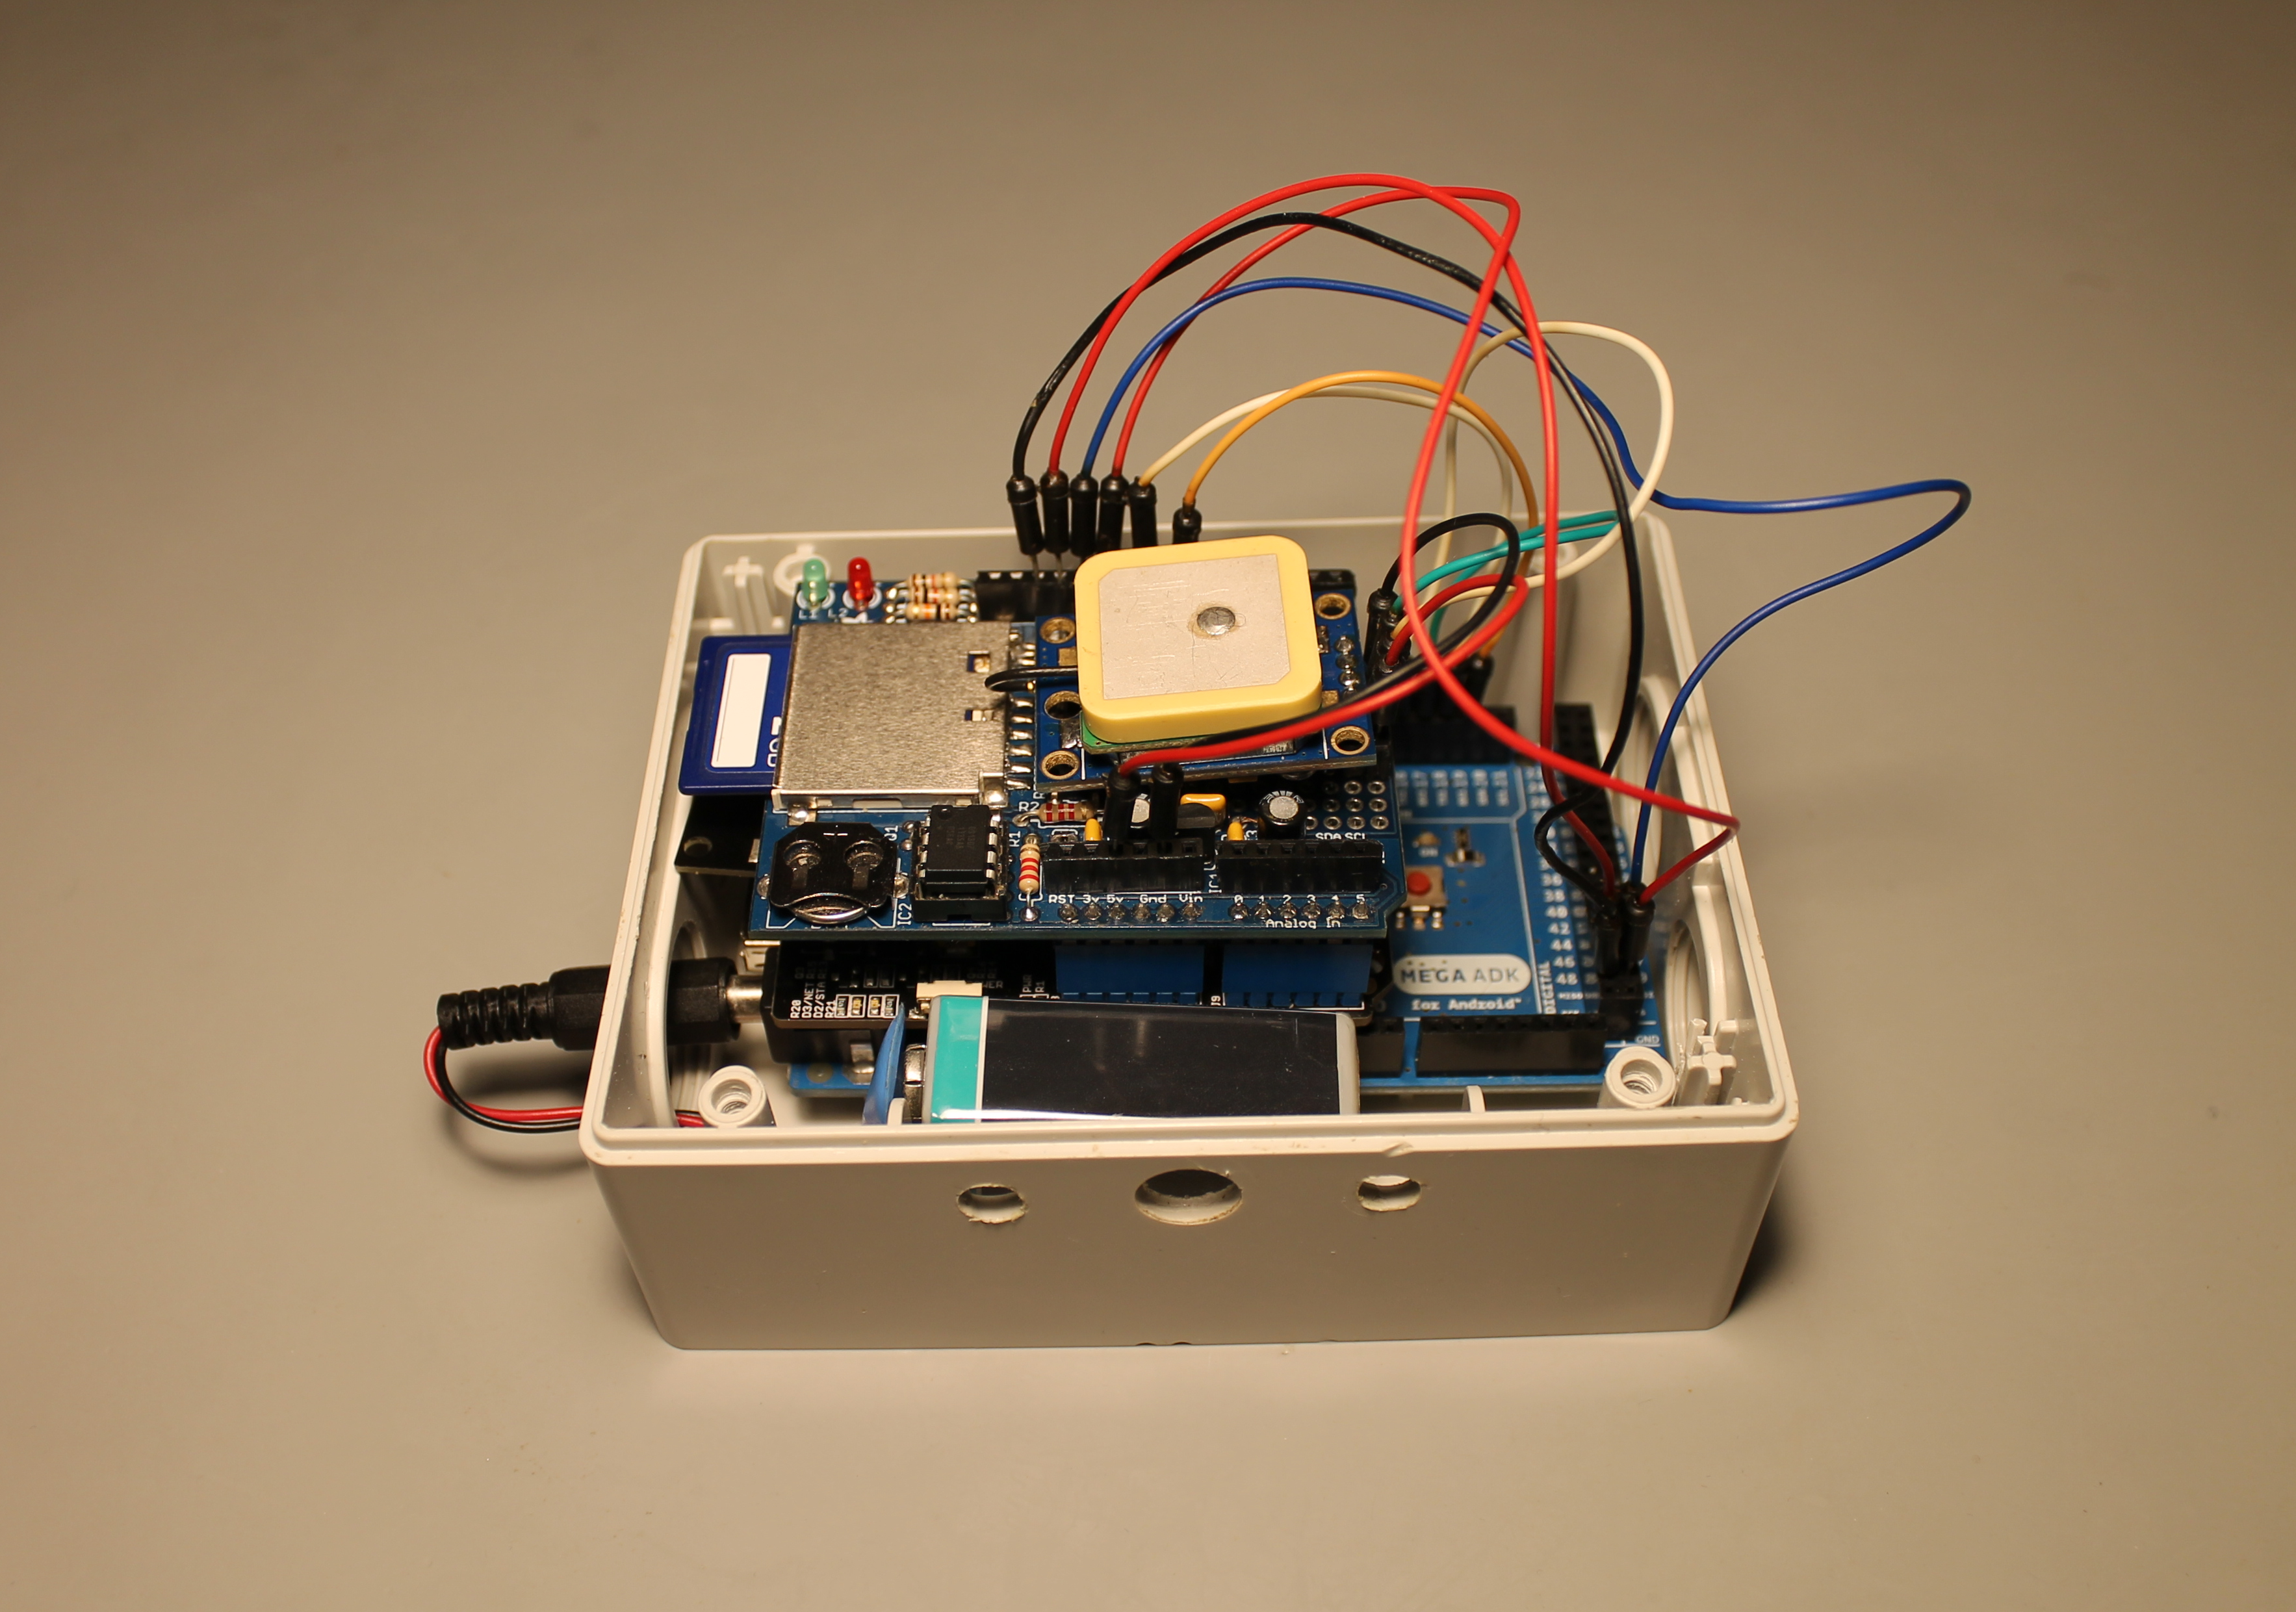
The system itself is very simple. Just an Arduino Mega, a GPS, a GPRS Shield and an SD Card. This one is optional but I included because I thought in launching a challenge to my friends in Facebook, they call the system and get an SMS with my position or my last known position.
The system is always searching for the actual position. If someone calls the number of the SIM card, the system will send an SMS with the actual position and with a link to google maps. For example:
Hugo location is now: Lat: 54.315010, Log: 10.130997. http://maps.google.com/maps?q=54.315010,+10.130997
If the GPS is not receiving any position, the system will send the last known position. For Example:
I can not seem to find Hugo. Last time that I've saw him, was in: Lat: 54.315010, Log: 10.130997. http://maps.google.com/maps?q=54.315010,+10.130997
The date, time, position and SMS status are then stored in the SD Card.
I used:
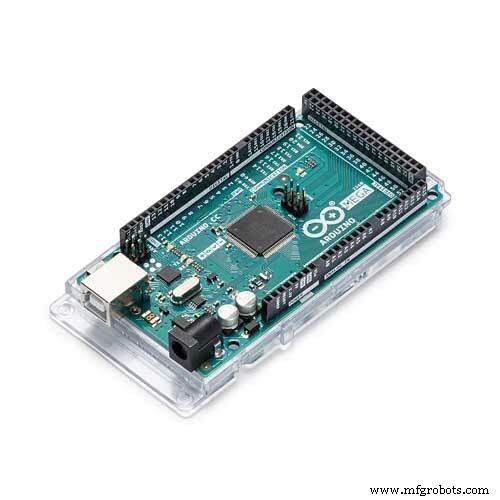
1x Arduino MEGA
1x GPRS Shield (It is also possible to use other GSM shields available in the market)
1x GPS (I used the NEO 6, very popular in ebay)
1x SD Card Shield
1x 9V Battery
1x Plastic Box
Some wires
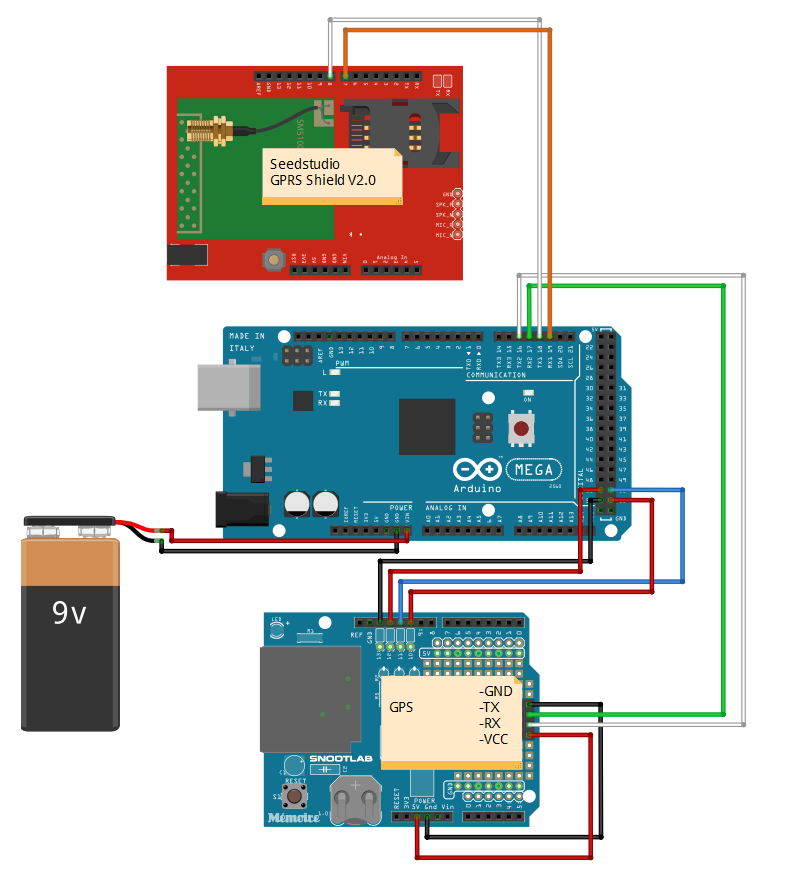
Since the Arduino Mega uses a different pinout, some rewiring are necessary.
First the SD Card Shield, that was designed for Arduino Uno, uses pins 10 to 13 for SPI, so in order for this to work on Mega, they need to be "passed" to the SPI pins on MEGA.
Arduino UNO SPI pins - Arduino MEGA SPI pins
MOSI - 11 to 51
MISO - 12 to 50
SCK - 13 to 52
SS - 10 to 53

On GPRS Shield first is necessary to setup the communication pins to Software Serial in the J7 jumper of the shield.

Then using some wires I connected Pins 7 and 8 in GPRS shield to Serial 1 port (pins 18 and 19 in the Arduino Mega).

For more details in how to connect the SIM Card in the GPRS Shield, please see my other project in Hackster.
The GPS is connected to Serial 2 Port (pins 16 and 17) in the Arduino Mega.
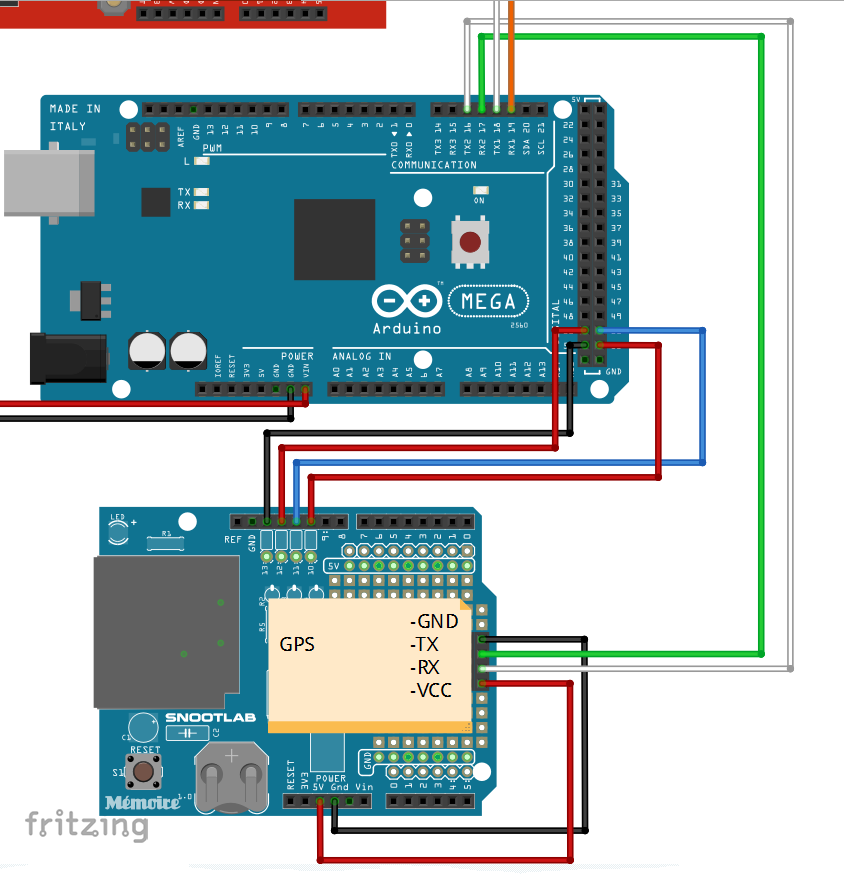
Also the power necessary for the GPS is taken out from the SD card 5V pin and GND pin.
The 9V battery can be connected to the Vin pin or to the power jack plug.
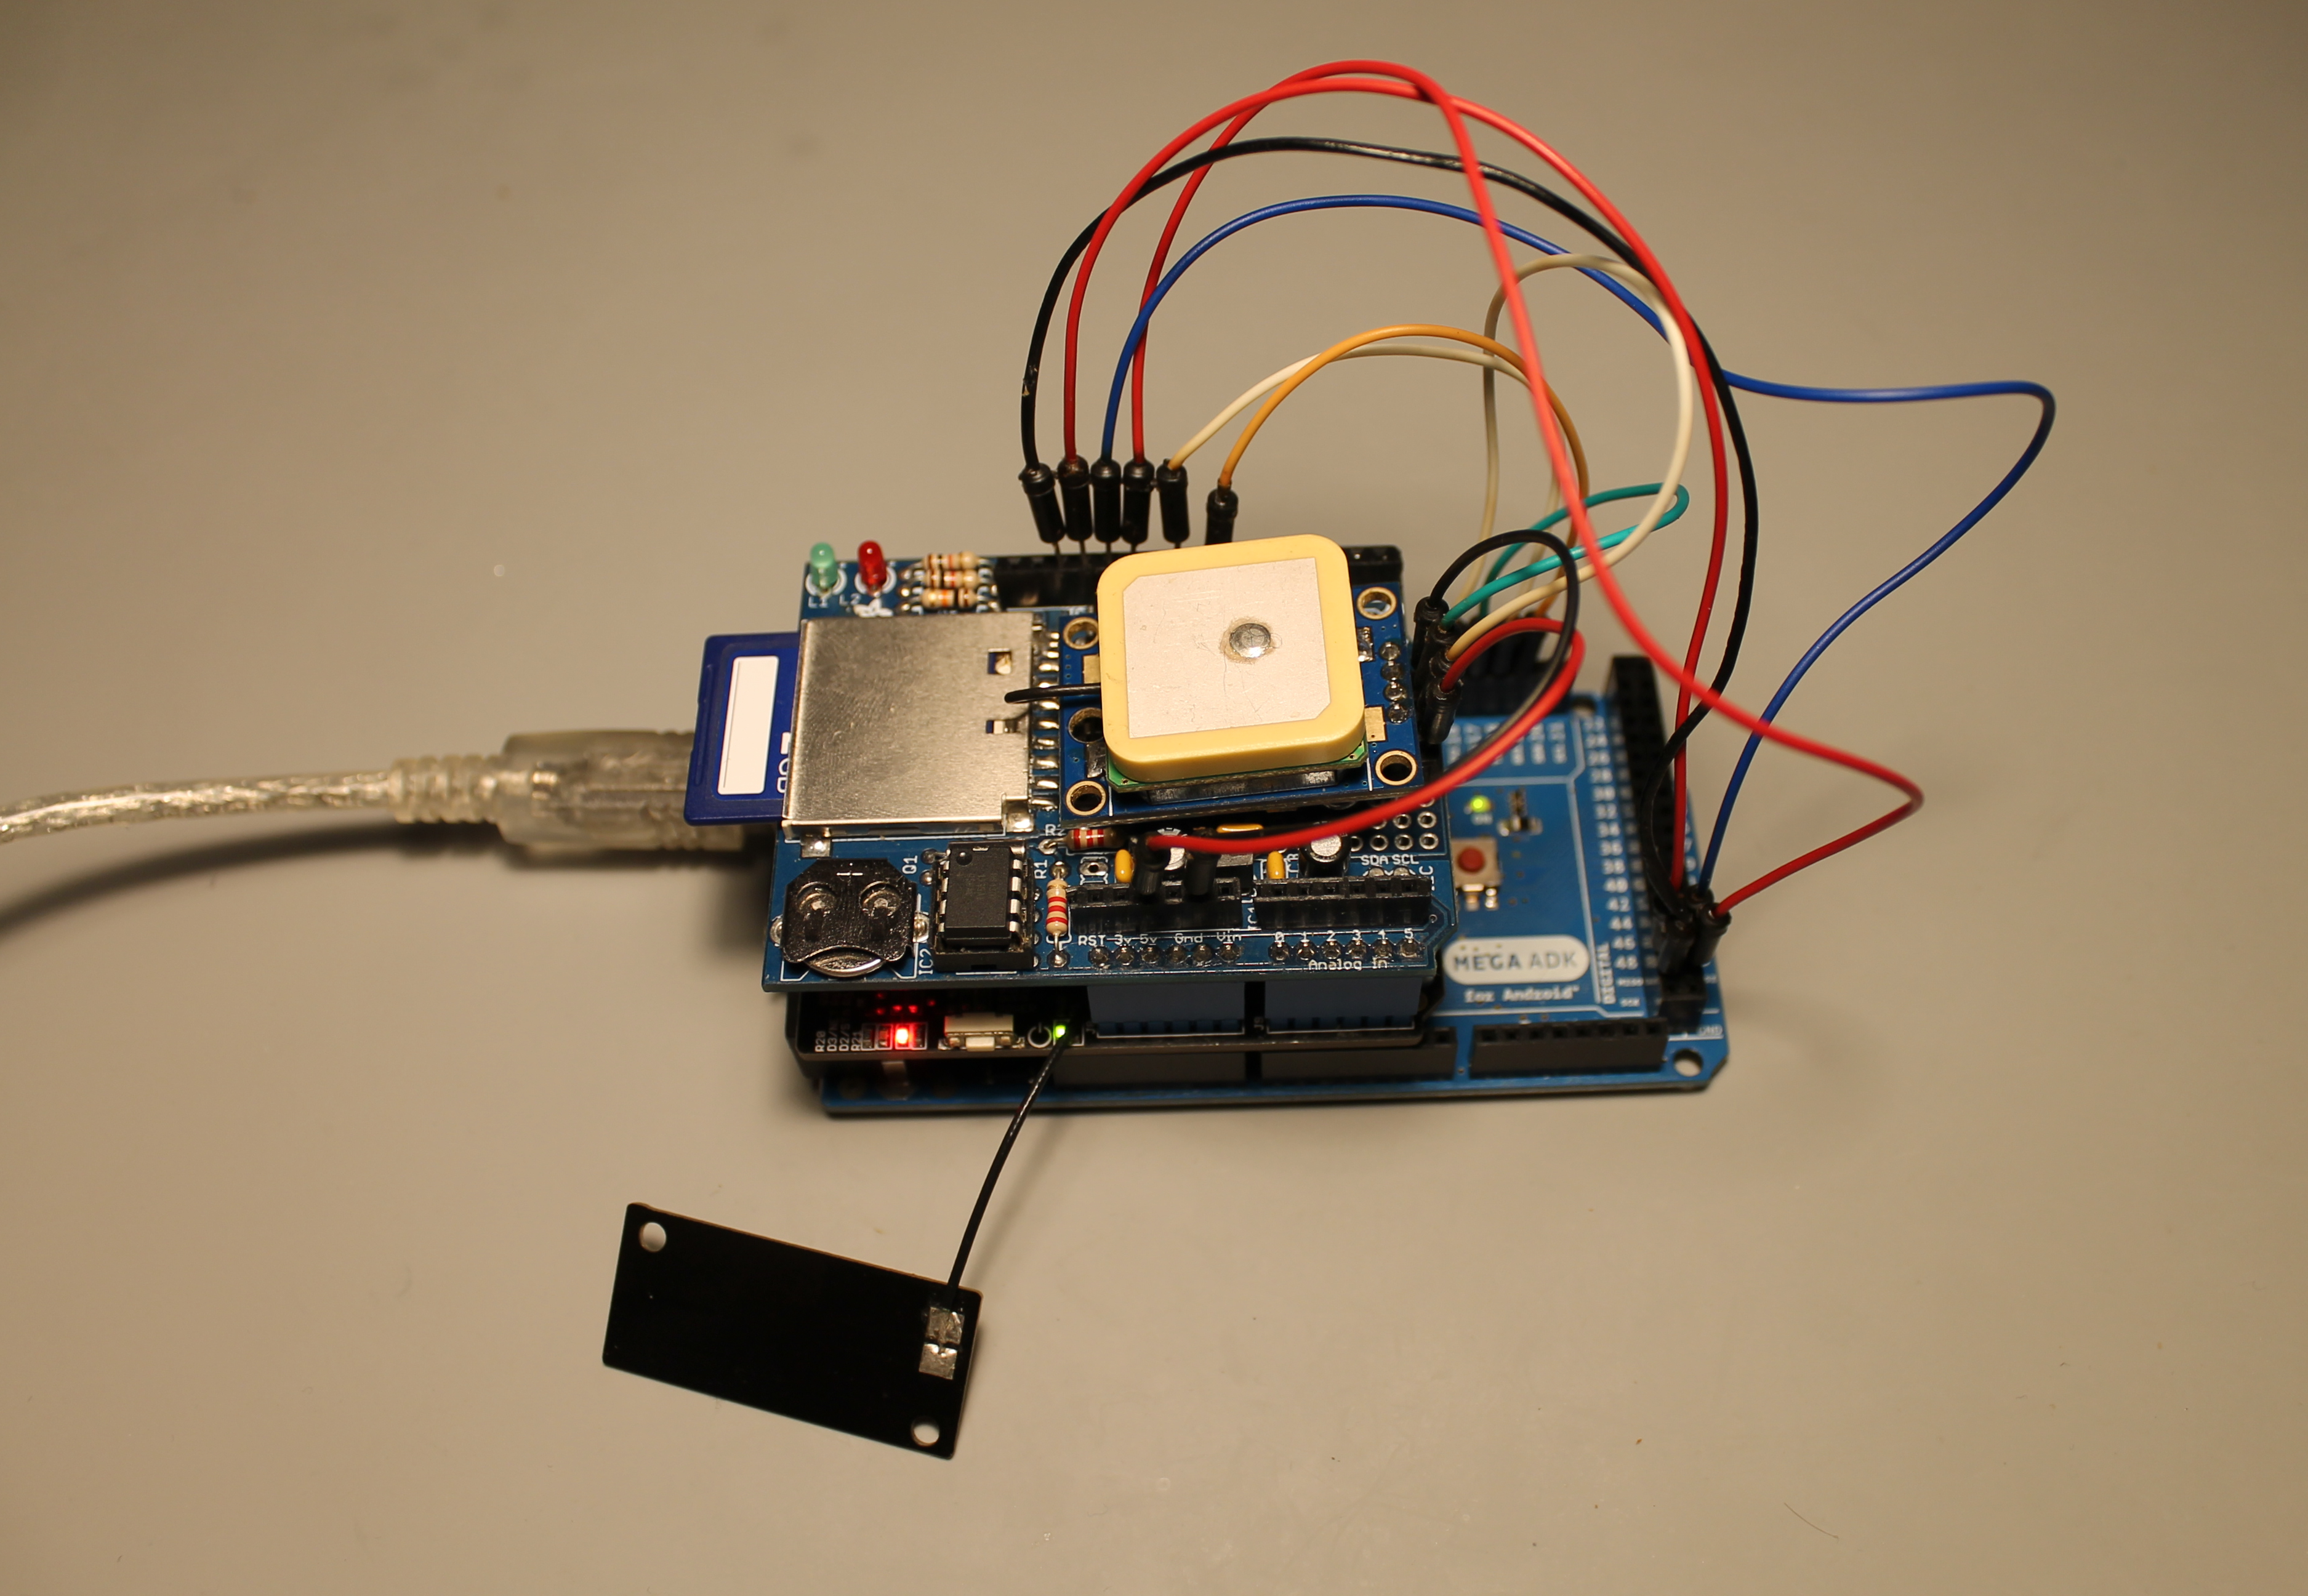
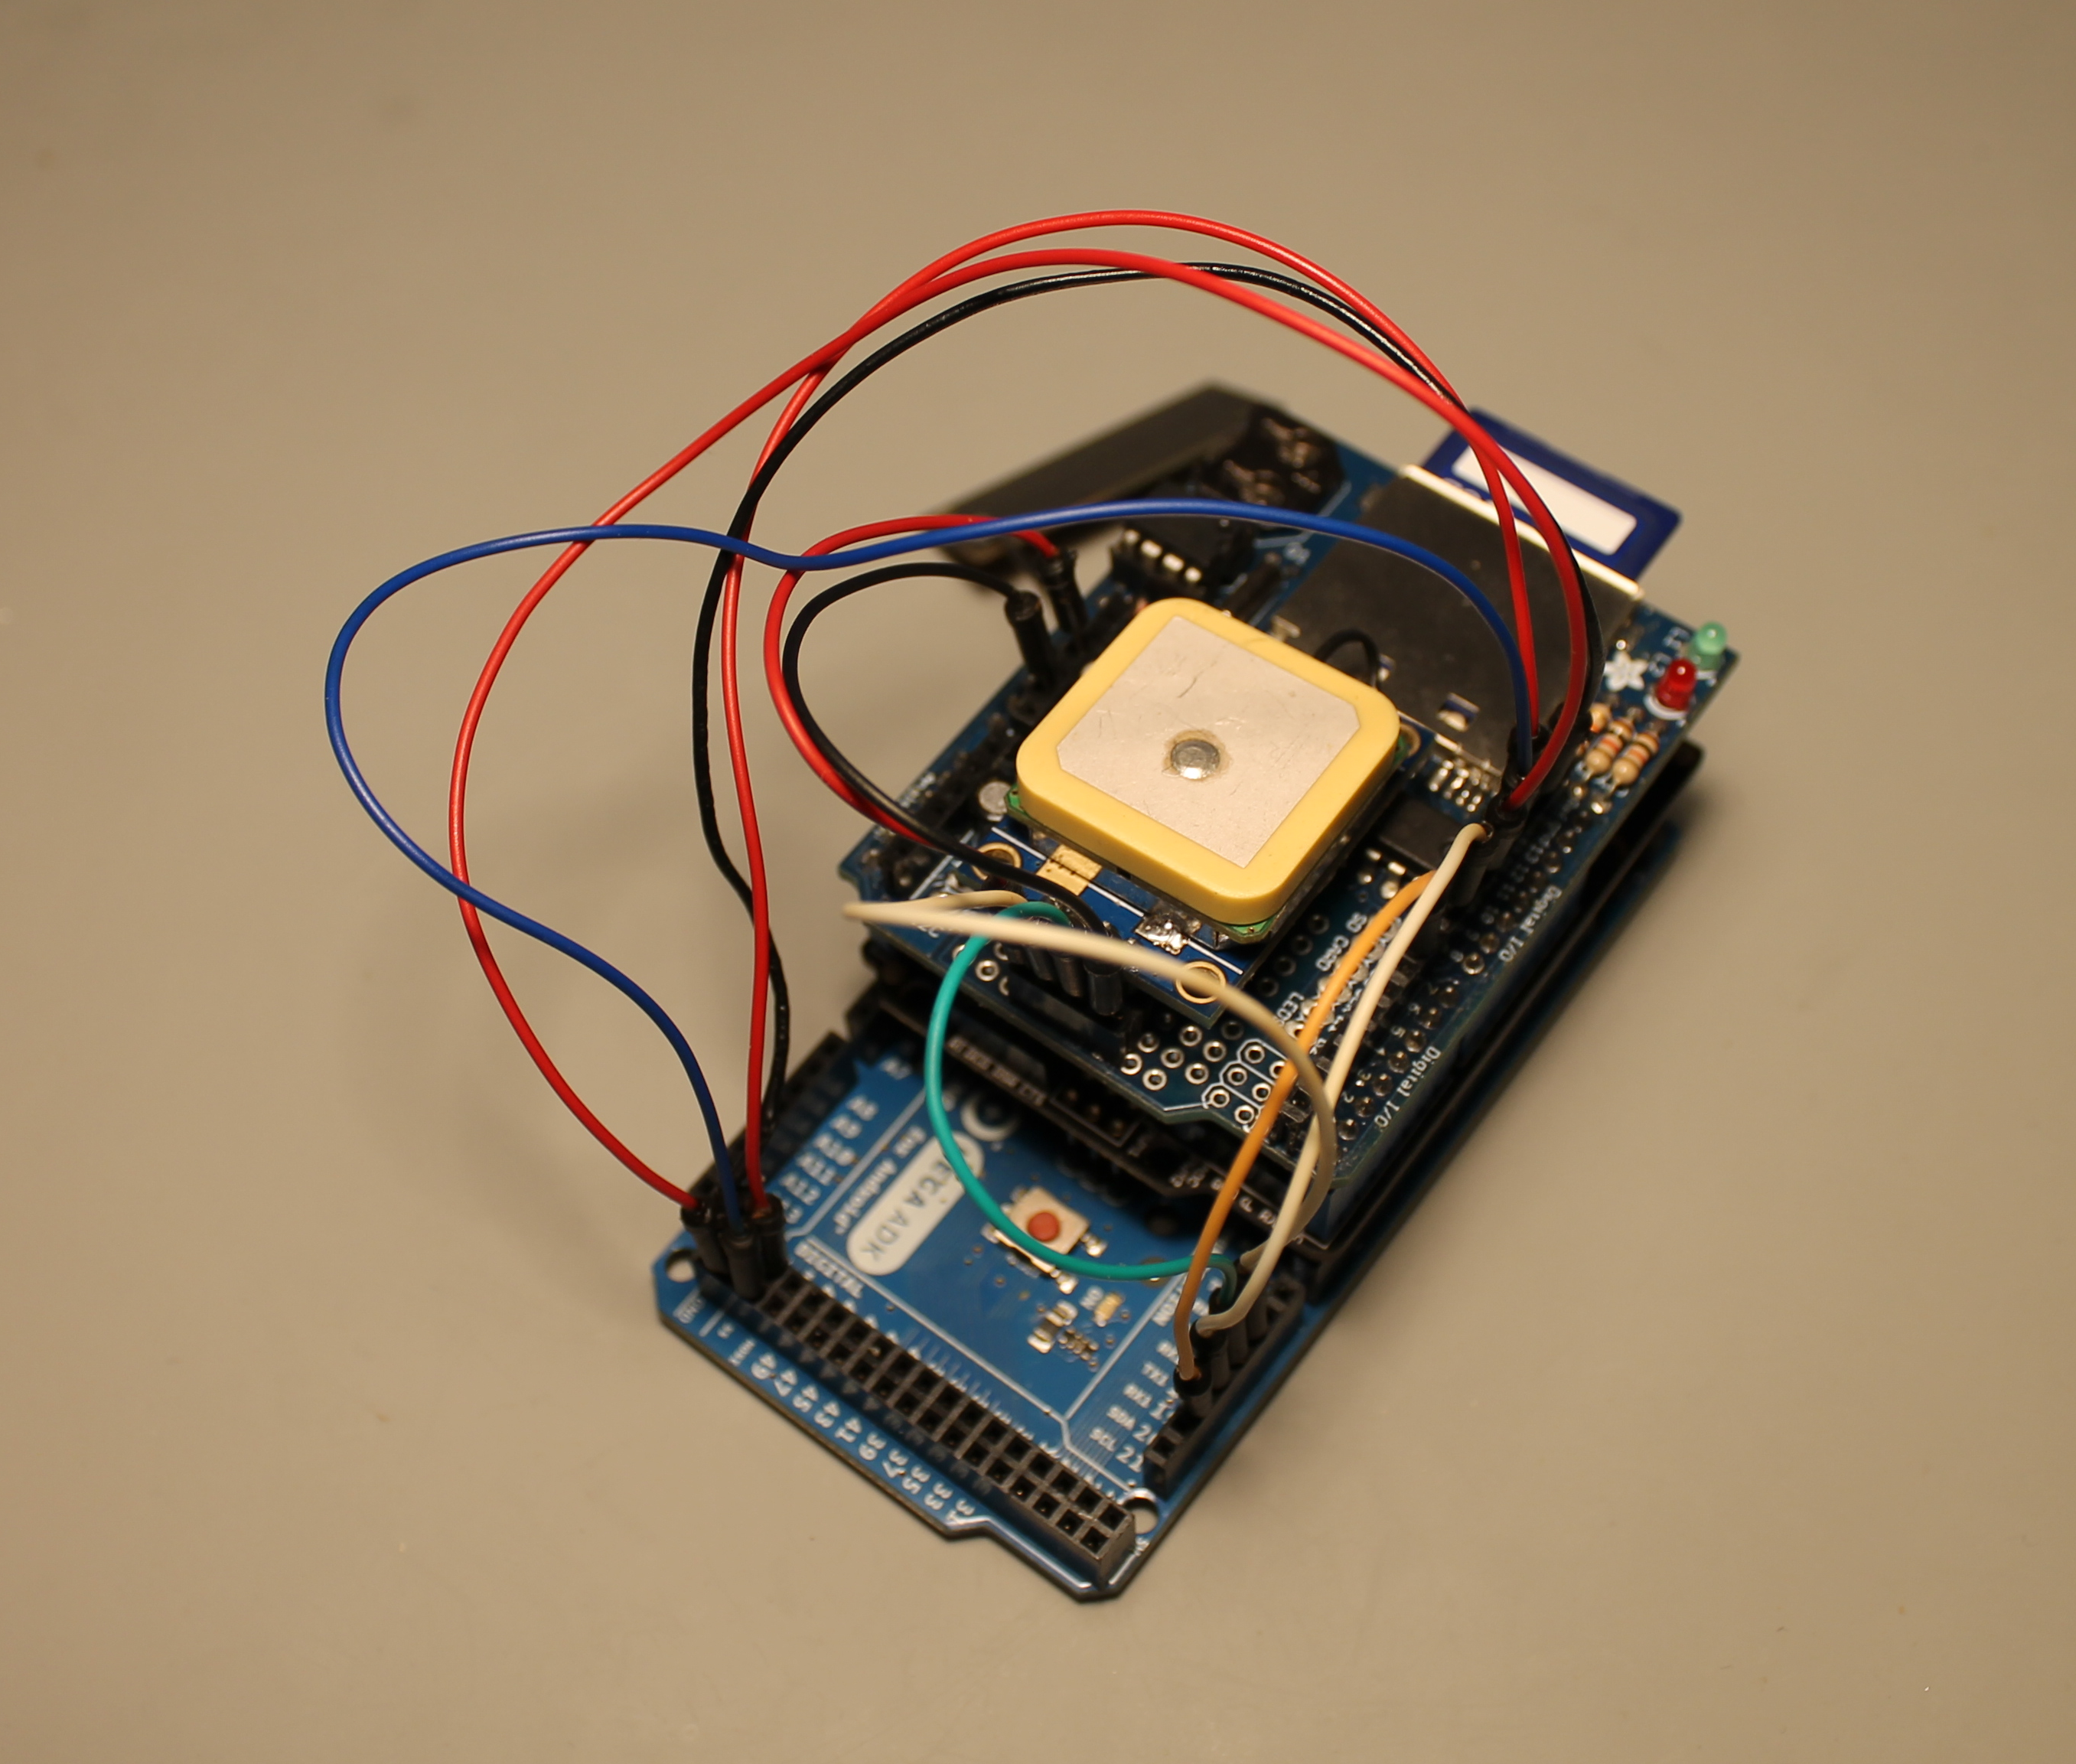
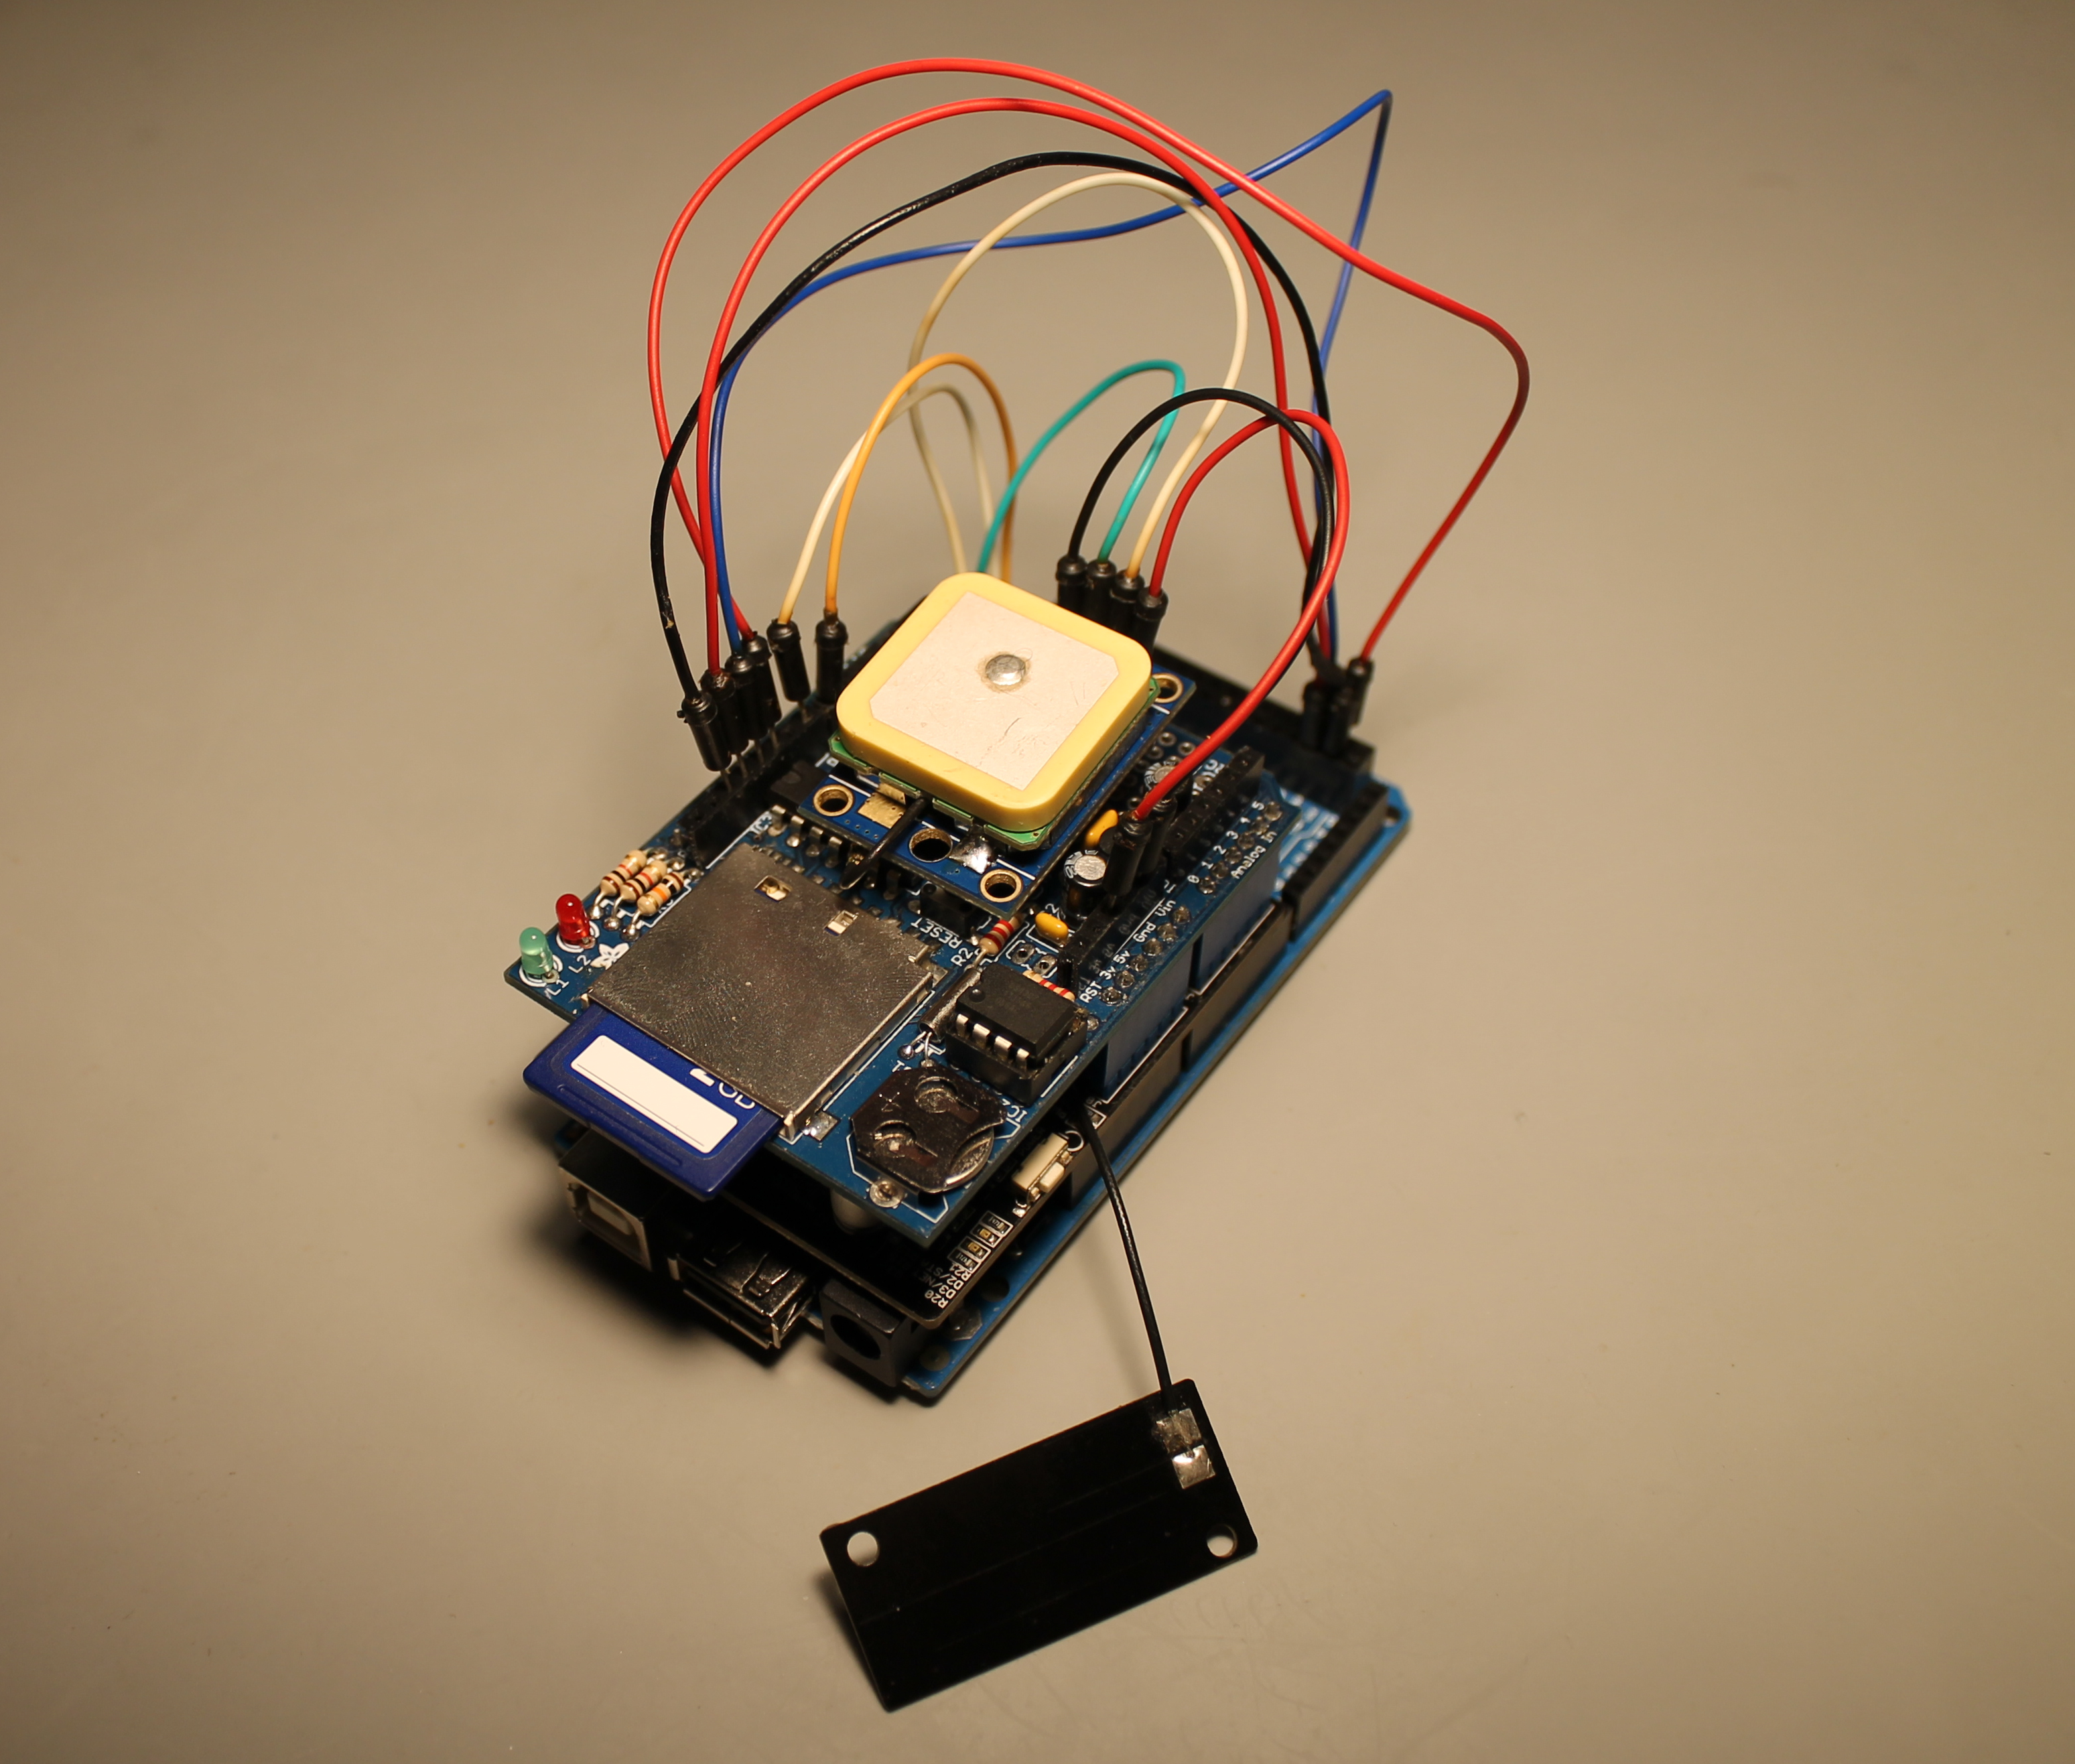
Preparing to close the box and field test.
I leave here some quick notes about the code.
I used this library for the GPRS Shield.
It is necessary to do some changes in order to use the Arduino Mega:
1) Open GSM.h and comment-decomment the appropriate lines like below e.g. for Arduino Mega:
//#define UNO
#define MEGA
2) In HWSerial.h decomment the line for Mega definition e.g. for Arduino Mega:
#define MEGA
For GPS I'm using this library.
The program it self runs in a very simple manner. After all of the start up routines (GPRS, GPS and SD card initialization), the GPS will attempt to determine the number of satellites that he has available and a valid GPS coordinates point.
If call is placed during this period, the call will be automatically rejected and nothing will happen.
When the GPS has a valid location and is detecting more than 3 satellites (I'm assuming where that the GPS has good reception), if a call is placed, the system will send an SMS to the call number with my position. All of these data will be stored in the SD card.
If the GPS has less then 3 satellites, no valid position can be retrieved, so if a call is placed, the call number will receive an SMS with my last known position. Again all data is stored in the SD card.
Since this is a prototype, there are a lot of thing that didn't work ok. But the objective is always to improve.
First the battery only lasts for one hour!! I did not implement any energy saving mechanics in the software. So for future improvements "Sleep Mode" is a must.
The size was also reviewed and I design a complete new board. The first look is this:
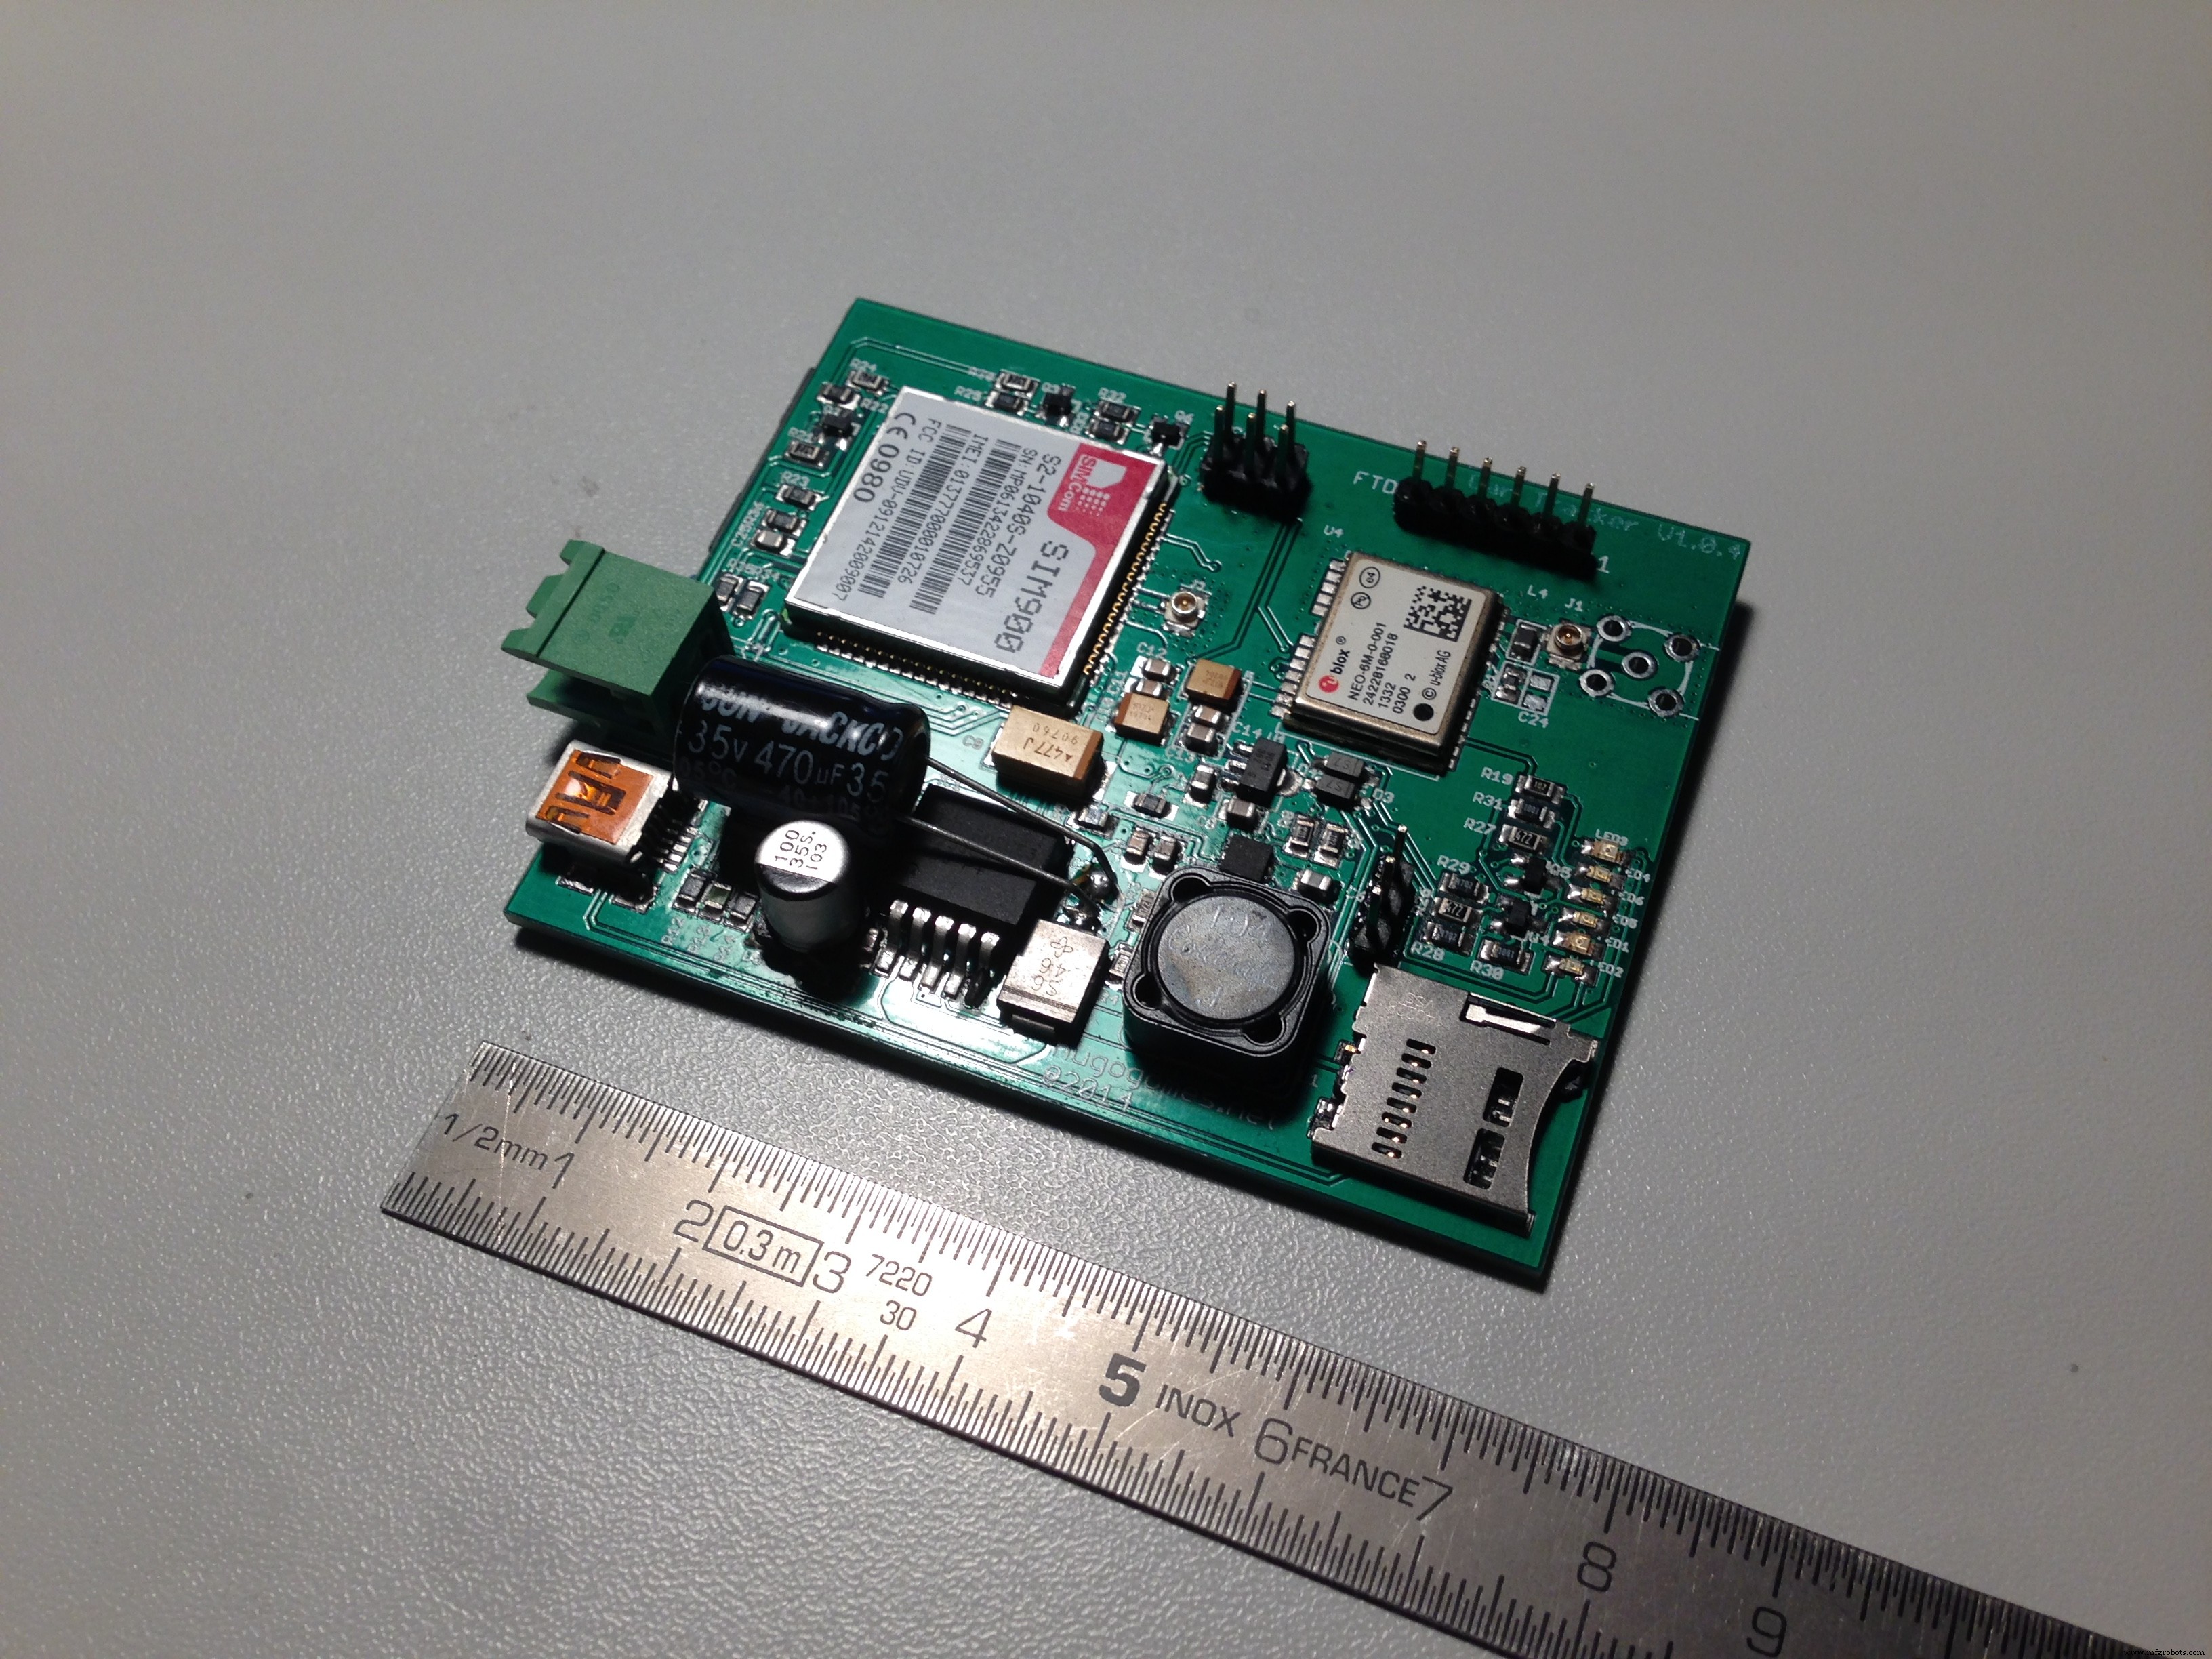
Please write me if you found any mistake or if you have any suggestion/improvement or questions.
Thanks for reading.
Hugo Gomes
Code
- Code
CodeArduino
#include "SIM900.h"
#include <SoftwareSerial.h>
#include "sms.h"
#include "call.h"

#include <TinyGPS++.h>

//To change pins for Software/Hardware Serial, use 27, 28 lines in GSM.cpp.
//To use Arduino Mega please define MEGA in line 5 in GSM.h.

#include <SPI.h>
#include <SD.h>

//Mega CS pin
const int chipSelect = 53;


//We have to create the classes for SMSs and calls.
CallGSM call;
SMSGSM sms;

char number[20];
byte stat = 0;
int value = 0;

char value_str[5];

//GPS Variable

// The TinyGPS++ object
TinyGPSPlus gps;

const char *googlePrefix = "http://maps.google.com/maps?q=";


double Lat;
double Long;
int day, month, year;
int hour, minute, second;

int num_sat;

boolean one_point_true = false;


void setup()
{

  //Serial connection.
  Serial.begin(9600);

  //GPRS connection
  Serial.print(F("Starting GSM..."));
  //Start configuration of shield with baudrate.
  if (gsm.begin(9600))
    Serial.println(F("READY"));
  else Serial.println(F("IDLE"));

  //GPS connection
  Serial.println(F("Starting GPS"));
  //GPS com port
  Serial2.begin(9600);

  //SD Card start
  Serial.print(F("Initializing SD card..."));
  // make sure that the default chip select pin is set to
  // output, even if you don't use it:
  pinMode(53, OUTPUT);

  // see if the card is present and can be initialized:
  if (!SD.begin(chipSelect)) {
    Serial.println(F("Card failed, or not present"));
    // don't do anything more:
    return;
  }
  Serial.println(F("card initialized."));

}


//******************************************************************************
//Main loop
void loop()
{

  Get_GPS(); // Get the position

  Check_call(); //See if anyone is calling


};

////////////////////////////////////////////////////////////////////////////////


//******************************************************************************
// Get the position from the GPS
void Get_GPS()
{

  while (Serial2.available() > 0)
    if (gps.encode(Serial2.read()))

      num_sat = gps.satellites.value();
  //Serial.println(num_sat);

  if (gps.location.isValid() == 1) {

    Lat = gps.location.lat();
    Long = gps.location.lng();

    if (Lat != 0 && Long != 0) one_point_true = true;

  }


  if (gps.date.isValid())
  {
    day = gps.date.day();
    month = gps.date.month();
    year = gps.date.year();
  }

  if (gps.time.isValid())
  {

    hour = gps.time.hour();
    minute = gps.time.minute();
    second = gps.time.second();
  }

  smartDelay(500);


  if (millis() > 5000 && gps.charsProcessed() < 10)
  {
    Serial.println(F("No GPS detected: check wiring."));
    while (true);
  }


}


//******************************************************************************
// This custom version of delay() ensures that the gps object
// is being "fed".
static void smartDelay(unsigned long ms)
{
  unsigned long start = millis();
  do
  {
    while (Serial2.available())
      gps.encode(Serial2.read());
  }
  while (millis() - start < ms);
}
////////////////////////////////////////////////////////////////////////////////

//******************************************************************************
// Check to see if anyone is calling
void Check_call()
{
  //Checks status of call
  stat = call.CallStatusWithAuth(number, 0, 0);

  //If the any incoming call
  if (stat == CALL_INCOM_VOICE_AUTH) {
    delay(100);
    //Hang up the call.
    call.HangUp(); //Reject the call

    Send_SMS();

  }
}
////////////////////////////////////////////////////////////////////////////////


//******************************************************************************
// Send an SMS with the current position or the last known position
void Send_SMS()
{


  int error;

  char Date[13];
  sprintf(Date, "%02d/%02d/%04d ", day, month, year);

  char time1[10];
  sprintf(time1, "%02d:%02d:%02d ", hour, minute, second);

  //Serial print GPS data
  /*
   Serial.print(Date);
  Serial.print("  ");
  Serial.print(time1);
  Serial.print("  ");
  Serial.print("Lat: ");
  Serial.print(Lat, 6);
  Serial.print("  ");
  Serial.print("Long: ");
  Serial.println(Long, 6);
  */

  delay(100);

  char lat_print[10];
  dtostrf(Lat, 5, 6, lat_print);

  char Long_print[10];
  dtostrf(Long, 5, 6, Long_print);


  if (num_sat >= 3 && one_point_true == true)
  {
    char sms_OK[160];
    sprintf(sms_OK, "Hugo location is now: Lat: %s, Log: %s. %s%s,+%s\n", lat_print, Long_print, googlePrefix, lat_print, Long_print);
    Serial.println(sms_OK);

    error = sms.SendSMS(number, sms_OK);
    delay(500);
    if (error == 0) //Check status
    {
      Serial.println(F("SMS ERROR"));
    }
    else
    {
      Serial.println(F("SMS OK"));
    }

  }

  else if (num_sat < 3 && one_point_true == true)
  {

    char sms_NOK[150];
    sprintf(sms_NOK, "I can not seen to find Hugo. Last time that i've saw him, was in: Lat: %s, Log: %s. %s%s,+%s\n", lat_print, Long_print, googlePrefix, lat_print, Long_print);
    Serial.println(sms_NOK);

    int error = sms.SendSMS(number, sms_NOK);
    if (error == 0) //Check status
    {
      Serial.println(F("SMS ERROR"));
    }
    else
    {
      Serial.println(F("SMS OK"));
    }

  }

  else if (one_point_true == false)
  {
    Serial.println(F("No valid GPS point"));

  }

//Save everything in the SD Card
  File dataFile = SD.open("datalog.txt", FILE_WRITE);

  // if the file is available, write to it:
  if (dataFile) {


    dataFile.print(Date);
    dataFile.print(" ");
    dataFile.print(time1);
    dataFile.print(" ");
    dataFile.print(number);
    dataFile.print(" ");
    dataFile.print(lat_print);
    dataFile.print(", ");
    dataFile.print(Long_print);
    dataFile.print(" ");
    dataFile.print(error);
    dataFile.println();

    dataFile.close();

  }
  // if the file isn't open, pop up an error:
  else {
    Serial.println(F("error opening datalog.txt"));
  }

}
////////////////////////////////////////////////////////////////////////////////
Schematics

Manufacturing process
- Build a Bluetooth‑controlled Arduino Spybot
- UnifiedWater v1 – Complete Arduino Water Quality Sensor Kit
- HSV Clock: Vibrant, Customizable Timepiece for Arduino Enthusiasts
- Advanced Snow Plow Robot for Efficient Winter Clearing
- Modern Jukebox: Raspberry Pi & Arduino LED Music Player
- DIY Arduino Smartwatch: Build Your Own Apple Watch‑Style Timepiece
- Arduino-Driven GrowBox Controller – Open-Source Firmware & Hardware Guide
- KITtyBot: DIY Smart Robot Kit with Arduino Pro Mini, Servos, IR Control & Power Supply
- ED BMSdiag – Arduino CAN‑BUS & OBD‑II Diagnostic Kit
- Build a Reliable FM Radio with SparkFun & Arduino Components