


Infrared Eye‑Motion Tracking with Arduino Pro Mini – LED Control Demo
Components and supplies
 |
| × | 1 | |||
| × | 1 | ||||
 |
| × | 1 | |||
| × | 1 | ||||
| × | 1 |
Apps and online services
 |
|
About this project
I used an infrared sensor to sense eye movements and control the LED.
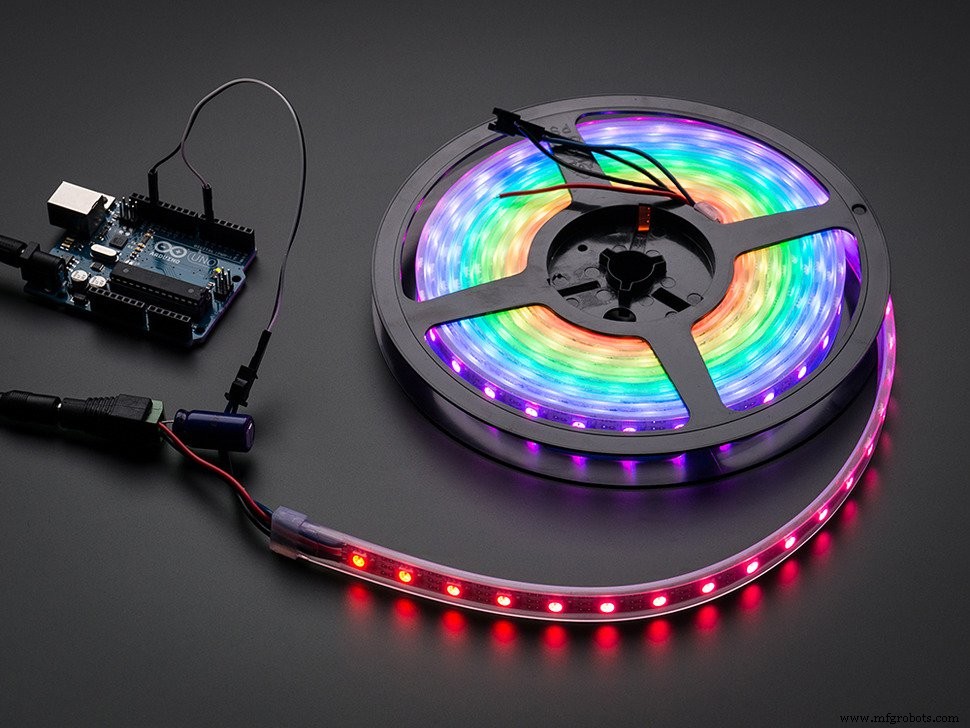
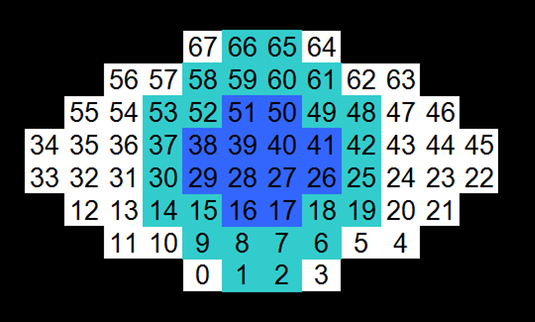
NeoPixel LED Eye BallNeoPixel LED tape is used. LED is 68 unit.
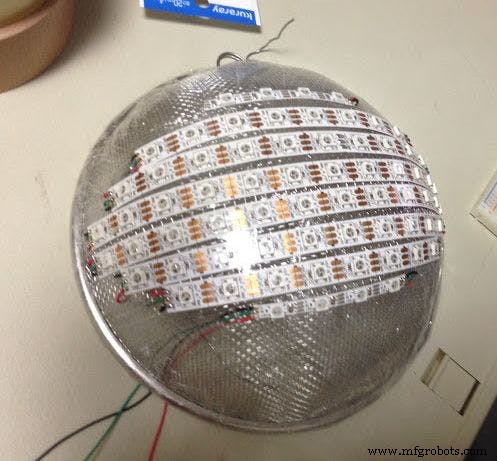
LED is fixed to the bowl with double-sided tape and wired in the following order.
Schematics
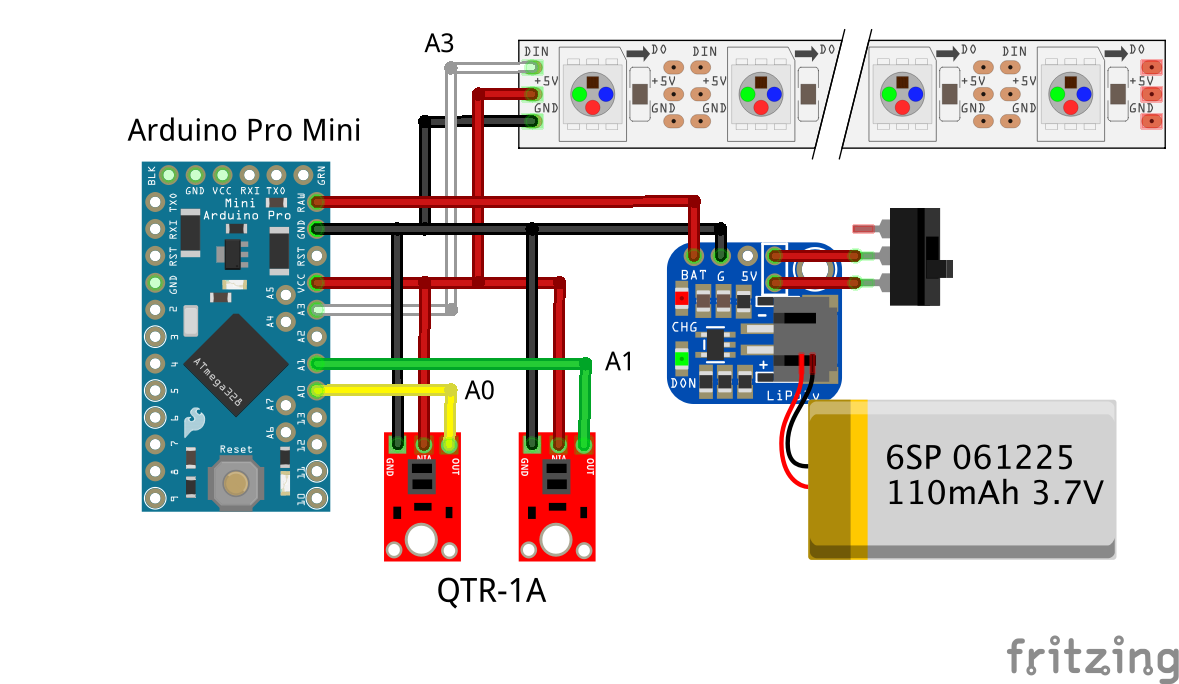
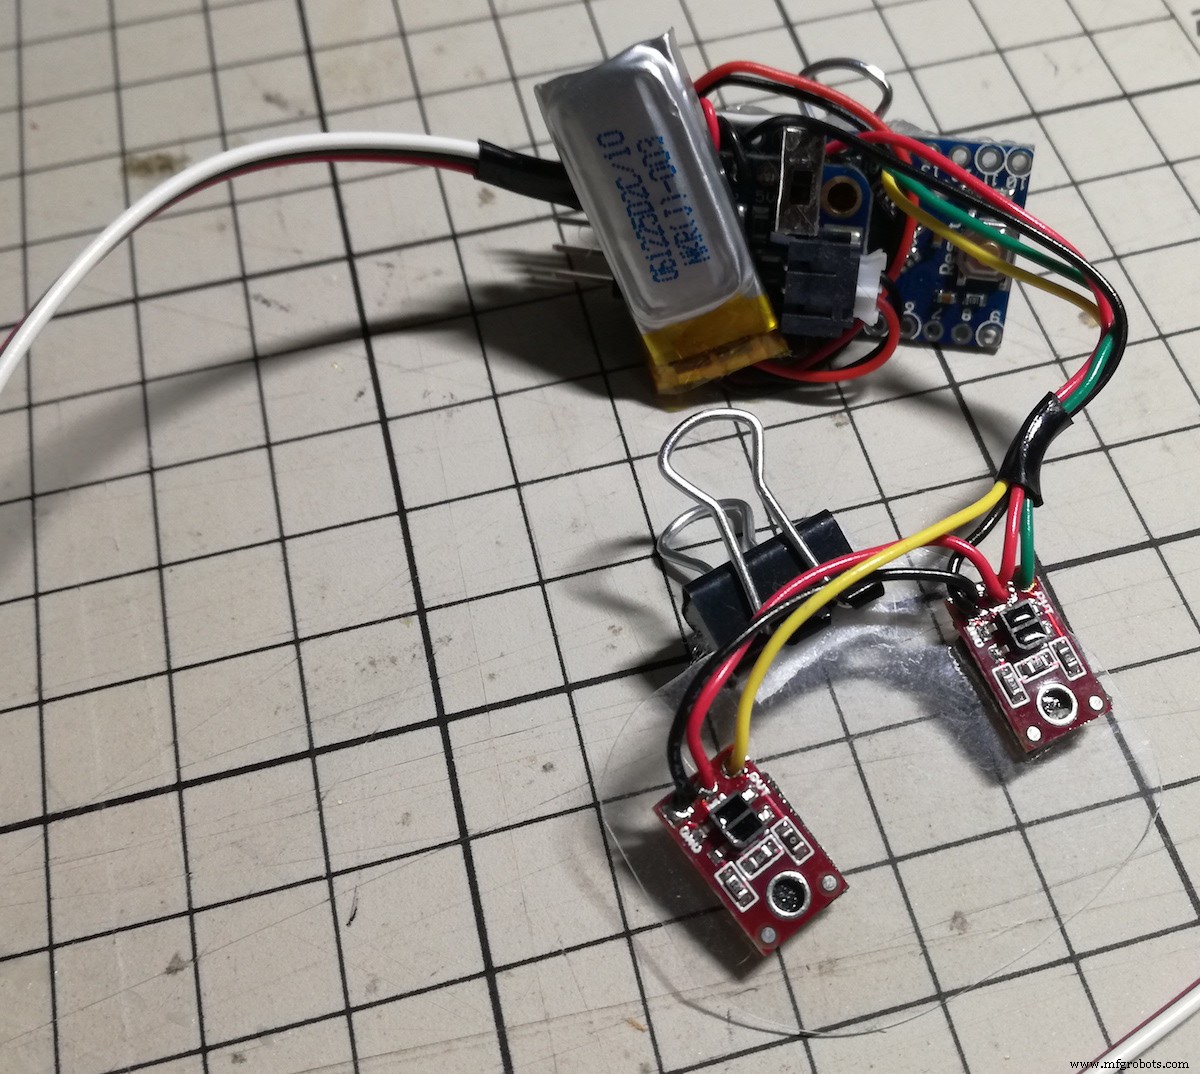
Sensor
I used two sensors QTR - 1A for eye tracking. QTR - 1A are placed on a plastic sheet at a distance of about the width of the eye.

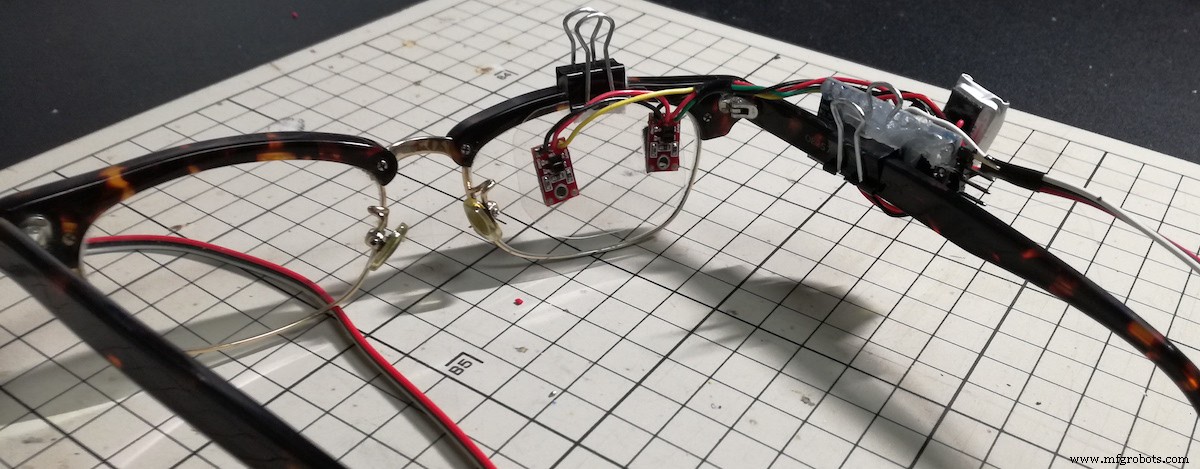
The sensor part and the microcontroller part were fixed to the eyeglasses with a clip respectively.

When the iris approaches one sensor, the reflected light decreases and the sensor value increases. Conversely, when the iris moves away, the reflected light increases and the sensor value of the photo reflector decreases.
The right and left movement of the pupil of the LED eyeball senses the increase and decrease of one sensor value and controls it.
When blinking, both sensor values decrease, so if the two sensor values decrease simultaneously, the eyelids of the LED eyeball will go down.
#include <QTRSensors.h>
#include <Adafruit_NeoPixel.h>
#define NUM_SENSORS             2  // number of sensors used
#define NUM_SAMPLES_PER_SENSOR  10  // averaging
#define EMITTER_PIN             QTR_NO_EMITTER_PIN
int iniSensorValL, sensorValL;
int iniSensorValR, sensorValR;
#define PIN A3
Adafruit_NeoPixel led = Adafruit_NeoPixel(68, PIN, NEO_GRB + NEO_KHZ800);
int blackNum = 24;
int pupilNum = 12;
uint32_t color;
int brightness = 40;
byte eyeColor;
int LR =7;
boolean lid = false;
int cnt = 0;
//Black eye L&R animation
int blackLED[15][24] = {{12,32,35,55,68,68,68,68,68,68,68,68,68,68,68,68,68,68,68,68,68,68,68,68},
                       {12,13,31,36,54,55,68,68,68,68,68,68,68,68,68,68,68,68,68,68,68,68,68,68},
                       {11,13,14,30,37,53,54,56,68,68,68,68,68,68,68,68,68,68,68,68,68,68,68,68},
                       {10,11,14,15,29,38,52,53,56,57,68,68,68,68,68,68,68,68,68,68,68,68,68,68},
                       { 9,10,11,12,15,16,28,33,34,39,51,52,55,56,57,58,68,68,68,68,68,68,68,68},
                       { 0, 8, 9,10,11,12,13,16,17,27,32,35,40,50,51,54,55,56,57,58,59,67,68,68},
                       { 0, 1, 7, 8, 9,10,13,14,17,18,26,31,36,41,49,50,53,54,57,58,59,60,66,67},
                       { 1, 2, 6, 7, 8, 9,14,15,18,19,25,30,37,42,48,49,52,53,58,59,60,61,65,66},
                       { 2, 3, 5, 6, 7, 8,15,16,19,20,24,29,38,43,47,48,51,52,59,60,61,62,64,65},
                       { 3, 4, 5, 6, 7,16,17,20,21,23,28,39,44,46,47,50,51,60,61,62,63,64,68,68},
                       { 4, 5, 6,17,18,21,22,27,40,45,46,49,50,61,62,63,68,68,68,68,68,68,68,68},
                       { 4, 5,18,19,26,41,48,49,62,68,68,68,68,68,68,68,68,68,68,68,68,68,68,68},
                       { 4,19,20,25,42,47,48,63,68,68,68,68,68,68,68,68,68,68,68,68,68,68,68,68},
                       {20,21,24,43,46,47,68,68,68,68,68,68,68,68,68,68,68,68,68,68,68,68,68,68},
                       {21,23,44,46,68,68,68,68,68,68,68,68,68,68,68,68,68,68,68,68,68,68,68,68}};
//pupil L&R animation
int pupilLED[15][12] = {{33,34,68,68,68,68,68,68,68,68,68,68},
                       {32,33,34,35,68,68,68,68,68,68,68,68},
                       {12,31,32,33,34,35,36,55,68,68,68,68},
                       {12,13,30,31,32,33,34,35,36,37,54,55},
                       {13,14,29,30,31,32,35,36,37,38,53,54},
                       {14,15,28,29,30,31,36,37,38,39,52,53},
                       {15,16,27,28,29,30,37,38,39,40,51,52},
                       {16,17,26,27,28,29,38,39,40,41,50,51},
                       {17,18,25,26,27,28,39,40,41,42,49,50},
                       {18,19,24,25,26,27,40,41,42,43,48,49},
                       {19,20,23,24,25,26,41,42,43,44,47,48},
                       {20,21,22,23,24,25,42,43,44,45,46,47},
                       {21,22,23,24,43,44,45,46,68,68,68,68},
                       {22,23,44,45,68,68,68,68,68,68,68,68},
                       {22,45,68,68,68,68,68,68,68,68,68,68}};
//Blink animation
int eyelid = 0;
int eyelidNum[8] = {0,4,8,16,24,34,44,56};
int eyelidLED[56] = {64,65,66,67,58,59,60,61,56,57,62,63,49,50,51,52,47,48,53,54,38,39,40,41,46,55,36,37,42,43,26,27,28,29,35,44,24,25,30,31,15,16,17,18,34,45,23,32,13,14,19,20,6,7,8,9};
QTRSensorsAnalog qtra((unsigned char[]) {0, 1}, NUM_SENSORS, NUM_SAMPLES_PER_SENSOR, EMITTER_PIN);
unsigned int sensorValues[NUM_SENSORS];
void blink(int eyelid, int LR) {
 if (eyelid != 8){
   //Pewter
   for(uint16_t i=0; i<led.numPixels(); i++) {
     led.setPixelColor(i, led.Color(66, 66, 66));
   }
   //Black eye
   for(uint16_t i=0; i<blackNum; i++) {
     led.setPixelColor(blackLED[LR][i], color);
   }
   //pupil
   for(uint16_t i=0; i<pupilNum; i++) {
     led.setPixelColor(pupilLED[LR][i], led.Color(0, 0, 66));
   }
   //eyelid
   for(int i=0; i < eyelidNum[eyelid]; i++) {
     led.setPixelColor(eyelidLED[i], 0);
   }
 } else if (eyelid == 8){
   led.clear();
 }
 led.show();
}
void setup() {
 Serial.begin(115200);
 led.begin();
 led.setBrightness(brightness); // Initial Brightness 40
 led.show(); // Initialize all pixels to 'off'
 color = led.Color(0, 177, 55); //pupil color
 delay(100);
 qtra.read(sensorValues);
 iniSensorValL = sensorValues[0];
 iniSensorValR = sensorValues[1];
 blink(eyelid, LR);
}
void loop() {
 //QTR - 1A sensor value
 qtra.read(sensorValues);
 sensorValL = sensorValues[0];
 sensorValR = sensorValues[1];
 double rasioL = (double)sensorValL / iniSensorValL;
 double rasioR = (double)sensorValR / iniSensorValR;
 Serial.print(rasioL);
 Serial.print("  ");
 Serial.println(rasioR);
 if(rasioL > 0.985 && rasioR < 0.985){ //right
   for(int i = LR; i < 12; i++){
     blink(0, i);
     delay(40);
     LR = i;
   }
 }else if(rasioL < 0.985 && rasioR > 0.985){ //left
   for(int i=LR; i>2; i--){
     blink(0, i);
     delay(40);
     LR = i;
   }
 }else if(lid == false && rasioL < 0.96 && rasioR < 0.96){ //Blinking close
   for(int i = 1; i < 9; i++){
     blink(i, LR);
     delay(40);
     lid = true;
   }
 }else if(lid == true && rasioL > 0.96 && rasioR > 0.96){ //Blinking open
   for(int i = 8; i > 0; i--){
     blink(i, LR);
     delay(40);
     lid = false;
   }
 }else if(lid == false && rasioL > 0.96 && rasioR > 0.96) {   //normal
   //cnt++;
   //eyelid = 0;
   if(LR <= 7){
     for(int i=LR; i<=7; i++){
       blink(0, i);
       delay(40);
       LR = i;
     }
   }else {
     for(int i=LR; i>=7; i--){
       blink(0, i);
       delay(40);
       LR = i;
     }
   }
   Serial.println("通常時");
 }
 //Initial value refresh
 if (cnt > 10){
   iniSensorValL = sensorValL;
   iniSensorValR = sensorValR;
   cnt = 0;
 }
}
Manufacturing process
- Build a Remote Temperature Sensor with Raspberry Pi and Python – Step‑by‑Step Guide
- Line Tracking Sensor with Raspberry Pi – Simple KY‑033 Door/Line Detector
- Build a DIY Infrared Motion Sensor for Raspberry Pi – Step‑by‑Step Guide
- Control an LED with a PIR Motion Sensor on Raspberry Pi
- Build a Leap Motion‑Controlled Laser Tank – Arduino, Raspberry Pi, RGB LEDs
- Build a Reliable Infrared Heartbeat Sensor with Arduino: Step-by-Step Guide
- Interactive LED Matrix Door Display with PIR Motion Sensor – Arduino Holiday Greeting
- Precision Surveillance: Object Tracking with Arduino and Servos
- Build an Ambient Light Sensor with Photoresistor and LED: Step‑by‑Step Guide
- Build a Real-Time Face-Tracking System with Arduino & OpenCV