


Smart Traffic Light Control System with Real-Time Data
Components and supplies
 |
| × | 1 | |||
 |
| × | 1 | |||
 |
| × | 1 | |||
| × | 1 | ||||
 |
| × | 3 | |||
 |
| × | 3 | |||
| × | 1 | ||||
 |
| × | 1 | |||
| × | 1 | ||||
 |
| × | 1 | |||
 |
| × | 1 |
Apps and online services
 |
| |||
 |
| |||
|
About this project
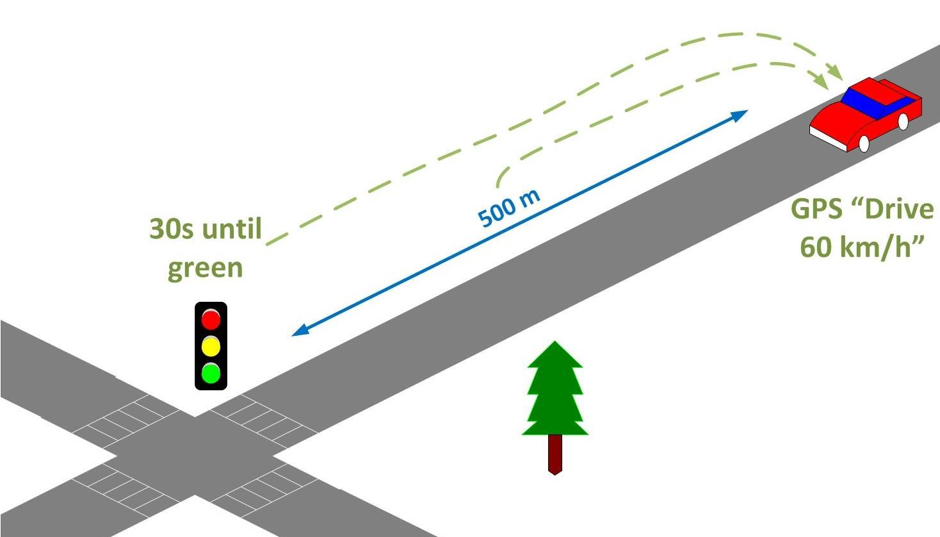
IntroTraffic has the ability to irritate the best of us and it's getting worse. What if that can be changed with intelligent traffic lights? We created a Traffic Light Information System that lets the driver know at which speed he needs to drive in order to get at the junction and pass the green light without exceeding the maximum speed limit. And when the driver has to wait for the inevitable red light, it lets him know when the light is about to turn green.

A traffic light sends data about how long it will remain green or the time until the next green light etc. to an online database. A GPS or an application on your smartphone will retrieve data from the database and calculates the desired speed to pass the green light. It will display the remaining waiting time until the end of the red light phase when it's unavoidable that you will have to wait.
ExampleYou are driving in a 70 km/h zone, keeping to the limit. The traffic light up ahead of you is red and the light is about to turn green in 30 seconds. You are 500 meter away from the traffic light, so the system will recommend you to proceed towards the light at 60 km/h.
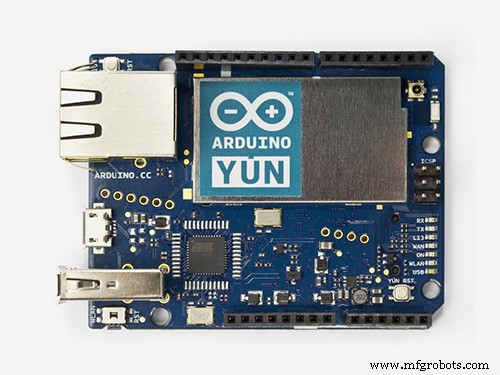
To demonstrate our project, we created a traffic light with the Arduino Yun. The traffic light consists of 3 LEDs and a Real-Time-Clock. The lights will change at a given interval. The Arduino Yun saves the time that the traffic light will turn green/red. Then, it runs a PHP file that makes a connection to the online MySQL database and inserts the data received from the Arduino Yun. An Android app (created with Android Studio) will retrieve the date from that database. This is done via another PHP file that returns the traffic light data in JSON format. The app calculates the desired speed and it will display a countdown timer when you're not able to pass the green light.
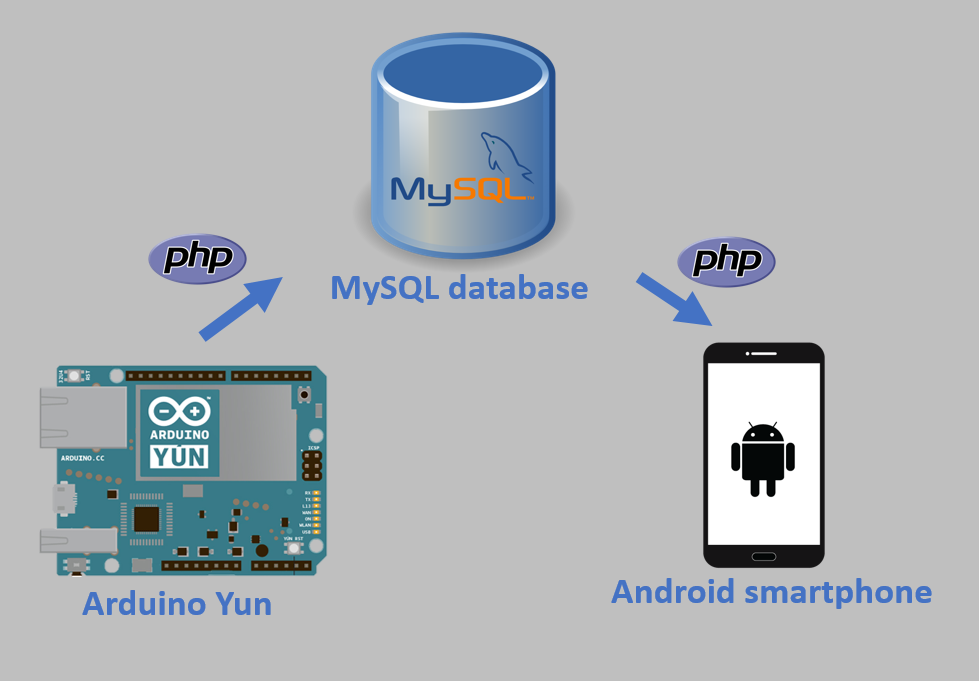
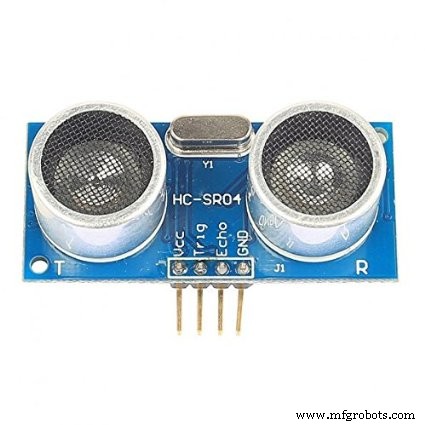
To calculate the desired speed, the app needs to know the distance to the traffic light. This is done by calculating the distance according to the GPS coordinates. But unfortunately, a GPS in a smartphone is not precise enough to prove our concept because we are working on a small scale. That's why we made use of the ultrasonic ranging module (HC-SR04). The Arduino Yun receives the distance between the car and the traffic light via 433 MHz RF modules. Every time the Yun receives a new measurement from the other Arduino, it updates the data in the database. Now, the app is able to calculate the desired speed.

1) Create an online MySQL database
(We used freemysqlhosting.net )
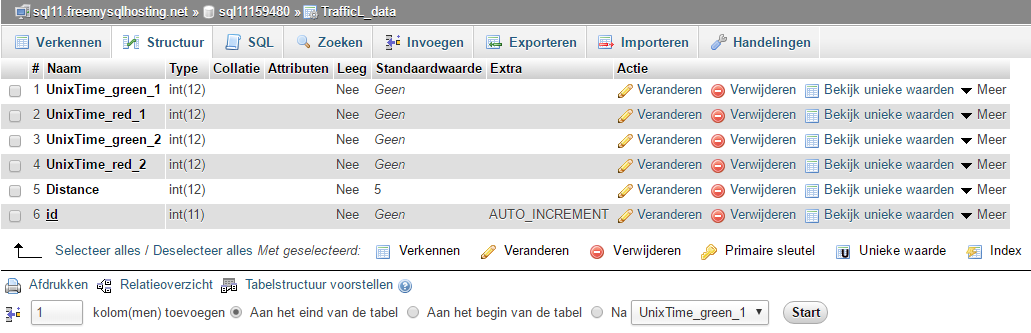
2) Add a table 'TrafficL_data' to the database:
3) Set up the hardware (transmitter)
You can find the schematic 'Arduino transmitter' here.
4) Upload 'Arduino Transmitter Code' to the Arduino
You can find the code here.
5) Connect the Arduino Yun to your WiFi network
6) Access Linux Server of Arduino YUN with Putty:
opkg update
opkg install php5-mod-mysqli
opkg install php5-cli
nano /mnt/sda1/MySQL_UpdateTrafficLData.php
You can find 'MySQL_UpdateTrafficLData.php' here.
If you see this error: '-ash: nano: not found', you have to install 'nano' (this is a basic text editor):
opkg install nano
chmod 755 /mnt/sda1/MySQL_UpdateTrafficLData.php
/mnt/sda1/MySQL_UpdateTrafficLData.php
nano /mnt/sda1/MySQL_UpdateDistance.php
You can find 'MySQL_UpdateDistance.php' here.
chmod 755 /mnt/sda1/MySQL_UpdateDistance.php
/mnt/sda1/MySQL_UpdateDistance.php
7) Set up the hardware (Arduino Yun receiver)
You can find the schematic 'Arduino Yun receiver' here.
8) Upload 'Arduino Receiver & MySQLdb' to the Arduino Yun
You can find the code here.
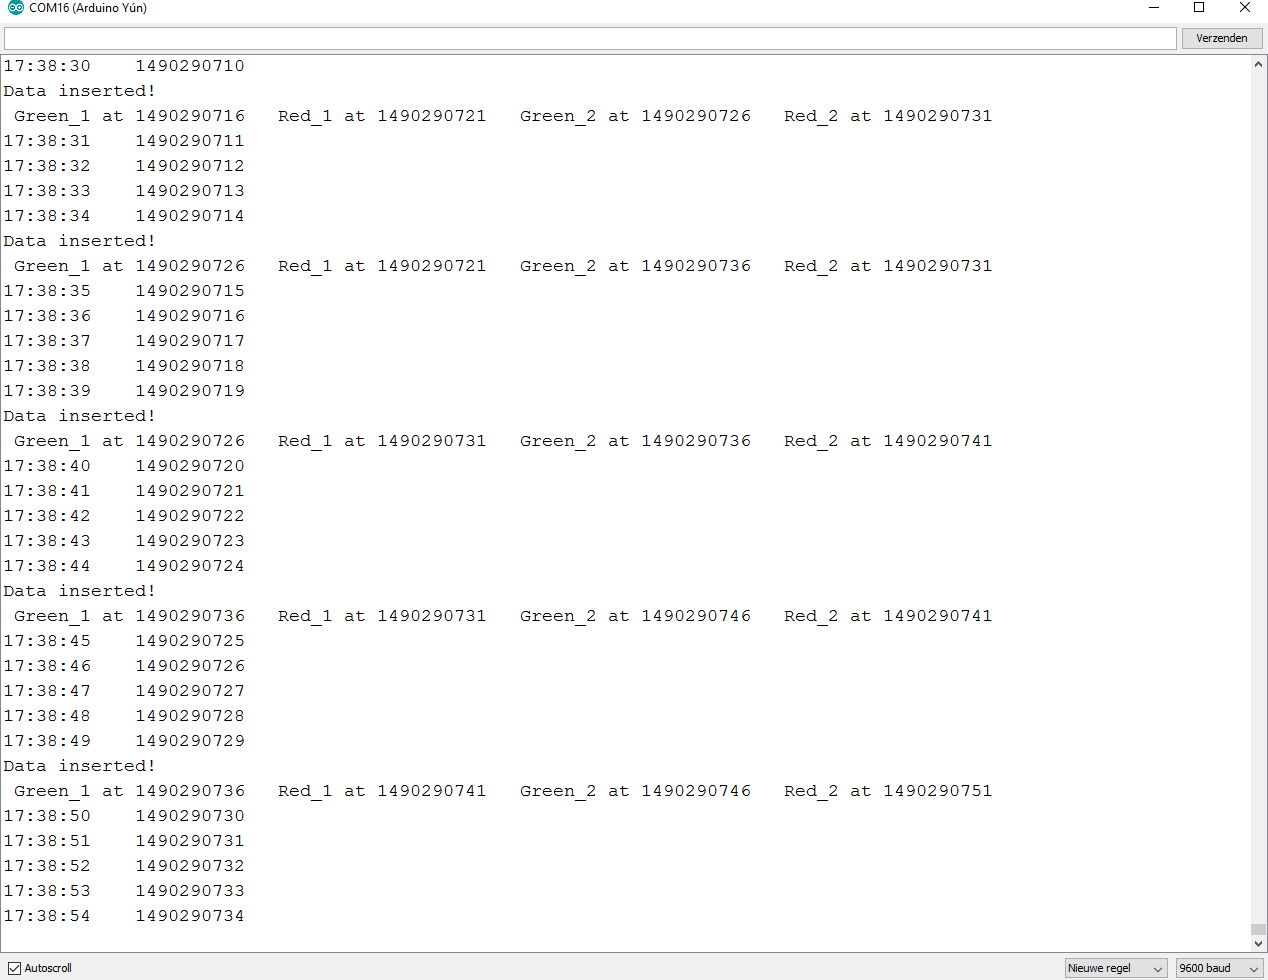
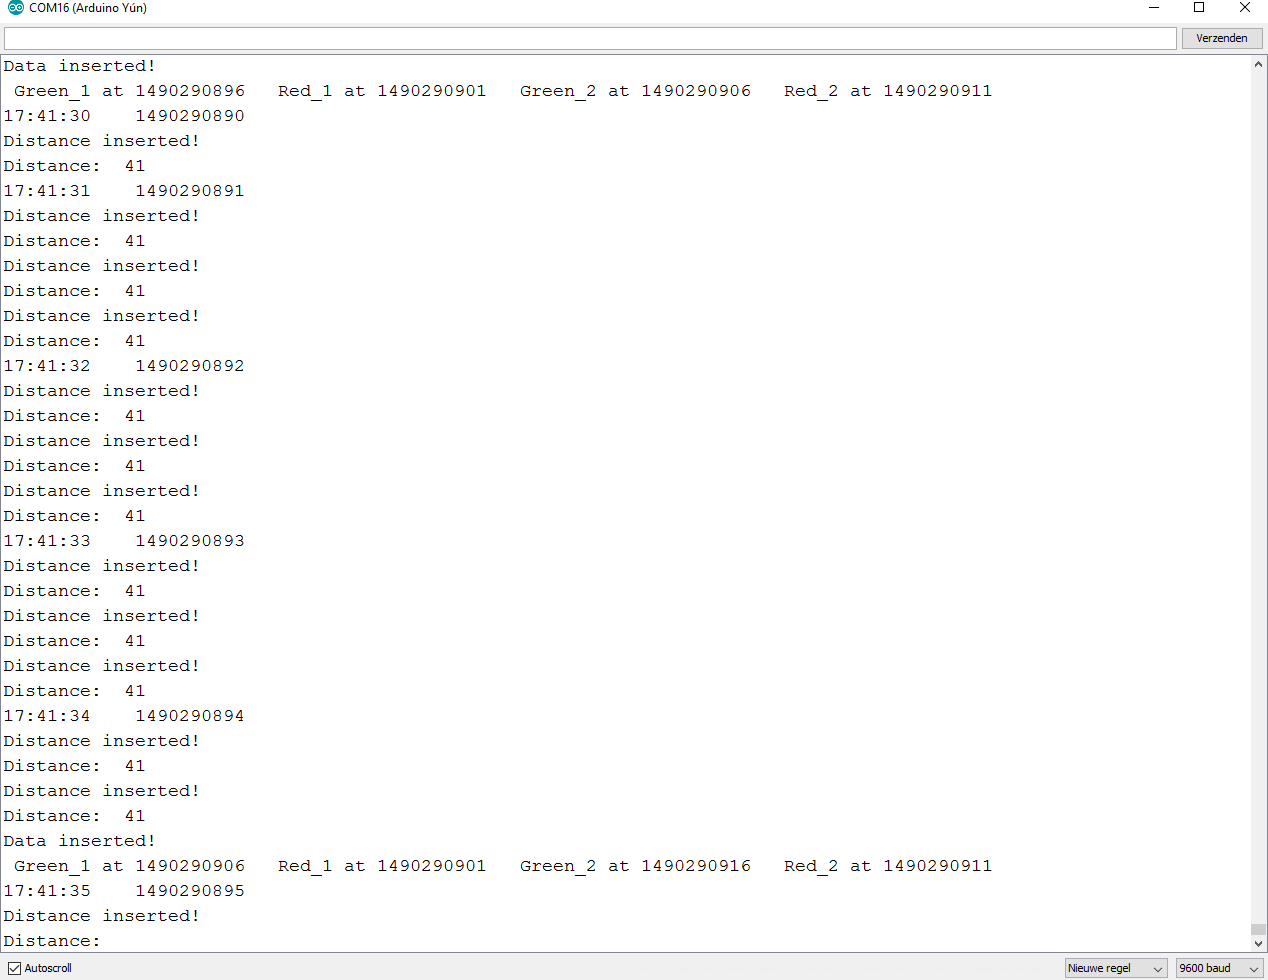
9) Open the Serial monitor
You should see something similar:
11) Android Studio files
- activity_main.xml
- MainActivity.java*
- AndroidManifest.xml
- strings.xml
*don't forget to change the URL
You can find 'EchoJSON.php' here.
12) Upload the Android Studio project to your smartphone
Instructions for ESP8266 [additional]It is possible to use an ESP8266 based module instead of the more expensive Arduino Yun:
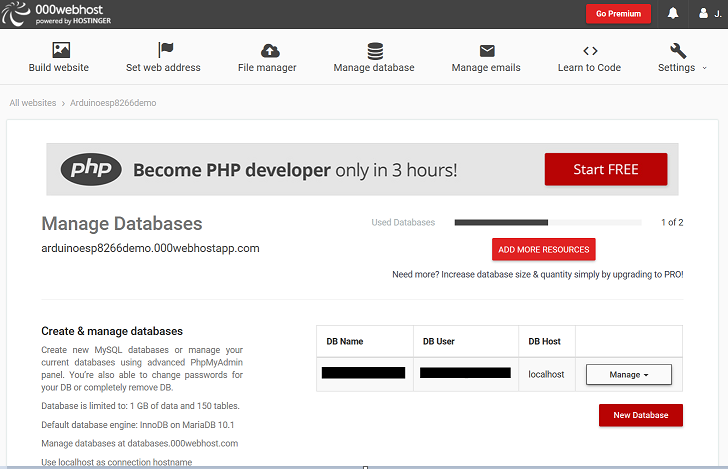
1. Create an account on https://www.000webhost.com

2. Create a website
3. Create a new database
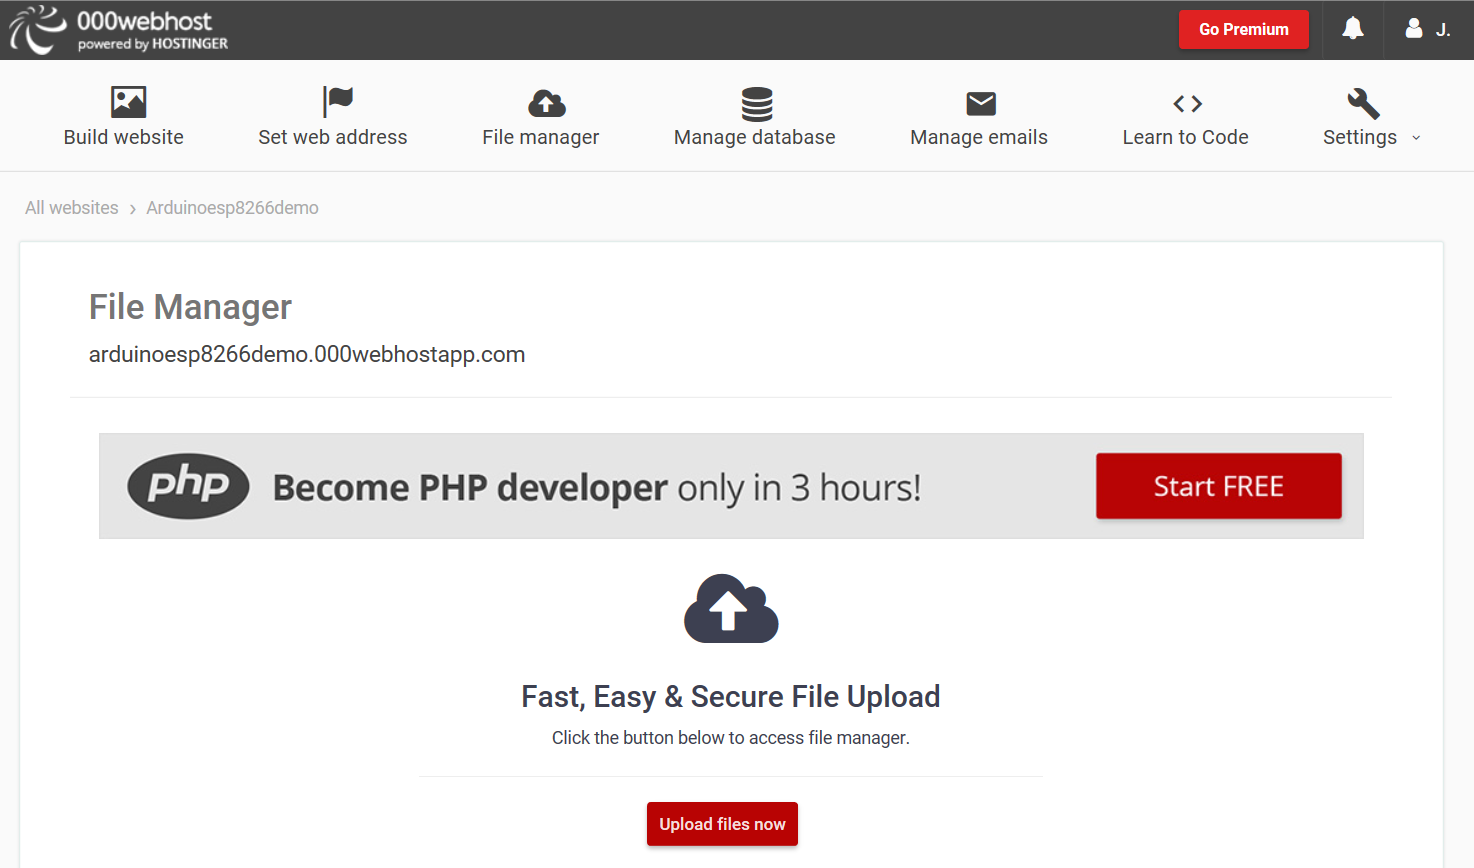
4. Upload ‘CreateTable.php’ and ‘PostDemo.php’ with File manager. Change ‘username’, ‘password’ and ‘dbname’ in both files.
CreateTable.php:
<?php
//Connect to database and create table
$servername = "localhost";
$username = "yourUsername";
$password = "yourPassword";
$dbname = "yourDBName";
// Create connection
$conn = new mysqli($servername, $username, $password, $dbname);
// Check connection
if ($conn->connect_error) {
   die("Connection failed: " . $conn->connect_error);
}
// trafficl_data_v2 is the name of the table
$sql = "CREATE TABLE trafficl_data_v2 (
       UnixTime_green_1 INT(12) NOT NULL,
       UnixTime_red_1 INT(12) NOT NULL,
       UnixTime_green_2 INT(12) NOT NULL,
       UnixTime_red_2 INT(12) NOT NULL,
       Distance INT(12) NOT NULL,
       id INT(6) UNSIGNED AUTO_INCREMENT PRIMARY KEY
	)";
if ($conn->query($sql) === TRUE) {
   echo "Table created successfully!";
} else {
   echo "Error creating table: " . $conn->error;
}
$conn->close();
?>
PostDemo.php:
<?php
//Connect to database and create new record as per request
$servername = "localhost";
$username = "yourUsername";
$password = "yourPassword";
$dbname = "yourDBName";
// Create connection
$conn = new mysqli($servername, $username, $password, $dbname);
// Check connection
if ($conn->connect_error) {
   die("Database Connection failed: " . $conn->connect_error);
}
if (!empty($_POST['UnixTime_green_1']) && !empty($_POST['UnixTime_red_1']) && !empty($_POST['UnixTime_green_2']) && !empty($_POST['UnixTime_red_2'])) {
   $UnixTime_green_1 = $_POST['UnixTime_green_1'];
   $UnixTime_red_1 = $_POST['UnixTime_red_1'];
   $UnixTime_green_2 = $_POST['UnixTime_green_2'];
   $UnixTime_red_2 = $_POST['UnixTime_red_2'];
   $sql = "UPDATE `trafficl_data_v2` SET `UnixTime_green_1`='5',`UnixTime_red_1`='6',`UnixTime_green_2`='7',`UnixTime_red_2`='8',`Distance`='99' WHERE 1";
   if ($conn->query($sql) === TRUE) {
       echo "Data inserted successfully!";
   } else {
       echo "Error: " . $sql . "<br>" . $conn->error;
   }
}
else {
   echo "FAILED: incorrect parameters";
}
$conn->close();
?>
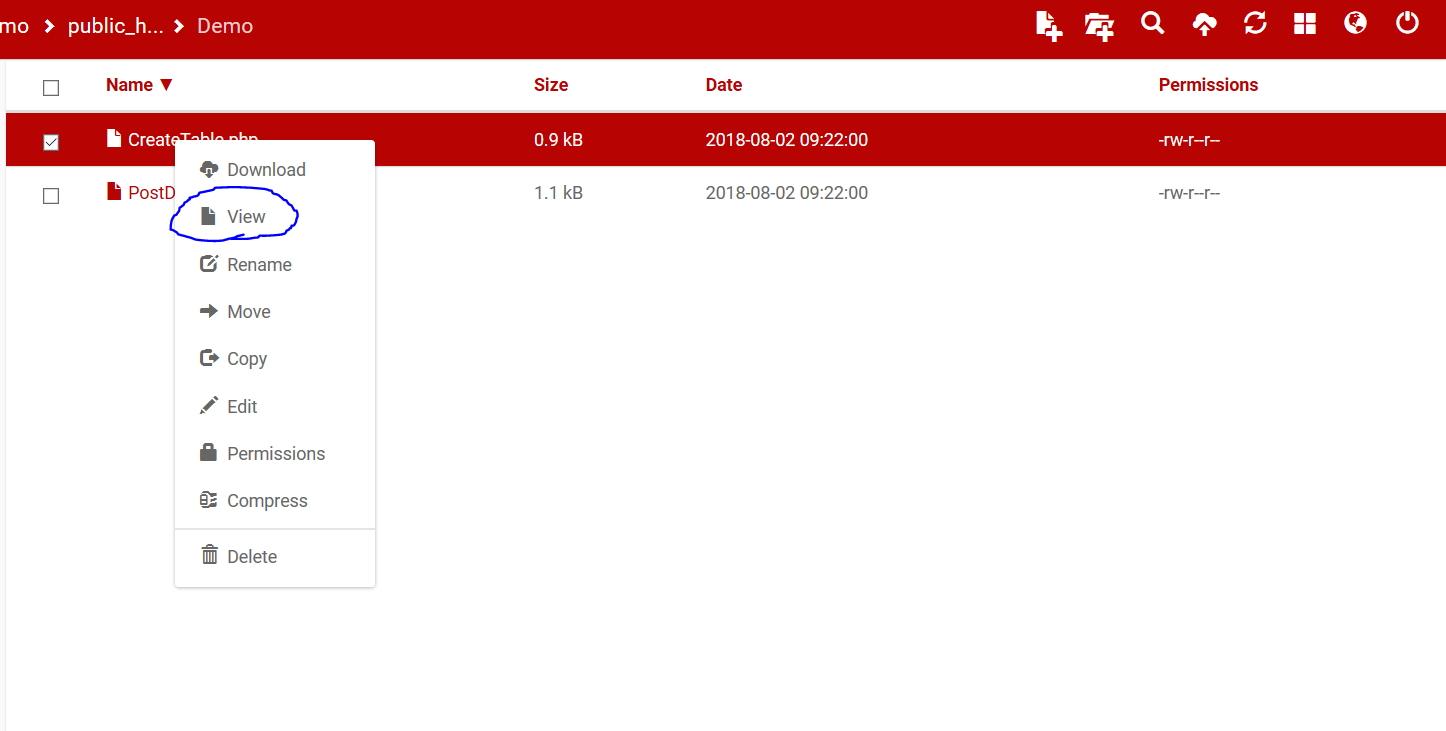
5. Create a new table: Select 'CreateTable.php' and click on 'view'
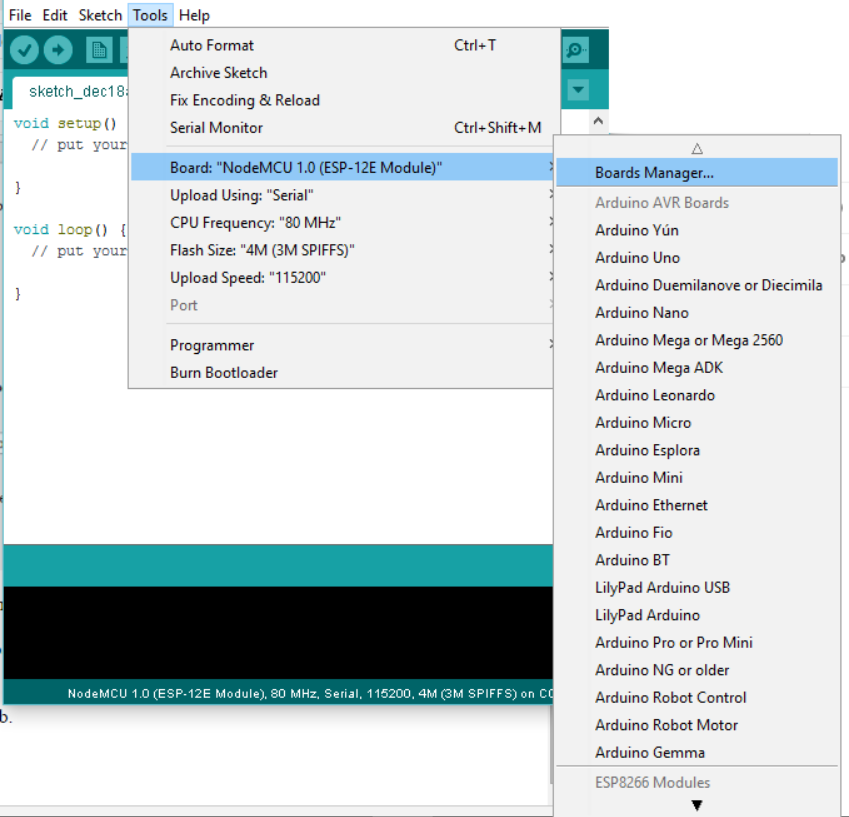
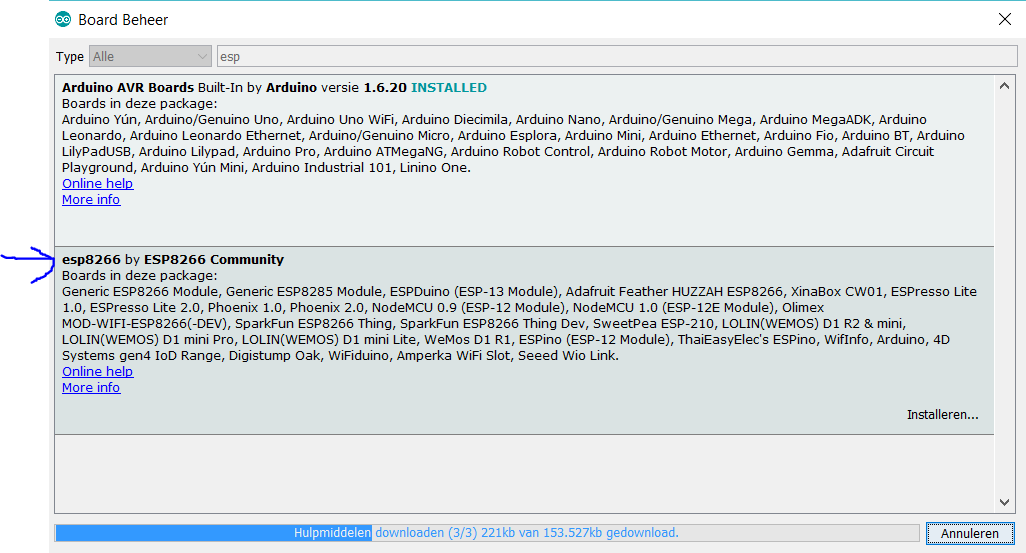
6. Install the packages for the ESP8266 in arduino
Add this URL File--> Preferences:
http://arduino.esp8266.com/stable/package_esp8266com_index.json
7.
[UPDATE 9 February 2019]
Select your board, COM port ... and upload ESP8266PostDemo.ino to your ESP8266 based board. I am using a NodeMcu V3 ESP8266 12E. The code below should work for almost all ESP8266-based boards.
Because I no longer have a clock at hand, I have changed the code so that the database is updated every 10 seconds with random values.
ESP8266PostDemo.ino:
#include <ESP8266WiFi.h>
#include <WiFiClient.h>
#include <ESP8266WebServer.h>
#include <ESP8266HTTPClient.h>
#define ARRAYSIZE 4 // 4 arguments
const char* ssid     = "yourSSID";
const char* password = "yourPassword";
const char* dest = "http://xxxxx.000webhostapp.com/xxxxx/ ... /xxxxx.php"; // your request destination
const char* argument_names[ARRAYSIZE] = {"UnixTime_green_1","UnixTime_red_1","UnixTime_green_2","UnixTime_red_2"};
const String equals_sign = "=";
const String ampersand_sign = "&";
void setup() {
 delay(1000);
 Serial.begin(115200);
 WiFi.mode(WIFI_OFF);        //Prevents reconnection issue (taking too long to connect)
 delay(1000);
 WiFi.mode(WIFI_STA);        //This line hides the viewing of ESP as wifi hotspot
 WiFi.begin(ssid, password);
 Serial.println("");
 Serial.print("Connecting");
 while (WiFi.status() != WL_CONNECTED) {
   delay(500);
   Serial.print(".");
 }
 Serial.println("");
 Serial.print("Connected to ");
 Serial.println(ssid);
 Serial.print("IP address: ");
 Serial.println(WiFi.localIP());
}
void loop() {
 HTTPClient http;
 String parameter = "";
 parameter += argument_names[0] +equals_sign+ (int)random(100);
 for(int i=1; i<ARRAYSIZE; i++){
     parameter += ampersand_sign + argument_names[i] + equals_sign + (int)random(100);
   }
 http.begin(dest);
 http.addHeader("Content-Type", "application/x-www-form-urlencoded");    //Specify content-type header
 int http_code = http.POST(parameter);   //Send the request
 String payload = http.getString();    //Get the response payload
 Serial.println(http_code);   //Print HTTP return code
 Serial.println(payload);    //Print request response payload
 http.end();  //Close connection
 Serial.println(parameter);
 delay(10000);  //Update database every 10 seconds
}
php-file:
<?php
       //Connect to database
       $servername = "localhost";
       $username = "yourUsername";
       $password = "yourPassword";
       $dbname = "yourDBName";
       // Create connection
       $conn = new mysqli($servername, $username, $password, $dbname);
       // Check connection
       if ($conn->connect_error) {
           die("Database Connection failed: " . $conn->connect_error);
       }
       if (!empty($_POST["UnixTime_green_1"]) && !empty($_POST["UnixTime_red_1"]) && !empty($_POST["UnixTime_green_2"]) && !empty($_POST["UnixTime_red_2"])) {
           $UnixTime_green_1 = $_POST["UnixTime_green_1"];
           $UnixTime_red_1 = $_POST["UnixTime_red_1"];
           $UnixTime_green_2 = $_POST["UnixTime_green_2"];
           $UnixTime_red_2 = $_POST["UnixTime_red_2"];
           $sql = "UPDATE TrafficL_data SET UnixTime_green_1='$UnixTime_green_1', UnixTime_red_1='$UnixTime_red_1',UnixTime_green_2='$UnixTime_green_2', UnixTime_red_2='$UnixTime_red_2' WHERE id=1";
           if ($conn->query($sql) === TRUE) {
               echo "OK";
           } else {
               echo "Error: " . $sql . "<br>" . $conn->error;
           }
       }
?>
If you have succeeded in updating the database, you can modify the following procedures in the arduino code of 'Arduino Receiver & MySQLdb':
- void MySQL_UpdateTrafficLData()
- void MySQL_UpdateDistance()
Note that if you want to replicate the project, it is not a good idea to implement everything at once. First try to test each component separately. If they all work well you can start by combining the different components. Feel free to ask for help in the comment section and try to describe your problem as detailed as possible.
Code
- Arduino Transmitter Code
- Arduino Receiver & MySQLdb
- MySQL_UpdateTrafficLData.php
- MySQL_UpdateDistance.php
- EchoJSON
- MainActivity.java
- AndroidManifest.xml
- strings.xml
- activity_main.xml
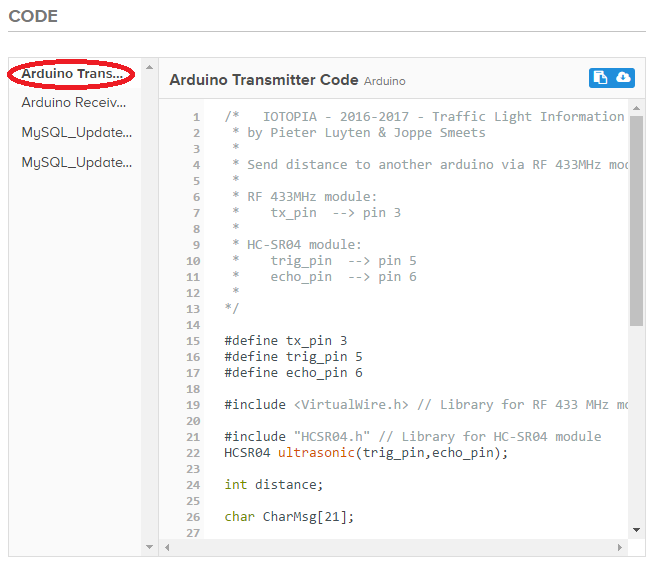
Arduino Transmitter CodeArduino
/*   IOTOPIA - 2016-2017 - Traffic Light Information System (Transmitter)
 * by Pieter Luyten & Joppe Smeets
 *
 * Send distance to another arduino via RF 433MHz modules
 *
 * RF 433MHz module:
 *    tx_pin  --> pin 3
 *
 * HC-SR04 module:
 *    trig_pin  --> pin 5
 *    echo_pin  --> pin 6
 *
*/

#define tx_pin 3
#define trig_pin 5
#define echo_pin 6

#include <VirtualWire.h> // Library for RF 433 MHz modules

#include "HCSR04.h" // Library for HC-SR04 module
HCSR04 ultrasonic(trig_pin,echo_pin);

int distance;

char CharMsg[21];


void setup() {
  Serial.begin(9600);
  vw_setup(2000); // Bits per sec
  vw_set_tx_pin(tx_pin);
}

void loop() {

  distance = ultrasonic.Ranging(CM); // Measure the distance in cm

  while(distance < 0){ // Avoid false readings, measure the distance again
      distance = ultrasonic.Ranging(CM);
  }

  sprintf(CharMsg, "%d,", distance);
  vw_send((uint8_t *)CharMsg, strlen(CharMsg)); // Send the distance
  vw_wait_tx(); // Wait until the whole message is gone

  Serial.print("Distance (cm):  ");
  Serial.println(distance);
  delay(250);

}
Arduino Receiver & MySQLdbArduino
/*   IOTOPIA - 2016-2017 - Traffic Light Information System  (Receiver + Upload to MySQLdb)
 *  by Pieter Luyten & Joppe Smeets
 *
 *  Receive distance from another arduino via RF
 *  Upload traffic light data and distance to MySQL database
 *
 *  RF 433MHz module:
 *     rx_pin  --> pin 3
 *
 *  TrafficLight (3 LEDs):
 *     RedLED  --> pin 5
 *     OrangeLED  --> pin 6
 *     GreenLED  --> pin 7
 *
 *  DS3231 (Real-Time-Clock):
 *     SCL --> SCL (pin 3 on Arduino Yun)
 *     SDA --> SDA (pin 2 on Arduino Yun)
 *
 *  SD Card - Arduino Yun
 *     SD Card (with PHP-file)--> integrated SD slot
*/

#define RedLED  5
#define OrangeLED  6
#define GreenLED  7

#define rx_pin 9

#include <VirtualWire.h> //  RF 433 MHz modules
#include <TimeAlarms.h> //  Alarms
#include <Wire.h> //  I2C communication
#include "RTClib.h" //  Real Time Clock
#include <Process.h> // Run Linux processes on the AR9331

// UnixTime: Time, defined as the number of seconds that have elapsed since 1 January 1970
long UnixTime_green_1; // Next green light (in UnixTime)
long UnixTime_red_1; // Next red light (in UnixTime)
long UnixTime_green_2; // Next but one green light (in UnixTime)
long UnixTime_red_2; // Next but one red light (in UnixTime)
long s_till_orange; // Seconds till orange

RTC_DS3231 rtc;

char StringReceived[22];

boolean i;

int interval = 5; // in seconds
int distance; // in cm

void setup() {
  rtc.begin();
  //rtc.adjust(DateTime(F(__DATE__), F(__TIME__)));
  Serial.begin(9600);
  Bridge.begin(); // Initialize Bridge


  vw_setup(2000); // Bits per sec
  vw_set_rx_pin(rx_pin);
  vw_rx_start();

  Alarm.timerRepeat(interval, UpdateTrafficLData); // Update traffic light data (next green/red light ... )
  Alarm.timerRepeat(1,PrintCurrentTime); // Print current time every x seconds

  pinMode(GreenLED, OUTPUT);
  pinMode(OrangeLED, OUTPUT);
  pinMode(RedLED, OUTPUT);

  digitalWrite(GreenLED, LOW);
  digitalWrite(OrangeLED, LOW);
  digitalWrite(RedLED, LOW);

  Serial.println("Setup finished");
}

void loop() {
  Alarm.delay(0); // This delay should be used instead of the normal Arduino delay(),
                  // for timely processing of alarms and timers. You can pass 0 for minimal delay.

  RF_Listen ();
}

void RF_Listen (){
  uint8_t buf[VW_MAX_MESSAGE_LEN];
  uint8_t buflen = VW_MAX_MESSAGE_LEN;

  if (vw_get_message(buf, &buflen)) {
    int a;
    for (a = 0; a < buflen; a++) {
      StringReceived[a] = char(buf[a]);
    }

    sscanf(StringReceived, "%d", &distance);
    MySQL_UpdateDistance();
    Serial.print("Distance:  ");
    Serial.println(distance);
  }
  memset( StringReceived, 0, sizeof( StringReceived));
}

void UpdateTrafficLData() {
  DateTime now = rtc.now();
  if (i == 1) {
    UnixTime_green_1 = now.unixtime() + interval + 1;
    UnixTime_red_1 = now.unixtime() + 2 * interval + 1;

    UnixTime_green_2 = now.unixtime() + 3 * interval + 1;
    UnixTime_red_2 = now.unixtime() + 4 * interval + 1;

    MySQL_UpdateTrafficLData();

    i = 0;
  }

  else if (i == 0) {
    UnixTime_red_1 = now.unixtime() + interval + 1;
    UnixTime_green_1 = now.unixtime() + (2 * interval) + 1;

    UnixTime_red_2 = now.unixtime()+ 3 * interval + 1;
    UnixTime_green_2 = now.unixtime() + 4 * interval + 1;

    MySQL_UpdateTrafficLData();

    i = 1;
  }

  Serial.print(" Green_1 at ");
  Serial.print(UnixTime_green_1);
  Serial.print("   Red_1 at ");
  Serial.print(UnixTime_red_1);
  Serial.print("   Green_2 at ");
  Serial.print(UnixTime_green_2);
  Serial.print("   Red_2 at ");
  Serial.println(UnixTime_red_2);
}

// Update traffic light data in MySQL database via PHP-script (SD Card)
void MySQL_UpdateTrafficLData() {
  long dataArray[4]={UnixTime_green_1, UnixTime_red_1, UnixTime_green_2,UnixTime_red_2};
  Process p;
  p.begin("/mnt/sda1/MySQL_UpdateTrafficLData.php");
  for (int b = 0; b < 4; b++){
   p.addParameter(String(dataArray[b]));
   }
  p.run();

  // Read feedback (for debugging)
  while (p.available() > 0) {
    char c = p.read();
    Serial.print(c);
  }
  // Ensure the last bit of data is sent.
  Serial.flush();
}

void MySQL_UpdateDistance(){
  Process p;
  p.begin("/mnt/sda1/MySQL_UpdateDistance.php");
  p.addParameter(String(distance));
  p.run();

  // Read feedback (for debugging)
  while (p.available() > 0) {
    char c = p.read();
    Serial.print(c);
  }
  // Ensure the last bit of data is sent.
  Serial.flush();
}

void PrintCurrentTime() {
  DateTime now = rtc.now();
  SetLEDsTrafficL();
  Serial.print(now.hour(), DEC);
  Serial.print(':');
  Serial.print(now.minute(), DEC);
  Serial.print(':');
  Serial.print(now.second(), DEC);
  Serial.print("    ");
  Serial.println(now.unixtime());
}

void SetLEDsTrafficL () {
  DateTime now = rtc.now();
  s_till_orange = UnixTime_red_1 - now.unixtime();

  if (i == 0) {
    digitalWrite(GreenLED, LOW);
    digitalWrite(OrangeLED, LOW);
    digitalWrite(RedLED, HIGH);
  }

  if (i == 1 && s_till_orange <= 3) {
    digitalWrite(GreenLED, LOW);
    digitalWrite(OrangeLED, HIGH);
    digitalWrite(RedLED, LOW);
  }

  if (i == 1 && s_till_orange > 3) {
    digitalWrite(GreenLED, HIGH);
    digitalWrite(OrangeLED, LOW);
    digitalWrite(RedLED, LOW);
  }
}
MySQL_UpdateTrafficLData.phpPHP
#!/usr/bin/php-cli

<?php
$UnixTime_green_1 = $argv[1];
$UnixTime_red_1 = $argv[2];
$UnixTime_green_2 = $argv[3];
$UnixTime_red_2 = $argv[4];
$DBServer = 'yourServerName';
$DBUser   = 'yourUserName';
$DBPass   = 'yourPassword';
$DBName   = 'yourDBName';
$conn = new mysqli($DBServer, $DBUser, $DBPass, $DBName);
// check connection
if ($conn->connect_error) {
  trigger_error('Database connection failed: '  . $conn->connect_error, E_USER_ERROR);
}
$sql="UPDATE TrafficL_data SET UnixTime_green_1='$UnixTime_green_1', UnixTime_red_1='$UnixTime_red_1',UnixTime_green_2='$UnixTime_green_2', UnixTime_red_2='$UnixTime_red_2' WHERE id=1";
if($conn->query($sql) === false) {
  trigger_error('Wrong SQL: ' . $sql . ' Error: ' . $conn->error, E_USER_ERROR);
}
else{
echo "Data inserted!\n";
}
?>
MySQL_UpdateDistance.phpPHP
#!/usr/bin/php-cli
<?php
$Distance = $argv[1];
$DBServer = 'yourServerName';
$DBUser   = 'yourUserName';
$DBPass   = 'yourPassword';
$DBName   = 'yourDBName';
$conn = new mysqli($DBServer, $DBUser, $DBPass, $DBName);
// check connection
if ($conn->connect_error) {
  trigger_error('Database connection failed: '  . $conn->connect_error, E_USER_ERROR);
}
$sql="UPDATE TrafficL_data SET Distance='$Distance'WHERE id=1";

if($conn->query($sql) === false) {
  trigger_error('Wrong SQL: ' . $sql . ' Error: ' . $conn->error, E_USER_ERROR);
}
else{
echo "Distance inserted!\n";
}
?>
EchoJSONPHP
<?php
define('HOST','yourServerName');
define('USER','yourUserName');
define('PASS','yourPassword');
define('DB','yourDBName');

$con = mysqli_connect(HOST,USER,PASS,DB);

$sql = "select * from TrafficL_data";

$res = mysqli_query($con,$sql);

while($row = mysqli_fetch_array($res,MYSQLI_BOTH)){
printf('[
    {
        "TrafficLArray":[
                {
                "UnixTime_green_1":"%s",
                "UnixTime_red_1":"%s",
                "UnixTime_green_2":"%s",
                "UnixTime_red_2":"%s",
                "Distance":"%s"
            }
        ]
    }
]', $row['UnixTime_green_1'], $row['UnixTime_red_1'],$row['UnixTime_green_2'],$row['UnixTime_red_2'],$row['Distance']);
}


mysqli_close($con);

?>
MainActivity.javaJava
package com.example.xxx.xxx;// change xxx xxx


import android.support.v7.app.AppCompatActivity;
import android.os.Bundle;

import android.util.Log;
import android.widget.TextView;

import com.android.volley.RequestQueue;
import com.android.volley.Response;
import com.android.volley.VolleyError;
import com.android.volley.toolbox.JsonArrayRequest;
import com.android.volley.toolbox.Volley;
import org.json.JSONArray;
import org.json.JSONException;
import org.json.JSONObject;

//import java.text.DateFormat;
import java.util.Date;
import java.util.Timer;
//import java.util.TimerTask;
import java.util.concurrent.Executors;
import java.util.concurrent.Future;
import java.util.concurrent.ScheduledExecutorService;
import java.util.concurrent.TimeUnit;


public class MainActivity extends AppCompatActivity {
    // Will show the string "data" that holds the results
    TextView results;
    //The textview that holds the recommended speed
    TextView recSpeed;

    // URL of object to be parsed
    String JsonURL = "YourURLhere";

    // This string will hold the results
    String data = "";
    // Defining the Volley request queue that handles the URL request concurrently
    RequestQueue requestQueue;

    //timer object to uppdate the data every second
    //Timer timer;

    //The speedLimit (cm/s)
    private final static double maxSpeed = 18;
    //The recommended speed
    private double speed;

    //number of times in the table
    public final static int NUMBER_OF_ENTRIES = 2;
    //array with the times when it is green
    long[] unixTimesGreen = new long[NUMBER_OF_ENTRIES];
    //array with the times when it is red
    long[] unixTimesRed = new long[NUMBER_OF_ENTRIES];
    //variable which hold the distance
    private double distance;

    //variables for repeating updateTable
    private final ScheduledExecutorService scheduler = Executors.newSingleThreadScheduledExecutor();

    //for testing:
    private Future<?> timingTask;

    public void tick(long milliseconds) {
        timingTask = scheduler.scheduleAtFixedRate(new Runnable() {
            public void run() {
                updateTable();
            }
        }, 0, milliseconds, TimeUnit.MILLISECONDS);
    }

    @Override
    protected void onCreate(Bundle savedInstanceState) {
        super.onCreate(savedInstanceState);
        setContentView(R.layout.activity_main);

        //textViews to cast results to
        results = (TextView) findViewById(R.id.jsonData);

        recSpeed = (TextView) findViewById(R.id.recommendedSpeed);

        //initialize table
        updateTable();

        //update app every 100 milliseconds
        tick(500);

        //for working with a timer object to repeatedly update
        /**
        timer = new Timer("Timer");
        timer.schedule(new UpdateTable(),(long)100,(long)100);
         */

    }

    //for working with timer object to repeatedly update
    /**
    private class UpdateTable extends TimerTask{
        public void run(){
            updateTable();
        }
    }
     */

    private void updateTable(){
        //reset String
        data = "";
        // Creates the Volley request queue
        requestQueue = Volley.newRequestQueue(this);

        //for testing
        /**
        // Casts results into the TextView found within the main layout XML with id jsonData
        results = (TextView) findViewById(R.id.jsonData);
         */


        // Creating the JsonArrayRequest class called arrayreq, passing the required parameters
        //JsonURL is the URL to be fetched from
        JsonArrayRequest arrayreq = new JsonArrayRequest(JsonURL,
                // The second parameter Listener overrides the method onResponse() and passes
                //JSONArray as a parameter
                new Response.Listener<JSONArray>() {


                    // Takes the response from the JSON request
                    @Override
                    public void onResponse(JSONArray response) {
                        try {
                            // Retrieves first JSON object in outer array
                            JSONObject TrafficLObj = response.getJSONObject(0);
                            // Retrieves "trafficArry" from the JSON object
                            JSONArray trafficArry = TrafficLObj.getJSONArray("TrafficLArray");
                            // Iterates through the JSON Array getting objects and adding them
                            //to the list view until there are no more objects in trafficArry
                            for (int i = 0; i < trafficArry.length(); i++) {
                                //gets each JSON object within the JSON array
                                JSONObject jsonObject = trafficArry.getJSONObject(i);

                                //arrays for storing the Strings
                                String[] green = new String[NUMBER_OF_ENTRIES];
                                String[] red = new String[NUMBER_OF_ENTRIES];

                                //String for distance
                                String distanceTemp = jsonObject.getString("Distance");

                                distance = (double)Long.parseLong(distanceTemp);

                                // Retrieves the string
                                // and converts them into javascript objects
                                green[0] = jsonObject.getString("UnixTime_green_1");
                                red[0] = jsonObject.getString("UnixTime_red_1");
                                green[1] = jsonObject.getString("UnixTime_green_2");
                                red[1] = jsonObject.getString("UnixTime_red_2");

                                // Converts Strings retrieved from JSon object to longs
                               for (int j = 0; j < unixTimesRed.length; j++){
                                   unixTimesGreen[j] = Long.parseLong(green[j]);
                                   unixTimesRed[j] = Long.parseLong(red[j]);
                               }

                                //for testing
                                /**
                                //create Date Objects to print out readable dates
                                Date green_1 = new Date(IntUnixTime_green*1000);
                                Date green_2 = new Date(IntUnixTime_green_2*1000);
                                Date red_1 = new Date(IntUnixTime_red*1000);
                                Date red_2 = new Date(IntUnixTime_red_2*1000);


                                /**
                                // Adds strings from the current object to the data string
                                //spacing is included at the end to separate the results from
                                //one another
                                data += "\nID " + (i + 1) +
                                        "\nUnixTime green:  " + green_1.toString() +
                                        "\nUnixTime red:  " + red_1.toString() +
                                        "\nUnixTime green_2:  " + green_2.toString() +
                                        "\nUnixTime red_2:  " + red_2.toString()
                                        +
                                        "\nSum = " + (new Date(currentTime)).toString();
                                 */
                            }//end for

                            // Adds the data string to the TextView "results"
                            //for testing
                            /**
                            results.setText(data);
                             */

                            updateTextView();

                        }//end try

                        // Try and catch are included to handle any errors due to JSON
                        catch (JSONException e) {
                            // If an error occurs, this prints the error to the log
                            e.printStackTrace();
                        }//end catch
                    }//end onResponse
                    //end response.listener
                },
                // The final parameter overrides the method onErrorResponse() and passes VolleyError
                //as a parameter
                new Response.ErrorListener() {
                    @Override
                    // Handles errors that occur due to Volley
                    public void onErrorResponse(VolleyError error) {
                        Log.e("Volley", "Error");
                    }
                }
        );
        // Adds the JSON array request "arrayreq" to the request queue
        requestQueue.add(arrayreq);
    }//end updateTable

    private void updateTextView(){
        //update time info
        StringBuilder builder = new StringBuilder("");

        for (int i = 0; i < unixTimesGreen.length; i++){
            builder.append("unixTimeGreen");
            builder.append(i);
            builder.append(": ");
            builder.append((new Date(unixTimesGreen[i]*1000)).toString());
            builder.append("\n");

            builder.append("unixTimeRed");
            builder.append(i);
            builder.append(": ");
            builder.append((new Date(unixTimesRed[i]*1000)).toString());
            builder.append("\n");
        }
        builder.append("distance: " + distance);

        //results.setText(builder.toString());

        //update speed
        speedCalc();
        String s = String.format("%.0f",speed);
        recSpeed.setText(s);
    }

    private void speedCalc(){

        int interval = 0;
        double time = (double)System.currentTimeMillis()/1000;
        double diff;

       for (int i = 0; i < NUMBER_OF_ENTRIES; i++){
           diff = unixTimesRed[interval] - time;
           speed = distance/((diff)/1000);
           interval++;
       }

        interval = interval-1;
        if(distance/((unixTimesGreen[interval]-time)) > maxSpeed)
            speed = maxSpeed;
        else
            speed = distance/((unixTimesGreen[interval]-time));

        speed = speed*5;
    }
}
AndroidManifest.xmlXML
<?xml version="1.0" encoding="utf-8"?>
<manifest xmlns:android="http://schemas.android.com/apk/res/android"
    package="com.example.xxx.xxx">// change xxx xxx

    <uses-permission android:name="android.permission.INTERNET"/>

    <application
        android:allowBackup="true"
        android:icon="@mipmap/ic_launcher"
        android:label="@string/app_name"
        android:supportsRtl="true"
        android:theme="@style/AppTheme">
        <activity android:name=".MainActivity">
            <intent-filter>
                <action android:name="android.intent.action.MAIN" />

                <category android:name="android.intent.category.LAUNCHER" />
            </intent-filter>
        </activity>
    </application>

</manifest>
strings.xmlXML
"NooitRood", meaning: "NeverRed"<resources>
<string name="app_name">NooitRood</string>
</resources>
activity_main.xmlXML
<?xml version="1.0" encoding="utf-8"?>
<LinearLayout xmlns:android="http://schemas.android.com/apk/res/android"
    xmlns:tools="http://schemas.android.com/tools"
    android:layout_width="match_parent"
    android:layout_height="wrap_content"
    android:layout_marginLeft="16dp"
    android:layout_marginRight="16dp"
    tools:context="com.example.xxx.xxx.MainActivity"// change xxx xxx
    android:orientation="vertical">

    <TextView
        android:layout_width="wrap_content"
        android:layout_height="wrap_content"
        android:layout_gravity="center_horizontal"
        android:paddingBottom="10dp"
        android:textAppearance="?android:attr/textAppearanceSmall"
        android:text="Aanbevolen snelheid:"
        android:textSize="20sp"
        android:textStyle="bold"
        android:id="@+id/jsonData"
        android:textColor="#000000" />

    <TextView
        android:layout_width="900px"
        android:layout_height="900px"
        android:layout_gravity="center_horizontal"
        android:paddingTop="10dp"
        android:id="@+id/recommendedSpeed"
        android:textSize="120sp"
        android:textColor="#000000"
        android:textStyle="bold"
        android:gravity="center"
        android:background="@drawable/gebodsbord"/>

</LinearLayout>
Schematics
RF 433MHz module:tx_pin --> pin 3
HC-SR04 module:
trig_pin --> pin 5
echo_pin --> pin 6
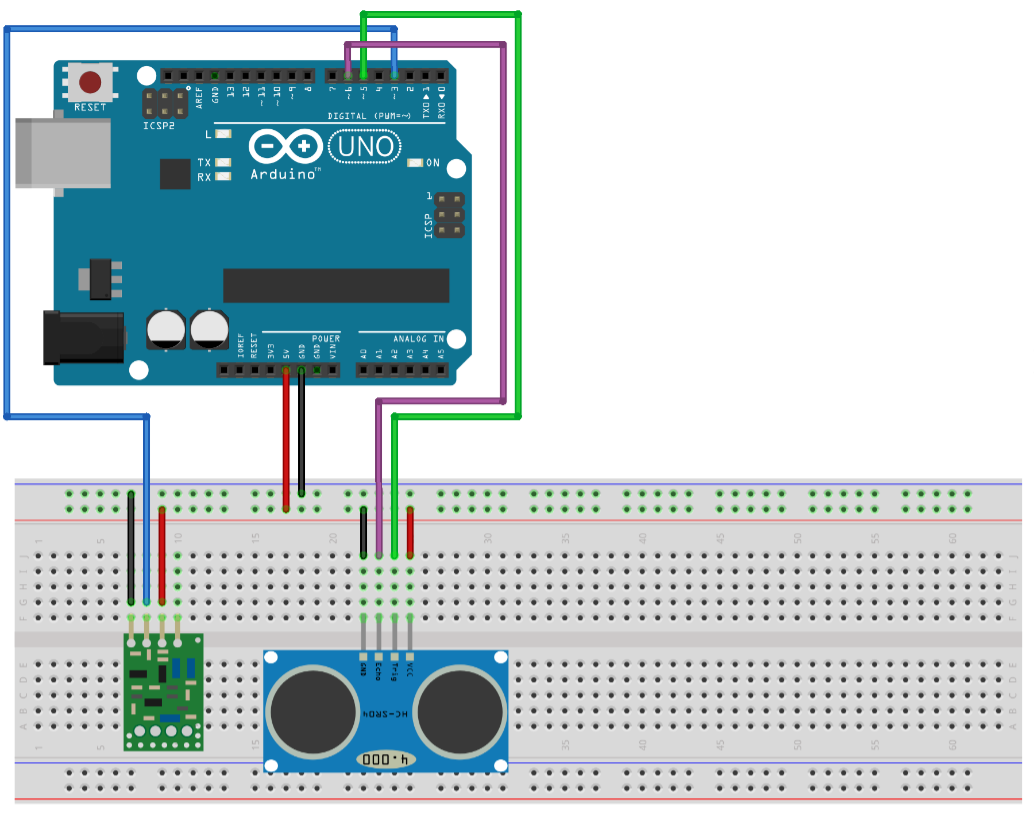 RF 433MHz module:
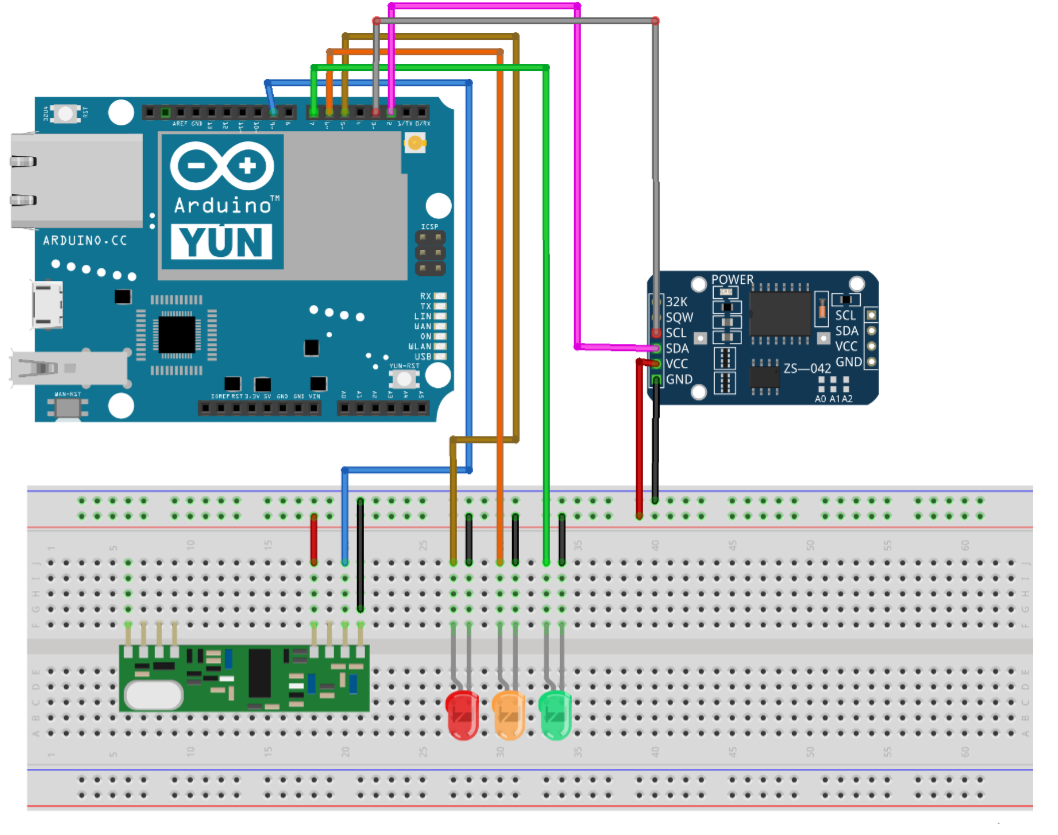
rx_pin --> pin 3
TrafficLight (3 LEDs):
RedLED --> pin 5
OrangeLED --> pin 6
GreenLED --> pin 7
DS3231 (Real-Time-Clock):
SCL --> SCL (pin 3 on Arduino Yun)
SDA --> SDA (pin 2 on Arduino Yun)
Manufacturing process
- Traffic Signals: Engineering, History, and Future Innovations
- Light‑Emitting Diodes: From Inception to 100‑Year Lifespans
- Smart Traffic Light: Adaptive Street Lighting Powered by IoT
- Wireless Data Transfer via LED (Li-Fi) – Arduino Project
- LED Whack‑a‑Mole Game with Arduino Uno – Interactive LED and Joystick Project
- IoT Smart Street Lighting: Intelligent, Energy‑Efficient LED System
- Build a Realistic Traffic Light Simulator with Arduino UNO
- DIY LED Lamp Kit: Build an Energy‑Efficient, Eco‑Friendly Light
- Mastering LED Strip Accessories: Connect, Control, and Customize Your Lighting
- LED Strip Diffusers: How They Evenly Distribute Light for Optimal Design