


Build Your First Arduino Robot: A Comprehensive Beginner's Guide
Components and supplies
 |
| × | 1 | |||
| × | 1 | ||||
| × | 1 | ||||
 |
| × | 1 | |||
| × | 2 | ||||
| × | 2 | ||||
| × | 2 | ||||
 |
| × | 3 | |||
 |
| × | 3 | |||
 |
| × | 8 | |||
| × | 1 |
Necessary tools and machines
 |
| |||
 |
| |||
|
Apps and online services
| ||||
 |
| |||
|
About this project
If you're a beginner in Arduino and have a plan to make your first robot, then here's the tutorial for you. Look at the images of what you are going to build, today.


In this tutorial I am going to show how to make an Arduino robot with different functionalities. We can learn the use of different programs for different functions, mainly a smart phone controlled robot with Obstacle avoider, wall follower, and maze solver. Or you can also make it for only a single function.
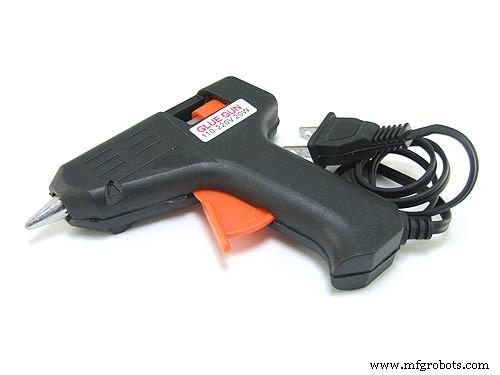
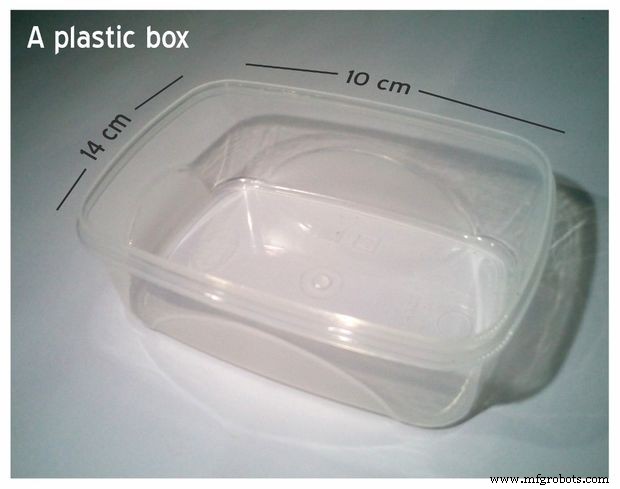
Materials and Tools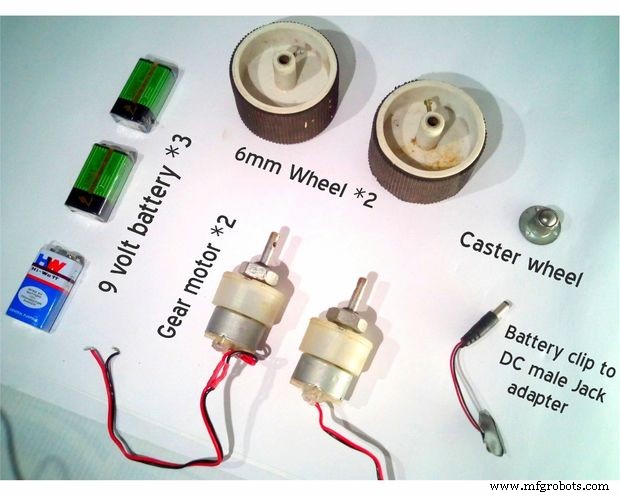


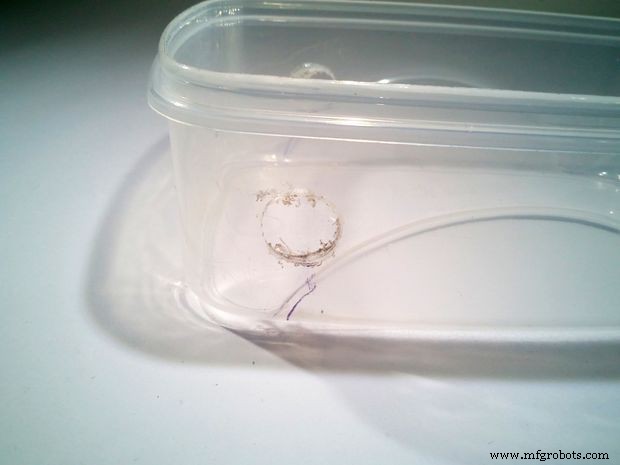
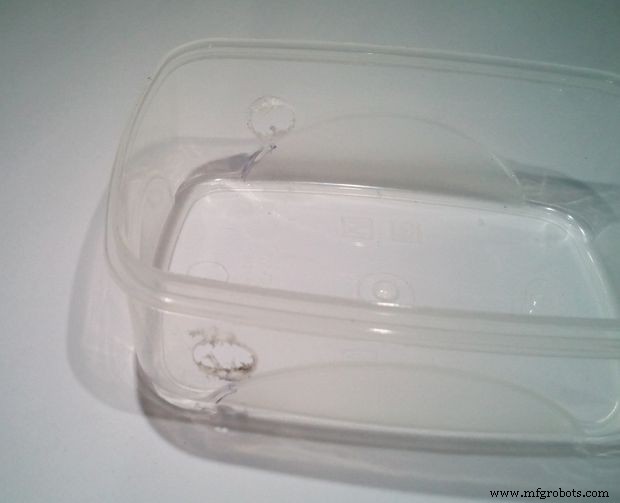
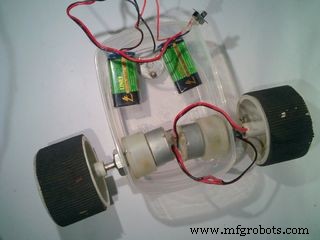
Drill two holes for motor:
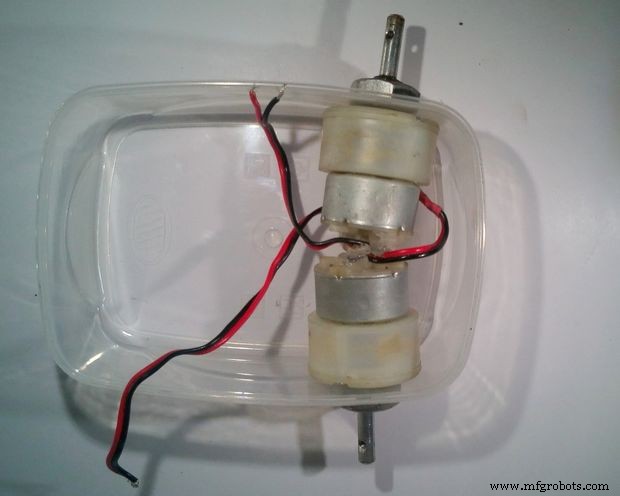
Connect two motors:

Make three holes for caster wheel:
Connect the caster wheel:

Make two holes on either side of the box for connecting the motors and three holes on the bottom for connecting the caster wheel after measuring and marking the correct diameter. Then install the motors and the caster.
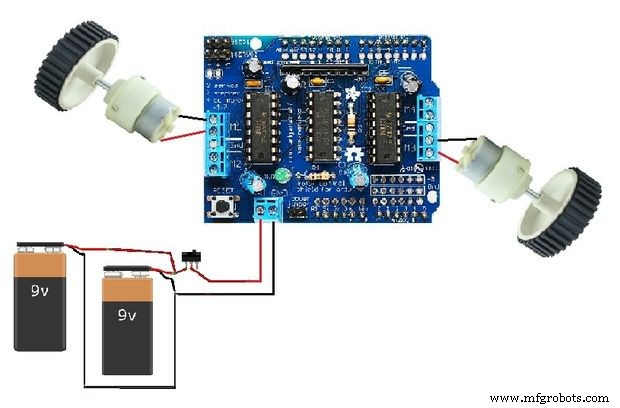
Batteries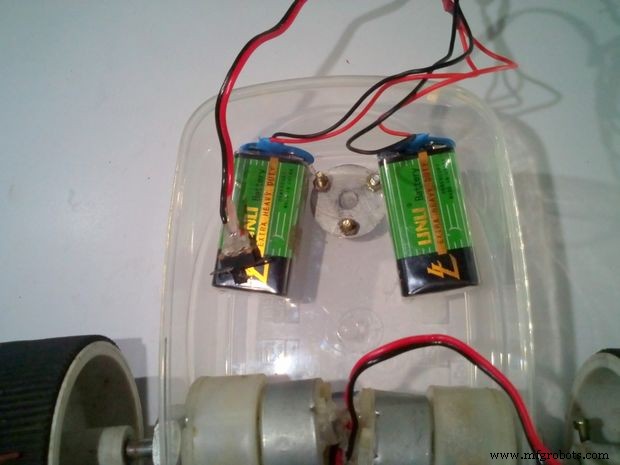
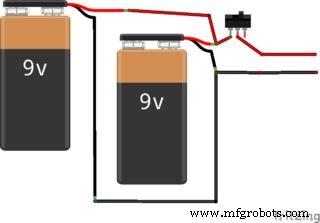
Connecting the batteries.
Connection diagram.
Glue the batteries inside the box.
Mount two 9 volt batteries inside the box above the caster. Then wire them in parallel and connect a switch as shown in above diagram.
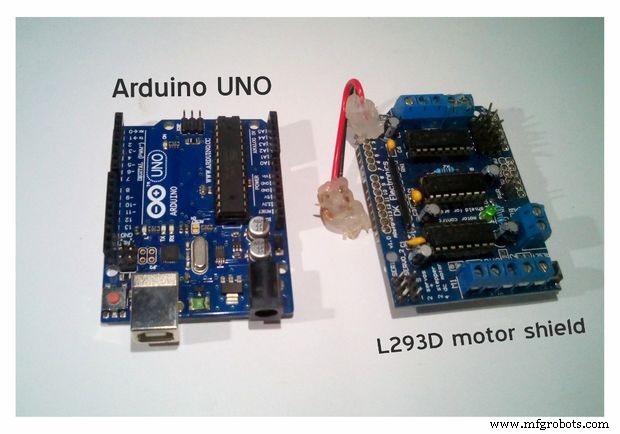
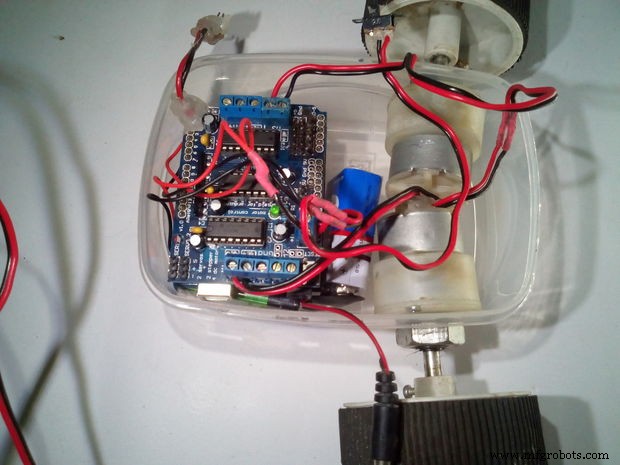
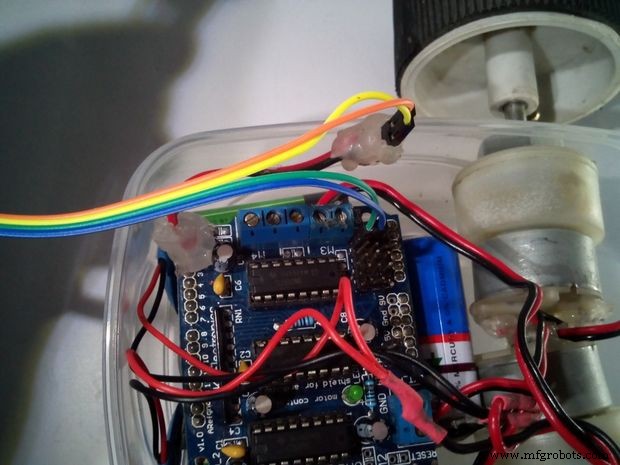
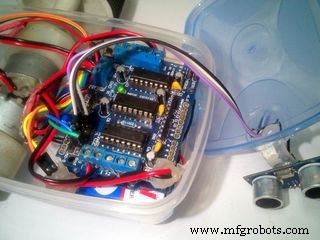
Connecting the Arduino and Motor Shield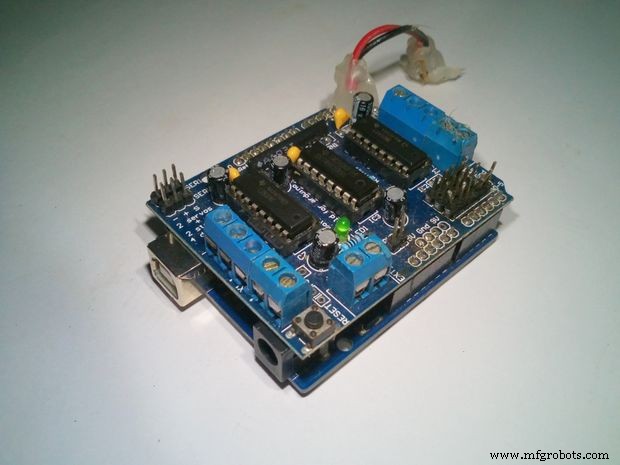
Attach the motor shield above the Arduino.
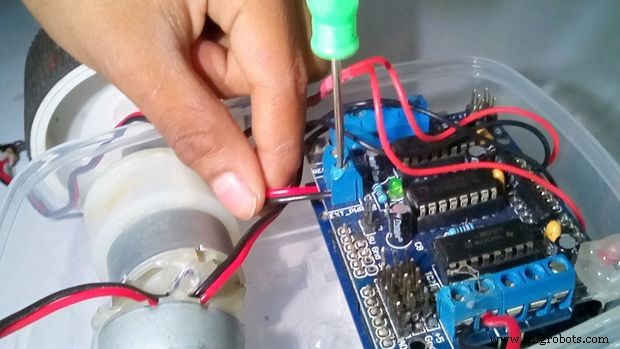
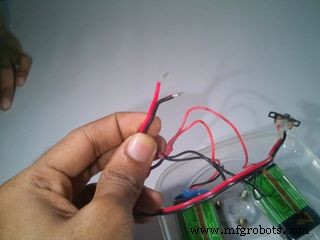
Connect the battery wires to the PWR terminals of motor shield.

Connect the motors to the motor shield.
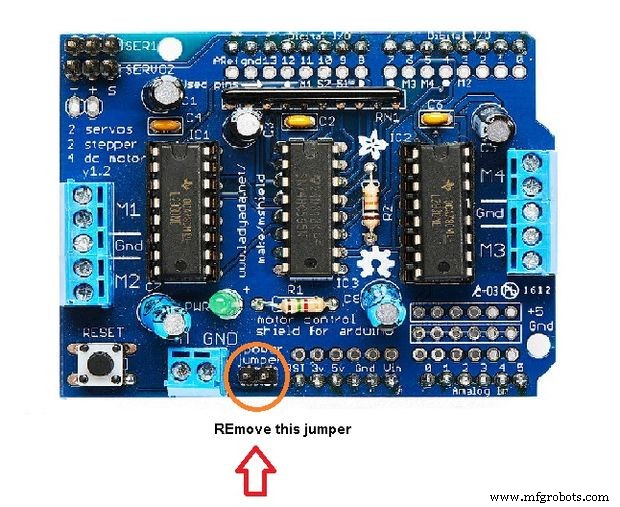
Remove the jumper from this port.
Connect the motor shield above the Arduino and place it above the battery. Then connect the wires from the motors and battery to the motor shield. Check out the connection diagram before connecting, as it is very important.
Wiring Instructions:
- Connect the left motor to "M1" of motor shield
- Connect the right motor to "M3" of motor shield
- Connect the the wire from battery to "ext pwr" of motor shield

Mark the spot to make holes.
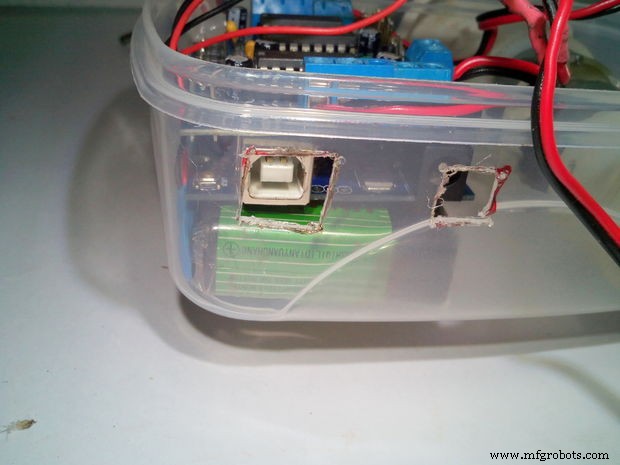
Make the holes.
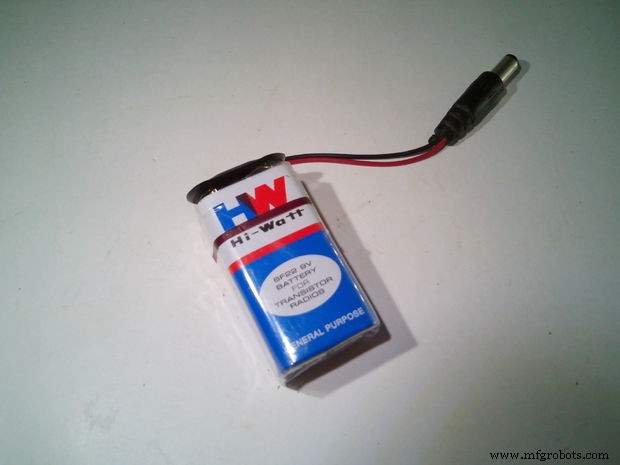
Connect the battery clip to DC male jack to the 9V battery.
Place this 9 volt battery inside the box.
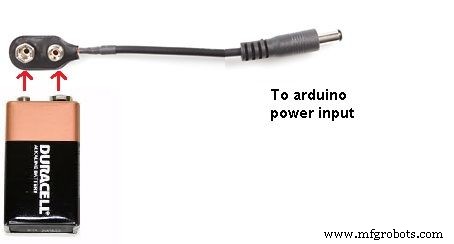
Make two holes for accessing the USB port and the DC input port of the Arduino. Take another 9 volt battery and connect a battery clip to a DC male jack adapter, then connect the DC male jack to the Arduino DC input port, to power the Arduino. Then place the battery between the motors and Arduino inside the box.
Connecting Bluetooth Module and Switch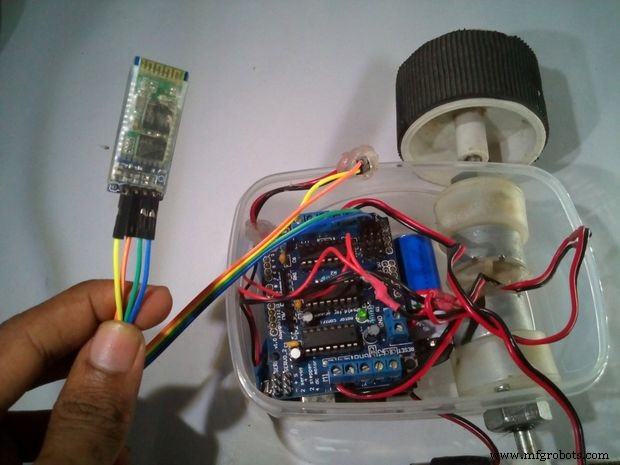

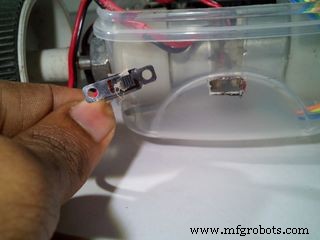

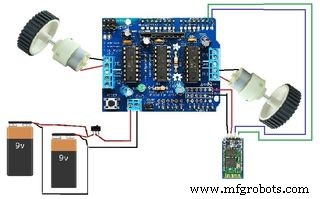
Connect the Bluetooth module to the Arduino as shown in the connection diagram and place it inside the box. Then make hole to mount the switch on the back side of the box and connect the switch (here I have changed the switch which is used earlier because of some soldering problem).
Wiring Instruction of Bluetooth module:
- "TX" of Bluetooth Module goes to "RX" of Arduino
- "RX" of Bluetooth Module goes to "TX" of Arduino
- "VCC" of Bluetooth Module goes to "5v" of Arduino
- "GND" of Bluetooth Module goes to "GND" of Arduino
- The State & Key pins of the BT modules are kept unused.
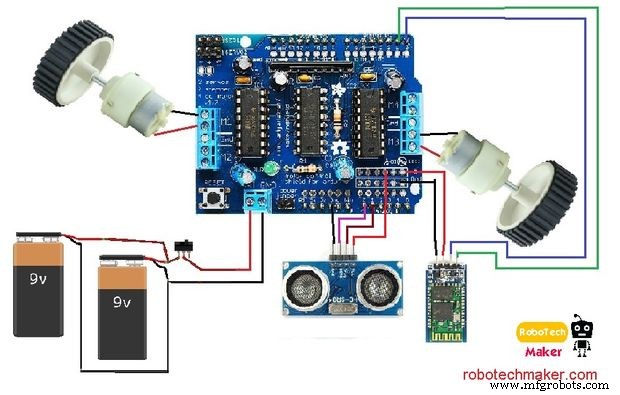
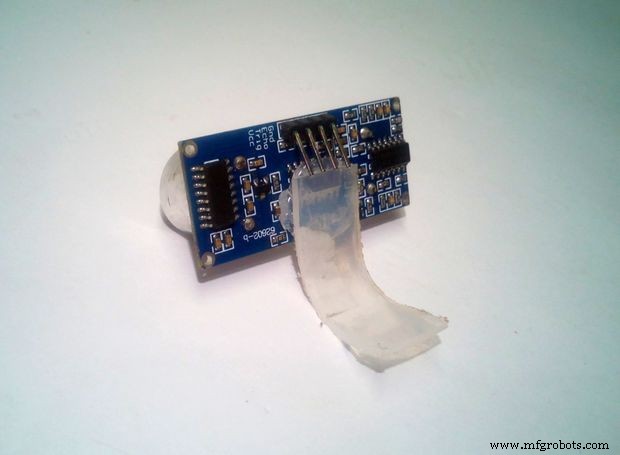
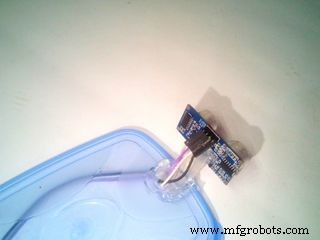

Take the ultrasonic sensor and glue a small 'L' shaped plastic piece to it and glue it on top of the plastic box (or if you don't have a glue stick use double sided tape). Then connect the jumper wires to as shown in the circuit diagram above.
Wiring Instruction of ultrasonic sensor:
- "VCC" of Ultra sonic sensor goes to "+5" of Arduino
- "GND" of Ultra sonic sensor goes to "GND" of Arduino
- "Trig" pin of Ultra sonic sensor goes to "Analog pin 1" of Arduino
- "Echo" pin of Ultra sonic sensor goes to "Analog pin 0" of Arduino
Now we finished the all the connections and it's time to program.
Last step - Arduino codes and Bluetooth app editing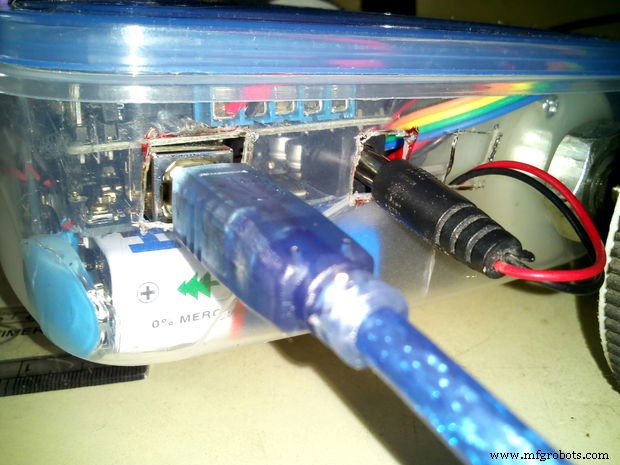
Upload the "Final Sketch" provided in the code section. If you face any error, make sure you have installed the AFmotor library.
Now, we learned how to program a Arduino easily. I have shown here some programs to work this robot as a obstacle avoiding robot, Wall follower, and Bluetooth controlled. and at last i have combined this three functions together. Watch the video for more details and information
Getting Started with Bluetooth AppSome fun with Wall Follower & Obstacle Avoidance
Visit my blog here - robotechmaker.com
If you have any questions or any suggestions please comment below.
Code
- Bluetooth (Controlled Robot) Sketch
- Final Sketch (Final Code)
- Obstacle Avoider Sketch
- Wall Follower Sketch
Bluetooth (Controlled Robot) SketchArduino
/*
Author:  Marcelo Moraes


  This project contains public domain code.
  The modification is allowed without notice.

 */

//Libraries
#include <AFMotor.h>

//Objects
AF_DCMotor motorRight(1, MOTOR12_64KHZ); // create motor #1, 64KHz pwm
AF_DCMotor motorLeft(3, MOTOR12_64KHZ);  // create motor #3, 64KHz pwm

//Constants and variable
char dataIn = 'S';
char determinant;
char det;
int vel = 0; //Bluetooth Stuff


void setup() {
  Serial.begin(9600); // set up Serial library at 9600 bps

  //Initalization messages
  Serial.println("ArduinoBymyself - ROVERBot");
  Serial.println("     AF Motor test!");

  //turn off motors
  motorRight.setSpeed(0);
  motorLeft.setSpeed(0);
  motorRight.run(RELEASE);
  motorLeft.run(RELEASE);


}

void loop() {
  det = check(); //call check() subrotine to get the serial code

  //serial code analysis
  switch (det){
    case 'F': // F, move forward
    motorRight.setSpeed(vel);
    motorLeft.setSpeed(vel);
    motorRight.run(FORWARD);
    motorLeft.run(FORWARD);
    det = check();
    break;

    case 'B': // B, move back
    motorRight.setSpeed(vel);
    motorLeft.setSpeed(vel);
    motorRight.run(BACKWARD);
    motorLeft.run(BACKWARD);
    det = check();
    break;

    case 'L':// L, move wheels left
    motorRight.setSpeed(vel);
    motorLeft.setSpeed(vel/4);
    motorRight.run(FORWARD);
    motorLeft.run(FORWARD);
    det = check();
    break;

    case 'R': // R, move wheels right
    motorRight.setSpeed(vel/4);
    motorLeft.setSpeed(vel);
    motorRight.run(FORWARD);
    motorLeft.run(FORWARD);
    det = check();
    break;

    case 'I': // I, turn right forward
    motorRight.setSpeed(vel/2);
    motorLeft.setSpeed(vel);
    motorRight.run(FORWARD);
    motorLeft.run(FORWARD);
    det = check();
    break;

    case 'J': // J, turn right back
    motorRight.setSpeed(vel/2);
    motorLeft.setSpeed(vel);
    motorRight.run(BACKWARD);
    motorLeft.run(BACKWARD);
    det = check();
    break;

    case 'G': // G, turn left forward
    motorRight.setSpeed(vel);
    motorLeft.setSpeed(vel/2);
    motorRight.run(FORWARD);
    motorLeft.run(FORWARD);
    det = check();
    break;

    case 'H': // H, turn left back
    motorRight.setSpeed(vel);
    motorLeft.setSpeed(vel/2);
    motorRight.run(BACKWARD);
    motorLeft.run(BACKWARD);
    det = check();
    break;

    case 'S': // S, stop
    motorRight.setSpeed(vel);
    motorLeft.setSpeed(vel);
    motorRight.run(RELEASE);
    motorLeft.run(RELEASE);
    det = check();
    break;


  }
}

//get bluetooth code received from serial port
int check(){
  if (Serial.available() > 0){// if there is valid data in the serial port
    dataIn = Serial.read();// stores data into a varialbe

    //check the code
    if (dataIn == 'F'){//Forward
      determinant = 'F';
    }
    else if (dataIn == 'B'){//Backward
      determinant = 'B';
    }
    else if (dataIn == 'L'){//Left
      determinant = 'L';
    }
    else if (dataIn == 'R'){//Right
      determinant = 'R';
    }
    else if (dataIn == 'I'){//Froward Right
      determinant = 'I';
    }
    else if (dataIn == 'J'){//Backward Right
      determinant = 'J';
    }
    else if (dataIn == 'G'){//Forward Left
      determinant = 'G';
    }
    else if (dataIn == 'H'){//Backward Left
      determinant = 'H';
    }
    else if (dataIn == 'S'){//Stop
      determinant = 'S';
    }
    else if (dataIn == '0'){//Speed 0
      vel = 0;
    }
    else if (dataIn == '1'){//Speed 25
      vel = 25;
    }
    else if (dataIn == '2'){//Speed 50
      vel = 50;
    }
    else if (dataIn == '3'){//Speed 75
      vel = 75;
    }
    else if (dataIn == '4'){//Speed 100
      vel = 100;
    }
    else if (dataIn == '5'){//Speed 125
      vel = 125;
    }
    else if (dataIn == '6'){//Speed 150
      vel = 150;
    }
    else if (dataIn == '7'){//Speed 175
      vel = 175;
    }
    else if (dataIn == '8'){//Speed 200
      vel = 200;
    }
    else if (dataIn == '9'){//Speed 225
      vel = 225;
    }
    else if (dataIn == 'q'){//Speed 255
      vel = 255;
    }
    else if (dataIn == 'U'){//Back Lights On
      determinant = 'U';
    }
    else if (dataIn == 'u'){//Back Lights Off
      determinant = 'u';
    }
    else if (dataIn == 'W'){//Front Lights On
      determinant = 'W';
    }
    else if (dataIn == 'w'){//Front Lights Off
      determinant = 'w';
    }
    else if (dataIn == 'V'){//Horn On
      determinant = 'V';
    }
    else if (dataIn == 'v'){//Horn Off
      determinant = 'v';
    }
    else if (dataIn == 'X'){//Extra On
      determinant = 'X';
    }
    else if (dataIn == 'x'){//Extra Off
      determinant = 'x';
    }
  }
  return determinant;
}
Final Sketch (Final Code)Arduino
/*
Author: Muhammed Azhar
visit - robotechmaker.com
*/

#include <AFMotor.h>
#define trigPin 14 // define the pins of your sensor
#define echoPin 15

//Objects
AF_DCMotor motorRight(1, MOTOR12_64KHZ); // create motor #1, 64KHz pwm
AF_DCMotor motorLeft(3, MOTOR12_64KHZ);  // create motor #3, 64KHz pwm

//Constants and variable
char dataIn = 'S';
char determinant;
char det;
int vel = 255; //Bluetooth Stuff

void setup() {
  Serial.begin(9600); // set up Serial library at 9600 bps

  pinMode(trigPin, OUTPUT);// set the trig pin to output (Send sound waves)
  pinMode(echoPin, INPUT);// set the echo pin to input (recieve sound waves)

  //Initalization messages
  Serial.println(" Mr.robot");
  Serial.println(" Reday for working!");

  //turn off motors
  motorRight.setSpeed(0);
  motorLeft.setSpeed(0);
  motorRight.run(RELEASE);
  motorLeft.run(RELEASE);
}

void loop() {
  det = check(); //call check() subrotine to get the serial code
  //serial code analysis
  switch (det){
    case 'F': // F, move forward
    motorRight.setSpeed(vel);
    motorLeft.setSpeed(vel);
    motorRight.run(FORWARD);
    motorLeft.run(FORWARD);
    det = check();
    break;

    case 'B': // B, move back
    motorRight.setSpeed(vel);
    motorLeft.setSpeed(vel);
    motorRight.run(BACKWARD);
    motorLeft.run(BACKWARD);
    det = check();
    break;

    case 'L':// L, move wheels left
    motorRight.setSpeed(vel);
    motorLeft.setSpeed(vel/4);
    motorRight.run(FORWARD);
    motorLeft.run(FORWARD);
    det = check();
    break;

    case 'R': // R, move wheels right
    motorRight.setSpeed(vel/4);
    motorLeft.setSpeed(vel);
    motorRight.run(FORWARD);
    motorLeft.run(FORWARD);
    det = check();
    break;

    case 'I': // I, turn right forward
    motorRight.setSpeed(vel/2);
    motorLeft.setSpeed(vel);
    motorRight.run(FORWARD);
    motorLeft.run(FORWARD);
    det = check();
    break;

    case 'J': // J, turn right back
    motorRight.setSpeed(vel/2);
    motorLeft.setSpeed(vel);
    motorRight.run(BACKWARD);
    motorLeft.run(BACKWARD);
    det = check();
    break;

    case 'G': // G, turn left forward
    motorRight.setSpeed(vel);
    motorLeft.setSpeed(vel/2);
    motorRight.run(FORWARD);
    motorLeft.run(FORWARD);
    det = check();
    break;

    case 'H': // H, turn left back
    motorRight.setSpeed(vel);
    motorLeft.setSpeed(vel/2);
    motorRight.run(BACKWARD);
    motorLeft.run(BACKWARD);
    det = check();
    break;

    case 'S':
   // S, stop
    motorRight.setSpeed(vel);
    motorLeft.setSpeed(vel);
    motorRight.run(RELEASE);
    motorLeft.run(RELEASE);
    det = check();
    break;

    case 'm':

  //for wall follower robot.
   motorRight.setSpeed(vel); //set the speed of the motors, between 0-255
   motorLeft.setSpeed (vel);

  long duration, distance; // start the scan
  digitalWrite(trigPin, LOW);
  delayMicroseconds(2); // delays are required for a succesful sensor operation.
  digitalWrite(trigPin, HIGH);

  delayMicroseconds(10); //this delay is required as well!
  digitalWrite(trigPin, LOW);
  duration = pulseIn(echoPin, HIGH);
  distance = (duration/2) / 29.1;// convert the distance to centimeters.
  if (distance < 30)/*The distance that need to to keep with the wall */ {
Serial.println ("Wall is ditected!" );
Serial.println (" Started following the wall ");
Serial.println (" Turning !");
   motorRight.setSpeed(vel);
   motorLeft.setSpeed(0);
   motorRight.run(FORWARD);
   motorLeft.run(RELEASE);
   delay(500); // wait for a second
}

  else {
   Serial.println ("No Wall detected. turning round");
   delay (15);
    motorRight.setSpeed(0);
    motorLeft.setSpeed(vel);
    motorRight.run(RELEASE);
    motorLeft.run (FORWARD);

  }
     break;

    case 'b':
  //obstacle avoider robot

   motorRight.setSpeed(vel); //set the speed of the motors, between 0-255
   motorLeft.setSpeed (vel);

  long Aduration, Adistance; // start the scan
  digitalWrite(trigPin, LOW);
  delayMicroseconds(2); // delays are required for a succesful sensor operation.
  digitalWrite(trigPin, HIGH);

  delayMicroseconds(10); //this delay is required as well!
  digitalWrite(trigPin, LOW);
  Aduration = pulseIn(echoPin, HIGH);
  Adistance = (Aduration/2) / 29.1;// convert the distance to centimeters.
  if (Adistance < 25)/*if there's an obstacle 25 centimers, ahead, do the following: */ {
Serial.println ("Close Obstacle detected!" );
Serial.println ("Obstacle Details:");
Serial.print ("Distance From Robot is " );
Serial.print ( Adistance);
Serial.print ( " CM!");// print out the distance in centimeters.

Serial.println (" The obstacle is declared a threat due to close distance. ");
Serial.println (" Turning !");
    motorRight.setSpeed(vel);
    motorLeft.setSpeed(vel);
    motorLeft.run(BACKWARD);  // Turn as long as there's an obstacle ahead.
    motorRight.run (FORWARD);

}
  else {
   Serial.println ("No obstacle detected. going forward");
   delay (15);
   motorRight.setSpeed(vel);
   motorLeft.setSpeed(vel);
   motorRight.run(FORWARD); //if there's no obstacle ahead, Go Forward!
   motorLeft.run(FORWARD);

    }
   break;
  }
}

//get bluetooth code received from serial port
int check(){
  if (Serial.available() > 0){// if there is valid data in the serial port
  dataIn = Serial.read();// stores data into a varialbe

//check the code
    if (dataIn == 'F'){//Forward
      determinant = 'F';
    }
    else if (dataIn == 'B'){//Backward
      determinant = 'B';
    }
    else if (dataIn == 'L'){//Left
      determinant = 'L';
    }
    else if (dataIn == 'R'){//Right
      determinant = 'R';
    }
    else if (dataIn == 'I'){//Froward Right
      determinant = 'I';
    }
    else if (dataIn == 'J'){//Backward Right
      determinant = 'J';
    }
    else if (dataIn == 'G'){//Forward Left
      determinant = 'G';
    }
    else if (dataIn == 'H'){//Backward Left
      determinant = 'H';
    }
    else if (dataIn == 'S'){//Stop
      determinant = 'S';
    }
    else if (dataIn == '0'){//Speed 0
      vel = 0;
    }
    else if (dataIn == '1'){//Speed 25
      vel = 25;
    }
    else if (dataIn == '2'){//Speed 50
      vel = 50;
    }
    else if (dataIn == '3'){//Speed 75
      vel = 75;
    }
    else if (dataIn == '4'){//Speed 100
      vel = 100;
    }
    else if (dataIn == '5'){//Speed 125
      vel = 125;
    }
    else if (dataIn == '6'){//Speed 150
      vel = 150;
    }
    else if (dataIn == '7'){//Speed 175
      vel = 175;
    }
    else if (dataIn == '8'){//Speed 200
      vel = 200;
    }
    else if (dataIn == '9'){//Speed 225
      vel = 225;
    }
    else if (dataIn == 'b'){//Extra On
      determinant = 'b';
    }
    else if (dataIn == 'm'){//Extra On
      determinant = 'm';
    }

  }
  return determinant;
}
Obstacle Avoider SketchArduino
/*
Author: Muhammed Azhar
visit - robotechmaker.com
*/

#include <AFMotor.h>
#define trigPin 14 // define the pins of your sensor
#define echoPin 15

int vel = 255; // Speed of the robot

//Objects
AF_DCMotor motorRight(1, MOTOR12_64KHZ); // create motor #1, 64KHz pwm
AF_DCMotor motorLeft(3, MOTOR12_64KHZ);  // create motor #3, 64KHz pwm

void setup() {
  Serial.begin(9600); // set up Serial library at 9600 bps

  pinMode(trigPin, OUTPUT);// set the trig pin to output (Send sound waves)
  pinMode(echoPin, INPUT);// set the echo pin to input (recieve sound waves)

  //Initalization messages
  Serial.println(" Mr.robot");
  Serial.println(" Reday for working!");

  //turn off motors
  motorRight.setSpeed(0);
  motorLeft.setSpeed(0);
  motorRight.run(RELEASE);
  motorLeft.run(RELEASE);
}

void loop() {
 //obstacle avoider robot

   motorRight.setSpeed(vel); //set the speed of the motors, between 0-255
   motorLeft.setSpeed (vel);

  long duration, distance; // start the scan
  digitalWrite(trigPin, LOW);
  delayMicroseconds(2); // delays are required for a succesful sensor operation.
  digitalWrite(trigPin, HIGH);

  delayMicroseconds(10); //this delay is required as well!
  digitalWrite(trigPin, LOW);
  duration = pulseIn(echoPin, HIGH);
  distance = (duration/2) / 29.1;// convert the distance to centimeters.
  if (distance < 25)/*if there's an obstacle 25 centimers, ahead, do the following: */ {
Serial.println ("Close Obstacle detected!" );
Serial.println ("Obstacle Details:");
Serial.print ("Distance From Robot is " );
Serial.print ( distance);
Serial.print ( " CM!");// print out the distance in centimeters.

Serial.println (" The obstacle is declared a threat due to close distance. ");
Serial.println (" Turning !");
    motorRight.setSpeed(vel);
    motorLeft.setSpeed(vel);
    motorLeft.run(BACKWARD);  // Turn as long as there's an obstacle ahead.
    motorRight.run (FORWARD);

}
  else {
   Serial.println ("No obstacle detected. going forward");
   delay (15);
   motorRight.setSpeed(vel);
   motorLeft.setSpeed(vel);
   motorRight.run(FORWARD); //if there's no obstacle ahead, Go Forward!
   motorLeft.run(FORWARD);

    }
  }
Wall Follower SketchArduino
/*
Author: Muhammed Azhar
visit - robotechmaker.com
*/

#include <AFMotor.h>
#define trigPin 14 // define the pins of your sensor
#define echoPin 15

int vel = 255; // Speed of the robot

			   //Objects
AF_DCMotor motorRight(1, MOTOR12_64KHZ); // create motor #1, 64KHz pwm
AF_DCMotor motorLeft(3, MOTOR12_64KHZ);  // create motor #3, 64KHz pwm

void setup()
{
	Serial.begin(9600); // set up Serial library at 9600 bps

	pinMode(trigPin, OUTPUT);// set the trig pin to output (Send sound waves)
	pinMode(echoPin, INPUT);// set the echo pin to input (recieve sound waves)

							//Initalization messages
	Serial.println(" Mr.robot");
	Serial.println(" Reday for working!");

	//turn off motors
	motorRight.setSpeed(0);
	motorLeft.setSpeed(0);
	motorRight.run(RELEASE);
	motorLeft.run(RELEASE);
}

void loop()
{

	//for wall follower robot.
	motorRight.setSpeed(vel); //set the speed of the motors, between 0-255
	motorLeft.setSpeed(vel);

	long duration, distance; // start the scan
	digitalWrite(trigPin, LOW);
	delayMicroseconds(2); // delays are required for a succesful sensor operation.
	digitalWrite(trigPin, HIGH);

	delayMicroseconds(10); //this delay is required as well!
	digitalWrite(trigPin, LOW);
	duration = pulseIn(echoPin, HIGH);
	distance = (duration / 2) / 29.1;// convert the distance to centimeters.
	if (distance < 30)/*The distance that need to to keep with the wall */
	{
		Serial.println("Wall is ditected!");
		Serial.println(" Started following the wall ");
		Serial.println(" Turning !");
		motorRight.setSpeed(vel);
		motorLeft.setSpeed(0);
		motorRight.run(FORWARD);
		motorLeft.run(RELEASE);
		delay(500); // wait for a second
	}

	else
	{
		Serial.println("No Wall detected. turning round");
		delay(15);
		motorRight.setSpeed(0);
		motorLeft.setSpeed(vel);
		motorRight.run(RELEASE);
		motorLeft.run(FORWARD);
	}
}
Schematics

Manufacturing process
- Top Accessories to Unlock Your Raspberry Pi's Full Potential
- Achieving Success with Your First Robot Integration: A Practical Guide
- Create an Autonomous Line-Following Robot with Arduino UNO
- Build an Autonomous Home Assistant Robot: Full Parts List & Setup Guide
- Control Your Robot with Brainwaves: A Comprehensive Arduino Project
- Build a Gesture‑Controlled Robot at Home with Arduino and MPU‑6050
- Comprehensive Guide to Premier Industrial Agricultural Products
- Top Crane Brands: Expert Guide for Construction Professionals
- Ultiboard: Comprehensive Beginner’s Guide to PCB Design
- AMS1117 Pinout & Wiring Guide: A Complete Beginner’s Tutorial