Build a Large-Scale 3D Printer at Home with Arduino: Step-by-Step Guide
Components and supplies
aluminium section pipe
×
1
Acrylic Sheets
×
1
12mm Diameter steel Rod
×
2
8 mm Diameter steel Rod
×
4
SC8UU 8mm Aluminum Linear Motion Ball Bearing Slide Bushing For CNC
×
8
SC12UU Aluminum Linear Motion Ball Bearing Slide Bushing For CNC
×
4
SK12UU Linear Rail Shaft Rod
×
4
SK8UU Linear Rail Shaft Rod
×
8
Pedestal bearing 8mm KP08
×
2
T8 8mm Lead Screw with Nut
×
2
stepper motor coupler 5mm to 8mm
×
2
GT2 20 tooth flanged pulley for 5 mm shaft with timing belt 4 mtr.
×
2
Nema17 Mounting Bracket
×
3
RAMPS 1.4 board
×
1
a4988 stepper motor driver
×
4
optical endstop switch
×
3
Power Supply 12V/20A
×
1
1.75mm PLA Filament For 3D Printer
×
1
Extruder
×
1
0.4mm J-head Hotend Extruder
×
1
PCB Heated Bed
×
4
Arduino Mega 2560
×
1
OpenBuilds NEMA 17 Stepper Motor
I used Nema17 59Ncm 2A 1.8°4-lead 48mm Stepper Motor jk42hs40-1704
×
5
Necessary tools and machines
drill machine
grinder machine
Apps and online services
Arduino IDE
slic3r
printrun
About this project
YouTube Video
For everything about this project, see my YouTube video.
I already attached 26-pagePDF,whichcontains required quantity of parts and its dimensions. Download it from this website tab: Custom parts and enclosures.
_____________________________________________
Note:
All the links to buy parts are non-affiliate links,
You can buy parts somewhere else where you get lower price parts,
It is just for your reference thanks.
_____________________________________________
Any difficulty for making a 3D printer feel free to comment down below.
Electrical Components Required
Arduino Mega 2560 x 01 Nos.
Ramps 1.4 controller board x 01 Nos.
Optical endstop switch x 03 Nos.
NEMA 17 stepper motor x 05 Nos.
PCB heatbed x 04 Nos.
E3D v6 hotend x 01 Nos.
A4988 stepper motor driver x 04 Nos.
Power supply 12V/20A x 01 Nos.
Mechanical Component Required
Aluminium section pipe 38mmx38mmx02mm
Acrylic Sheets 3mm thickness
12mm Diameter steel Rod 696mmx02 Nos.
8mm Diameter steel Rod 562mmx02 Nos.
8mm Diameter steel Rod 507mmx02 Nos.
3 mm aluminium sheet
SC8UU 8mm Linear Motion Ball Bearing Slide Bushing X 08 Nos.
SC12UU 12mm Linear Motion Ball Bearing Slide Bushing X 04 Nos.
SK12UU Linear Rail Shaft Rod x 04 Nos.
SK8UU Linear Rail Shaft Rod x 04 Nos.
Pedestal bearing 8mm KP08 x 02 Nos.
T8 8mm Lead Screw with Nut 500 to 550mm x 02 Nos.
stepper motor coupler 5mm to 8mm x 02 Nos.
GT2 20 tooth flanged pulley for 5 mm shaft x 02 Nos.
Nema17 Mounting Bracket x 02 Nos.
Extruder x 01 Nos.
1.75mm PLA Filament For 3D Printer x 01 Kg.
Timing Belt for GT2 pulley x 04 meter.
Electrical Components Short Intro :
Ramps 1.4 controller board:
it is used for generally for interfacing serval things like endstop switch, stepper motor driver, heatbed, hotend etc with Arduino.
Optical endstop switch:
it is one type of sensor switch, it has NO or NC (normally open or normally closed ) switch are trigger when 3d printers XYZ axis reaches to its end position.
end stop switch is generally two types 1. optical type 2. simple mechanical type. you can use whatever you want.
NEMA 17 stepper motor:
I used stepper motor which has 200 steps, in one revolution 1.8 degrees of each step
PCB heatbed:
heatbed keep extruded plastic warm and prevent it from warping.
E3D v6 hotend:
it has a nozzle of 0.4 mm where the filament comes out by heating up of the filament with temperature sensor/ Thermistors is attached.
A4988 stepper motor driver:
need driver circuit because stepper motor runs at 12V/24V and Arduino pin output is 5V when it is in HIGH condition.
Power supply 12V/20A:
each stepper motors draw around 1.2 A current per phase, a total of 5 stepper motors are used, and other electrical parts draw some amount of current so current ratting minimum 20 A is suitable.
so Let's get started!
Build a Frame
First of all, I build a frame based on my CAD model Dimension, For Dimension of different parts I already attached 26 pages Pdf it contains Required qty. of parts and its dimension, you can change the dimension as per your convenience. Then I assemble all the different parts together. For more Reference, you can see my youtube video.
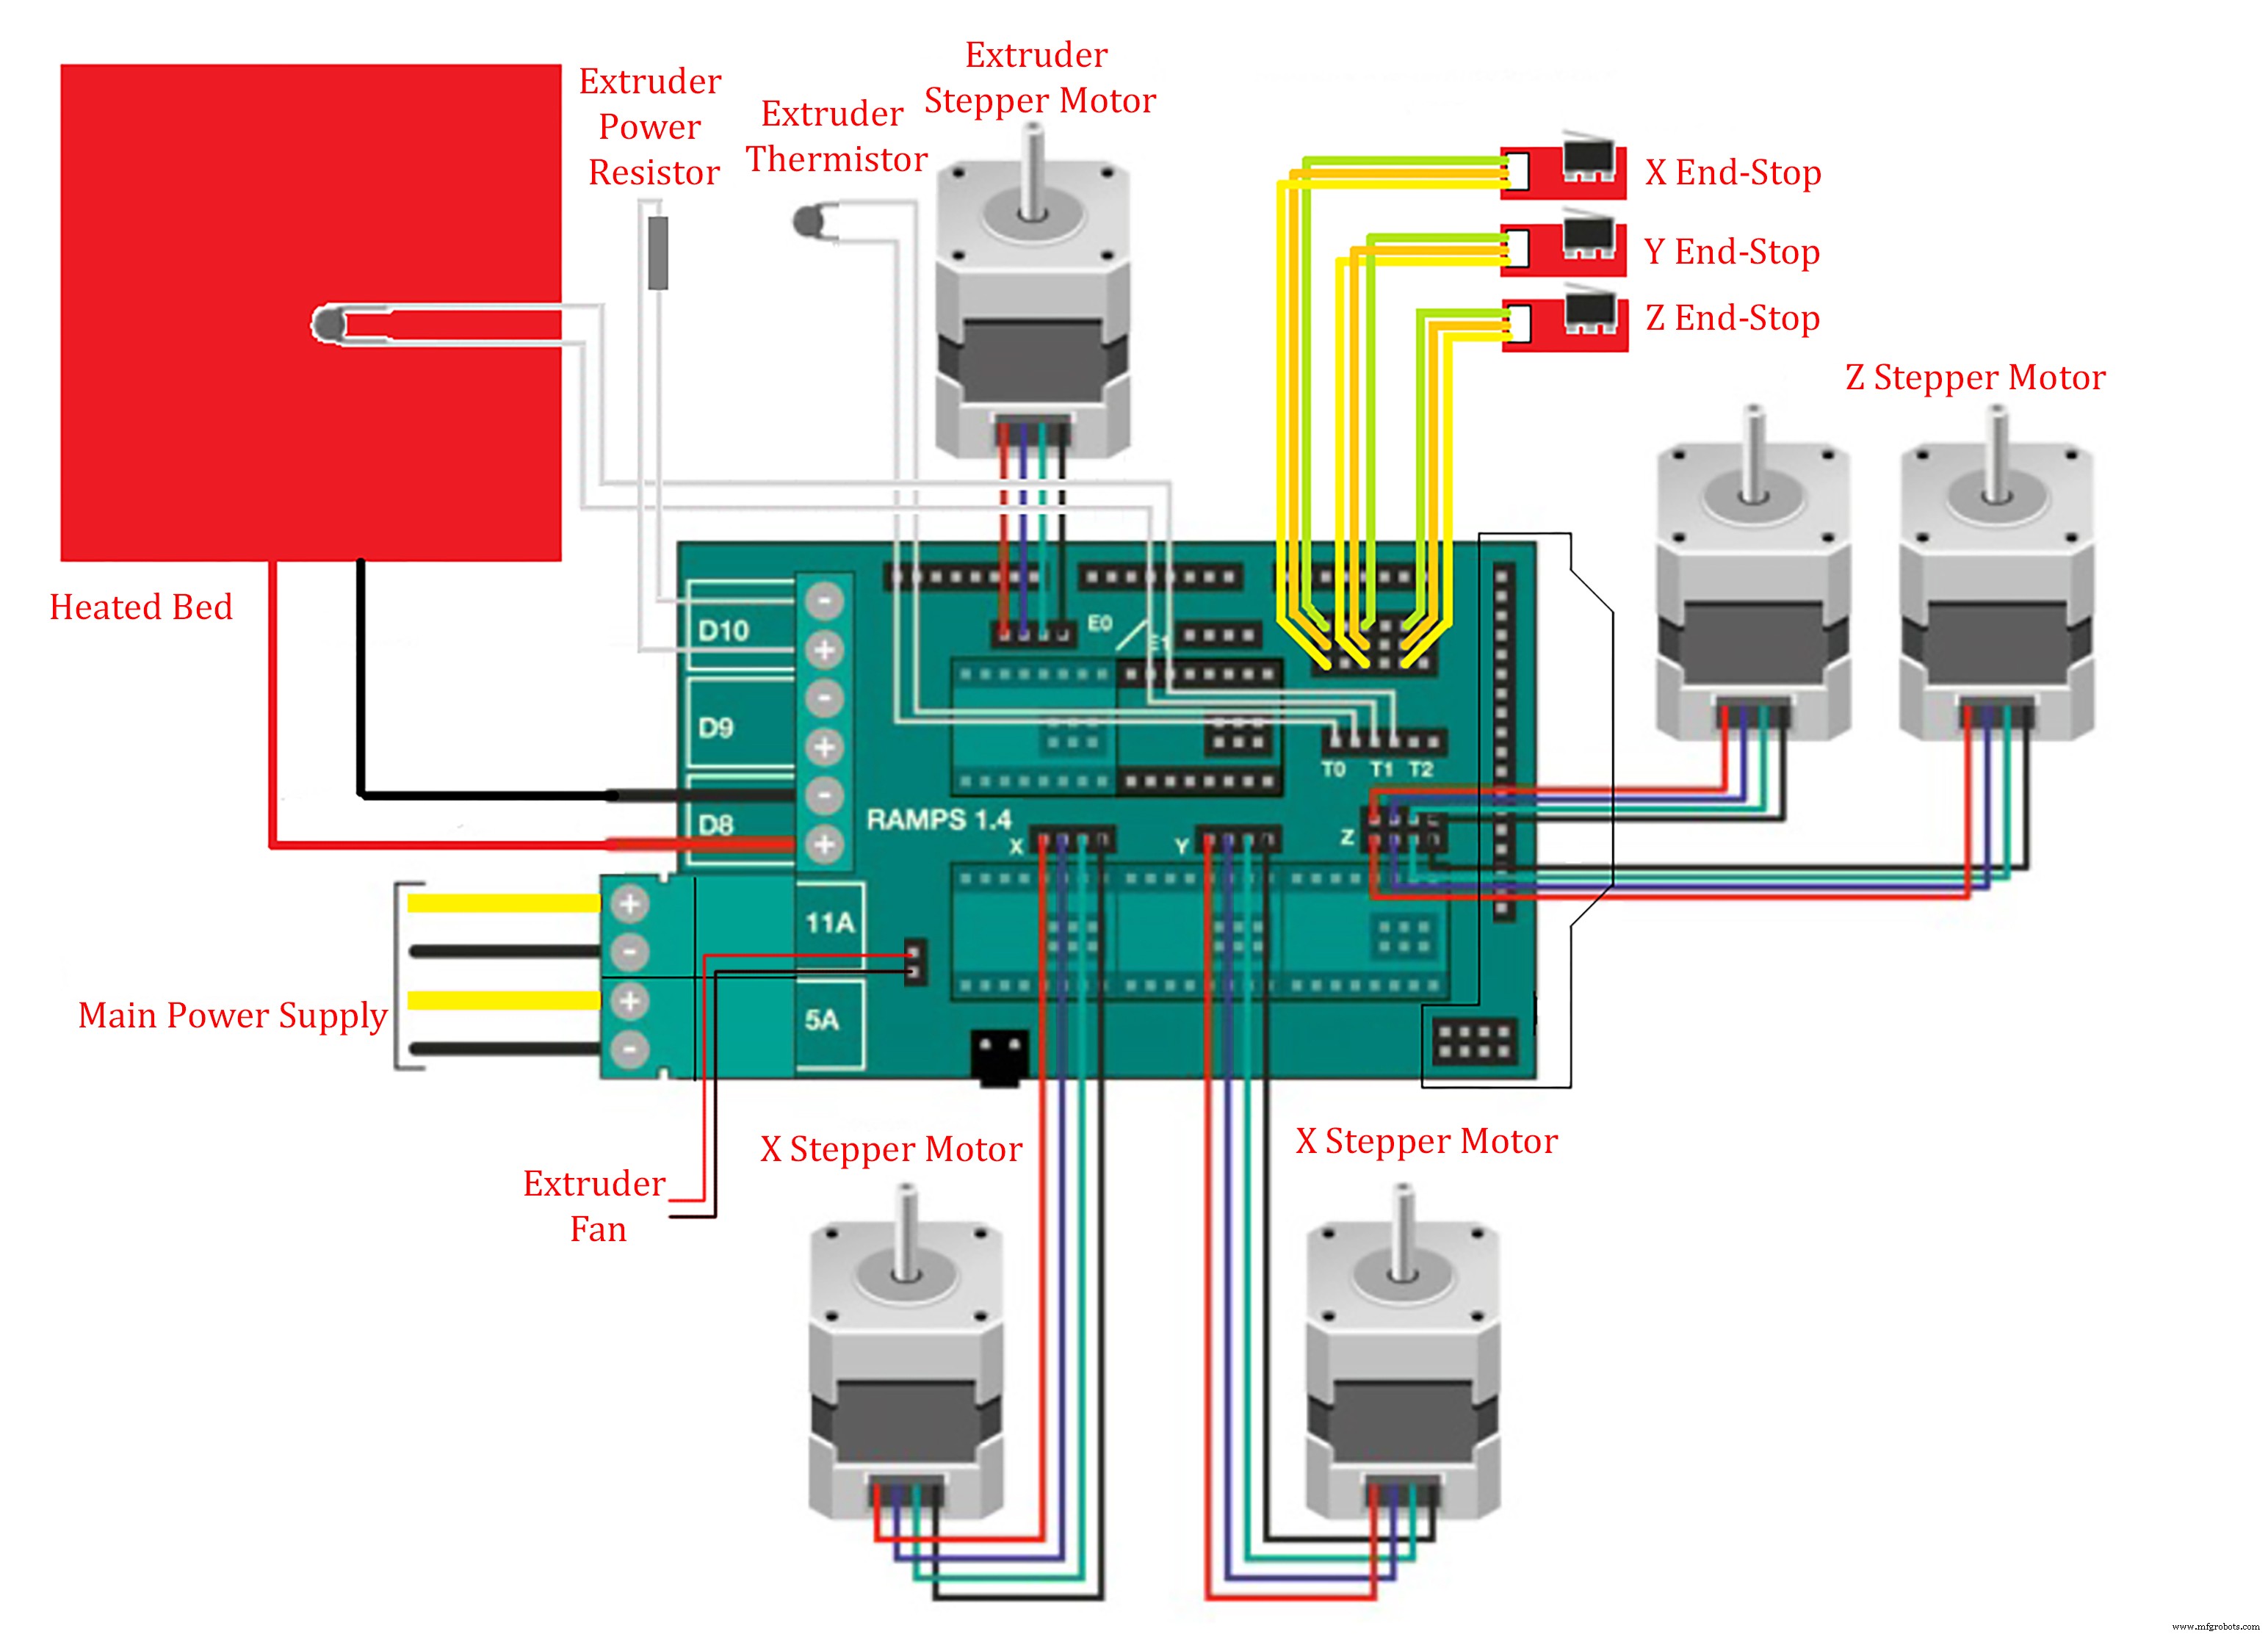
Electrical Connection
In this scene, I connect all the necessary thing according to Schematics and circuit diagrams image. And for the main Power source, I used 12V, 20A Dc Power Supply. For more reference see the youtube video from 30:57 to 33:15.
Coding
For Coding part, I used Arduino IDE Software and used marlin firmware.