


Designing ADC Drivers: Blocking vs. Non‑Blocking Polling Techniques
In our previous article we explored how a well‑structured interface can separate low‑level driver details from application logic, boosting scalability and portability across hardware platforms.
In this entry we dive into practical ADC driver implementations, focusing on the polling approach. We’ll contrast blocking and non‑blocking designs and show how each impacts system performance.
Blocking vs. Non‑Blocking Drivers
When creating a microcontroller driver, a developer must decide whether the API will block execution until the operation completes. A blocking driver halts program flow, ensuring that subsequent code runs only after the task finishes. A classic example is a UART‑backed printf:
printf("Hello World!");
With a blocking UART driver, the line that follows this call will not run until the 12‑byte string (96 bits) has been fully transmitted. The actual delay depends on the baud rate: at 1 Mbps, the block lasts roughly 96 µs; at 9.6 kbps, it stretches to about 10 ms.
Conversely, a non‑blocking driver initiates the transfer and immediately returns control to the application. The UART can then continue processing while the data streams out, typically via interrupts, DMA, or a transmit buffer. This approach improves efficiency in latency‑sensitive contexts but adds complexity to the driver and application.
Choosing the right model depends on the application’s timing demands and hardware configuration. For high‑speed UARTs (e.g., 1 Mbps), the overhead of a non‑blocking design may outweigh its benefits. For slower links (e.g., 9.6 kbps), a non‑blocking driver can unlock significant performance gains with manageable added complexity.
Architecting an ADC Driver
A robust ADC driver typically comprises three layers:
- The low‑level driver, which accepts a configuration structure during initialization and sets up the hardware registers.
- The application code, which calls generic HAL functions to start conversions and retrieve results.
- A configuration module that abstracts device‑specific parameters.
The low‑level driver provides a Hardware Abstraction Layer (HAL) with a concise, reusable API. Examples from real‑world projects include:
AdcError_t Adc_Init(const AdcConfig_t * Config);AdcError_t Adc_StartConversion(void);bool Adc_ConversionComplete(void);void Adc_RegisterWrite(uint32_t const Address, uint32_t const Value);uint32_t Adc_RegisterRead(uint32_t Address);void Adc_CallbackRegister(AdcCallback_t const Function, TYPE (*CallbackFunction)(type));
These APIs enable straightforward initialization, conversion control, and status polling. The register access helpers allow developers to extend the HAL for custom features, such as single‑channel conversions, without bloating the public API.
Implementing a Simple Blocking ADC Driver
A minimal blocking driver might expose a single Adc_Sample routine that starts the hardware, waits for completion, and copies the result into a caller‑provided buffer. The code below demonstrates the core idea:
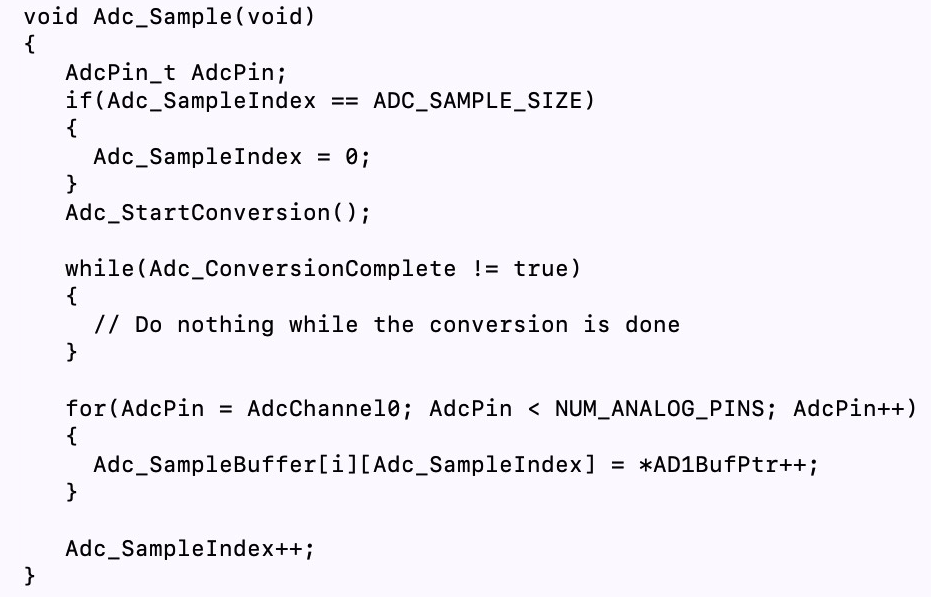
The while loop blocks until Adc_ConversionComplete returns true, after which the driver reads the conversion registers and stores the samples.
Converting to a Non‑Blocking ADC Driver
Switching to a non‑blocking model requires a small change in the API: the caller now receives a status flag and must poll for completion. The updated function might look like this:
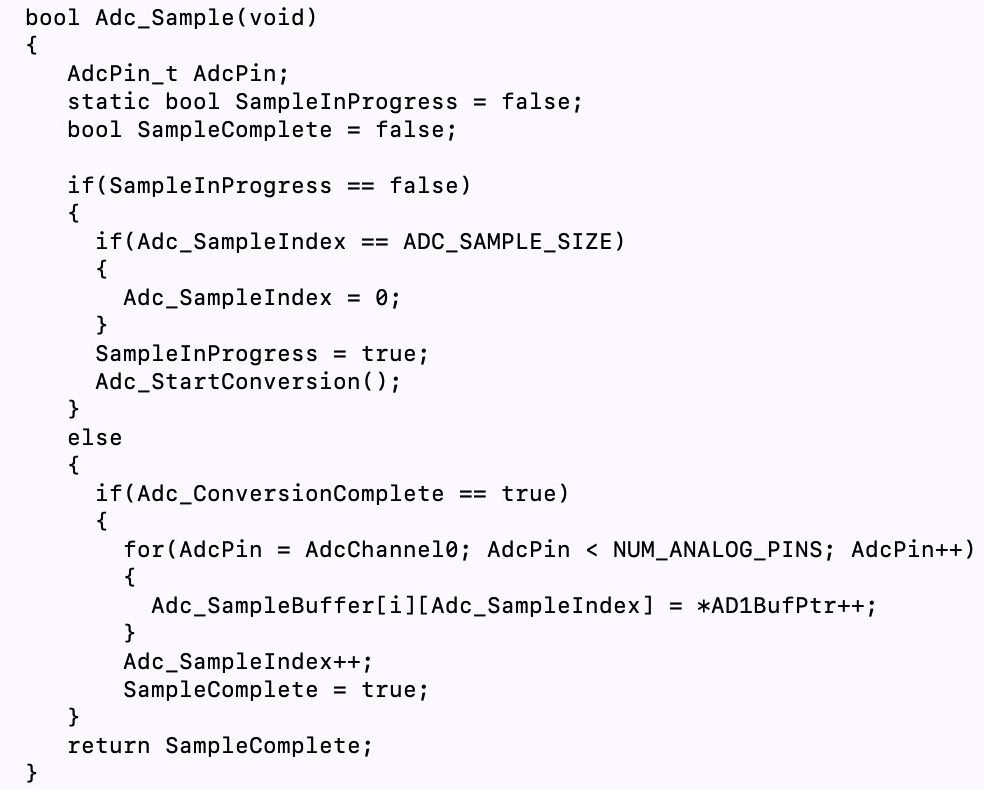
In the application, a typical sequence becomes:
Adc_Sample();
while (!Adc_ConversionComplete()) {
    // Perform other tasks
}
// Read results
This approach frees the CPU to execute unrelated code while the ADC hardware completes its conversion.
Takeaways
Both blocking and non‑blocking ADC drivers have distinct advantages:
- Blocking drivers are simple and require no additional state management but can stall critical paths.
- Non‑blocking drivers allow concurrent execution, improving overall throughput, but demand careful status checking and potentially more complex driver logic.
In the next post, we’ll extend this discussion by demonstrating an interrupt‑based ADC driver that further decouples sensor acquisition from application logic.
Embedded
- Seamless Modbus Sensor Integration Using EdgeX Foundry on Raspberry Pi
- Achieving High-Precision Temperature Measurements with Advanced Silicon Sensors
- Writing a Kernel Device Driver for Embedded Linux: A Practical Guide
- Embedded Linux Device Drivers: Runtime State Monitoring
- ams Illuminates Sensors Expo 2019 with Cutting-Edge Optical Sensor Showcases
- Integrated Drivers Simplify High‑Power Stepper Motor Design
- MEMS Sensors: Powering the Invisible IoT
- C# Windows Forms Development: A Hands‑On Tutorial
- Seamless GPS Integration with Raspberry Pi: Easy Setup & Reliable Data
- Conveyors: A Smart Solution to the Construction Truck Driver Shortage