


3D Printing a Protective Mask: A Step-by-Step Guide
In the current situation, in which we are facing a global pandemic due to the spread of the coronavirus COVID-19, we believe that any contribution and help that can be provided from any field can be extremely important, and there are emerging very interesting initiatives from the printing sector 3D that we believe are relevant to spread.
During the last days, are frecuent the news about the shortage of masks, a basic protective equipment, especially for health professionals, but also for other people who may be more exposed to the virus due to their work or other circumstances.
For this reason, the team at Copper3D, manufacturer of the antibacterial PLActive filament, has shared the design of a mask that is valid for manufacturing on practically any 3D FDM printer and whose STL file is available for free and free download:
DOWNLOAD STL
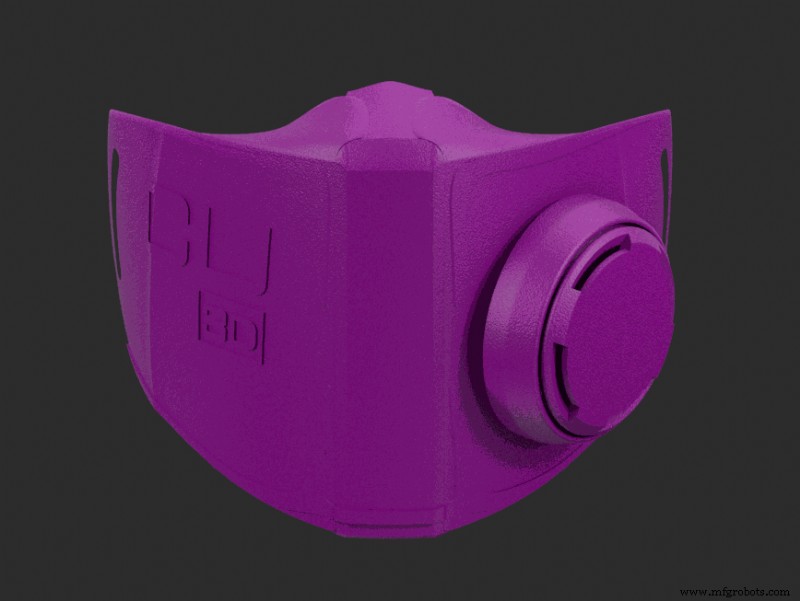
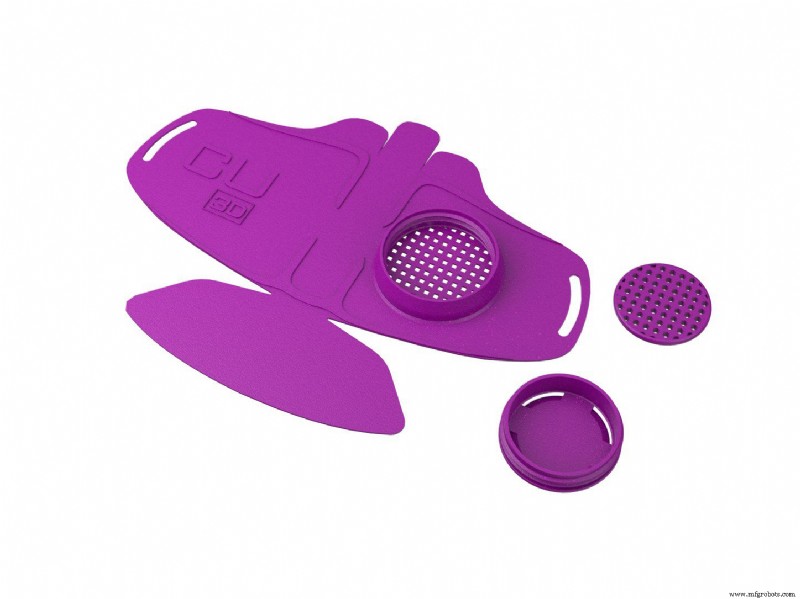
Image 1: NanoHack mask design. Source: 3D Copper.
This mask has the following characteristics:
- Antimicrobial and antiviral, being manufactured with PLActive, an innovative nanocomposite developed with a high-quality PLA and a patented, scientifically validated and highly effective nano-copper additive.
- Recyclable: Increased use of disposable surgical masks and respirators will have a detrimental effect on the environment. To avoid this detrimental effect on the ecosystem, using the PLActive filament for printing is consuming a recyclable material.
- Flat pattern, to facilitate its manufacture in a massive way and in practically any 3D FDM printer.
- Modular filtration system: The mask incorporates a novel modular filtration system for fine particles made of a material that uses proven copper nanocomposites to deactivate viruses. This filtration system includes several layers with different geometries to provide effective filtration of fine particles. In addition, it can accommodate third-party filter materials such as non-woven propylene, sponges, or textiles.
- Thermoforming capabilities at 55 - 60 ºC, which allows give the correct shape of the anatomy of any face simply using a hair dryer or warm water.
- Filtration control and air intake. Prolonged use of respirators has been shown to reduce lung capacity. These single-use respirators do not allow regulation of air intake or particle size. This mask incorporates a modular filter disc that can effectively regulate air intake and particle size. This system can be customized by using non-woven filtration propylene, clothing, sponges, and different textiles to reduce the level of filtration.
3D printing and assembly of the mask is very simple, but it's important to follow the following instructions for safe use:
- Print the pieces with 20 % filling, without support or rafts. Each mask consumes about 40 grams of filament, so with a coil of 750 grams of PLActive 17-18 masks can be printed.
- Heat the mask to 55 - 60 ºC with a hair dryer or hot water. The circular part must be intact, for this reason it's thicker to avoid deformations.
- When softening, bring together the nose wings and adjustment wings located on the lower jaw.
- Heat again and place it on the face to fully adjust it to each face.
- Enter one or two additional filters. If using a filter, you can use a circular piece (single or double) of a conventional non-woven propylene mask (A) or add a cotton makeup remover pad (B), fitting them well to the window of the filtration system. Filtration and air flow can be regulated with combinations of these elements.
- Add the elastics for fastening.
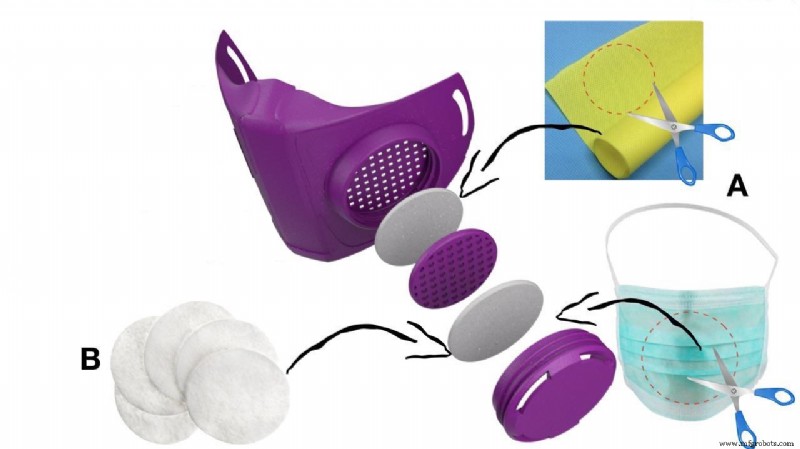
Image 2: NanoHack assembly instructions. Source: Copper 3D.
Another option would be to use the flexible antibacterial MD1 Flex filament, also manufactured by Copper3D, which being flexible, the printed mask does not need to be heated for adaptation.
On the other hand, it must be taken into account that these masks, although they are effective, have certain limitations, such as a short life cycle (approximately 8 hours). Respiratory viruses, specifically SARS-Cov-2 (COVID-19) can live up to 72 hours on different surfaces, because at the end of the day we would have a high viral / bacterial load trapped just a few millimeters from our nose and mouth, further exposing ourselves to these dangerous microbes.
Finally, we want to thank NanoHack project and its team of scientists and industrial designers from the United States and Chile for making available to society the description and the plans of their patent.
UPDATE (March 20): Copper3D has published a communication to resolve doubts about the certifications and uses of Nanohack. View publication
UPDATE (March 21): New communication from Copper3D, where it states that the filtration efficiency of Nanohack is 96.4 % for 1 micron microorganisms and 89.5 % for 0.02 microns microorganisms. In addition, it details the specifications and configurations for the correct printing of Nanohack in practically any 3D FDM printer. View publication
NanoHack 2.0
Recently, the Copper3D team has shared a new mask design: NanoHack 2.0.
Unlike other concepts, NanoHack 2.0 is made up of a strong and hermetic monoblock structure, which must be 3D printed with PLActive to provide maximum protection against the external environment. To make the mask watertight, the frame is sealed with a 3D printed edge with MDFlex, an antimicrobial TPU.
DOWNLOAD STL
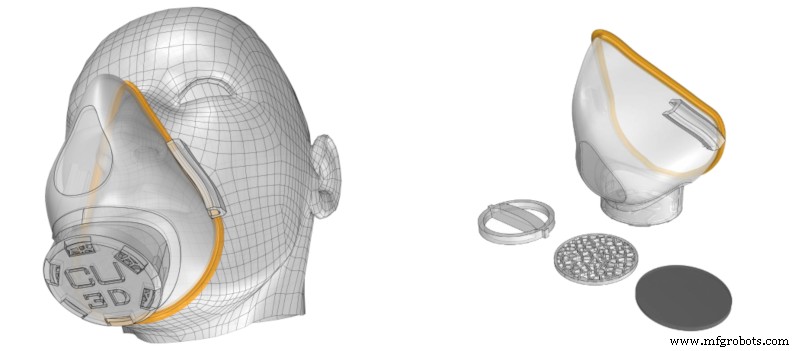
Image 3: NanoHack 2.0 mask design. Source: Copper 3D.
Technical considerations
NanoHack mask is a device created with the purpose of offering protection against particles in the air and prevents the spread of liquids that contaminate the airways.
Through studies on the effectiveness of home-made masks, it has been detected that the NanoHack filter materials (non-woven polypropylene, the same material used in surgical masks), achieve a filtration efficiency of 96.4 % for microorganisms of 1 micron and 89.5 % for microorganisms of 0.02 microns.
According to a study by the United States FDA, the design of common surgical masks does not allow complete protection against germs and other contaminants due to their loose fit. In addition, surgical masks are single-use devices that must be disposed of safely. The health authorities recommend placing these items in a plastic bag and throwing them away; as well as washing hands after handling the used mask. Previously published research has indicated that the high viral load remaining in surgical masks and respirators may be a source of viral transmission for both the mask-wearing person and respirators and for others. This can happen when toilets touch your mask and then do not wash their hands or when they dispose of the mask without proper disposal precautions. In addition, pathogens that are neglected by surgical respirators in patients in the operating room increase the risk of nosocomial infections (infections acquired during a hospital stay). For all these reasons, the NanoHack mask uses a recyclable and biocompatible polymer that contains a copper nanocomposite that has shown antimicrobial properties: PLActive.
About copper's antimicrobial activity, you can tell what inhibits the replication and spread capabilities of SARS-CoV, Influenza, and other respiratory viruses. This is because they have a high antimicrobial potential (antiviral and antibacterial).
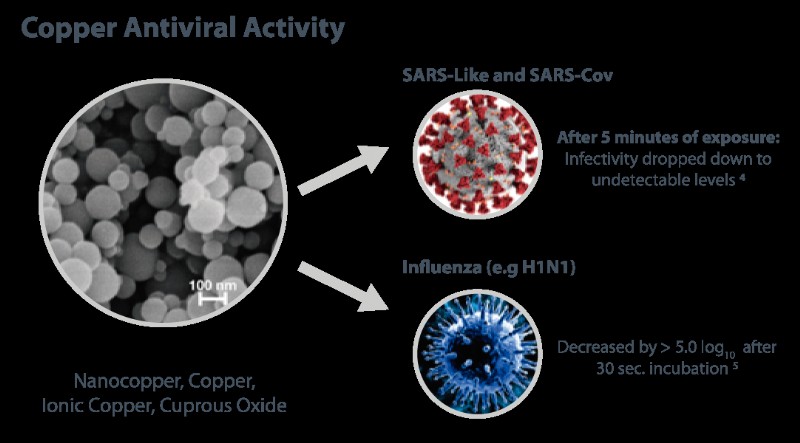
Image 4: Copper antiviral activity. Source: Copper 3D.
Thus, as copper can inactivate viruses such as SARS-CoV, Influenza virus, H1N1, and eliminate dangerous bacteria such as Staphylococcus aureus, Escherichia coli or Listeria among others, after a short period of exposure. PLActive and MDflex filaments from the manufacturer Copper3D be. an effective and low-cost complementary strategy to help reduce the transmission of various infectious diseases by limiting nosocomial infectious transmission.
NanoHack was conceived as an antimicrobial face mask suitable for 3D printing in FDM and manufactured with active materials. For its mounting, active non-woven polypropylene filters (3 layers) must be used to obtain additional protection against microorganisms.
According to the study by Borkow G. (Neutralizing viruses in suspensions using copper oxide-based filters. Antimicrobial agents and chemotherapy), a non-woven fabric filter impregnated with copper oxide is capable of generating virus filters of different types, including Respiratory viruses.
Image 5: Design of NanoHack 2.0 mask filters. Source: Copper 3D.
For optimum protection against the environment, it's recommended to use the triple-layer non-woven polypropylene filter with copper nanocomposites developed by The Copper Company.
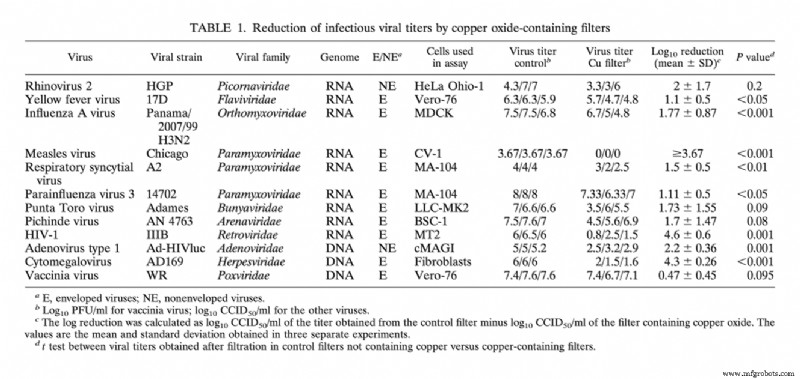
Image 6: Table of viral load reduction with filters with copper particles. Source: Copper 3D.
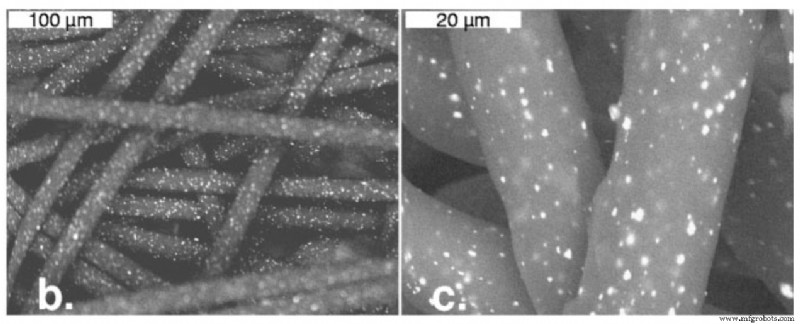
Image 7: Scanning electron microscope images of polypropylene fibers impregnated with copper oxide. Source: Copper 3D.
In case of not having access to this type of filter, a study by Anna Davies analyzes the efficiency of filters of different materials such as vacuum filters and fibers such as cotton or silk:
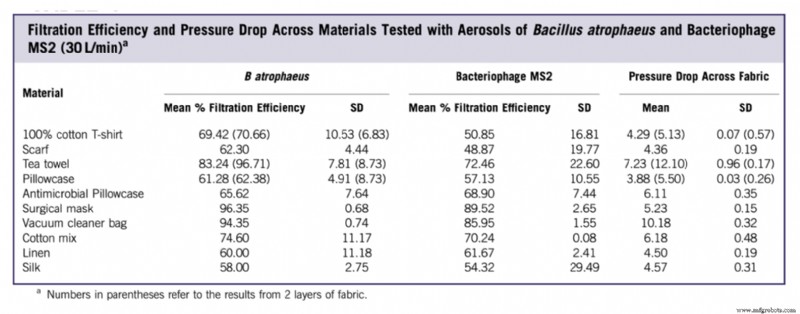
Image 8: Table of effectiveness of different materials as a filter. Source: Copper 3D.
Recommendations for use
The objective of NanoMask 2.0 is to offer the population protection against particles in the air and to avoid the spread of liquid aerosols that could contaminate the respiratory tract. Please note that it isn't an N95 mask. It's a face mask and should not be considered as an approved PPE.
In relation to health professionals, this device should be used as a last resort: Intubations, mechanical ventilation, or bronchoscopies or similar procedures should not be manipulated.
This mask is designed to be used in common spaces, for a maximum of 8 hours, and to change the non-woven filter once a day. After handling the active filter, you should wash your hands and follow the precautions recommended by the health authorities.
The cleaning tips for NanoMask are as follows:
- Washing: The device shoud be washed with soap and water.
- Rinse: Once washed, it should be rinsed well with clean water.
- Disinfect: Equipment must be disinfected to inactivate any remaining pathogens. For this, chemical disinfection must be used, not using an autoclave, since PLActive does not tolerate 80 ºC or more. The most accessible chemical and germicidal methods are shown below:
- Method 1: Alcohol is effective against the influenza virus. Ethyl alcohol (70%) is a powerful broad-spectrum germicide and is generally considered superior to isopropyl alcohol. Since alcohol is flammable, limit its use as a surface disinfectant to small surfaces and use only in well-ventilated spaces.
- Method: Most household bleach solutions contain 5% sodium hypochlorite (50,000 parts per million available chlorine). Recommended dilution: 1: 100 dilution of 5% sodium hypochlorite is the usual recommendation. Use 1 part bleach to 99 parts cold tap water (1: 100 dilution) to disinfect surfaces. Adjust the ratio of bleach to water as necessary to achieve the proper concentration of sodium hypochlorite. For example, for bleach preparations containing 2.5% sodium hypochlorite, use twice as much bleach (i.e. 2 parts bleach to 98 parts water).
- Rinsing: If using chemical disinfection, rinse with sterile or clean water (i.e. water boiled for 5 minutes and cooled). Sterile water is preferred for rinsing off residual liquid chemical disinfectant from a respiratory device that has been chemically disinfected for reuse, because tap or distilled water may harbor microorganisms that can cause pneumonia. However, when rinsing with sterile water is not feasible, instead, rinse with tap water or filtered water (i.e. water passed through a 0.2 μ filter). Disinfection by immersion is recommended with a contact time of 30 minutes.
- Dry equipment: Follow the previous step by an alcohol rinse and forced-air drying.
- Store: Store equipment dry in closed packages.
NanoHack 2.2
Copper3D recently released an update to the NanoHack 2.0 mask; the NanoHack 2.2.
Like its predecessor, the NanoHack 2.2 is made up of a monoblock structure. In this new version, it's made of 3 layer constant walls without angles to strengthen the structure of the device. In addition, two options are offered for the internal filter structure: Voronoi or Gyroid.
Total printing time for NanoHack 2.2 is 4 1/2 hours.
DOWNLOAD STL
Image 9: NanoHack 2.2 mask design. Source: Copper 3D.
NanoHack 2.0 and NanoHack 2.2 masks are designed to fit a face 12 cm tall, measured from the tip of the chin to the eye plane (a horizontal line that passes just between the eyes) and a distance between the cheekbones (measured directly on nose) also 12 cm. If your face is smaller or larger than these measurements, it is suggested to resize the model by 5 % or 10 % to fit your face perfectly.
3D printing
- Assessing the Sustainability of Industrial 3D Printing
- Revolutionizing Gaming Controllers with In‑House SLS 3D Printing
- What to Make of 3D‑Printed Firearms: Ethics, Technology, and Public Policy
- Build a DIY Mini Oscilloscope with Arduino Nano – Step‑by‑Step Tutorial
- Build Stronger 3D Prints: A Complete Step‑by‑Step Guide
- How Quickly Can a 3D Printer Produce Parts? Understanding Print Speed Factors
- A Step-by-Step Guide to Launching Your 3D Printing Project
- Are 3D Printing Pens Safe? A Comprehensive Safety Guide
- Beginner's Guide to 3D Printing: Start with Confidence
- Create a 3D Printing Profile: A Step-by-Step Guide to FDM Success