


DIY Soldering Iron Controller for 862D+—Precision & Reliability
Components and supplies
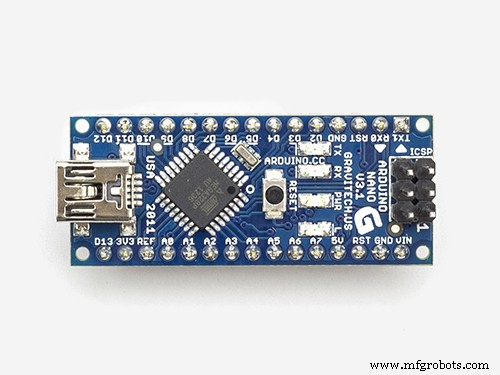 |
| × | 1 | |||
| × | 1 | ||||
| × | 1 | ||||
| × | 1 | ||||
 |
| × | 1 | |||
| × | 2 | ||||
| × | 1 |
Necessary tools and machines
 |
| |||
|
About this project
Update (10/21/2019): Major update to code. Also take a read below. A bit of it has changed.
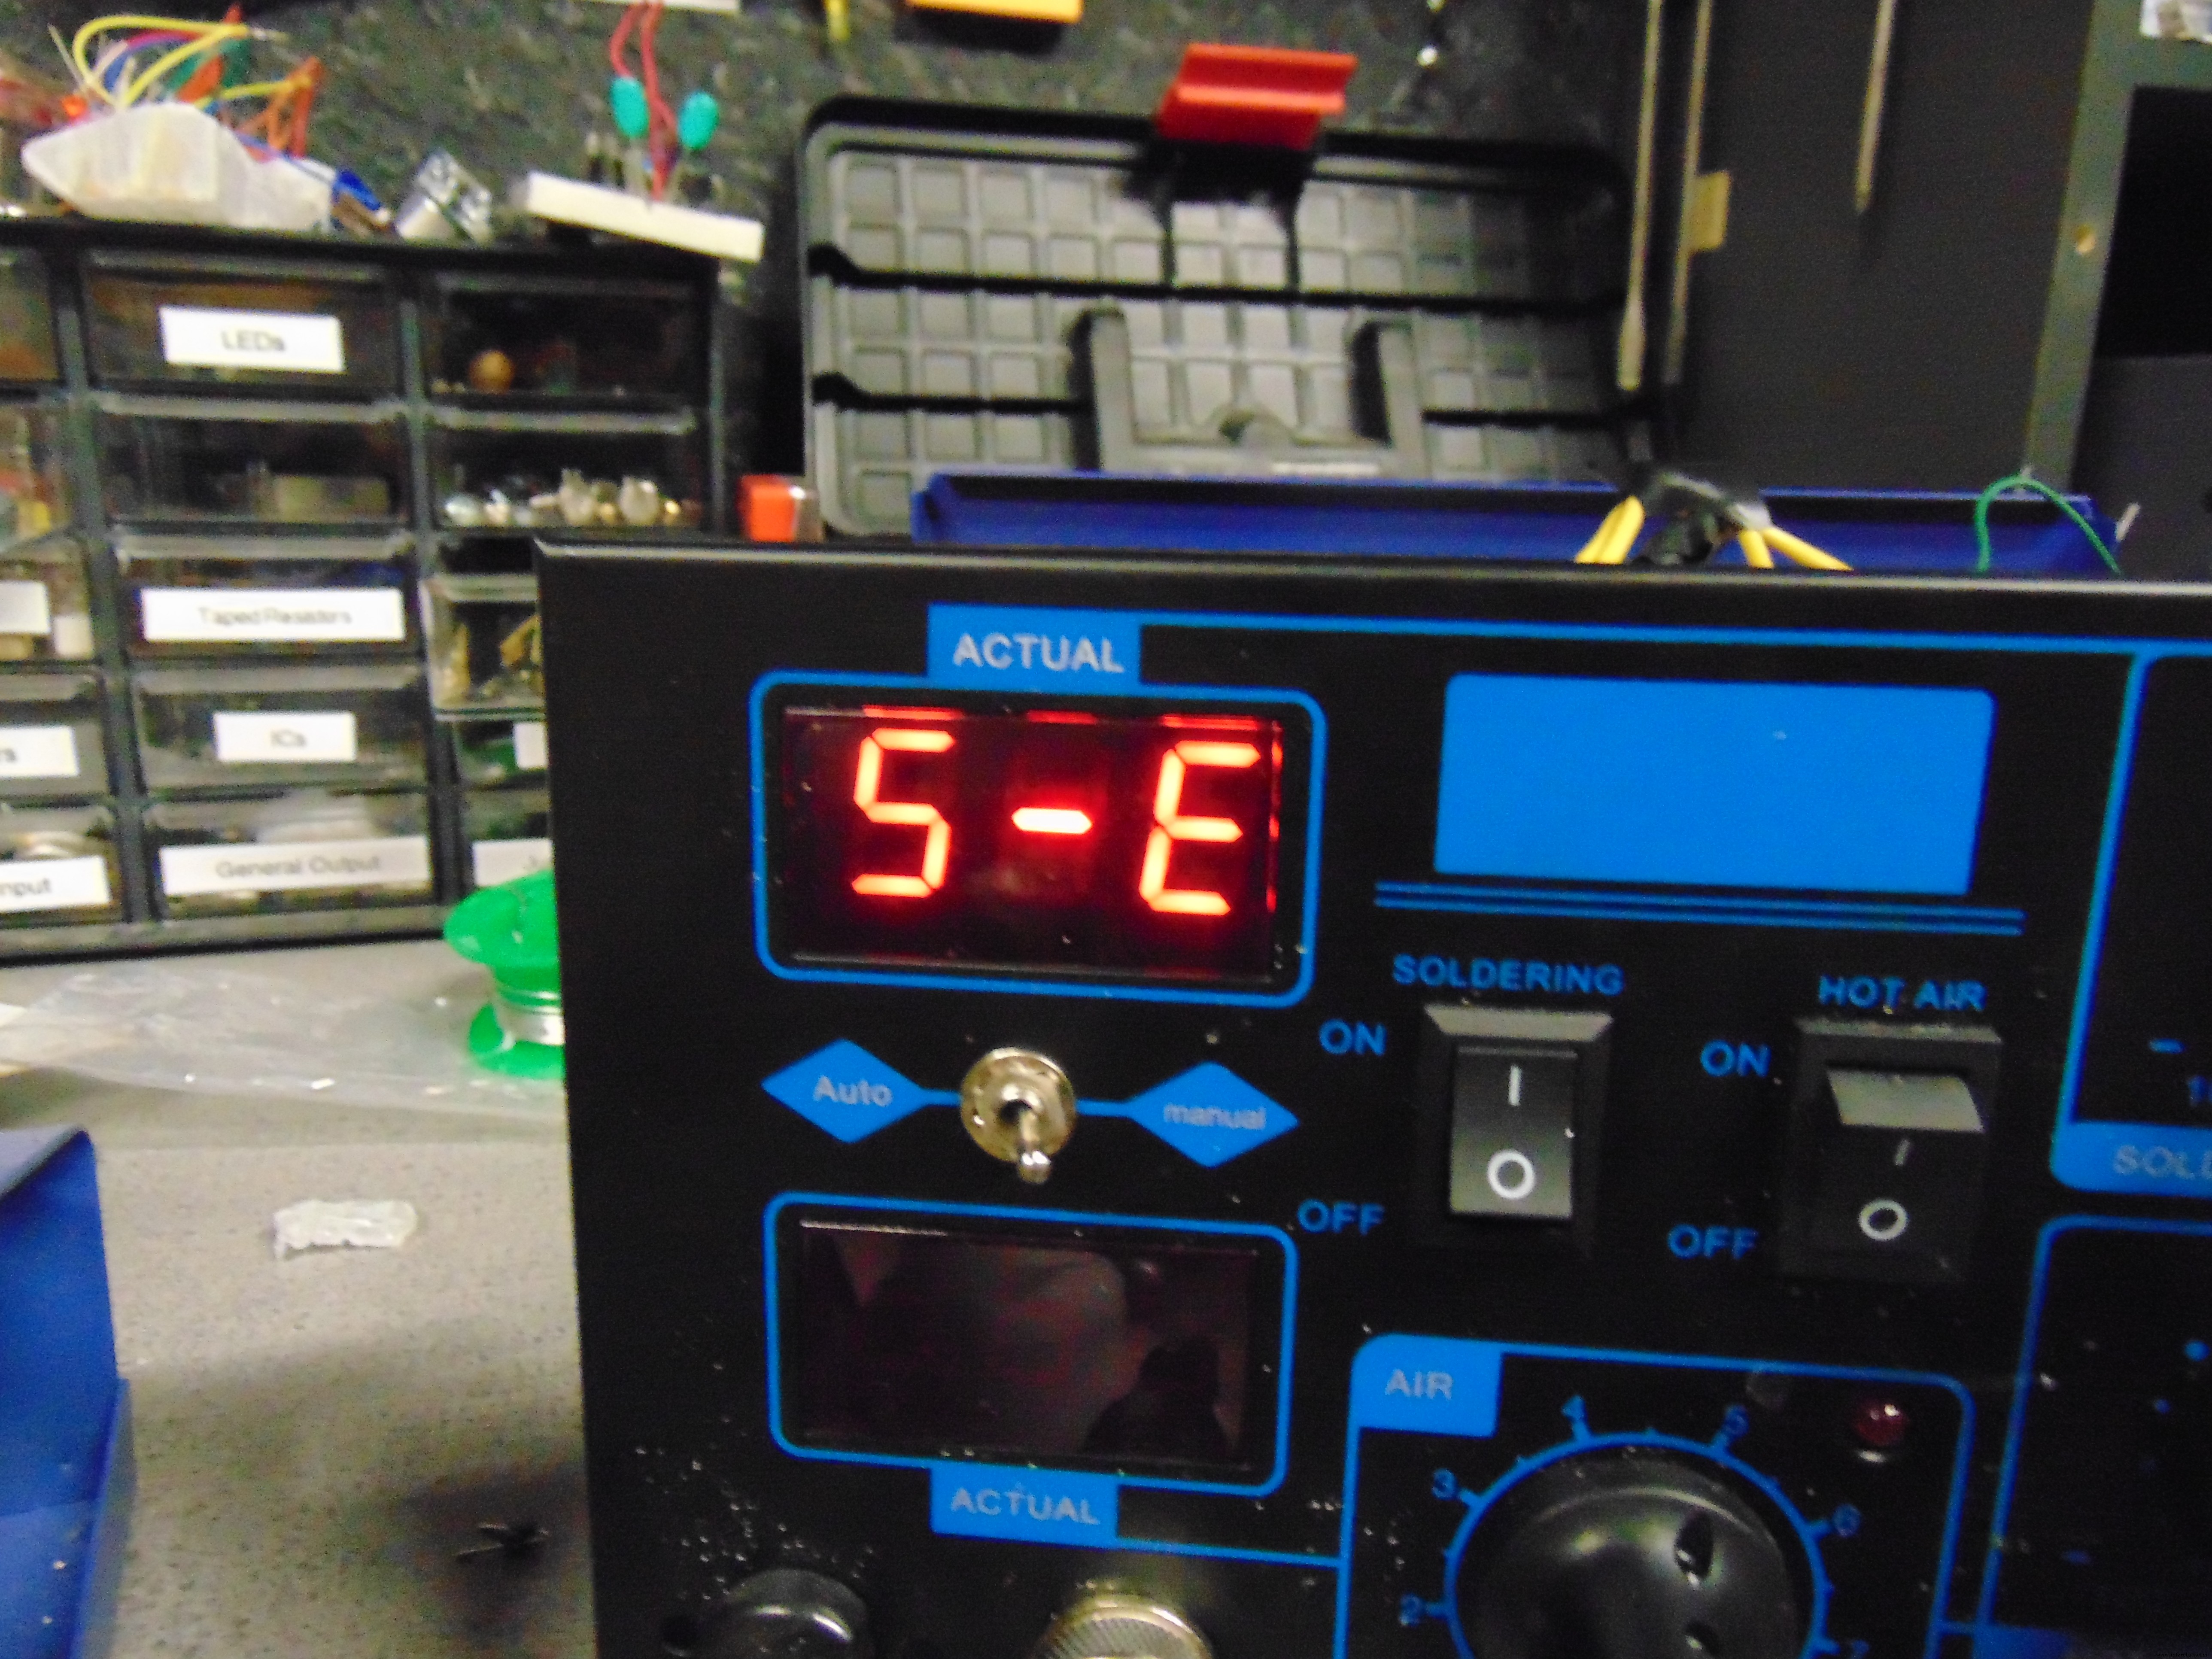
My 862D+ soldering iron broke, so instead of buying a new one I took a second iron and fixed it. The hardest part is that there was no solution elsewhere online. The PCB was broken because after replacing the iron it still said S-E or sensor error.
So I decided to create my own controller circuit, and stuff it inside. It required a second transformer but being cheap, there was plenty of room inside.
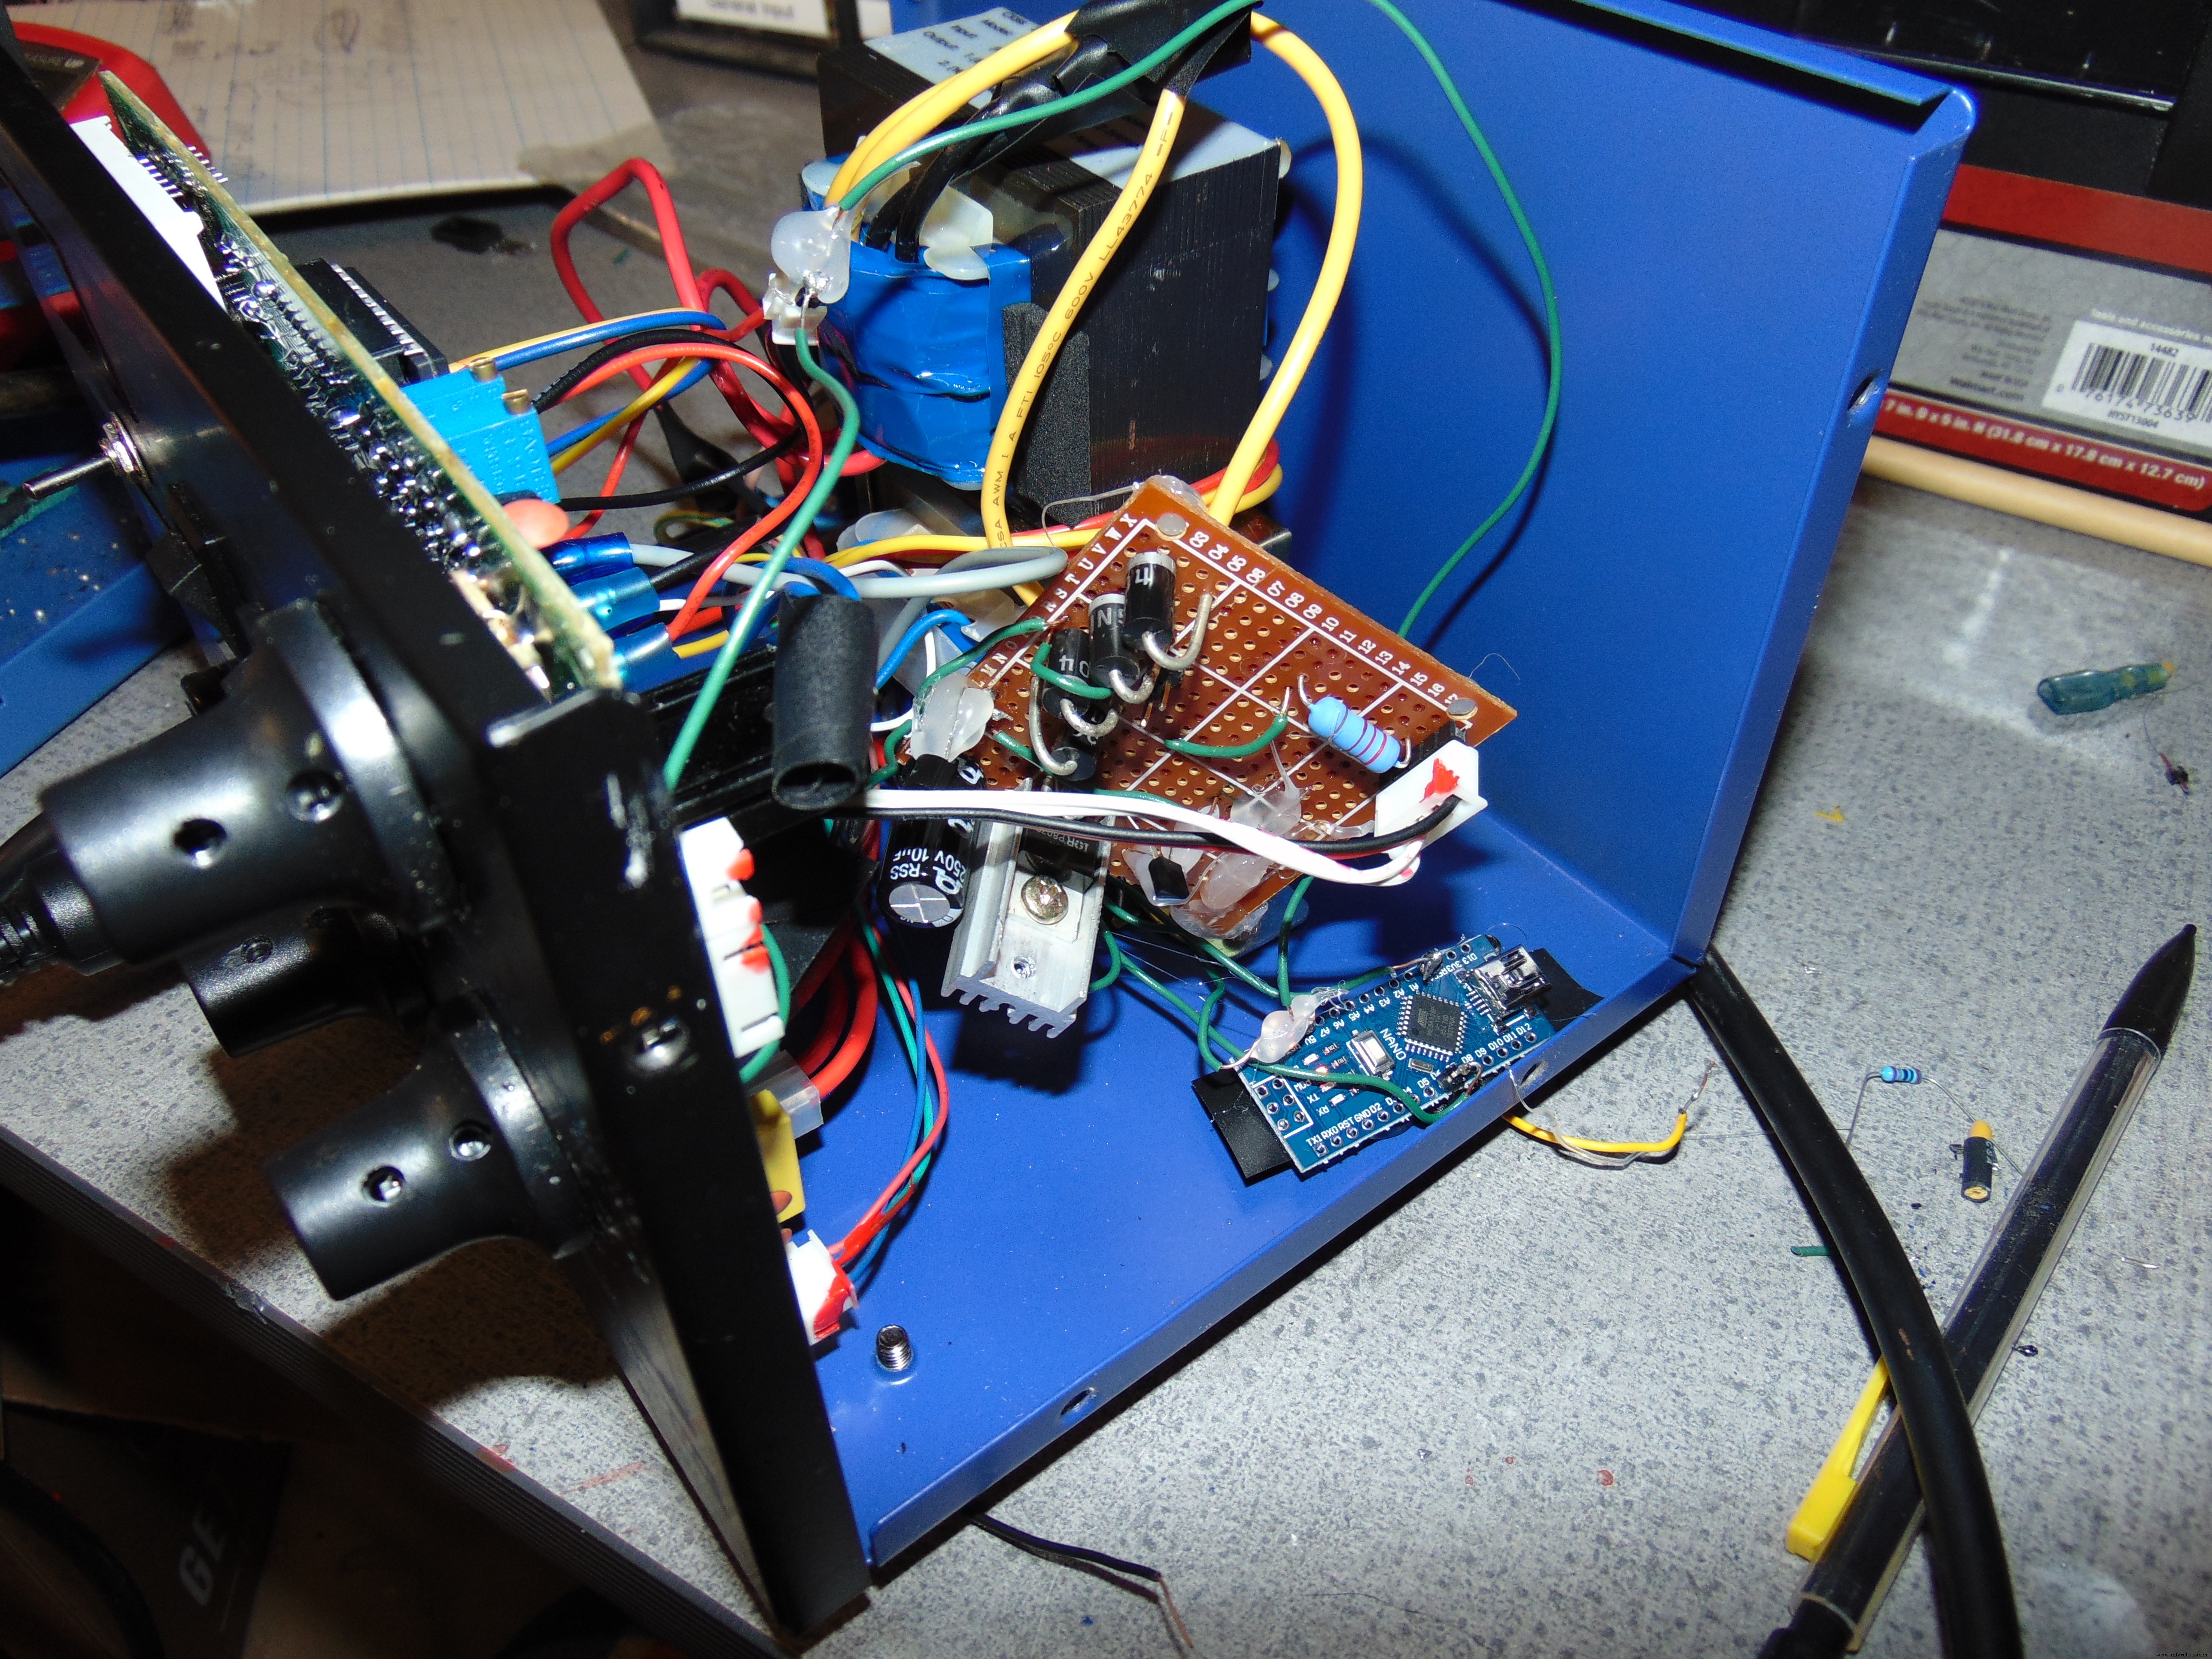
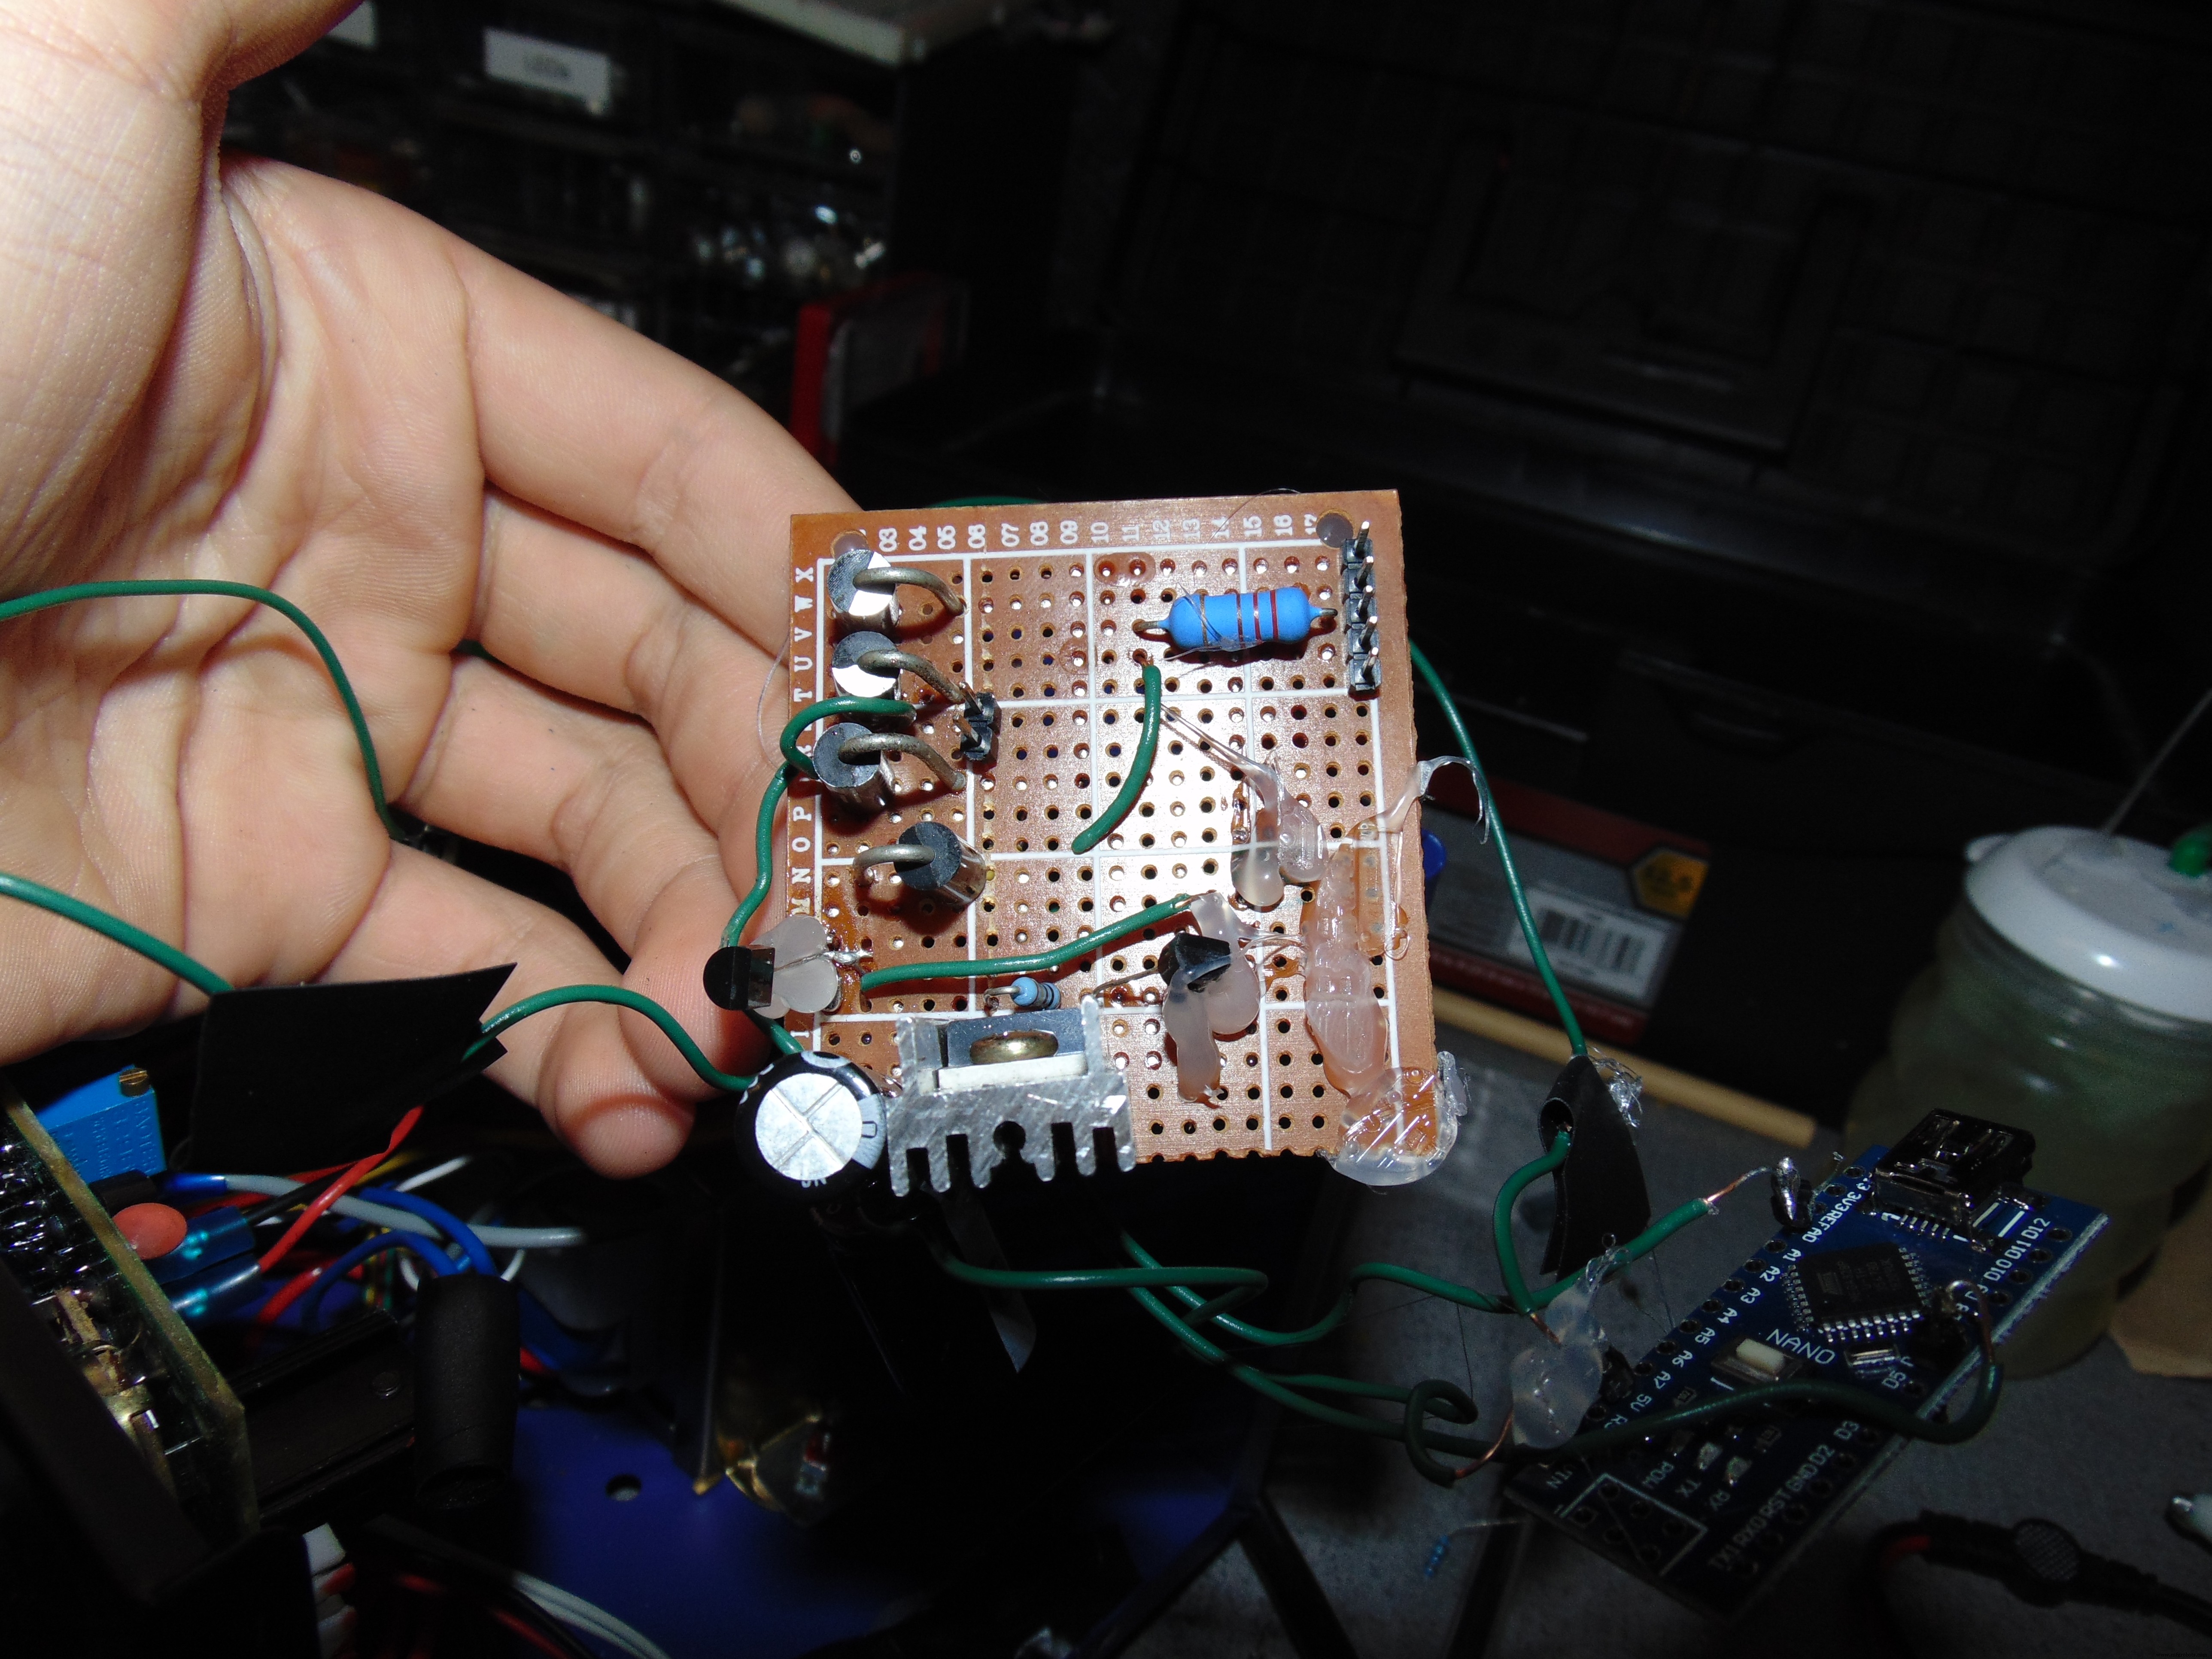
It may not look good, but it works like a charm. As a bonus, I removed the soldering iron power button, and added it between 5v and the arduino.
Onto the build tips:
All parts can be bought now. LCSC is a bulk electronics site. Shipping is expensive to America, but the components are ridiculously cheap.
EX mosfet on Amazon $6 but mosfet on LCSC 32 cents. However things like resistors must be bought in bulk. Still, 50 resistors are literally .84 cents.
MAKE SURE TO SHIELD LONG DATA WIRES with grounded aluminum foil or something else. The 12c screen wire for example.
In the code:
1023 coldest 0 lava. Change the settemp to you desire. Somewhere around 600 typically.
The soldering iron controller can detect whether your iron is connected or broken. If the soldering iron is disconnected, the arduino will zero the analog input. If the soldering iron used to heat up properly, but does not now: disconnect the iron, wait until it says plug iron in, then you are good to go. (This has been an issue for me)
Now you know the basics of your iron. This can be a cheap alternative to buying a quality soldering iron. While there are higher quality irons, this one is very cheap and diy.
Code
- Control Code
- The Code
- Code Updated 10/21/2019
Control CodeC/C++
Paste this into the arduino and upload. This only works with the circuit providedint output = 0;
int temp = 0;
int settemp = 630;
String inputString = ""; // a string to hold incoming data
boolean rap = false;
boolean stringComplete = false; // whether the string is complete
int t = 0;
void setup() {
Serial.begin(9600);
inputString.reserve(200);
pinMode(6, OUTPUT);
digitalWrite(6, LOW);
}
void loop() {
serialEvent();
if (stringComplete) {
Serial.println(inputString);
t = inputString.toInt();
//settemp = t //sets the set temp to the serial input
inputString = "";
stringComplete = false;
}
rapid();
pid();
}
void rapid() { //Controls the soldering iron by rapidly heating it up in the beginning.
if (rap == false) {
digitalWrite(6, HIGH);
do {
temp = analogRead(0);
Serial.print("rapid");
Serial.println(temp);
} while (temp - settemp > 10);
digitalWrite(6, LOW);
rap = true;
}
}
void pid() { //Controls the soldering with slow active power heating.
temp = analogRead(0);
output = temp - settemp;
if (output < 0) {
output = 0;
}
if (output > 255) {
output = 255;
}
Serial.print("pid");
Serial.print(temp);
Serial.print(", ");
Serial.println(output);
analogWrite(6, output);
}
void serialEvent() { //Serial communication that can be used to update settemp
while (Serial.available()) {
char inChar = (char)Serial.read();
inputString += inChar;
if (inChar == '\n') {
stringComplete = true;
}
}
}
The CodeC/C++
Paste into editor and upload. Only works with designed schematic.#include <Wire.h>
#include <Adafruit_SSD1306.h>
#include <Adafruit_GFX.h>
#define OLED_ADDR 0x3C
Adafruit_SSD1306 display(-1);
int settemp = 590; //manual set variables
int output = 0;
int temp = 0;
String inputString = "";
boolean rap = false;
boolean stringComplete = false;
int t = 0;
int mappedpower = 0;
byte powermultiply = 0;
long counter = 0;
int temp2 = 0;
byte outputoffset = 0;
byte scaleread = 0;
void setup() {
Serial.begin(9600);
pinMode(12, OUTPUT);
digitalWrite(12, LOW);
display.begin(SSD1306_SWITCHCAPVCC, OLED_ADDR);
display.clearDisplay();
display.display();
rapid();
}
void loop() {
pid();
display.clearDisplay();
updatebar();
updatetext();
display.display();
}
void rapid() { //Controls the soldering iron by rapidly heating it up in the beginning.
if (rap == false) {
digitalWrite(12, HIGH);
output = 255;
do {
temp = analogRead(0);
Serial.print("rapid");
Serial.println(temp);
display.clearDisplay();
updatebar();
updatetext();
display.display();
} while (temp - settemp > 1);
digitalWrite(12, LOW);
rap = true;
}
}
void pid() { //Controls the soldering with slow active power heating.
temp = analogRead(0); //Temp averager
temp2 = temp;
delay(50);
temp = analogRead(0);
temp = temp + temp2;
temp = temp / 2;
zeroscale; //activate no soldering iron checker
temp = temp + outputoffset;
output = temp - settemp;
output = output + powermultiply;
output = output * 4;
if (output < 0) {
output = 0;
}
if (output > 255) {
output = 255;
}
counter = counter + 1;
if (counter > 10) {
counter = 0;
if (temp > settemp + 3) {
powermultiply = powermultiply + 1;
}
if (temp < settemp - 3 && powermultiply > 0) {
powermultiply = powermultiply - 1;
}
}
Serial.print(powermultiply);
Serial.print(", ");
Serial.print(temp);
Serial.print(", ");
Serial.println(output);
analogWrite(12, output);
}
void updatebar() { //Updates Powerbar on OLED display
mappedpower = map(output, 0, 255, 0, 127) - 10;
display.fillRect(0, 0, mappedpower, 8, WHITE);
display.fillRoundRect(mappedpower - 5, 0, 20, 8, 3, WHITE);
}
void updatetext() {//Update text on Oled display
display.setCursor(0, 9);
display.setTextColor(WHITE);
display.setTextSize(1);
display.print("Set Temp: ");
display.print(settemp);
display.setCursor(0, 20);
display.print("Temp: ");
display.print(temp);
}
void zeroscale() { //If soldering iron is unplugged, adjust the input pin value to zero it out
if (output < 200) {
display.clearDisplay();
display.setCursor(0, 9);
display.setTextColor(WHITE);
display.setTextSize(1);
display.print("No soldering iron, or defective");
display.setCursor(0, 15);
display.print("iron.");
display.setCursor(0, 20);
display.print("Testing in 5 seconds.");
display.display();
delay(5000);
if (output < 200) {
outputoffset = temp;
}
display.clearDisplay();
display.setCursor(0, 9);
display.setTextColor(WHITE);
display.setTextSize(1);
display.print("Output offset set.");
display.setCursor(0, 20);
display.print("Please plug in the iron.");
display.display();
do {
scaleread = analogRead(0);
} while (scaleread < 200);
}
}
Code Updated 10/21/2019C/C++
Paste in IDE and upload. Only works with shematic.#include <Wire.h>
#include <Adafruit_SSD1306.h>
#include <Adafruit_GFX.h>
#define OLED_ADDR 0x3C
Adafruit_SSD1306 display(-1);
int settemp = 590; //manual set variables
int output = 0;
int temp = 0;
String inputString = "";
boolean rap = false;
boolean stringComplete = false;
int t = 0;
int mappedpower = 0;
byte powermultiply = 0;
long counter = 0;
int temp2 = 0;
byte outputoffset = 0;
byte scaleread = 0;
void setup() {
Serial.begin(9600);
pinMode(12, OUTPUT);
digitalWrite(12, LOW);
display.begin(SSD1306_SWITCHCAPVCC, OLED_ADDR);
display.clearDisplay();
display.display();
rapid();
}
void loop() {
pid();
display.clearDisplay();
updatebar();
updatetext();
display.display();
}
void rapid() { //Controls the soldering iron by rapidly heating it up in the beginning.
if (rap == false) {
digitalWrite(12, HIGH);
output = 255;
do {
temp = analogRead(0);
Serial.print("rapid");
Serial.println(temp);
display.clearDisplay();
updatebar();
updatetext();
display.display();
} while (temp - settemp > 1);
digitalWrite(12, LOW);
rap = true;
}
}
void pid() { //Controls the soldering with slow active power heating.
temp = analogRead(0); //Temp averager
temp2 = temp;
delay(50);
temp = analogRead(0);
temp = temp + temp2;
temp = temp / 2;
zeroscale(); //activate no soldering iron checker
temp = temp + outputoffset;
output = temp - settemp;
output = output + powermultiply;
output = output * 4;
if (output < 0) {
output = 0;
}
if (output > 255) {
output = 255;
}
counter = counter + 1;
if (counter > 10) {
counter = 0;
if (temp > settemp + 3) {
powermultiply = powermultiply + 1;
}
if (temp < settemp - 3 && powermultiply > 0) {
powermultiply = powermultiply - 1;
}
}
Serial.print(powermultiply);
Serial.print(", ");
Serial.print(temp);
Serial.print(", ");
Serial.println(output);
analogWrite(12, output);
}
void updatebar() { //Updates Powerbar on OLED display
mappedpower = map(output, 0, 255, 0, 127) - 10;
display.fillRect(0, 0, mappedpower, 8, WHITE);
display.fillRoundRect(mappedpower - 5, 0, 20, 8, 3, WHITE);
}
void updatetext() {//Update text on Oled display
display.setCursor(0, 9);
display.setTextColor(WHITE);
display.setTextSize(1);
display.print("Set Temp: ");
display.print(settemp);
display.setCursor(0, 20);
display.print("Temp: ");
display.print(temp);
}
void zeroscale() { //If soldering iron is unplugged, adjust the input pin value to zero it out
if (temp < 200) {
display.clearDisplay();
display.setCursor(0, 20);
display.setTextColor(WHITE);
display.setTextSize(1);
display.print("No soldering iron.");
display.display();
delay(10000);
display.setCursor(0, 0);
display.print("Testing in 5 seconds.");
display.display();
delay(5000);
if (temp < 200) {
outputoffset = temp;
}
display.clearDisplay();
display.setCursor(0, 20);
display.setTextColor(WHITE);
display.setTextSize(1);
display.print("Output offset set.");
display.setCursor(0, 0);
display.print("Connect the iron.");
display.display();
do {
scaleread = analogRead(0);
} while (scaleread < 200);
}
}
Schematics
Use this schematic to create a circuit for the iron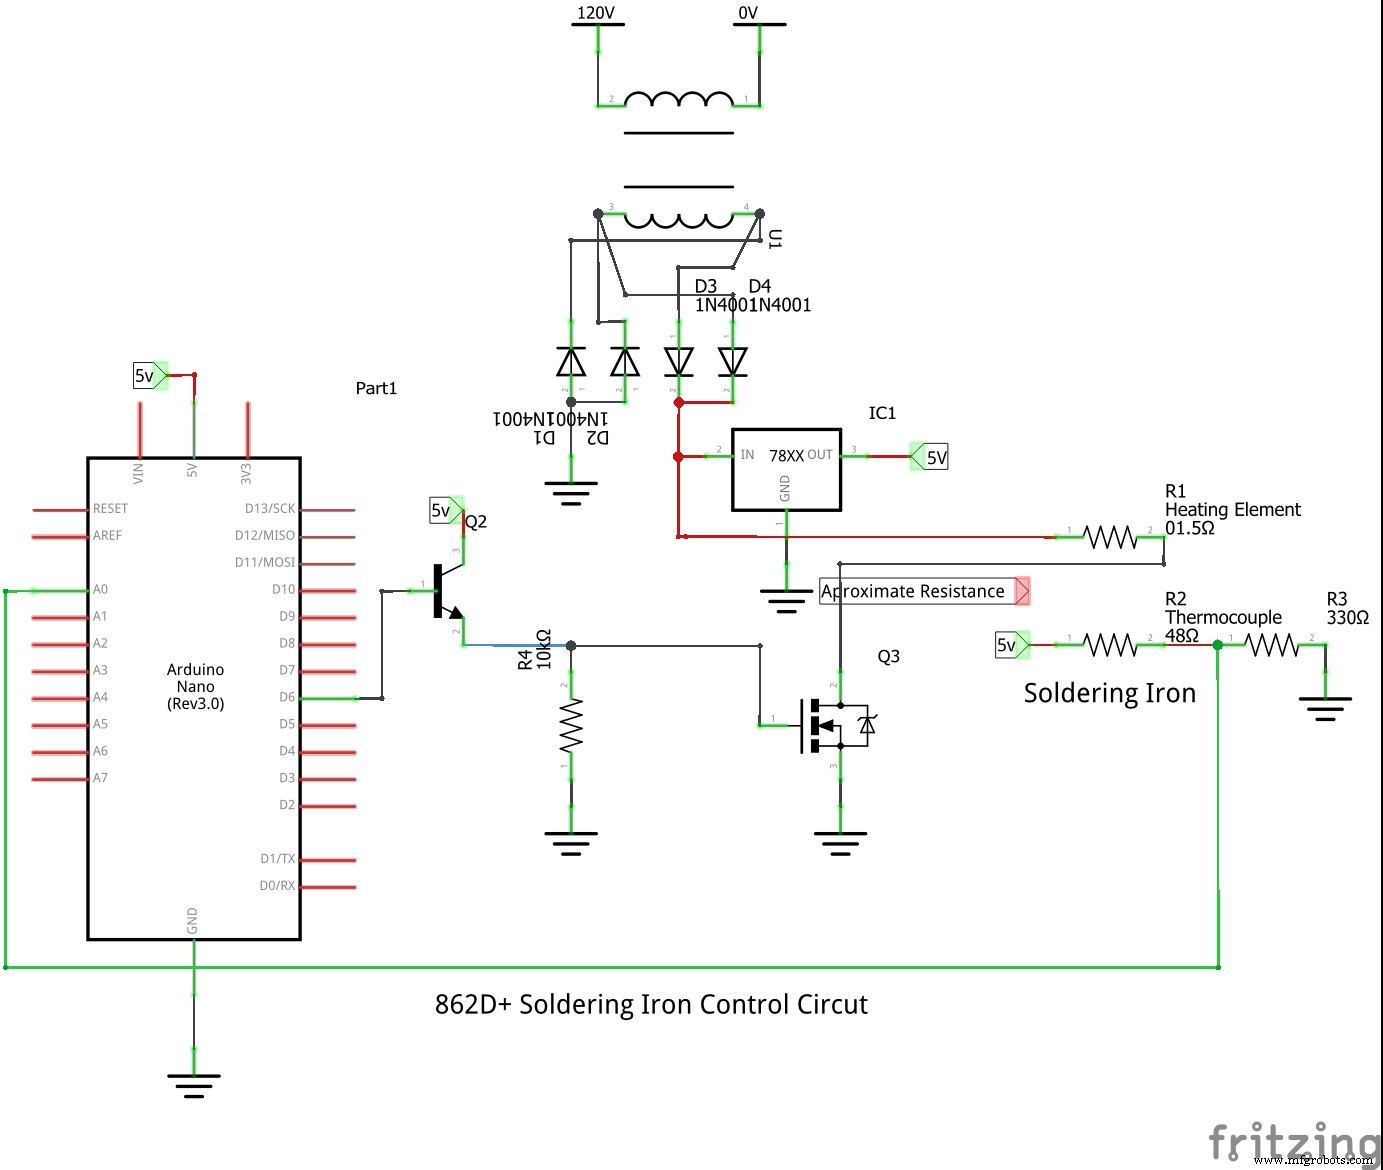
Manufacturing process
- Multi‑Position Temperature Sensor System for Smart Home Integration
- MotionSense: Smart Intrusion Detection with Arduino & ESP8266
- Advanced Remote‑Controlled Gripper Robot for Precision Handling
- Advanced Microcontrollers Lab: ESP32, Arduino, PIC, and Sensor Modules
- Build a Smart Hand Sanitizer Dispenser with Arduino – DIY Guide
- Hakko 907 Soldering Iron Controller – DIY Arduino Power Supply & LED Display
- Build a DIY Logic Analyzer with Arduino UNO – Step‑by‑Step Guide
- Hakko 907 v.2 Soldering Iron Controller – DIY Arduino Project
- Arduino-Powered Third Eye: An Assistive Vision Device for the Blind
- Create a DIY Solder Iron: A Complete Guide for Precision Crafting