


Build an Android‑Controlled Remote Vehicle with Raspberry Pi Motor Shield
Components and supplies
 |
| × | 1 | |||
 |
| × | 1 | |||
 |
| × | 1 | |||
| × | 1 | ||||
| × | 1 | ||||
| × | 1 |
Apps and online services
 |
| |||
 |
| |||
 |
|
About this project
At the end of the project we will manage a terrain vehicle which controlled by android device's accelemoter sensor
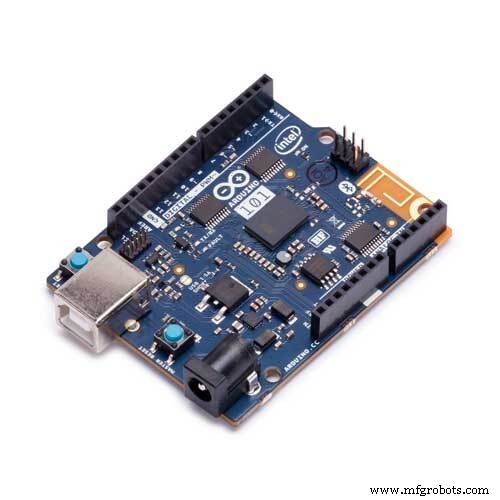
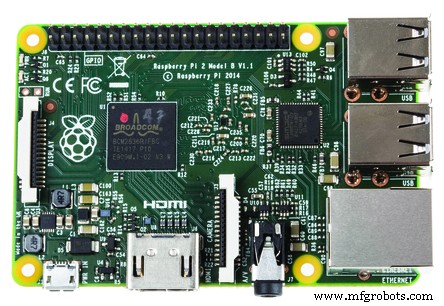
The project contains Motor shield, raspberry pi, arduino and dc motors devices.
STEP 1First of all we should make I2C bus between raspberry pi and arduino. You can see why we choose I2C from here.
You can find required code which contains both I2C and motor shield process as show below.
#include
#define MyAddress 0x40
#include
AF_DCMotor motorhiz(3);
AF_DCMotor motoryon(4);
byte DataToBeSend[1];
byte ReceivedData;
int counter = 0;
void setup()
{
Serial.begin(9600);
  /* Initialize I2C Slave & assign call-back function 'onReceive' on 'I2CReceived'*/
  Wire.begin(MyAddress);
  Wire.onReceive(I2CReceived);
  Wire.onRequest(I2CRequest);
  motorhiz.setSpeed(254);
  motorhiz.run(RELEASE);
  motoryon.setSpeed(254);
  motoryon.run(RELEASE);
}
void loop()
{
  /* Increment DataToBeSend every second and make sure it ranges between 0 and 99 */
  //DataToBeSend[0] = (DataToBeSend[0] >= 99) ? 0 : DataToBeSend[0] + 1;
}
/* This function will automatically be called when RPi2 sends data to this I2C slave */
void I2CReceived(int NumberOfBytes)
{
 //counter++;
 //String counterStr = String(counter);
 //Serial.println("ReceivedData :"+counterStr);
  /* WinIoT have sent data byte; read it */
  ReceivedData = Wire.read();
  int ReceivedDataInt = (int)ReceivedData;
  String ReceivedDataStr = String(ReceivedData);
  Serial.println(ReceivedDataInt);
  if(ReceivedDataInt >=100)      //X Datası
  {
      Serial.println("DataX :"+ReceivedDataStr);
      if(ReceivedDataInt > 145 && ReceivedDataInt < 154)
      {
         Serial.println("RELEASE");
         motorhiz.run(RELEASE);
      }
      else if(ReceivedDataInt >= 100 && ReceivedDataInt < 104)
      {
         Serial.println("RELEASE");
         motorhiz.run(RELEASE);
      }
      else if(ReceivedDataInt >= 155)
      {
        ReceivedDataInt = ReceivedDataInt -155;
        int motorSpeed = (ReceivedDataInt * 10)+50;
        if(motorSpeed > 254)
        {
          motorSpeed = 254;
        }
        motorhiz.setSpeed(motorSpeed);
        motorhiz.run(BACKWARD);
        String motorSpeedStr = String(motorSpeed);
        Serial.println("MotorHiz :"+motorSpeedStr);
      }
      else if(ReceivedDataInt >= 105  )
      {
          ReceivedDataInt = ReceivedDataInt -105;
          int motorSpeed = (ReceivedDataInt * 10)+50;
          if(motorSpeed > 254)
          {
           motorSpeed = 254;
          }
          motorhiz.setSpeed(motorSpeed);
          motorhiz.run(FORWARD);
          String motorSpeedStr = String(motorSpeed);
          Serial.println("MotorHiz :"+motorSpeedStr);
      }
  }
  else  // Y Datası
  {
      Serial.println("DataX :"+ReceivedDataStr);
      if(ReceivedDataInt > 45 && ReceivedDataInt < 54)
      {
         Serial.println("RELEASE");
         motoryon.run(RELEASE);
      }
      else if(ReceivedDataInt >= 0 && ReceivedDataInt < 4)
      {
         Serial.println("RELEASE");
         motoryon.run(RELEASE);
      }
      else if(ReceivedDataInt >= 55)
      {
        ReceivedDataInt = ReceivedDataInt -55;
        int motorSpeed = (ReceivedDataInt * 12)+50;
        if(motorSpeed > 254)
        {
          motorSpeed = 254;
        }
        motoryon.setSpeed(motorSpeed);
        motoryon.run(BACKWARD);
        String motorSpeedStr = String(motorSpeed);
        Serial.println("MotorHiz :"+motorSpeedStr);
      }
      else if(ReceivedDataInt >= 5  )
      {
          ReceivedDataInt = ReceivedDataInt -5;
          int motorSpeed = (ReceivedDataInt * 12)+50;
          if(motorSpeed > 254)
          {
           motorSpeed = 254;
          }
          motoryon.setSpeed(motorSpeed);
          motoryon.run(FORWARD);
          String motorSpeedStr = String(motorSpeed);
          Serial.println("MotorHiz :"+motorSpeedStr);
      }
  }
}
/* This function will automatically be called when RPi2 requests for data from this I2C slave */
void I2CRequest()
{
//Serial.println("DataToBeSend");
  /*Send data to WinIoT */
  //Wire.write(DataToBeSend,1);
}
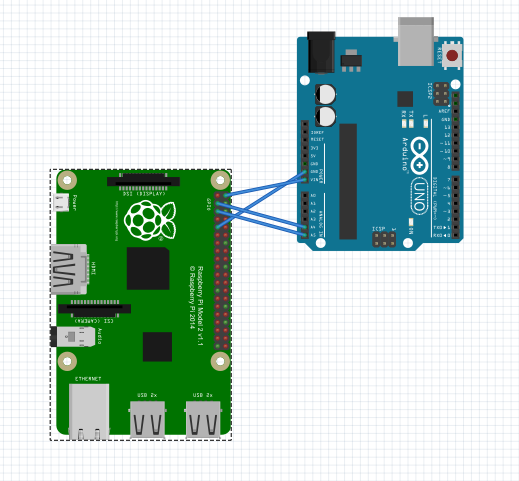
I2C's pin schema for comminication between arduino and raspberry pi in picture as shown above. It's no need to use external power supply for arduino. Arduino will get power from raspberry pi's Vout pin.
The required code for raspberry pi(working as a web server) which sends datas to arduino via I2C as shown below.
Code could find the codes end of the page (Code Section).
STEP 3We develop Visual Studio Cordova Android Application that sends accelerometer sensor's data to web server using ajax requests.
Code could find the codes end of the page (Code Section).
BRIEFLY1-) Android application sends sensor data(android phone accelerometer data) to web server which runs in raspberry pi.
2-) The web server sends data(raspberry pi gets data from android phone's accelerometer sensor) to arduino using I2C.
3-) Arduino process datas and runs motors using motors shields.
Code
- Wiri.h I2C Comminication and moto shield android code
- Android Remote Controller
- Windows IOT Web Server
Wiri.h I2C Comminication and moto shield android codeArduino
I2C comminication between arduino and raspberry pi arduino code. It is for serial comminication for two devices with minumum input output source.#include <Wire.h>
#define MyAddress 0x40
#include <AFMotor.h>
AF_DCMotor motorhiz(3);
AF_DCMotor motoryon(4);
byte DataToBeSend[1];
byte ReceivedData;
int counter = 0;
void setup()
{
Serial.begin(9600);
/* Initialize I2C Slave & assign call-back function 'onReceive' on 'I2CReceived'*/
Wire.begin(MyAddress);
Wire.onReceive(I2CReceived);
Wire.onRequest(I2CRequest);
motorhiz.setSpeed(254);
motorhiz.run(RELEASE);
motoryon.setSpeed(254);
motoryon.run(RELEASE);
}
void loop()
{
/* Increment DataToBeSend every second and make sure it ranges between 0 and 99 */
//DataToBeSend[0] = (DataToBeSend[0] >= 99) ? 0 : DataToBeSend[0] + 1;
}
/* This function will automatically be called when RPi2 sends data to this I2C slave */
void I2CReceived(int NumberOfBytes)
{
//counter++;
//String counterStr = String(counter);
//Serial.println("ReceivedData :"+counterStr);
/* WinIoT have sent data byte; read it */
ReceivedData = Wire.read();
int ReceivedDataInt = (int)ReceivedData;
String ReceivedDataStr = String(ReceivedData);
Serial.println(ReceivedDataInt);
if(ReceivedDataInt >=100) //X Datası
{
Serial.println("DataX :"+ReceivedDataStr);
if(ReceivedDataInt > 145 && ReceivedDataInt < 154)
{
Serial.println("RELEASE");
motorhiz.run(RELEASE);
}
else if(ReceivedDataInt >= 100 && ReceivedDataInt < 104)
{
Serial.println("RELEASE");
motorhiz.run(RELEASE);
}
else if(ReceivedDataInt >= 155)
{
ReceivedDataInt = ReceivedDataInt -155;
int motorSpeed = (ReceivedDataInt * 10)+50;
if(motorSpeed > 254)
{
motorSpeed = 254;
}
motorhiz.setSpeed(motorSpeed);
motorhiz.run(BACKWARD);
String motorSpeedStr = String(motorSpeed);
Serial.println("MotorHiz :"+motorSpeedStr);
}
else if(ReceivedDataInt >= 105 )
{
ReceivedDataInt = ReceivedDataInt -105;
int motorSpeed = (ReceivedDataInt * 10)+50;
if(motorSpeed > 254)
{
motorSpeed = 254;
}
motorhiz.setSpeed(motorSpeed);
motorhiz.run(FORWARD);
String motorSpeedStr = String(motorSpeed);
Serial.println("MotorHiz :"+motorSpeedStr);
}
}
else // Y Datası
{
Serial.println("DataX :"+ReceivedDataStr);
if(ReceivedDataInt > 45 && ReceivedDataInt < 54)
{
Serial.println("RELEASE");
motoryon.run(RELEASE);
}
else if(ReceivedDataInt >= 0 && ReceivedDataInt < 4)
{
Serial.println("RELEASE");
motoryon.run(RELEASE);
}
else if(ReceivedDataInt >= 55)
{
ReceivedDataInt = ReceivedDataInt -55;
int motorSpeed = (ReceivedDataInt * 12)+50;
if(motorSpeed > 254)
{
motorSpeed = 254;
}
motoryon.setSpeed(motorSpeed);
motoryon.run(BACKWARD);
String motorSpeedStr = String(motorSpeed);
Serial.println("MotorHiz :"+motorSpeedStr);
}
else if(ReceivedDataInt >= 5 )
{
ReceivedDataInt = ReceivedDataInt -5;
int motorSpeed = (ReceivedDataInt * 12)+50;
if(motorSpeed > 254)
{
motorSpeed = 254;
}
motoryon.setSpeed(motorSpeed);
motoryon.run(FORWARD);
String motorSpeedStr = String(motorSpeed);
Serial.println("MotorHiz :"+motorSpeedStr);
}
}
}
/* This function will automatically be called when RPi2 requests for data from this I2C slave */
void I2CRequest()
{
//Serial.println("DataToBeSend");
/*Send data to WinIoT */
//Wire.write(DataToBeSend,1);
}
Android Remote ControllerC#
Android Remote ControllerNo preview (download only).
Windows IOT Web ServerC#
Windows IOT Web ServerNo preview (download only).
Custom parts and enclosures
Arduino to raspberry pin diagram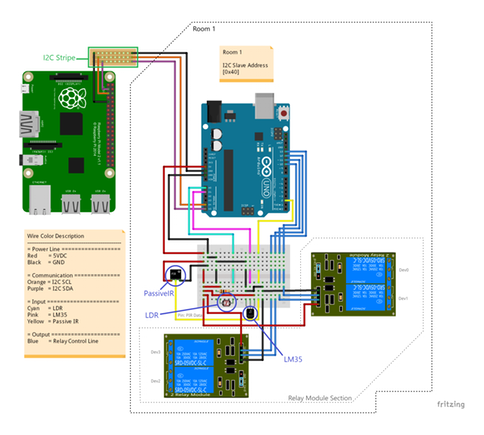
Schematics
for details: https://www.hackster.io/AnuragVasanwala/home-automation-0dcefc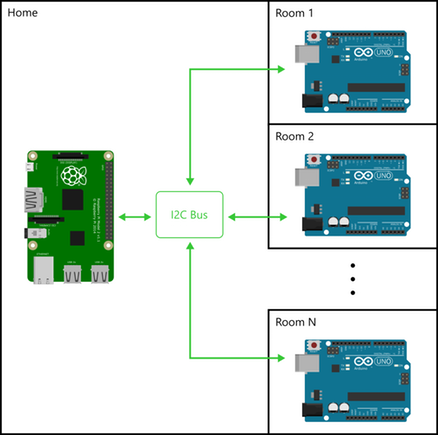
Manufacturing process
- Build a Smart Robot with the Bridge Shield – Raspberry Pi & Arduino Integration
- Build a Bluetooth‑Controlled Raspberry Pi Robot with Audio Feedback
- Gesture‑Controlled Robot Powered by Raspberry Pi
- Build a Wi‑Fi‑Controlled Raspberry Pi Robot with Python – Step‑by‑Step Guide
- Control LEDs with Alexa via Raspberry Pi – Easy Step‑by‑Step Guide
- Wireless Arduino Programming Shield with HC-05 Bluetooth – No USB Needed
- Capacitive Touch LED Switch with Arduino UNO – Easy DIY Project
- Build a 4-Wheel Arduino Robot Controlled via Dabble App
- Smartphone G‑Sensor Controlled Robot Car with Arduino and Bluetooth
- Build an Ultrasonic Map-Maker with Arduino Yun – A Step-by-Step Guide