


DIY 2D Motion Racing Simulator Using Arduino Nano & SG90 Servos
Components and supplies
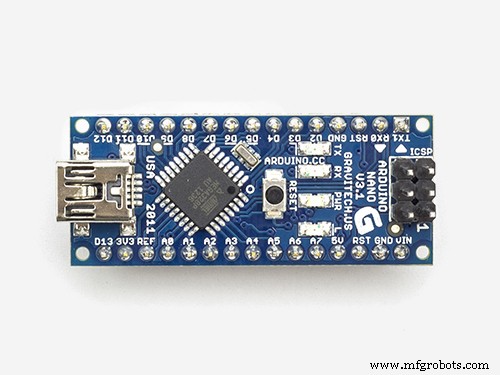 |
| × | 1 | |||
 |
| × | 2 |
Necessary tools and machines
 |
|
Apps and online services
|
|
About this project
SimTools is a generic Motion Simulator Software able to control multiple hardware interfaces, including Arduino. This combination is used in the project presented in the video. Hardware part consist only Arduino Nano microcontroller and two cheap SG90 micro servo motors. We only need to upload the code given below.
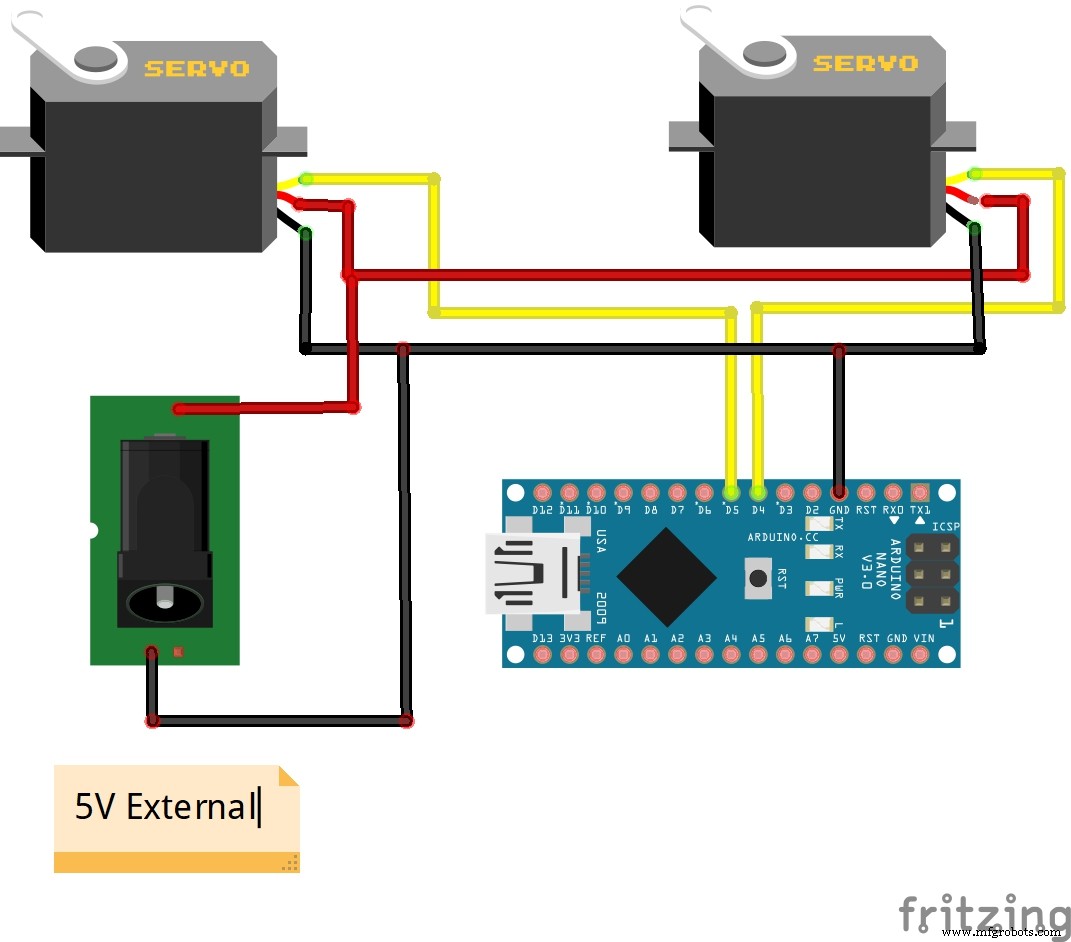
The required game data with help of the SimTools software is transmitted through the serial port to the Arduino. Next Arduino activates servo motors that move the simulation platform accordingly. This is a small scale of a two-axis simulator. To make a real simulator, you need to add motor drivers and large servo motors.

There are many examples of such DIY simulators as well as construction drawings and tips on "https://www.xsimulator.net/" page. The SimTools setup procedure is described in the video, but you can also download the PDF user manual on: https://simtools.us/wp-content/uploads/2019/06/SimToolsUserManual-v2.4.pdf
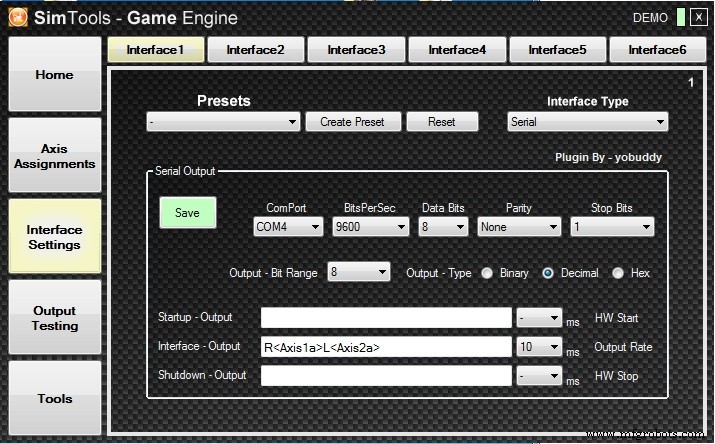
SimTools will run in “Demo” mode until a valid license has been registered. The plugin for Live for Speed is fully operational for testing while SimTools is in demo mode. (The demo of Live for Speed will work for testing SimTools too.) You can find more in formation and download Live for Speed at https://www.lfs.net/downloads
SimTools download link:
https://www.xsimulator.net/community/marketplace/motion-simulation-software-simtools.63/
Code
- Code
CodeC/C++
//********************************************************************************************
// RC Model Servo
// Original code By EAOROBBIE (Robert Lindsay)
// Completely mangled by aarondc
// For free use for Sim Tool Motion Software
//********************************************************************************************
#include <Servo.h>
//#define DEBUG 1                                    // comment out this line to remove debuggin Serial.print lines
const int kActuatorCount = 2;                       // how many Actuators we are handling

// the letters ("names") sent from Sim Tools to identify each actuator
// NB: the order of the letters here determines the order of the remaining constants kPins and kActuatorScale
const char kActuatorName[kActuatorCount] = { 'R', 'L' };
const int kPins[kActuatorCount] = {4, 5};                       // pins to which the Actuators are attached
const int kActuatorScale[kActuatorCount][2] = { { 0, 179 } ,    // Right Actuator scaling
                                                { 179, 0 }      // Left side Actuator scaling
                                               };
const char kEOL = '~';                              // End of Line - the delimiter for our acutator values
const int kMaxCharCount = 3;                        // some insurance...
Servo actuatorSet[kActuatorCount];                  // our array of Actuators
int actuatorPosition[kActuatorCount] = {90, 90};    // current Actuator positions, initialised to 90
int currentActuator;                                // keep track of the current Actuator being read in from serial port
int valueCharCount = 0;                             // how many value characters have we read (must be less than kMaxCharCount!!

// set up some states for our state machine
// psReadActuator = next character from serial port tells us the Actuator
// psReadValue = next 3 characters from serial port tells us the value
enum TPortState { psReadActuator, psReadValue };
TPortState currentState = psReadActuator;

void setup()
{
    // attach the Actuators to the pins
    for (int i = 0; i < kActuatorCount; i++)
        actuatorSet[i].attach(kPins[i]);

    // initialise actuator position
    for (int i = 0; i < kActuatorCount; i++)
        updateActuator(i);

    Serial.begin(9600); // opens serial port at a baud rate of 9600
}

void loop()
{

}

// this code only runs when we have serial data available. ie (Serial.available() > 0).
void serialEvent() {
    char tmpChar;
    int tmpValue;

    while (Serial.available()) {
        // if we're waiting for a Actuator name, grab it here
        if (currentState == psReadActuator) {
            tmpChar = Serial.read();
            // look for our actuator in the array of actuator names we set up
#ifdef DEBUG
Serial.print("read in ");
Serial.println(tmpChar);
#endif
            for (int i = 0; i < kActuatorCount; i++) {
                if (tmpChar == kActuatorName[i]) {
#ifdef DEBUG
Serial.print("which is actuator ");
Serial.println(i);
#endif
                    currentActuator = i;                        // remember which actuator we found
                    currentState = psReadValue;                 // start looking for the Actuator position
                    actuatorPosition[currentActuator] = 0;      // initialise the new position
                    valueCharCount = 0;                         // initialise number of value chars read in
                    break;
                }
            }
        }

        // if we're ready to read in the current Actuator's position data
        if (currentState == psReadValue) {
            while ((valueCharCount < kMaxCharCount) && Serial.available()) {
                tmpValue = Serial.read();
                if (tmpValue != kEOL) {
                    tmpValue = tmpValue - 48;
                    if ((tmpValue < 0) || (tmpValue > 9)) tmpValue = 0;
                    actuatorPosition[currentActuator] = actuatorPosition[currentActuator] * 10 + tmpValue;
                    valueCharCount++;
                }
                else break;
            }

            // if we've read the value delimiter, update the Actuator and start looking for the next Actuator name
            if (tmpValue == kEOL || valueCharCount == kMaxCharCount) {
#ifdef DEBUG
Serial.print("read in ");
Serial.println(actuatorPosition[currentActuator]);
#endif
                // scale the new position so the value is between 0 and 179
                actuatorPosition[currentActuator] = map(actuatorPosition[currentActuator], 0, 255, kActuatorScale[currentActuator][0], kActuatorScale[currentActuator][1]);
#ifdef DEBUG
Serial.print("scaled to ");
Serial.println(actuatorPosition[currentActuator]);
#endif
                updateActuator(currentActuator);
                currentState = psReadActuator;
            }
        }
    }
}


// write the current Actuator position to the passed in Actuator
void updateActuator(int thisActuator) {
    actuatorSet[thisActuator].write(actuatorPosition[thisActuator]);
}
Schematics
Manufacturing process
- Build a Smart Voltmeter with Arduino & Smartphone – Easy DIY Project
- Build a DIY VR Skateboard with Arduino, Google Cardboard, and Bluetooth
- Build a Portable RFID Door Lock with Arduino – Step-by-Step Guide
- Build Your Own Flight Simulator Rudder Pedals: Step‑by‑Step DIY Guide
- DIY Arduino Height Measurement Device – Accurate & Easy to Build
- Build a Realistic Traffic Light Simulator with Arduino UNO
- Arduino-Based Altair 8800 Simulator Kit – Build & Program Retro Computer
- Build a Complete Arduino‑Powered RC Airplane from Scratch
- Build an Arduino‑Powered RC Hovercraft: Full 3D‑Printed Design & Programming Guide
- Build a Multifunctional Arduino RC Transmitter: Step‑by‑Step DIY Guide