


Build Your Own Robot in Just One Hour with Otto DIY Kit
Components and supplies
 |
| × | 1 | |||
| × | 1 | ||||
 |
| × | 1 | |||
 |
| × | 1 | |||
 |
| × | 4 | |||
 |
| × | 1 | |||
 |
| × | 6 | |||
| × | 1 | ||||
 |
| × | 1 | |||
 |
| × | 1 |
Necessary tools and machines
 |
| |||
|
Apps and online services
 |
| |||
 |
| |||
 |
|
About this project
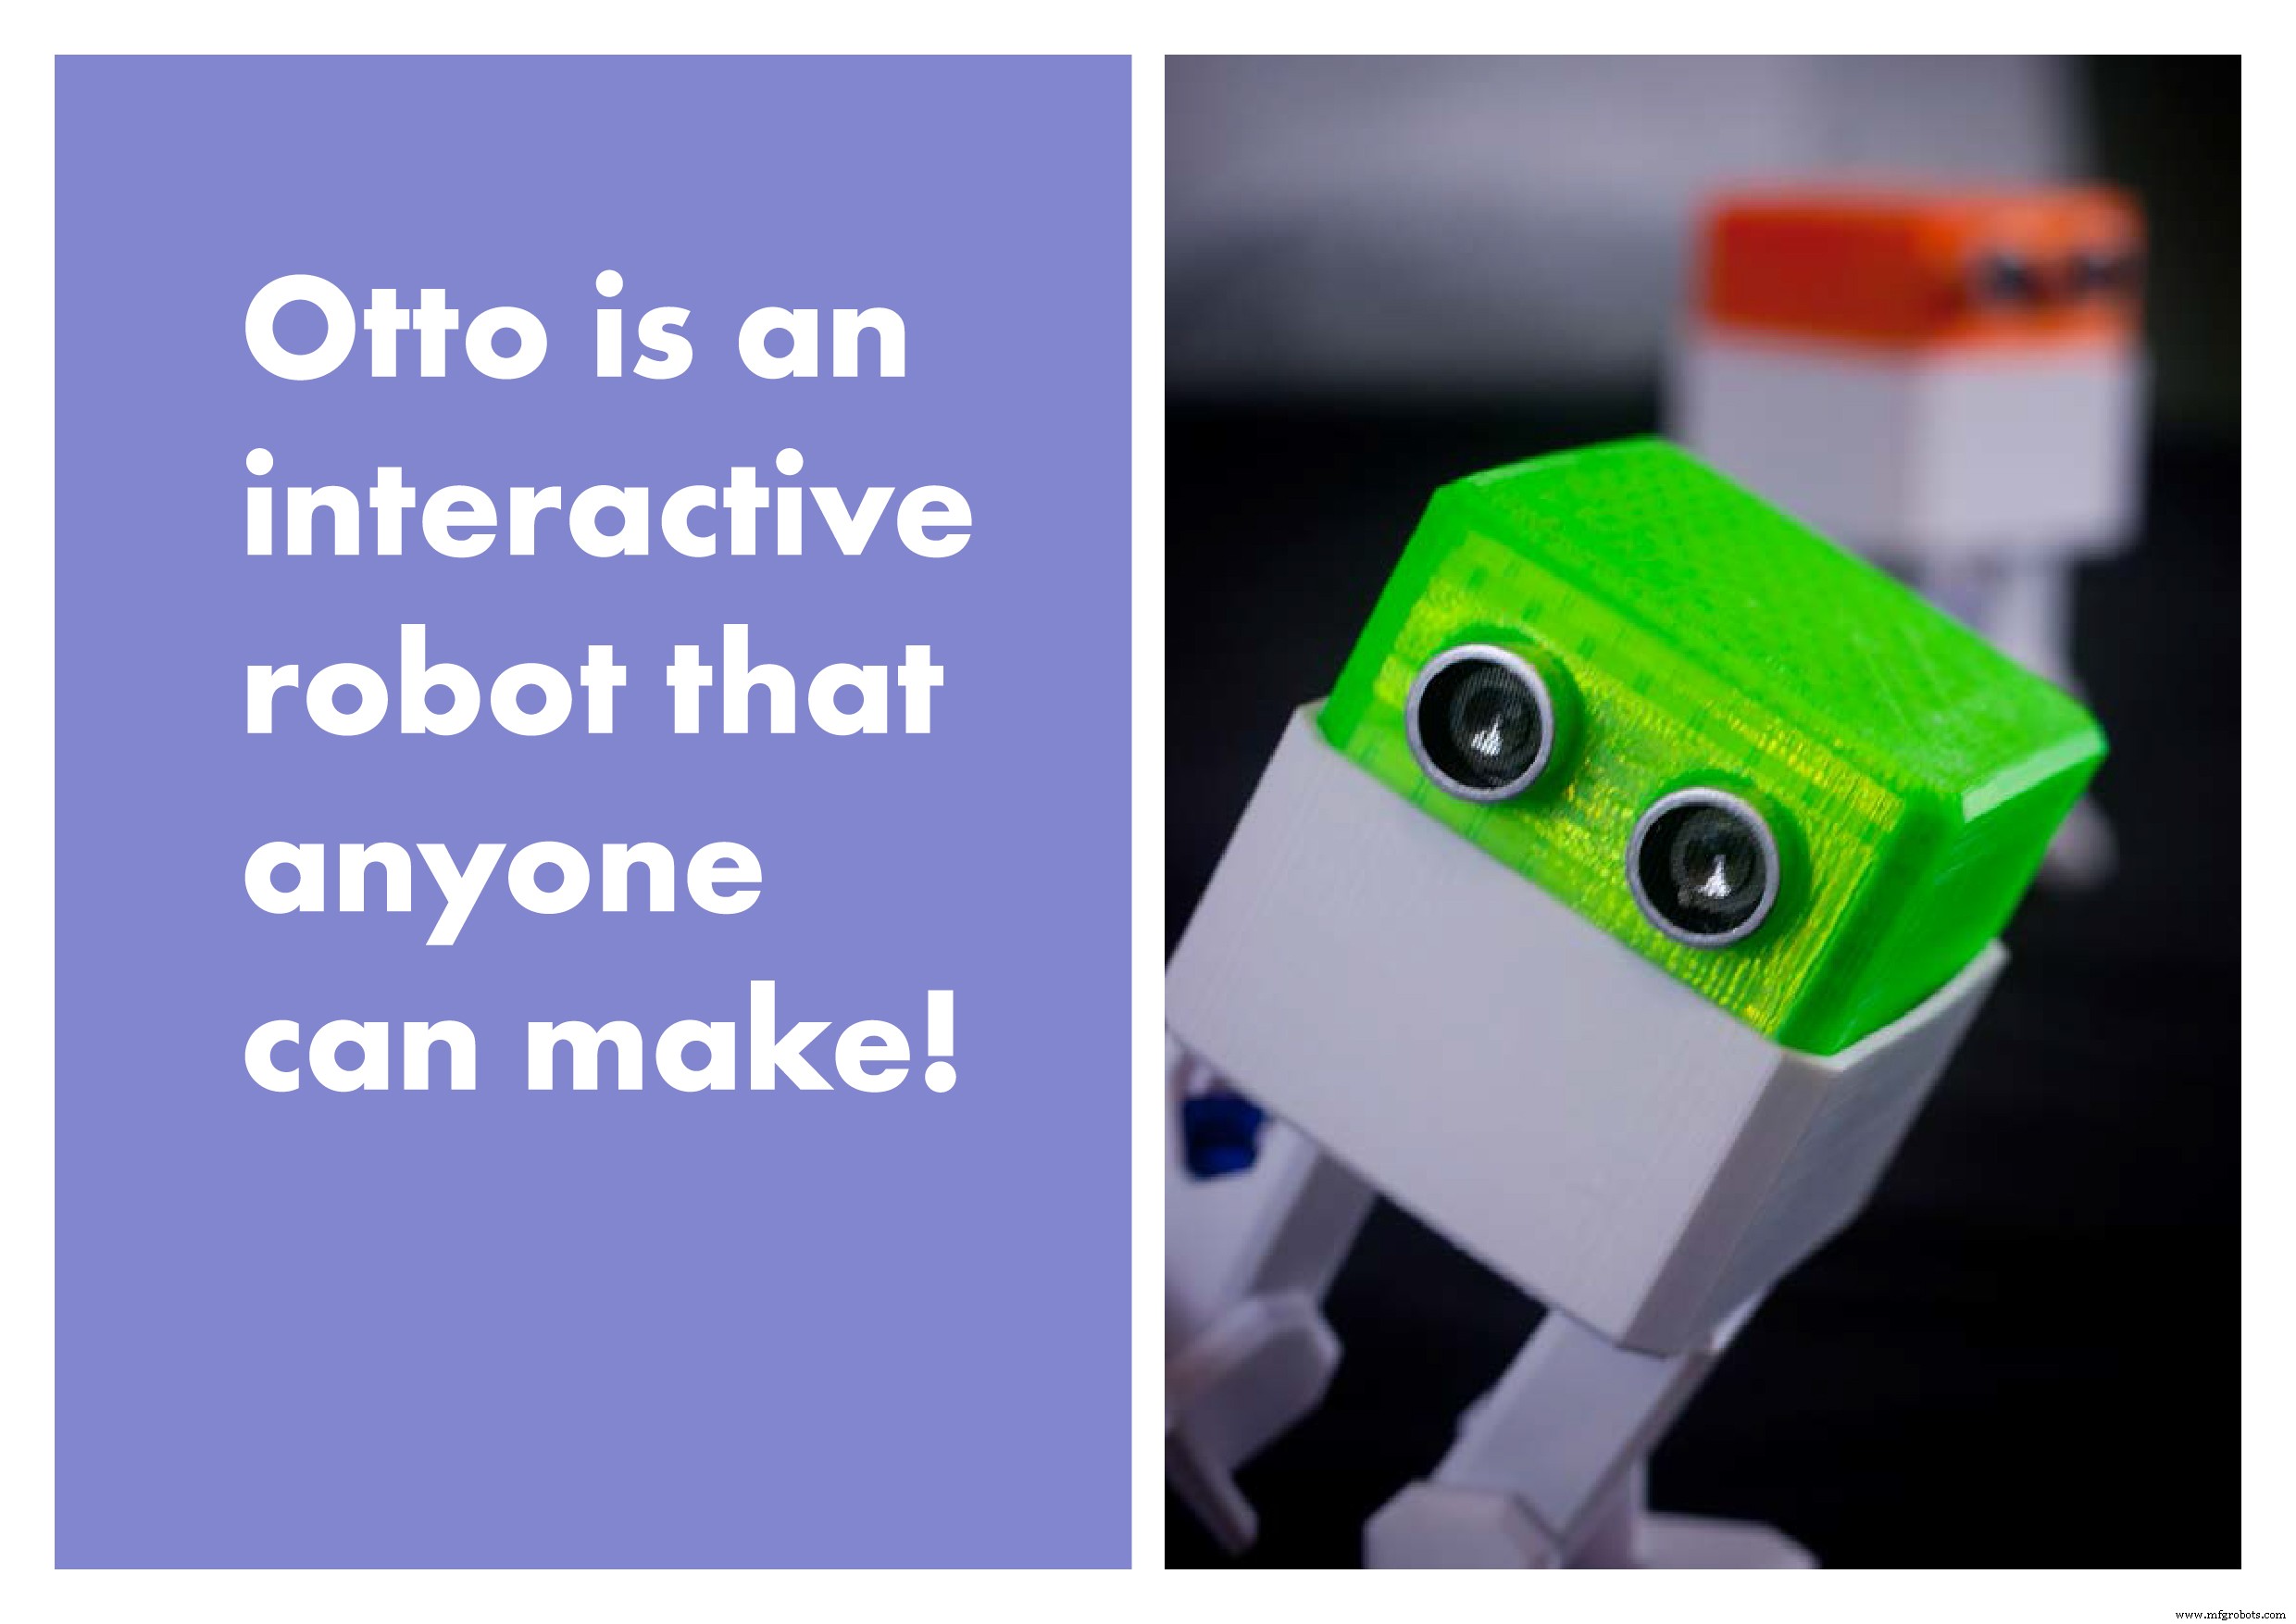
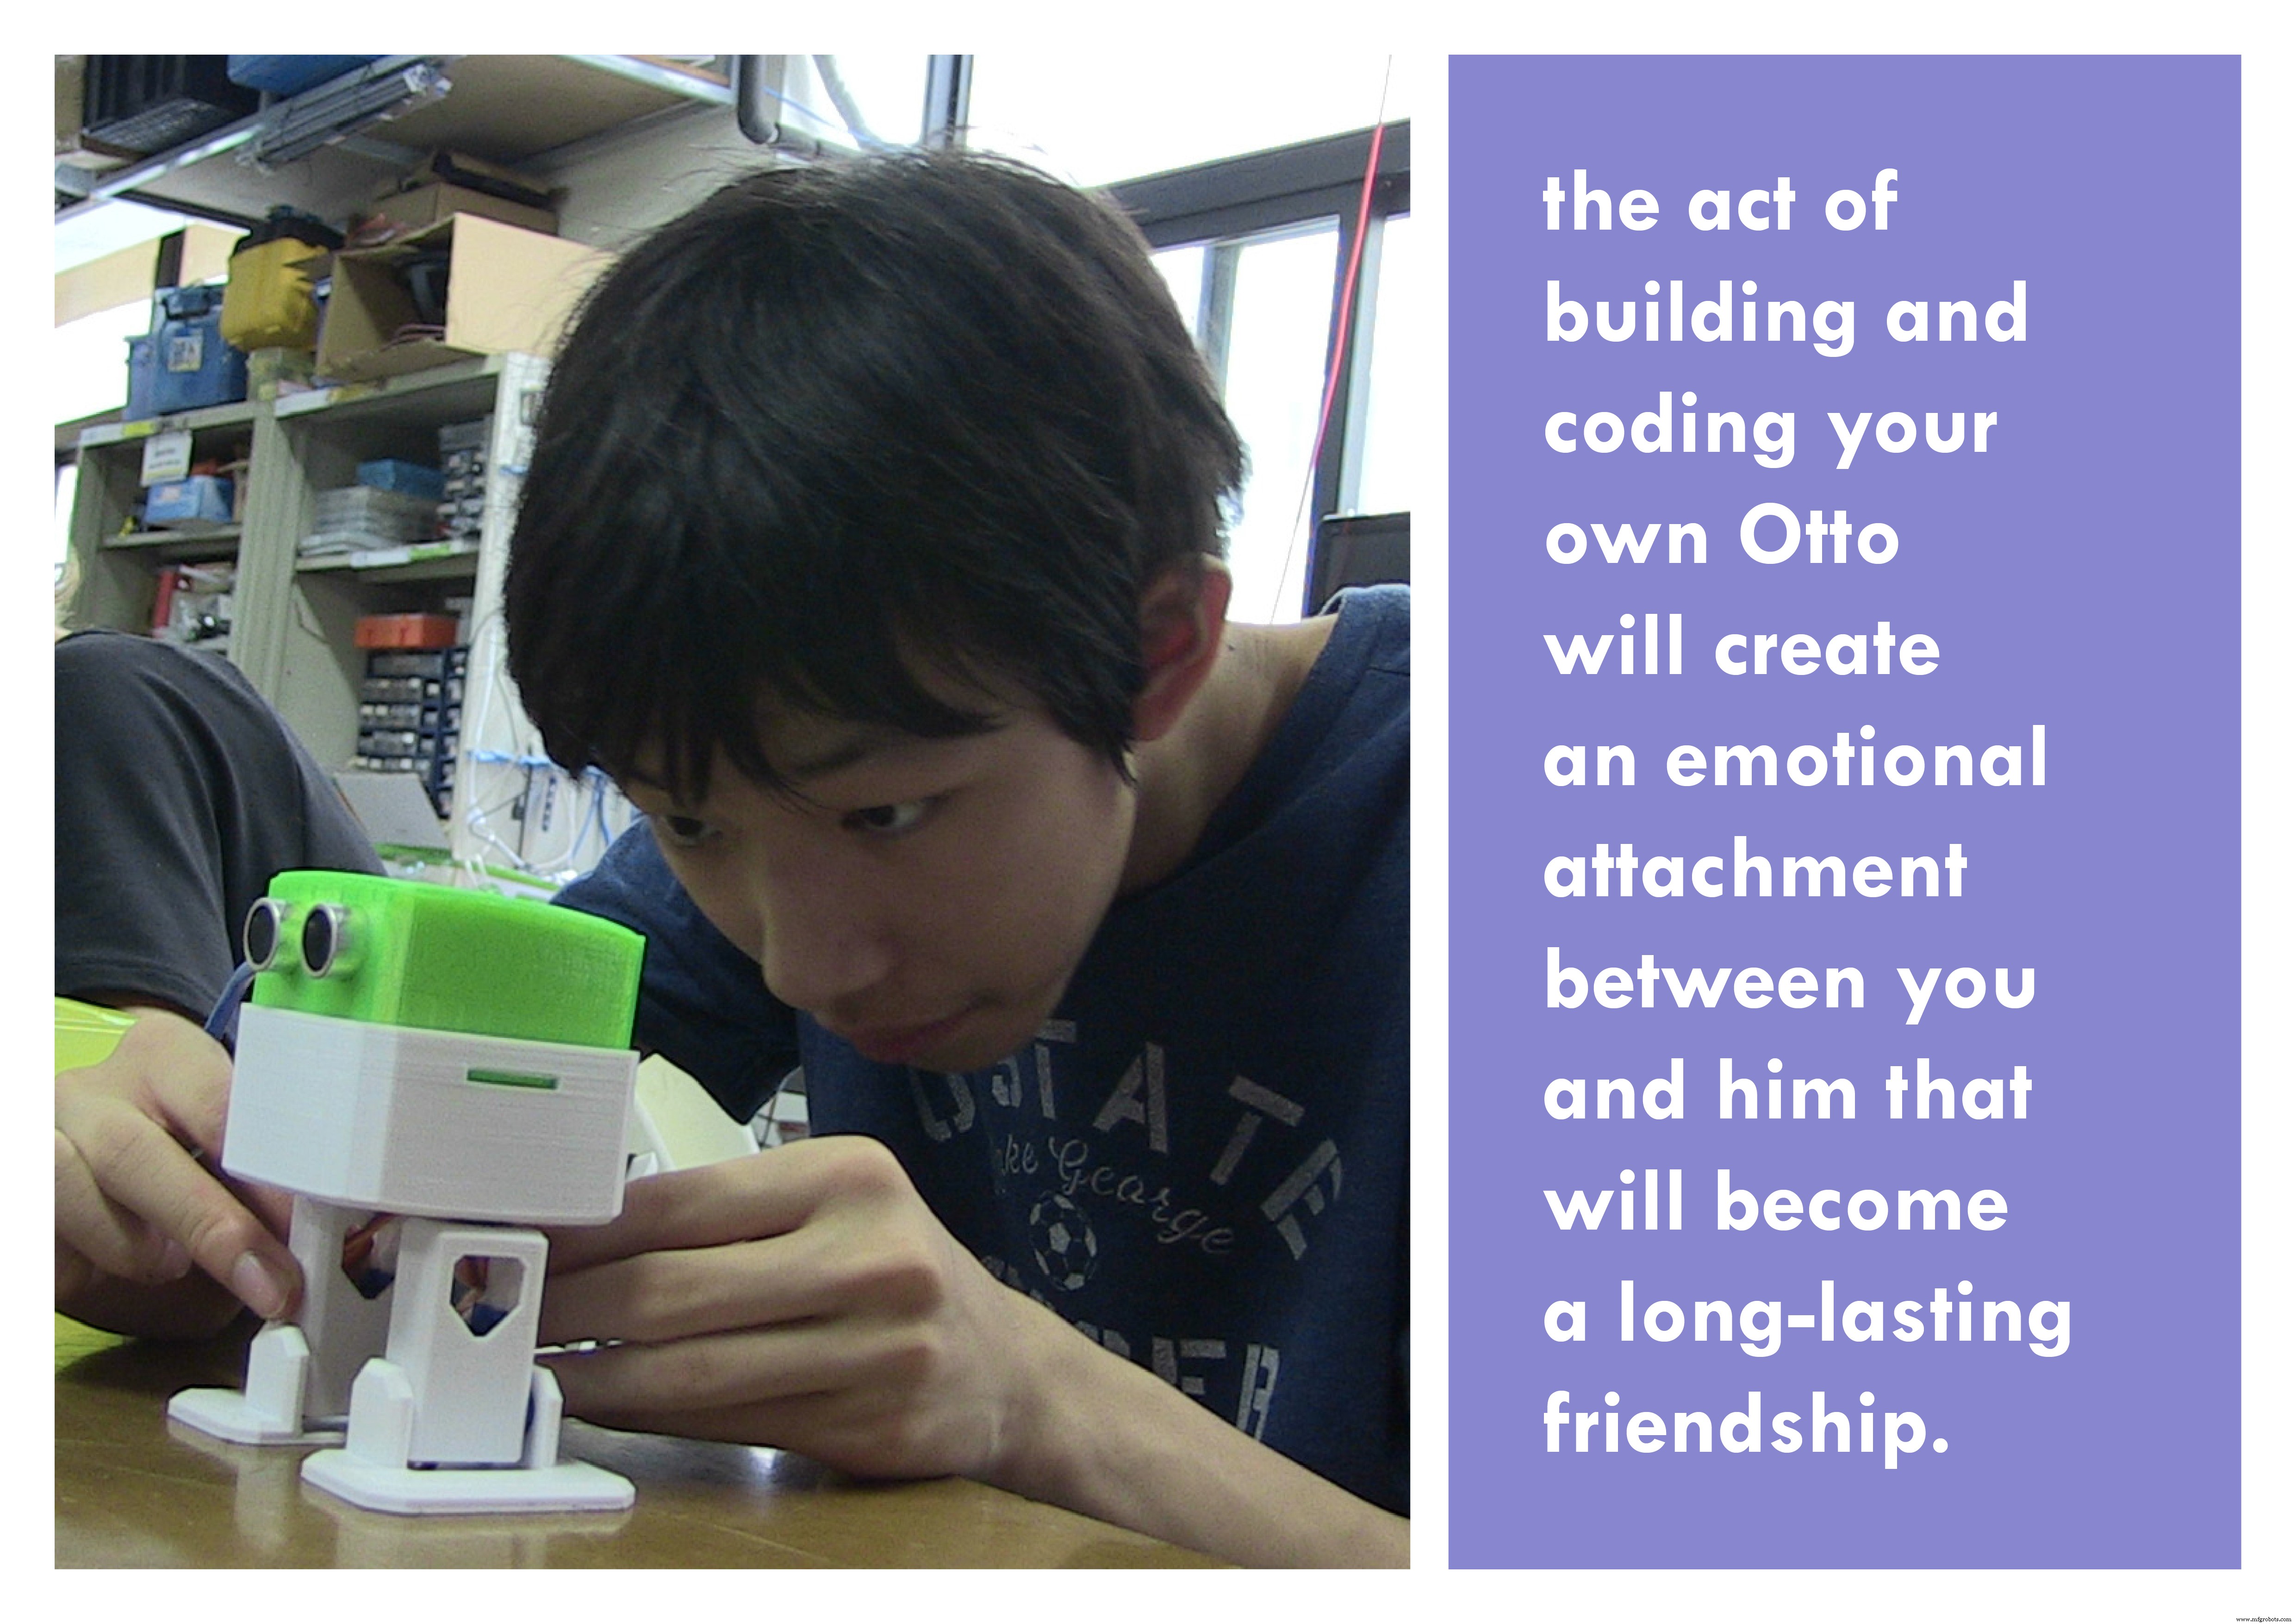
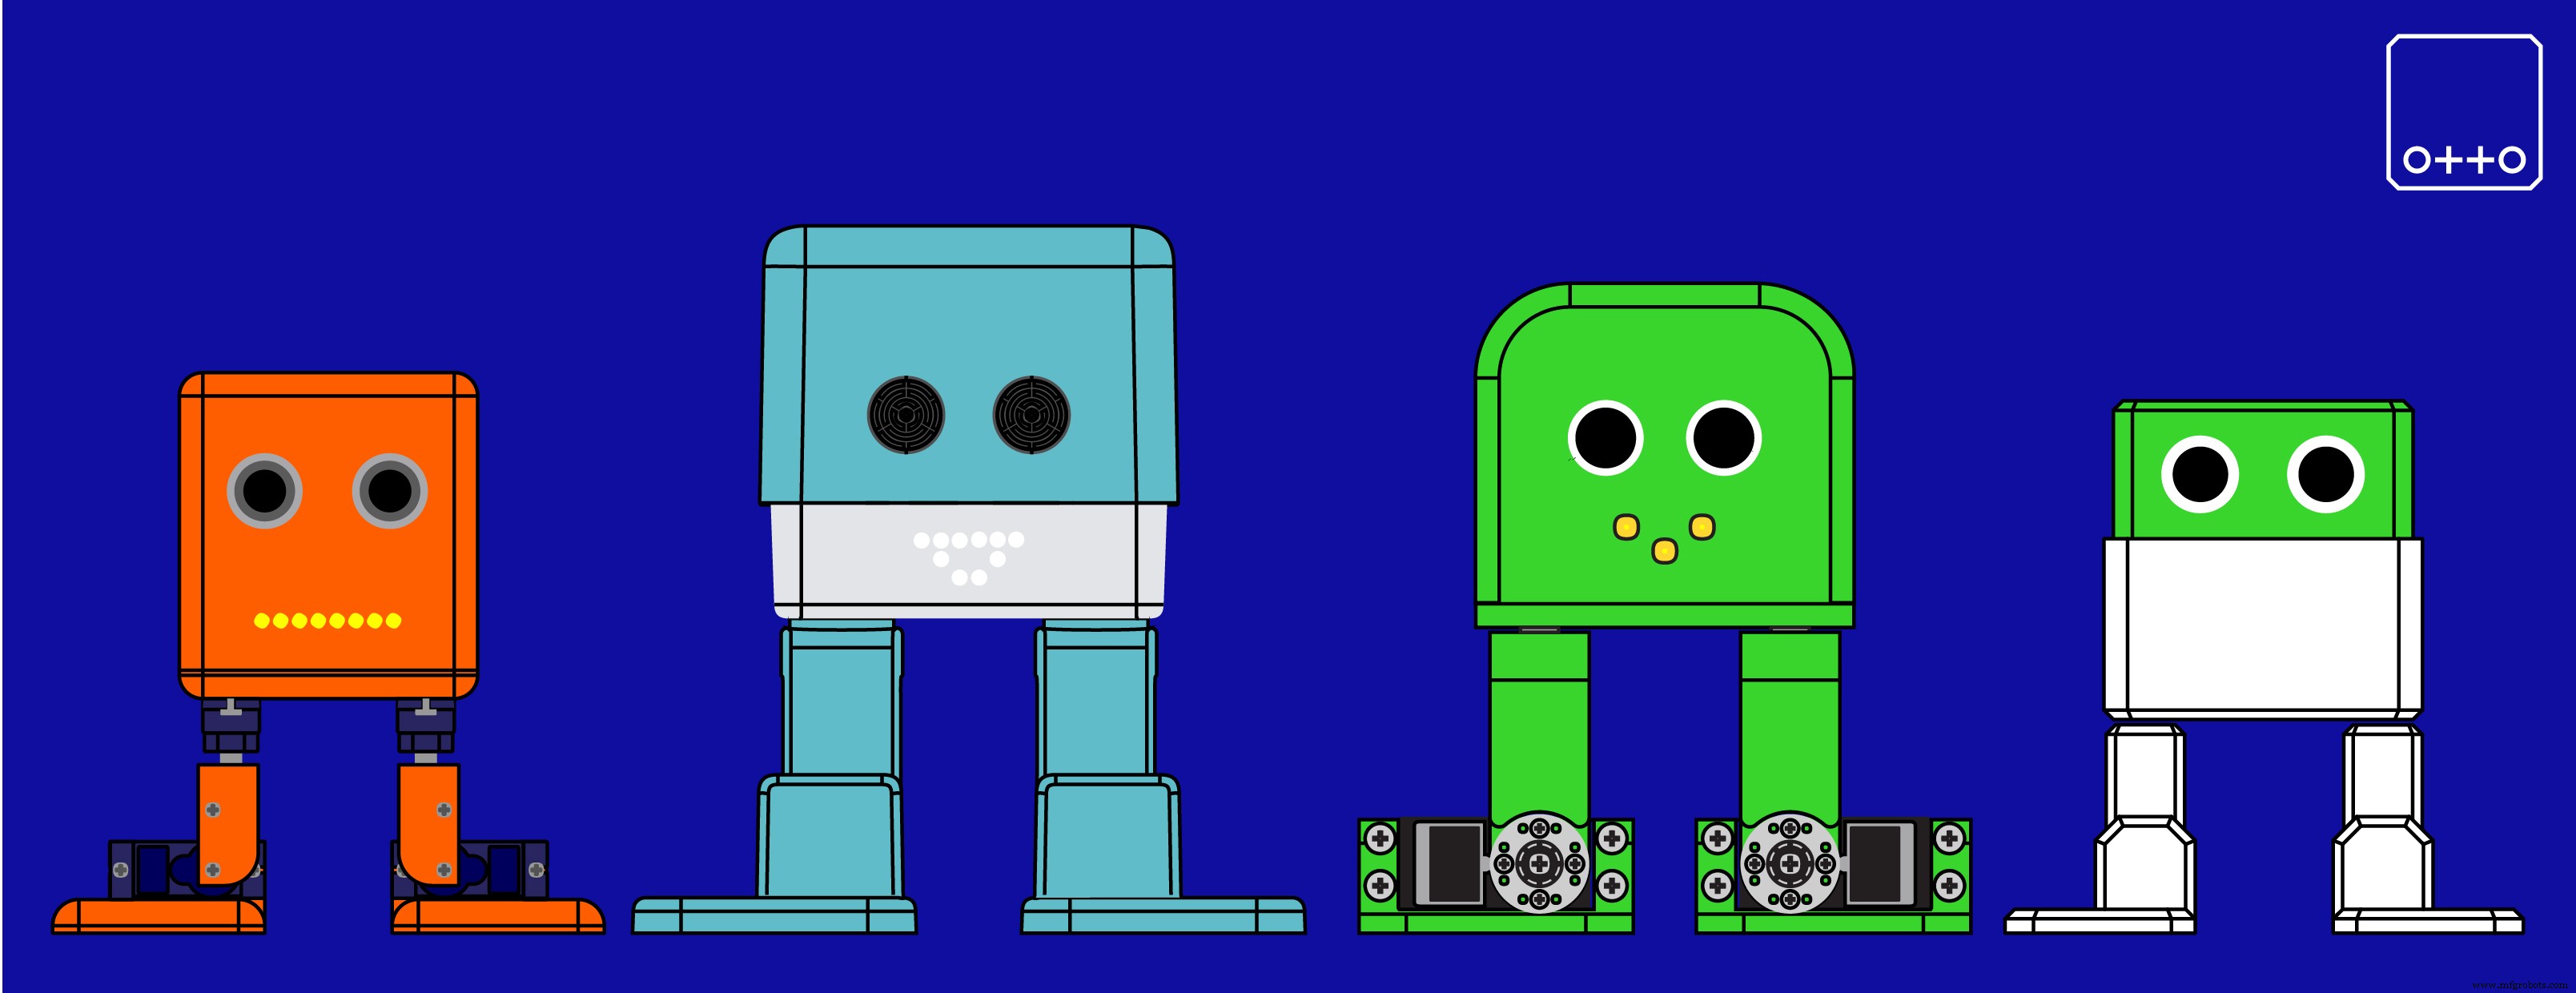
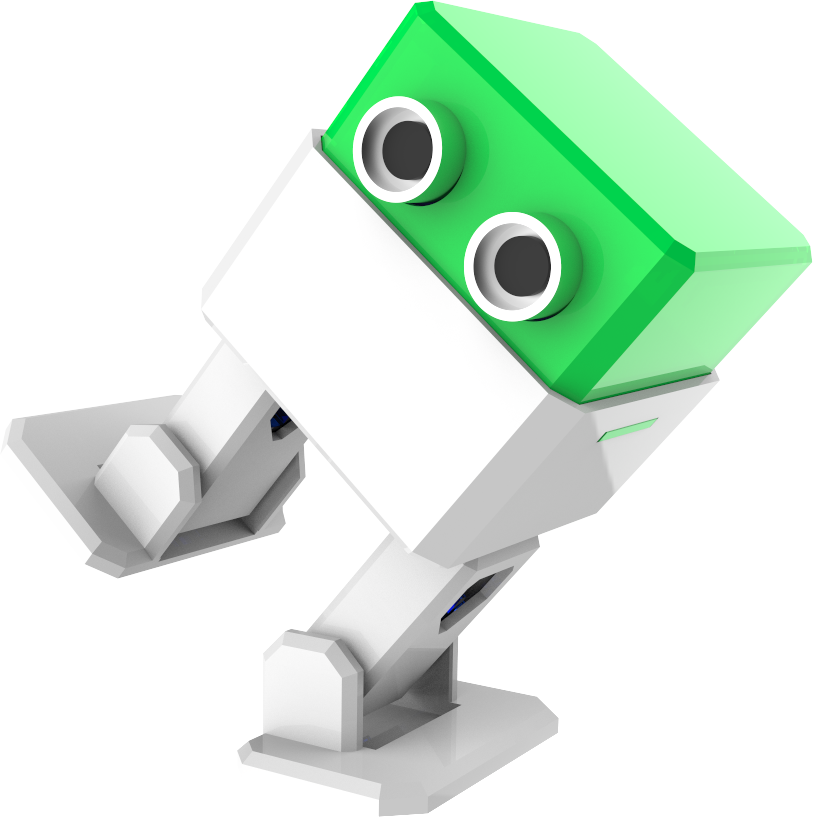
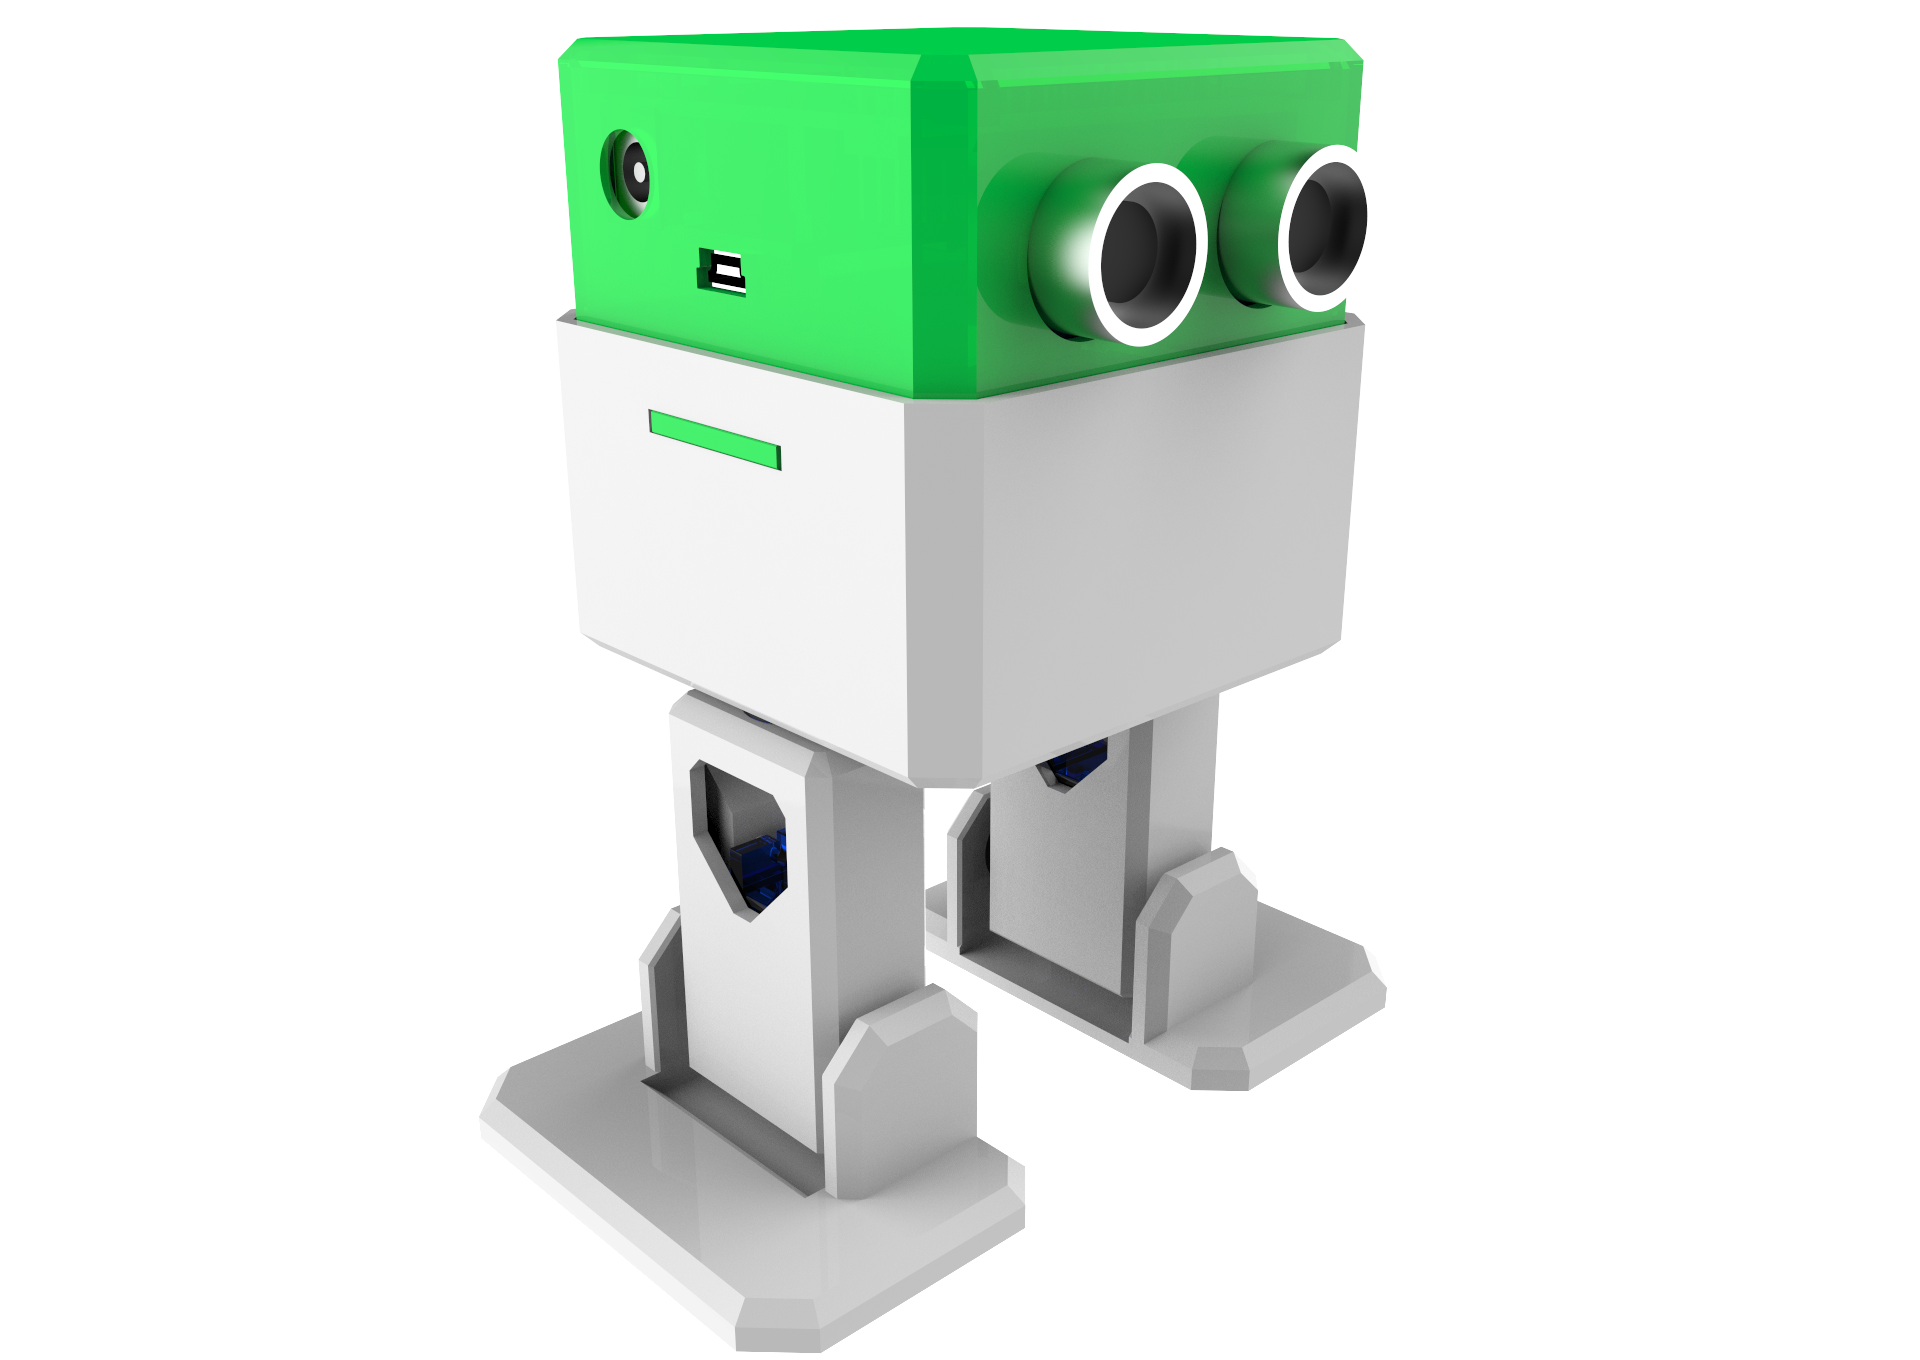
Who is Otto?
An interactive robot that anyone can make!
What can Otto do?
Otto walks, dances, makes sounds and avoids obstacles.
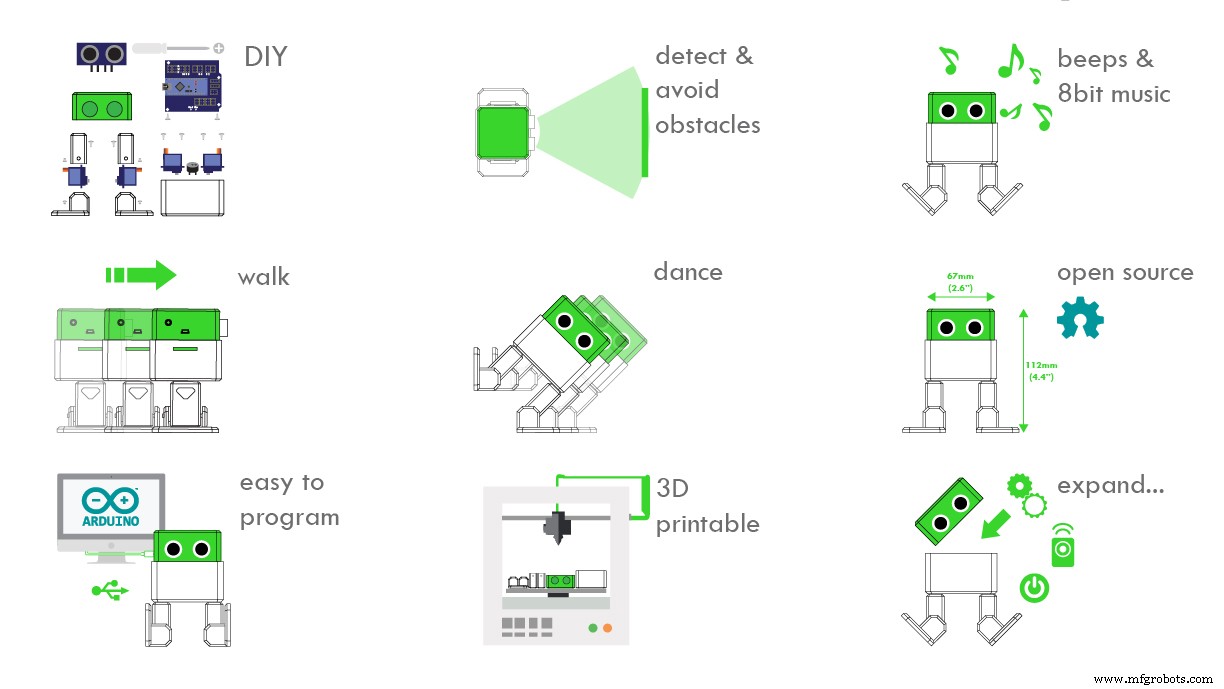
Why Is Otto special?
Otto is completely open source, Arduino compatible, 3D printable, and with a social impact mission to create an inclusive environment for kids.
Otto was inspired by another robot instructable BoB the BiPed and programmed using code from another open source biped robot called Zowi.
CC-BY-SA
Otto's differences are in the assembled size (11cm x 7cm x12cm), cleaner integration of components and expressions. Using off the shelf and 3D printed parts, simple electronics connections (almost no welding required), and basic coding skills, you will be able to build your own cute Otto friend in as little as one hour! or even less
Otto was design using Autodesk 123D Design, now ThinkerCAD software you can modify it for customization or further improvements!

This step by step focuses on how to build the Otto DIY simple version; yes, there are more advanced bipdeal robots like Otto DIY+ or Tito
Step 1: First gather all parts and tools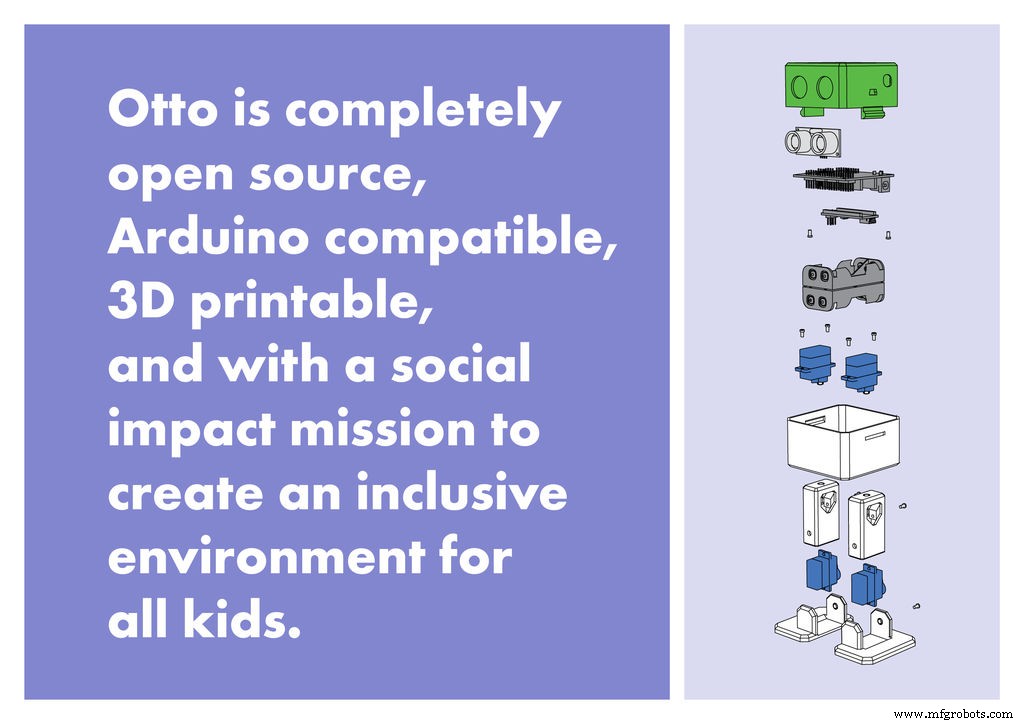
Gather all the off the shelf hardware parts that you'll need for this assembly.
mini bread board is an alternative for the shield but more wiring and time required
Then you only need to 3D print 6 parts in total:
11. 3D printed head.
12. 3D printed body.
13. 3D printed leg x2.
14. 3D printed foot x2
Optional: cutter for post cleaning the 3D parts (if the 3D print quality is good enough no need) and a soldering iron (if you want it battery power otherwise can still connect it through USB to energize)
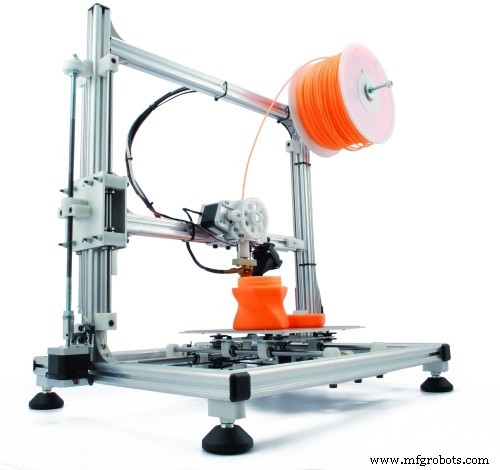
That's all simple!; download all .stl files, If you do not have a 3D printer you can always got to your local maker space.
If you don't have or is difficult to get the part you can just buy our full kits visit www.ottodiy.com
3D print settings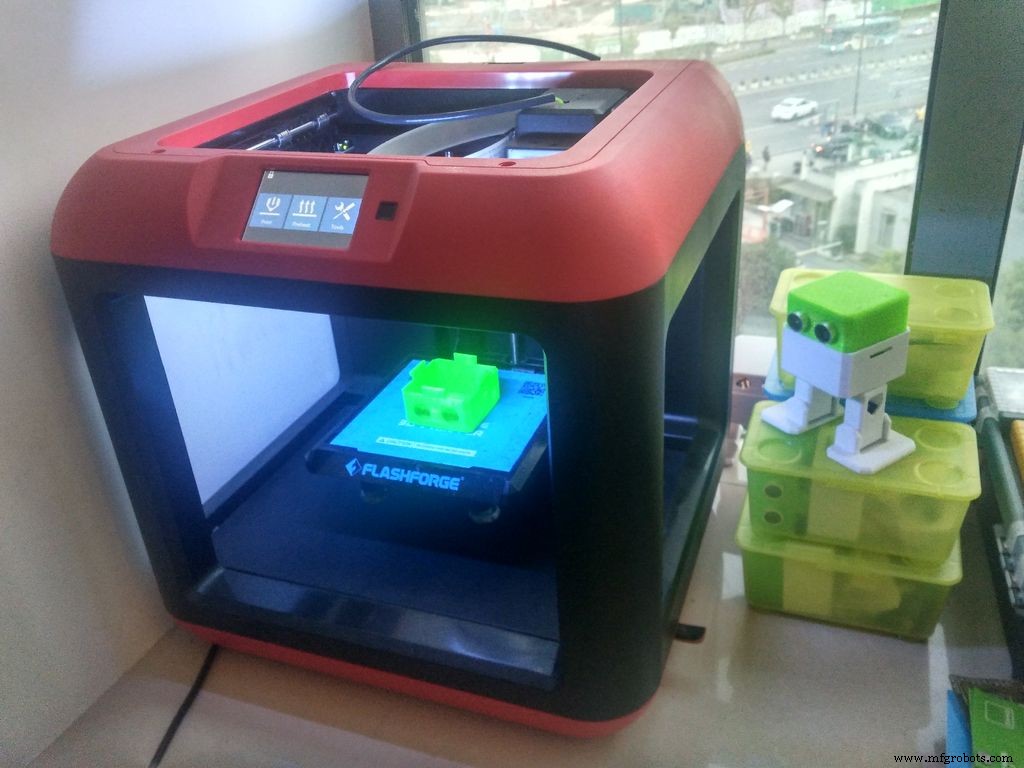
Otto is very well designed for 3D printing, the files that you had downloaded are property oriented and centered, so wont give you trouble if you follow this common parameters:
- Recommended to use a FDM 3D printer with PLA material.
- No need supports or rafts at all.
- Resolution: 0.15mm
- Fill density 20%
For slicing and generating the g code for the machine free slicer software like Cura or in our case FlashPrint that comes with the FlashForge Finder 3D printer that we are using (If you are outsourcing the printing no need to worry about it)
After printing you will need to clean a little bit the legs and feet areas that fix the motors.
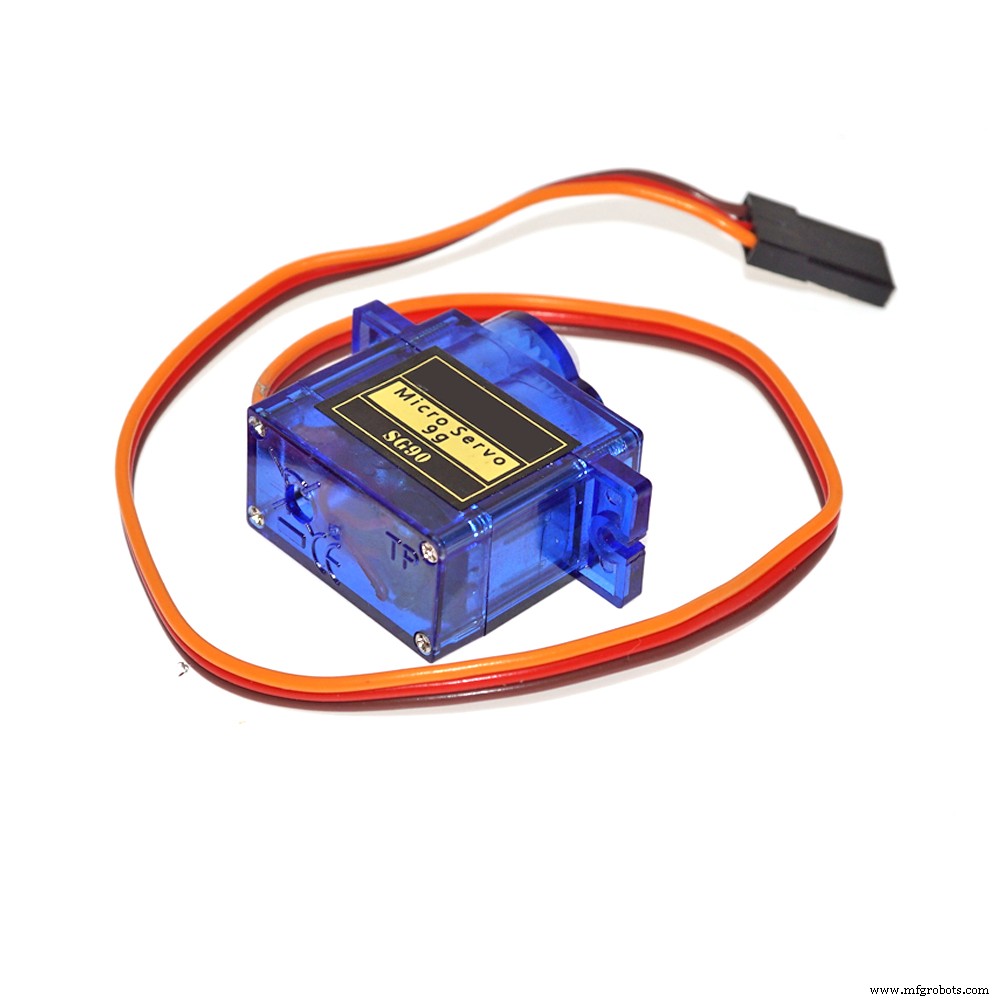
Check your partsAs mention in step 2, Micro servo motors come with 3 screws in the picture are now included and rearranged the parts number for easy reading.
Remember to have magnetized your mini screwdriver.
Download or print the instructions manuals or just follow this video:
Foot servos assemblyPut the micro servo inside feet and then push it inside, if is to hard maybe need to clean more the area with a cutter.
Is very important to check that the servo is able to rotate at least 90 degrees to each side.
After checking the movement use only the small screw to fix it.
Same process for the other foot.
Fix Servos to BodyTake the other 2 micro servos put them in the defined locations in the 3D printed body and fix them only with the pointed screws.
Fix Legs to BodyConnect the legs to the hub of the micro servo, important like the foot servos you must check the legs are able to rotate 90 degrees each side respect to the body.
After verifying the alignment fix them using the small screws to the hole inside the leg.
Fix Foot to LegsTaking care of the cables as showed in the illustration you should put the cables inside the slots of the body passing thought the hole of the legs.
Once they are in right position use the pointed screws to fix them from the back.
Head assemblyStart from the ultrasound sensor is important to pull out the eyes to the limit.
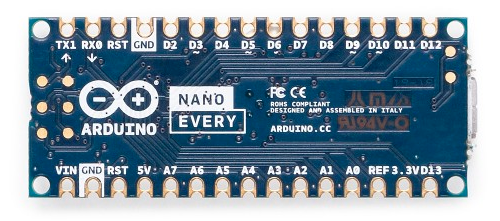
After putting the Arduino nano in the shield, optionally you can weld the battery holder positive cable to Vin in the board and negative to any GND.
Insert diagonally the both boards together facing the USB conector to the hole in the 3D printed head, then use the last 2 pointed screws to fix it.
Step 9: Electric connection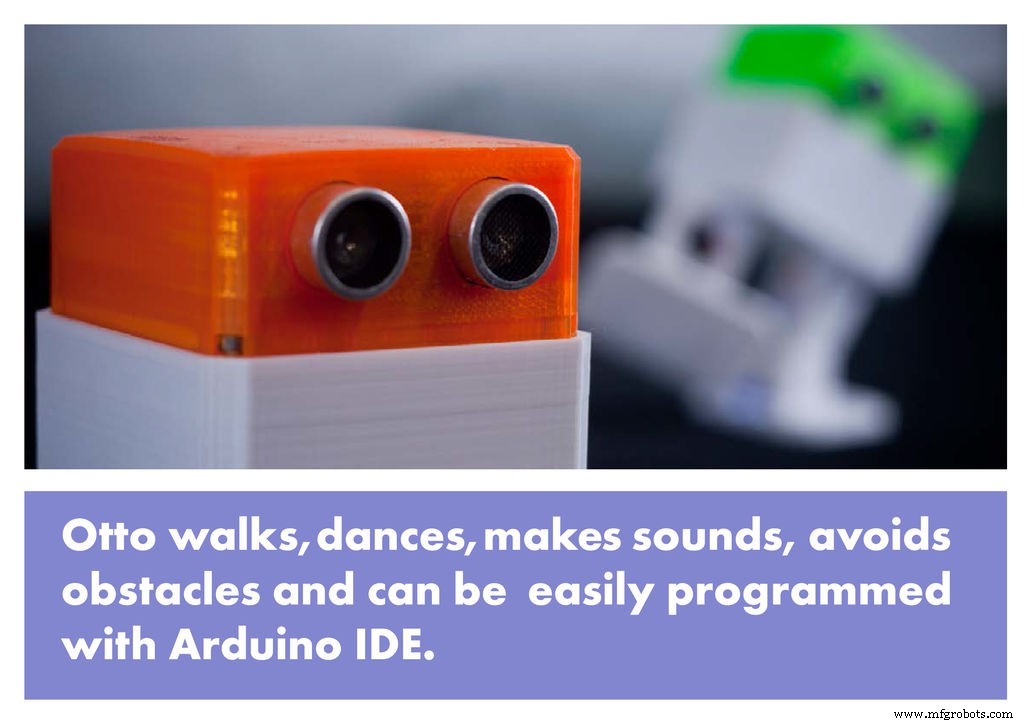
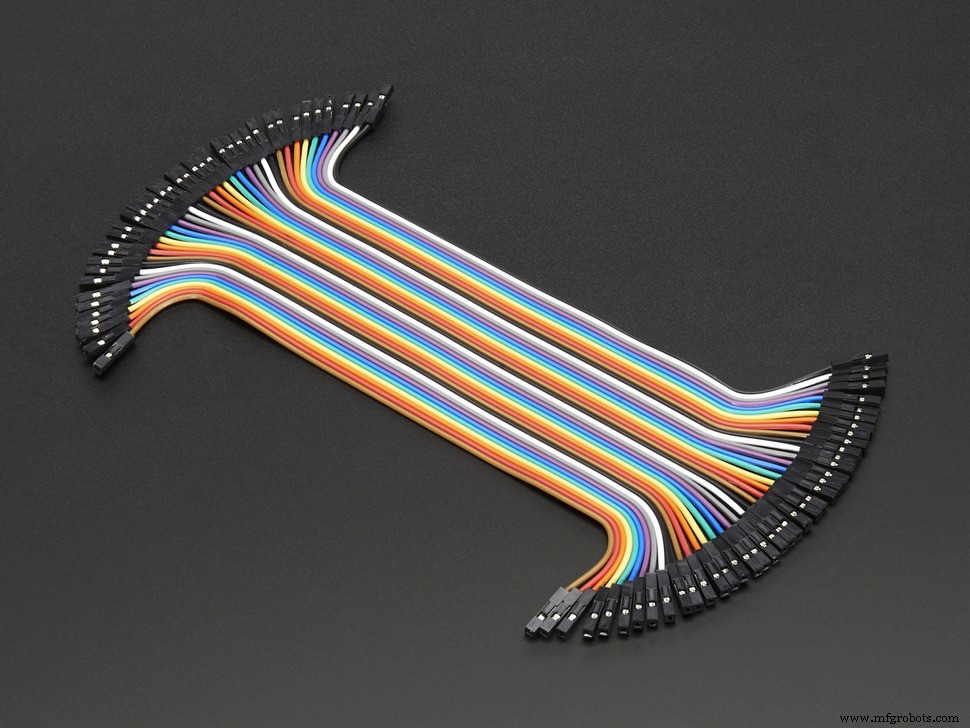
Prepare the DuPont cables, micro switch and buzzer.
Then follow the diagram pins numbers and make sure to put them in the right position.
If you don't have or find the Arduino Nano shield use a bread board and follow this circuit diagram TinkerCAD Circuits
Code with BlocksYou can always try the source Arduino codes from the Otto Wikifactory.
Here you can find some complimentary tutorials for beginners to quickly get started with Arduino for each component:
- Servo Motor Tutorial: https://arduinogetstarted.com/tutorials/arduino-servo-motor
- Ultrasonic Sensor Tutorial: https://arduinogetstarted.com/tutorials/arduino-ultrasonic-sensor
- Touch Sensor Tutorial: https://arduinogetstarted.com/tutorials/arduino-touch-sensor
- Buzzer Tutorial: https://arduinogetstarted.com/tutorials/arduino-piezo-buzzer
Visit www.ottodiy.com
Otto DIY+ version have more possibilities using Bluetooth, more sensors and interactions.
post your remix and modifications in the Wikifactory
Code
- Avoid obstacles
Avoid obstaclesArduino
Otto will walk endless until see an obstacle in the range, will be surprised, come back turn and then continue walking//----------------------------------------------------------------
//-- Zowi basic firmware v2 adapted to Otto
//-- (c) BQ. Released under a GPL licencse
//-- 04 December 2015
//-- Authors: Anita de Prado: ana.deprado@bq.com
//-- Jose Alberca: jose.alberca@bq.com
//-- Javier Isabel: javier.isabel@bq.com
//-- Juan Gonzalez (obijuan): juan.gonzalez@bq.com
//-- Irene Sanz : irene.sanz@bq.com
//-----------------------------------------------------------------
//-- Experiment with all the features that Otto has thanks to Zowi!
//-----------------------------------------------------------------
#include <Servo.h>
#include <Oscillator.h>
#include <EEPROM.h>
#include <BatReader.h>
#include <US.h>
#include <LedMatrix.h>
#include <EnableInterrupt.h>
#include <OttoSerialCommand.h>
OttoSerialCommand SCmd; //The SerialCommand object
//-- Otto Library
#include <Otto.h>
Otto Otto; //This is Otto!
//---------------------------------------------------------
//-- First step: Configure the pins where the servos are attached
/*
---------------
| O O |
|---------------|
YR 3==> | | <== YL 2
---------------
|| ||
|| ||
RR 5==> ----- ------ <== RL 4
|----- ------|
*/
#define PIN_YL 2 //servo[0]
#define PIN_YR 3 //servo[1]
#define PIN_RL 4 //servo[2]
#define PIN_RR 5 //servo[3]
//---Otto Buttons
#define PIN_SecondButton 6
#define PIN_ThirdButton 7
///////////////////////////////////////////////////////////////////
//-- Global Variables -------------------------------------------//
///////////////////////////////////////////////////////////////////
const char programID[]="Otto_todo"; //Each program will have a ID
const char name_fac='$'; //Factory name
const char name_fir='#'; //First name
//-- Movement parameters
int T=1000; //Initial duration of movement
int moveId=0; //Number of movement
int moveSize=15; //Asociated with the height of some movements
//---------------------------------------------------------
//-- Otto has 5 modes:
//-- * MODE = 0: Otto is awaiting
//-- * MODE = 1: Dancing mode!
//-- * MODE = 2: Obstacle detector mode
//-- * MODE = 3: Noise detector mode
//-- * MODE = 4: OttoPAD or any Teleoperation mode (listening SerialPort).
//---------------------------------------------------------
volatile int MODE=0; //State of Otto in the principal state machine.
volatile bool buttonPushed=false; //Variable to remember when a button has been pushed
volatile bool buttonAPushed=false; //Variable to remember when A button has been pushed
volatile bool buttonBPushed=false; //Variable to remember when B button has been pushed
unsigned long previousMillis=0;
int randomDance=0;
int randomSteps=0;
bool obstacleDetected = false;
///////////////////////////////////////////////////////////////////
//-- Setup ------------------------------------------------------//
///////////////////////////////////////////////////////////////////
void setup(){
//Serial communication initialization
Serial.begin(115200);
pinMode(PIN_SecondButton,INPUT);
pinMode(PIN_ThirdButton,INPUT);
//Set the servo pins
Otto.init(PIN_YL,PIN_YR,PIN_RL,PIN_RR,true);
//Uncomment this to set the servo trims manually and save on EEPROM
//Otto.setTrims(TRIM_YL, TRIM_YR, TRIM_RL, TRIM_RR);
//Otto.saveTrimsOnEEPROM(); //Uncomment this only for one upload when you finaly set the trims.
//Set a random seed
randomSeed(analogRead(A6));
//Interrumptions
enableInterrupt(PIN_SecondButton, secondButtonPushed, RISING);
enableInterrupt(PIN_ThirdButton, thirdButtonPushed, RISING);
//Setup callbacks for SerialCommand commands
SCmd.addCommand("S", receiveStop); // sendAck & sendFinalAck
SCmd.addCommand("L", receiveLED); // sendAck & sendFinalAck
SCmd.addCommand("T", recieveBuzzer); // sendAck & sendFinalAck
SCmd.addCommand("M", receiveMovement); // sendAck & sendFinalAck
SCmd.addCommand("H", receiveGesture); // sendAck & sendFinalAck
SCmd.addCommand("K", receiveSing); // sendAck & sendFinalAck
SCmd.addCommand("C", receiveTrims); // sendAck & sendFinalAck
SCmd.addCommand("G", receiveServo); // sendAck & sendFinalAck
SCmd.addCommand("D", requestDistance);
SCmd.addCommand("N", requestNoise);
SCmd.addCommand("B", requestBattery);
SCmd.addCommand("I", requestProgramId);
SCmd.addDefaultHandler(receiveStop);
//Otto wake up!
Otto.sing(S_connection);
Otto.home();
delay(50);
// Animation Uuuuuh - A little moment of initial surprise
//-----
for(int i=0; i<2; i++){
for (int i=0;i<8;i++){
if(buttonPushed){break;}
Otto.putAnimationMouth(littleUuh,i);
delay(150);
}
}
//-----
//Smile for a happy Otto :)
if(!buttonPushed){
Otto.putMouth(smile);
Otto.sing(S_happy);
delay(200);
}
//If Otto's name is '#' means that Otto hasn't been baptized
//In this case, Otto does a longer greeting
//5 = EEPROM address that contains first name character
if (EEPROM.read(5)==name_fir){
if(!buttonPushed){
Otto.jump(1,700);
delay(200);
}
if(!buttonPushed){
Otto.shakeLeg(1,T,1);
}
if(!buttonPushed){
Otto.putMouth(smallSurprise);
Otto.swing(2,800,20);
Otto.home();
}
}
if(!buttonPushed){
Otto.putMouth(happyOpen);
}
previousMillis = millis();
}
///////////////////////////////////////////////////////////////////
//-- Principal Loop ---------------------------------------------//
///////////////////////////////////////////////////////////////////
void loop() {
//-- MODE 2 - Obstacle detector mode
if(obstacleDetected){
Otto.sing(S_surprise);
Otto.playGesture(OttoFretful);
Otto.sing(S_fart3);
Otto.walk(2,1300,-1);
Otto.turn(2,1000,-1);
delay(50);
obstacleDetector();
}
else{
Otto.walk(1,1000,1);
obstacleDetector();
}
}
///////////////////////////////////////////////////////////////////
//-- Functions --------------------------------------------------//
///////////////////////////////////////////////////////////////////
//-- Function executed when second button is pushed
void secondButtonPushed(){
buttonAPushed=true;
if(!buttonPushed){
buttonPushed=true;
Otto.putMouth(smallSurprise);
}
}
//-- Function executed when third button is pushed
void thirdButtonPushed(){
buttonBPushed=true;
if(!buttonPushed){
buttonPushed=true;
Otto.putMouth(smallSurprise);
}
}
//-- Function to read distance sensor & to actualize obstacleDetected variable
void obstacleDetector(){
int distance = Otto.getDistance();
if(distance<15){
obstacleDetected = true;
}else{
obstacleDetected = false;
}
}
//-- Function to receive Stop command.
void receiveStop(){
sendAck();
Otto.home();
sendFinalAck();
}
//-- Function to receive LED commands
void receiveLED(){
//sendAck & stop if necessary
sendAck();
Otto.home();
//Examples of receiveLED Bluetooth commands
//L 000000001000010100100011000000000
//L 001111111111111111111111111111111 (todos los LED encendidos)
unsigned long int matrix;
char *arg;
char *endstr;
arg=SCmd.next();
//Serial.println (arg);
if (arg != NULL) {
matrix=strtoul(arg,&endstr,2); // Converts a char string to unsigned long integer
Otto.putMouth(matrix,false);
}else{
Otto.putMouth(xMouth);
delay(2000);
Otto.clearMouth();
}
sendFinalAck();
}
//-- Function to receive buzzer commands
void recieveBuzzer(){
//sendAck & stop if necessary
sendAck();
Otto.home();
bool error = false;
int frec;
int duration;
char *arg;
arg = SCmd.next();
if (arg != NULL) { frec=atoi(arg); } // Converts a char string to an integer
else {error=true;}
arg = SCmd.next();
if (arg != NULL) { duration=atoi(arg); } // Converts a char string to an integer
else {error=true;}
if(error==true){
Otto.putMouth(xMouth);
delay(2000);
Otto.clearMouth();
}else{
Otto._tone(frec, duration, 1);
}
sendFinalAck();
}
//-- Function to receive TRims commands
void receiveTrims(){
//sendAck & stop if necessary
sendAck();
Otto.home();
int trim_YL,trim_YR,trim_RL,trim_RR;
//Definition of Servo Bluetooth command
//C trim_YL trim_YR trim_RL trim_RR
//Examples of receiveTrims Bluetooth commands
//C 20 0 -8 3
bool error = false;
char *arg;
arg=SCmd.next();
if (arg != NULL) { trim_YL=atoi(arg); } // Converts a char string to an integer
else {error=true;}
arg = SCmd.next();
if (arg != NULL) { trim_YR=atoi(arg); } // Converts a char string to an integer
else {error=true;}
arg = SCmd.next();
if (arg != NULL) { trim_RL=atoi(arg); } // Converts a char string to an integer
else {error=true;}
arg = SCmd.next();
if (arg != NULL) { trim_RR=atoi(arg); } // Converts a char string to an integer
else {error=true;}
if(error==true){
Otto.putMouth(xMouth);
delay(2000);
Otto.clearMouth();
}else{ //Save it on EEPROM
Otto.setTrims(trim_YL, trim_YR, trim_RL, trim_RR);
Otto.saveTrimsOnEEPROM(); //Uncomment this only for one upload when you finaly set the trims.
}
sendFinalAck();
}
//-- Function to receive Servo commands
void receiveServo(){
sendAck();
moveId = 30;
//Definition of Servo Bluetooth command
//G servo_YL servo_YR servo_RL servo_RR
//Example of receiveServo Bluetooth commands
//G 90 85 96 78
bool error = false;
char *arg;
int servo_YL,servo_YR,servo_RL,servo_RR;
arg=SCmd.next();
if (arg != NULL) { servo_YL=atoi(arg); } // Converts a char string to an integer
else {error=true;}
arg = SCmd.next();
if (arg != NULL) { servo_YR=atoi(arg); } // Converts a char string to an integer
else {error=true;}
arg = SCmd.next();
if (arg != NULL) { servo_RL=atoi(arg); } // Converts a char string to an integer
else {error=true;}
arg = SCmd.next();
if (arg != NULL) { servo_RR=atoi(arg); } // Converts a char string to an integer
else {error=true;}
if(error==true){
Otto.putMouth(xMouth);
delay(2000);
Otto.clearMouth();
}else{ //Update Servo:
int servoPos[4]={servo_YL, servo_YR, servo_RL, servo_RR};
Otto._moveServos(200, servoPos); //Move 200ms
}
sendFinalAck();
}
//-- Function to receive movement commands
void receiveMovement(){
sendAck();
if (Otto.getRestState()==true){
Otto.setRestState(false);
}
//Definition of Movement Bluetooth commands
//M MoveID T MoveSize
char *arg;
arg = SCmd.next();
if (arg != NULL) {moveId=atoi(arg);}
else{
Otto.putMouth(xMouth);
delay(2000);
Otto.clearMouth();
moveId=0; //stop
}
arg = SCmd.next();
if (arg != NULL) {T=atoi(arg);}
else{
T=1000;
}
arg = SCmd.next();
if (arg != NULL) {moveSize=atoi(arg);}
else{
moveSize =15;
}
}
//-- Function to execute the right movement according the movement command received.
void move(int moveId){
bool manualMode = false;
switch (moveId) {
case 0:
Otto.home();
break;
case 1: //M 1 1000
Otto.walk(1,T,1);
break;
case 2: //M 2 1000
Otto.walk(1,T,-1);
break;
case 3: //M 3 1000
Otto.turn(1,T,1);
break;
case 4: //M 4 1000
Otto.turn(1,T,-1);
break;
case 5: //M 5 1000 30
Otto.updown(1,T,moveSize);
break;
case 6: //M 6 1000 30
Otto.moonwalker(1,T,moveSize,1);
break;
case 7: //M 7 1000 30
Otto.moonwalker(1,T,moveSize,-1);
break;
case 8: //M 8 1000 30
Otto.swing(1,T,moveSize);
break;
case 9: //M 9 1000 30
Otto.crusaito(1,T,moveSize,1);
break;
case 10: //M 10 1000 30
Otto.crusaito(1,T,moveSize,-1);
break;
case 11: //M 11 1000
Otto.jump(1,T);
break;
case 12: //M 12 1000 30
Otto.flapping(1,T,moveSize,1);
break;
case 13: //M 13 1000 30
Otto.flapping(1,T,moveSize,-1);
break;
case 14: //M 14 1000 20
Otto.tiptoeSwing(1,T,moveSize);
break;
case 15: //M 15 500
Otto.bend(1,T,1);
break;
case 16: //M 16 500
Otto.bend(1,T,-1);
break;
case 17: //M 17 500
Otto.shakeLeg(1,T,1);
break;
case 18: //M 18 500
Otto.shakeLeg(1,T,-1);
break;
case 19: //M 19 500 20
Otto.jitter(1,T,moveSize);
break;
case 20: //M 20 500 15
Otto.ascendingTurn(1,T,moveSize);
break;
default:
manualMode = true;
break;
}
if(!manualMode){
sendFinalAck();
}
}
//-- Function to receive gesture commands
void receiveGesture(){
//sendAck & stop if necessary
sendAck();
Otto.home();
//Definition of Gesture Bluetooth commands
//H GestureID
int gesture = 0;
char *arg;
arg = SCmd.next();
if (arg != NULL) {gesture=atoi(arg);}
else
{
Otto.putMouth(xMouth);
delay(2000);
Otto.clearMouth();
}
switch (gesture) {
case 1: //H 1
Otto.playGesture(OttoHappy);
break;
case 2: //H 2
Otto.playGesture(OttoSuperHappy);
break;
case 3: //H 3
Otto.playGesture(OttoSad);
break;
case 4: //H 4
Otto.playGesture(OttoSleeping);
break;
case 5: //H 5
Otto.playGesture(OttoFart);
break;
case 6: //H 6
Otto.playGesture(OttoConfused);
break;
case 7: //H 7
Otto.playGesture(OttoLove);
break;
case 8: //H 8
Otto.playGesture(OttoAngry);
break;
case 9: //H 9
Otto.playGesture(OttoFretful);
break;
case 10: //H 10
Otto.playGesture(OttoMagic);
break;
case 11: //H 11
Otto.playGesture(OttoWave);
break;
case 12: //H 12
Otto.playGesture(OttoVictory);
break;
case 13: //H 13
Otto.playGesture(OttoFail);
break;
default:
break;
}
sendFinalAck();
}
//-- Function to receive sing commands
void receiveSing(){
//sendAck & stop if necessary
sendAck();
Otto.home();
//Definition of Sing Bluetooth commands
//K SingID
int sing = 0;
char *arg;
arg = SCmd.next();
if (arg != NULL) {sing=atoi(arg);}
else
{
Otto.putMouth(xMouth);
delay(2000);
Otto.clearMouth();
}
switch (sing) {
case 1: //K 1
Otto.sing(S_connection);
break;
case 2: //K 2
Otto.sing(S_disconnection);
break;
case 3: //K 3
Otto.sing(S_surprise);
break;
case 4: //K 4
Otto.sing(S_OhOoh);
break;
case 5: //K 5
Otto.sing(S_OhOoh2);
break;
case 6: //K 6
Otto.sing(S_cuddly);
break;
case 7: //K 7
Otto.sing(S_sleeping);
break;
case 8: //K 8
Otto.sing(S_happy);
break;
case 9: //K 9
Otto.sing(S_superHappy);
break;
case 10: //K 10
Otto.sing(S_happy_short);
break;
case 11: //K 11
Otto.sing(S_sad);
break;
case 12: //K 12
Otto.sing(S_confused);
break;
case 13: //K 13
Otto.sing(S_fart1);
break;
case 14: //K 14
Otto.sing(S_fart2);
break;
case 15: //K 15
Otto.sing(S_fart3);
break;
case 16: //K 16
Otto.sing(S_mode1);
break;
case 17: //K 17
Otto.sing(S_mode2);
break;
case 18: //K 18
Otto.sing(S_mode3);
break;
case 19: //K 19
Otto.sing(S_buttonPushed);
break;
default:
break;
}
sendFinalAck();
}
//-- Function to send ultrasonic sensor measure (distance in "cm")
void requestDistance(){
Otto.home(); //stop if necessary
int distance = Otto.getDistance();
Serial.print(F("&&"));
Serial.print(F("D "));
Serial.print(distance);
Serial.println(F("%%"));
Serial.flush();
}
//-- Function to send noise sensor measure
void requestNoise(){
Otto.home(); //stop if necessary
int microphone= Otto.getNoise(); //analogRead(PIN_NoiseSensor);
Serial.print(F("&&"));
Serial.print(F("N "));
Serial.print(microphone);
Serial.println(F("%%"));
Serial.flush();
}
//-- Function to send battery voltage percent
void requestBattery(){
Otto.home(); //stop if necessary
//The first read of the batery is often a wrong reading, so we will discard this value.
double batteryLevel = Otto.getBatteryLevel();
Serial.print(F("&&"));
Serial.print(F("B "));
Serial.print(batteryLevel);
Serial.println(F("%%"));
Serial.flush();
}
//-- Function to send program ID
void requestProgramId(){
Otto.home(); //stop if necessary
Serial.print(F("&&"));
Serial.print(F("I "));
Serial.print(programID);
Serial.println(F("%%"));
Serial.flush();
}
//-- Function to send Ack comand (A)
void sendAck(){
delay(30);
Serial.print(F("&&"));
Serial.print(F("A"));
Serial.println(F("%%"));
Serial.flush();
}
//-- Function to send final Ack comand (F)
void sendFinalAck(){
delay(30);
Serial.print(F("&&"));
Serial.print(F("F"));
Serial.println(F("%%"));
Serial.flush();
}
//-- Functions with animatics
//--------------------------------------------------------
void OttoLowBatteryAlarm(){
double batteryLevel = Otto.getBatteryLevel();
if(batteryLevel<45){
while(!buttonPushed){
Otto.putMouth(thunder);
Otto.bendTones (880, 2000, 1.04, 8, 3); //A5 = 880
delay(30);
Otto.bendTones (2000, 880, 1.02, 8, 3); //A5 = 880
Otto.clearMouth();
delay(500);
}
}
}
void OttoSleeping_withInterrupts(){
int bedPos_0[4]={100, 80, 60, 120};
if(!buttonPushed){
Otto._moveServos(700, bedPos_0);
}
for(int i=0; i<4;i++){
if(buttonPushed){break;}
Otto.putAnimationMouth(dreamMouth,0);
Otto.bendTones (100, 200, 1.04, 10, 10);
if(buttonPushed){break;}
Otto.putAnimationMouth(dreamMouth,1);
Otto.bendTones (200, 300, 1.04, 10, 10);
if(buttonPushed){break;}
Otto.putAnimationMouth(dreamMouth,2);
Otto.bendTones (300, 500, 1.04, 10, 10);
delay(500);
if(buttonPushed){break;}
Otto.putAnimationMouth(dreamMouth,1);
Otto.bendTones (400, 250, 1.04, 10, 1);
if(buttonPushed){break;}
Otto.putAnimationMouth(dreamMouth,0);
Otto.bendTones (250, 100, 1.04, 10, 1);
delay(500);
}
if(!buttonPushed){
Otto.putMouth(lineMouth);
Otto.sing(S_cuddly);
}
Otto.home();
if(!buttonPushed){Otto.putMouth(happyOpen);}
}
Arduino source
Install first these Librarieshttps://github.com/OttoDIY/DIYCustom parts and enclosures
Thingiverse .STL 3D printable files
3D print parts to use in the building process of Otto.CAD file on thingiverse.comSchematics
Servos, ultrasound sensor , buzzer and battery connections, follow the cables. use the DuPont cables.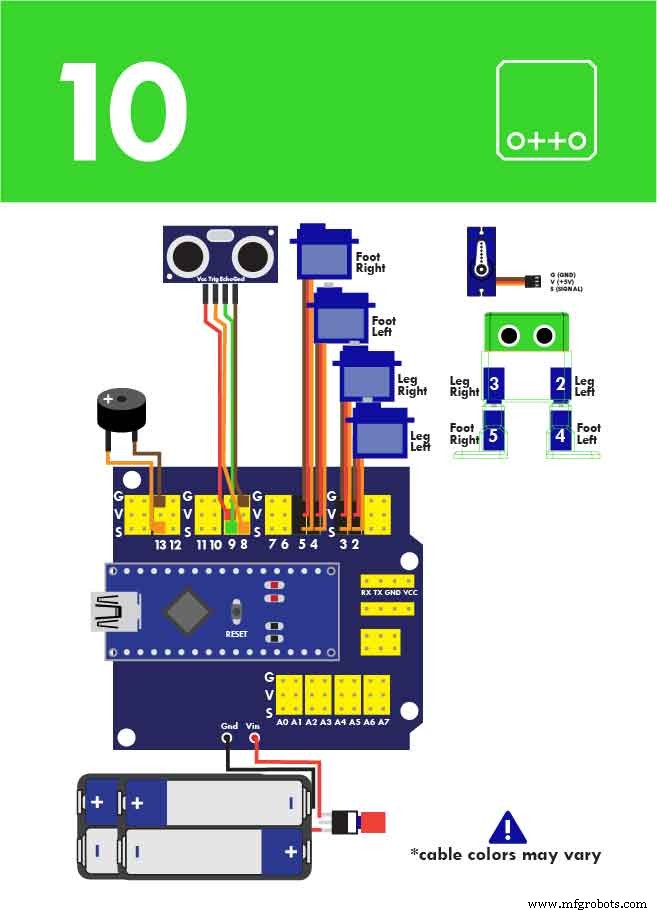
Manufacturing process
- DIY Thermocam: From Classroom Idea to Global Product
- Build Custom Object Sensors for LEGO Mindstorms EV3: DIY Light‑Based “Eyes”
- Build a DIY Google Voice HAT for Your Raspberry Pi
- Build an Internet‑Controlled Video‑Streaming Robot with Arduino & Raspberry Pi
- MeArm Robot Arm V1.0 – Build Your Arduino & Raspberry Pi-Powered Robotic Arm
- Otto DIY+ Arduino Bluetooth Robot – Easy 3D‑Print Build Kit
- Build a DIY SCARA Robot with Arduino – Step‑by‑Step Guide
- DIY LED Heat Sink: Build a Professional-Grade Cooling Solution
- Build Your Own Raspberry Pi Robot: A Beginner‑Friendly Guide
- Build Your Own Low-Cost Thermal Imaging Camera: A DIY Guide