


Smoke Detectors: Life‑Saving Technology, History, and Modern Innovations
Background
A smoke detector senses airborne particles and alerts occupants, giving them critical seconds to escape before smoke inhalation or burns become lethal. Equipping a home with at least one smoke detector can reduce the risk of fatality in a fire by 50%. In 1992, readers of R&D Magazine named home smoke alarms one of the "30 Products that Changed Our Lives." Since the early 1970s, smoke detectors have become widely available and affordable. Prior to their adoption, home‑fire fatalities averaged 10,000 per year; by the early 1990s, that figure fell to fewer than 6,000 annually.
Residential smoke detectors come in two primary styles. The photoelectric model uses an optical beam; when smoke particles scatter the beam, a photoelectric cell detects the drop in light intensity and triggers an alarm. This design is most responsive to smoldering fires that produce dense smoke. The ionization chamber smoke detector (ICSD) employs a small amount of radioactive material to ionize the air inside a sensing chamber. Smoke disrupts ion flow between electrodes, triggering the alarm. ICSDs are faster at detecting flaming fires that produce little smoke. In the United States, 80–90% of residential units contain ICSDs.
Most ICSDs are self‑contained units powered by a 9‑volt battery, but building codes in many regions now require new installations to be wired into the house’s electrical system with a battery backup for power outages.
The ICSD’s radiation source emits alpha particles that strip electrons from air molecules, creating positive and negative ions. Opposite‑charged electrodes in the chamber attract these ions, establishing a small current. Smoke particles attach to ions, disrupting the current flow. A reference chamber, free of smoke, provides a baseline; a significant difference between the two chambers triggers the alarm.
History
In 1939, Swiss physicist Ermst Meili invented an ionization chamber capable of detecting combustible gases in mines. His breakthrough came with a cold‑cathode tube that amplified the weak electrical signal to a level that could drive an alarm.
Although ICSDs entered the U.S. market in 1951, they were initially limited to industrial settings due to cost. By 1971, residential ICSDs became commercially available at roughly $125 each, with a few hundred thousand units sold annually. Over the next five years, advances—such as solid‑state circuitry, energy‑efficient alarm horns, and smarter battery monitoring—reduced the price by 80% and pushed sales to 8 million units in 1976 and 12 million in 1977. These improvements also allowed the use of common 9‑volt batteries and reduced the required radioactive material.
Raw Materials
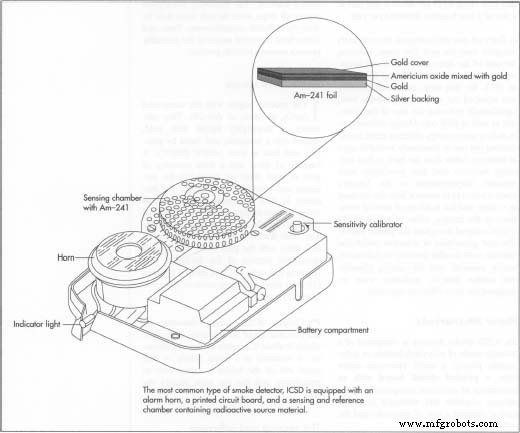
An ICSD is assembled from a polyvinyl chloride or polystyrene housing, a small electronic alarm horn, a printed circuit board (PCB) with standard electronic components, and a sensing chamber plus a reference chamber, each containing electrodes and a radioactive source.
Americium‑241 (Am‑241) has been the preferred radioactive source since the late 1970s. It is highly stable, with a 458‑year half‑life, and is encapsulated in gold and silver foils for safe handling.
The Manufacturing Process
Production involves two main steps: fabricating the Am‑241 source into a usable foil and assembling the full ICSD. Each stage incorporates rigorous testing to ensure reliability.
Radioactive Source
- AmO₂ is mixed with gold, shaped into a briquette, and fused under pressure and heat above 1470 °F (800 °C). The briquette is wrapped in silver and gold, then sealed. Cold rolling reduces the foil to about 0.008 inches (0.2 mm) thick, 0.8 inches (20 mm) wide, and cut into 39‑inch (1 m) strips.
- Circular source discs (~0.2 inches/5 mm diameter) are punched from the foil, mounted in metal holders, and sealed with a rolled metal rim.
Sensing and Reference Chambers
- A source disc is installed in the sensing chamber and a second in the reference chamber. Electrodes are placed in both chambers and connected to external leads.
Printed Circuit Board
- PCBs are fabricated from design schematics, with holes punched and copper traces laid on the back. Components—diodes, capacitors, resistors—are soldered onto the board, and leads are trimmed.
- The sensing chamber, reference chamber, and alarm horn are mounted onto the PCB.
- Wave soldering finalizes component placement.
Housing
- The plastic housing, composed of a mounting base and cover, is produced by injection molding: powdered plastic and pigments are heated, molded under pressure, and cooled.
Final Assembly
- The PCB is seated on the plastic base, a test button is installed, a mounting bracket added, and the cover fitted to complete the unit.
- The finished detector is boxed with a battery and an owner’s manual.
New Developments
Recent innovations enhance detector effectiveness. One model incorporates a strobe‑light alarm that alerts hearing‑impaired occupants even when the detector is located elsewhere in the building.
In 1993, Newtron Products redesigned a traditional detector to fit within standard HVAC filter housings, allowing continuous air sampling throughout a building. When smoke is detected, the unit shuts off the blower to prevent smoke spread and emits a duct‑resonant alarm audible throughout the structure.
Sound‑based detection is another emerging approach. Researchers at the National Institute of Standards and Technology’s Building and Fire Research Laboratory discovered that various building materials—wood, plastic, and drywall—emit characteristic sounds as they expand from rapid heating. Piezoelectric transducers can capture these acoustic signatures before the materials ignite, offering early warning of incipient fires such as overheated electrical wiring.
Manufacturing process
- Peak Detector: How It Works and Practical Applications
- Carbon Monoxide Detectors: Technology, Design, and Safety Standards for Home Protection
- Converting RF to DC with a Raspberry Pi: Building and Troubleshooting an Envelope Detector
- Build a Raspberry Pi‑Based Thief Detector – Step‑by‑Step Guide
- DIY Air Quality Monitor: Cost‑Effective EPA‑Compliant Detector
- Arduino Audio Frequency Detector – Measure Loudest Sound Peaks with High‑Sensitivity Module
- Build a Cost-Effective Lightning Detector with Arduino Uno
- Food Quality Sensor: Detecting Food Freshness with Arduino
- Build a Reliable Arduino-Based Lie Detector
- Understanding Envelope Detectors: Converting High-Frequency Signals into Accurate Envelopes