


VUnit 101: A Practical Guide to Automated VHDL Verification
VUnit is a leading open‑source VHDL verification framework that couples a Python test‑suite runner with a dedicated VHDL library. Together they automate testbench compilation, execution, and result reporting, enabling engineers to follow a test‑driven development cycle.
In this tutorial, Ahmadmunthar Zaklouta, the author behind VHDLwhiz, walks you through the entire VUnit workflow—from installation and configuration to creating a testbench, writing test cases, and running them in ModelSim. A ready‑to‑run example project is available for download.
Overview
Use the sidebar or the mobile navigation button to jump between sections. The tutorial includes screenshots for visual reference.
Requirements
- Intel ModelSim – Install for free as described here. Add it to your system
PATH. - Python 3.6+ – Download and add to
PATH. - Git (optional) – Download.
- Windows Terminal (optional) – Download.
Basic VHDL and ModelSim proficiency is assumed.
Installing VUnit
Clone the repository with submodules:
git clone --recurse-submodules https://github.com/VUnit/vunit.git
Or download the ZIP, extract it to C:\vunit, then install via:
cd C:\vunit
python setup.py install
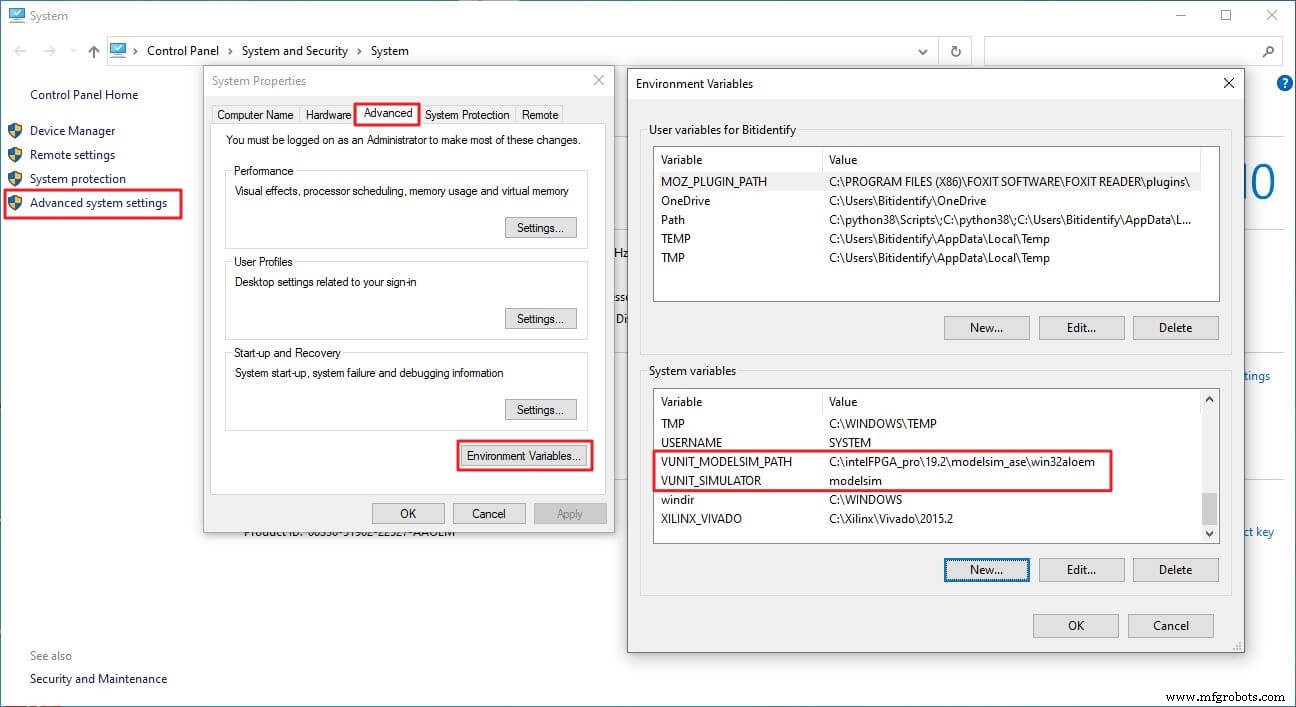
Configure environment variables:
VUNIT_MODELSIM_PATH– Path to the ModelSim executable.VUNIT_SIMULATOR– Set toModelsim.
Example screenshot:
Download the Example Project
Extract the ZIP to C:\vunit_tutorial and run the included scripts.
Introduction to VUnit
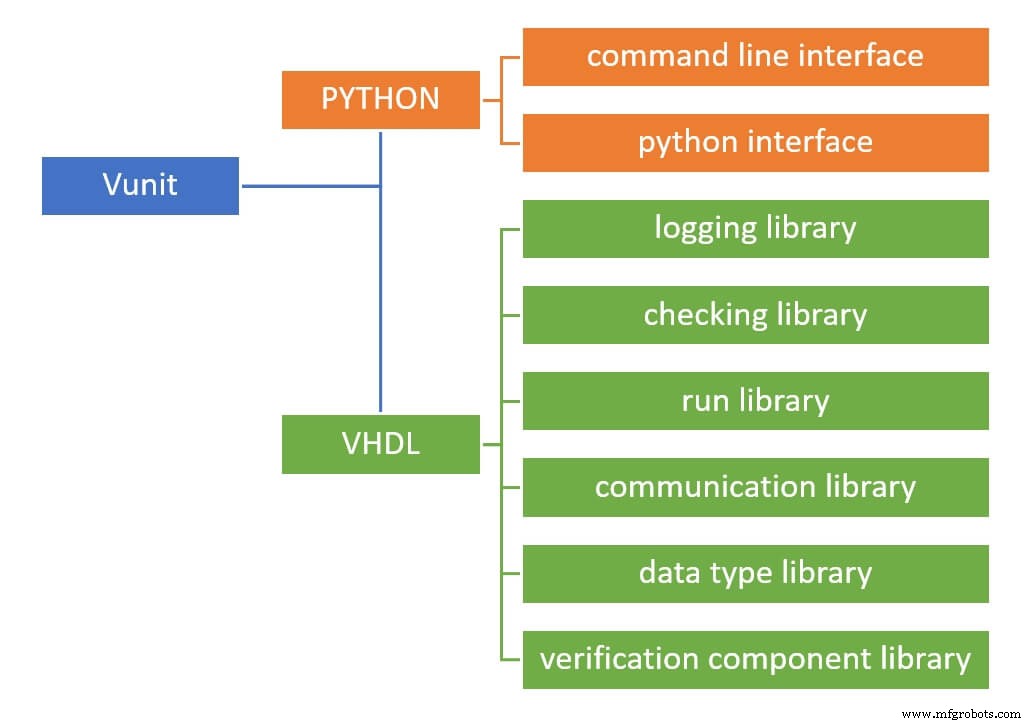
VUnit simplifies HDL verification by providing:
- A Python library for test automation, configuration, and administration.
- A VHDL library containing reusable verification components.
The VHDL side includes six libraries; this tutorial focuses on the logging and check libraries.
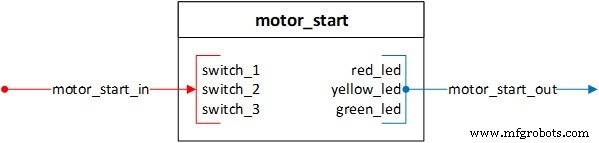
Design Under Test (DUT)
The example DUT, motor_start, drives three LEDs (RED, YELLOW, GREEN) to represent a motor’s startup sequence. Its interface uses record types for inputs and outputs.
The startup process has three steps:
- Loading configuration (RED LED)
- Calibration (YELLOW LED)
- Rotation (GREEN LED)
Startup Sequence
- RED LED – Blinks five times, then stays lit.
- YELLOW LED – Turns on for ten cycles after switch 2, then turns off with RED.
- GREEN LED – Lights while switch 3 is active.
Testbench Development
- Configure the Python
run.pyscript. - Build the VUnit skeleton.
- Instantiate the DUT and drive signals.
Python Run Script
The run.py script defines paths, creates a VUnit instance, and adds design and testbench libraries:
# ROOT directory
ROOT = Path(__file__).resolve().parent
# Source paths
DUT_PATH = ROOT / "design"
TEST_PATH = ROOT / "testbench"

# VUnit instance
VU = VUnit.from_argv()
VU.enable_location_preprocessing()

# Libraries
design_lib = VU.add_library("design_lib")
design_lib.add_source_files([DUT_PATH / "*.vhdl"])

tb_lib = VU.add_library("tb_lib")
tb_lib.add_source_files([TEST_PATH / "*.vhdl"])
VUnit Skeleton
In the testbench entity, add the VUnit context and a mandatory generic:
LIBRARY VUNIT_LIB;
CONTEXT VUNIT_LIB.VUNIT_CONTEXT;

ENTITY motor_start_tb IS
  GENERIC(runner_cfg : string := runner_cfg_default);
END ENTITY motor_start_tb;
The architecture hosts the test runner process:
ARCHITECTURE tb OF motor_start_tb IS
  test_runner : PROCESS
  BEGIN
    test_runner_setup(runner, runner_cfg);
    WHILE test_suite LOOP
      -- test cases
    END LOOP;
    test_runner_cleanup(runner);
  END PROCESS;
END ARCHITECTURE;
Individual test cases are defined with IF run("case_name") THEN blocks.
Signal Declarations & DUT Instantiation
Define clocks, resets, and interface records:
CONSTANT C_CLK_PERIOD : time := 10 ns;
SIGNAL clk, reset : STD_LOGIC := '0';
SIGNAL motor_start_in  : MOTOR_START_IN_RECORD_TYPE := (switch_1 => '0', switch_2 => '0', switch_3 => '0');
SIGNAL motor_start_out : MOTOR_START_OUT_RECORD_TYPE;
Instantiate the DUT:
motor_start_tb_inst : ENTITY DESIGN_LIB.motor_start(rtl)
  PORT MAP(
    clk            => clk,
    reset          => reset,
    motor_start_in => motor_start_in,
    motor_start_out => motor_start_out
  );
Drive clock and reset:
clk   <= NOT clk after C_CLK_PERIOD / 2;
reset <= '0' after 5 * (C_CLK_PERIOD / 2);
Test Case Development
We explore three verification styles: inline driver & checker, controlled checker, and self‑checking checker.
Inline Driver & Checker
A simple test case that drives switch_1 and checks LED states using VUnit’s check family:
IF run("switch_1_on_output_check") THEN
  WAIT UNTIL reset = '0';
  WAIT UNTIL falling_edge(clk);
  motor_start_in.switch_1 <= '1';
  FOR i IN 0 TO 4 LOOP
    WAIT UNTIL rising_edge(clk);
    check(motor_start_out.red_led = '1', "Red LED should be on");
    check_false(motor_start_out.yellow_led, "Yellow LED should be off");
    check_equal(motor_start_out.green_led, '0', "Green LED should be off");
  END LOOP;
END IF;
Controlled Checker
Here the driver remains in the test case while the checker runs in a separate process, controlled by start/end events. For example, verifying the YELLOW LED after switch_2 is enabled:
check_stable(clock       => clk,
             en          => enable,
             start_event => yellow_low_start_event,
             end_event   => yellow_low_end_event,
             expr        => motor_start_out.yellow_led,
             msg         => "YELLOW LED low before switch_2");
Self‑Checking Checker
Encapsulate verification logic in a dedicated process that uses check or check_stable internally. A driver procedure simplifies stimulus:
PROCEDURE switch_driver(
  SIGNAL switches     : OUT MOTOR_START_IN_RECORD_TYPE;
  CONSTANT clk_period : IN TIME;
  CONSTANT sw1_delay  : IN INTEGER;
  CONSTANT sw2_delay  : IN INTEGER;
  CONSTANT sw3_delay  : IN INTEGER) IS
BEGIN
  IF sw1_delay >= 0 THEN
    WAIT FOR clk_period * sw1_delay;
    switches.switch_1 <= '1';
  END IF;
  IF sw2_delay >= 0 THEN
    WAIT FOR clk_period * sw2_delay;
    switches.switch_2 <= '1';
  END IF;
  IF sw3_delay >= 0 THEN
    WAIT FOR clk_period * sw3_delay;
    switches.switch_3 <= '1';
  END IF;
END PROCEDURE;
Running Tests
From the terminal:
python .\run.py *switch_1_on_output_check
VUnit compiles the design, discovers testbenches, and executes the specified case. Output is logged to C:\vunit_tutorial\vunit_out\test_output.
Use -v for verbose logs, -l to list all cases, --clean to purge previous results, or -g to launch ModelSim with a waveform window (requires a wave.do file).
Summary
VUnit offers a robust, lightweight framework that accelerates both design and verification teams. Its Python‑driven test harness, rich VHDL libraries, and flexible checker API make it a valuable addition to any HDL workflow.
Next Steps
- Read the official documentation.
- Follow the VUnit blog for updates.
- Join the community on Gitter.
Download the full example project via the form below.
VHDL
- Connext DDS 101: A Beginner’s Guide to Getting Started
- A Practical Guide to Ceramic 3D Printing: Techniques, Materials, and Design Tips
- Getting Started with TJBot: Build, Configure, and Voice‑Control Your Own AI Robot
- AI in Insurance: A Practical Starter Guide for Real-World Implementation
- Master Permanent Mold Casting: A Beginner's Guide to Durable, High-Volume Metal Parts
- Touch Switch Circuits: A Beginner’s Guide to Simple Tactile Sensors
- Optimize Cat® Machinery: The Ultimate My.Cat.com Guide
- Deploying Node-RED on PLCnext with Docker: A Step‑by‑Step Guide
- Build Your First Go Application on PLCnext: A Beginner’s Guide
- How to Convert Your Tormach CNC into a 2D Scanner: A Beginner's Guide