


Mastering Low‑Power Modes on Arm Cortex‑M: Practical Tips & Energy Savings
In my previous article, “Arm Cortex‑M low‑power mode fundamentals,” I outlined the basic low‑power states available on every Cortex‑M processor and how to use the WFI and WFE instructions to enter sleep. The next logical question is: how are these modes implemented on real microcontrollers, and what impact do they have on an embedded system’s overall power budget? This post dives into hands‑on experimentation with an NXP Kinetis‑L Freedom board to quantify the gains and trade‑offs.
Low Power Mode Experimentation
The most reliable way to evaluate low‑power behaviour is to run a device in its various power states and measure the resulting current draw. For this study I revived the NXP Kinetis‑L Freedom board—a platform I’ve used in numerous products and courses—to gather concrete data. While the microcontroller is typically the largest consumer of power on a board, measuring the entire system current is essential: other components (e.g., voltage regulators, sensors, and communication modules) can contribute significantly to the total draw. Optimising the MCU alone can bring substantial benefits, but a holistic view prevents hidden drains.
Start with a Baseline Measurement
Before making any changes, I captured a baseline current profile by running the Kinetis‑L in normal run mode, leaving all peripherals enabled, and toggling an LED every second. Using IAR Embedded Workbench with an I‑Jet debugger and I‑Scope, I observed a steady current of approximately 16.9 mA when the LED was off and about 18.0 mA when the LED was on (see Figure 1). The precise measurement point is critical—different test points can lead to markedly different results.
click for larger image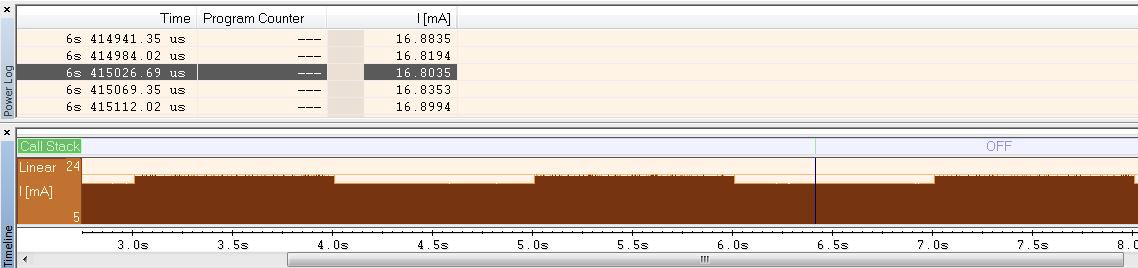
Figure 1. Current measurement of the development board with an LED toggling once per second. (Source: Author)
Optimizing Energy with Wait and Deep Sleep Modes
Enabling the processor’s wait mode is a quick way to shave power. According to the Kinetis‑L datasheet, wait mode draws between 3.7 mA and 5.0 mA at 3 V, because the CPU and peripheral clocks are disabled while flash remains in a low‑leakage doze state. The processor can still wake within 12–15 clock cycles when an interrupt occurs.
void Sleep_Wait(void)
{
    SCB_SCR &=~ SCB_SCR_SLEEPDEEP_MASK;
    asm("WFI");
}
With just these two lines, the board’s current fell from 18.0 mA to 15.9 mA—a reduction of 11.6 %. If powered by a 680 mAh battery, the device’s runtime would increase from 37.8 hours to 42.8 hours—an additional five hours of operation for minimal code changes.
We can push further by entering deep sleep mode:
void Sleep_Deep(void)
{
    SCB_SCR |= SCB_SCR_SLEEPDEEP_MASK;
    asm("WFI");
}
Setting a single bit in SCB_SCR drops the current to 14.8 mA, a 17.8 % saving. On a 680 mAh battery, runtime climbs to 46 hours—a substantial benefit from just a few extra lines.
Leveraging Stop and VLLS Modes for Microamp Draw
Stop mode can reduce the MCU’s consumption by an additional millamp by disabling core and system clocks. It requires manipulating the power‑management register and then invoking Sleep_Deep:
void Sleep_Stop(void)
{
    volatile unsigned int dummyread = 0;
    SMC_PMCTRL &=~ SMC_PMCTRL_STOPM_MASK;
    SMC_PMCTRL |= SMC_PMCTRL_STOPM(0);
    dummyread = SMC_PMCTRL;
    Sleep_Deep();
}
The Kinetis‑L’s Very Low Leakage Stop (VLLS) modes push this further, drawing only 135 µA to 496 µA. The code to enable VLLS1 is shown below:
void Sleep_VLLS1(void)
{
    volatile unsigned int dummyread = 0;
    SMC_PMCTRL &=~ SMC_PMCTRL_STOPM_MASK;
    SMC_PMCTRL |= SMC_PMCTRL_STOPM(0x4);
    SMC_VLLSTRL = SMC_VLLSCTRL_LLSM(1);
    dummyread = VLLS_CTRL;
    Sleep_Deep();
}
At this level, the microcontroller consumes virtually no energy, but the wake‑up latency increases dramatically.
Wake‑Up Latency Considerations
Lower power states come with longer wake‑up times. Standard stop mode requires roughly 2 µs plus interrupt latency to resume operation. VLLS modes introduce a boot‑up delay of 53 µs to 115 µs, which may be unacceptable for time‑critical applications. Figure 2 illustrates the transition times from various low‑power states to run mode.
click for larger image
Figure 2. Transition times from low power modes to various modes on the Kinetis‑L. (Source: Kinetis‑L datasheet)
Conclusion
All Arm microcontrollers expose the standard low‑power modes, but silicon vendors add their own variations to suit different use cases. Vendors typically offer “low‑hanging fruit” modes that impose negligible wake‑up penalties, as well as ultra‑low‑power options that can reduce current to microamps. Developers must balance energy savings against the required responsiveness of their application; a single low‑power mode is rarely a one‑size‑fits‑all solution.
 Jacob Beningo is an embedded software consultant, advisor and educator who currently works with clients in more than a dozen countries to dramatically transform their software, systems and processes. Feel free to contact him at jacob@beningo.com, visit his website www.beningo.com, and sign up for his monthly Embedded Bytes Newsletter.
Embedded
- Choosing a Reliable CNC Machine Dealer: A Trusted Guide
- How Power Outages Threaten Your Power Supplies—and How to Protect Them
- How a Trusted Metal Fabrication Partner Cuts Your Project Costs
- Boost Your Manufacturing Efficiency: Proven Strategies to Maximize Productivity
- Step-by-Step Guide: Setting Up OpenMediaVault on Your Raspberry Pi NAS
- Master Naval Brass Welding: Techniques & Safety Tips
- Using Weldless, Threadless Plumbing in Fluid Power Systems: Benefits & Best Practices
- How to Detect a Faulty Hydraulic Pump: Key Indicators
- Boosting Hydraulic Strength: Proven Strategies for Increased Durability
- Assessing Hydraulic Pump Efficiency: Key Indicators & Best Practices