


Understanding SLA 3D Printing: Process, Benefits, and Applications
In this introduction to Stereolithography (SLA), we cover the basic principles of the process to determine whether it is suitable for your specific application. After reading this article you will be familiar with all the important aspects of SLA 3D printing.
If you are interested in Hubs' SLA printing processes, check out our SLA capabilities .
What is stereolithography?
Stereolithography (SLA) is an additive manufacturing process that belongs to the vat photopolymerization family. Also known as resin 3D printing , there are three main 3D printing technologies associated with vat polymerization: SLA, DLP and LCD. The three technologies all use a light source to cure a photopolymer resin but with the following differences:
-
Stereolithography (SLA) uses UV lasers as a light source to selectively cure a polymer resin.
-
Digital light processing (DLP) uses a digital projector as a UV light source to cure a layer of resin.
-
Liquid crystal display (LCD) uses an LCD display module for projecting specific light patterns.
SLA is one of the most widely used vat photopolymerization technologies. It is used to create objects by selectively curing a polymer resin, layer by layer, using an ultraviolet (UV) laser beam. The materials used in SLA are photosensitive thermoset polymers that come in a liquid form.
Patented in 1986, SLA was the first 3D printing technology. And even today, SLA is still the most cost-effective 3D printing technology available when parts of very high accuracy or smooth surface finish are needed. Best results are achieved when the designer takes advantage of the benefits and limitations of the manufacturing process.
What to watch: How do you print highly detailed parts with SLA?
Here's a short video that will teach you everything you need to know to get you started with SLA 3D printing in about 10 minutes.
How does SLA 3D printing work ?
-
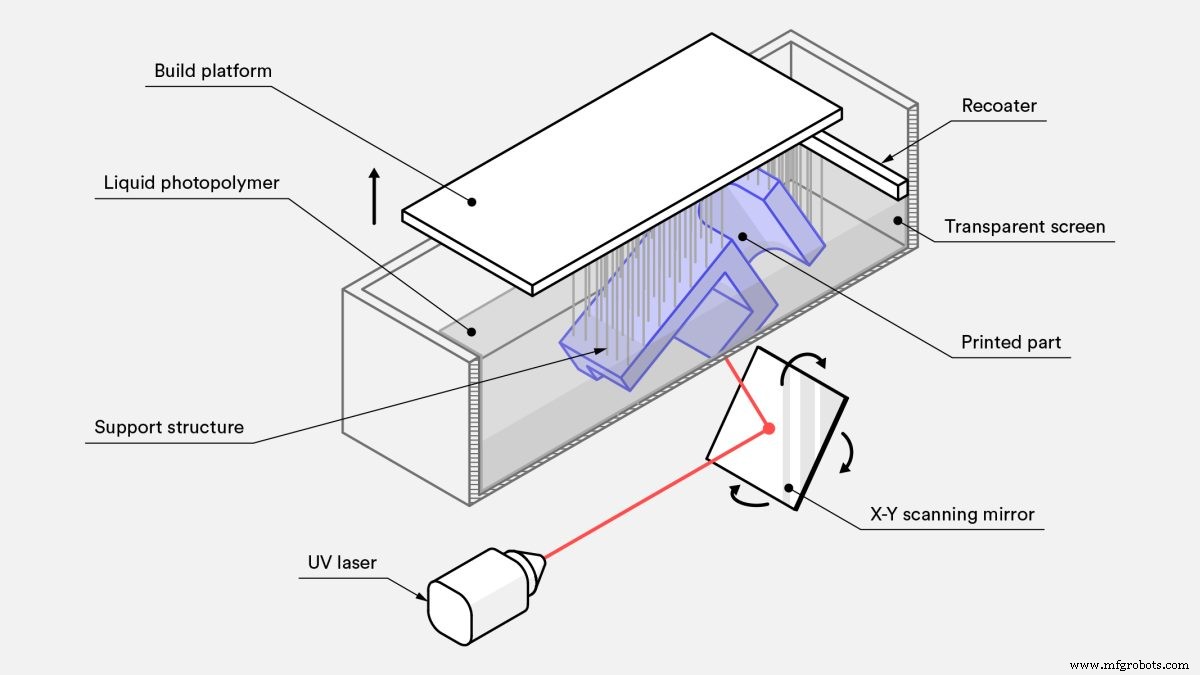
SLA 3D printing works by first positioning the build platform in the tank of liquid photopolymer, at a distance of one layer height for the surface of the liquid.
-
A UV laser creates the next layer by selectively curing and solidifying the photopolymer resin.
-
During the solidification part of the photopolymerization process, the monomer carbon chains that compose the liquid resin are activated by the light of the UV laser and become solid, creating strong unbreakable bonds between each other.
-
The laser beam is focused in a predetermined path using a set of mirrors, called galvos. The whole cross-sectional area of the model is scanned, so the produced part is fully solid.
-
After printing, the part is in a not-fully-cured state. It requires further post-processing under UV light if very high mechanical and thermal properties are required.
The photopolymerization process is irreversible and there is no way to convert the SLA parts back to their liquid form. Heating these SLA parts will cause them to burn instead of melt. This is because the materials that are produced with SLA are made of thermoset polymers, as opposed to the thermoplastics that fused deposition modeling (FDM) uses.
What are the print parameters of SLA printing?
Most print parameters in SLA systems are fixed by the manufacturer and cannot be changed. The only inputs are the layer height and part orientation (the latter determines support location).
Layer height: Ranges between 25 and 100 microns. Lower layer heights capture curved geometries more accurately but increase the build time and cost—and the probability of a failed print. A layer height of 100 microns is suitable for most common applications.
Build size: This is another parameter that is important for the designer. The build size depends on the type of SLA machine. There are two main SLA machine setups: the top-down orientation and the bottom-up orientation:
-
Top-down printers place the laser source above the tank and the part is built facing upwards. The build platform begins at the very top of the resin vat and moves downwards after every layer.
-
Bottom-up printers place the light source under the resin tank (see figure above) and the part is built upside down. The tank has a transparent bottom with a silicone coating that allows the light of the laser to pass through but stops the cured resin from sticking to it. After every layer, the cured resin is detached from the bottom of the tank, as the build platform moves upwards. This is called the peeling step.
The bottom-up orientation is mainly used in desktop printers, like Formlabs, while the top-down is generally used in industrial SLA systems. Bottom-up SLA printers are easier to manufacture and operate, but their build size is limited. This is because the forces applied to the part during the peeling step might cause the print to fail. On the other hand, top-down printers can scale up to very large build sizes without big loss in accuracy. The advanced capabilities of these systems come at a higher cost.
The following table summarises the key characteristics and differences of the two orientations:
| Bottom-up (Desktop) SLA | Top-down (Industrial) SLA | |
|---|---|---|
| Advantages | + Lower cost + Widely available |
+ Very large build size + Faster build times |
| Disadvantages | - Small build size - Smaller material range - Requires more post-processing due to extensive use of support |
- Higher cost - Requires specialist operator - Changing material involves emptying the whole tank |
| Popular SLA printer manufacturers | Formlabs | 3D Systems |
| Build size | Up to 145 x 145 x 175mm | Up to 1500 x 750 x 500mm |
| Typical layer height | 25 to 100 µm | 25 to 150 µm |
| Dimensional Accuracy | ± 0.5% (lower limit: ± 0.010–0.250 mm) | ± 0.15% (lower limit ± 0.010–0.030 mm) |
What are the characteristics of SLA 3D printing?
The main characteristics of SLA 3D printing are the necessary support structure, curling and layer adhesion.
Support structures
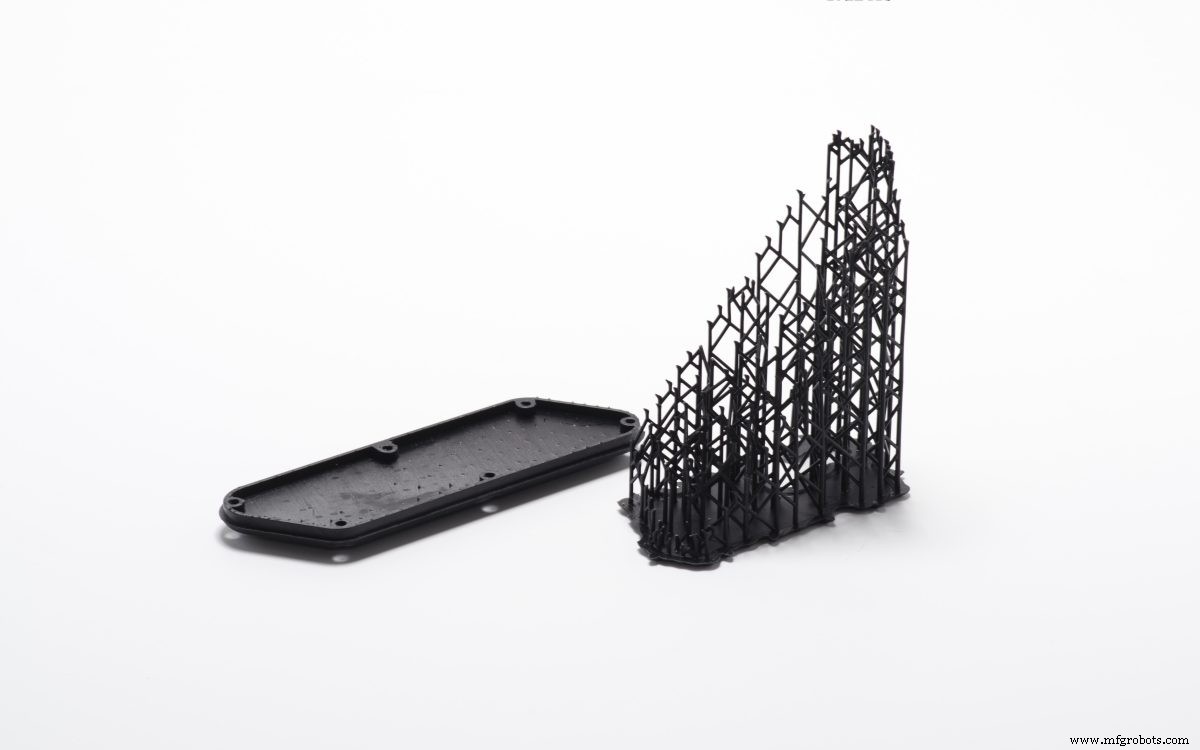
A support structure is always required in SLA. Support structures are printed in the same material as the part and must be manually removed after printing. The orientation of the part determines the location and amount of support. It is recommended that the part is oriented so that so visually critical surfaces do not come in contact with the support structures.
Bottom-up and top-down SLA printers use support differently:
-
Top-down SLA printers: S upport requirements are similar to those for FDM . They are needed to accurately print overhangs and bridges (the critical overhang angle is usually 30o). The part can be oriented in any position, and they are usually printed flat, to minimize the amount of support and the total number of layers.
-
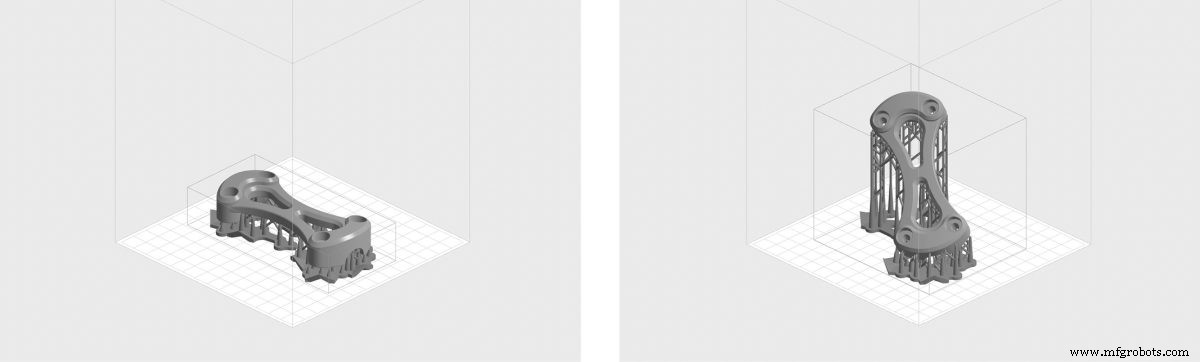
Bottom-up SLA printers: Support requirements can be more complex. Overhangs and bridges must still be supported, but minimizing the cross-sectional area of each layer is the most crucial criterion: the forces applied to the part during the peeling step may cause it to detach from the build platform. These forces are proportional to the cross-sectional area of each layer. For this reason, parts are oriented at an angle and the reduction of support is not a primary concern.
Curling
One of the biggest problems relating to the accuracy of parts produced via SLA is curling. Curling is similar to warping in FDM.
During the curing process, the resin shrinks slightly upon exposure to the printer's light source. When the shrinkage is considerable, large internal stresses develop between the new layer and the previously solidified material, which results in the part curling.
Support is important to help anchor at-risk sections of a print to the build plate and mitigate the likelihood of curling. Part orientation and limiting large flat layers is also important. Over-curing (for example by exposing the part in direct sunlight post-printing) might also cause curling.
The best way to prevent curling is to keep it in mind during the design process. Avoid large thin and flat areas wherever possible, or add a structure to prevent the part from curling.
Layer adhesion
SLA printed parts have isotropic mechanical properties. This is because a single UV laser pass is not enough to fully cure the liquid resin. Later laser passes help previously solidified layers to fuse together to a very high degree. In fact, curing continues even after the completion of the printing process.
To achieve the best mechanical properties, SLA parts must be post-cured, by placing them in a cure box under intense UV light (and sometimes at elevated temperatures). This greatly improves the hardness and temperature resistance of the SLA part but makes it more brittle. The results of the post-curing process mean:
-
Test pieces of parts printed in standard clear resin using a desktop SLA printer have almost twice as much tensile strength post-cure (65 MPa compared to 38 MPa).
-
Parts can operate under load at higher temperatures (at a max temperature of 58ºC compared to 42ºC).
-
The elongation at break is almost half (6.2% compared to 12%).
Leaving the SLA printed part in the sun can also cause curing. Although spray coating with a clear UV acrylic paint before use is highly recommended because extended exposure to UV light has a detrimental effect in the physical properties and appearance of SLA parts—they may curl, become brittle or change color.
Summary of the main characteristics of SLA 3D printing
The main characteristics of SLA are summarized in the table below:
| Stereolithography (SLA) | |
|---|---|
| Materials | Photopolymer resins (thermosets) |
| Dimensional Accuracy | ± 0.5% (lower limit: ±0.10 mm) – desktop ± 0.15% (lower limit ± 0.01 mm) – industrial |
| Typical Build Size | Up to 145 x 145 x 175mm – desktop Up to 1500 x 750 x 500mm – industrial |
| Common layer thickness | 25–100 µm |
| Support | Always required (essential to producing an accurate part) |
What materials are used for SLA printing?
SLA materials come in the form of liquid resins, which can be chosen based on the end use of the part—for example, thermal resistance properties, a smooth surface finish or abrasion resistant. As such, the price of the resin varies greatly, from about $50 per liter for the standard material, upwards to $400 per liter for specialty materials, such as the castable or dental resin. Industrial systems offer a wider range of materials than desktop SLA printers, that give the designer a closer control over the mechanical properties of the printed part.
SLA materials (thermosets) are more brittle than the materials produced with FDM or SLS (thermoplastics) and for this reason SLA parts are not usually used for functional prototypes that will undertake significant loading. Advances in materials may change this in the near future.
The following table summarizes the advantages and disadvantages of the most commonly used resins.
| Material | Characteristics |
|---|---|
| Standard resin | + Smooth surface finish - Relatively brittle |
| High detail resin | + Higher dimensionally accuracy - Higher price |
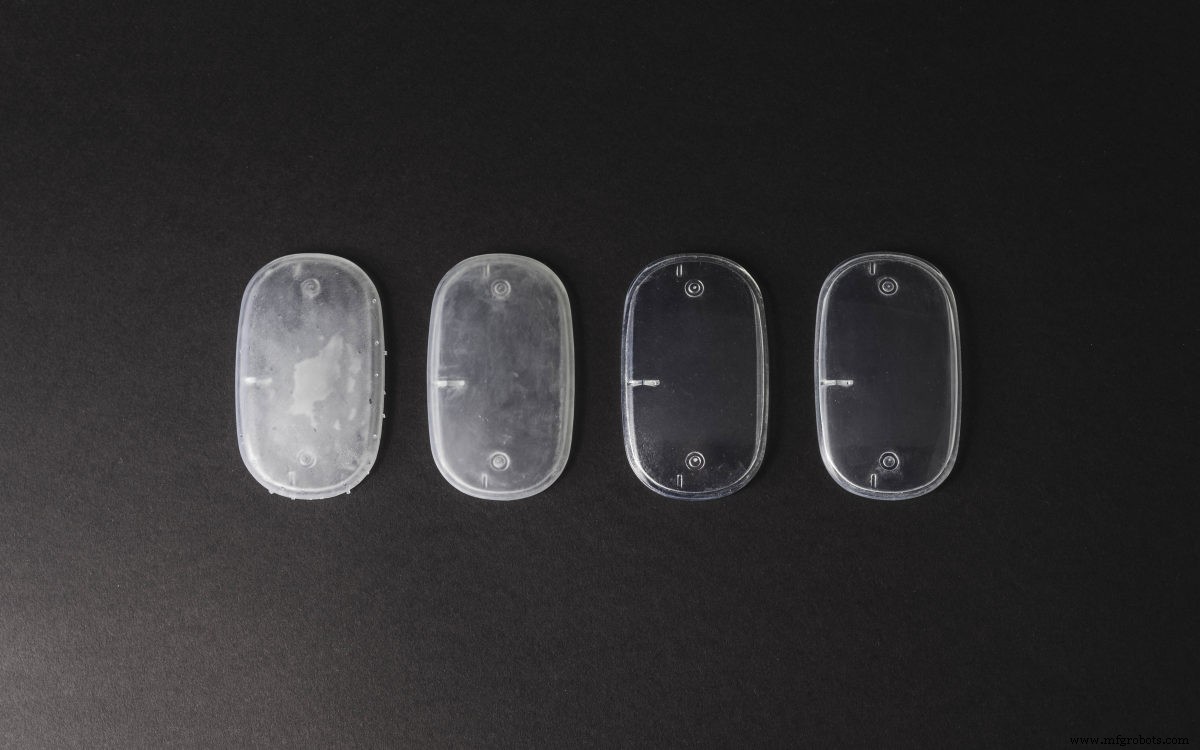
| Clear resin | + Transparent material - Requires post processing for a very clear finish |
| Castable resin | + Used for creating mold patterns + Low ash percentage after burnout |
| Tough or Durable resin | + ABS-like or PP-like mechanical properties - Low thermal resistance |
| High temperature resin | + Temperature resistance + Used for injection molding and thermoforming tooling |
| Dental resin | + Biocompatible+ High abrasion resistant- High cost |
| Flexible resin | + Rubber-like material- Lower dimensional accuracy |
What are the options for SLA post-processing?
SLA parts can be finished to a very high standard using various post-processing methods, such as sanding and polishing, spray coating and finishing with a mineral oil. To find out more, read our extensive article on post-processing for SLA parts.
What are the advantages of SLA 3D printing?
-
SLA can produce parts with very high dimensional accuracy and with intricate details.
-
SLA parts have a very smooth surface finish, making them ideal for visual prototypes.
-
Speciality SLA materials are available, such as clear, flexible and castable resins.
What are the disadvantages of SLA 3D printing?
-
SLA parts are generally brittle and not suitable for functional prototypes.
-
The mechanical properties and visual appearance of SLA parts will degrade over time when the parts are exposed to sunlight.
-
Support structures are always required and post-processing is necessary to remove the visual marks left on the SLA part.
What are Hubs' top tips & tricks for SLA 3D printing?
Is SLA 3D printing the right manufacturing solution for your parts or products? These are our rules of thumb:
-
SLA 3D printing is best suited for producing visual prototypes with very smooth surfaces and very fine details from a range of thermoset materials.
-
Desktop SLA is ideal for manufacturing small injection-molded-like parts at an affordable price. Think "smaller-than-a-fist".
-
Industrial SLA machines can produce very large parts, as big as 1500 x 750 x 500mm).
Want to find out more? Read our complete guide to 3D printing.
3D printing
- Multi‑Material 3D Printing: Unlocking Complex Designs & Faster Production
- Robocasting 3D Printing: Process, Differences, and Key Advantages
- Understanding Ringing (Ghosting) in 3D Printing and How to Eliminate It
- What Is a 3D Printing Marketplace? A Complete Guide to Buying and Selling 3D Models
- Bioprinting Explained: How 3D Printing Creates Living Tissues & Future Organs
- 4D Printing Explained: The Future of Adaptive, Time‑Responsive Manufacturing
- Understanding SLS 3D Printing: How Selective Laser Sintering Creates Durable Parts
- SLS vs SLA 3D Printing: Key Differences and How to Choose
- Demystifying 3D Printing: A Clear Guide for Innovators
- Understanding Resin 3D Printing: Process, Applications, and Benefits