


Complete Guide to the Arduino Nano Pinout: Specs, Pin Functions & Programming Tips
Technology goes hand in hand with robotics and electronics. At the center of all these is the electronic circuit board, and the most common circuit board in the electronics world is the Arduino circuit board. People also think Aduinos are microcontrollers, and however, they are circuit boards with multiple components, including the microcontroller. On the contrary, the Arduino Nano Pinout as a printed circuit board has several components within itself, and that makes it even more interesting to learn about as well.
What is an Arduino Nano Pinout
Arduino Nano is a small ATmega328P microcontroller processor serial chipboard with dimensions of 4.5 cm by 1.8 cm. Indeed, Arduino Nano is popular instead of the Arduino UNO because of its many similarities.
The most significant difference is that Arduino UNO uses Plastic Dual-In-line Package (PDIP) circuit board form and has 30 pins, while Arduino Nano uses a plastic quad flat pack (TQFP) and has 32 pins. In fact, Arduino Nano uses Type-B Micro USB while Arduino Nano has a DC power jack.
(Also known as PDIP (plastic DIP))
(Thin pin Square flat package (TQFP))
Subsequently, Arduino Nano is preferable to Arduino UNO due to its small size, price, and special functions since they both have similar functionalities.
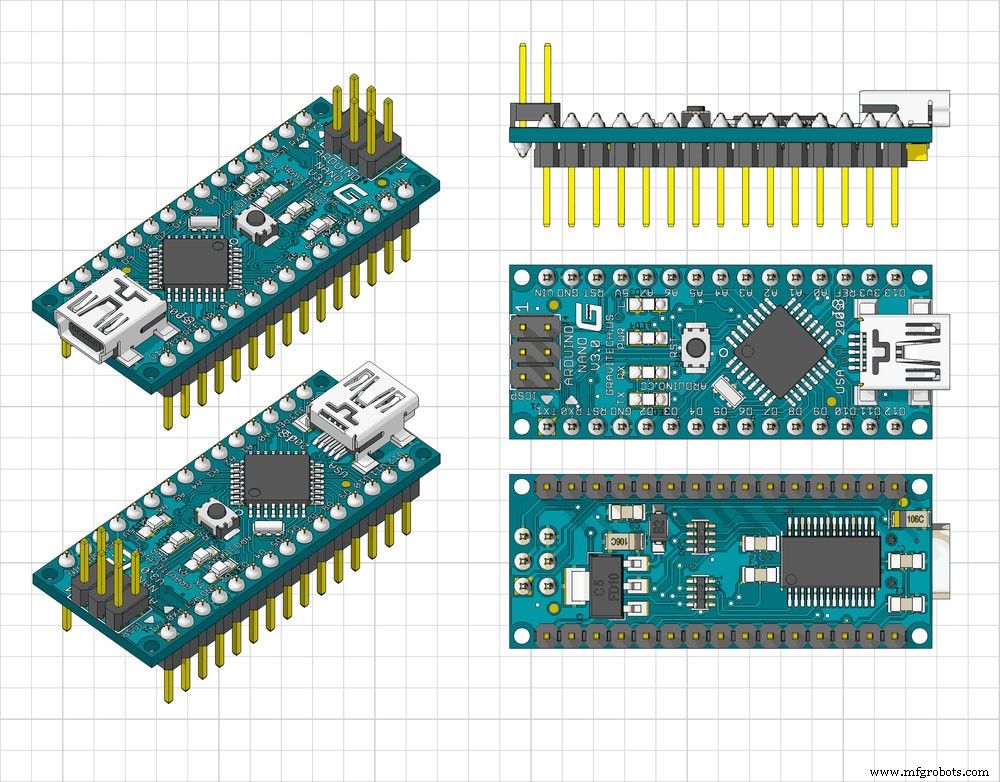
(Arduino Nano Front, Back, and side view)
Features of Arduino Nano
- ATmega328P microcontroller comes with a built-in bootloader, making it easier to flash the board with your code. The power microcontroller is of the 8-bit AVR (Audio/Video Receiver) family.
- Operating voltage signal of 5V.
- Power supply through VIN or VCC can vary between 7V and 12V.
- 32KB CPU Flash memory was by 2KB used by the Bootloader.
- 16MHz clock speed or crystal oscillator.
- 2KB SRAM memory.
- 1KB of EEPROM memory
- Arduino Nano Pinout has 30 pins. Eight analog Pins,14 digital pins, 6 Power Pins, and 2 Reset Pins.
- 19mA Power supply consumption.
- 40mA DC per I/O pin.
- The Arduino Nano Pinout’s small size can fit standard breadboards, making it the first choice for many applications.
- Supports SPI communication (Serial Peripheral Interface), USART (Universal Synchronous/Asynchronous Receiver/Transmitter), and inter-integrated circuits (IIC) communications.
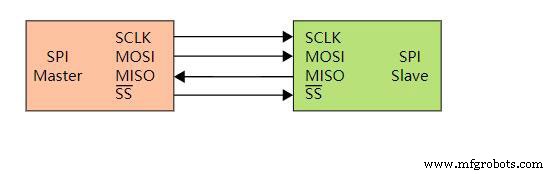
Basic SPI bus example)
- Uses Type-B Micro USB, unlike Arduino UNO.
- In-circuit serial programming (ICSP) enables the microcontroller programming without being disconnected from the circuit board.
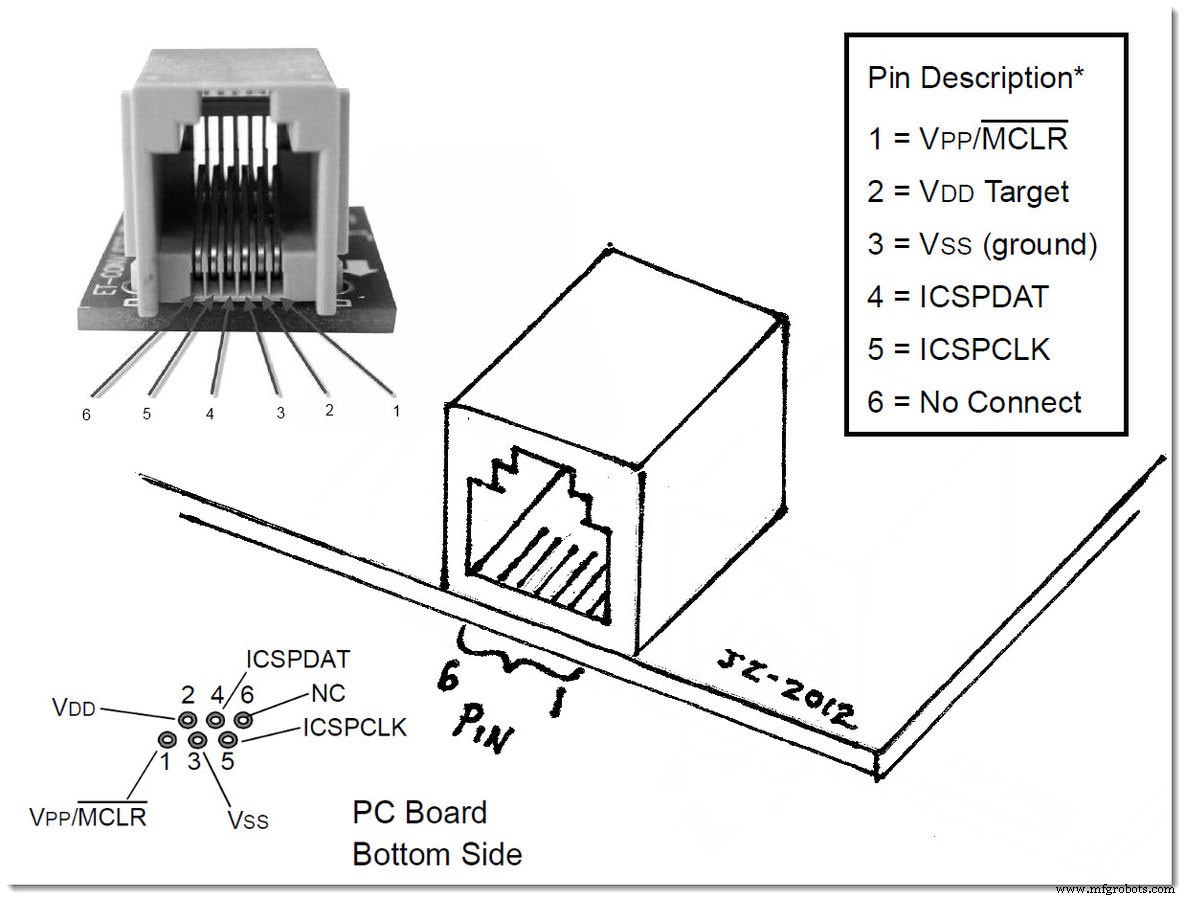
(RJ11 turn ICSP PIC programmer)
Arduino Nano Specifications
| ARDUINO NANO | SPECIFICATION |
| Microcontroller | ATmega328P |
| CPU Flash Memory | 32 KB (2 KB used by Bootloader) flash memory |
| Architecture / Processor | AVR 8-bit |
| SRAM | 2 KB |
| EEPROM | 1 KB |
| Clock Speed | 16 MHz clock speed |
| Operating Voltage Source | 5V |
| Analog I/O Pins | 8 |
| Input Voltage | 7V-12V |
| DC Current per I/O Pins | 40 mA |
| Digital I/O Pins | 22 |
| Pulse-width modulation (PWM) output | 6 |
| Power Consumption | 19 mA |
| PCB Size | 1.8 cm X 4.5 cm |
| USB | Type-B Micro USB |
| ICSP Header | YES |
| Communication | IIC, SPI communication, USART |
| Weight | 7 grams |
| Programmable | Arduino IDE |
Arduino Nano Pinout Arrangement
This section will explain the functions of the pins in the underlying hardware, and we will discuss the pins’ alternative tasks in detail.
(Arduino Nano function pins arrangements)
TX / D1 pin is a digital I/O pin responsible for the transmission of serial data from the Arduino Nano PCB. Hence it’s a serial port.
RX / D0 pin is a digital I/O pin responsible for receiving serial data into the Arduino Nano PCB. Hence it’s one of the serial communication pins and a serial port.
2 Reset pins and one Reset button that resets the microcontroller and the Reset button to active LOW.
Pin D2 and D3. These are digital I/O pins used to interrupt the microcontroller program in case of an emergency or when a more important function needs execution and the running program needs stopping.
D0 to D13 Serial Clock (SCK) pins. These are all the 14 Digital Input-Output pins (I/O) of the Arduino Nano pinout. In addition the pins configuration is as per the application requirements using the functions pinMode(), digitalRead(), and digitalWrite(). Digital IO pins also have an internal pull-up resistor that ranges from 20Ω to 40Ω and are not connected by default. Subsequently, the Digital IO pins can also source 40 mA of power supply current to power the microcontroller.
D3, D5, D6, D9, and D11 pins for Pulse width Modulation. Hence they control the motor in terms of speed, LED brightness, and many more functions that need modulation.
A0 to A7 pins. These are eight Analog input pins, and analog inputs have an 8-bit analog-to-digital converter (ADC) feature. In addition, it is read with the analogRead() function, which also reads values from specified analog pins.
D10 Signal and Systems (SS), D11 Master Out Slave In (MOSI), D12 Master In Slave Out (MISO), and D13 Serial Clock (SCK) pins.
Consequently, these are the Digital pins that are used in (Serial Peripheral Interface) SPI communication.
Inbuilt LED (13). This Digital pin controls the internal LED embedded on the circuit board, turning it on or off whenever required.
A4 (SDA), A5 (SCA) pins. These are Analog pins for Two-Wire Interface (TWI) or Inter-Integrated Circuit (I2C) communication.
AREF is an Analog voltage-to-Digital Conversion (ADC) reference.
VIN, one of the power pins, is the power supply input voltage pin used when also connecting to an external power source (7V – 12V input voltage level) tower microcontroller.
3v3 is the minimum voltage generated by the inbuilt Nano board voltage regulator.
5V is the regulated power supply voltage used by the Nano board to power its components.
GND pin is the ground pin on the nano board.
How to Power the Arduino Nano
You will need to power Arduino Nano up to run your first application. Powering up the Arduino Nano circuit board and its power consumption modes are also discussed in this section. These power modes can keep your Arduino circuit board safe, specifically from power damage.
(Arduino Nano powered using mini USB)
- Mini-B USB cable Connector – Connect the mini USB cable power jack to the pin and let it draw power from any source from which a connection occurs. On the one hand, this option also allows you to draw power from any device that specifically supports USB connector micro USB.
- VIN pin – 6-20V unregulated external power supply specifically passes through the pin to the board to power it. Afterward, the power goes through regulation by the Nano board to 5V voltage suitable for the power circuit board’s operation by a board voltage regulator.
- 5V pin– equally important, If you have a regulated power supply source of 5V, here is where the power connection occurs. Hence, this source also supplies the power to the circuit board directly; hence any external power source overload or external interrupts can specifically damage the Arduino microcontroller board.
Difference Between Arduino Uno and Arduino Nano
In contrast, Arduino UNO and the Arduino Nano have significant differences in tech specs. However, here are some of the differences discussed below.
(Arduino Nano and Arduino UNO laid side by side)
- Size – In contrast, Arduino Uno is larger than the Arduino Nano with 6.9cm x 5.3cm, while the Arduino Nano has 1.8 cm x 4.5 cm.
- Arduino board – In contrast, Arduino Nano has a TQFP (plastic quad flat pack) board package while Arduino UNO board has PDIP (Plastic Dual-In-line Package) board package.
- Pins -In contrast, Arduino Nano has 32 pins, while Arduino UNO has 30 pins. The two extra pins on the Arduino Nano are for ADC functions.
- Power supply – In contrast, Arduino Uno has a DC power jack and a regular USB cable, while Arduino Nano uses a mini-B USB port; hence can get power from the regular mini-B USB connection. Subsequently, it also allows communication over USB.
How to Program Arduino Nano

(Arduino Nano set-up on a breadboard)
In this section, we will be discussing how to program the Arduino and also execute the programs.
The first step is to download the Arduino IDE and related drivers like the megaAVR core. Later, once the Arduino IDE board has been installed, connect the Arduino board to the computer using the USB port. It will power LEDs.
Meanwhile, in the Arduino software, choose the correct type of Arduino board you are using. Go to the built-in examples of code. Subsequently, load the example code from your computer to the board on the top bar of the Arduino software. Immediately when the process is complete, the Arduino built-in LED will start blinking. Afterward, you can then observe the Arduino and see your commands being executed. Hence, if you have the example code for the Arduino board to blink, you will observe afterward what the nano board is doing.
Summary
To summarize, Arduino Nano’s application and familiarity are majorly based on the features and functionalities discussed in this article. Furthermore, Arduino Nano has uses in many applications, such as tracking gestures and electronic onboard sensors.
In brief, we have also established that Arduino programming can vary in more extensive programs. Additionally, SPI communication and serial communication on pins has also been covered. In case of any technicality or question, please feel free to contact us. We are always delighted to listen to your feedback.
Industrial Technology
- ICM-20608-G: Compact 6‑Axis Motion Sensor for High‑Performance Applications
- APDS‑9960: A Multi‑Sensor IC for Gesture, Proximity, Light and Color Detection
- Arduino Explained: What It Is and How to Program It
- Mastering PWM in Arduino: Comprehensive Guide & Key Functions
- IC 4060 Pinout & Functions Explained – A Comprehensive Guide
- BeagleBone Black Pinout Guide: Pin Configurations, Specs & Practical Applications
- SG3524 Modulator IC: Pinout, Specs, and Practical Applications
- Comprehensive Guide: Alcohol Sensor Pinout & Arduino Integration
- AT89C51 Microcontroller: Overview, Pinouts, Programming Tips & Alternatives
- Arduino Pro Mini vs Nano: Detailed Feature Comparison for Smart Projects