


HC-SR04 Ultrasonic Sensor Explained: Working Principles and Arduino Integration
Ultrasounds are high-pitched sound waves with frequencies exceeding the audible range of normal human hearing (greater than 20kHz). One type of ultrasound sensor is HC-SR04 which senses objects 13ft away from it. In this article, we’ll show you how the sensor works and conduct an interfacing project with Arduino.
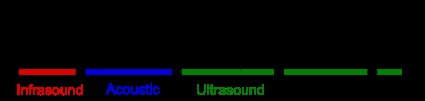
Frequency ranges in comparison to ultrasounds
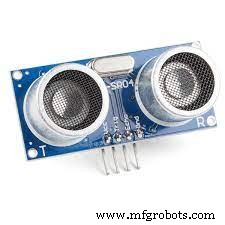
Overview of HC SR04 ultrasonic distance sensor
- An overview of the hardware
An hc-sr04 ultrasonic (US) sensor comprises two ultrasonic transducers; transmitter and receiver.
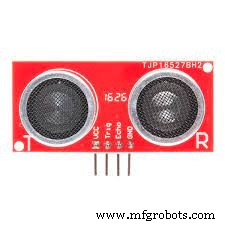
Transmitter (T) and Receiver (R)
The receiver waits for and receives transmitted pulses, whereas the transmitter converts electrical signals to ultrasonic sound pulses of 40KHz.
- Specifications
The specifications consist of:
Dimension – 45 x 20 x 15mm
Trigger input signal – 10microsecond TTL pulse
Measuring angle – 15°
Ranging accuracy – 3mm
Minimum range – 2cm
Maximum range – 4cm
Operating frequency – 40KHz
Operating voltage – DC 5V power
Hc-sr04 Ultrasonic Distance Sensor Pin

Pinout of Ultrasonic sensor HC-SR04
We have summarized the pin configuration of ultrasonic sensor hc-sr04 in the following table.
| Pin No | Name of pin | Pin description |
| 1 | Vcc | It’s the power supply pin of the sensor (5V supply voltage). |
| 2 | Trigger/ Trig | It functions as the input pin. Always keep it high for 10µs to start measuring by sending ultrasound waves. |
| 3 | Echo | It acts as the output pin. The echo pin stays high for some period, equivalent to the time taken for the ultrasound pulse to go back to hc-sr04. |
| 4 | GND | It connects to the system’s ground. |
What is the Working Principle of an HC-SR04 Ultrasonic Ranging Sensor?
Hc-sr04 works by producing an ultrasound of approximately 40K Hz that travels via air. If the ultrasonic sound pulses encounter an obstacle or object in their traveling path, it bounces back to the sensors.
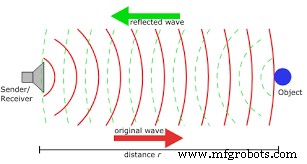
How an ultrasonic sensor works
Generating the ultrasound
First, ensure the trigPin is in a High state for ten microseconds, sending an 8-cycle ultrasonic burst that travels at the sound speed. Subsequently, the echoPin will go high after the sent burst. Afterward, the echoPin will wait or listen to an ultrasound wave you’re to reflect from an object.
The echoPin will go into a Low state after 38ms if no object is present.
However, if there’s an object that reflects an ultrasonic pulse, the echoPin gets into the Low state earlier than 38ms.
With the information on time duration during the high state of the Echo pin, we can work out the distance of sound waves traveling. We’ll also determine the distance from hc-sr04 to the object.
Distance = (Speed X Time)/2
Whereby;
Time = Amount of time echoPin was high (assuming it’s 2ms)
Speed = Speed of sound (340m/s or 340cm/s)
Dividing the results by two helps measure the duration of the sound wave needed to reach the object before bouncing back.
So;
Distance = (Speed × Time)/2 = (34cm/ms × 1.5ms) / 2 = 25.5cm
Now the distance from sensor to object is 25.5cm.
Hc sr04 Dimensions
The dimensions of HC-SR04 sensor are shown below:
HC-SR04 Dimensions
However, note that the dimensions will always differ a little due to different manufacturers.
Hc-sr04 Connected to Arduino
There are several ways to interface your sensor, including using I2C, Raspberry Pi, and Arduino. For today’s projects, we’ll be dwelling on an Arduino board.
Materials needed
- Grove Ultrasonic distance sensor
- Grove base shield
- Breadboard and Jumper wires
- Arduino UNO board
Guidelines
Connecting the Hardware
- Start by connecting the sensor to the Grove-based shield on port D7.
- Secondly, plug your Grove-base shield into the Arduino board.
- Then, use a USB cable to connect the Arduino to a computer.
The pin connection is in the table below.
| Arduino UNO | HC-SR04 Ultrasonic sensor |
| GND | GND |
| -3 (or any other digital I/O) pin) | Echo |
| 2 (or any other digital I/O) pin) | Trigger pin |
| 5V | Vcc |
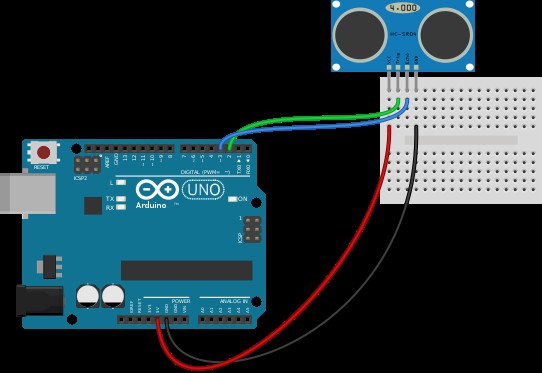
HC-SR04 Ultrasonic sensor and Arduino wiring diagram
Configuring the Software
- Search the GitHub website and download the Ultrasonic sensor Library from it.
- Next, copy and paste the code into Arduino IDE, where you’ll upload it afterward.
The code appears like the one below.

Code Elaboration
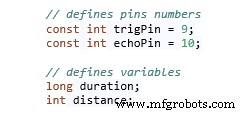
Beginning by defining Echo and Trig pins, i.e., pin3 (echoPin) and pin2 (trigPin). Further on, we need an integer variable to represent the distance and a long variable (‘duration’) to know the travel time from the sensor.
Additionally, define the echoPin as input, whereas the trip-in will be the output. Then, begin the serial communication that’ll display the results on a serial monitor screen.

Ensure that you have a clear trigPin such that you can set it on a LOW State for about two microseconds during the loop. Later, raise the pin’s setting to a high State of ten microseconds to produce an ultrasound wave.

Next, there’s a pulseIn() function key with two parameters, i.e.,
- State of pulse you’re to read (Low or High), or
- Name of the Echo pin.
Use the function to read the travel time, then place the value in the ‘duration’ variable.

We’ll set the echoPin to High since the HC-SR04 sensor automatically sets it high after transferring the 8-cycle ultrasonic burst from the transmitter. Consequently, timing starts, but after receiving the reflected sound wave, the timing stops due to the echo pin going Low.
Eventually, the pulseIn() function returns the pulse length in microseconds.
We’ll use the formula discussed earlier to get the distance from here. Therefore, multiply the duration by 0.034, then divide the value by two.
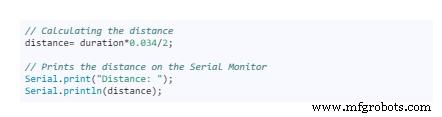
Finally, print out the final distance value displayed on the Serial Monitor.
Application limitations of HC-SR04
Compared to other low-cost ultrasonic sensors, we approve the HC-SR04 sensor to be ideal for usability and high accuracy. However, the sensor may pose some challenges, as in the examples below.
- First, it may be hard for the sensor to detect soft, irregular surface objects like stuffed animals since the objects absorb but don’t reflect sound.
- Secondly, mounting the HC-SR04 sensor low on a device often results in a reflected floor sound, not of the device. Also, an object can be too small, thus not reflecting enough sound to HC-SR04.
- Then, if the reflective surface of the solid object is at a shallow angle, the sound doesn’t reflect HC-SR04.
- Finally, if the distance between obstacle/object and sensor is more than 13ft, there’ll be no sound reflection.
Conclusion
HC-SR04 is a popular sensor that’s easy to interface, affordable, and low-power, thus ideal for battery-operated devices. It has a wide range of applications consisting of measuring distances within 2cm to 400cm distance, mapping objects in a surrounding, etc.
If you wish to know more about the ultrasonic sensor, you may contact us. We’ll be more than happy to hear from you.
Industrial Technology
- Understanding Cloud Computing: How It Works and Why It Matters
- Mastering the HC‑SR04 Ultrasonic Sensor with Arduino: A Complete Tutorial
- PIR Motion Sensor: Working Principles & Arduino Integration Guide
- Mastering Polyurethane Production: Process Insights & Cost‑Saving Strategies
- Constant Depth of Cut in Turning: Why It Matters and How It Works
- Understanding Welding: Processes, Techniques, and Industrial Applications
- Master the ADS1115: Features, Pinouts, and Arduino Integration Guide
- Connecting the DS1307 Real‑Time Clock to Arduino: A Step‑by‑Step Guide
- Light Intensity Sensors: Features, Uses, and Arduino Integration Guide
- MCP9808 Temperature Sensor: A Complete Arduino I2C Integration Guide