


Mastering the HC‑SR04 Ultrasonic Sensor with Arduino: A Complete Tutorial
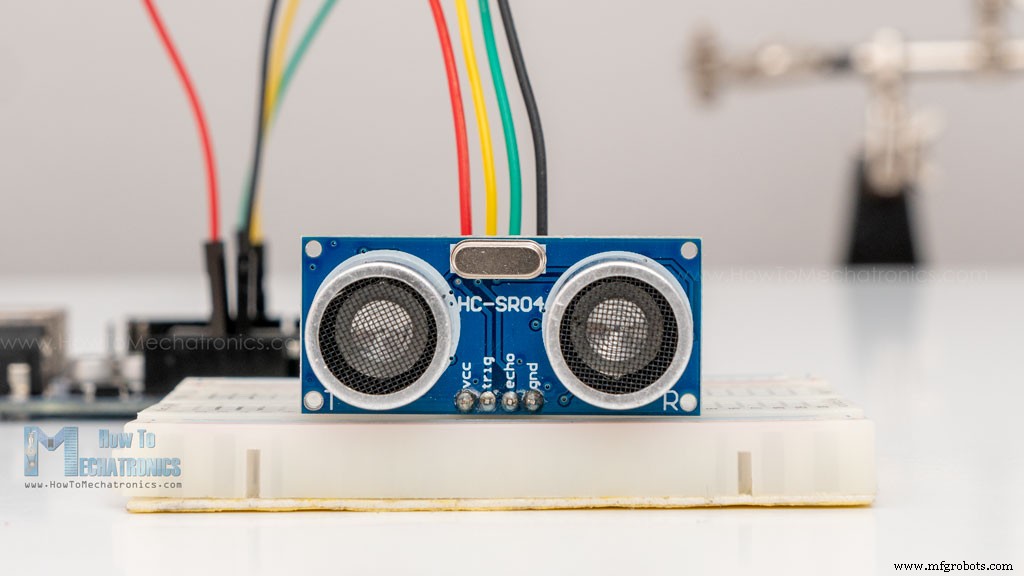
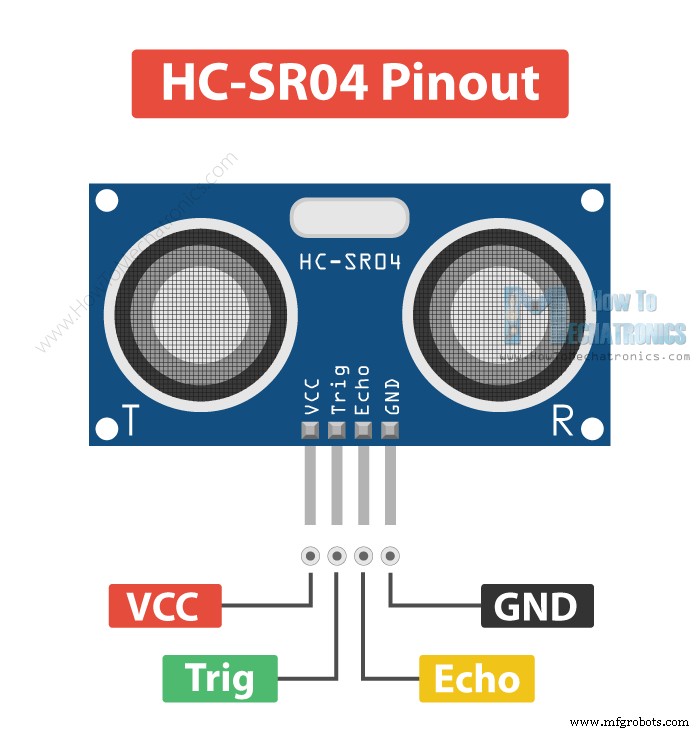
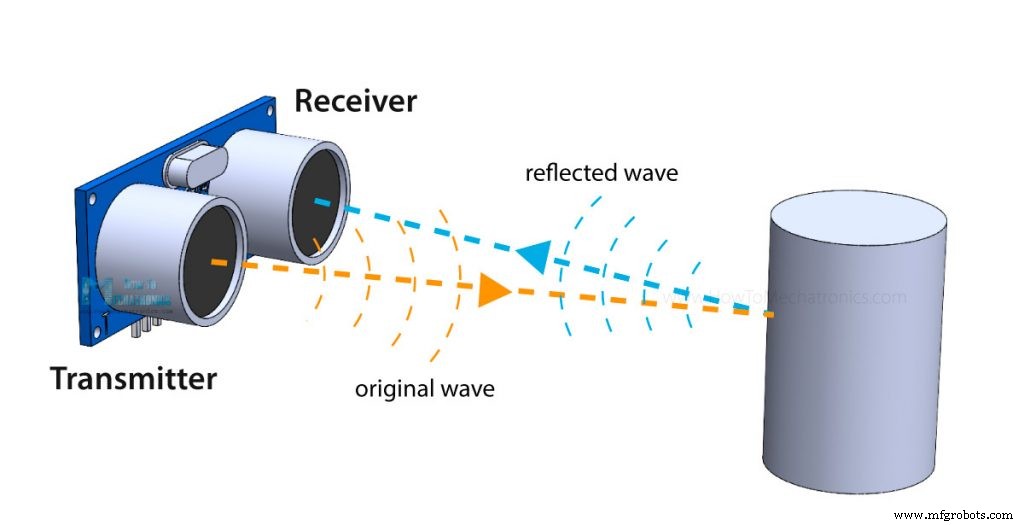
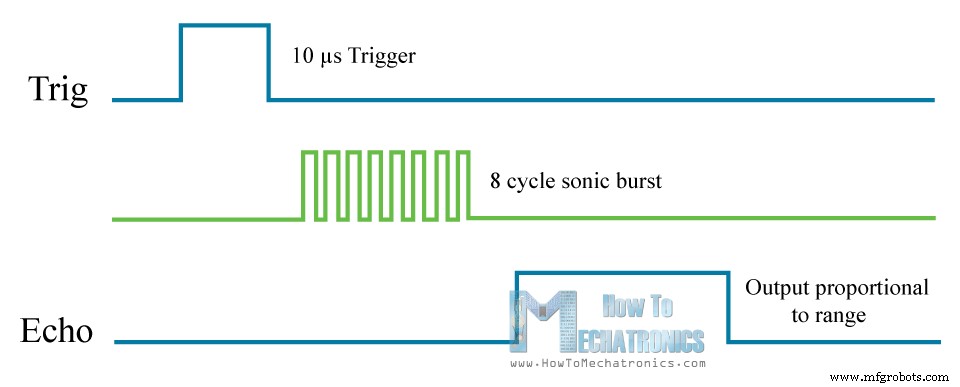
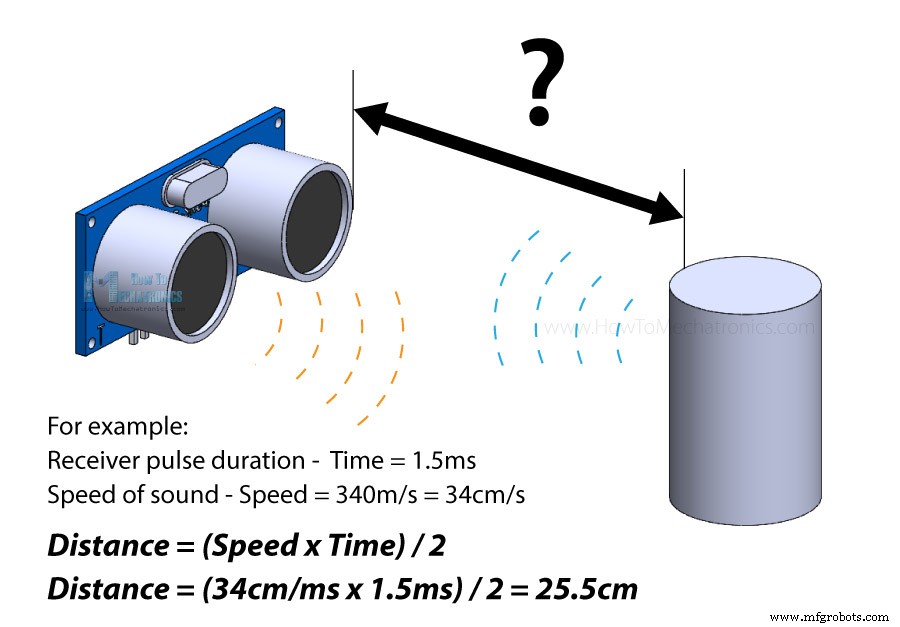
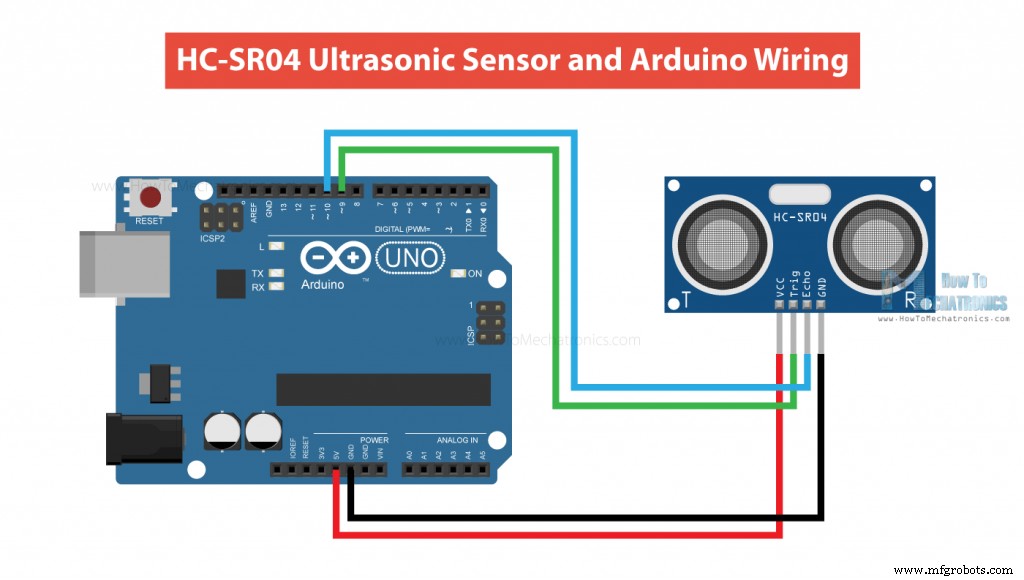
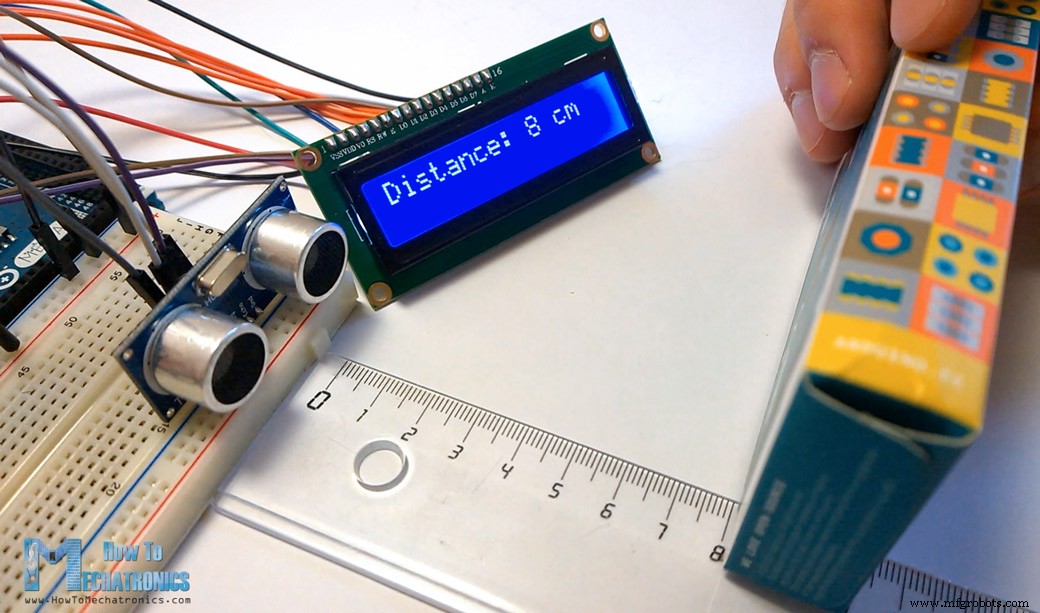
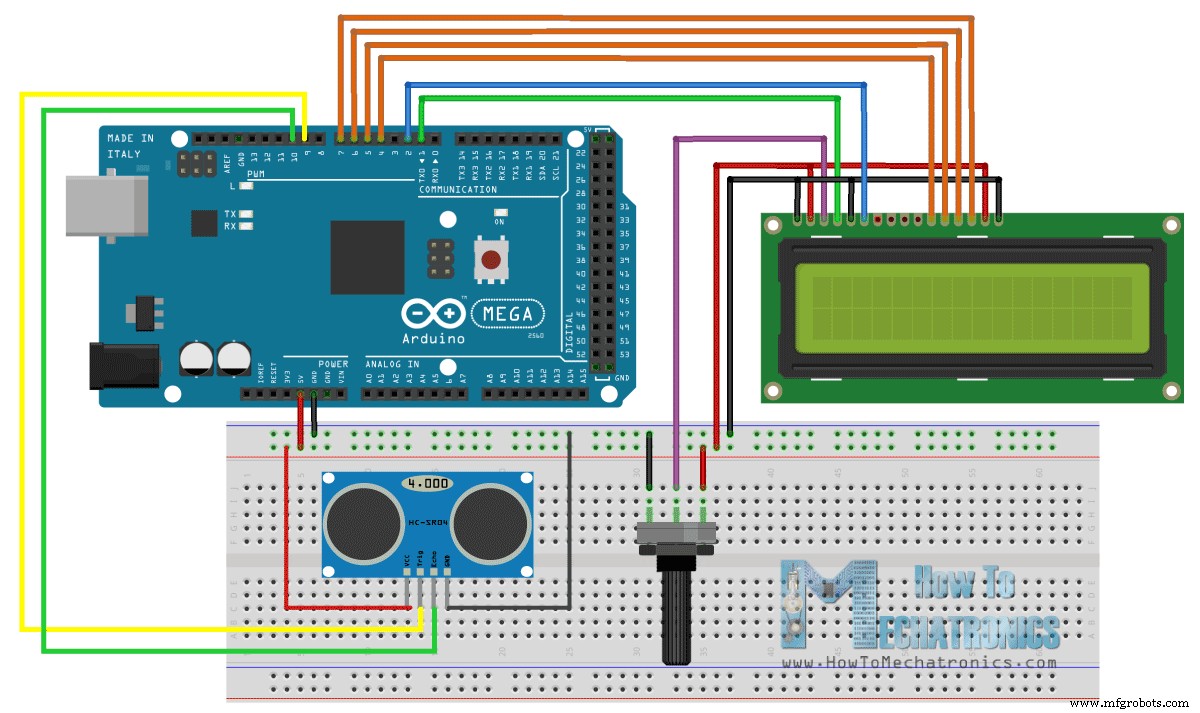
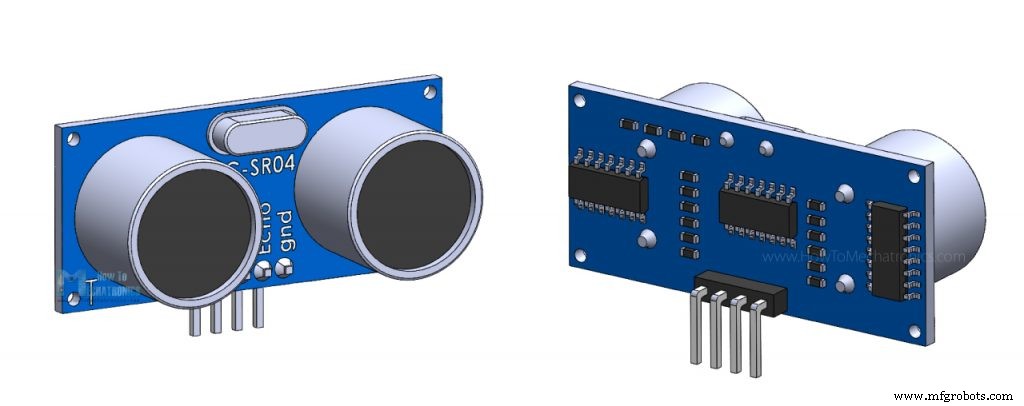
In this tutorial we will learn how the HC-SR04 ultrasonic sensor works and how to use it with Arduino. This is the most popular sensor for measuring distance and making obstacle avoiding robots with Arduino. I have already used the HC-SR04 ultrasonic sensor for building several cool Arduino projects and you can check them out here: You can watch the following video or read the written tutorial below. It has additional information and examples for the sensor, including specifications, pinouts, wiring diagrams, codes and more. The HC-SR04 is an affordable and easy to use distance measuring sensor which has a range from 2cm to 400cm (about an inch to 13 feet). The sensor is composed of two ultrasonic transducers. One is transmitter which outputs ultrasonic sound pulses and the other is receiver which listens for reflected waves. It’s basically a SONAR which is used in submarines for detecting underwater objects. Here are its main specifications: Here’s the pinout of the sensor: The sensor has 4 pins. VCC and GND go to 5V and GND pins on the Arduino, and the Trig and Echo go to any digital Arduino pin. Using the Trig pin we send the ultrasound wave from the transmitter, and with the Echo pin we listen for the reflected signal. It emits an ultrasound at 40 000 Hz which travels through the air and if there is an object or obstacle on its path It will bounce back to the module. Considering the travel time and the speed of the sound you can calculate the distance. In order to generate the ultrasound we need to set the Trig pin on a High State for 10 µs. That will send out an 8 cycle ultrasonic burst which will travel at the speed of sound. The Echo pins goes high right away after that 8 cycle ultrasonic burst is sent, and it starts listening or waiting for that wave to be reflected from an object. If there is no object or reflected pulse, the Echo pin will time-out after 38ms and get back to low state. If we receive a reflected pulse, the Echo pin will go down sooner than those 38ms. According to the amount of time the Echo pin was HIGH, we can determine the distance the sound wave traveled, thus the distance from the sensor to the object. For that purpose we are using the following basic formula for calculating distance: Distance = Speed x Time We actually know both the speed and the time values. The time is the amount of time the Echo pin was HIGH, and the speed is the speed of sound which is 340m/s. There’s one additional step we need to do, and that’s divide the end result by 2. and that’s because we are measuring the duration the sound wave needs to travel to the object and bounce back. Let’s say the Echo pin was HIGH for 2ms. If we want the get the distance result in cm, we can convert the speed of sound value from 340m/s to 34cm/ms. Distance = (Speed x Time) / 2 = (34cm/ms x 1.5ms) / 2 = 25.5cm. So, if the Echo pin was HIGH for 2ms (which we measure using the pulseIn() function), the distance from the sensor to the object is 34cm. Here’s how we need to connect the HC-SR04 sensor to an Arduino board. The Ground and the VCC pins of the module needs to be connected to the Ground and the 5 volts pins on the Arduino Board respectively and the trig and echo pins to any Digital I/O pin on the Arduino Board. You can get these components need for this tutorial from any of the sites below: Here’s a code for measuring distance using the HC-SR04 ultrasonic sensor and Arduino. First we have to define the Trig and Echo pins. In this case they are the pins number 9 and 10 on the Arduino Board and they are named trigPin and echoPin. Then we need a Long variable, named “duration” for the travel time that we will get from the sensor and an integer variable for the distance. In the setup we have to define the trigPin as an output and the echoPin as an Input and also start the serial communication for showing the results on the serial monitor. In the loop first we have to make sure that the trigPin is clear so you have to set that pin on a LOW State for just 2 µs. Now for generating the Ultra sound wave we have to set the trigPin on HIGH State for 10 µs. Using the pulseIn() function we read the travel time and put that value into the variable “duration”. This function has 2 parameters, the first one is the name of the Echo pin and for the second is the state of the pulse we are reading, either High or Low. In this case, we need this set to it HIGH, as the HC-SR04 sensors sets the Echo pin to High after sending the 8 cycle ultrasonic burst from the transmitter. This actually starts the timing and once we receive the reflected sound wave the Echo pin will go to Low which stops the timing. At the end the function will return the length of the pulse in microseconds. For getting the distance we will multiply the duration by 0.034 and divide it by 2 as we explained this equation previously. At the end we will print the value of the distance on the Serial Monitor. Here’s another example how to use the ultrasonic sensor with Arduino and display the results on an LCD. You can connect the ultrasonic sensor and the LDC as following: The code measuring the distance is pretty much the same as the basic example. Here, instead of printing the results on the serial monitor we print them on the LCD. If you need more details how to use and connect an LCD with Arduino you can check my particular tutorial for it. There are actually a simpler and better way to program the Arduino to measure distance using the HC-SR04 ultrasonic sensor, and that’s using the NewPing library. In the previously explained code we manually triggered the sensor and measured the received signal pulse duration. Then according to those results we calculated the distance based on it. Using the NewPing library we can get the distance with just a single line of code. Here’s an example code: It is much simpler than the previous example. We just use the call the ping_cm() method on the NewPing sonar object and we get the distance in centimeters. If we want the distance in inches we can use the ping_in() instead. The library also has few other useful features. For example, with the ping_median(iterations [, max_cm_distance]) method, we can get more accurate results, as it returns a median, or the middle value from several measurements. With the iterations parameter we set the number of samples the program will take for calculating the middle value. The default value is 5 iterations. The ping_median() returns the received pulse duration in microseconds. Nevertheless, for more info and details you can check the NewPing wiki page. The HC-SR04 sensor is fairly accurate, but as it work depends on the speed of sound, for more accurate results we should also take the air temperature into consideration. The speed of sound can significantly change as the air temperature changes. For example, at 20°C, the speed of sound is around 340m/s, but at -20°C the speed of sound is around 315m/s. The relative humidity affects the speed as well. So, if we use this sensor to measure distances at various temperatures we should implement a temperature compensation, and we can do that with the following formula: Velocity = 331.4 + 0.6 x Temperature + 0.0124 x Relative_Humidity Here’s an example: Along the HC-SR04 ultrasonic sensor, we will use the DHT11 / DHT22 sensor to measure the temperature and the humidity of the environment, and adjust the speed of sound value accordingly. So, first we are reading the temperature and humidity values from the DHT22 sensor, and then use those values to calculate the speed of sound. Then we get the duration the sound wave travel in microseconds, convert them to seconds and calculate the distance from the sensor to the objects in centimeters. I made a 3D model of the HC-SR04 ultrasonic sensor in case you need one when making your next project with it. You can download it in from the link below. You can find and download this 3D model at Thangs. Here are the dimensions of the HC-SR04 sensor: Please keep in mind that they can sometimes differ a little bit depending on the manufacturer. So, we have covered pretty much everything that we need to know about using the HC-SR04 Ultrasonic sensor with Arduino. It’s a great sensor for many DIY electronics projects where we need a non-contact distance measuring, detection of presence or objects, level or position something etc. I already mentioned the projects that I have made with this sensor at the beginning of the post. Here are some other cool projects using the HC-SR04 sensor and Arduino: I hope you enjoyed this tutorial and learned something new. Feel free to ask any question in the comments section below and don’t forget to check out my full collection of 30+ Arduino Projects.HC-SR04 Hardware Overview
Operating Voltage 5V DC Operating Current 15mA Operating Frequency 40KHz Min Range 2cm / 1 inch Max Range 400cm / 13 feet Accuracy 3mm Measuring Angle <15° Dimension 45 x 20 x 15mm HC-SR04 Ultrasonic Sensor Pinout
How the HC-SR04 Ultrasonic Distance Sensor Works?
How to Connect HC-SR04 Ultrasonic Sensor to Arduino
HC-SR04 Ultrasonic Sensor Arduino Code
/*
  Ultrasonic Sensor HC-SR04 and Arduino Tutorial

  by Dejan Nedelkovski,
  www.HowToMechatronics.com

*/
// defines pins numbers
const int trigPin = 9;
const int echoPin = 10;
// defines variables
long duration;
int distance;
void setup() {
  pinMode(trigPin, OUTPUT); // Sets the trigPin as an Output
  pinMode(echoPin, INPUT); // Sets the echoPin as an Input
  Serial.begin(9600); // Starts the serial communication
}
void loop() {
  // Clears the trigPin
  digitalWrite(trigPin, LOW);
  delayMicroseconds(2);
  // Sets the trigPin on HIGH state for 10 micro seconds
  digitalWrite(trigPin, HIGH);
  delayMicroseconds(10);
  digitalWrite(trigPin, LOW);
  // Reads the echoPin, returns the sound wave travel time in microseconds
  duration = pulseIn(echoPin, HIGH);
  // Calculating the distance
  distance = duration * 0.034 / 2;
  // Prints the distance on the Serial Monitor
  Serial.print("Distance: ");
  Serial.println(distance);
}Code language: Arduino (arduino)
Code Explanation
// defines pins numbers
const int trigPin = 9;
const int echoPin = 10;

// defines variables
long duration;
int distance;Code language: Arduino (arduino)void setup() {
pinMode(trigPin, OUTPUT); // Sets the trigPin as an Output
pinMode(echoPin, INPUT); // Sets the echoPin as an Input
Serial.begin(9600); // Starts the serial communication
}Code language: Arduino (arduino)// Clears the trigPin
digitalWrite(trigPin, LOW);
delayMicroseconds(2);
// Sets the trigPin on HIGH state for 10 micro seconds
digitalWrite(trigPin, HIGH);
delayMicroseconds(10);
digitalWrite(trigPin, LOW);Code language: Arduino (arduino)// Reads the echoPin, returns the sound wave travel time in microseconds
duration = pulseIn(echoPin, HIGH);Code language: Arduino (arduino)// Calculating the distance
distance= duration*0.034/2;
// Prints the distance on the Serial Monitor
Serial.print("Distance: ");
Serial.println(distance);Code language: Arduino (arduino)Arduino Ultrasonic Sensor and LCD Display Example
/*
  Ultrasonic Sensor HC-SR04 and Arduino Tutorial

  by Dejan Nedelkovski,
  www.HowToMechatronics.com

*/
#include <LiquidCrystal.h> // includes the LiquidCrystal Library
LiquidCrystal lcd(1, 2, 4, 5, 6, 7); // Creates an LCD object. Parameters: (rs, enable, d4, d5, d6, d7)
const int trigPin = 9;
const int echoPin = 10;
long duration;
int distanceCm, distanceInch;
void setup() {
  lcd.begin(16, 2); // Initializes the interface to the LCD screen, and specifies the dimensions (width and height) of the display
  pinMode(trigPin, OUTPUT);
  pinMode(echoPin, INPUT);
}
void loop() {
  digitalWrite(trigPin, LOW);
  delayMicroseconds(2);
  digitalWrite(trigPin, HIGH);
  delayMicroseconds(10);
  digitalWrite(trigPin, LOW);
  duration = pulseIn(echoPin, HIGH);
  distanceCm = duration * 0.034 / 2;
  distanceInch = duration * 0.0133 / 2;
  lcd.setCursor(0, 0); // Sets the location at which subsequent text written to the LCD will be displayed
  lcd.print("Distance: "); // Prints string "Distance" on the LCD
  lcd.print(distanceCm); // Prints the distance value from the sensor
  lcd.print(" cm");
  delay(10);
  lcd.setCursor(0, 1);
  lcd.print("Distance: ");
  lcd.print(distanceInch);
  lcd.print(" inch");
  delay(10);
}Code language: Arduino (arduino)
Example Code Using the NewPing Library
#include <NewPing.h>

#define TRIGGER_PIN  9
#define ECHO_PIN     10
#define MAX_DISTANCE 400 // Maximum distance we want to measure (in centimeters).


NewPing sonar(TRIGGER_PIN, ECHO_PIN, MAX_DISTANCE); // NewPing setup of pins and maximum distance.

void setup() {
  Serial.begin(9600);
}

void loop() {
  delay(50);                    // Wait 50ms between pings (about 20 pings/sec). 29ms should be the shortest delay between pings.

  int distance = sonar.ping_cm(); // Send ping, get distance in cm and print result (0 = outside set distance range)

  Serial.print("Distance: ");
  Serial.print(distance);
  Serial.println("cm");
}Code language: Arduino (arduino)Improving HC-SR04 Distance Sensor Accuracy with DHT22 Temperature Sensor

Arduino code
/*
  Example made by Dejan, How To Mechatronics,
  https://howtomechatronics.com/

*/

#include <NewPing.h>  // https://bitbucket.org/teckel12/arduino-new-ping/wiki/Home
#include "dht.h"      // https://github.com/RobTillaart/DHTlib

#define TRIGGER_PIN  9
#define ECHO_PIN     10
#define MAX_DISTANCE 400
#define dht22 5 // DHT22 temperature and humidity sensor

NewPing sonar(TRIGGER_PIN, ECHO_PIN, MAX_DISTANCE);
dht DHT; // Creats a DHT object

int readDHT, temp, hum;
float speedOfSound, distance, duration;

void setup() {
  Serial.begin(9600);
}

void loop() {
  delay(100);

  // Read temperature and humidity from DHT22 sensor
  readDHT = DHT.read22(dht22); // Reads the data from the sensor
  temp = DHT.temperature; // Gets the values of the temperature
  hum = DHT.humidity; // Gets the values of the humidity


  speedOfSound = 331.4 + (0.6 * temp) + (0.0124 * hum); // Calculate speed of sound in m/s

  duration = sonar.ping_median(10); // 10 interations - returns duration in microseconds
  duration = duration/1000000; // Convert mircroseconds to seconds
  distance = (speedOfSound * duration)/2;
  distance = distance * 100; // meters to centimeters

  Serial.print("Distance: ");
  Serial.print(distance);
  Serial.println("cm");
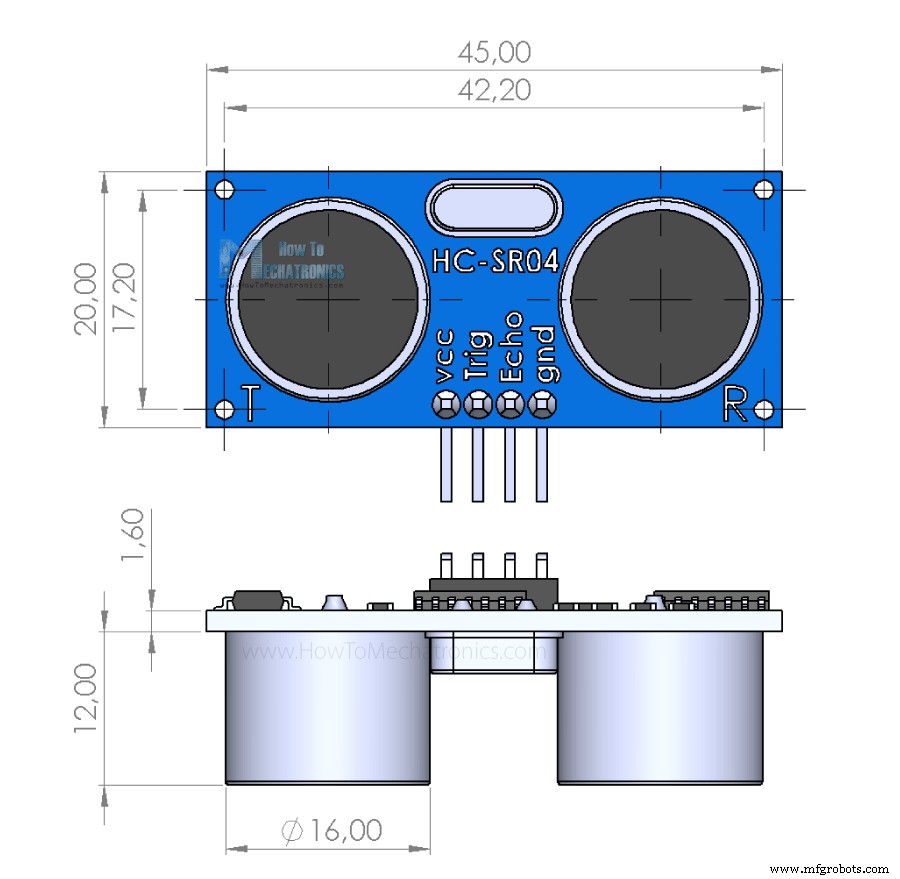
}Code language: Arduino (arduino)HC-SR04 Dimensions and 3D Model
Conclusion
Manufacturing process
- HC‑SR04 Ultrasonic Sensor: How It Works and Key Applications
- Arduino Sensors: Types, Applications, and Real‑World Projects
- Connecting HC‑SR04 Ultrasonic Sensor to Raspberry Pi 3 – A Complete Guide
- Build a Smart IoT Jar with ESP8266, Arduino & Ultrasonic Sensor – Real‑Time Monitoring
- Compact Arduino Radar System with HC‑SR04 Ultrasonic Sensor & 1.8" Display
- Build an Ultrasonic Range Detector Using Arduino UNO and SR04 Sensor
- MKR1000 with DHT22: Real‑Time Temperature & Humidity Monitoring to Azure
- Precise Ultrasonic Distance Sensing with Arduino – Step‑by‑Step Guide
- Mastering Ultrasonic Sensor Circuits: The Ultimate Guide
- HC-SR04 Ultrasonic Sensor Explained: Working Principles and Arduino Integration