


Spooky Halloween PIR Motion Speaker: Scare & Light Effects Kit
Components and supplies
 |
| × | 1 | |||
| × | 1 | ||||
| × | 1 | ||||
| × | 1 | ||||
| × | 1 | ||||
| × | 3 | ||||
| × | 1 | ||||
| × | 1 | ||||
| × | 1 | ||||
| × | 1 | ||||
| × | 1 |
About this project
//UPDATE: Added laughing ghost variant in zip file and extra battery pack
I wanted to make several small concealed audio boxes to put in the front garden to scare people for Halloween as the approached the front door. This one describes the most complicated one I wanted to build and was also my first test case, it has audio with a scary sound track, and 2 different visual lighting effects to catch peoples attention.
Before I get started I would like to credit Kristian Blåsol with the original concept for using a relay to control an MP3 amplifier module.
The concept behind this build is to make a self contained battery (or externally supplied 12v) motion activated speak with two outputs to supply 12v LEDs for effects if desired. It needed be cheap (total costs here less than £20/$25), customisable and able to take a bit of weather for one day during halloween.
Here I have opted for a 12v external supply as I have a nearby outdoor plug, and wanted to use some quite bright power hungry LED light drawing 2A. It would work with virtually no modifications with a 5v/12v battery powered unit though AA Battery holders or a small 5000mah USB powered phone charger, and could be quickly modified to power 5v external lights too off the same supply, just swap over the 12v incoming supply for your 5v supply.
(Note: post prolonged use I noticed that the Arduino struggled to supply enough juice to the mp3 module at higher volumes and caused the Arduino reset during playback, so I cut in a dedicated 5v battery supply)
Part 1 - BuildThe principle behind this build is to use an Arduino UNO to control the MP3 player and lighting. To do this we are going to use a 4 way relay module, two of which will be used to control the play and previous track buttons by simulating a PRESS on the buttons, and the remaining two to power the LEDs by opening and closing the circuit.
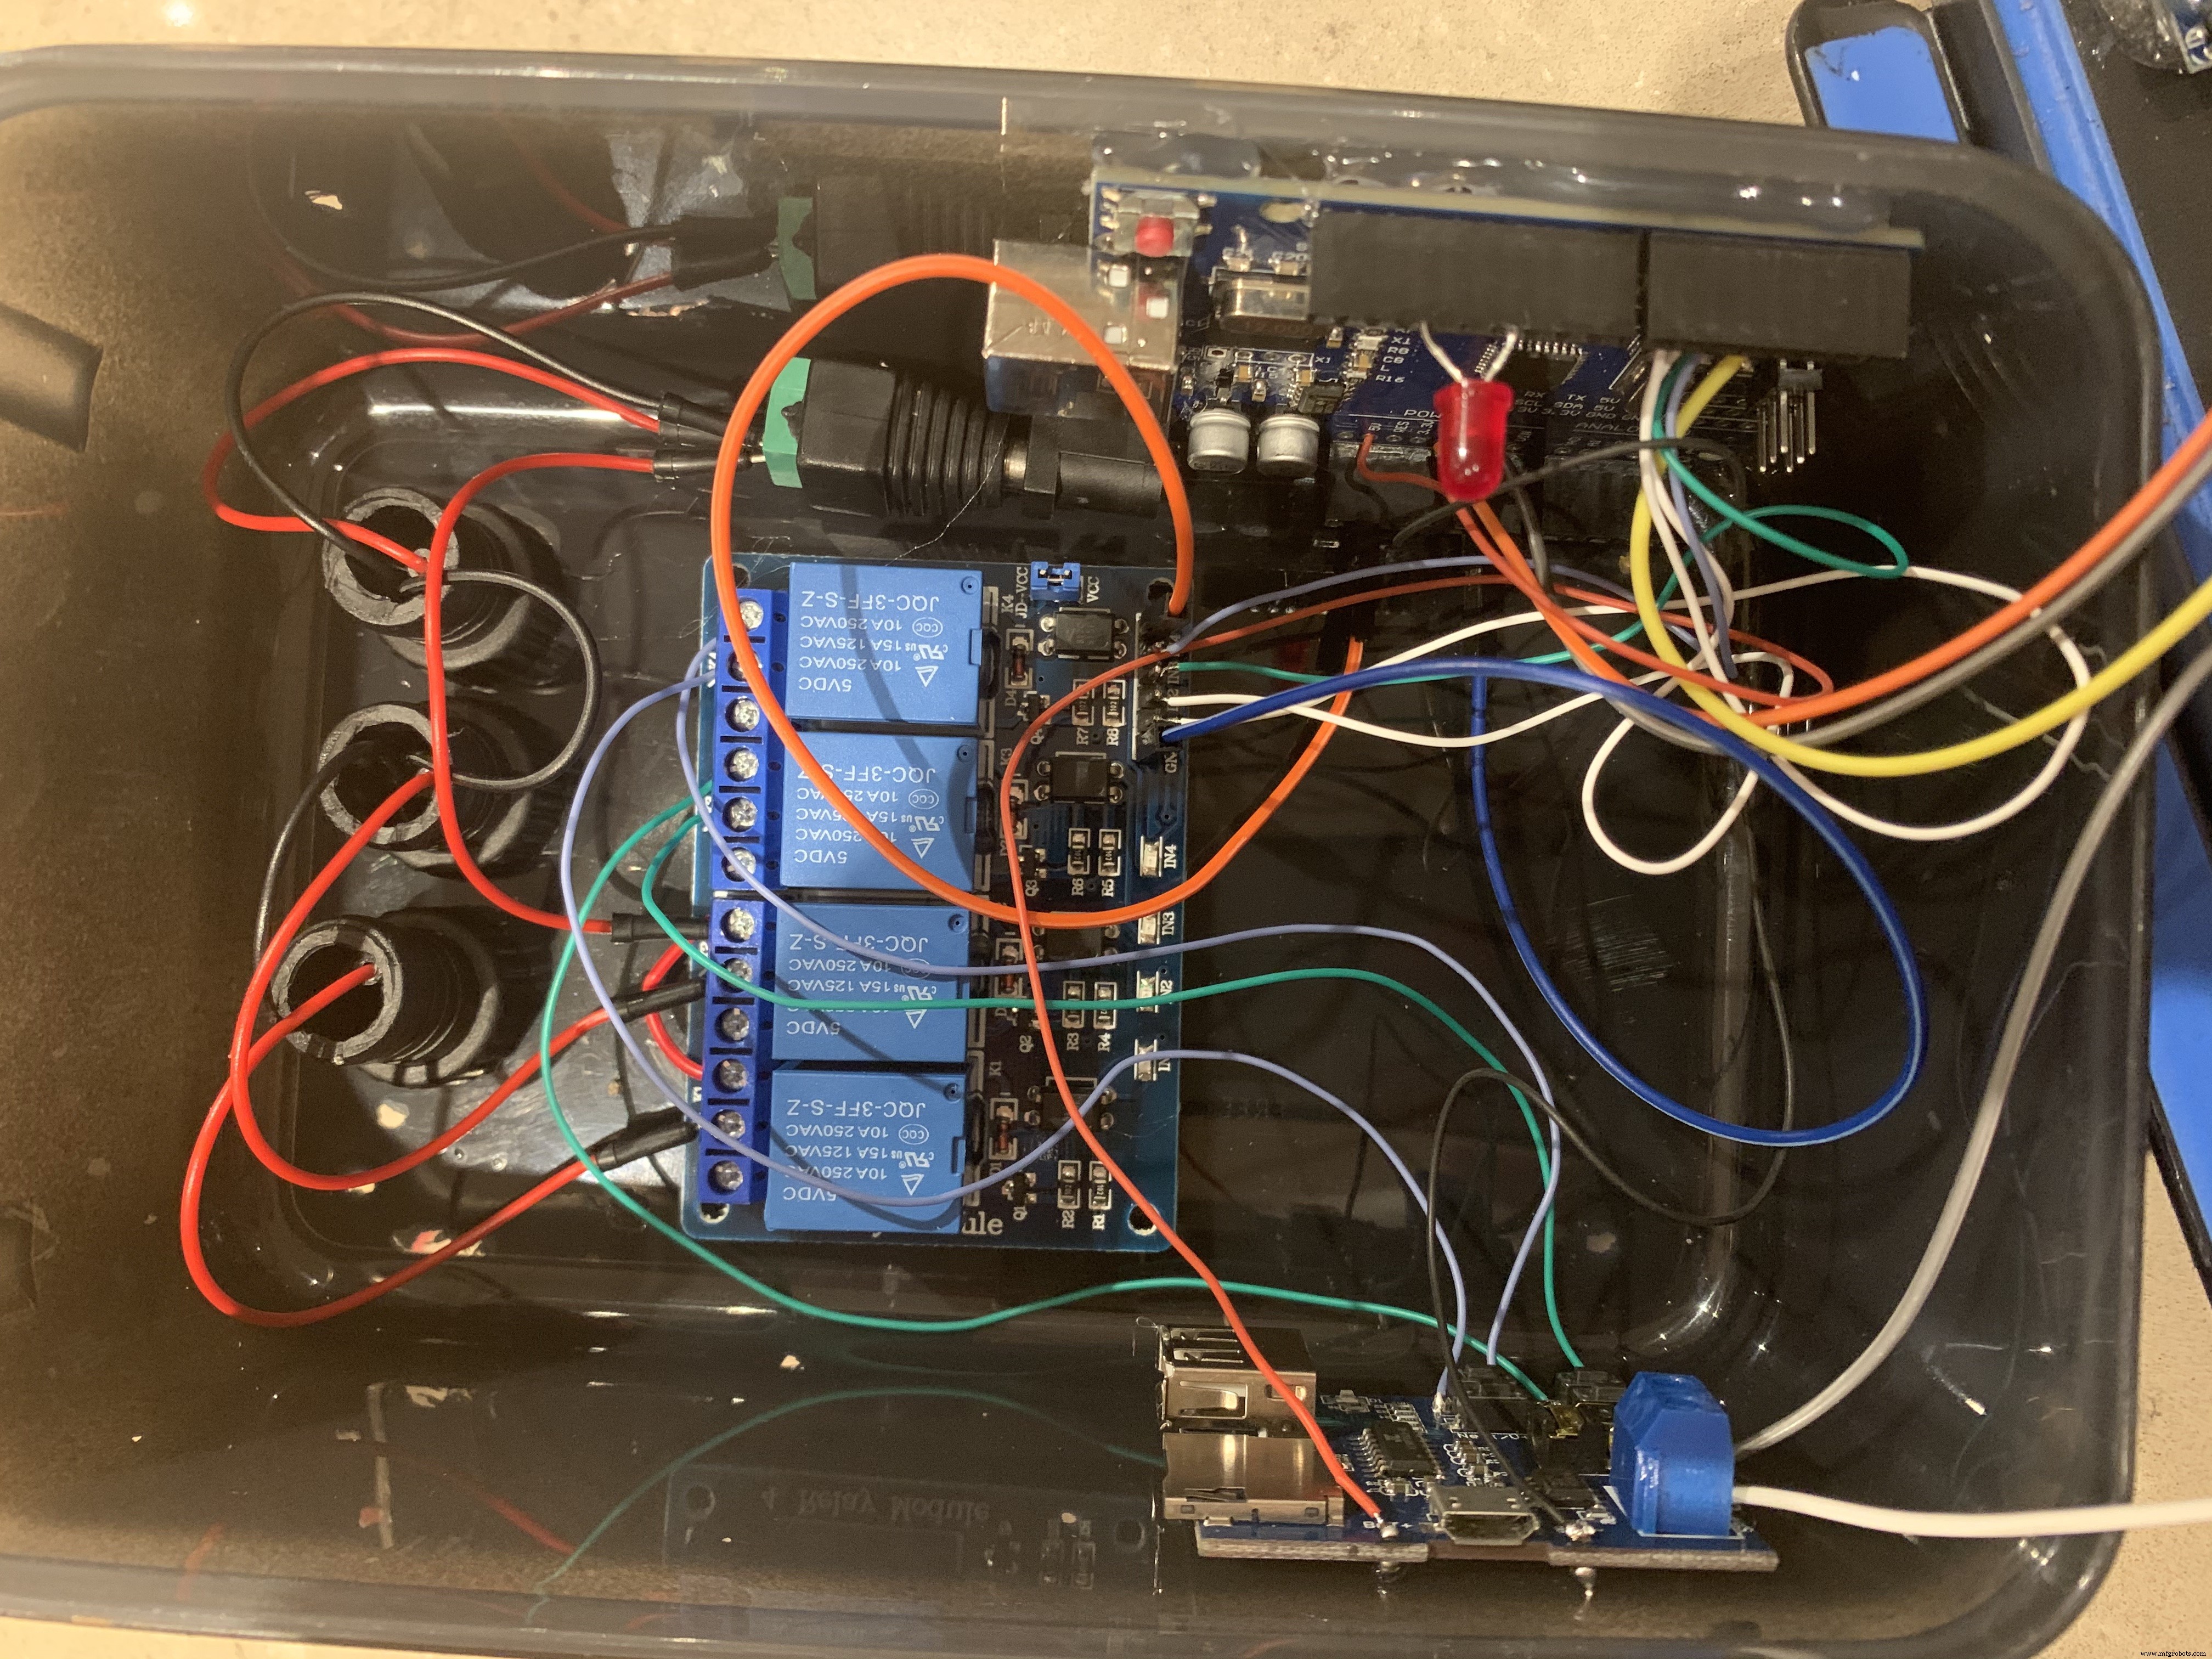
I used stranded 30AWG for all the control wiring all at 100mm long and 18AWG for the 12v circuit, also left long inside the box. It looks a mess but there is plenty of space inside the box and it makes it easy to take the lid off and components out without pulling off anything as I have wanted to solder it all together for reliability. In order to allow me to get the lid off however, I used female plugs for the PIR sensor connection and the speaker cables into the MP3 module are screwed in place, this allows future disconnection and removal off the lid.
I wired up the circuit as shown in the wiring diagram, with the 12v supply coming into the waterproof connector. To switch the external LEDs I connected the -v side of the incoming supply to the other -v side of the output connectors, and the routed the +v side through the relays to enable the switching.
To make the case I drilled a 32mill hole centrally for the speaker and a 16mm hole at the top to one side for the PIR sensor. I then sprayed the whole thing black to keep the LEDs on the circuit boards from giving the speaker away and keeping it concealed.
(Not shown, to waterproof the speaker I use a bicycle inner tube and repair kit to glue a square patch on the outside to allow the sound out but keep the water from getting in. Then bolted through it.)
The speaker was then screwed in place and the PIR sensor was glued in place with the glue gun (a later change meant that I ended up using an epoxy resin to fix the PIR in place as the glue gun glue let water in).
All the components were arrange as per the photo, this allowed access to the USB ports on the MP3 module and the Arduino.
(If you wanted to power the unit via 5v, you can use the USB connector on the Arduino or the micro USB connector on the MP3 player.)
Once the build was done and code uploaded I tested the unit to make sure it was working fully, and then to ensure that the soldered connections had a bit of extra support I applied some glue gun glue to the key areas that were vulnerable, such as the speaker connections,
Note, the MP3 module used requires a USB/SD card formatted for FAT32, other formats didn't work for me.
Part 2 - soundThe sound file was edited with Audacity and source files/credits are
screams
creepy laugh
I see you
stone walking sound
Part 3 - SetupThe audio file and the switching on the relays by the Arduino programme are timed. If you choose to use a different audio file then manipulate the timings as test as you go, I have noted the code that needs changing.
Part 4 - Real World TestPart 5 - Final Build


Code
- Halloween PIR proximity activated speak and light
Halloween PIR proximity activated speak and light Arduino
//Assign pins
int pirSENSOR = 2;      //SENSOR to detect motion, set to maximum sensitivity and range
int previousBUTTON = 3; //button on MP3 module
int playBUTTON = 4;     //button on MP3 module
int whiteLED = 5;       //Whiteflashing light
int redLED = 6;         //Blood sequnce light during screem
int statusLED = 10;


void setup() {
 pinMode(pirSENSOR,INPUT);
 pinMode(previousBUTTON,OUTPUT);
 pinMode(playBUTTON,OUTPUT);
 pinMode(whiteLED,OUTPUT);
 pinMode(redLED,OUTPUT);
 pinMode(statusLED,OUTPUT);
 digitalWrite(previousBUTTON,HIGH); //set initial state, in my case Relay HIGH is OFF/OPEN
 digitalWrite(playBUTTON,HIGH);     //set initial state, in my case Relay HIGH is OFF/OPEN
 digitalWrite(whiteLED,HIGH);       //set initial state, in my case Relay HIGH is OFF/OPEN
 digitalWrite(redLED,HIGH);         //set initial state, in my case Relay HIGH is OFF/OPEN
}

void loop() {
//Play Sound
  if (digitalRead(pirSENSOR) == HIGH) {    //HIGH on my PIR sensor mean positive detection of movement
    digitalWrite(previousBUTTON,LOW);      //PRESS previous button which plays sound from begining
    delay(100);
    digitalWrite(previousBUTTON,HIGH);     //release previous button
    delay(100);

//LED Flash sequence
    //grab attention
    digitalWrite(whiteLED,LOW);
    delay(1000);
    digitalWrite(whiteLED,HIGH);
    delay(500);
    digitalWrite(whiteLED,LOW);
    delay(500);
    digitalWrite(whiteLED,HIGH);
    delay(9000);

    //I See you
    digitalWrite(whiteLED,LOW);
    delay(500);
    digitalWrite(whiteLED,HIGH);
    delay(100);
    digitalWrite(whiteLED,LOW);
    delay(500);
    digitalWrite(whiteLED,HIGH);
    delay(300);
    digitalWrite(whiteLED,LOW);
    delay(500);
    digitalWrite(whiteLED,HIGH);
    delay(300);
    digitalWrite(whiteLED,LOW);
    delay(300);
    digitalWrite(whiteLED,HIGH);
    delay(300);
    digitalWrite(whiteLED,LOW);
    delay(300);
    digitalWrite(whiteLED,HIGH);
    delay(300);
    digitalWrite(whiteLED,LOW);
    delay(300);
    digitalWrite(whiteLED,HIGH);
    delay(300);
    digitalWrite(whiteLED,LOW);
    delay(300);
    digitalWrite(whiteLED,HIGH);
    delay(6000);

 //children sounds
    digitalWrite(whiteLED,LOW);
    delay(300);
    digitalWrite(whiteLED,HIGH);
    delay(1000);
    digitalWrite(whiteLED,LOW);
    delay(100);
    digitalWrite(whiteLED,HIGH);
    delay(300);
    digitalWrite(whiteLED,LOW);
    delay(100);
    digitalWrite(whiteLED,HIGH);
    delay(300);
    digitalWrite(whiteLED,LOW);
    delay(100);
    digitalWrite(whiteLED,HIGH);
    delay(300);
    digitalWrite(whiteLED,LOW);
    delay(100);
    digitalWrite(whiteLED,HIGH);
    delay(1000);
    digitalWrite(whiteLED,LOW);
    delay(600);
    digitalWrite(whiteLED,HIGH);
    delay(1400);
    digitalWrite(whiteLED,LOW);
    delay(100);
    digitalWrite(whiteLED,HIGH);
    delay(7000);

 //scream/blood sequence
    digitalWrite(redLED,LOW);
    delay(3000);
    digitalWrite(redLED,HIGH);
    delay(100);

 //Stop Sound
    digitalWrite(playBUTTON,LOW);          //pause/stop the sound playback
    delay(100);
    digitalWrite(playBUTTON,HIGH);         //release play button
    delay(60000);                          //wait 1minute before allowing to reactive
  }

  else {
    digitalWrite(statusLED,HIGH);          //If PIR detects nothing, maintain status light on to draw small amount of power as some USB batteries will deactivate
  }

}
Schematics
Please note that this variant only has one battery pack, I later added a second independent supply for the audio as it was drawing to much current and shutting down the Arduino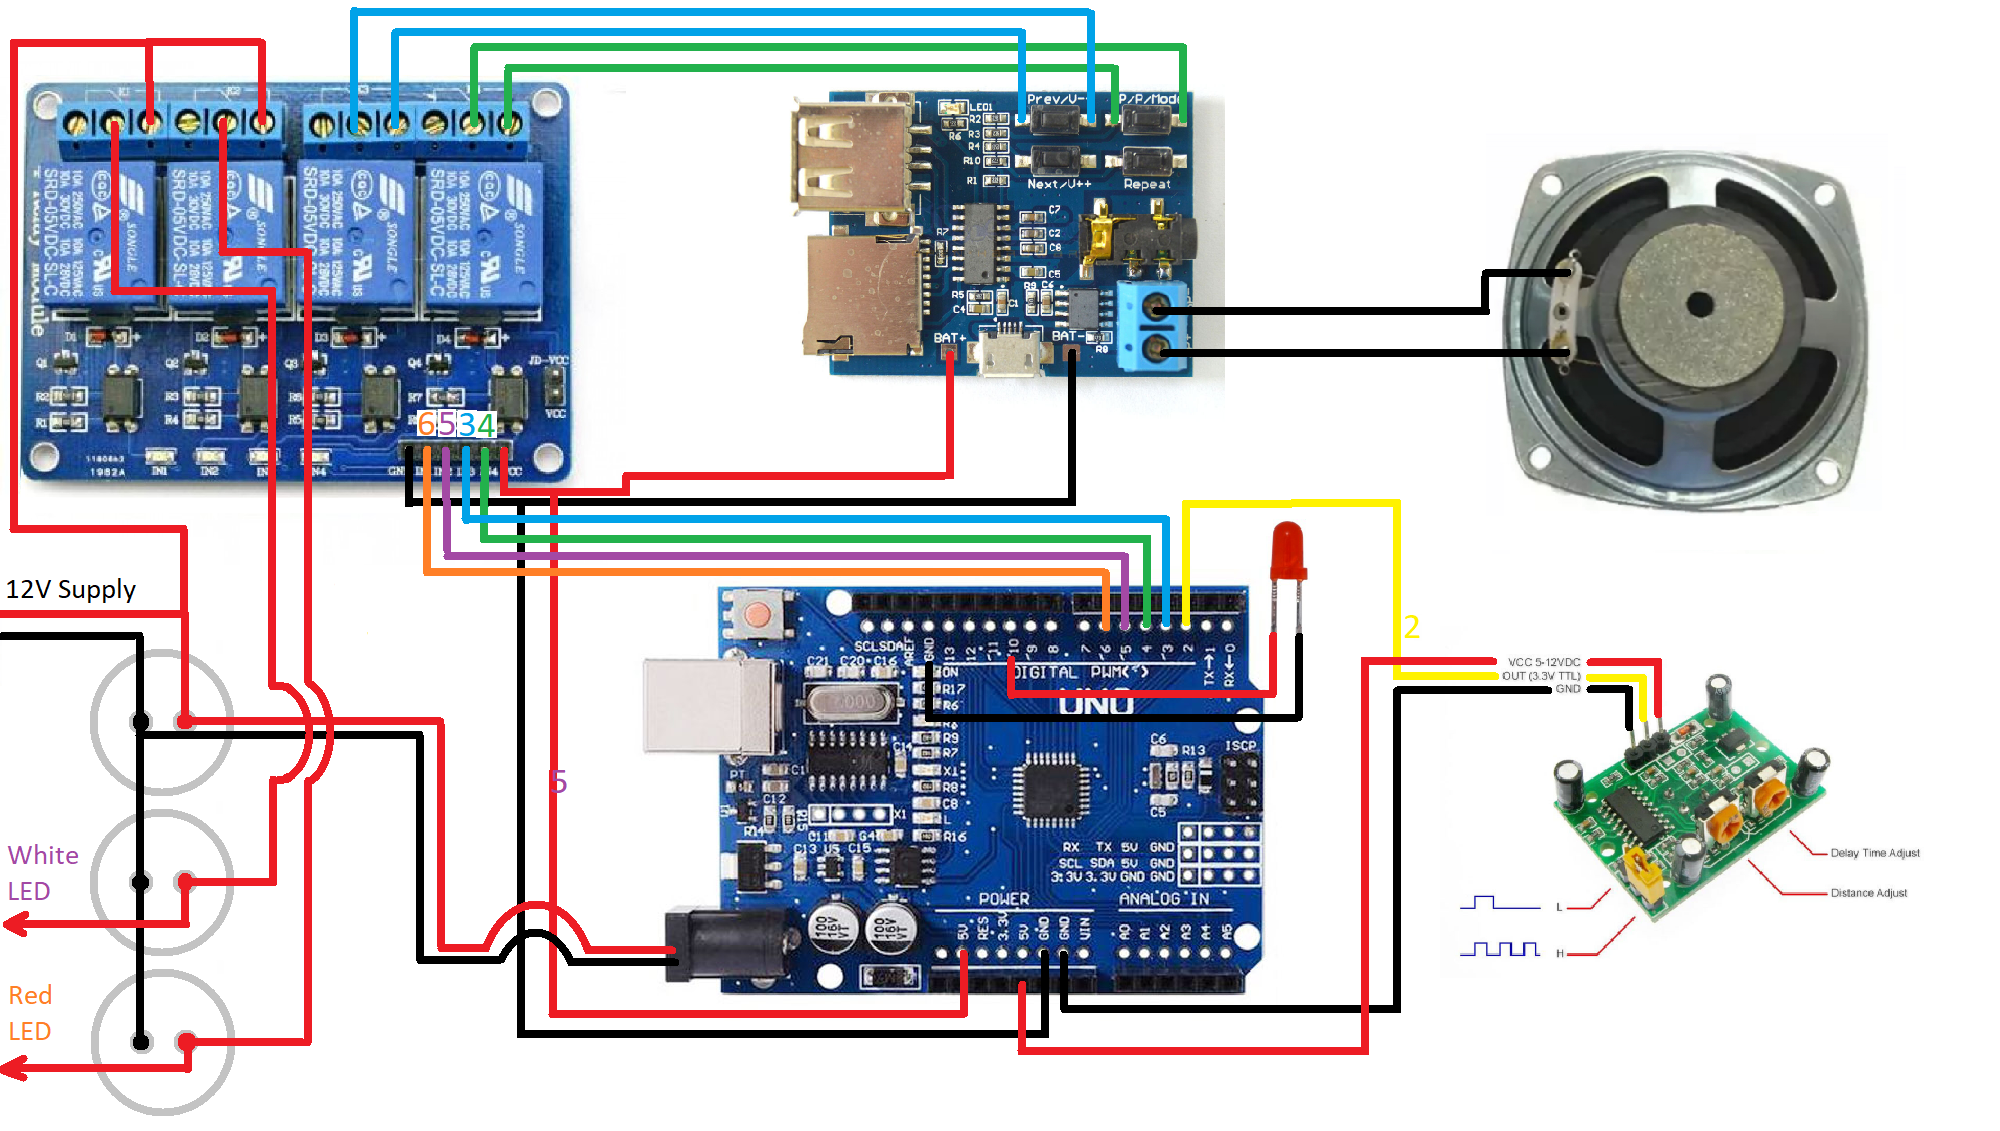
 PIR glued in place and speaker bolted with plastic screws
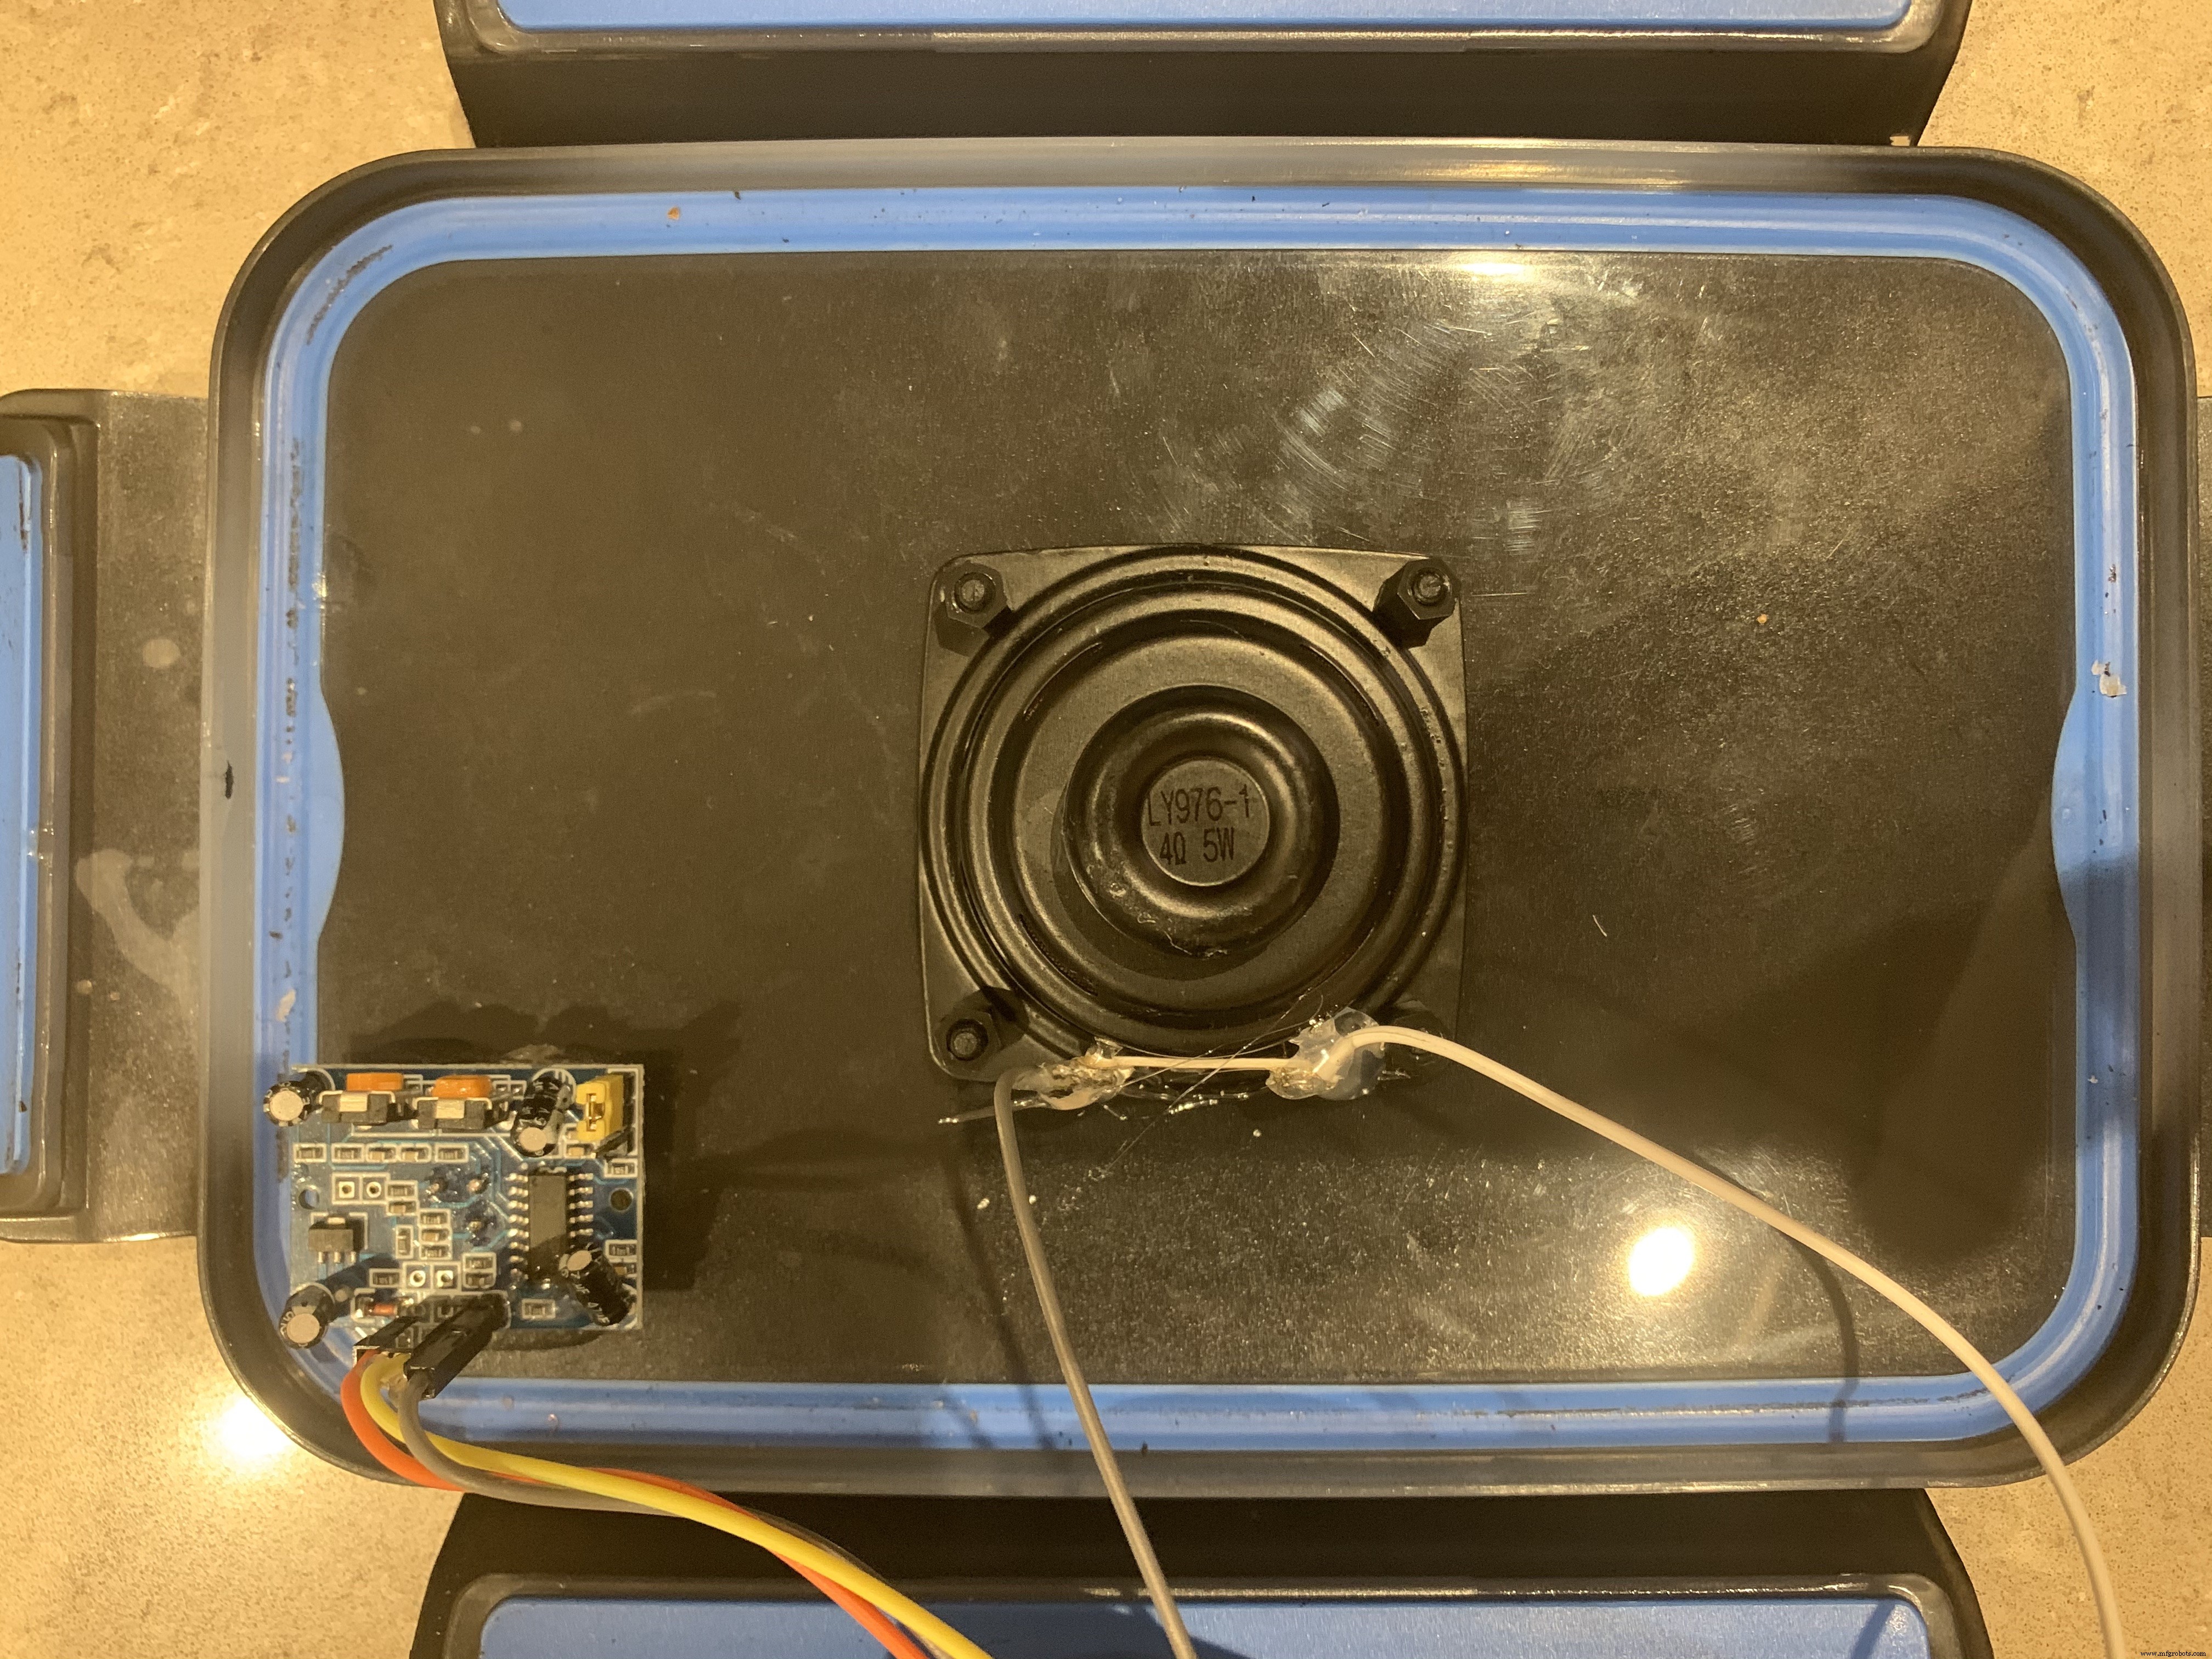 voices_audio_dUluBtMyqG.mp3this one is just a voice box with no lighting effects. 6 different laughs played when people pass bylaughing_ghost_variant_VsB0Y8CTlM.ziparchive_IipdobBdHs.zipgraveyard_ambience_sound_fx_(128_kbps)_nhuprhuJcc.mp3
Manufacturing process
- Build a Robust Temperature & Sensor API on Raspberry Pi Using the GY‑91 Module
- Master Raspberry Pi GPIO: Interfacing a PIR Motion Sensor on B+/Model 2
- How to Connect, Calibrate, and Program the HC‑SR501 PIR Motion Sensor with a Raspberry Pi
- Capture Water Droplets in Action Using Arduino Nano – DIY High-Speed Photography
- DIY Arduino J.A.R.V.I.S Voice Assistant with Arc Reactor Design
- Arduino PIR Sensor Halloween Prank: Motion-Triggered Scare with LED Lights & MP3 Audio
- Smart 3D Printed Pet Feeder Powered by Arduino Nano
- Integrate SIM800L GPRS Module with Arduino Using AT Commands
- Build a Retro-Style FM Radio with the TEA5767 Module – Step‑by‑Step DIY Guide
- PIR Motion Sensor: Working Principles & Arduino Integration Guide