Arduino PIR Sensor Halloween Prank: Motion-Triggered Scare with LED Lights & MP3 Audio
Components and supplies
About this project
This is a halloween scare prank I made last year for the holidays. It reacts to movement in front of it, and growls menacing with flashing red eyes and rhunder flashes... It was really effectful, and scared my own kids half to death when we got back from trick or treating and it had gotten dark, and the box standing on the porch was forgotten >:)
So the project consists of two tutorials, the first is how to connect the PIR-sensor and connect the LED's. The second one is how to interact with a mp3 player to play the growling sound.
Part 1In this tutorial I go through how to connect and use the PIR-sensor. It is a very simple sensor to interface with, and is a perfect partner to Arduino, especially in Halloween times. I make a simple sketch that I mount in a mask that gives it lightning and glowing eyes.
Part 2In this tutorial we hook up a generic mp3 player to an Arduino to give projects the possibility to play sounds. This particualar project was done to give my Halloween scare prank some sound. Instead of using an MP3 shield we use a generic mp3 player bought on ebay for about 3$. It works great when you just have one sound you want to play.
Code
- Halloween Arduino scare box
Halloween Arduino scare boxArduino
A simple installation to scare visiting trick or treaters using motion sensors, lights and sounds...//Example of using the PIR-sensor, great for Halloween pranks and scares in your yard or porch.
//Watch the video for full walk through and examples:
//part 1. pir-sensor and lights: https://youtu.be/ZAUXMoygVOU
//part 2. sound: https://www.youtube.com/watch?v=uR_UTPioQYc
int pirSensor=2;
int previousPin = 3;
int pausePin = 4;
int statusLed=10;
int led = 9; // the pin that the LED is attached to
void setup(){
pinMode(pirSensor, INPUT);
pinMode(statusLed, OUTPUT);
pinMode(previousPin, OUTPUT);
pinMode(pausePin, OUTPUT);
pinMode(led, OUTPUT);
}
void loop(){
if (digitalRead(pirSensor) == HIGH) {
//Sound!
digitalWrite(pausePin, HIGH);
delay(100);
digitalWrite(previousPin, LOW);
delay(100);
digitalWrite(previousPin,HIGH);
delay(2000);
//Glowing Eyes effect
digitalWrite(statusLed, LOW);
delay(100);
digitalWrite(statusLed, HIGH);
analogWrite(led, 0);
//Here we put whatever code is when Pir-sensor is activated
for (int i=0; i<255; i++) {
Serial.println(i);
analogWrite(led, i);
delay(5);
}
digitalWrite(statusLed, LOW);
delay(100);
digitalWrite(statusLed, HIGH);
delay(100);
digitalWrite(statusLed, LOW);
delay(100);
digitalWrite(statusLed, HIGH);
delay(100);
digitalWrite(statusLed, LOW);
delay(100);
digitalWrite(statusLed, HIGH);
delay(100);
digitalWrite(statusLed, LOW);
delay(2000);
for (int i=255; i>=0; i--) {
Serial.println(i);
analogWrite(led, i);
delay(5);
}
digitalWrite(statusLed, HIGH);
analogWrite(led, 0);
//End glowing eyes effect
//End Sound!
delay(2000);
digitalWrite(previousPin, HIGH);
delay(100);
digitalWrite(pausePin, LOW);
delay(100);
digitalWrite(pausePin, HIGH);
delay(1000);
}
else {
digitalWrite(statusLed, HIGH);
analogWrite(led, 0);
}
}
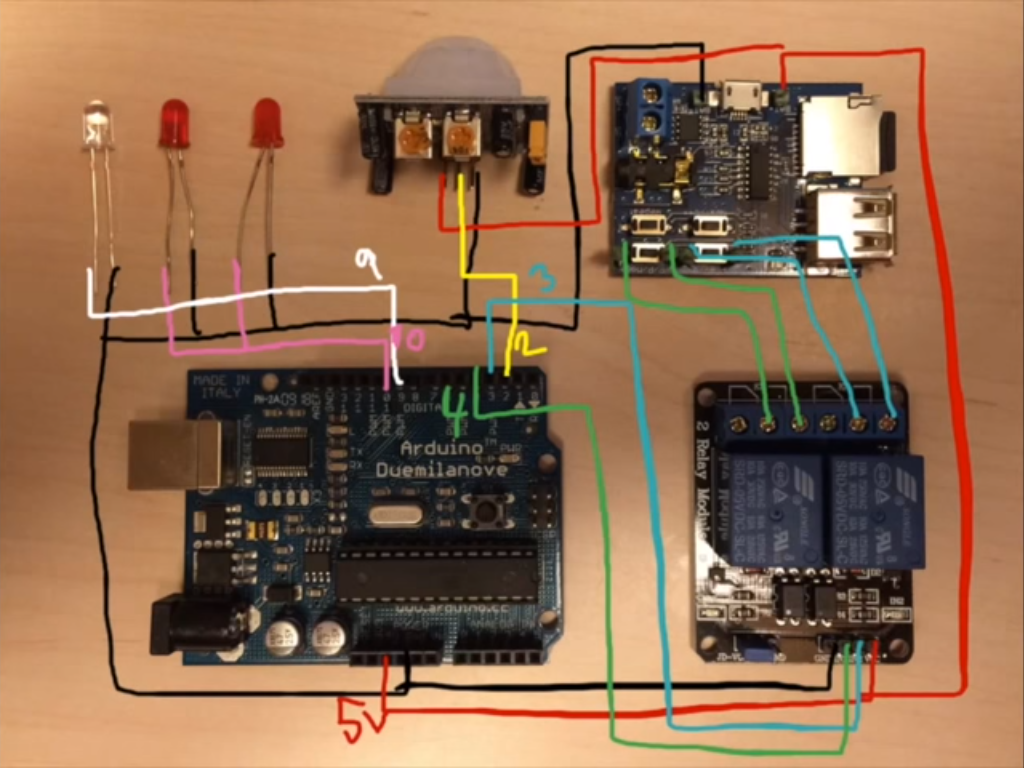
Schematics
It is well explained in the video if there are any questions.