Build a Retro-Style FM Radio with the TEA5767 Module – Step‑by‑Step DIY Guide
Components and supplies
Arduino Nano R3
×
1
TEA5767 FM radio module
×
1
Analog meters from old radio
×
2
Adafruit Standard LCD - 16x2 White on Blue
×
1
stereo potentiometer 10k log
×
1
D-class audio amplifier module 2x3W
×
1
Speaker: 3W, 4 ohms
×
2
Speaker: 0.25W, 8 ohms
×
2
Rotary Encoder with Push-Button
×
1
SparkFun Pushbutton switch 12mm
×
4
1microF capacitor
×
2
LED (generic)
×
3
Apps and online services
Arduino IDE
About this project
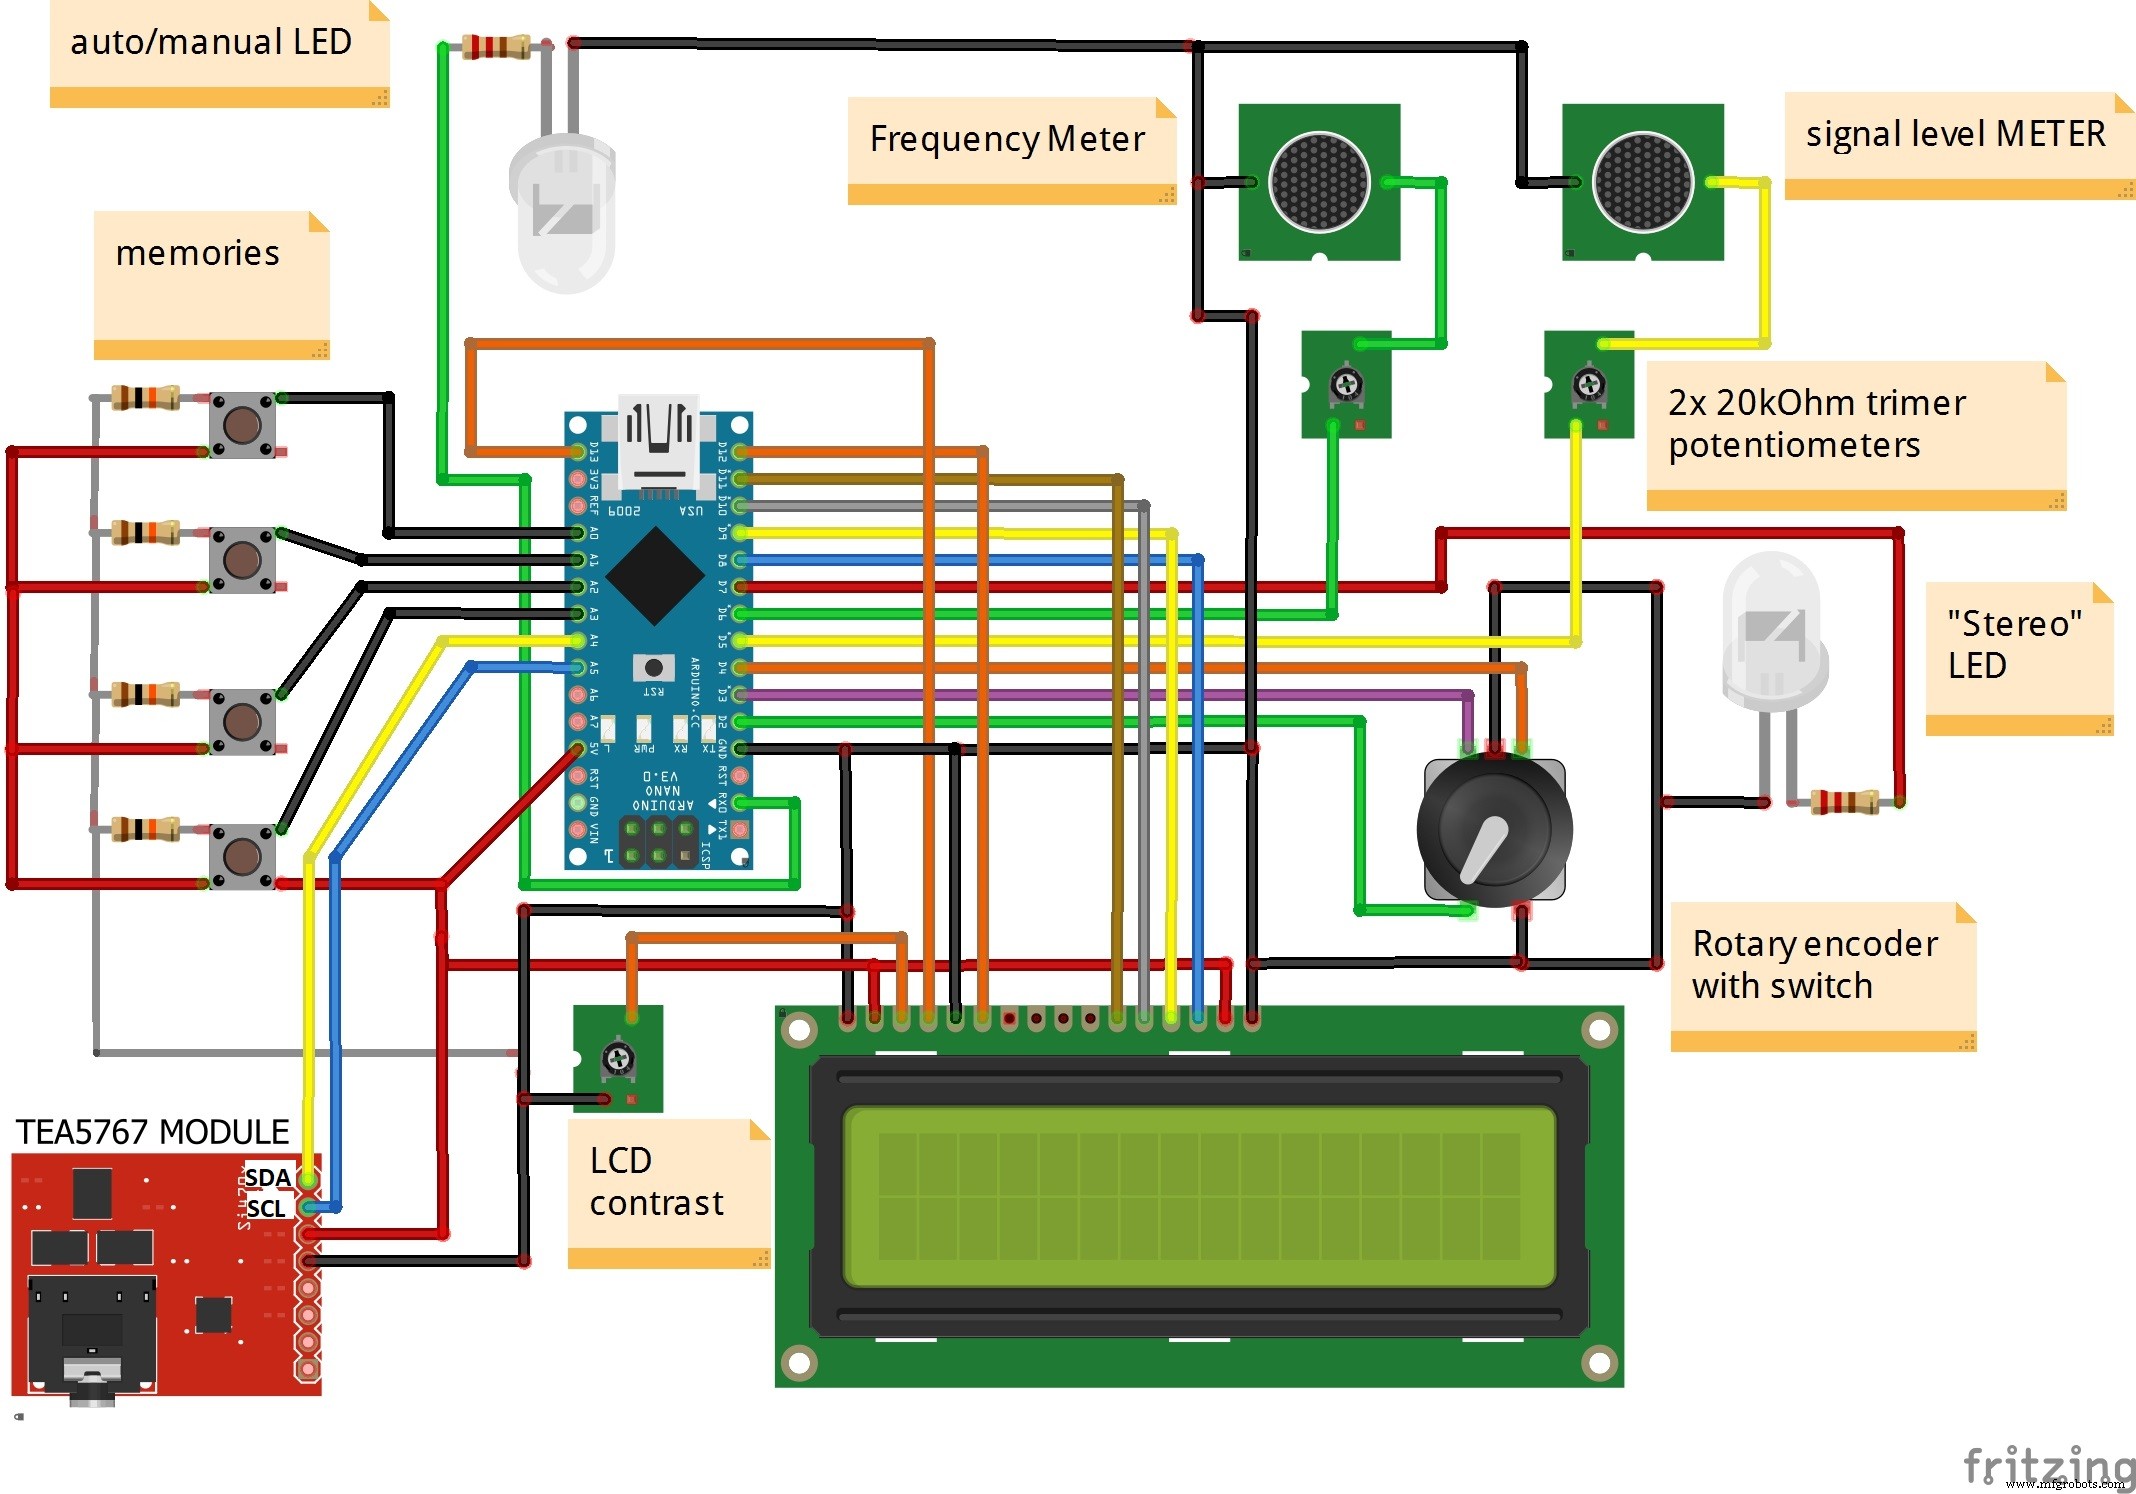
The base for this project is the code of Rodolfo Broco Manin (RodLophus on GitHub) which contains a beautiful analog scale on 16x2 LCD. I modified his code by adding two analog meters for reading the signal strength and frequency, "stereo" LED, and "auto /manual search" LED. Also, as a retro detail, I added four memory keys whose frequencies are predefined in the code, so the radio gets a completely antique look. Audio outputs of the TEA5767, via a stereo potentiometer, are connected to the D class power amplifier module with the power of 2x3w which is quite enough for this purpose. To the amplifier are connected two 2-way speakers with adequate power. The high-tone speaker is separated from the bass-midrange speaker with 1mf capacitor. Аnalog meters are from an old defective radio but you can use any meter, and a full deviation of the needle will be adjusted with trimmer potentiometers. The device is powered by two lithium batteries in series through a 7805 stabilizer, so we have stabilized 5V source.
You can find TEA5767 Arduino library here. Circuit diagram and code are given below.
Let me mention that the frequency meter needle is updated sequentially for every 1Mhz, which I think is a consequence of the library, but if someone finds a solution to the smooth movement of the needle, I would gladly accept it. Reception is excellent, especially for strong local FM stations, while in weaker stations there is a need for a stereo/mono switch due to frequent interruptions of stereo to mono and vice versa. In the next update of code, I plan to insert "stereo/mono" and "mute" switches.
The whole assembly is embedded in the appropriate box on which is mounted a telescopic antenna, so we have a complete FM stereo receiver with a nice retro look.
Code
code
codeArduino
/*

Simple radio tuner using Arduino Leonardo and the Philips TEA5767 module (Arduino Uno version)


Notes:
-----
- The TEA5767 maximum supply voltage is 5V.  Be sure your Arduino is not sourcing more than 5V
- The TEA5767 does not update the signal level indicator on read.  The signal level will only be update on

station change
- If you get some glitches on the encoder or on the pushbutton, use a snubber network, like this:

Arduino pin >----+----/\/\/\/---------> Encoder or switch pin
                 |     100Ohms resistor
               -----
               ----- 47nF cap
                 |
                ---
                GND

Connections:
-----------
- Encoder (with "pushable" shaft switch):
Push button     ---> Arduino pin 2
Encoder pin "A" ---> Arduino pin 3
Encoder pin "B" ---> Arduino pin 4


- LCD:
D7 ---> Arduino pin 8
D6 ---> Arduino pin 9
D5 ---> Arduino pin 10
D4 ---> Arduino pin 11
RS ---> Arduino pin 13
RW ---> GND
E ----> Arduino pin 12
VO ---> 2k2 resistor to GND (contrast)


- TEA5756 module:

Top view:
+-10--9--8--7--6-+
|  +------+  ++  |
|  | TEA  |  ||  |
|  | 5767 |  ||  |
|  +------+  ++  |
+--1--2--3--4--5-+

1 ----> Arduino SDA
2 ----> Arduino SCL
3 ----> GND
5 ----> +5V
6 ----> GND
7 ----> Audio out (right channel)
8 ----> Audio out (left channel)
10 ---> Antenna

Thank you for your interest.
Have fun!
rodolfo.manin@gmail.com

*/


#include <LiquidCrystal.h>
#include <Wire.h>

// Get TEA5767 library at https://github.com/andykarpov/TEA5767
#include <TEA5767.h>

// Encoder pins
#define ENCODER_SW 2
#define ENCODER_A  3
#define ENCODER_B  4

#define button_freq1            A0
#define button_freq2            A1
#define button_freq3            A2
#define button_freq4            A3

// Custom characters
#define SCALE_CLEAR   5    // Radio dial scale
#define STEREO_CHAR_S 6    // Stylized "S"
#define STEREO_CHAR_T 7    // Stylized "T"

// Global status flags
#define ST_AUTO    0      // Auto mode (toggled by the push button)
#define ST_STEREO  1      // Radio module detected a stereo pilot
#define ST_GO_UP   2      // Encoder being turned clockwise
#define ST_GO_DOWN 3      // Encoder being turned counterclockwise
#define ST_SEARCH  4      // Radio module is perfoming an automatic search

const int LED = 0;

int analogsignal=0;
int analogscale=0;
int stereoled=0;


TEA5767 Radio;
float frequency = 88;
byte status = 0;

LiquidCrystal lcd(13, 12, 11, 10, 9, 8);

/*******************************************\
 *             updateScale()               *
 * Moves the "needle" over the radio scale *
\*******************************************/
void updateScale() {
  int lcdBase = (frequency  - 88) * 4;  // LCD column pixel index (0 <= lcdBase <= (16 * 5))
  if(lcdBase > 79) lcdBase = 79;

  int lcdMajor = lcdBase / 5;    // LCD character index (0 <= lcdMajor <= 15)
  int lcdMinor = lcdBase % 5;    // LCD pixel column index within the character (0 <= lcdMinor <= 4)

  if(lcdMajor > 0) {
    // The radio dial needle is not at the leftmost position:
    // clean the character on the left (to erase previous neddle position)
    lcd.setCursor(lcdMajor  - 1, 0);
    lcd.write(SCALE_CLEAR);
  } else
    lcd.setCursor(lcdMajor, 0);
  lcd.write(lcdMinor);

  if(lcdMajor < 15)
    // Not at rightmost position: clear the character on the right
    lcd.write(SCALE_CLEAR);
}


/******************************\
 *         isrEncoder()       *
 * Catch encoder?s interrupts *
\******************************/
void isrEncoder() {
  delay(50);    // Debouncing (for crappy encoders)
  if(digitalRead(ENCODER_B) == HIGH){
    bitWrite(status, ST_GO_UP, 1);
  } else
    bitWrite(status, ST_GO_DOWN, 1);
}


/*****************************\
 *        isrSwitch()        *
 * Catch switch?s interrupts *
\*****************************/
void isrSwitch() {
  delay(50);    // Debouncing
  if(bitRead(status, ST_AUTO))
    bitWrite(status, ST_AUTO, 0);
  else
    bitWrite(status, ST_AUTO, 1);
}


/*******************\
 * Arduino Setup() *
\*******************/
void setup() {
  Serial.end();
   pinMode(button_freq1, INPUT); digitalWrite(button_freq1,LOW);
   pinMode(button_freq2, INPUT); digitalWrite(button_freq2,LOW);
   pinMode(button_freq3, INPUT); digitalWrite(button_freq3,LOW);
   pinMode(button_freq4, INPUT); digitalWrite(button_freq4,LOW);
   pinMode(LED, OUTPUT);

  pinMode(6,OUTPUT);
  pinMode(7,OUTPUT);
  pinMode(5,OUTPUT);

  int i;
  byte needleChar[8];

  // Stylized "S"
  byte stereoChar1[8] = {
    0b01111,
    0b11000,
    0b11011,
    0b11101,
    0b11110,
    0b11000,
    0b01111,
    0b00000
  };
  lcd.createChar(STEREO_CHAR_S, stereoChar1);

  // Stylized "T"
  byte stereoChar2[8] = {
    0b11110,
    0b00011,
    0b10111,
    0b10111,
    0b10111,
    0b10111,
    0b11110,
    0b00000
  };
  lcd.createChar(STEREO_CHAR_T, stereoChar2);

  // Dial scale background
  byte scaleChar[8] = {
    0b00000,
    0b00000,
    0b00000,
    0b00000,
    0b00000,
    0b00100,
    0b10101,
    0b10101
  };
  lcd.createChar(SCALE_CLEAR, scaleChar);

  // Create custom character to represent all (5) possible needle?s position
  for(int j = 0; j < 5; j++) {
    for(i = 0; i < 8; i++)
      needleChar[i] = scaleChar[i] | (0b10000 >> j);
    lcd.createChar(j, needleChar);
  }

  lcd.begin(16, 2);
  lcd.clear();

  // Draw the dial scale?s background
  for(i = 0; i < 16; i++)
    lcd.write(SCALE_CLEAR);

  pinMode(ENCODER_SW, INPUT); digitalWrite(ENCODER_SW, HIGH);
  pinMode(ENCODER_A, INPUT);  digitalWrite(ENCODER_A, HIGH);
  pinMode(ENCODER_B, INPUT);  digitalWrite(ENCODER_B, HIGH);

  attachInterrupt(0, isrSwitch, RISING);
  attachInterrupt(1, isrEncoder, RISING);

  // Initialize the radio module
  Wire.begin();
  Radio.init();
  Radio.set_frequency(frequency);
}


/******************\
 * Arduino Loop() *
\******************/
void loop() {
  unsigned char buf[5];
  int stereo;
  int signalLevel;
  int searchDirection;
  int i;
  i=0;

  // Update the Auto / Manual indicator
  lcd.setCursor(12, 1);
  lcd.write(bitRead(status, ST_AUTO) ? 'A' : 'M');

  if bitRead(status, ST_AUTO)   // Auto/manual LED
  {

    digitalWrite(LED, LOW);
  }
  else
  {

    digitalWrite(LED, HIGH);
  }

  if (Radio.read_status(buf) == 1) {
    // Get radio data
    frequency = floor(Radio.frequency_available(buf) / 100000 + .5) / 10;
    stereo = Radio.stereo(buf);
    // 0 <= Radio.signal_level <= 15
    signalLevel = (Radio.signal_level(buf) * 100) / 15;

    analogsignal=map(signalLevel,0,100,0,255);
    analogscale=map(frequency,88,114,0,255);
    stereoled=map(stereo,0.7,1,0,255);
    analogWrite (5,analogsignal);  // Signal meter
    analogWrite (6,analogscale);   //frequency meter
    analogWrite (7,stereoled);    //stereo LED

    // Update the radio dial
    updateScale();

    // Signal level indicator
    lcd.setCursor(0, 1);
    lcd.write(183);    // Japanese character that looks like an antenna :)
    if(signalLevel < 100) lcd.write(' ');
    lcd.print(signalLevel);
    lcd.write('%');

    // Frequency indicator
    lcd.setCursor(6, 1);
    if(frequency < 100) lcd.write(' ');
    lcd.print(frequency, 1);

    // Mono / stereo indicator
    lcd.setCursor(14, 1);
    if(stereo){
      lcd.write(STEREO_CHAR_S);
      lcd.write(STEREO_CHAR_T);
    } else
      lcd.print("  ");
  }

  if(bitRead(status, ST_SEARCH)) {   // Is the radio performing an automatic search?
    if(Radio.process_search(buf, searchDirection) == 1) {
      bitWrite(status, ST_SEARCH, 0);
    }
  }


if(digitalRead(button_freq2)==HIGH){      //"memory" buttons

  if(frequency > 94.8)
  {
    frequency=94.8;
     Radio.set_frequency(frequency);
     bitWrite(status, ST_GO_DOWN, 0);
  }
  else
  {
     frequency=94.8;
     Radio.set_frequency(frequency);
     bitWrite(status, ST_GO_UP, 0);
  }
     precrtajScale();
}

if(digitalRead(button_freq1)==HIGH){

  if(frequency > 92)
  {
    frequency=92;
     Radio.set_frequency(frequency);
     bitWrite(status, ST_GO_DOWN, 0);
  }
  else
  {
     frequency=92;
     Radio.set_frequency(frequency);
     bitWrite(status, ST_GO_UP, 0);
  }
      precrtajScale();
}

if(digitalRead(button_freq3)==HIGH){

  if(frequency > 97)
  {
    frequency=97;
     Radio.set_frequency(frequency);
     bitWrite(status, ST_GO_DOWN, 0);
  }
  else
  {
     frequency=97;
     Radio.set_frequency(frequency);
     bitWrite(status, ST_GO_UP, 0);
  }
      precrtajScale();

}

if(digitalRead(button_freq4)==HIGH){

  if(frequency > 101.2)
  {

    frequency=101.2;
     Radio.set_frequency(frequency);
     bitWrite(status, ST_GO_DOWN, 0);
  }
  else
  {
     frequency=101.2;
     Radio.set_frequency(frequency);
     bitWrite(status, ST_GO_UP, 0);
  }
   precrtajScale();
}

  // Encoder being turned clockwise (+)
  if(bitRead(status, ST_GO_UP)) {
    if(bitRead(status, ST_AUTO) && !bitRead(status, ST_SEARCH)) {
      // Automatic search mode (only processed if the radio is not currently performing a search)
      bitWrite(status, ST_SEARCH, 1);
      searchDirection = TEA5767_SEARCH_DIR_UP;
      Radio.search_up(buf);
      delay(50);
    } else {
      // Manual tuning mode
      if(frequency < 108) {
        frequency += 0.1;
        Radio.set_frequency(frequency);
      }
    }
    bitWrite(status, ST_GO_UP, 0);
  }

  // Encoder being turned counterclockwise (-)
  if(bitRead(status, ST_GO_DOWN)) {
    if(bitRead(status, ST_AUTO) && !bitRead(status, ST_SEARCH)) {
      // Automatic search mode (only processed if the radio is not currently performing a search)
      bitWrite(status, ST_SEARCH, 1);
      searchDirection = TEA5767_SEARCH_DIR_DOWN;
      Radio.search_down(buf);
      delay(50);
    } else {
      // Manual tuning mode
      if(frequency > 88) {
        frequency -= 0.1;
        Radio.set_frequency(frequency);
      }
    }
    bitWrite(status, ST_GO_DOWN, 0);
  }

}
void precrtajScale() {
  int i;
   lcd.clear();
       for(i = 0; i < 16; i++)
          lcd.write(SCALE_CLEAR);
}