


Integrate HID Prox RFID with Arduino UNO – Step‑by‑Step Setup
Components and supplies
 |
| × | 1 | |||
| × | 1 |
About this project
Arduino based RFID reader projects are a dime a dozen. It’s great and wonderful how plentiful and easy they are. Checking out Adafruit or Sparkfun one can find dozens of cheap components that are almost ready to go. The common factor is that they are all 13.56Mhz or Mifare compatible. Nominally this means cheap (And plentiful) components and fobs, but it also means that the systems aren’t compatible with most professional RFID badge systems. What if you want to hook up a “professional” grade system like a HID Prox-compatible reader? Turns out it isn’t that hard either.
Originally from: https://obviate.io/2016/11/23/connecting-a-hid-prox-pro-ii-rfid-reader-to-arduino/
Equipment List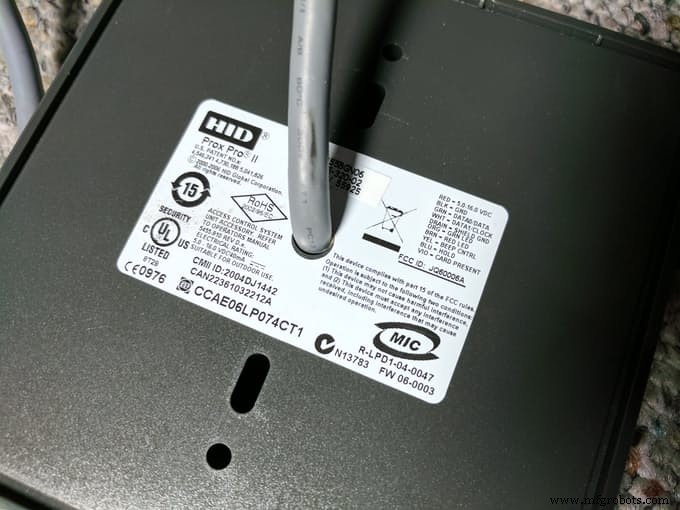
- HID 5455 PROX PRO II Proximity Card Reader Wiegand (5455BGN06)
- Arduino Uno
For the HID Prox reader, the two important parts are that it is 5v compatible and uses the Wiegand interface. The HID Prox Reader comparison sheet shows a number of possible options, it just happens that the Prox Pro II was readily available on Amazon. It’s ~$130 which makes it vastly more expensive than other options, but if you’re willing to put in the effort you might be able to get them for as low as $10/reader used on eBay. For the Arduino, theoretically any Arduino compatible system will work provided it uses 5v. I happened to have several old Uno’s laying around so that’s what I used (plus they are really easy to prototype with). The next version of this project I make will be using the Sparkfun Pro Micro, because why not?
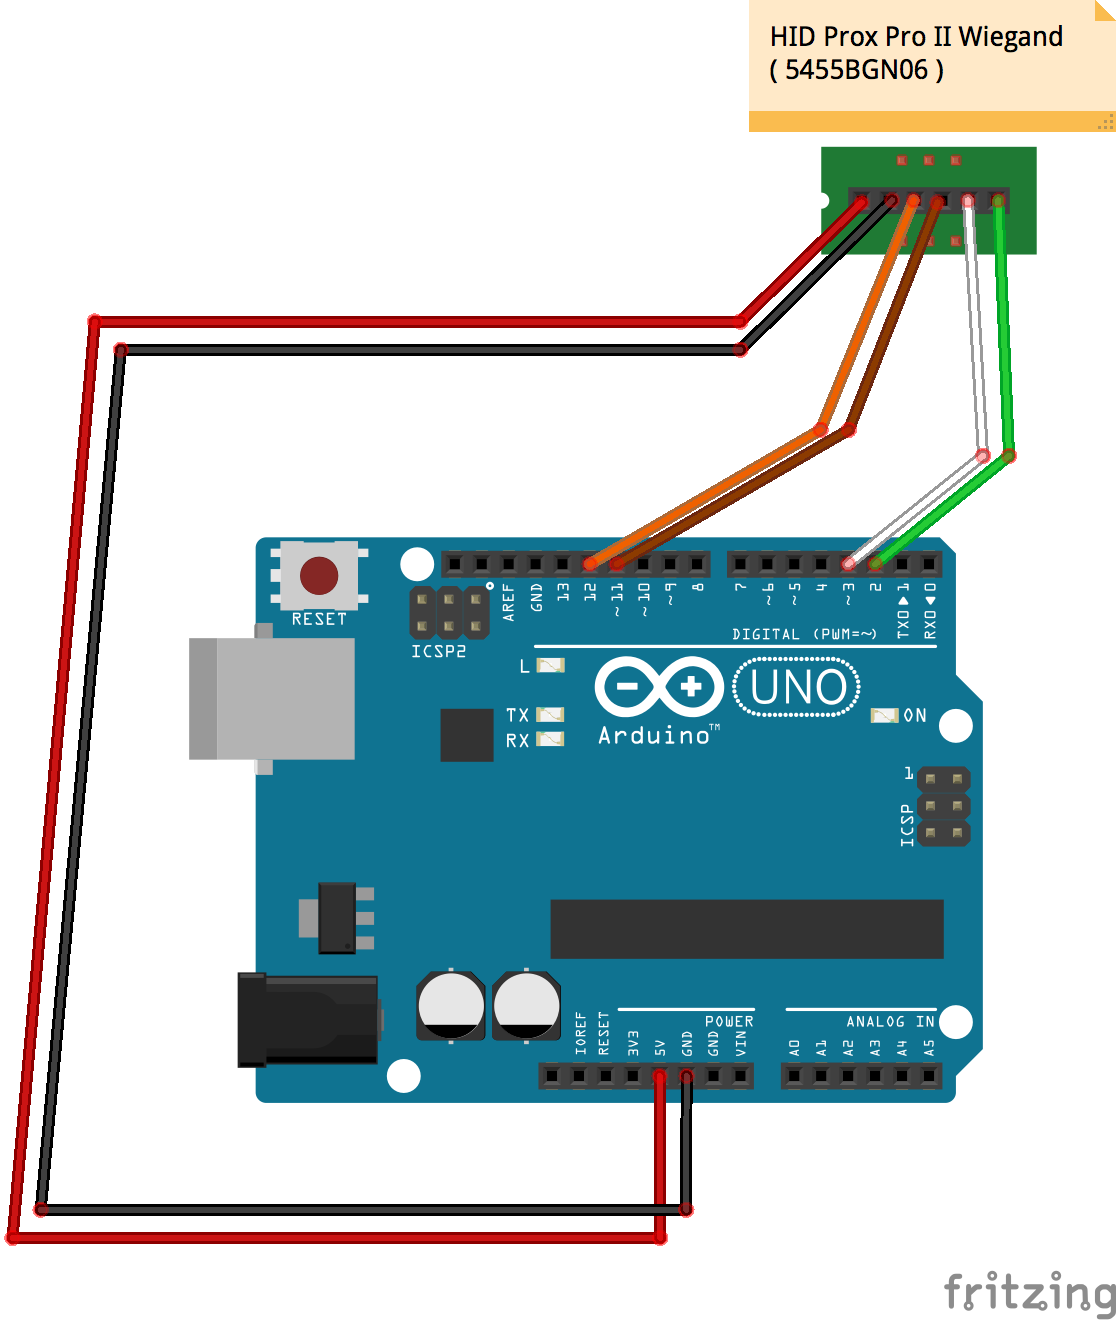
Wiring Diagram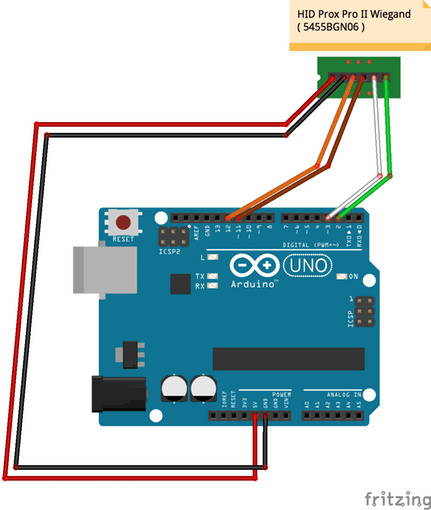
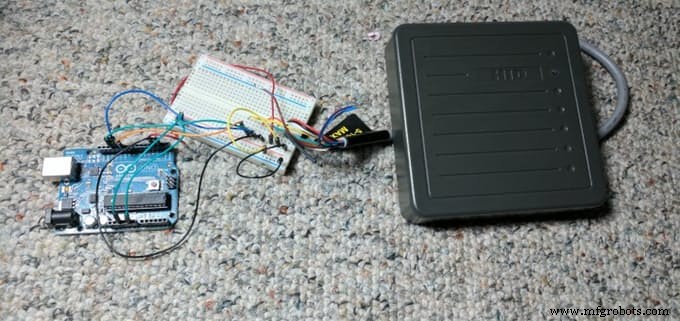
Wiring this up is really simple. The Prox reader has a wonderfully labeled pigtail with 10 wires. You only need to worry about 4: Red (VCC), Black (Ground), Green (Data 0), White (Data 1). VCC goes to Arduino 5v. Ground goes to Arduino Ground. Green goes to Digital 3. White goes to Digital 2. It’s really hard to mess this up, as long as you plug in everything but the VCC first.But wait, there are other wires on the diagram above and 6 more wires from the Prox reader. What about those? From Prox: Orange wire = Green LED. Brown wire = Red LED. Yellow wire = Beeper. If you have extra ports on your Arduino and want to control these items, you can do that. Keep in mind that the beeper will always beep when it reads a card, regardless. As for Blue (Hold), Violet (Card present), and Drain (Shield Ground. I haven’t found a use for those.
CodeAfter searching the net I found a few libraries and postings for Arduino/HID/Wiegand, but most didn’t work properly for me. However I did find one from 2012 on Pagemac.com that did work. I made some changes and added the LEDs along with beep control just as a sample, see the GitHub Gist. It works great for 26 or 35 bit HID cards and spits out their facility codes as well. The code is ultra simple so if you have a custom length HID card, it shouldn’t be too hard to update:
Putting it all togetherWire everything up. Plug your Arduino into the USB port. Upload the code. Open the serial monitor. If everything has gone according to plan when you swipe a HID badge in front of the Prox Pro II, it will beep and you will see the badge number (and facility code) come in over the serial monitor. Done!
Code
GitHub Gist
Schematics
Manufacturing process
- Build a Secure Arduino RFID Door Lock with RC522 (MIFARE 13.56 MHz)
- Preventing USB HID Attacks: Arduino Leonardo Keyboard Exploit Demo
- Create a Secure Arduino RFID Lock – Step‑by‑Step Guide
- Reliable Arduino-Based RFID Attendance System Powered by Python
- Build a Bluetooth‑controlled Arduino Spybot
- FlickMote: Gesture‑Controlled IR Remote for Smart Home
- DIY Arduino TV B-Gone: Universal Remote for All TVs
- Build a Portable RFID Door Lock with Arduino – Step-by-Step Guide
- Build a Network‑Enabled RFID Card Reader with Arduino, ENC28J60 Ethernet, and MFRC522
- Build an Arduino RFID Door Lock – Master RFID Technology with a Step‑by‑Step Guide