


Build a Secure Arduino RFID Door Lock with RC522 (MIFARE 13.56 MHz)
Components and supplies
 |
| × | 1 | |||
| × | 1 | ||||
| × | 1 | ||||
 |
| × | 1 | |||
| × | 2 |
About this project
I will show you how to easily make a RFID lock using an Arduino UNO and RFID RC522 (MIFARE protocol). This project can also be seen here: Arduino RFID lock.
Step 1: Components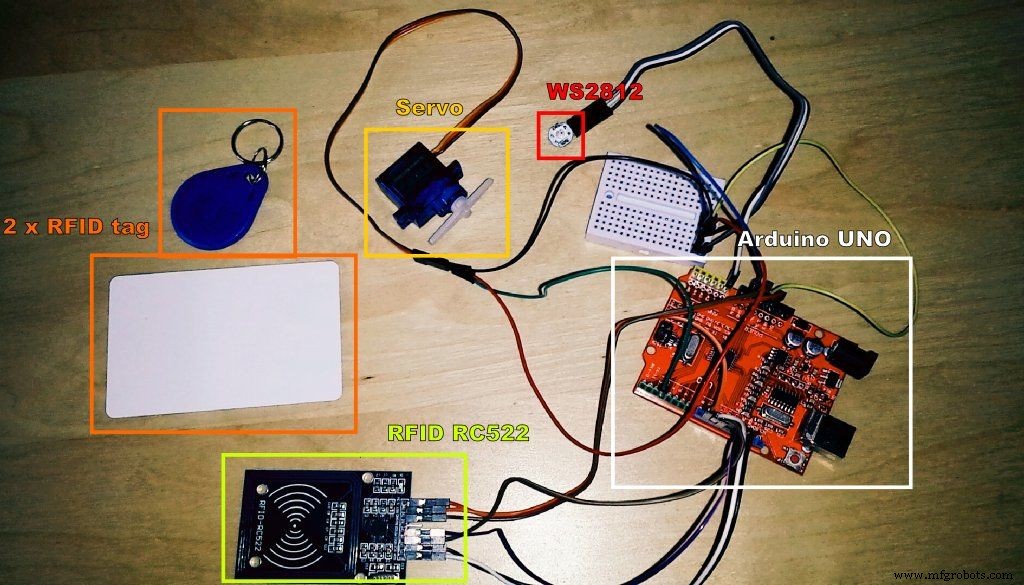
- Arduino UNO
- RFID RC522
- TG9e servo
- LED RGB - WS2812
- 2 x RFID tag
At the beginning, we import all the needed libraries.
#include <SPI.h>
#include <MFRC522.h>
#include <Servo.h>
#include <Adafruit_NeoPixel.h> //----------------------------------------------------------
Then we configure and initialize: UART speed
We initiate rc522. We set the servo to zero.
void setup() {   Serial.begin(115200);
SPI.begin();
mfrc522.PCD_Init();
Serial.println("For more:  http://geek.adachsoft.com");
Serial.println("Arduino RFID lock");
Serial.println("");
myservo.attach(SERVO_PIN);
myservo.write( 0 );
pixels.begin();
pixels.setPixelColor(0, 32, 32, 32);
pixels.show();
delay(500);
pixels.setPixelColor(0, 0, 0, 0);
pixels.show();
}
//----------------------------------------------------------
After we read the UID tag, we compare it with the proper UID. If the UID is the same then start the servo.
if( content == "77-39-50-39" ){    Serial.println("Authorized access");
myservo.write( 90 );
pixels.setPixelColor(0, 0, 32, 0);
pixels.show();
delay(1000);
myservo.write( 0 );
pixels.setPixelColor(0, 0, 0, 0);
pixels.show();
}else{
Serial.println("Access denied");
pixels.setPixelColor(0, 32, 0, 0);
pixels.show();
delay(500);
pixels.setPixelColor(0, 0, 0, 0);
pixels.show();
}
//----------------------------------------------------------
Download source code: RFID_with_servo.ino
Step 4: End and CheckingCode
- RFID_with_servo.ino
RFID_with_servo.inoArduino
/*
 * http://geek.adachsoft.com
 *
 *
 *
*/
#include <SPI.h>
#include <MFRC522.h>
#include <Servo.h>
#include <Adafruit_NeoPixel.h>


#define LED_PIN A0
Adafruit_NeoPixel pixels = Adafruit_NeoPixel(1, LED_PIN, NEO_GRB + NEO_KHZ800);

#define SERVO_PIN 3
Servo myservo;  // create servo object to control a servo

#define SS_PIN 10
#define RST_PIN 9
MFRC522 mfrc522(SS_PIN, RST_PIN);   // Create MFRC522 instance.


void setup() {
  Serial.begin(115200);
  SPI.begin();
  mfrc522.PCD_Init();
  Serial.println("For more: http://geek.adachsoft.com");
  Serial.println("Arduino RFID lock");
  Serial.println("");

  myservo.attach(SERVO_PIN);
  myservo.write( 0 );


  pixels.begin();
  pixels.setPixelColor(0, 32, 32, 32);
  pixels.show();
  delay(500);
  pixels.setPixelColor(0, 0, 0, 0);
  pixels.show();
}

void loop(){
  //Look for new cards
  if ( !mfrc522.PICC_IsNewCardPresent() ){
    return;
  }
  //Select one of the cards
  if ( !mfrc522.PICC_ReadCardSerial() ) {
    return;
  }

  String content= "";
  byte letter;
  for( byte i = 0; i < mfrc522.uid.size; i++ ){
     content.concat(String(mfrc522.uid.uidByte[i], HEX));
     if( i < mfrc522.uid.size-1 ) content+="-";
  }
  content.toUpperCase();
  Serial.println();
  Serial.println("UID tag :'" + content + "'");

  if( content == "77-39-50-39" ){
    Serial.println("Authorized access");
    myservo.write( 90 );

    pixels.setPixelColor(0, 0, 32, 0);
    pixels.show();

    delay(1000);
    myservo.write( 0 );

    pixels.setPixelColor(0, 0, 0, 0);
    pixels.show();
  }else{
    Serial.println("Access denied");
    pixels.setPixelColor(0, 32, 0, 0);
    pixels.show();
    delay(500);
    pixels.setPixelColor(0, 0, 0, 0);
    pixels.show();
  }

  delay(1000);
}
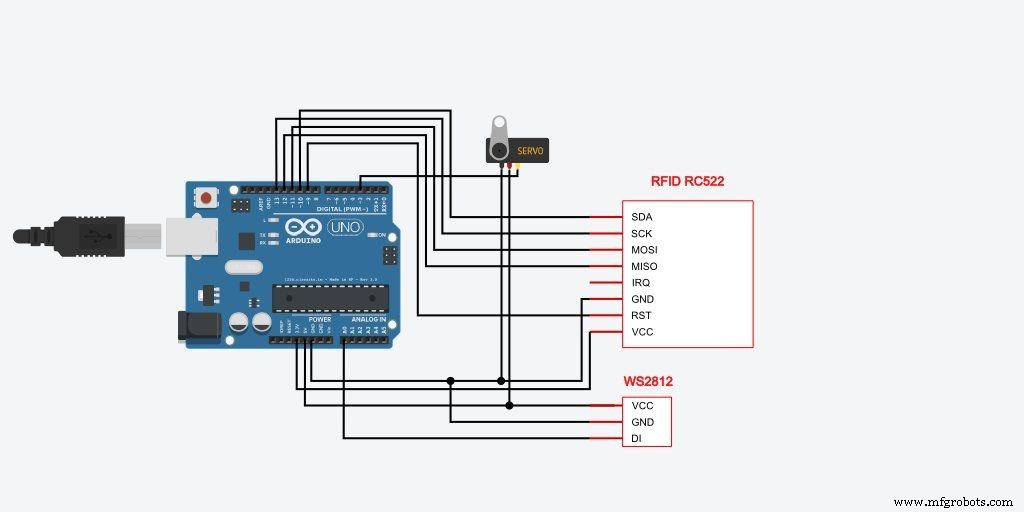
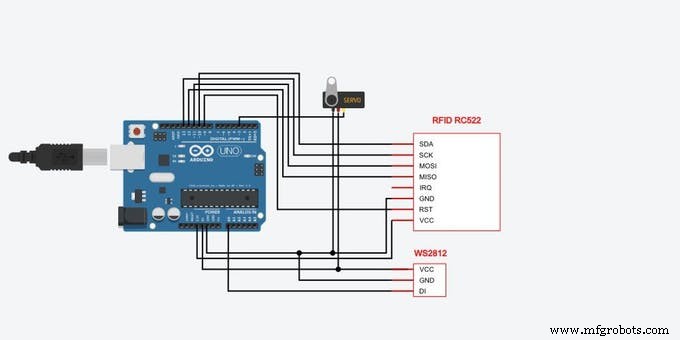
Schematics
Web‑Controlled DMX Lighting System – Arduino Master Controller
Real-Time Solar Panel Monitoring with Arduino: Low-Cost Data Acquisition System
Manufacturing process
- Create a Secure Arduino RFID Lock – Step‑by‑Step Guide
- Reliable Arduino-Based RFID Attendance System Powered by Python
- Build a Smart Piggy Bank: Control a Coin Acceptor with Arduino Nano
- Smart Electronic Check‑In System for Hackerspaces
- Arduino‑Powered HID UPS: Upgrade Your Dummy Power Supply to USB‑Compatible Backup
- Build a Portable RFID Door Lock with Arduino – Step-by-Step Guide
- Integrate HID Prox RFID with Arduino UNO – Step‑by‑Step Setup
- Build an IR Sensor Project with Arduino UNO – Simple Guide
- Secure Arduino‑Based Keyless Door Lock with LCD Display and 4×4 Keypad
- Build an Arduino RFID Door Lock – Master RFID Technology with a Step‑by‑Step Guide