Build a Smart Piggy Bank: Control a Coin Acceptor with Arduino Nano
Components and supplies
 | | × | 1 | |
| | 4 Digit TM1637 LED Display |
| × | 1 | |
About this project
The purpose of this project is to write code to control coin acceptor with arduino so it can be used in other project. The particular project I had in mind was to build balance aware piggy bank for my daughter.
Code
- Controlling coin acceptor with Arduino
Controlling coin acceptor with ArduinoArduino
//Mario's Ideas
//Controlling coin acceptor with Arduino

#include <Arduino.h>
#include <TM1637Display.h>
#include <EEPROM.h>

// Module connection pins (Digital Pins)
#define CLK 3
#define DIO 4

TM1637Display display(CLK, DIO);

// variable use to measuer the intervals inbetween impulses
int i=0;
// Number of impulses detected
int impulsCount=0;
// Sum of all the coins inseted
float total_amount=0;

void setup() {
 // pinMode(2, INPUT_PULLUP);
 Serial.begin(9600);
  display.setBrightness(0x0f);
 // Interrupt connected to PIN D2 executing IncomingImpuls function when signal goes from HIGH to LOW
 attachInterrupt(0,incomingImpuls, FALLING);
 EEPROM.get(0, total_amount);
 display.clear();

}

void incomingImpuls()
{
  impulsCount=impulsCount+1;
  i=0;
}

void loop() {
  i=i+1;

  Serial.print("i=");
  Serial.print(i);
  Serial.print(" Impulses:");
  Serial.print(impulsCount);
  Serial.print(" Total:");
  Serial.println(total_amount);

  if (i>=30 and impulsCount==1){
    total_amount=total_amount+2;
    impulsCount=0;
    EEPROM.put(0, total_amount);
  }
   if (i>=30 and impulsCount==2){
    total_amount=total_amount+1;
    impulsCount=0;
    EEPROM.put(0, total_amount);
  }
   if (i>=30 and impulsCount==3){
    total_amount=total_amount+0.5;
    impulsCount=0;
    EEPROM.put(0, total_amount);
  }
   if (i>=30 and impulsCount==4){
    total_amount=total_amount+0.2;
    impulsCount=0;
    EEPROM.put(0, total_amount);
  }
   if (i>=30 and impulsCount==5){
    total_amount=total_amount+0.1;
    impulsCount=0;
    EEPROM.put(0, total_amount);
  }

 if(total_amount<10) display.showNumberDecEx(total_amount*10, 0b10000000, true, 2, 2);
  else
  display.showNumberDecEx(total_amount*10, 0b00100000, false, 4, 0);
}
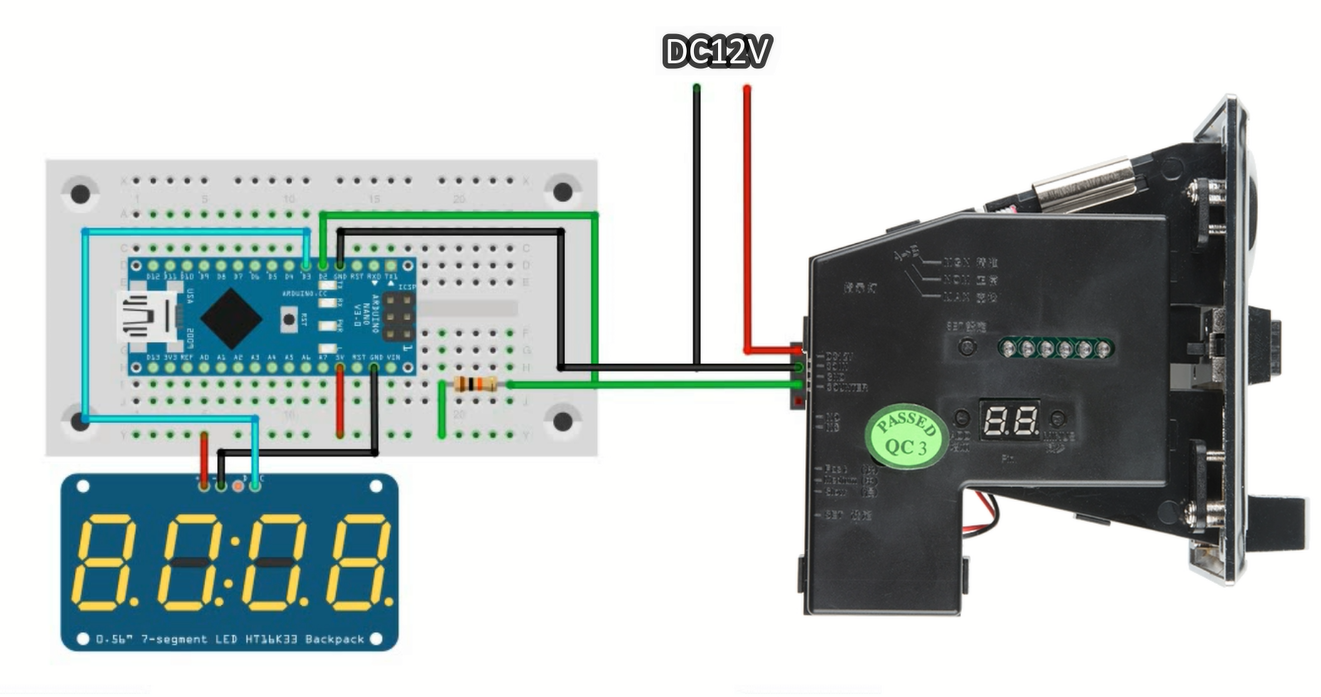
Schematics