


Advanced Smart Basketball Scoreboard with Bluetooth, Sensors & Real‑Time Updates
Components and supplies
 |
| × | 1 | |||
 |
| × | 1 | |||
| × | 1 | ||||
 |
| × | 1 | |||
 |
| × | 1 | |||
| × | 1 | ||||
 |
| × | 3 | |||
 |
| × | 3 | |||
 |
| × | 1 | |||
 |
| × | 1 | |||
 |
| × | 1 | |||
 |
| × | 1 |
Apps and online services
 |
| |||
|
About this project
I use to do basketball training workouts regularly and I always track the sections statistics (number of shots, scores, misses, etc). Track these numbers is kind of boring and hard to accomplish. The smart balls can be used to this but they have some drawbacks:
- If you want to train with multiple balls you'll need to buy several (expensive) smart balls.
- The accuracy isn't so good.
- The durability of the ball.
In my previous project smart basketball scoreboard prototype, I used the Avnet SmartEdge device to test a method to track my basketball workouts. I used the acceleration sensor to detect the shots and the proximity sensor to detect the scores. Now, the idea of this project is to implement a definitive solution for the basketball scoreboard task.
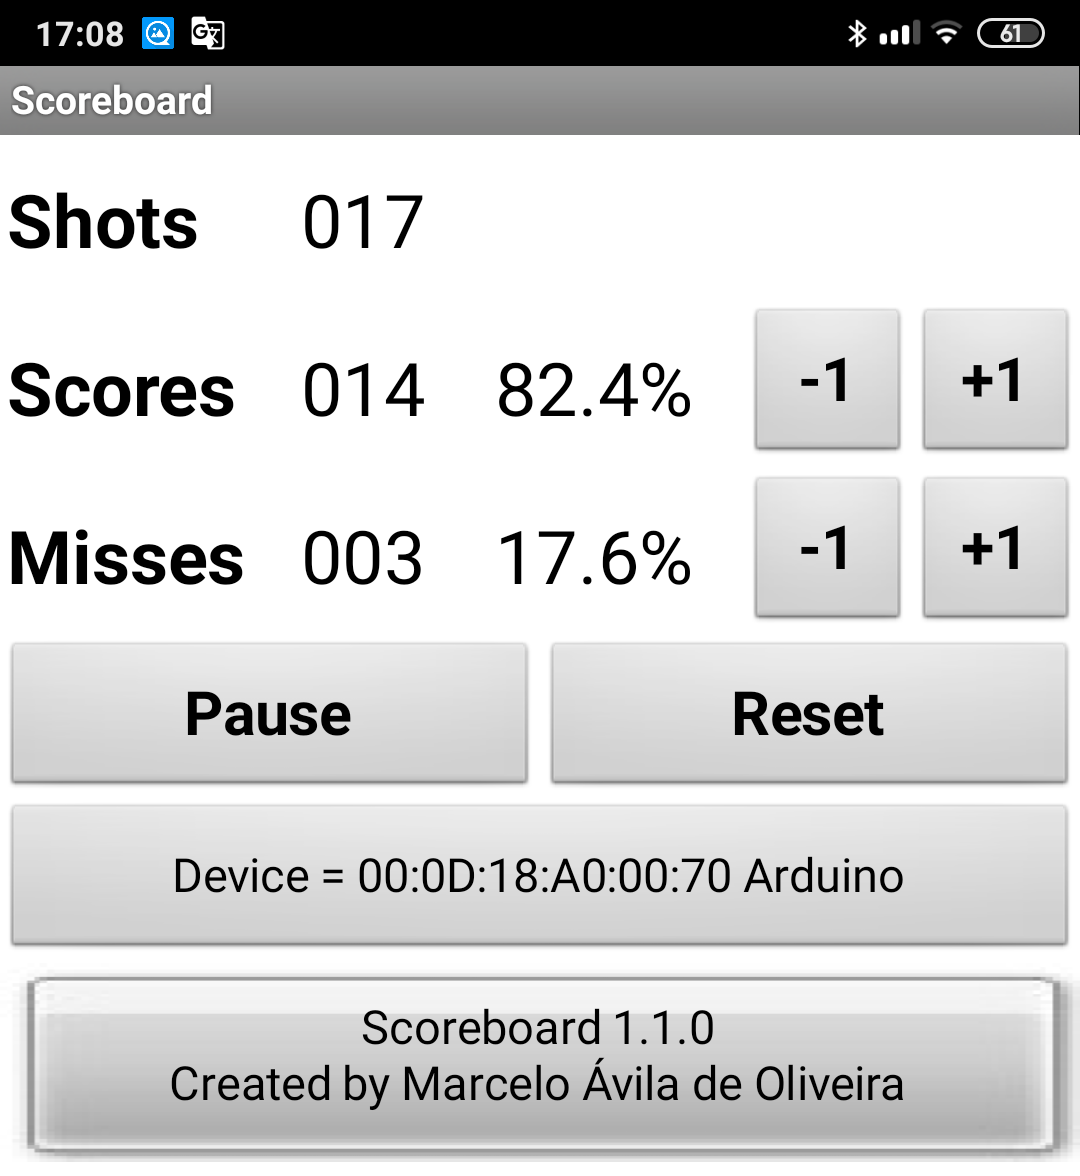
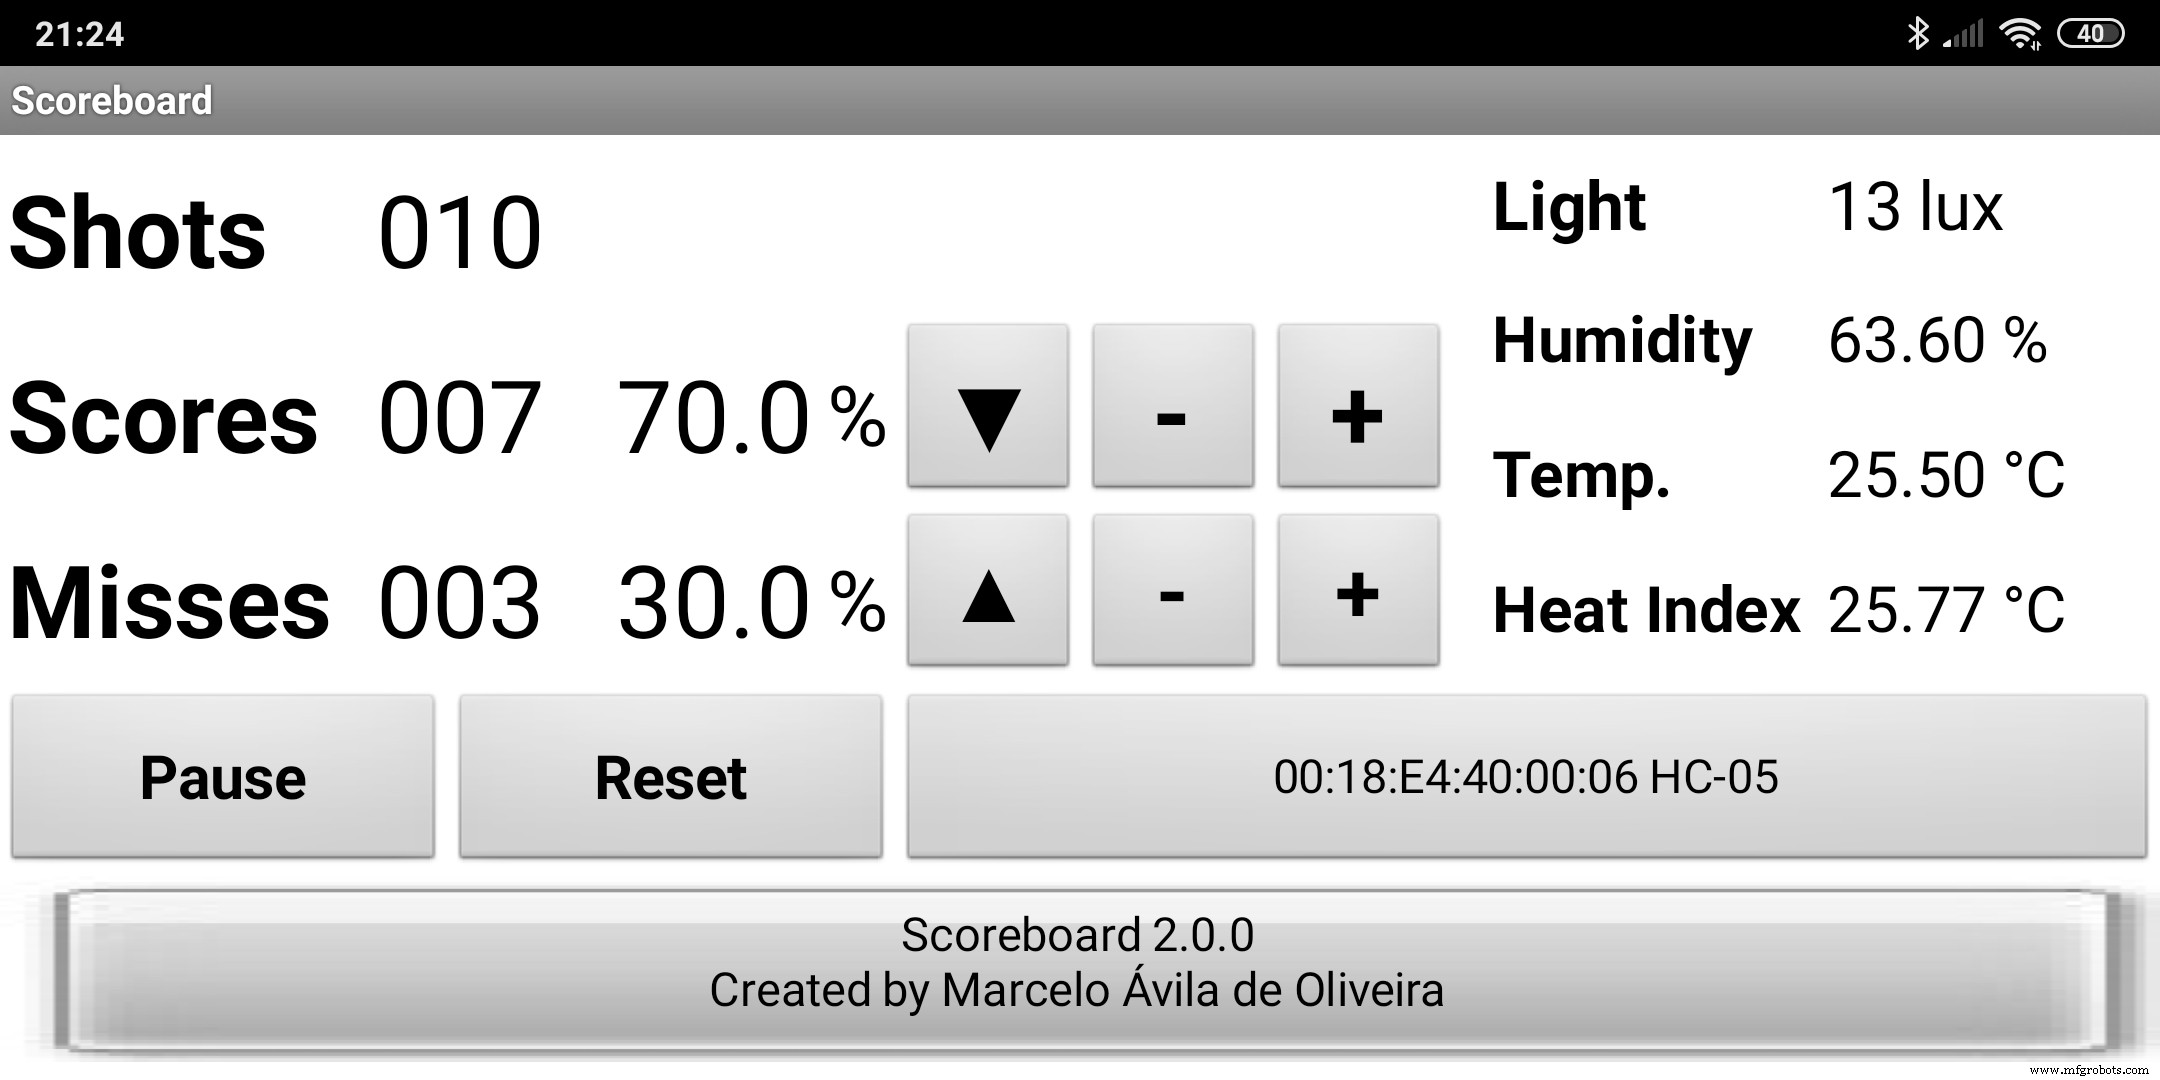
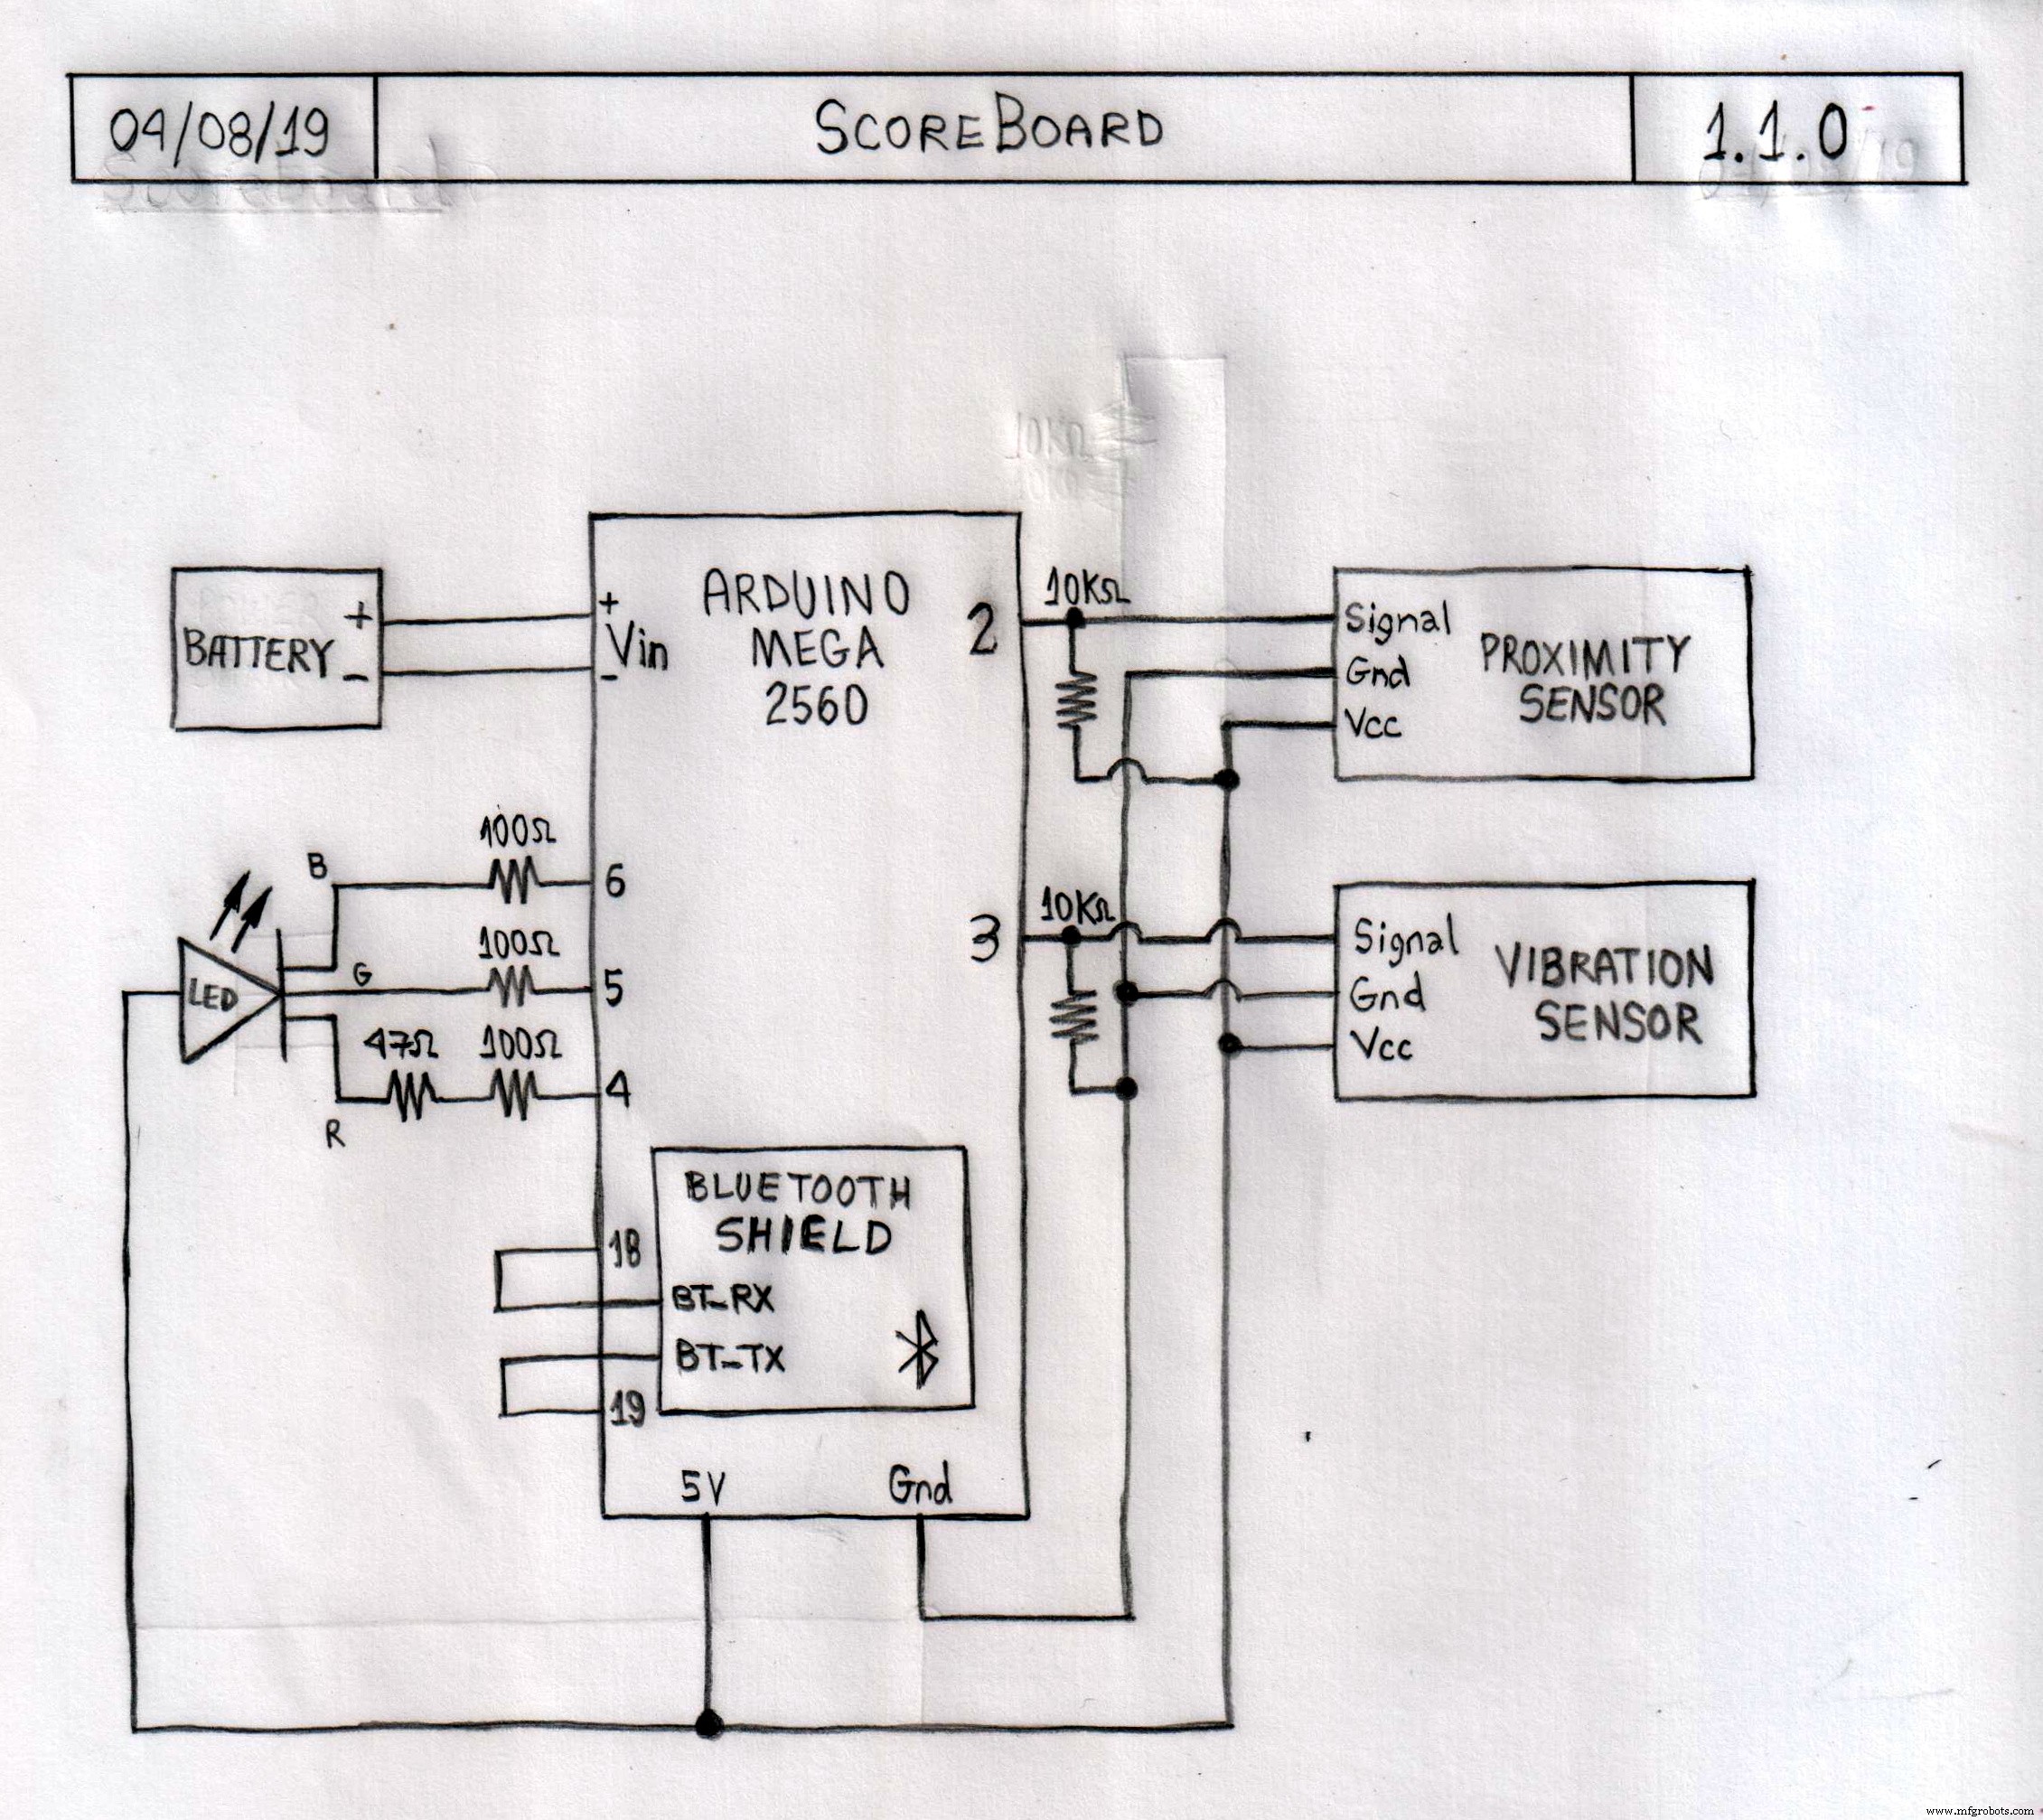
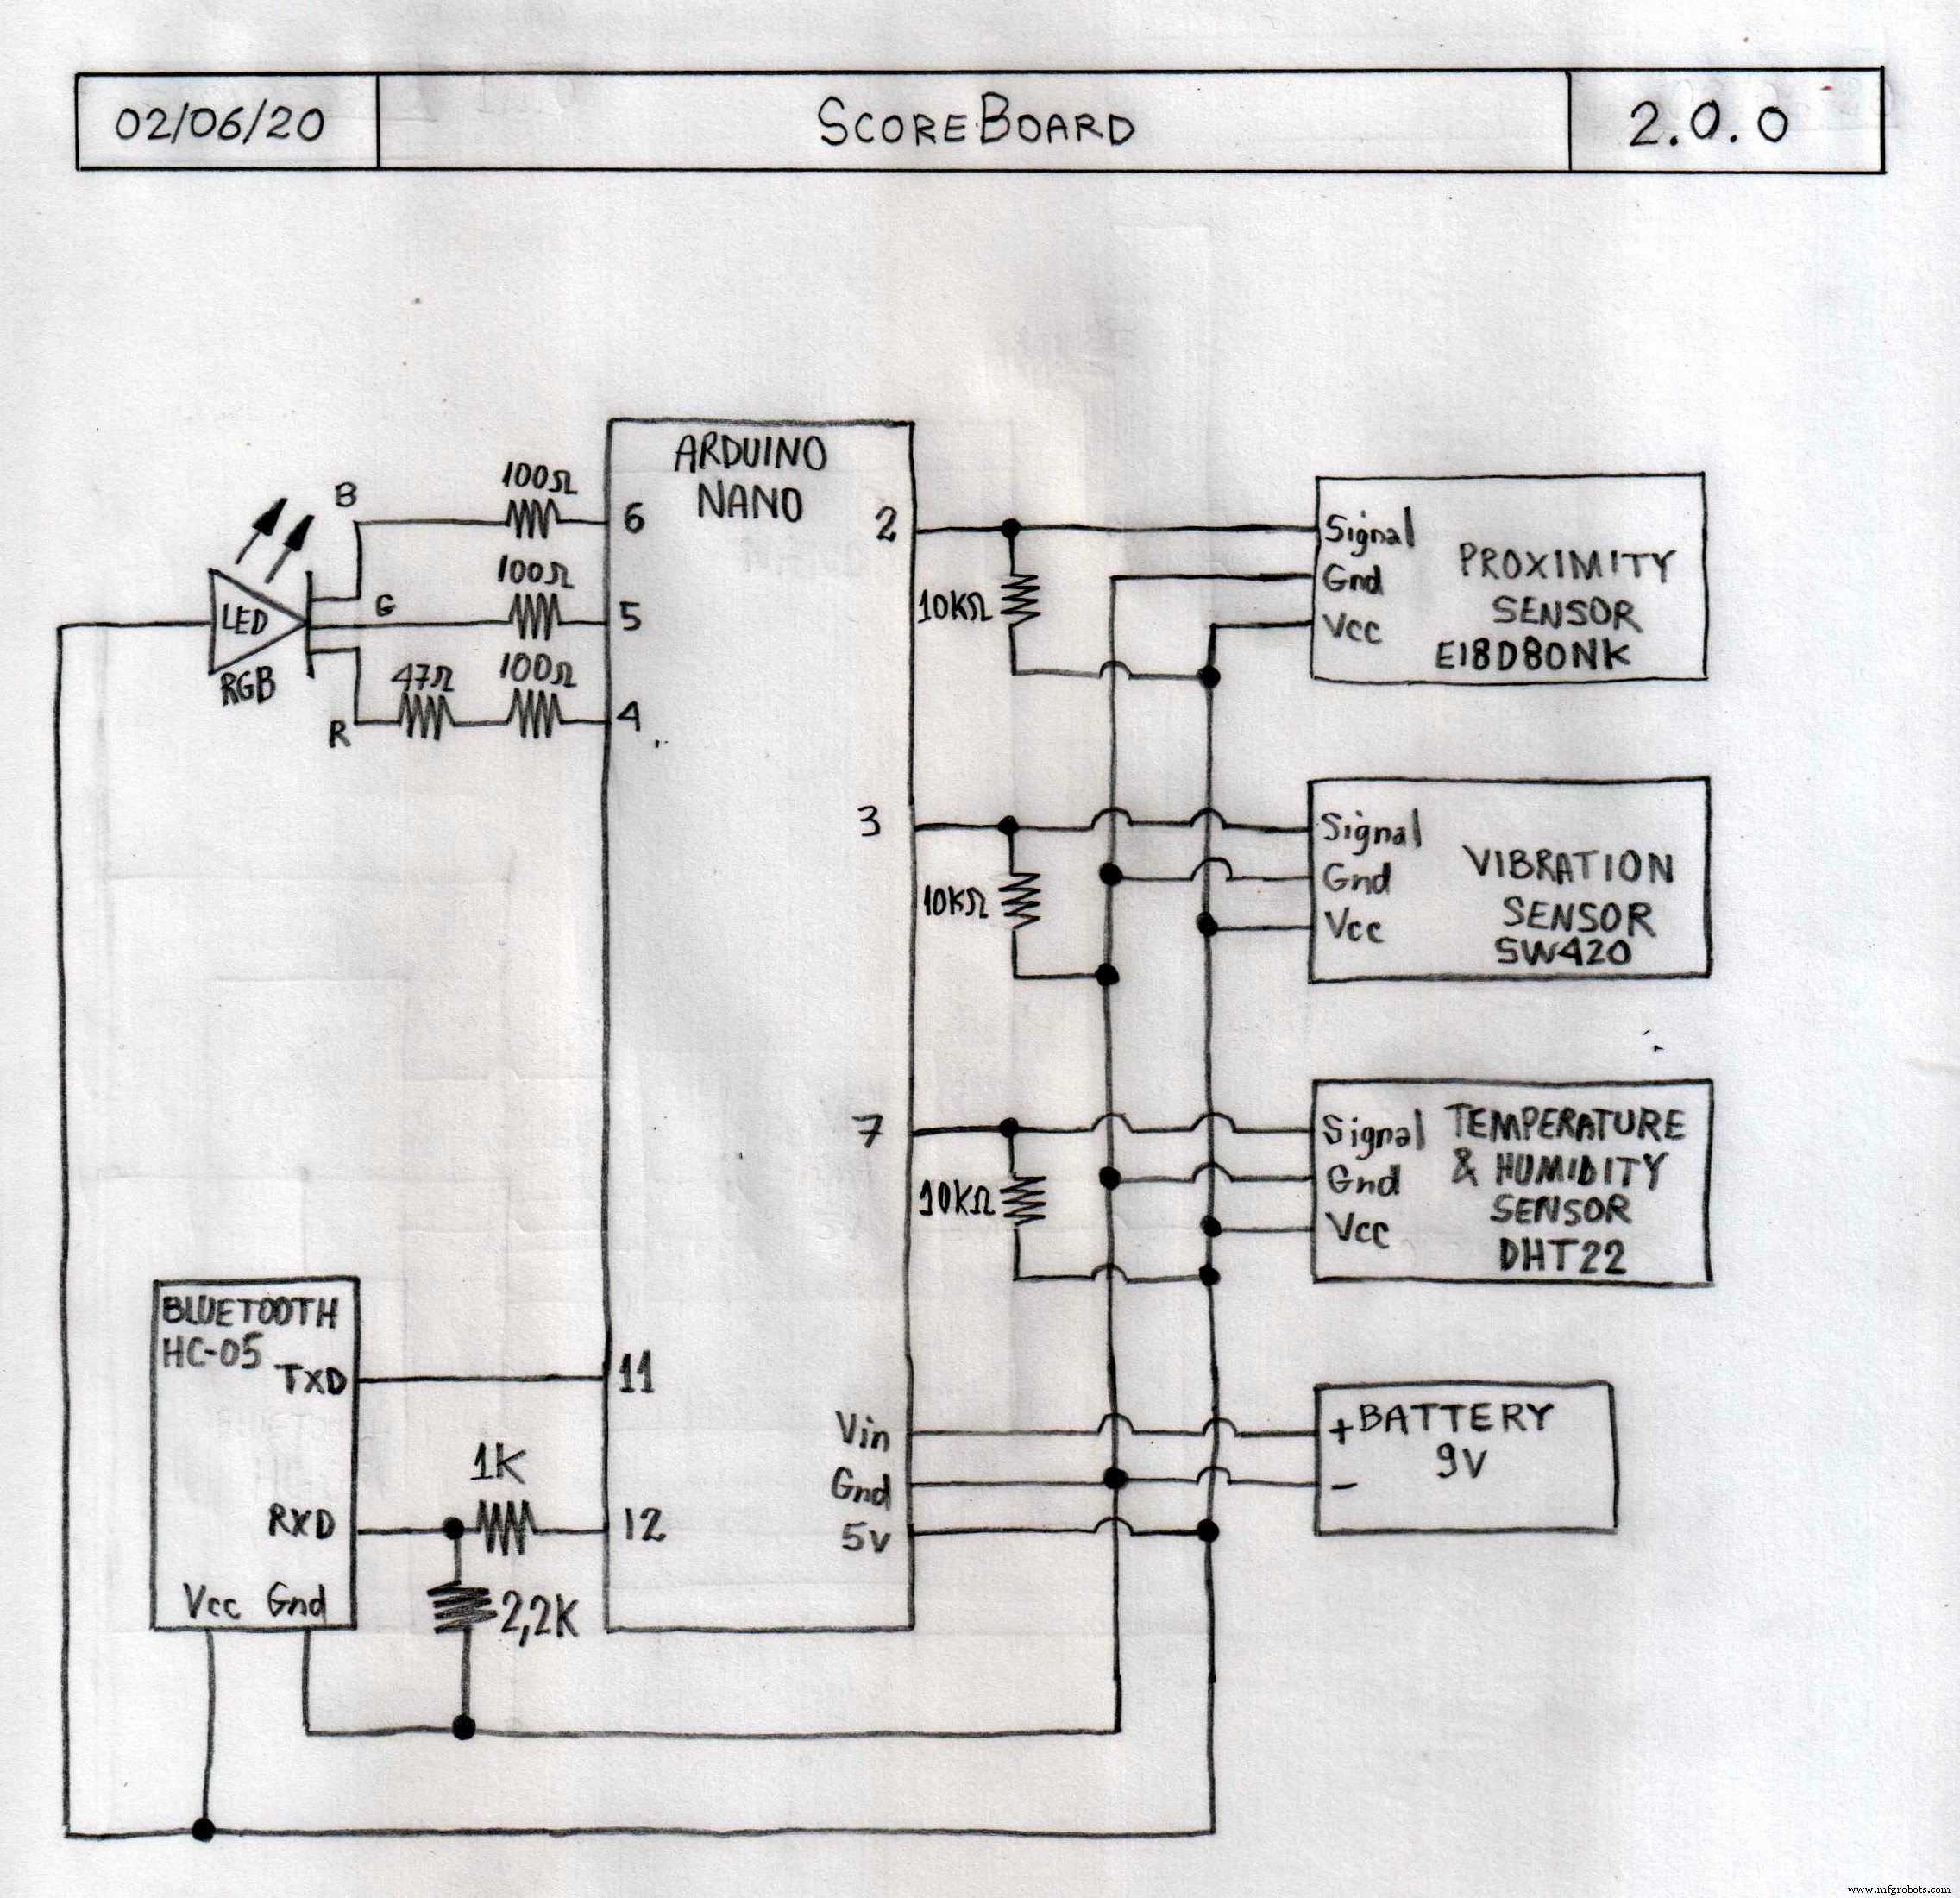
VersionsAt the beginning of the project, I used the hardware components I had available at home and developed the software (Arduino and Android) needed. This first version (1.1.0) proved to work pretty well so I decided to make some changes to use cheaper components and to implement some software improvements too. The second version (2.0.0) is even better, enjoy.
Step 1: ArduinoHardware
You can see the hardware components list for the version 2.0.0 in the Things section.
These are the main changes made from version 1.1.0 to version 2.0.0:
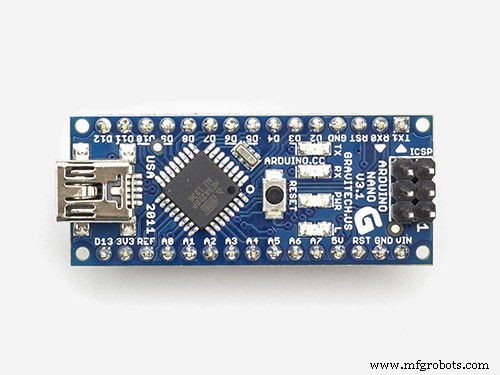
- Arduino Mega 2560 => Changed to Arduino Nano R3
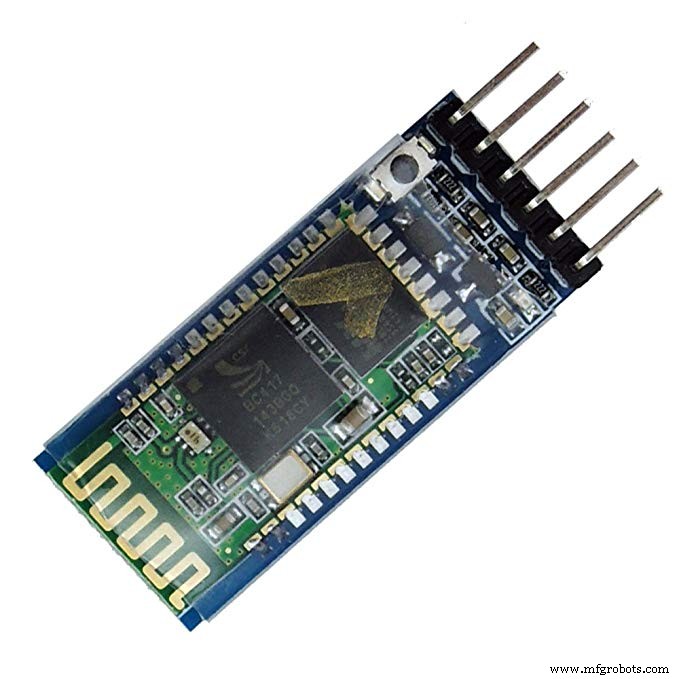
- Bluetooth Shield => Changed to HC-05 Bluetooth Module
- Rechargeable Li-ion Power => Changed to 9V Battery
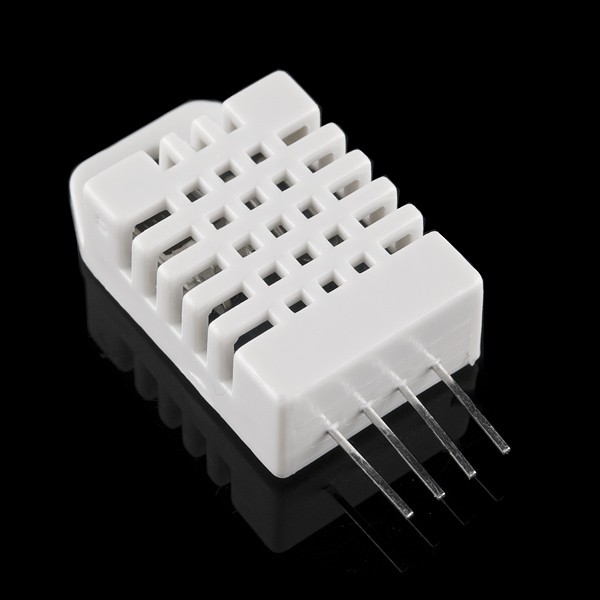
- DHT22 Temperature & Humidity Sensor => Added.
Some considerations about other components used in this project:
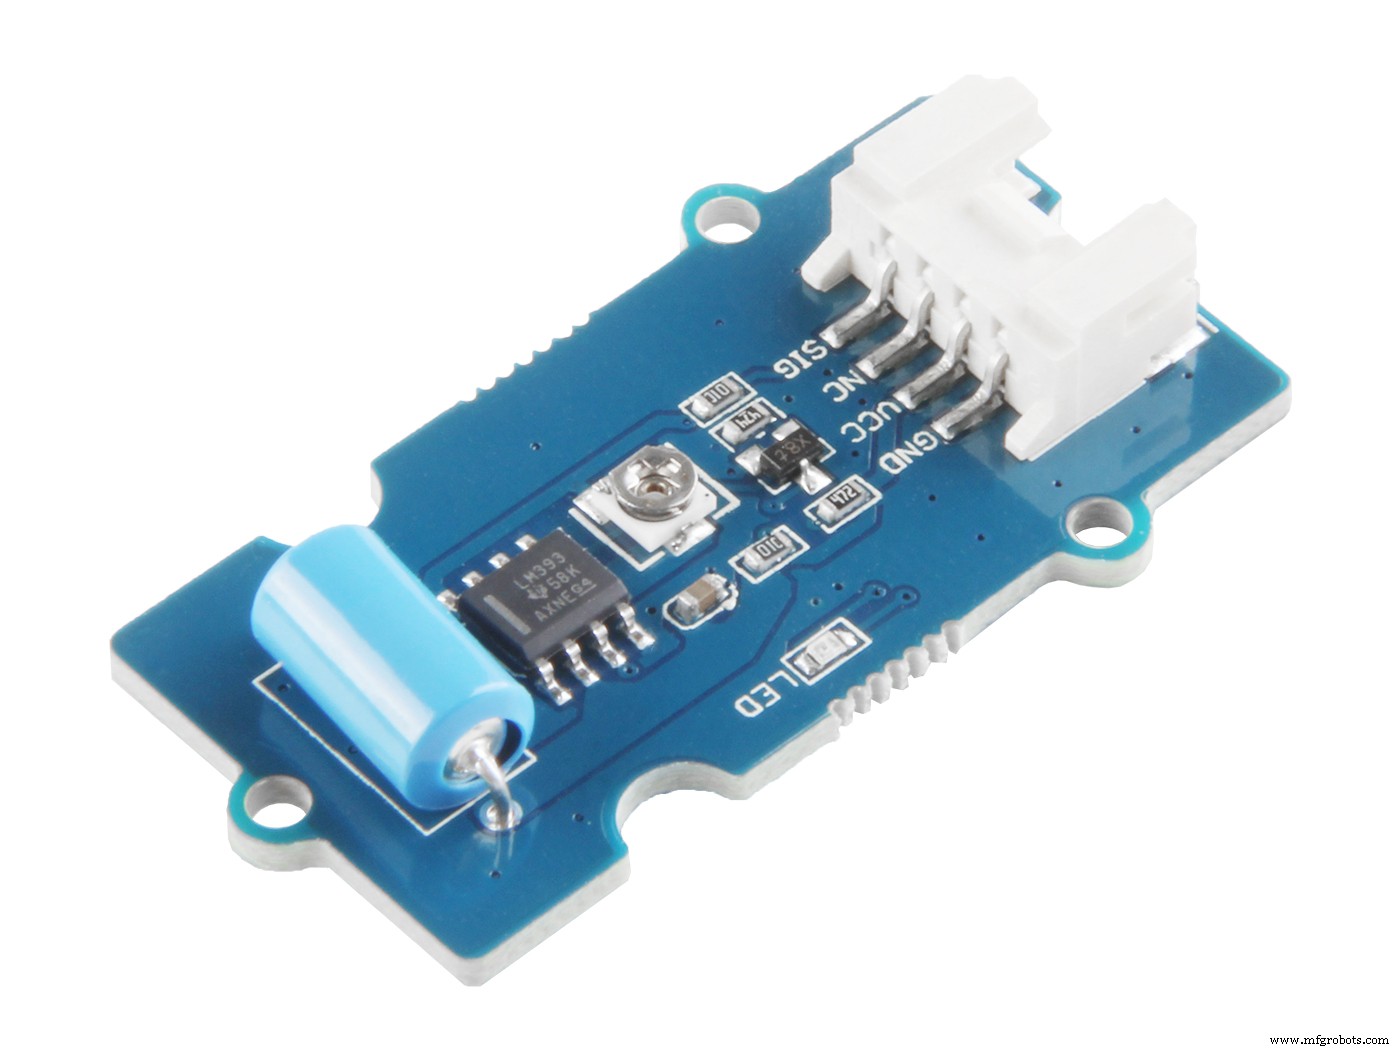
- E18-D80NK Infrared Proximity Sensor: Other proximity sensors could be used in this project, but have in mind that it's better to use one that doesn't suffer from sunlight interference, like this one.
- SW420 Vibration Sensor: Other vibration sensors could be used in this project, this one works really well.
The Arduino schematics for the two versions are available in the Schematics section.
Software
I used the Arduino IDE to develop the Arduino code, programmed with the following strategy:
- After the initialization (variables, LED, Bluetooth, etc) it stays continuously monitoring the status of the sensors.
- If the proximity sensor detects the presence of the ball, it means a shot has just happened and it's a score.
- If the vibration sensor detects some movement, it means a shot has just happened but it waits for 2 seconds (maximum) to make a decision.
- In this time, if the proximity sensor detects the presence of the ball, it (immediately) knows it's a score.
- At the end of the 2 seconds time, if the proximity sensor didn't detect the presence of the ball, it knows it's a miss.
- The Arduino informs the Android through Bluetooth that a shot (score or miss) has just happened.
- The process restarts.
These are the main changes made from version 1.1.0 to version 2.0.0:
- Change support from Bluetooth shield to HC-05 Bluetooth module
- Add support to DHT22 Temperature & Humidity sensor
- Improve the logic to detect shots, scores, and misses and to better signaling thought the LED.
The Arduino codes for the two versions are available in the Code section.
Step 2: AndroidI used the MIT App Inventor to develop the Android code, programmed with the following strategy:
- After the initialization (shots, scores, misses, Bluetooth, etc) it waits for the "Start" button to be pressed.
- When the "Start" button is pressed it stays continuously monitoring the Bluetooth connection.
- Every time it receives any data it updates the board and plays the correct notification sound.
- The process repeats until the "Pause" button is pressed.
- There're buttons to select de Bluetooth device, reset the count, and some extra buttons to adjust the board if necessary.
These are the main changes made from version 1.1.0 to version 2.0.0:
- Change the layout from portrait to landscape.
- Add Light, Humidity, Temperature, and Heat Index.
- Improve the adjust buttons.
- Add feature to keep the screen always on.
- Add press sounds in all buttons.
- Adds functionality to warn each time the 50-shots mark (50, 100, 150, etc) is reached.
The Android codes for the two versions are available in the Code section.
Step 3: Basketball board setupThis is the original basketball board that I regularly use to do basketball training workouts.
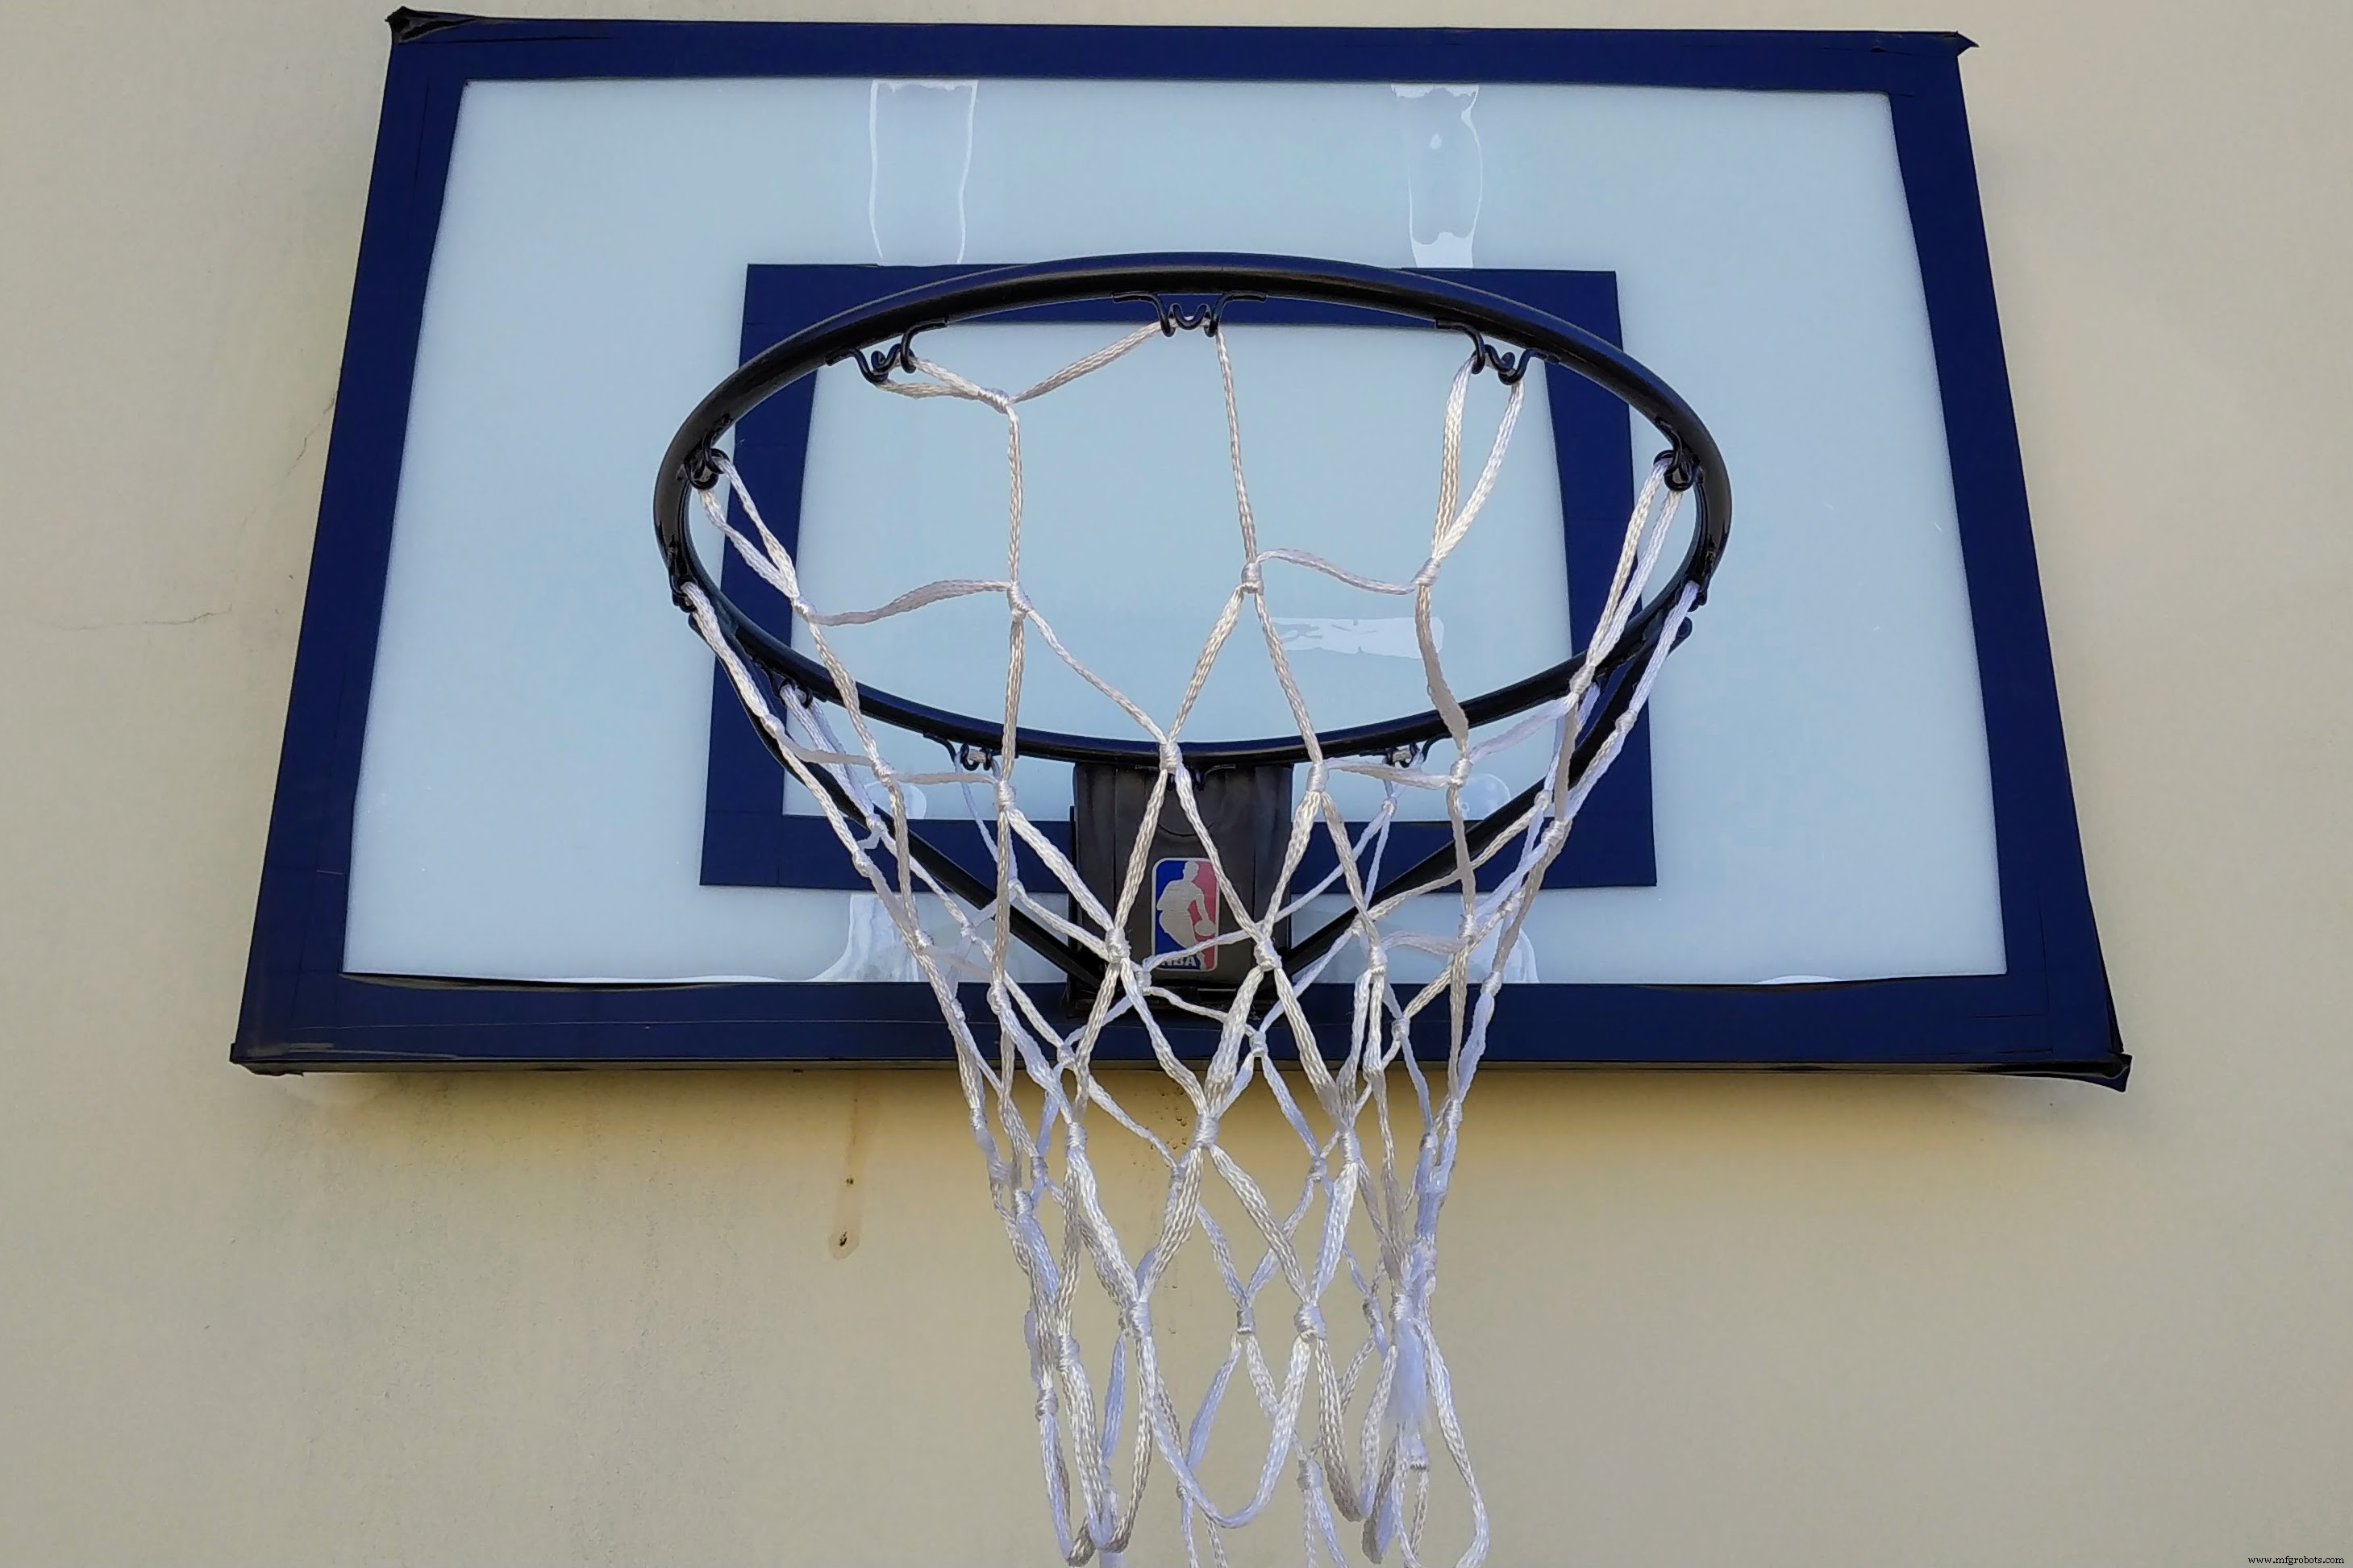
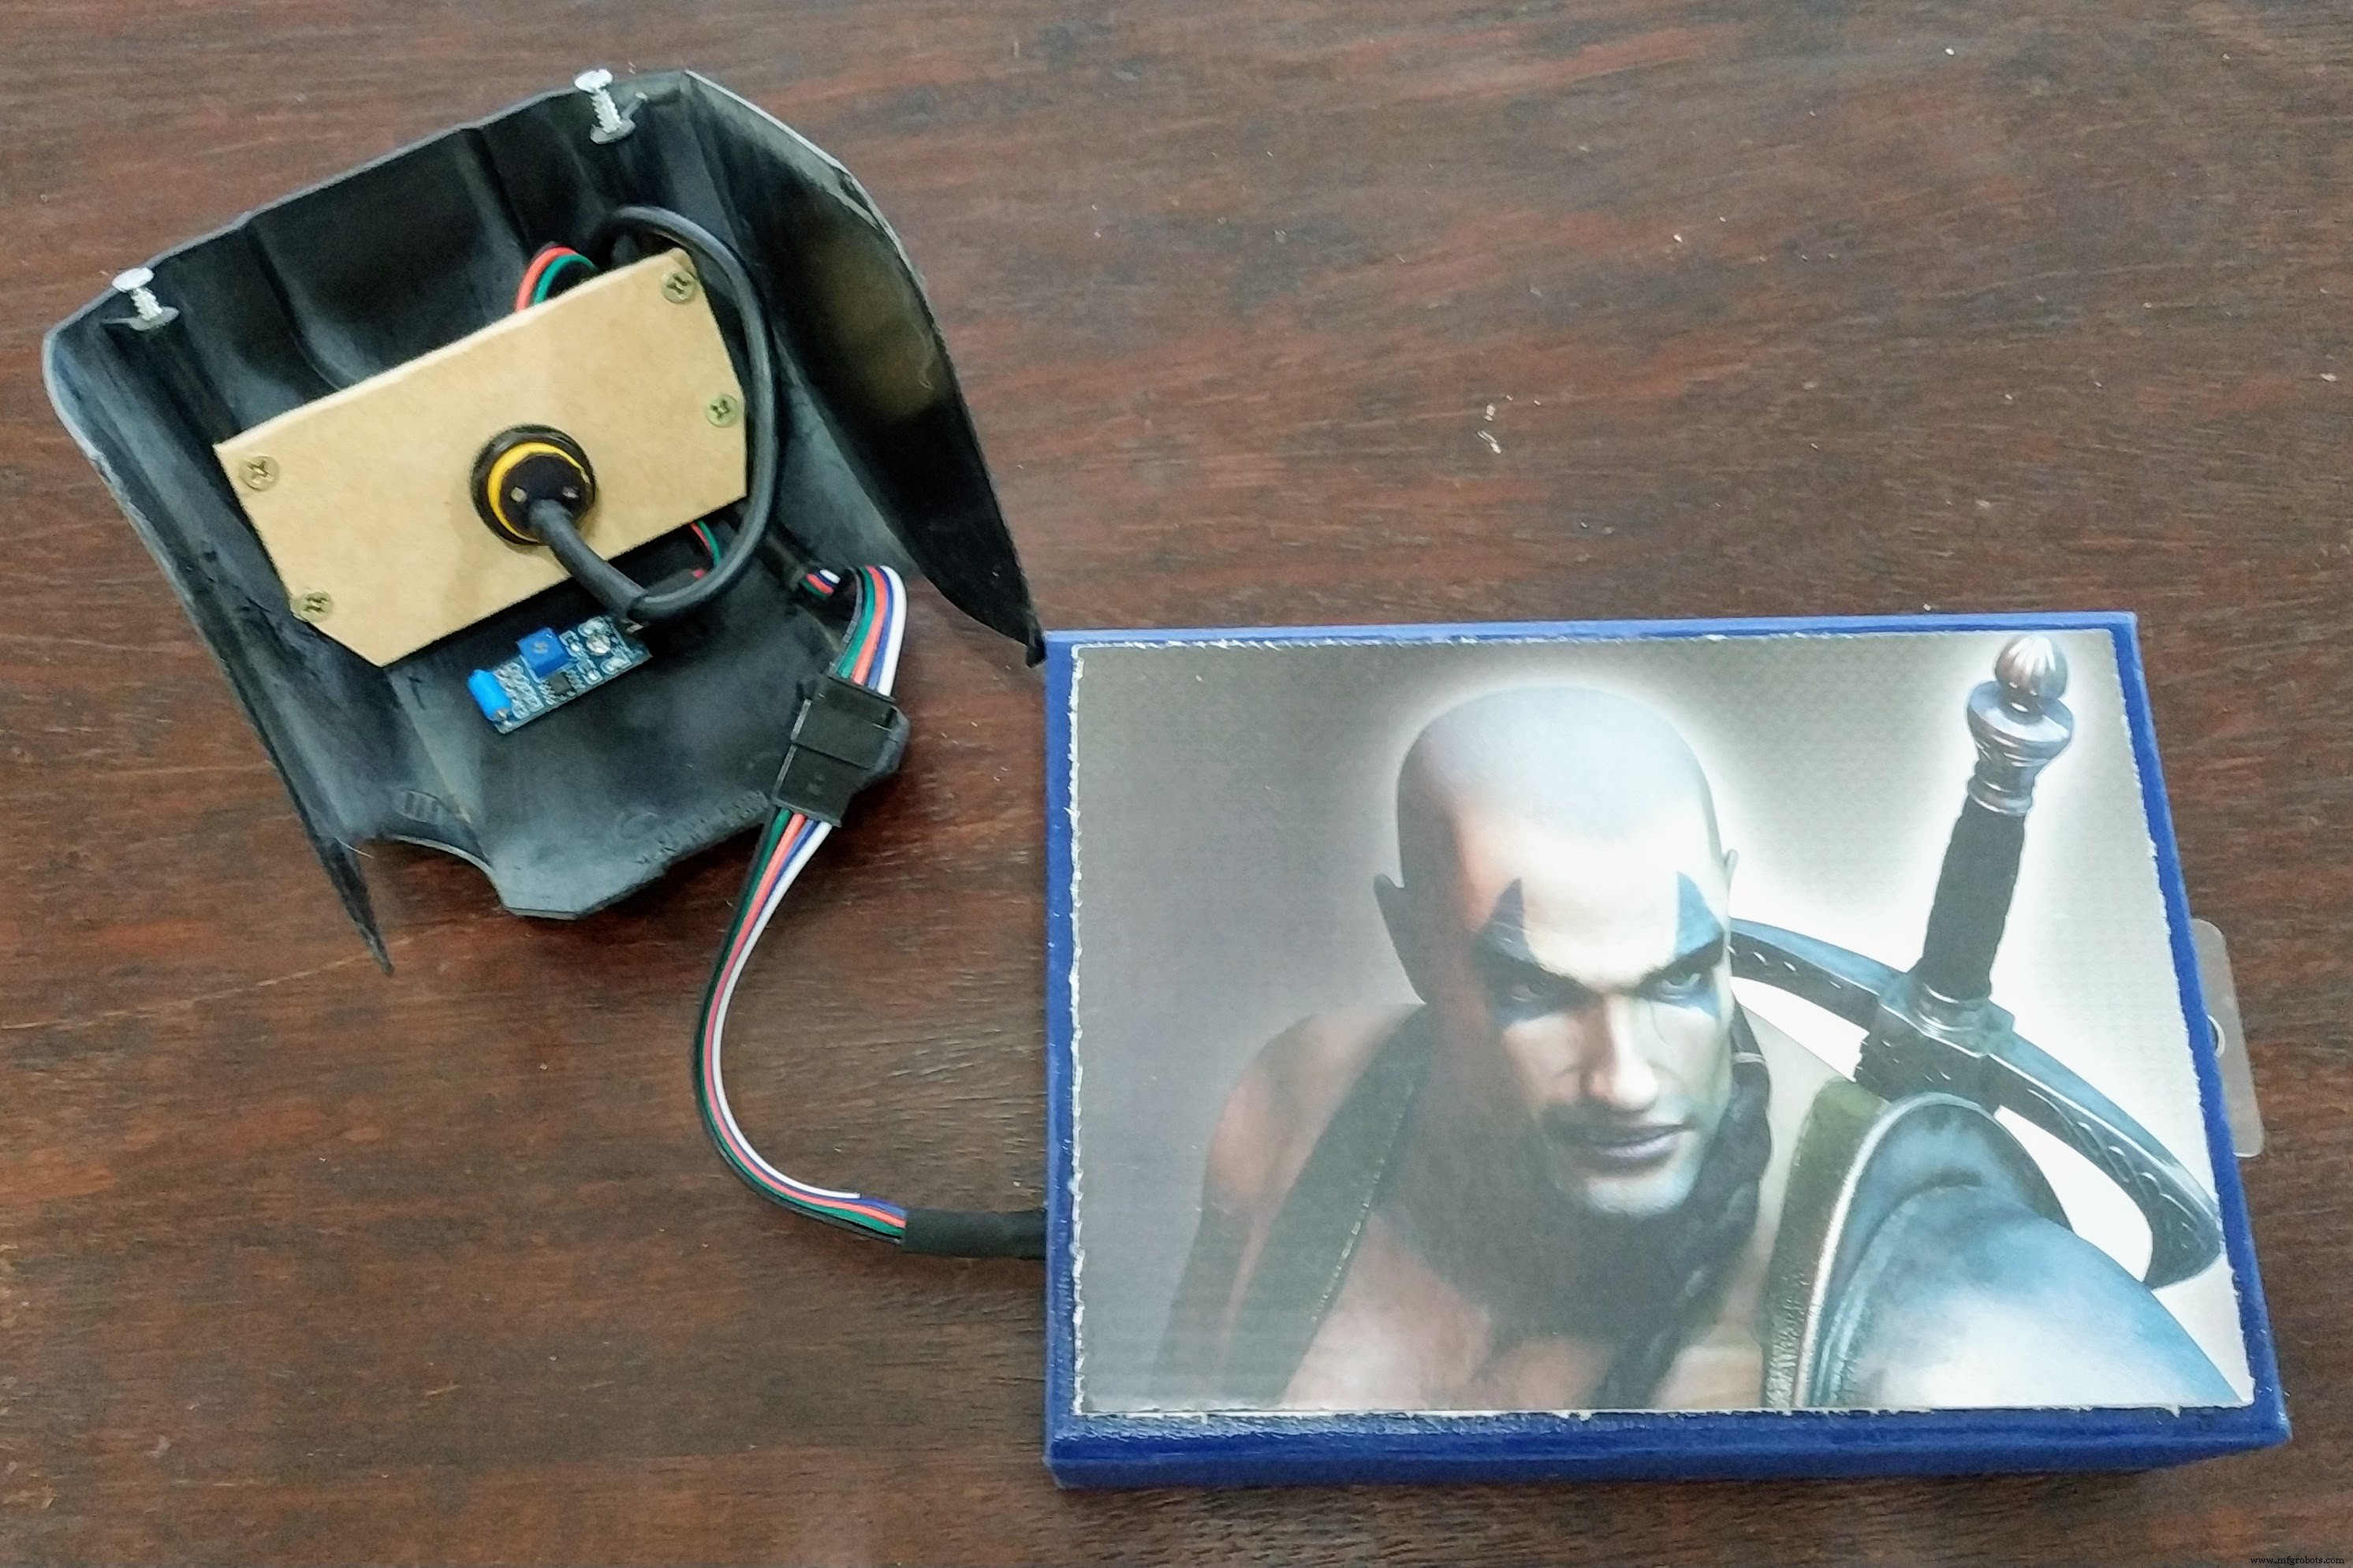
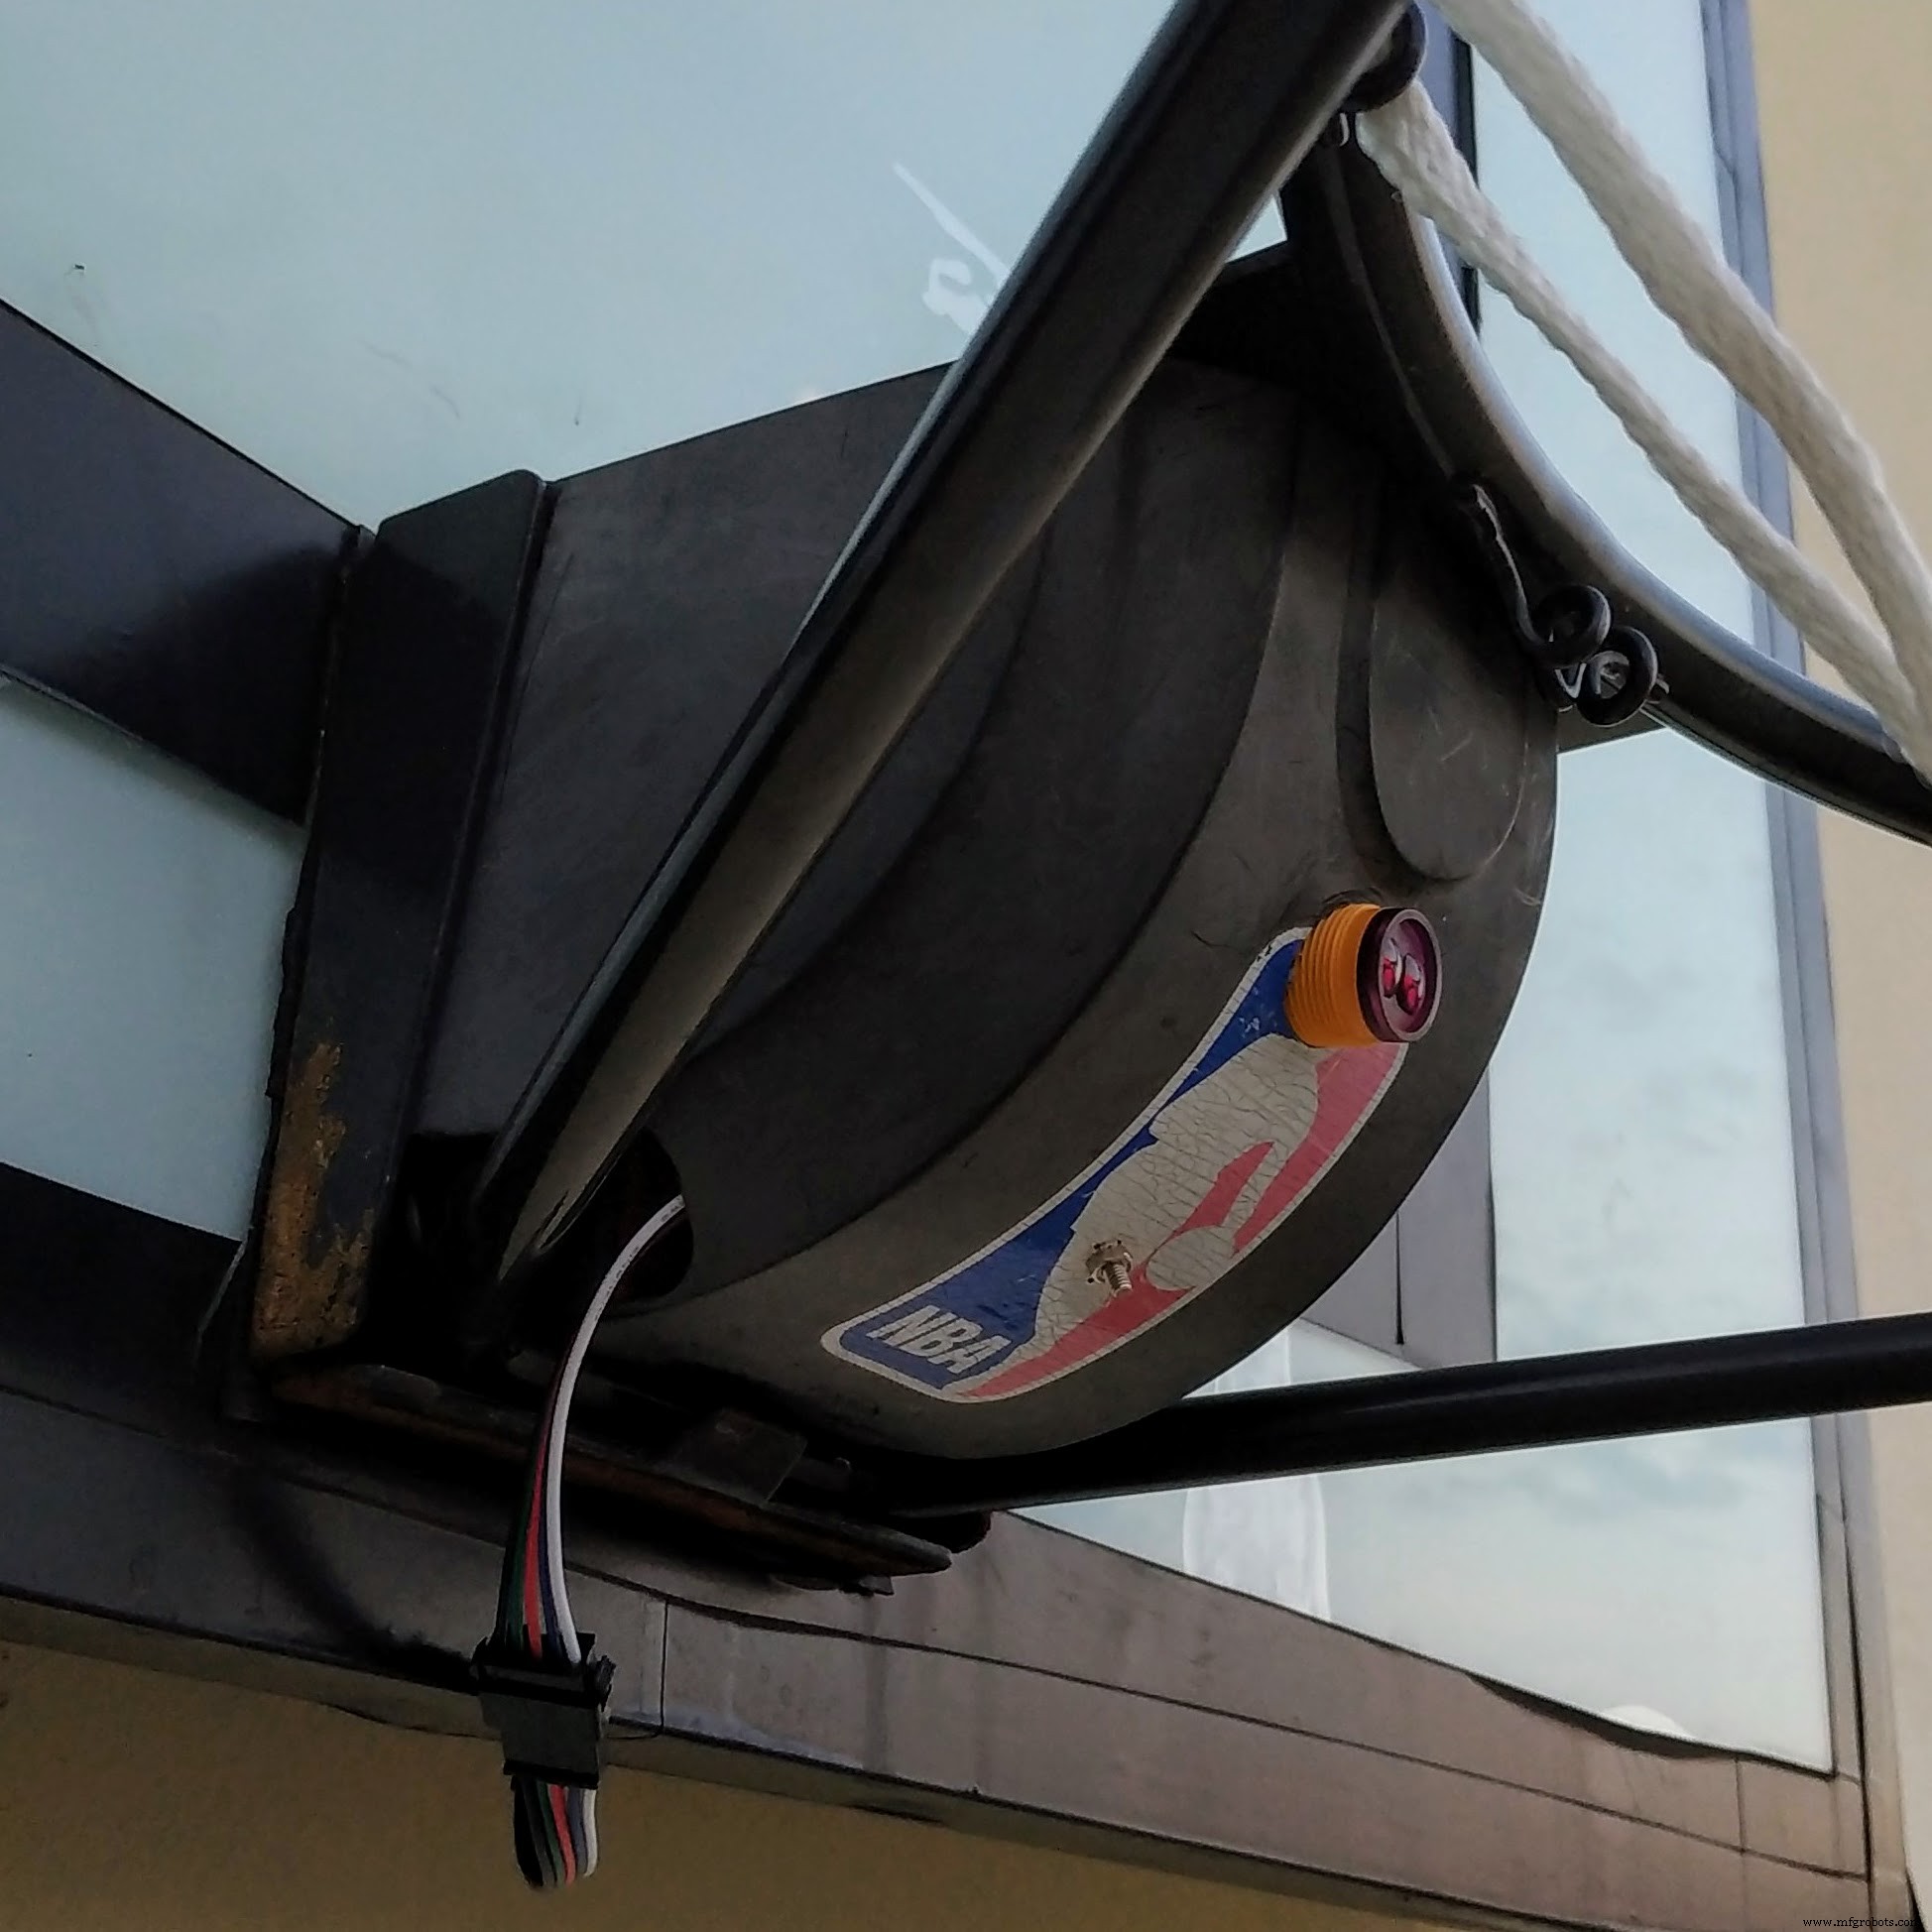
First I removed the plastic cover under the hoop and made a hole to the proximity sensor.
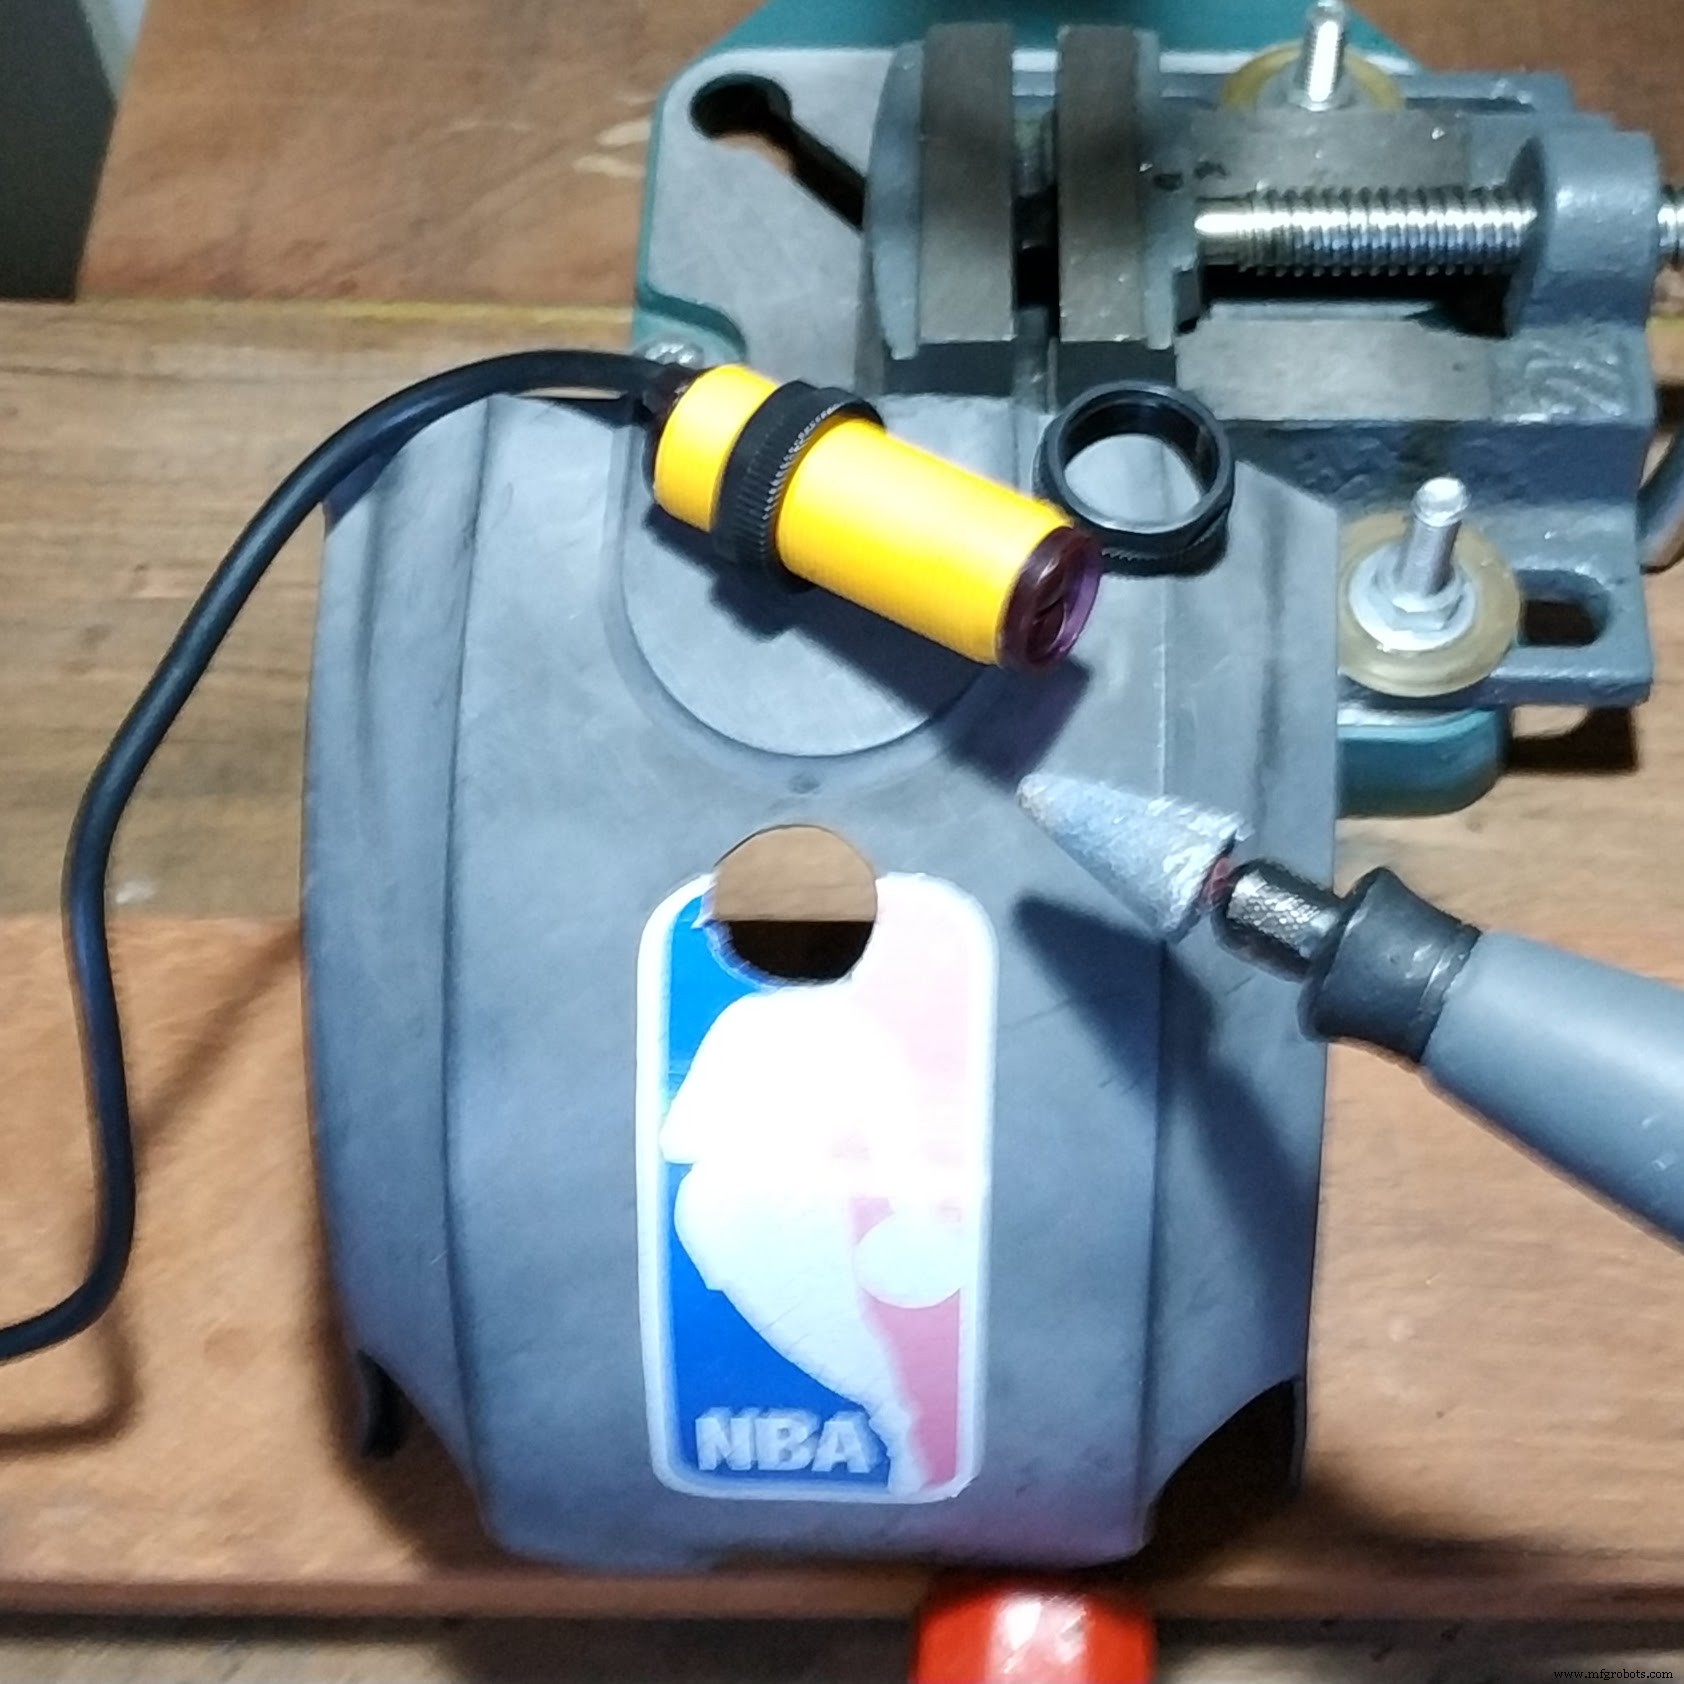
Then I made a small hole to fix the vibration sensor.

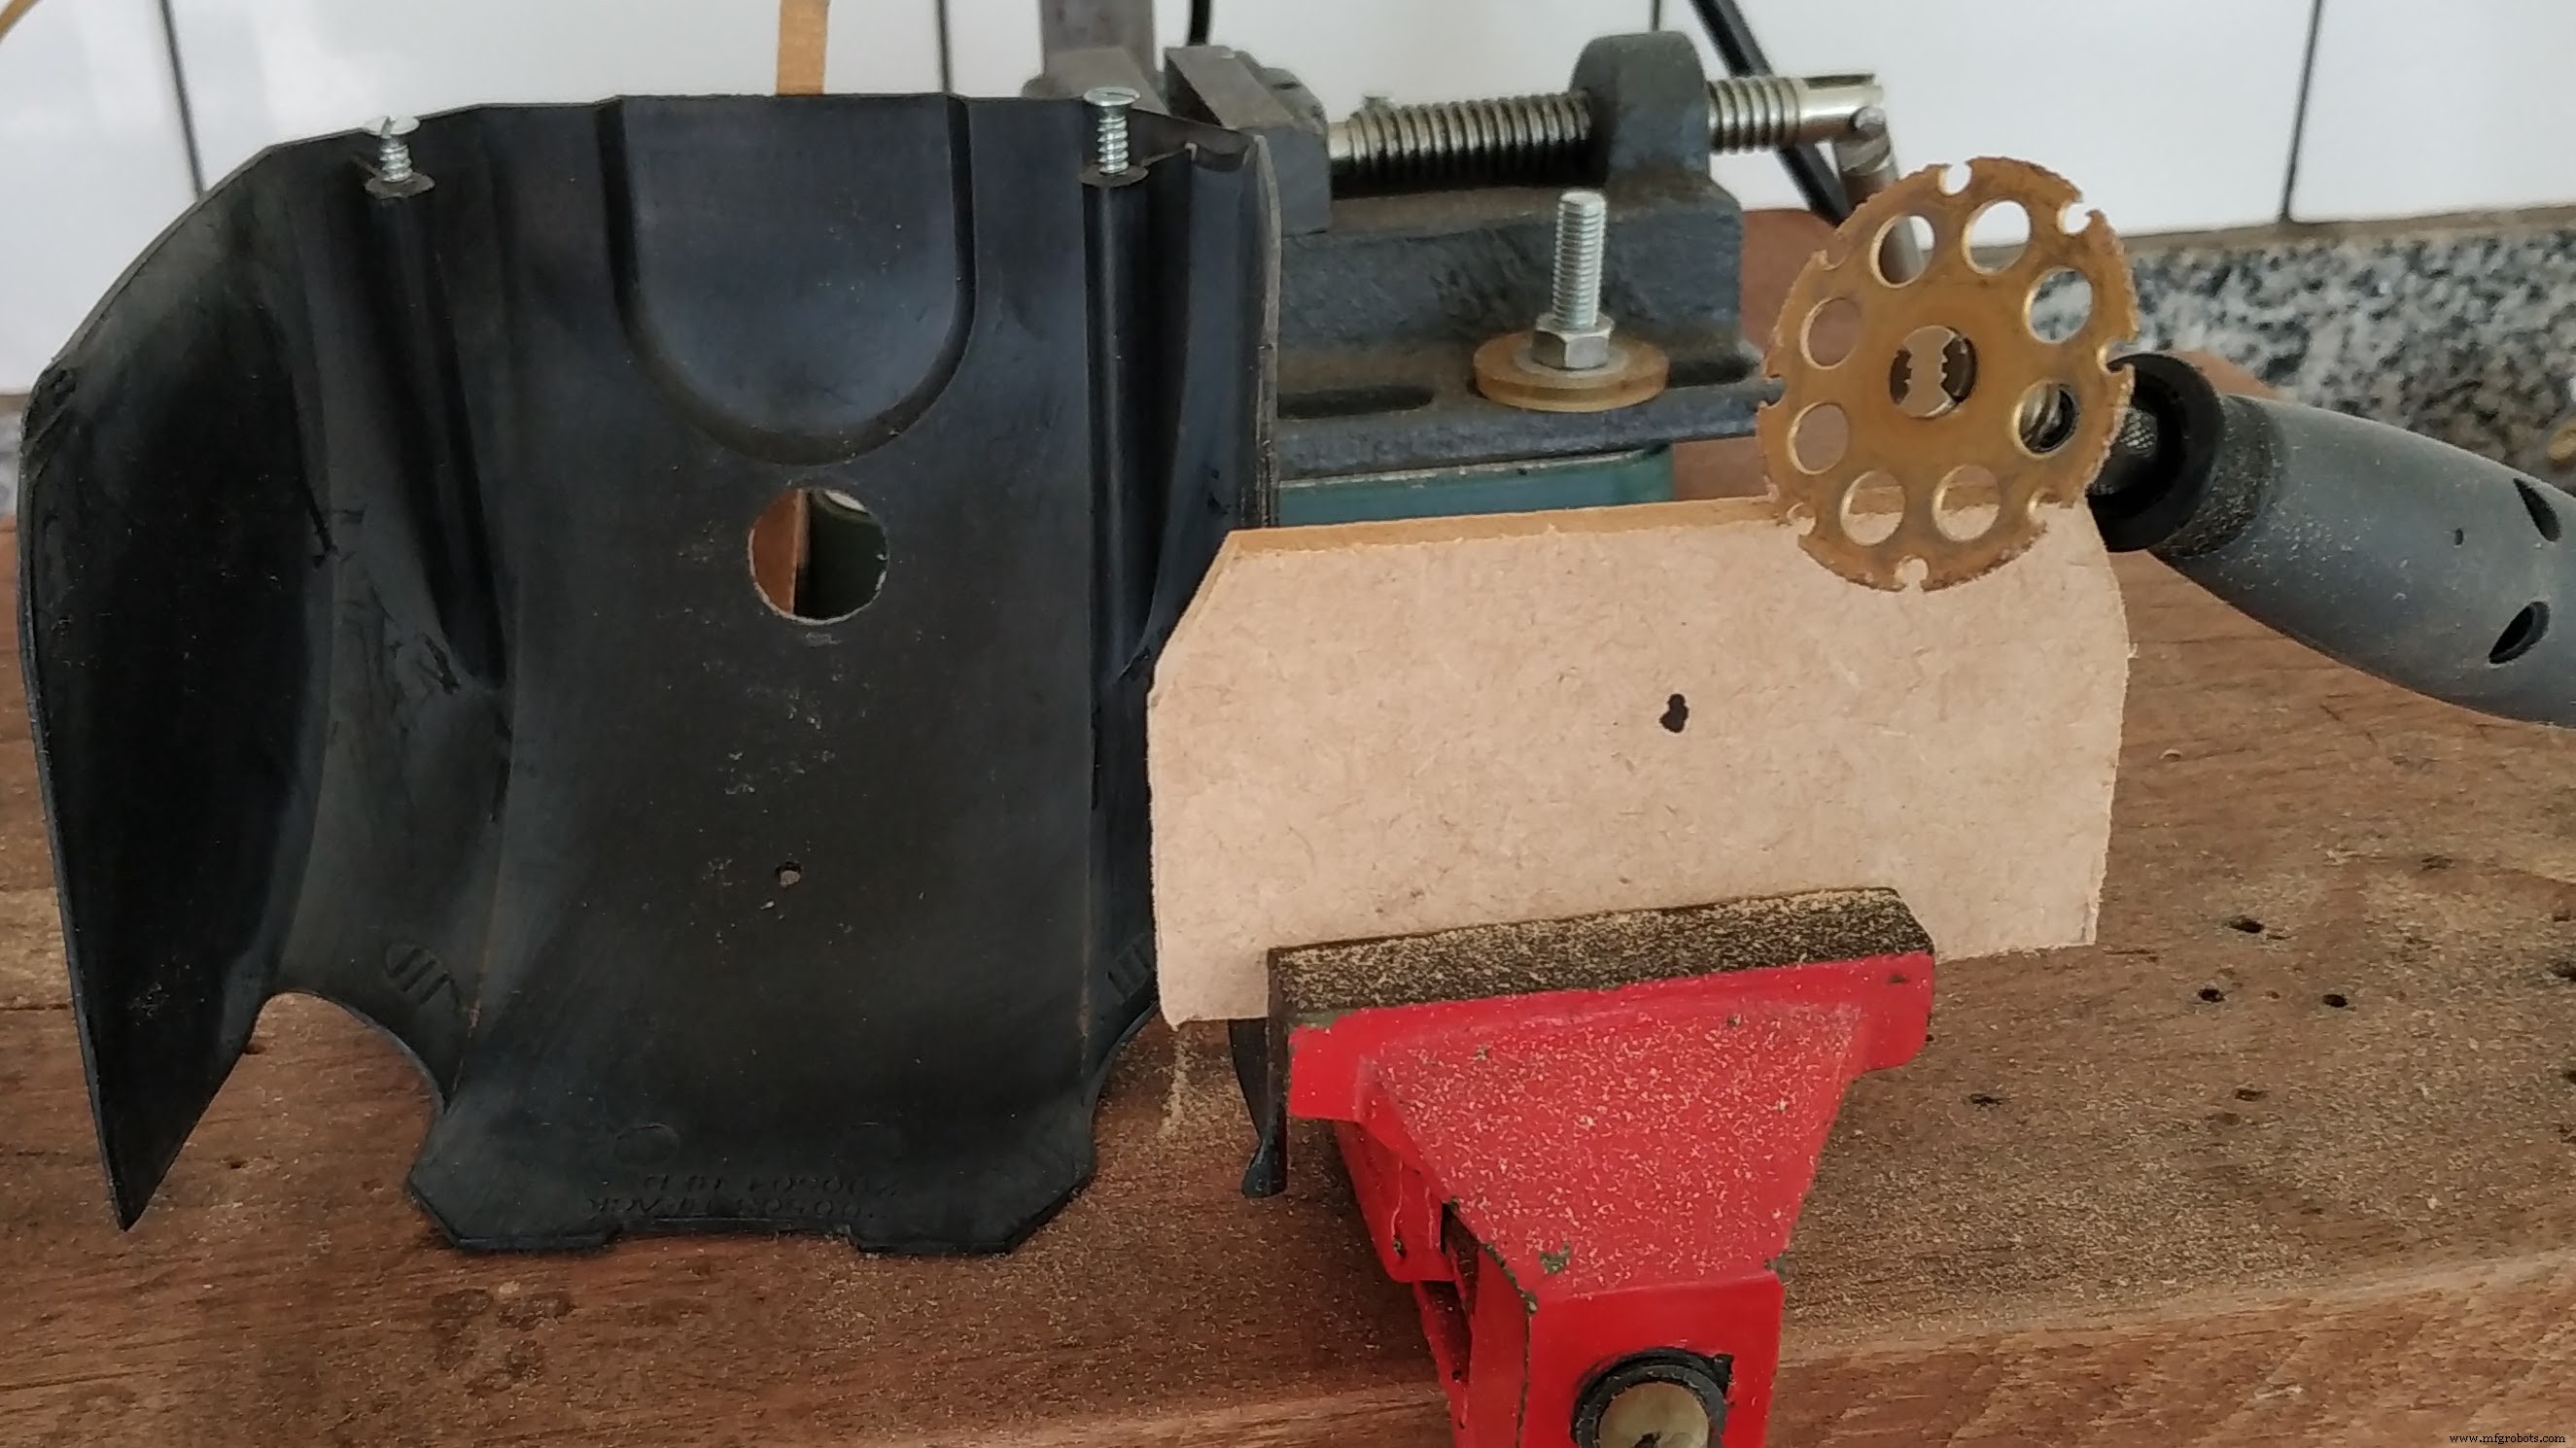
I could not attach the sensor directly to the plastic cover due to its curvature so I built a support to the sensor using MDF.
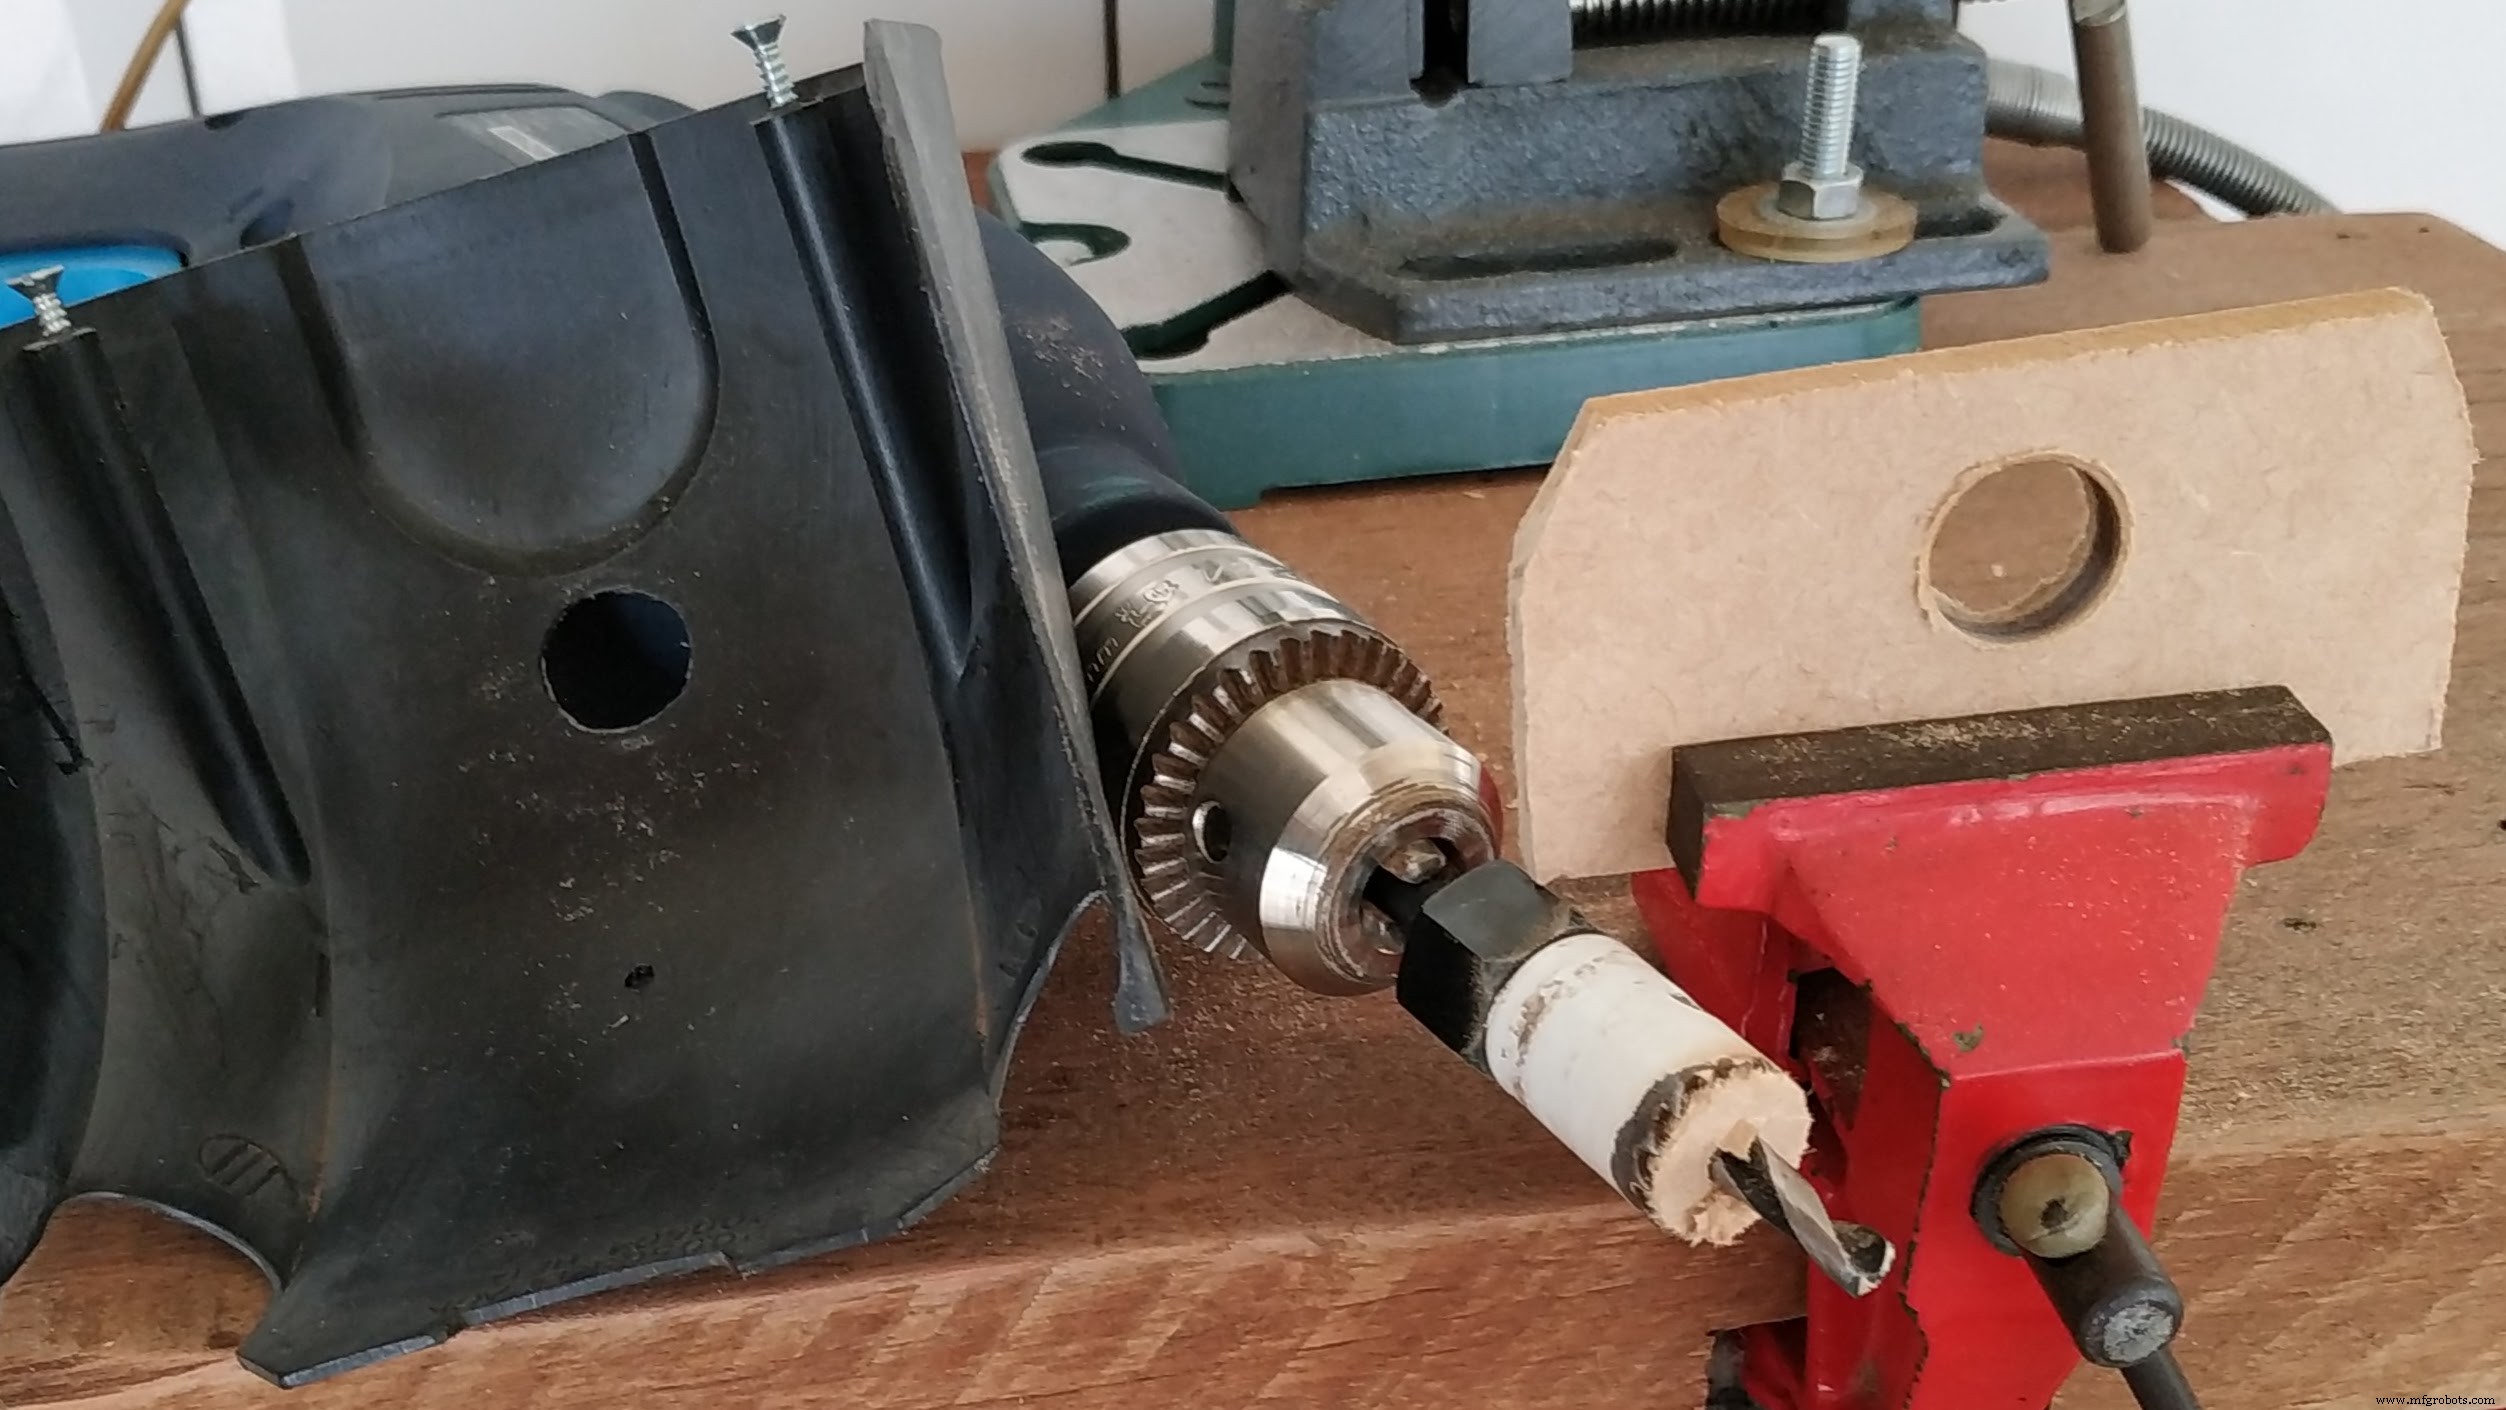
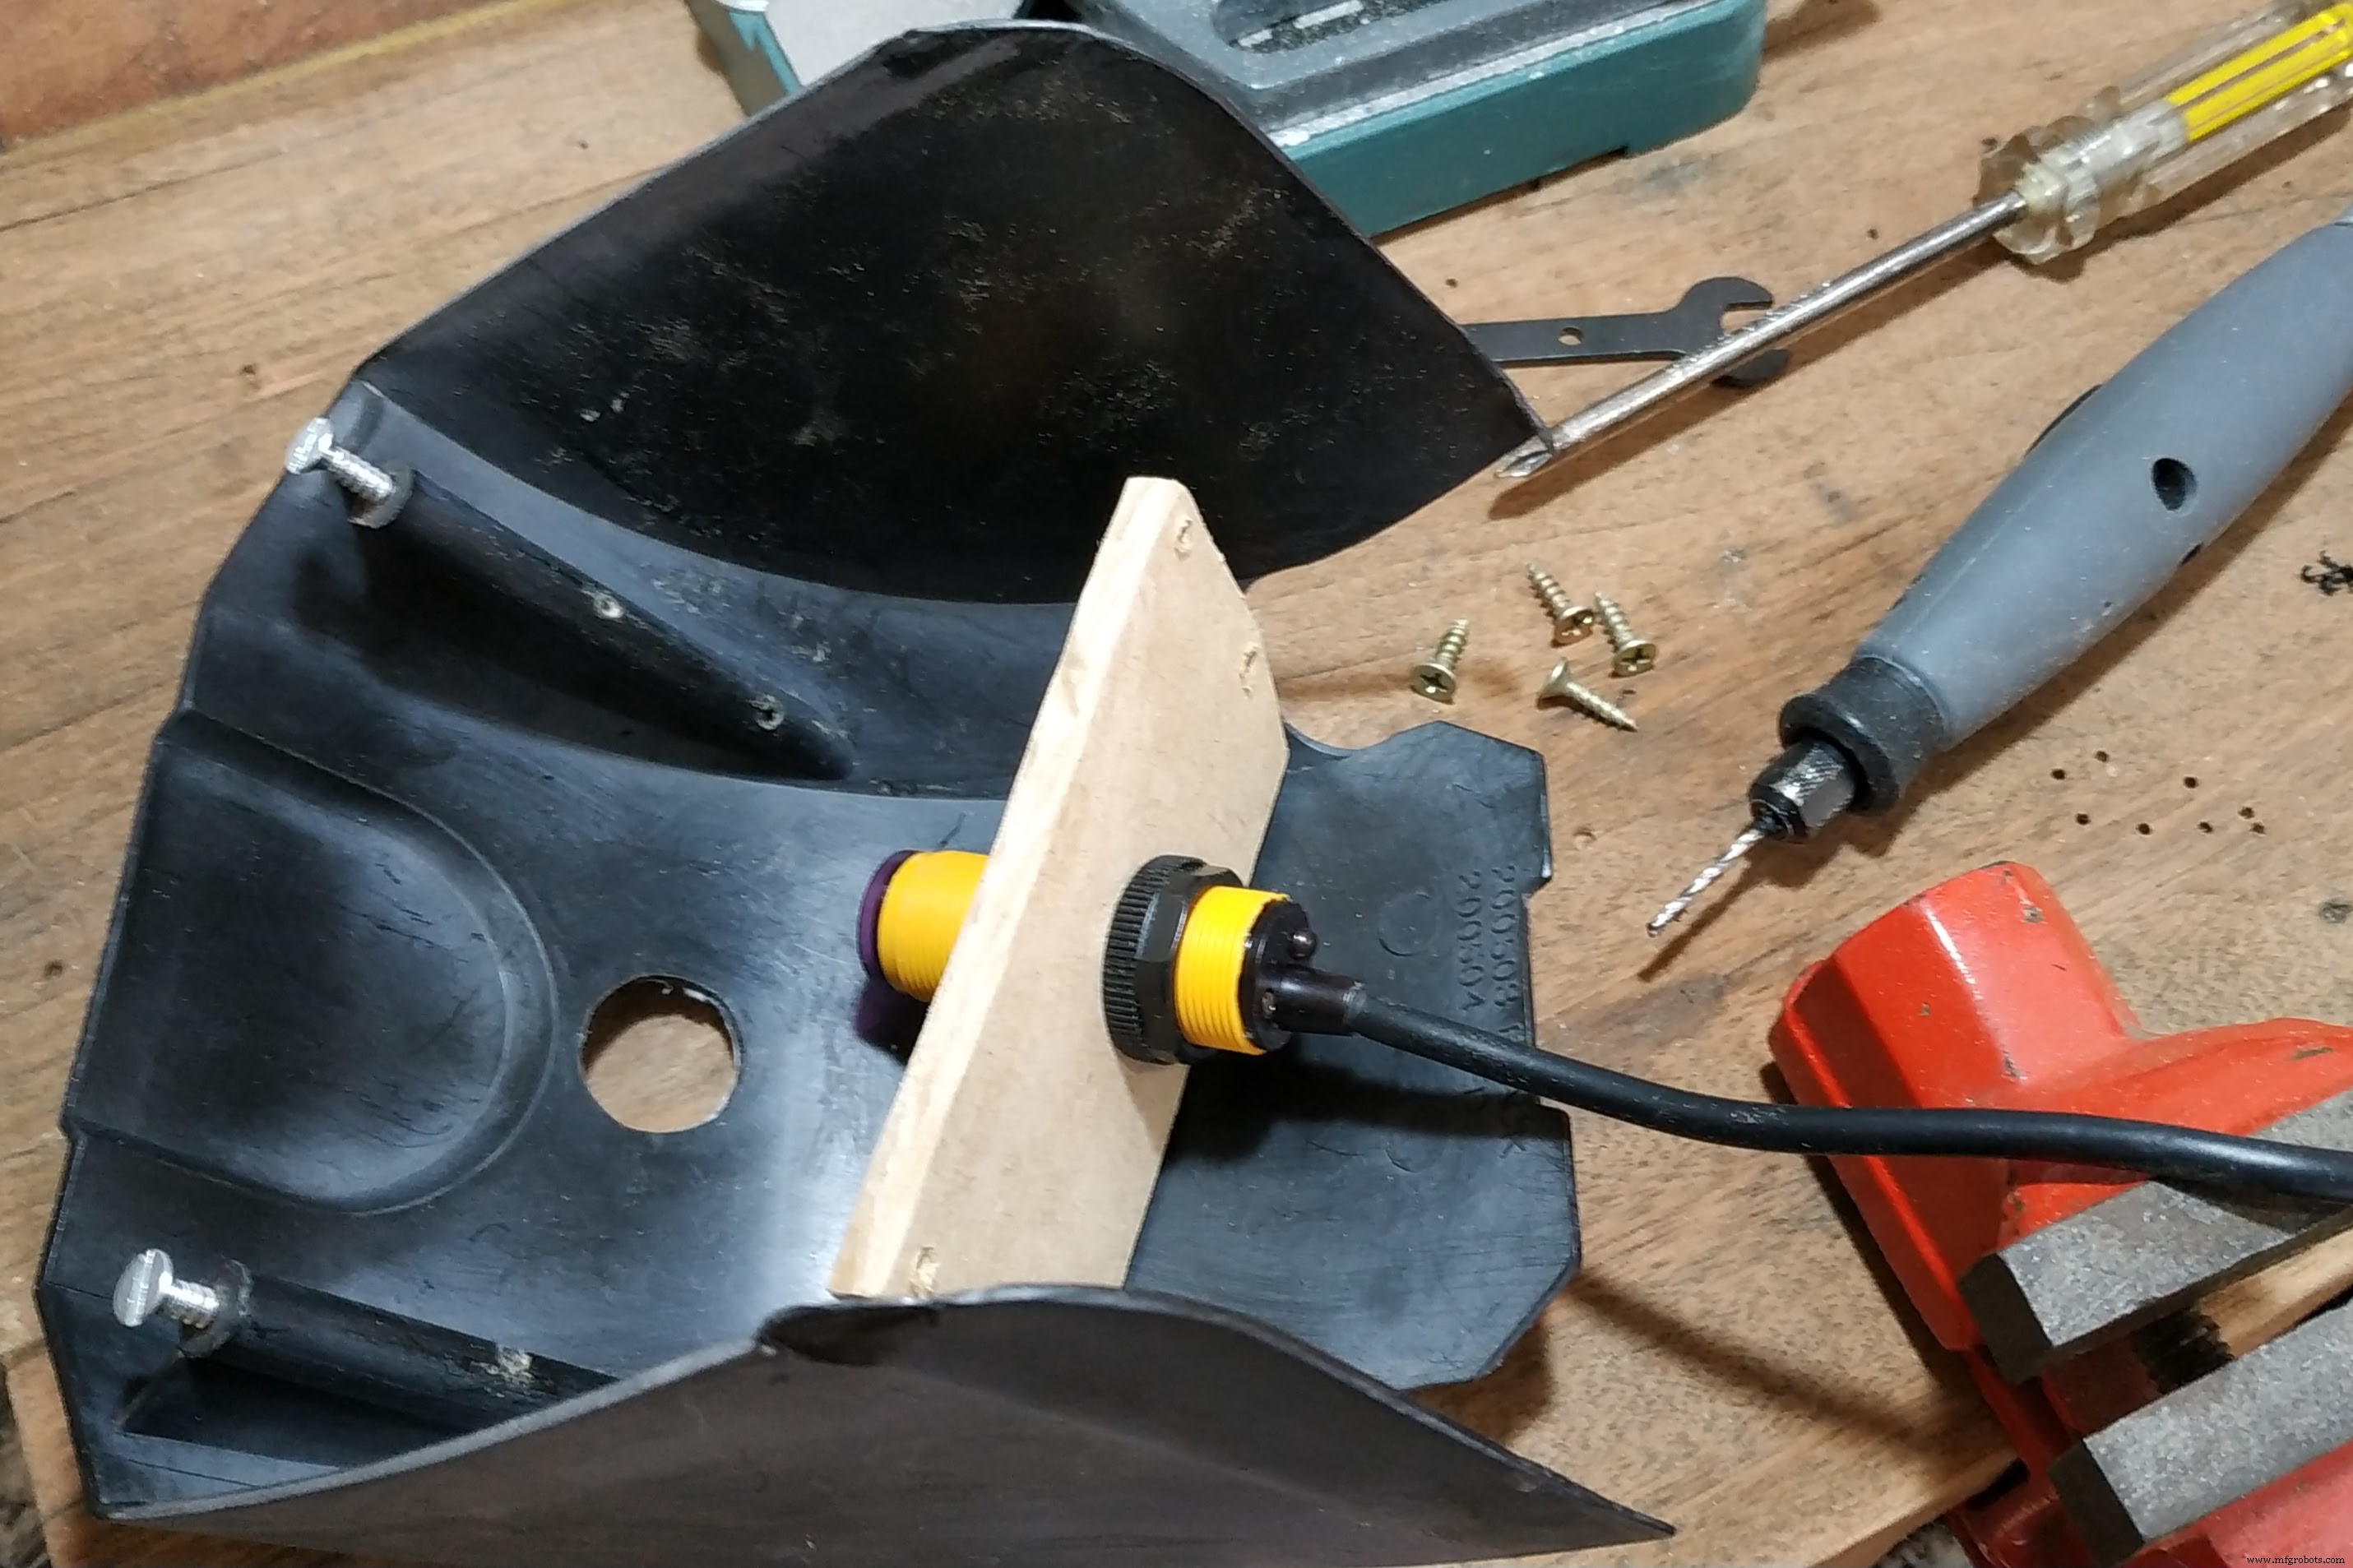
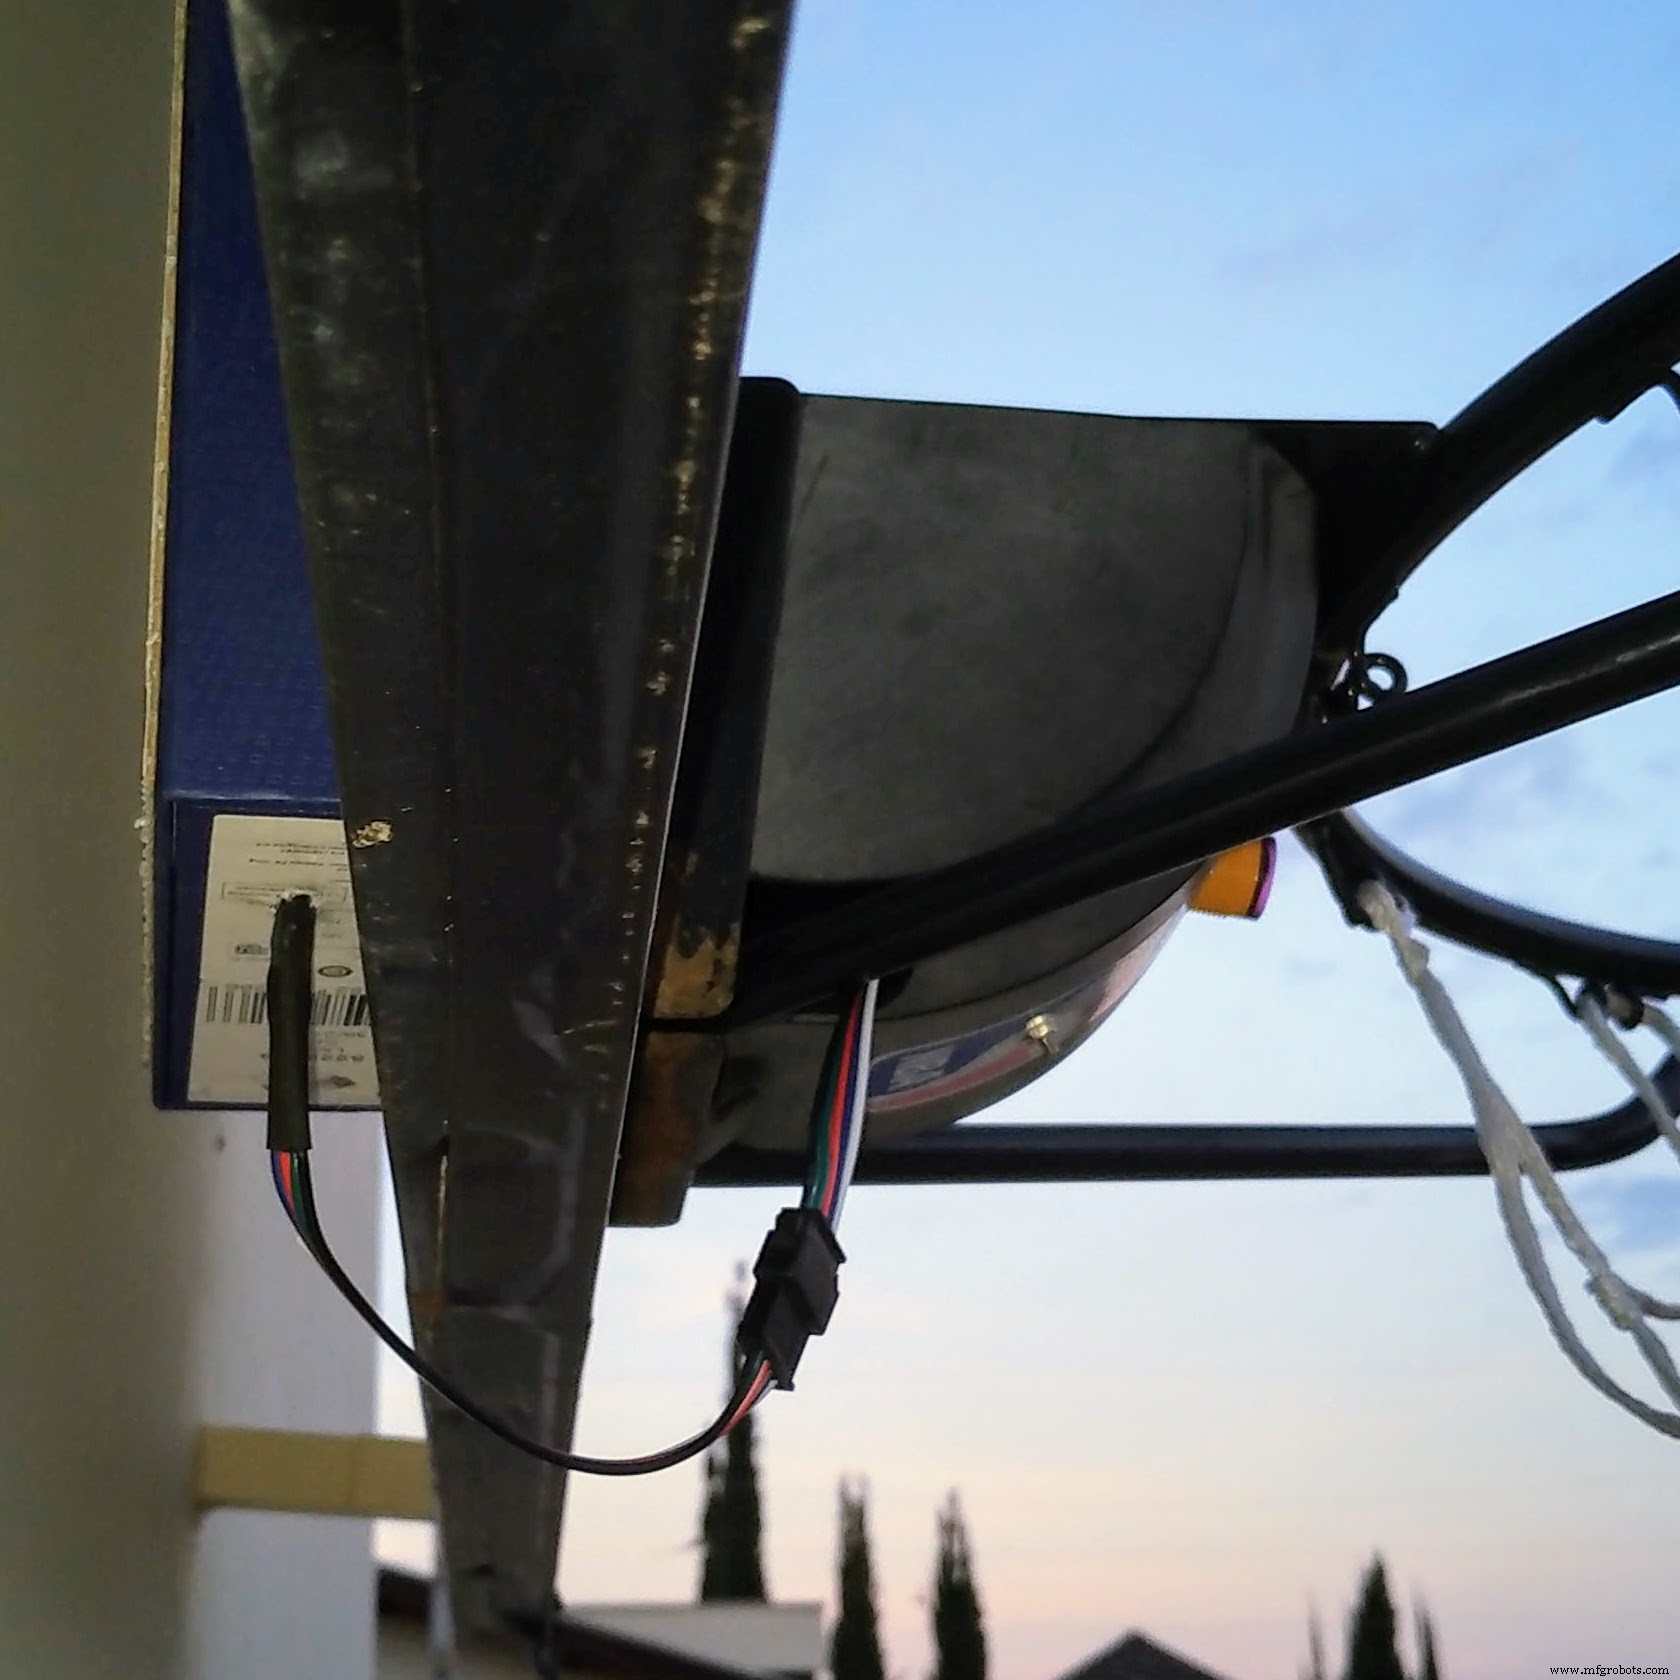
I fixed the proximity and vibration sensors using some bolts and a nut.
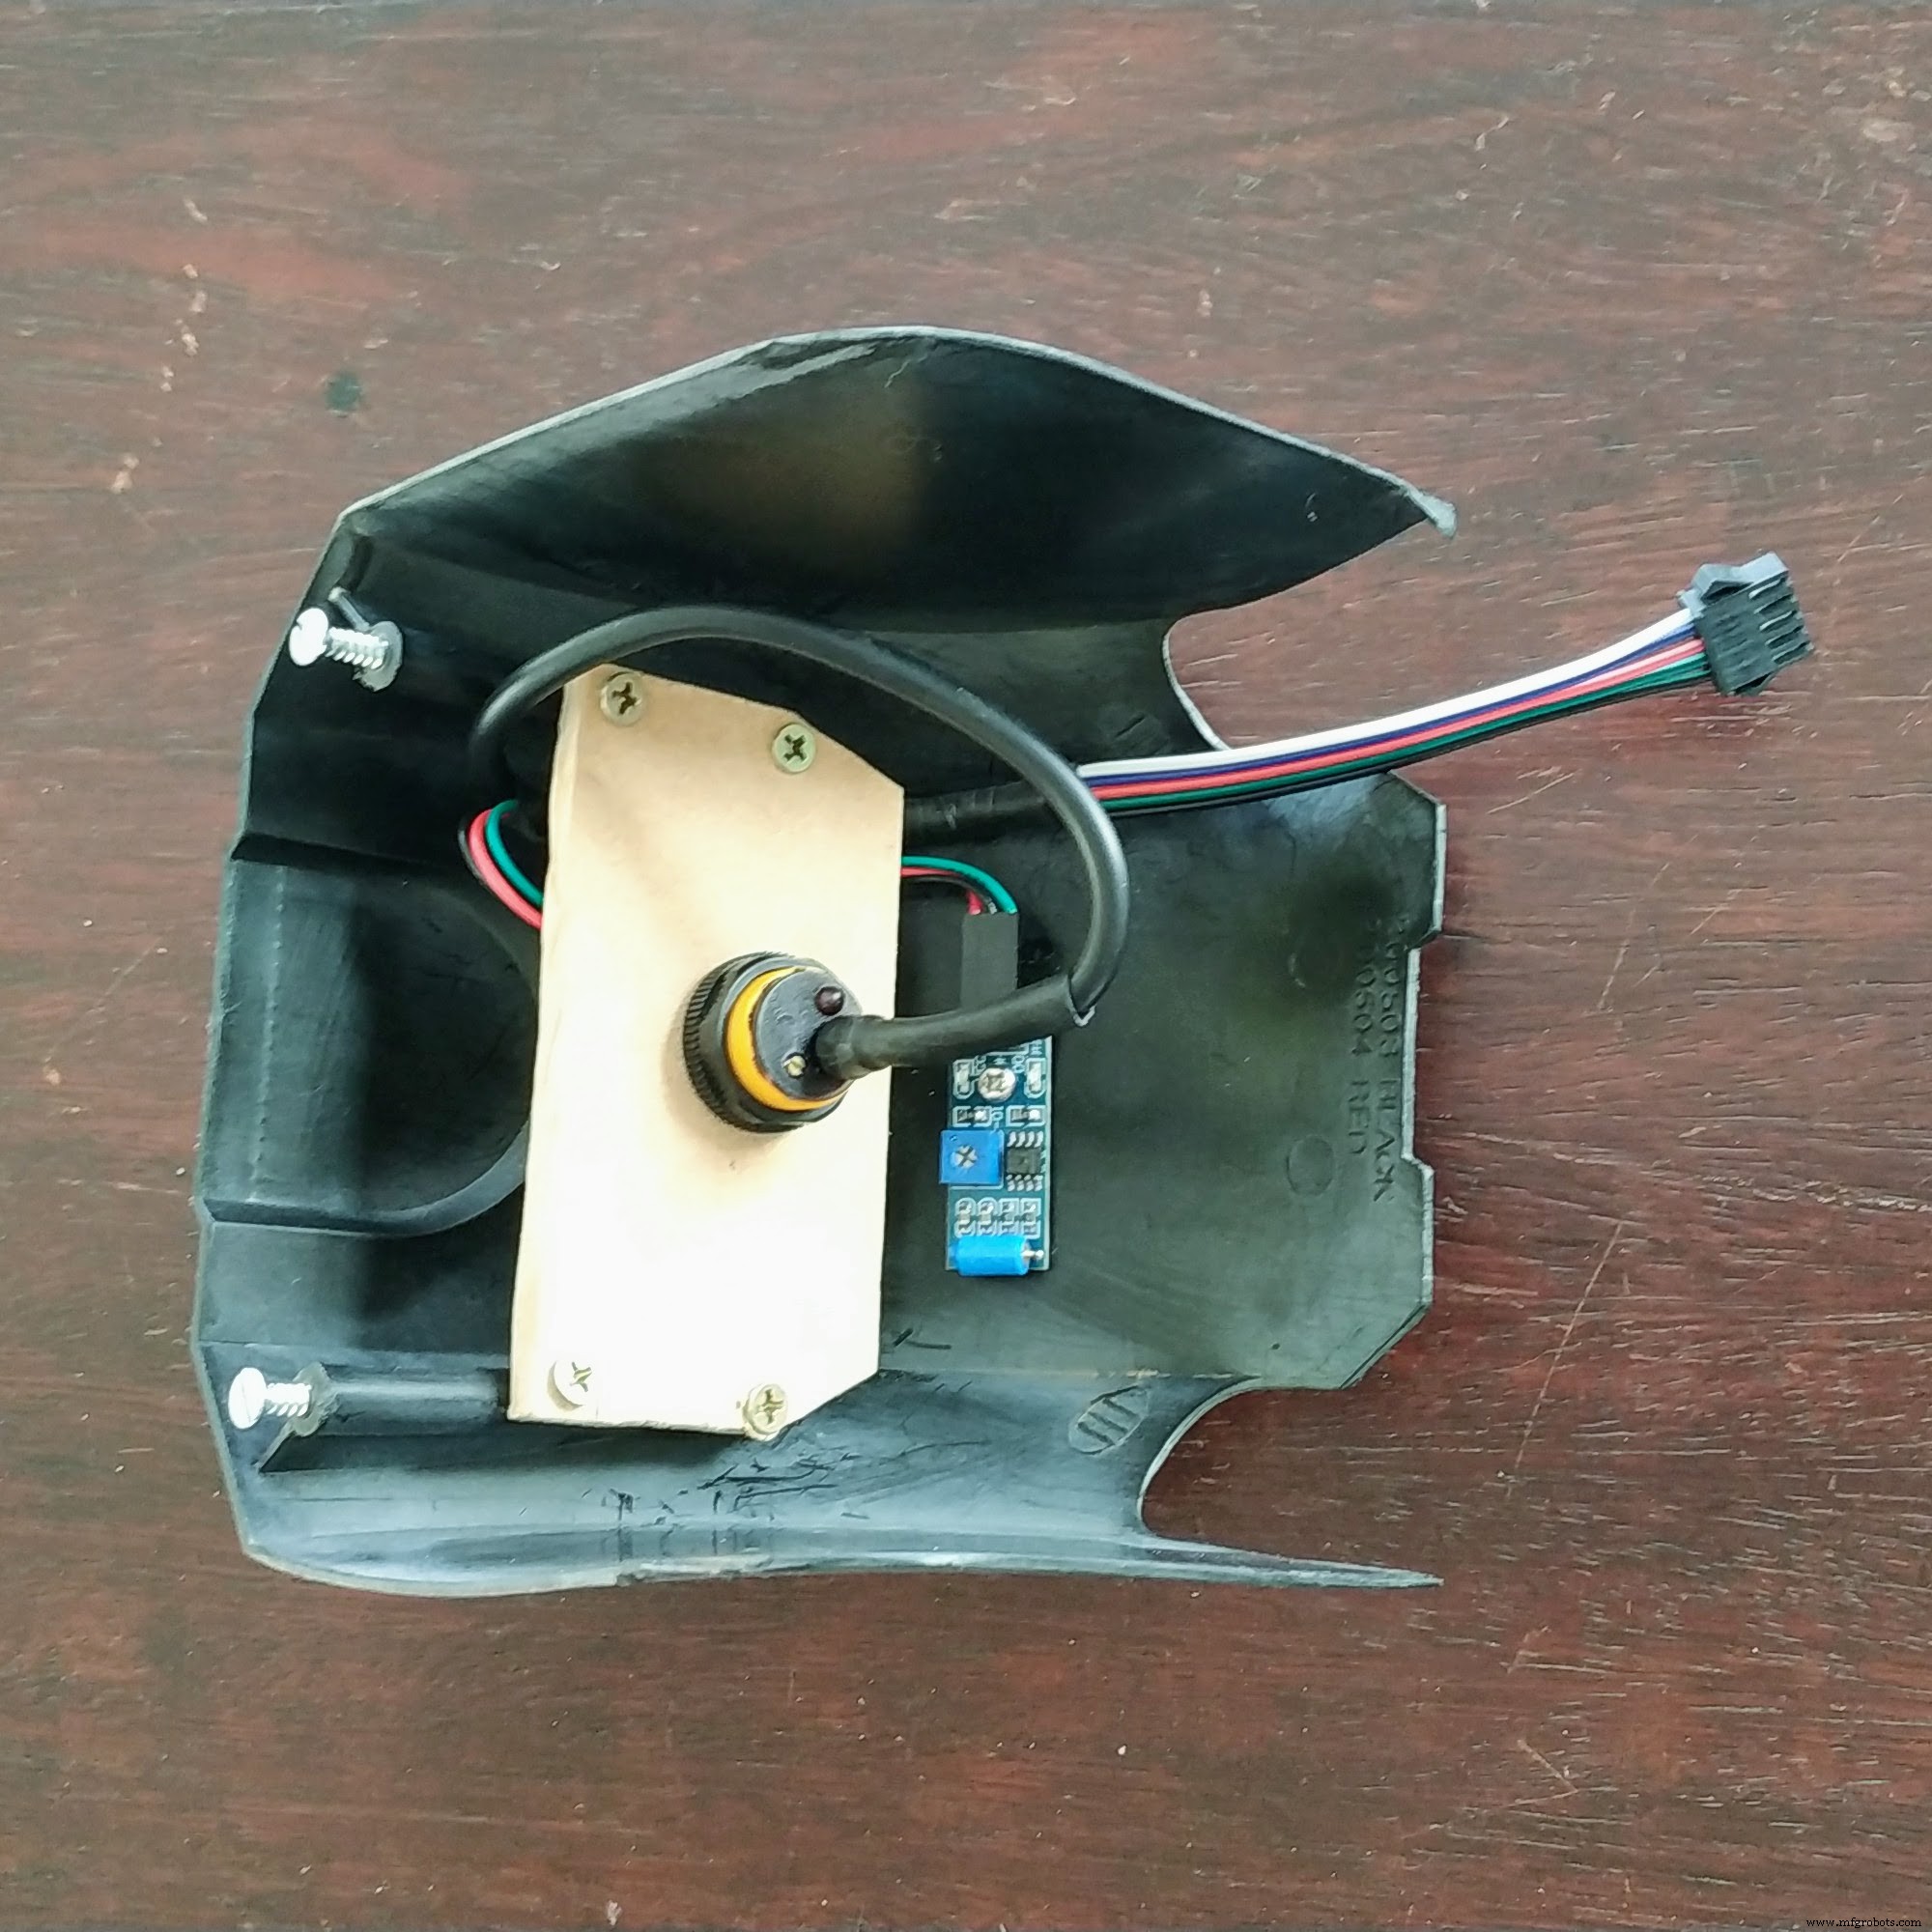
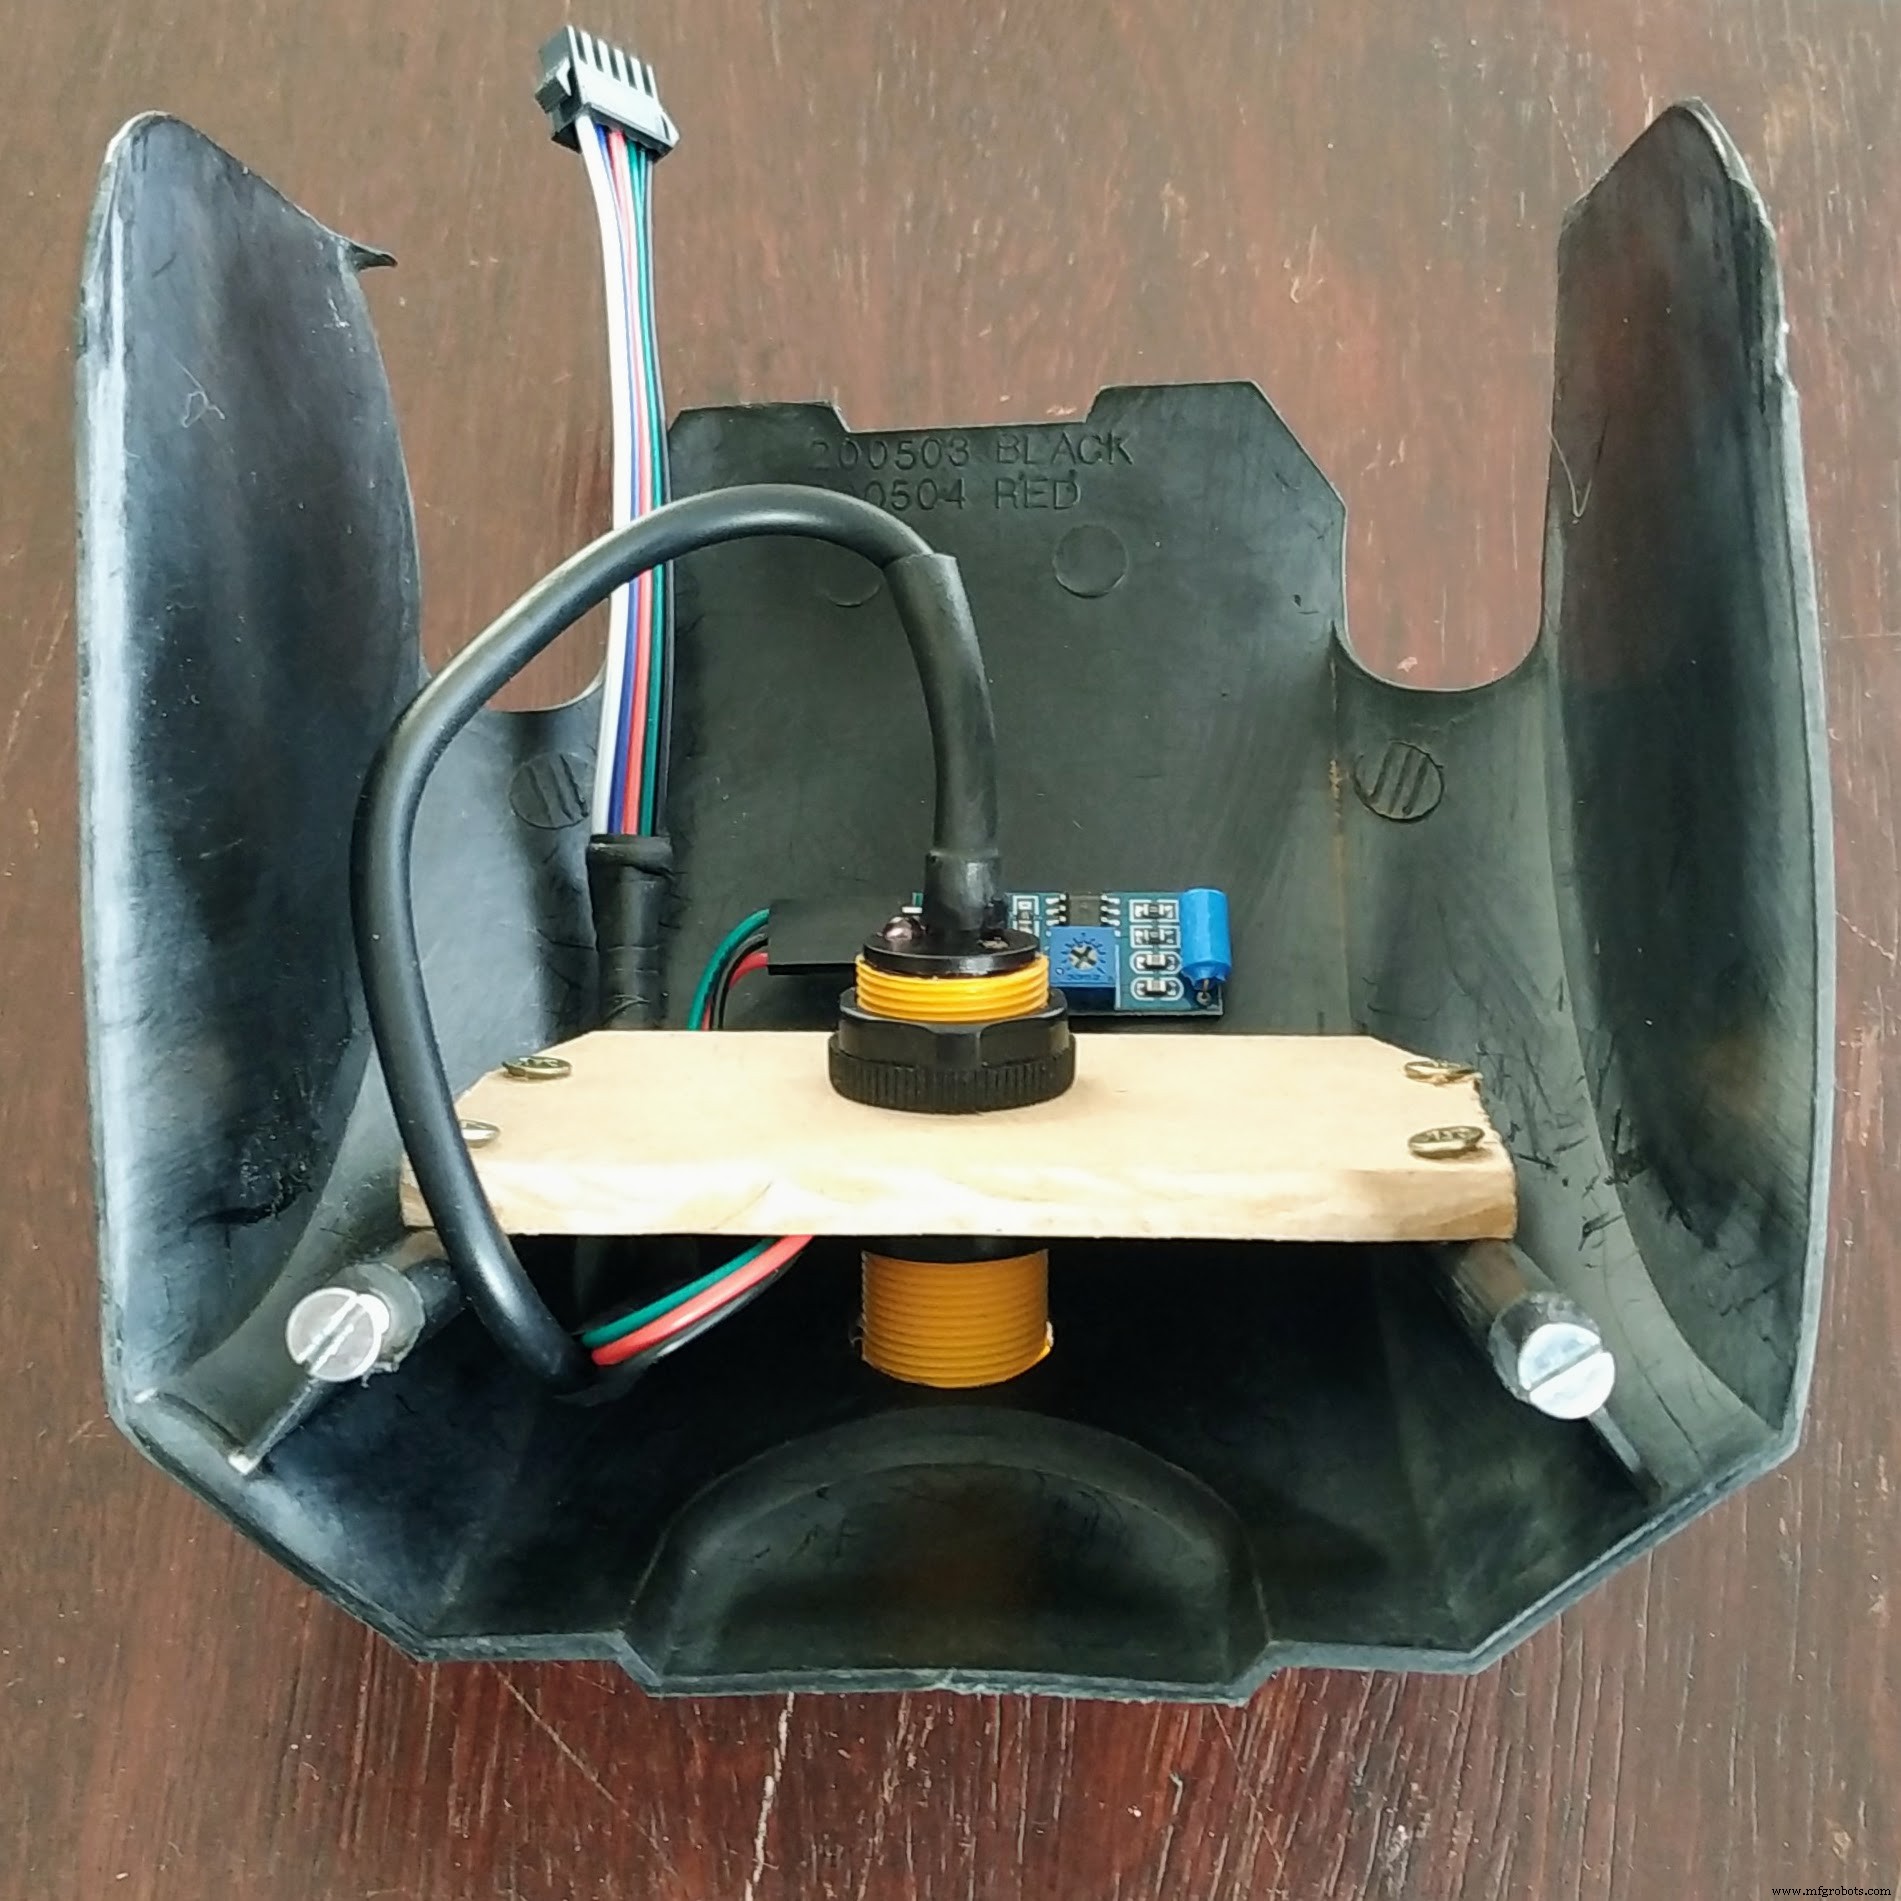
Then I connected the other components.
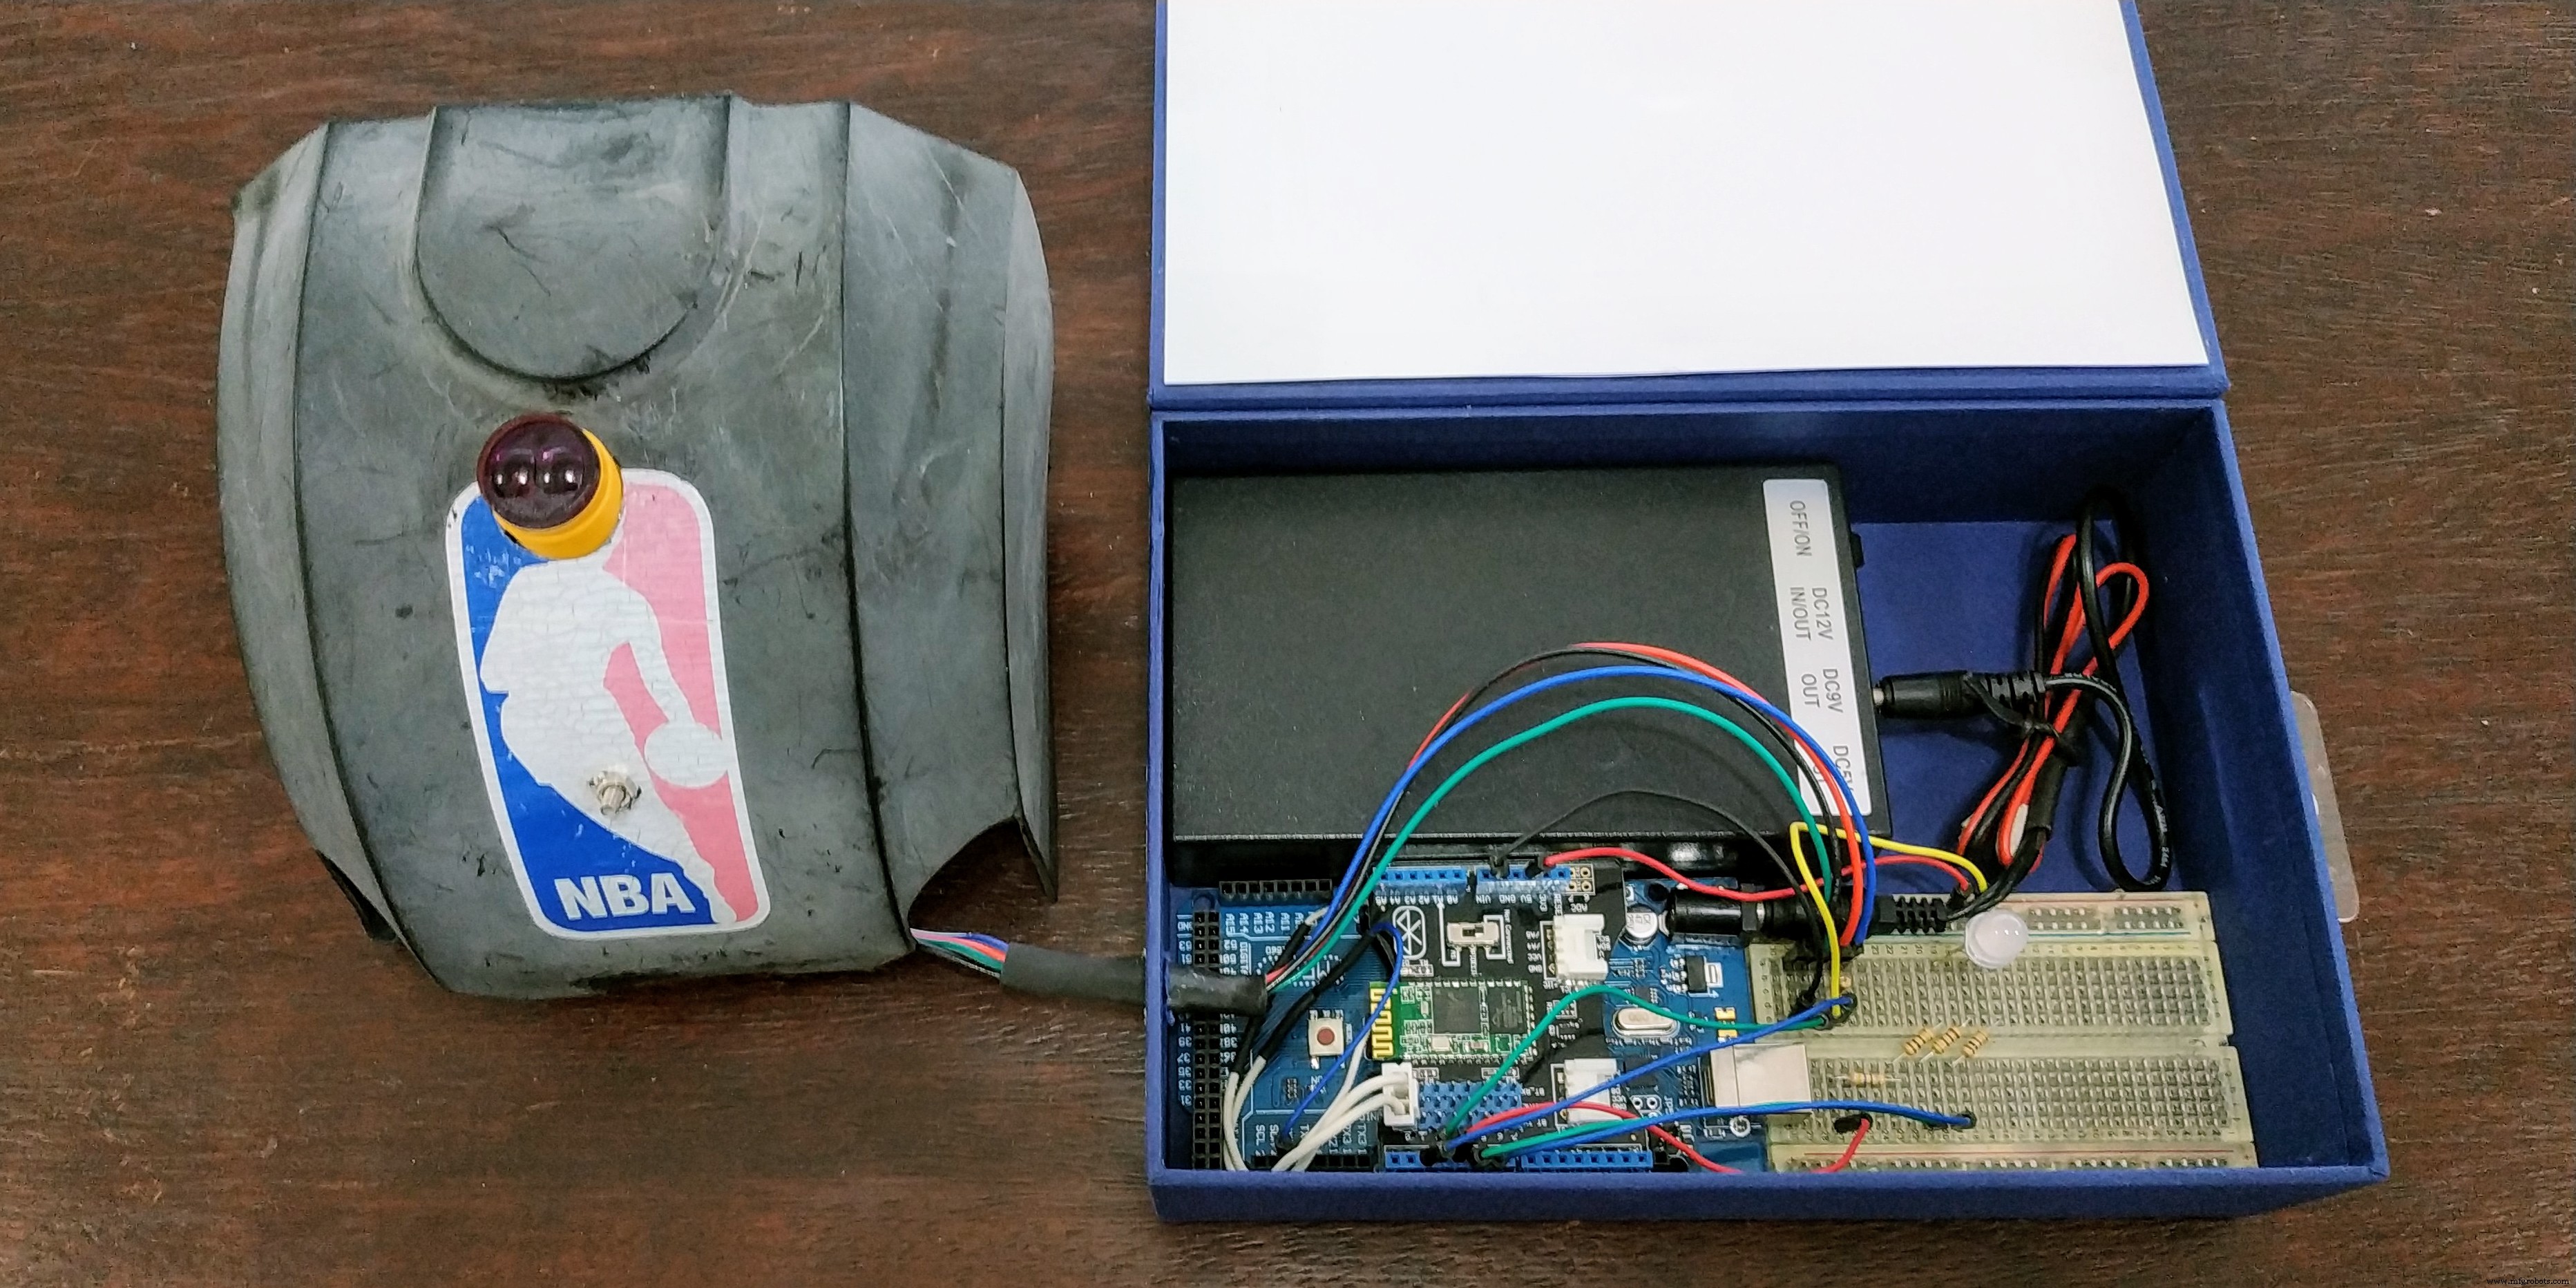
It's time for a smoke test.
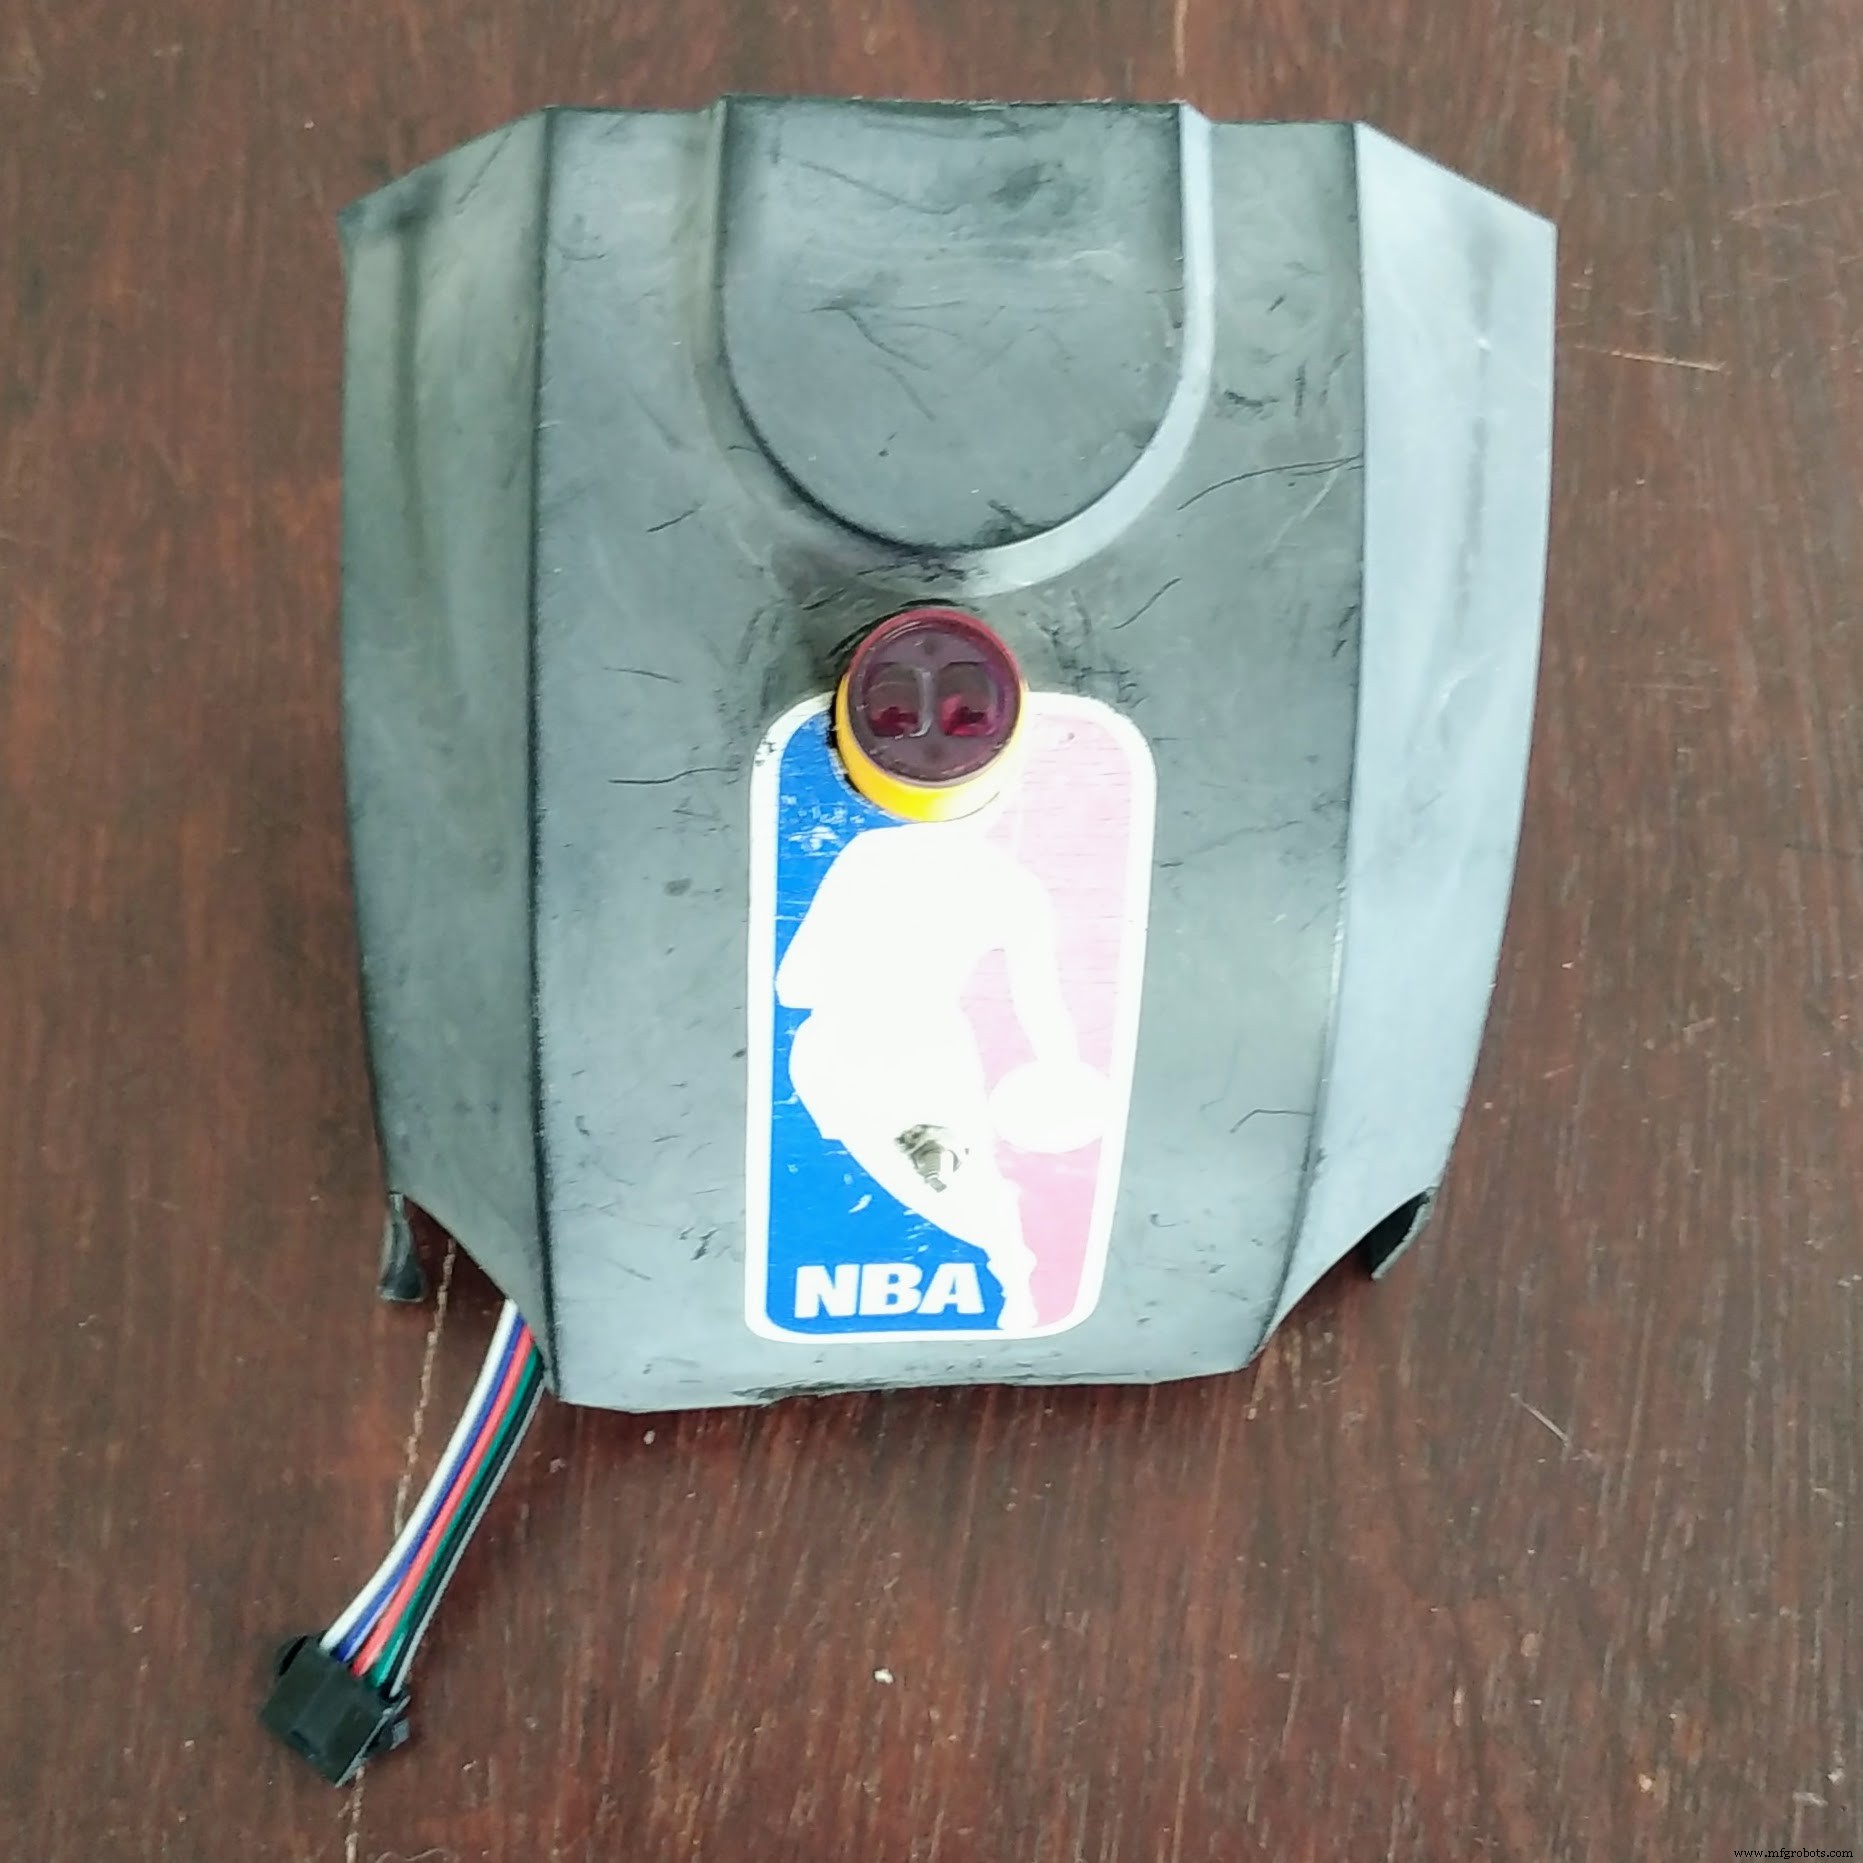
Finally, I installed everything on the basketball board.
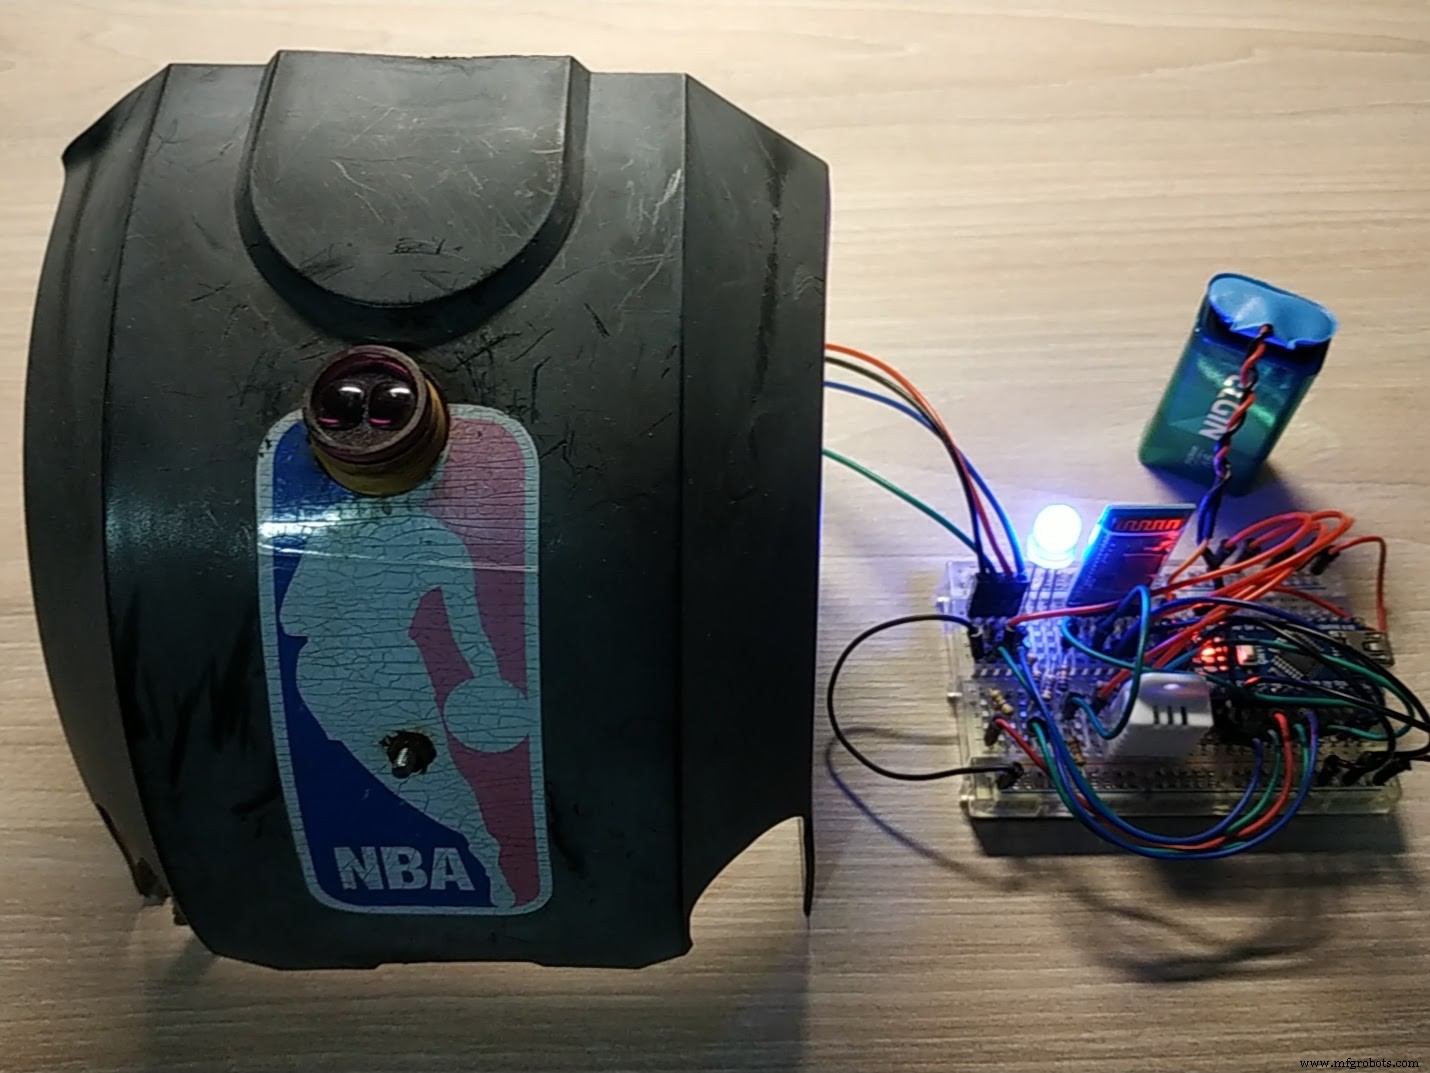
Now it's time to test everything.
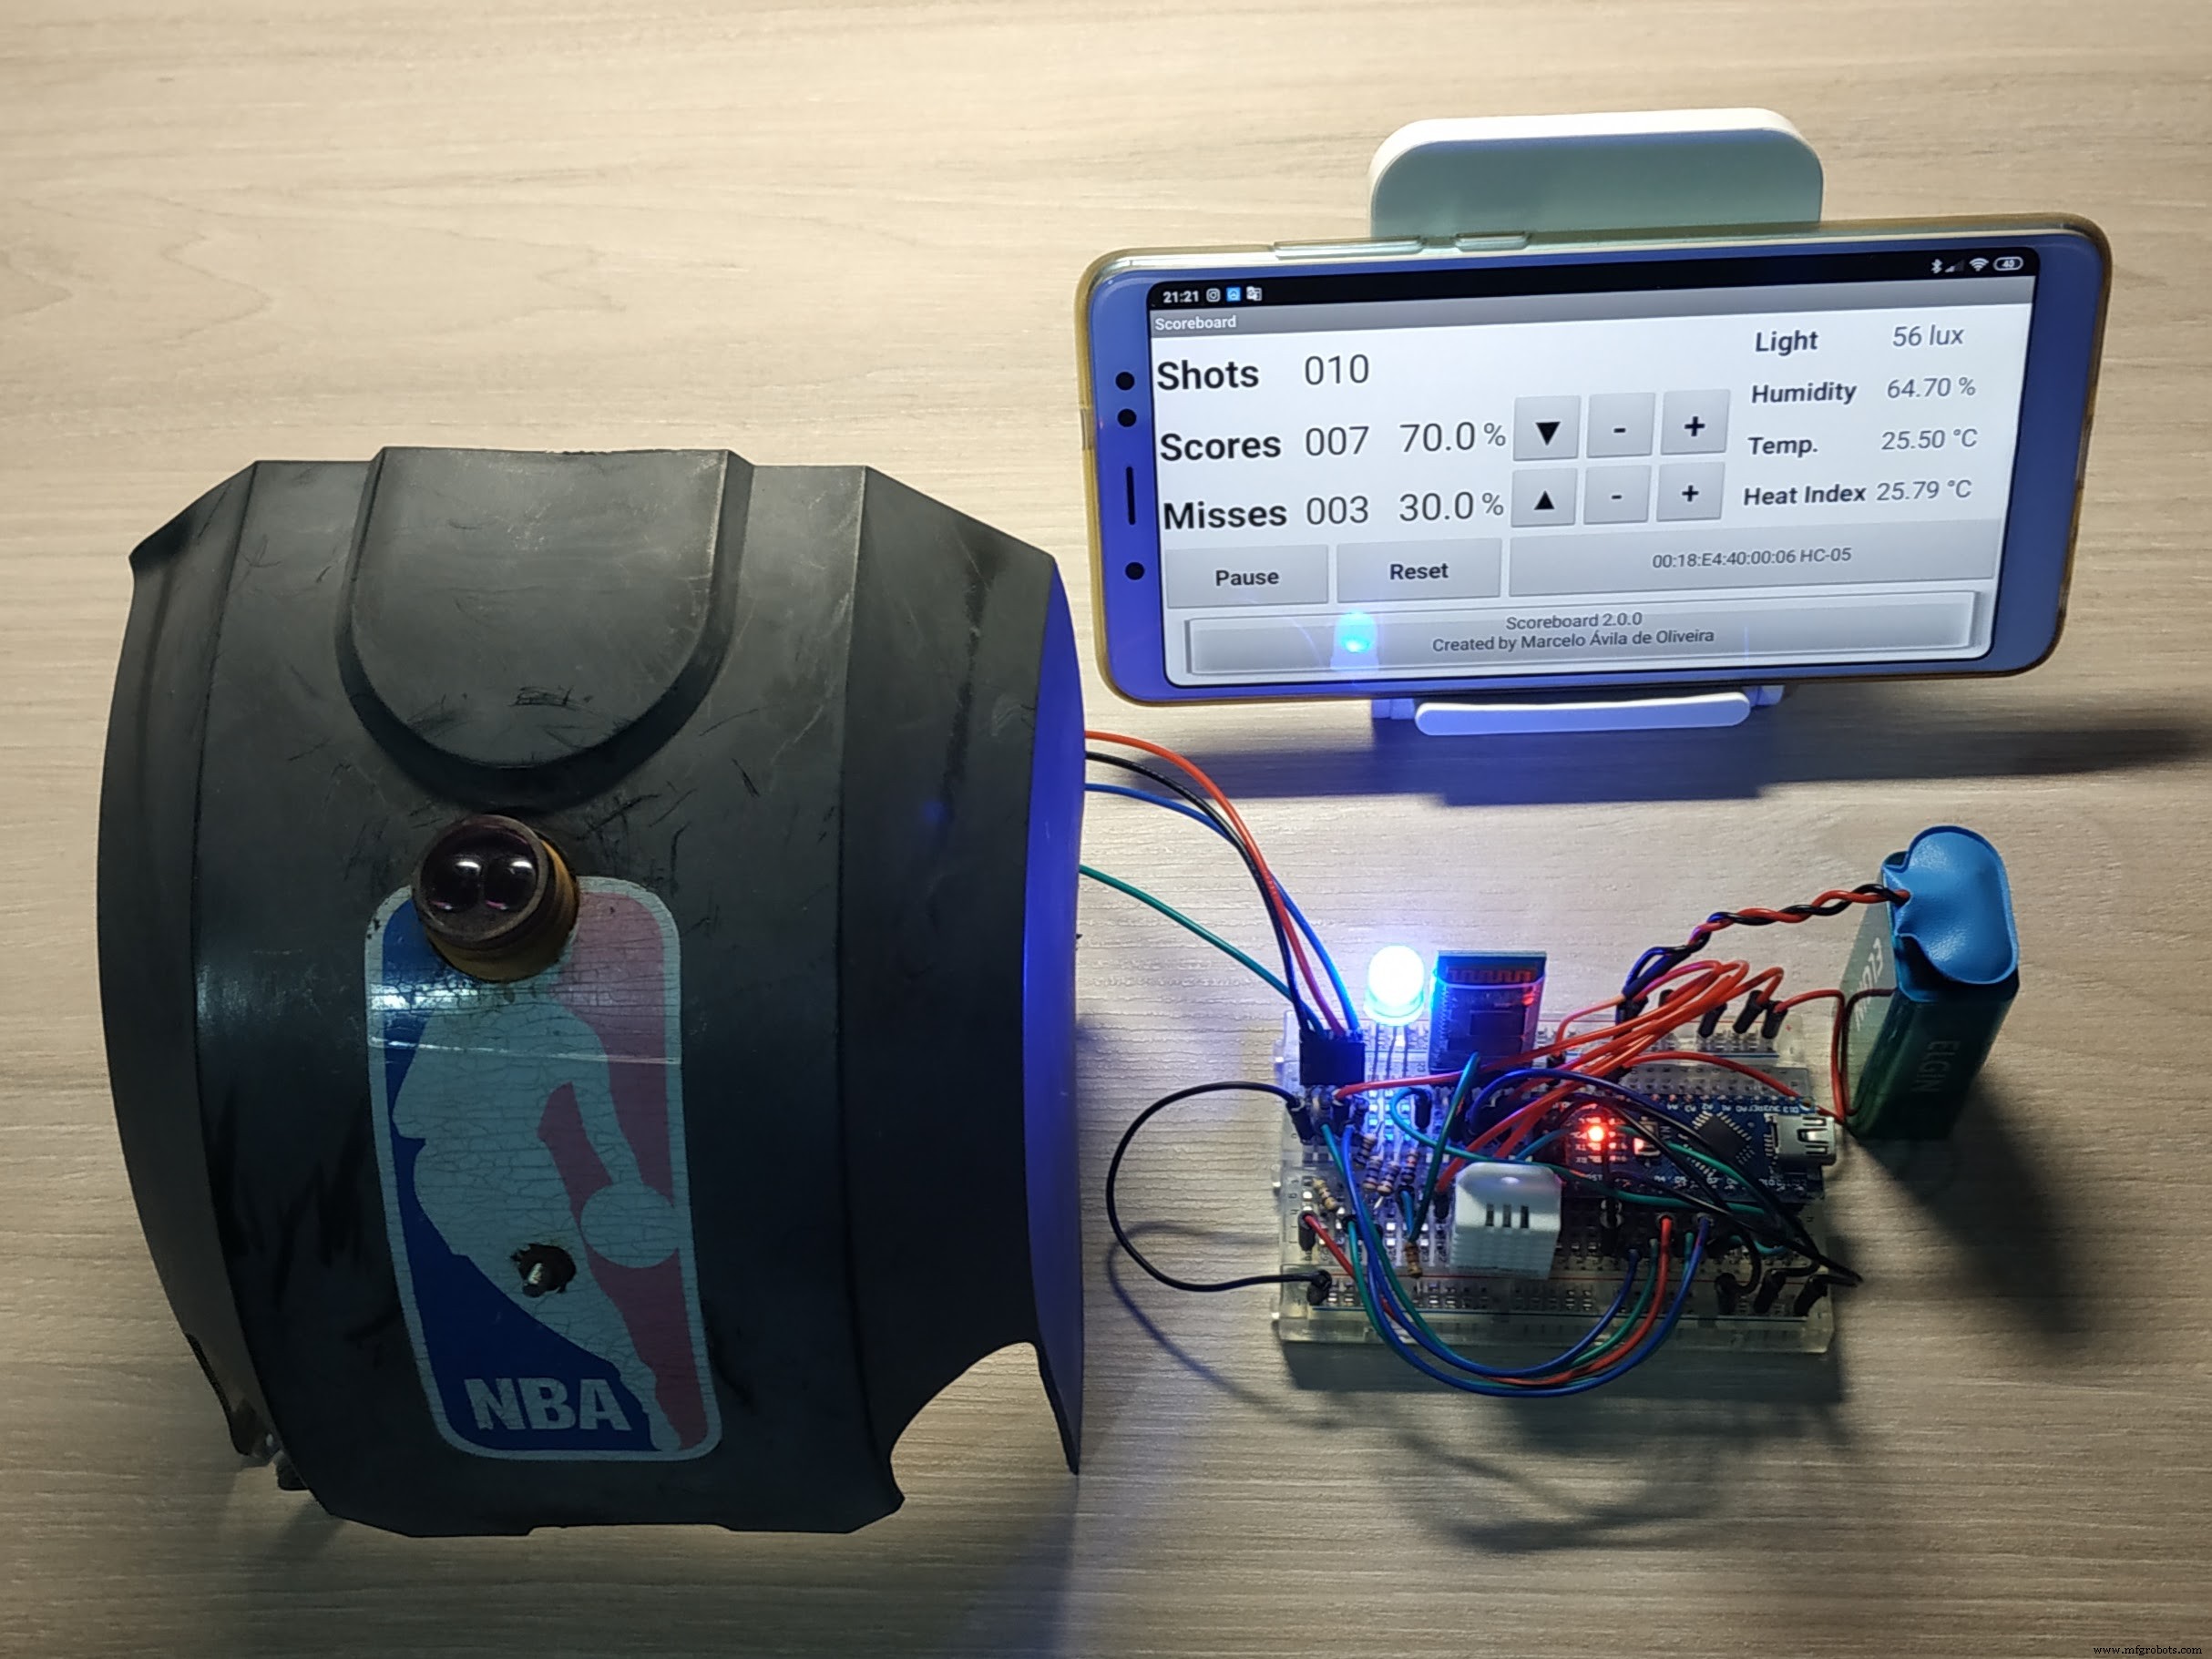
And the grand finale... it's showtime!
Step 5: Final considerations- The system proved to be very accurate, with very few false positives and rare false negatives.
- It's fantastic to play with the system to know the workout statistics in real-time and after the training.
Have fun...
Code
- Arduino code (1.1.0)
- Android code (1.1.0)
- Arduino code (2.0.0)
- Android code (2.0.0)
Arduino code (1.1.0)Arduino
//----------------------------------------------------------------------------//
// Filename    : Scoreboard.ino                                               //
// Description : Smart Basketball Scoreboard                                  //
// Version     : 1.1.0                                                        //
// Author      : Marcelo Avila de Oliveira <marceloavilaoliveira@gmail.com>   //
//----------------------------------------------------------------------------//

//----------------------------------------------------------------------------//
// DEFINITIONS                                                                //
//----------------------------------------------------------------------------//

// TURN ON DEBUG MODE
// #define DEBUG
// #define DEBUG_PROX
// #define DEBUG_VIBR

//----------------------------------------------------------------------------//
// CONSTANTS                                                                  //
//----------------------------------------------------------------------------//

// PINS
const int prox_pin = 2;
const int vibr_pin = 3;
const int led_r_pin = 4;
const int led_g_pin = 5;
const int led_b_pin = 6;

// TIME
const unsigned long wait_interval = 3000;

// MATH
const float percent_to_bright_factor = 100 * log10(2) / log10(255);

//----------------------------------------------------------------------------//
// VARIABLES                                                                  //
//----------------------------------------------------------------------------//

// TIME
unsigned long wait_time;

// STATUS
boolean prox = false;
boolean vibr = false;
boolean wait = false;

//----------------------------------------------------------------------------//
// FUNCTIONS (SETTINGS)                                                       //
//----------------------------------------------------------------------------//

void setup() {
    // INITIATE PINS
    pinMode(prox_pin, INPUT);
    pinMode(vibr_pin, INPUT);
    pinMode(led_r_pin, OUTPUT);
    pinMode(led_g_pin, OUTPUT);
    pinMode(led_b_pin, OUTPUT);

    set_led(5, 100);

    // INITIATE SERIAL COMMUNICATION
    Serial.begin(9600);

    // INITIATE BLUETOOTH COMMUNICATION
    setup_bluetooth();

    set_led(4, 100);

    #ifdef DEBUG
        Serial.println("Board is alive");
        Serial.println();
    #endif
}

void setup_bluetooth() {
    #ifdef DEBUG
        Serial.println("Setting Bluetooth");
        Serial.println();
    #endif

    Serial1.begin(38400);                   // Set baud rate
    Serial1.print("\r\n+STWMOD=0\r\n");     // Set to work in slave mode
    Serial1.print("\r\n+STNA=Arduino\r\n"); // Set name
    Serial1.print("\r\n+STOAUT=1\r\n");     // Permit Paired device to connect me
    Serial1.print("\r\n+STAUTO=0\r\n");     // Auto-connection should be forbidden here
    delay(2000);                            // This delay is required.
    Serial1.print("\r\n+INQ=1\r\n");        // Make the slave inquirable
    delay(2000);                            // This delay is required.
    while (Serial1.available()) {           // Clear data
        delay(50);
        Serial1.read();
    }
}

//----------------------------------------------------------------------------//
// FUNCTIONS (LIGHT)                                                          //
//----------------------------------------------------------------------------//

int percent_to_bright(int percent) {
    // PERCENT:
    // 0..100
    // RETURN BRIGHT
    // 255..0

    return 256 - pow(2, percent / percent_to_bright_factor);
}

void set_led(int color, int bright) {
    // COLOR:
    // 0 = GREEN
    // 1 = YELLOW
    // 2 = RED
    // 3 = CYAN
    // 4 = BLUE
    // 5 = MAGENTA
    // 6 = WHITE
    //
    // BRIGHT:
    // 0 = OFF
    // ..
    // 100 = MAX

    #ifdef DEBUG
        Serial.println("Setting LED");
        Serial.println();
    #endif

    if (color < 0 || color > 6 || bright < 0 || bright > 100) {
        return;
    }

    int led_r_bright = 255;
    int led_g_bright = 255;
    int led_b_bright = 255;
    int bright_aux = percent_to_bright(bright);

    switch (color) {
        case 0:
            // GREEN
            led_g_bright = bright_aux;
            break;
        case 1:
            // YELLOW
            led_r_bright = bright_aux;
            led_g_bright = bright_aux;
            break;
        case 2:
            // RED
            led_r_bright = bright_aux;
            break;
        case 3:
            // CYAN
            led_g_bright = bright_aux;
            led_b_bright = bright_aux;
            break;
        case 4:
            // BLUE
            led_b_bright = bright_aux;
            break;
        case 5:
            // MAGENTA
            led_r_bright = bright_aux;
            led_b_bright = bright_aux;
            break;
        case 6:
            // WHITE
            led_r_bright = bright_aux;
            led_g_bright = bright_aux;
            led_b_bright = bright_aux;
            break;
    }

    analogWrite(led_r_pin, led_r_bright);
    analogWrite(led_g_pin, led_g_bright);
    analogWrite(led_b_pin, led_b_bright);

    return;
}

//----------------------------------------------------------------------------//
// FUNCTIONS (CHECK)                                                          //
//----------------------------------------------------------------------------//

void check_prox() {
    if (!prox) {
        if(digitalRead(prox_pin) == LOW) {
            #ifdef DEBUG_PROX
                Serial.println("Proximity detected");
                Serial.println();
            #endif

            prox = true;
            if (!vibr) {
                wait = true;
                wait_time = millis() + wait_interval;
            }
            set_shot(1);
        }
    }
}

void check_vibr() {
    if (!prox && !vibr) {
        if(digitalRead(vibr_pin) == HIGH) {
            #ifdef DEBUG_PROX
                Serial.println("Vibration detected");
                Serial.println();
            #endif

            vibr = true;
            wait = true;
            wait_time = millis() + wait_interval;
            set_led(1, 100);
        }
    }
}

void check_wait() {
    if (wait && millis() > wait_time) {
        if (!prox) {
            set_shot(0);
        }

        reset();
    }
}

//----------------------------------------------------------------------------//
// FUNCTIONS (MIS)                                                            //
//----------------------------------------------------------------------------//

void set_shot(int mode) {
    // MODE:
    // 0 = WRONG SHOT (MISS)
    // 1 = RIGHT SHOT (SCORE)

    if (mode == 0) {
        set_led(2, 100);
    } else {
        set_led(0, 100);
    }

    Serial1.print(mode);
    delay(1000);
}

void reset() {
    vibr = false;
    prox = false;
    wait = false;
    set_led(4, 100);
}

//----------------------------------------------------------------------------//
// MAIN                                                                       //
//----------------------------------------------------------------------------//

void loop() {
    check_prox();
    check_vibr();
    check_wait();
}
Android code (1.1.0)Java
Android MIT App Inventor (http://ai2.appinventor.mit.edu/)No preview (download only).
Arduino code (2.0.0)Arduino
//----------------------------------------------------------------------------//
// Filename    : Scoreboard.ino                                               //
// Description : Smart Basketball Scoreboard                                  //
// Version     : 2.0.0                                                        //
// Author      : Marcelo Avila de Oliveira <marceloavilaoliveira@gmail.com>   //
//----------------------------------------------------------------------------//

//----------------------------------------------------------------------------//
// LIBRARIES                                                                  //
//----------------------------------------------------------------------------//

// TEMPERATURE & HUMIDITY LIBRARY
#include "DHT.h"
// MULTI SERIAL LIBRARY
#include "SoftwareSerial.h"

//----------------------------------------------------------------------------//
// DEFINITIONS                                                                //
//----------------------------------------------------------------------------//

// TURN ON DEBUG MODE
// #define DEBUG
// #define DEBUG_BLUE
// #define DEBUG_PROX
// #define DEBUG_VIBR
// #define DEBUG_DHT

// DHT SENSOR
#define DHTPIN 7
#define DHTTYPE DHT22
DHT dht(DHTPIN, DHTTYPE);

// BLUETOOTH MODULE (RX, TX)
SoftwareSerial Bluetooth(10, 11);

//----------------------------------------------------------------------------//
// CONSTANTS                                                                  //
//----------------------------------------------------------------------------//

// PINS
const int prox_pin = 2;
const int vibr_pin = 3;
const int led_r_pin = 4;
const int led_g_pin = 5;
const int led_b_pin = 6;

// TIME
const unsigned long wait_interval = 2000;
const unsigned long dht_interval = 10000;

// MATH
const float percent_to_bright_factor = 100 * log10(2) / log10(255);

//----------------------------------------------------------------------------//
// VARIABLES                                                                  //
//----------------------------------------------------------------------------//

// TIME
unsigned long wait_time;
unsigned long dht_time;

// HUMIDITY & TEMPERATURE
float humi, temp, heat;

// STATUS
boolean prox = false;
boolean vibr = false;
boolean wait = false;

//----------------------------------------------------------------------------//
// FUNCTIONS (SETTINGS)                                                       //
//----------------------------------------------------------------------------//

void setup() {
    // INITIATE PINS
    pinMode(prox_pin, INPUT);
    pinMode(vibr_pin, INPUT);
    pinMode(led_r_pin, OUTPUT);
    pinMode(led_g_pin, OUTPUT);
    pinMode(led_b_pin, OUTPUT);

    // SET LED MAGENTA
    set_led(5, 100);

    // INITIATE SERIAL COMMUNICATION
    Serial.begin(9600);

    // INITIATE BLUETOOTH COMMUNICATION
    setup_bluetooth();

    // INITIATE DHT SENSOR
    dht.begin();

    // SET LED BLUE
    set_led(4, 100);

    #ifdef DEBUG
        Serial.println("Board is alive");
        Serial.println();
    #endif
}

void setup_bluetooth() {
    #ifdef DEBUG_BLUE
        Serial.println("Setting Bluetooth");
        Serial.println();
    #endif

    // SET BAUD RATE
    Bluetooth.begin(9600);
    // CLEAR ANY AVAILABLE DATA
    while (Bluetooth.available()) {
        delay(50);
        Bluetooth.read();
    }
}

//----------------------------------------------------------------------------//
// FUNCTIONS (LIGHT)                                                          //
//----------------------------------------------------------------------------//

int percent_to_bright(int percent) {
    // PERCENT:
    // 0..100
    // RETURN BRIGHT
    // 255..0

    return 256 - pow(2, percent / percent_to_bright_factor);
}

void set_led(int color, int bright) {
    // COLOR:
    // 0 = GREEN
    // 1 = YELLOW
    // 2 = RED
    // 3 = CYAN
    // 4 = BLUE
    // 5 = MAGENTA
    // 6 = WHITE
    //
    // BRIGHT:
    // 0 = OFF
    // ..
    // 100 = MAX

    #ifdef DEBUG
        Serial.println("Setting LED");
        Serial.println();
    #endif

    if (color < 0 || color > 6 || bright < 0 || bright > 100) {
        return;
    }

    int led_r_bright = 255;
    int led_g_bright = 255;
    int led_b_bright = 255;
    int bright_aux = percent_to_bright(bright);

    switch (color) {
        case 0:
            // GREEN
            led_g_bright = bright_aux;
            break;
        case 1:
            // YELLOW
            led_r_bright = bright_aux;
            led_g_bright = bright_aux;
            break;
        case 2:
            // RED
            led_r_bright = bright_aux;
            break;
        case 3:
            // CYAN
            led_g_bright = bright_aux;
            led_b_bright = bright_aux;
            break;
        case 4:
            // BLUE
            led_b_bright = bright_aux;
            break;
        case 5:
            // MAGENTA
            led_r_bright = bright_aux;
            led_b_bright = bright_aux;
            break;
        case 6:
            // WHITE
            led_r_bright = bright_aux;
            led_g_bright = bright_aux;
            led_b_bright = bright_aux;
            break;
    }

    analogWrite(led_r_pin, led_r_bright);
    analogWrite(led_g_pin, led_g_bright);
    analogWrite(led_b_pin, led_b_bright);

    return;
}

//----------------------------------------------------------------------------//
// FUNCTIONS (CHECK)                                                          //
//----------------------------------------------------------------------------//

void check_prox() {
    if (!prox) {
        // CHECK PROXIMITY ONLY IF PROXIMITY WASN'T DETECTED

        if(digitalRead(prox_pin) == LOW) {
            #ifdef DEBUG_PROX
                Serial.println("Proximity detected");
                Serial.println();
            #endif

            // SET LED GREEN
            set_led(0, 100);
            send_data(2);

            prox = true;
            if (!vibr) {
                wait = true;
                wait_time = millis() + wait_interval;
            }
        }
    }
}

void check_vibr() {
    if (!prox && !vibr) {
        // CHECK VIBRATION ONLY IF PROXIMITY AND VIBRATION WEREN'T DETECTED

        if(digitalRead(vibr_pin) == HIGH) {
            #ifdef DEBUG_VIBR
                Serial.println("Vibration detected");
                Serial.println();
            #endif

            // SET LED YELLOW
            set_led(1, 100);

            vibr = true;
            wait = true;
            wait_time = millis() + wait_interval;
        }
    }
}

void check_wait() {
    if (wait && millis() > wait_time) {
        if (!prox) {
            // SET LED RED
            set_led(2, 100);
            send_data(1);
        }

        reset();
    }
}

void check_dht() {
    if (!prox && !vibr) {
        // CHECK DHT ONLY IF VIBRATION WASN'T DETECTED

        if (millis() > dht_time) {
            humi = dht.readHumidity();
            temp = dht.readTemperature();
            heat = dht.computeHeatIndex(temp, humi, false);

            #ifdef DEBUG_DHT
                Serial.print("Humidity   : ");
                Serial.print(humi);
                Serial.println("%");
                Serial.print("Temperature: ");
                Serial.print(temp);
                Serial.println("C");
                Serial.print("Head Index : ");
                Serial.print(heat);
                Serial.println("C");
                Serial.println("");
           #endif

            send_data(0);
            dht_time = millis() + dht_interval;
        }
    }
}

//----------------------------------------------------------------------------//
// FUNCTIONS (MIS)                                                            //
//----------------------------------------------------------------------------//

void send_data(int shot) {
    // SHOT:
    // 0 = NO DATA
    // 1 = WRONG SHOT (MISS)
    // 2 = RIGHT SHOT (SCORE)

    Bluetooth.print(humi);
    Bluetooth.print(temp);
    Bluetooth.print(heat);
    Bluetooth.print(shot);

    #ifdef DEBUG_BLUE
        Serial.println("Bluetooth sent");
        Serial.println();
    #endif
}

void reset() {
    vibr = false;
    prox = false;
    wait = false;

    delay(1000);

    // SET LED BLUE
    set_led(4, 100);
}

//----------------------------------------------------------------------------//
// MAIN                                                                       //
//----------------------------------------------------------------------------//

void loop() {
    check_prox();
    check_vibr();
    check_wait();
    check_dht();
}
Android code (2.0.0)Java
Android MIT App Inventor (http://ai2.appinventor.mit.edu/)No preview (download only).
Schematics
Manufacturing process
- Basketball: From Naismith’s 1891 Invention to Modern Production Techniques
- ECM3532: Eta Compute’s First Integrated, Ultra‑Low‑Power AI Sensor Board Accelerates Edge Development
- Smart Garbage Can: A Cellular IoT Solution for Automated Waste Management
- Smart Blinds: Automated Light Control with Arduino & Solar Power
- Build a Simple Obstacle Sensor with Arduino – Easy IR LED & Photodiode Tutorial
- Build a Reliable DIY Plant Moisture Sensor with Arduino UNO
- Build a Smart Insole to Accurately Monitor Foot Pressure Distribution
- Arduino‑Powered Smart Irrigation Controller – Auto‑Watering with Weather & Light Sensors
- Smart Home Monitoring Powered by Alexa
- Revolutionary Ultra-Thin Sensor Enhances Smart Contact Lens Functionality