Tito: 3D-Printed Arduino UNO Robot with Servo Actuators, Sensors, and BLE Control
Components and supplies
Arduino UNO
×
1
Servos (Tower Pro MG996R)
Futaba servo S3003
×
4
Buzzer
×
1
Ultrasonic Sensor - HC-SR04 (Generic)
×
1
OpenBuilds Nut Block for 8mm Metric Acme Lead Screw
×
20
SparkFun Solder-able Breadboard - Mini
×
1
Male/Female Jumper Wires
×
16
Breadboard (generic)
×
1
LED (generic)
×
3
DFRobot Romeo BLE - Arduino Robot Control Board with Bluetooth 4.0
as an option to replace the Arduino UNO and breadboard
×
1
Otto DIY Otto maker kit
×
6
Necessary tools and machines
3D Printer (generic)
Soldering iron (generic)
OpenBuilds Allen Wrench
Apps and online services
Arduino IDE
Arduino Web Editor
Arduino IoT Cloud
About this project
If you don't have or is difficult to get the part you can just buy our full kits!
Visitwww.ottodiy.com
Tito is a Bi-ped dancing DIY robot, derivative from Zowi and Bob. Basically has been adapted to a standard Arduino UNO board with easier connections and supports. It was the first iteration for Otto DIY
Tools & Materials
Arduino UNO board or compatible (in my case a DFRduino UNO)
Nano breadboard
Buzzer
Futaba servo S3003 x4
HC-SR04 Ultrasound sensor
Powerbank (optional)
Nut M3 x20
Screw M3 x20
3D printed Head
3D printed Base
3D printed Leg x2
3D printed Foot R
3D printed Foot L
Tools:
3D printer
Allen key
Screwdriver
3D Print parts
3D.stl files here. Find a way to 3D print the parts, they are designed for no supports so is very easy to print with 20% infill and 0.2mm resolution. Since Tito is completely open source you can find the design of the 3D model files made in Autodesk 123D Design here:
Pre-assemble
There are many ways to build Tito, but one recommendation is: before connecting the servos, assemble the servo disk pieces to the legs, then put the servos in the body and the feet.
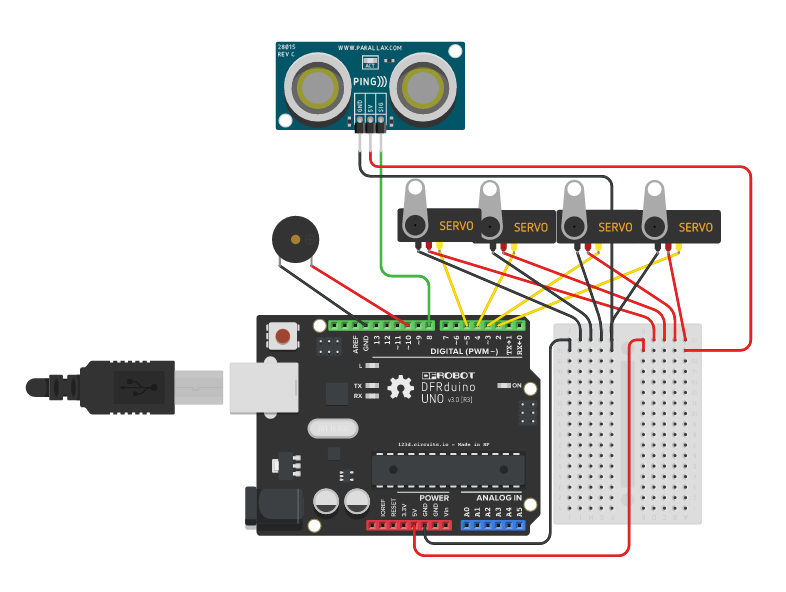
The Schematic
Follow the picture for the connections. HC-SR04 ultrasound sensor (trig for pin 8 and echo for pin 9). During the making process you may need to disconnect and connect constantly so just keep this schematic present for further fixes.
Test the position of the Servos
In the picture, the cables are disconnected but the idea here is to upload a code to the Arduino UNO board that will put the all servos in 90 degrees. Then match the right angle for the crank discs in the body and the feet. Tito should be in a position as the one in the photo. Then you can fix all the servos with the screw axis.
Assemble the Arduino UNO board
This design makes it easy to fix any Arduino Uno compatible board (in my case a DFRduino UNO) in the head part, you can use up to 4 screws.
Final assembly
If all connections are secured you can close the head part and fix it to the body using the lateral screws.
Arduino IDE Programming
All libraries and sketch codes are in this Github repository. Just connect your USB cable to Arduino UNO and upload the codes. There are many programmed movements for the robot like walk different directions, ultrasound, raise, tilt and dance.
post your remix and modifications in the hackster community or Thingiverse