


Build Reliable Long‑Range Arduino Networks with the HC‑12 Module
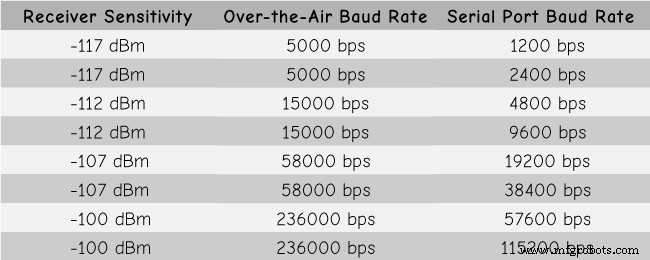
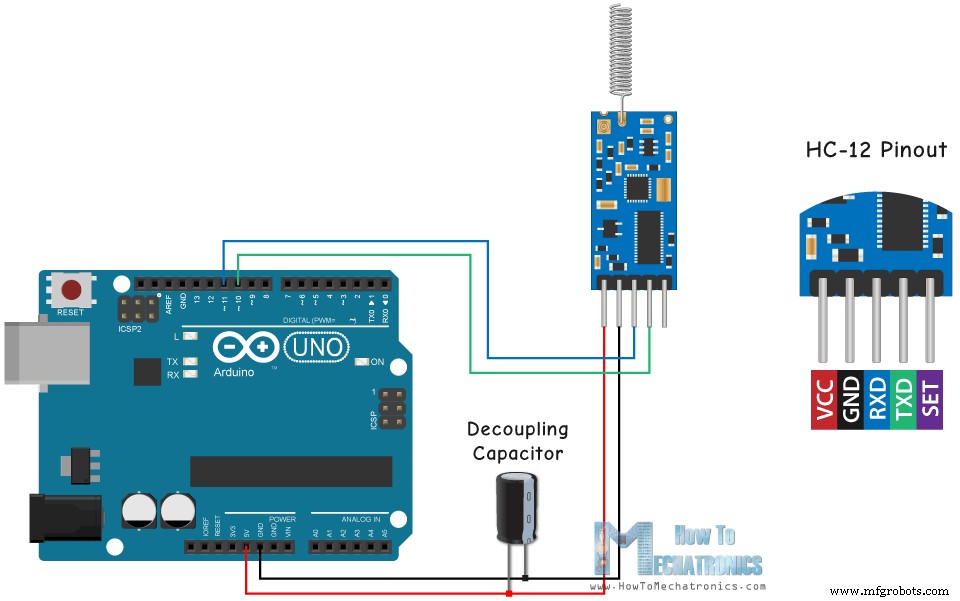
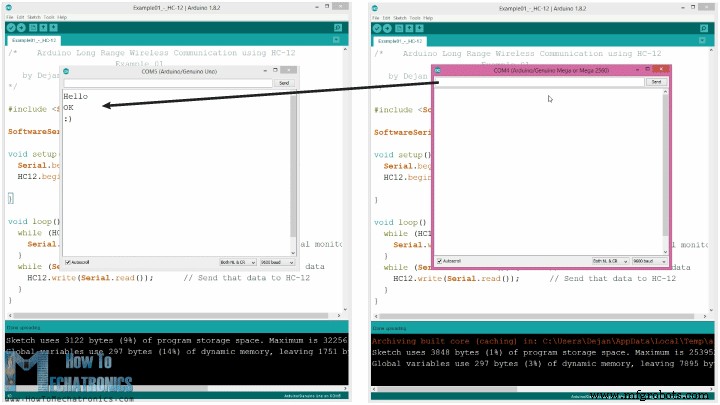
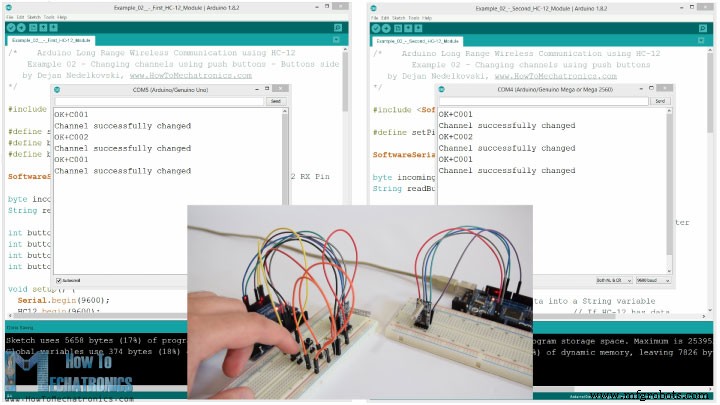
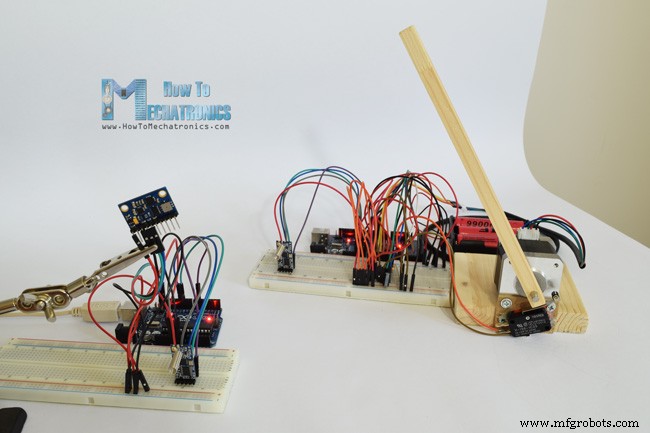
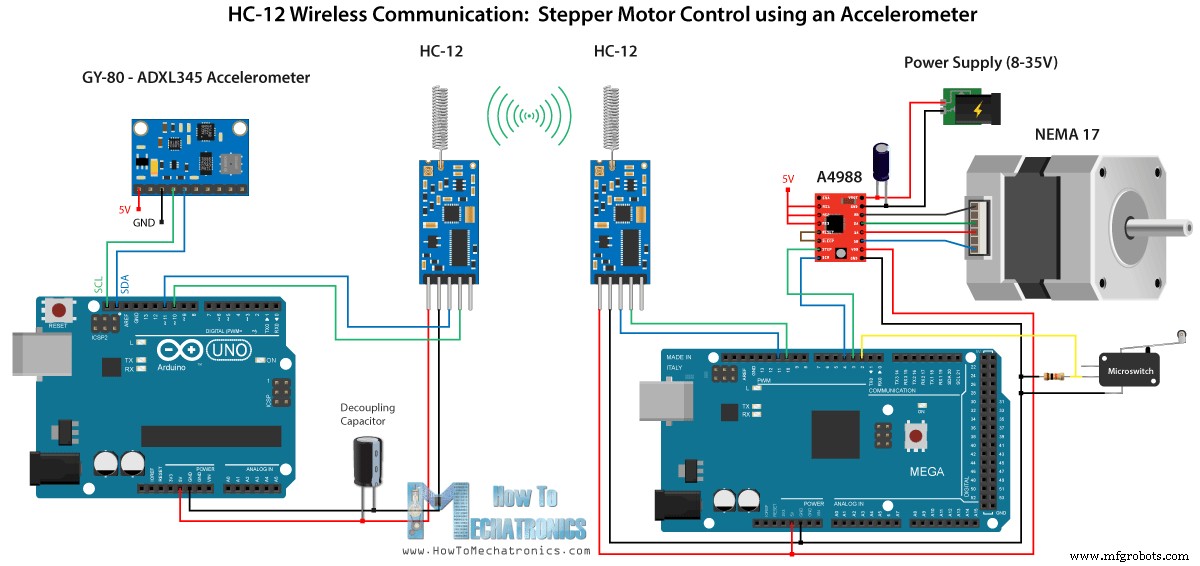
In this Arduino tutorial we will learn how to use the HC-12 wireless serial communication module which is capable of making a long range wireless communication between multiple Arduino boards, with distances up to 1.8km. You can watch the following video or read the written tutorial below for more details. For this tutorial I made two basic examples explaining the how to connect the HC-12 module and make a basic communication between two Arduinos and an additional example where using an accelerometer sensor at the first Arduino I wirelessly control the position of the stepper at the second Arduino. First let’s take a closer look at the HC-12 wireless serial port communication module. Here are some specification: These values actually depend on the selected Serial and Over-the-Air Baud Rate as seen in the table. The HC-12 module has a microcontroller which actually doesn’t have to be programmed by the user. For configuring the module we simply use AT commands, which can be sent from an Arduino, a PC, or any other microcontroller using the serial port. For entering the AT command mode we just have to set the “Set” pin of the module to a low logic level. Now let’s connect the HC-12 module to the Arduino and make the first example. Here’s the circuit schematics. The operating voltage of the module is from 3.2 V to 5.5 V and for more stable work it is recommended to use a decoupling capacitor and an external power supply. However, I used the PC USB as power for all three examples in this tutorial and didn’t have any problem with it. I connected the first module to an Arduino UNO and the second module to an Arduino MEGA, but of course, you can use any board you want. You can get the components needed for this Arduino Tutorial from the links below: Here’s the Arduino code for the first example, a basic communication between the two modules using the Serial Monitor. The same code is used for both Arduinos. We can connect the two Arduinos on two separate computers but also we can use a single computer. In that case, once we connect the first Arduino to the computer, we need to select the model and the COM port and upload the code to the Arduino. Then we connect the second Arduino and we have to start the Arduino IDE again in order to be able to select the other COM port to which our second Arduino is connected, and then upload the same code. So once we have the two Arduino IDEs running we can start the serial monitors and test whether the communication works properly. Anything we type in the serial monitor will be sent from one to the other Arduino. How the code works: So once we type something in the serial monitor and click the Send button, at the first Arduino, the while loop with the Serial.available() function will become true and using the HC12.write() function we will send the data from the serial monitor to the HC-12 module. This module will transfer the data wirelessly to the second HC-12 module, so at the second Arduino the while loop with the HC12.available() function will become true and using the Serial.write() function the data will be sent to the serial monitor. We can use the same code for sending AT Commands and configuring the module parameters. All we have to do is connect the “Set” pin of the module to Ground or any digital pin of the Arduino and set the pin to low logic level. To test whether we have successfully enter the mode, in the serial monitor we can type “AT” and we should get a response message “OK”. There are total of 12 AT Commands, and they are used for changing various parameters like the baud rate, the channel, the transmitting power etc. For example, if we type “AT+B38400” the baud rate of the module will be set to 38400. 1. AT – Test command. Example: Send “AT” to module, and the module returns “OK”. 2. AT+Bxxxx – Change the serial port baud rate. Available baud rates: 1200 bps, 2400 bps, 4800 bps, 9600 bps, 19200 bps, 38400 bps, 57600 bps, and 115200 bps. Default: 9600 bps. Example: Send “AT+B38400” to module, and the module returns “OK+B19200”. 3. AT+Cxxxx – Change wireless communication channel, from 001 to 100. Default: Channel 001, with working frequency of 433.4MHz. Each next channel is 400KHz higher. Example: If we want to set the module to channel 006, we need to send “AT+C006” command to the module, and the module will return “OK+C006”. The new working frequency will be 435.4MHz. Now let’s move the second example. Here we will use two push buttons for selecting different communication channels and see a different method of storing the incoming data. Note: The “Set” pins of both HC-12 modules are connected to the pins number 6 of the two Arduinos and the two buttons, at the first Arduino, to the pins 4 and 3. First Arduino code: Second Arduino code: Description of the codes: So, first we need to define the pins and set the “Set” pin to high logic level in order the module to work in normal, transparent mode. With the first while loop we store the incoming data into a String variable, so we can better handle it. The incoming data always comes one byte at a time, so for example if we send the string “Test123” from second Arduino, this while loop will do 7 iterations. Each iteration, using the HC12.read() function we will read each incoming byte or character and add it to the String variable named “readBuffer”. Next let’s see how we can change the communication channel using the first push button. So if we press the first push button, using the HC12.print() function we will send the string “AT+C001” to the HC-12 module or to the second Arduino. When this string will be received at the second Arduino, we will set the HC-12 module into AT command mode, and then write the same string “AT+C001” to it which will set the module to communication channel number one. We use the next while loop to print the response message from the HC-12 module whether the channel has been successfully changed. Back at the first Arduino, we do the same procedure of sending the AT command to the first HC-12 module. In the same way we, using the pushing the second button, we set the communication channel number two. So using this method we can select, at any time, with which HC-12 module we will communicate. At the end, the checkATCommand() custom function, checks whether the received message is an AT command, by checking whether the string starts with “AT”. If so, the module enters the AT command mode and executes the command. Now let’s take a look at the third example. Here we control the position of the stepper motor at the second Arduino, using the accelerometer module at the first Arduino. The circuit also contains a microswitch for finding the initial position of the stepper motor at 0 degrees. You can get the components needed for this example from the links below: Note here that I already have detailed tutorials on how to connect and use both the accelerometer and the stepper motor, so for this example I will only explain the HC-12 part of the code. First Arduino – Transmitter code: Second Arduino – Receiver code: Description of the codes: So first we defining the pins and initializing the modules in the setup section. Then we read the values of the X and Y axis of the accelerometer and map them to a values from 0 to 180 degrees. The values coming from the accelerometer can sometimes be unstable or shake, so for smoothing the result I used the average value of one hundred readings. For even further smoothing I will send the new value of the angle only if it differs from the previous by 2. Note here that when sending the angle to the HC-12 module, I’m also sending the character “s” in front, and the character “e” after, which will help me when receiving the data at the second Arduino. At the second Arduino we wait until the start marker “s” comes, then we read the value of the angle until the end marker “e” arrive. This way we are sure that we will receive only the value of the angle. Then we convert the value to integer, and map the value from 0 to 1600 steps, which corresponds to the selected sixteenth step resolution at the A4988 stepper driver. Then we rotate the stepper motor to the current angle. So that would be all for this Arduino tutorial. Feel free to ask any question in the comments section below.Overview
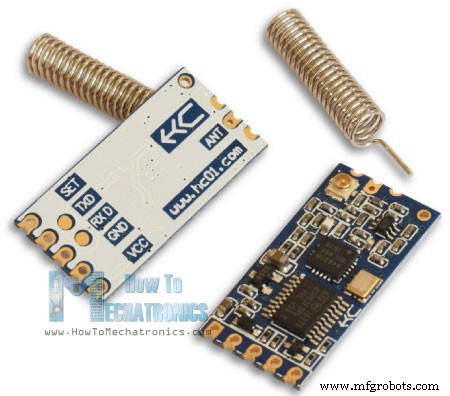
HC-12 Wireless Communication Module
Arduino and HC-12
Example 01 – Arduino Code
/*    Arduino Long Range Wireless Communication using HC-12
                      Example 01
   by Dejan Nedelkovski, www.HowToMechatronics.com
*/

#include <SoftwareSerial.h>

SoftwareSerial HC12(10, 11); // HC-12 TX Pin, HC-12 RX Pin

void setup() {
  Serial.begin(9600);             // Serial port to computer
  HC12.begin(9600);               // Serial port to HC12

}

void loop() {
  while (HC12.available()) {        // If HC-12 has data
    Serial.write(HC12.read());      // Send the data to Serial monitor
  }
  while (Serial.available()) {      // If Serial monitor has data
    HC12.write(Serial.read());      // Send that data to HC-12
  }
}Code language: Arduino (arduino)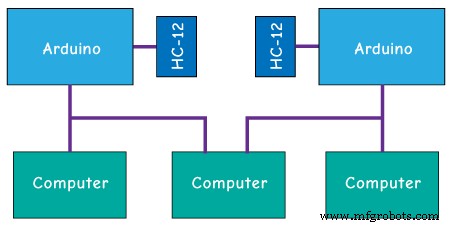

AT Commands:
Example 02
/*    Arduino Long Range Wireless Communication using HC-12
    Example 02 - Changing channels using push buttons - Buttons side
   by Dejan Nedelkovski, www.HowToMechatronics.com
*/

#include <SoftwareSerial.h>

#define setPin 6
#define button1 4
#define button2 3

SoftwareSerial HC12(10, 11);         // HC-12 TX Pin, HC-12 RX Pin

byte incomingByte;
String readBuffer = "";

int button1State = 0;
int button1Pressed = 0;
int button2State = 0;
int button2Pressed = 0;

void setup() {
  Serial.begin(9600);                   // Open serial port to computer
  HC12.begin(9600);                     // Open serial port to HC12
  pinMode(setPin, OUTPUT);
  pinMode(button1, INPUT);
  pinMode(button2, INPUT);
  digitalWrite(setPin, HIGH);           // HC-12 normal, transparent mode
}

void loop() {
  // ==== Storing the incoming data into a String variable
  while (HC12.available()) {             // If HC-12 has data
    incomingByte = HC12.read();          // Store each icoming byte from HC-12
    readBuffer += char(incomingByte);    // Add each byte to ReadBuffer string variable
  }
  delay(100);
  // ==== Sending data from one HC-12 to another via the Serial Monitor
  while (Serial.available()) {
    HC12.write(Serial.read());
  }

  // ==== If button 1 is pressed, set the channel 01
  button1State = digitalRead(button1);
  if (button1State == HIGH & button1Pressed == LOW) {
    button1Pressed = HIGH;
    delay(20);
  }
  if (button1Pressed == HIGH) {
    HC12.print("AT+C001");               // Send the AT Command to the other module
    delay(100);
    //Set AT Command Mode
    digitalWrite(setPin, LOW);           // Set HC-12 into AT Command mode
    delay(100);                          // Wait for the HC-12 to enter AT Command mode
    HC12.print("AT+C001");               // Send AT Command to HC-12
    delay(200);
    while (HC12.available()) {           // If HC-12 has data (the AT Command response)
      Serial.write(HC12.read());         // Send the data to Serial monitor
    }
    Serial.println("Channel successfully changed");
    digitalWrite(setPin, HIGH);          // Exit AT Command mode
    button1Pressed = LOW;
  }

  // ====  If button 2 is pressed, set the channel 02
  button2State = digitalRead(button2);
  if (button2State == HIGH & button2Pressed == LOW) {
    button2Pressed = HIGH;
    delay(100);
  }
  if (button2Pressed == HIGH) {
    HC12.print("AT+C002"); // Send the AT Command to the other module
    delay(100);
    //Set AT Command Mode
    digitalWrite(setPin, LOW);           // Set HC-12 into AT Command mode
    delay(100);                          // Wait for the HC-12 to enter AT Command mode
    HC12.print("AT+C002");               // Send AT Command to HC-12
    delay(200);
    while (HC12.available()) {           // If HC-12 has data (the AT Command response)
      Serial.write(HC12.read());         // Send the data to Serial monitor
    }
    Serial.println("Channel successfully changed");
    digitalWrite(setPin, HIGH);
    button2Pressed = LOW;
  }
  checkATCommand();
  readBuffer = "";                       // Clear readBuffer
}
// ==== Custom function - Check whether we have received an AT Command via the Serial Monitor
void checkATCommand () {
  if (readBuffer.startsWith("AT")) {     // Check whether the String starts with "AT"
    digitalWrite(setPin, LOW);           // Set HC-12 into AT Command mode
    delay(200);                          // Wait for the HC-12 to enter AT Command mode
    HC12.print(readBuffer);              // Send AT Command to HC-12
    delay(200);
    while (HC12.available()) {           // If HC-12 has data (the AT Command response)
      Serial.write(HC12.read());         // Send the data to Serial monitor
    }
    digitalWrite(setPin, HIGH);          // Exit AT Command mode
  }
}Code language: Arduino (arduino)/* Arduino Long Range Wireless Communication using HC-12
Example 02 - Changing channels using push buttons
by Dejan Nedelkovski, www.HowToMechatronics.com
*/
#include <SoftwareSerial.h>
#define setPin 6
SoftwareSerial HC12(10, 11); // HC-12 TX Pin, HC-12 RX Pin
byte incomingByte;
String readBuffer = "";
void setup() {
Serial.begin(9600); // Open serial port to computer
HC12.begin(9600); // Open serial port to HC12
pinMode(setPin, OUTPUT);
digitalWrite(setPin, HIGH); // HC-12 normal mode
}
void loop() {
// ==== Storing the incoming data into a String variable
while (HC12.available()) { // If HC-12 has data
incomingByte = HC12.read(); // Store each icoming byte from HC-12
readBuffer += char(incomingByte); // Add each byte to ReadBuffer string variable
}
delay(100);
// ==== Sending data from one HC-12 to another via the Serial Monitor
while (Serial.available()) {
HC12.write(Serial.read());
}
// === If button 1 is pressed, set channel 01
if (readBuffer == "AT+C001") {
digitalWrite(setPin, LOW); // Set HC-12 into AT Command mode
delay(100); // Wait for the HC-12 to enter AT Command mode
HC12.print(readBuffer); // Send AT Command to HC-12 ("AT+C001")
delay(200);
while (HC12.available()) { // If HC-12 has data (the AT Command response)
Serial.write(HC12.read()); // Send the data to Serial monitor
}
Serial.println("Channel successfully changed");
digitalWrite(setPin, HIGH); // Exit AT Command mode
readBuffer = "";
}
// === If button 2 is pressed, set channel 02
if (readBuffer == "AT+C002") {
digitalWrite(setPin, LOW); // Set HC-12 into AT Command mode
delay(100); // Wait for the HC-12 to enter AT Command mode
HC12.print(readBuffer); // Send AT Command to HC-12
delay(200);
while (HC12.available()) { // If HC-12 has data (the AT Command response)
Serial.write(HC12.read()); // Send the data to Serial monitor
}
Serial.println("Channel successfully changed");
digitalWrite(setPin, HIGH); // Exit AT Command mode
readBuffer = "";
}
checkATCommand();
readBuffer = ""; // Clear readBuffer
}
// ==== Custom function - Check whether we have received an AT Command via the Serial Monitor
void checkATCommand () {
if (readBuffer.startsWith("AT")) { // Check whether the String starts with "AT"
digitalWrite(setPin, LOW); // Set HC-12 into AT Command mode
delay(100); // Wait for the HC-12 to enter AT Command mode
HC12.print(readBuffer); // Send AT Command to HC-12
delay(200);
while (HC12.available()) { // If HC-12 has data (the AT Command response)
Serial.write(HC12.read()); // Send the data to Serial monitor
}
digitalWrite(setPin, HIGH); // Exit AT Command mode
}
}Code language: Arduino (arduino)// ==== Storing the incoming data into a String variable
while (HC12.available()) { // If HC-12 has data
incomingByte = HC12.read(); // Store each icoming byte from HC-12
readBuffer += char(incomingByte); // Add each byte to ReadBuffer string variable
}Code language: Arduino (arduino)
if (button1Pressed == HIGH) {
    HC12.print("AT+C001");               // Send the AT Command to the other module
    delay(100);
    //Set AT Command Mode
    digitalWrite(setPin, LOW);           // Set HC-12 into AT Command mode
    delay(100);                          // Wait for the HC-12 to enter AT Command mode
    HC12.print("AT+C001");               // Send AT Command to HC-12
    delay(200);
    while (HC12.available()) {           // If HC-12 has data (the AT Command response)
      Serial.write(HC12.read());         // Send the data to Serial monitor
    }
    Serial.println("Channel successfully changed");
    digitalWrite(setPin, HIGH);          // Exit AT Command mode
    button1Pressed = LOW;
}Code language: Arduino (arduino)// At the second Arduino
// === If button 1 is pressed, set channel 01
if (readBuffer == "AT+C001") {
digitalWrite(setPin, LOW); // Set HC-12 into AT Command mode
delay(100); // Wait for the HC-12 to enter AT Command mode
HC12.print(readBuffer); // Send AT Command to HC-12 ("AT+C001")
delay(200);
while (HC12.available()) { // If HC-12 has data (the AT Command response)
Serial.write(HC12.read()); // Send the data to Serial monitor
}
Serial.println("Channel successfully changed");
digitalWrite(setPin, HIGH); // Exit AT Command mode
readBuffer = "";
}Code language: Arduino (arduino)while (HC12.available()) { // If HC-12 has data (the AT Command response)
Serial.write(HC12.read()); // Send the data to Serial monitor
}Code language: Arduino (arduino)// ==== Custom function - Check whether we have received an AT Command via the Serial Monitor
void checkATCommand () {
if (readBuffer.startsWith("AT")) { // Check whether the String starts with "AT"
digitalWrite(setPin, LOW); // Set HC-12 into AT Command mode
delay(200); // Wait for the HC-12 to enter AT Command mode
HC12.print(readBuffer); // Send AT Command to HC-12
delay(200);
while (HC12.available()) { // If HC-12 has data (the AT Command response)
Serial.write(HC12.read()); // Send the data to Serial monitor
}
digitalWrite(setPin, HIGH); // Exit AT Command mode
}
}Code language: Arduino (arduino)HC-12 Wireless Communication: Stepper Motor Control using an Accelerometer
/*   Arduino Long Range Wireless Communication using HC-12
     Example 03 - Stepper Motor Control using Accelerometer - Transmitter, Accelerometer
    by Dejan Nedelkovski, www.HowToMechatronics.com
*/

#include <SoftwareSerial.h>
#include <Wire.h>

SoftwareSerial HC12(10, 11); // HC-12 TX Pin, HC-12 RX Pin

float angle;
int lastAngle = 0;
int count = 0;
int angleSum = 0;

//--- Accelerometer Register Addresses
#define Power_Register 0x2D
#define X_Axis_Register_DATAX0 0x32 // Hexadecima address for the DATAX0 internal register.
#define X_Axis_Register_DATAX1 0x33 // Hexadecima address for the DATAX1 internal register.
#define Y_Axis_Register_DATAY0 0x34
#define Y_Axis_Register_DATAY1 0x35
#define Z_Axis_Register_DATAZ0 0x36
#define Z_Axis_Register_DATAZ1 0x37
int ADXAddress = 0x53;  //Device address in which is also included the 8th bit for selecting the mode, read in this case.
int X0, X1, X_out;
int Y0, Y1, Y_out;
int Z1, Z0, Z_out;
float Xa, Ya, Za;

void setup() {
  HC12.begin(9600);               // Open serial port to HC12
  Wire.begin(); // Initiate the Wire library
  Serial.begin(9600);
  delay(100);

  Wire.beginTransmission(ADXAddress);
  Wire.write(Power_Register); // Power_CTL Register
  // Enable measurement
  Wire.write(8); // Bit D3 High for measuring enable (0000 1000)
  Wire.endTransmission();
}
void loop() {
  // X-axis
  Wire.beginTransmission(ADXAddress); // Begin transmission to the Sensor
  //Ask the particular registers for data
  Wire.write(X_Axis_Register_DATAX0);
  Wire.write(X_Axis_Register_DATAX1);
  Wire.endTransmission(); // Ends the transmission and transmits the data from the two registers
  Wire.requestFrom(ADXAddress, 2); // Request the transmitted two bytes from the two registers
  if (Wire.available() <= 2) { //
    X0 = Wire.read(); // Reads the data from the register
    X1 = Wire.read();
    /* Converting the raw data of the X-Axis into X-Axis Acceleration
      - The output data is Two's complement
      - X0 as the least significant byte
      - X1 as the most significant byte */
    X1 = X1 << 8;
    X_out = X0 + X1;
    Xa = X_out / 256.0; // Xa = output value from -1 to +1, Gravity acceleration acting on the X-Axis
  }
  //Serial.print("Xa= ");
  //Serial.println(X_out);

  // Y-Axis
  Wire.beginTransmission(ADXAddress);
  Wire.write(Y_Axis_Register_DATAY0);
  Wire.write(Y_Axis_Register_DATAY1);
  Wire.endTransmission();
  Wire.requestFrom(ADXAddress, 2);
  if (Wire.available() <= 2) {
    Y0 = Wire.read();
    Y1 = Wire.read();
    Y1 = Y1 << 8;
    Y_out = Y0 + Y1;
    Ya = Y_out / 256.0;
  }

  // Combine X and Y values for getting the angle value from 0 to 180 degrees
  if (Y_out > 0) {
    angle = map(Y_out, 0, 256, 90, 0);
  }
  else if (Y_out < 0) {
    angle = map(Y_out, 256, 0, 90, 0);
    angle = 90 - angle;
  }
  if (X_out < 0 & Y_out < 0) {
    angle = 180;
  }
  if (X_out < 0 & Y_out >0) {
    angle = 0;
  }

  // float to int
  int angleInt = int(angle);
  // Makes 100 accelerometer readings and sends the average for smoother result
  angleSum = angleSum + angleInt;
  count++;
  if (count >= 100) {
    angleInt = angleSum / 100;
    angleSum = 0;
    count = 0;
    // Some more smoothing of acceleromter reading - sends the new angle only if it differes from the previous one by +-2
    if (angleInt > lastAngle + 2 || angleInt < lastAngle - 2) {
      Serial.println(angleInt);
      String angleString = String(angleInt);
      //sends the angle value with start marker "s" and end marker "e"
      HC12.print("s" + angleString + "e");
      delay(10);
      lastAngle = angleInt;
      angleSum = 0;
      count = 0;
    }
  }
}
Code language: Arduino (arduino)/* Arduino Long Range Wireless Communication using HC-12
Example 03 - Stepper Motor Control using Accelerometer - Receiver, Stepper Motor
by Dejan Nedelkovski, www.HowToMechatronics.com
*/
#include <SoftwareSerial.h>
SoftwareSerial HC12(10, 11); // HC-12 TX Pin, HC-12 RX Pin
char incomingByte;
String readBuffer = "";
// defines pins numbers
const int dirPin = 4;
const int stepPin = 3;
const int button = 2;
int currentAngle = 0;
int lastAngle = 0;
int rotate = 0;
void setup() {
Serial.begin(9600); // Open serial port to computer
HC12.begin(9600); // Open serial port to HC12
// Sets the two pins as Outputs
pinMode(dirPin, OUTPUT);
pinMode(stepPin, OUTPUT);
// Microswitch input, with internal pull-up resistor activated
pinMode(button, INPUT_PULLUP);
delay(10);
digitalWrite(dirPin, HIGH);
boolean startingPosition = true;
while (startingPosition) {
digitalWrite(stepPin, HIGH);
delayMicroseconds(200);
digitalWrite(stepPin, LOW);
delayMicroseconds(200);
if (digitalRead(button) == LOW) {
startingPosition = false;
}
}
delay(100);
}
void loop() {
readBuffer = "";
boolean start = false;
// Reads the incoming angle
while (HC12.available()) { // If HC-12 has data
incomingByte = HC12.read(); // Store each icoming byte from HC-12
delay(5);
// Reads the data between the start "s" and end marker "e"
if (start == true) {
if (incomingByte != 'e') {
readBuffer += char(incomingByte); // Add each byte to ReadBuffer string variable
}
else {
start = false;
}
}
// Checks whether the received message statrs with the start marker "s"
else if ( incomingByte == 's') {
start = true; // If true start reading the message
}
}
// Converts the string into integer
currentAngle = readBuffer.toInt();
// Makes sure it uses angles between 0 and 180
if (currentAngle > 0 && currentAngle < 180) {
// Convert angle value to steps (depending on the selected step resolution)
// A cycle = 200 steps, 180deg = 100 steps ; Resolution: Sixteenth step x16
currentAngle = map(currentAngle, 0, 180, 0, 1600);
//Serial.println(currentAngle); // Prints the angle on the serial monitor
digitalWrite(dirPin, LOW); // Enables the motor to move in a particular direction
// Rotates the motor the amount of steps that differs from the previous positon
if (currentAngle != lastAngle) {
if (currentAngle > lastAngle) {
rotate = currentAngle - lastAngle;
for (int x = 0; x < rotate; x++) {
digitalWrite(stepPin, HIGH);
delayMicroseconds(400);
digitalWrite(stepPin, LOW);
delayMicroseconds(400);
}
}
// rotate the other way
if (currentAngle < lastAngle) {
rotate = lastAngle - currentAngle;
digitalWrite(dirPin, HIGH); //Changes the rotations direction
for (int x = 0; x < rotate; x++) {
digitalWrite(stepPin, HIGH);
delayMicroseconds(400);
digitalWrite(stepPin, LOW);
delayMicroseconds(400);
}
}
}
lastAngle = currentAngle; // Remembers the current/ last positon
}
}Code language: Arduino (arduino)// Makes 100 accelerometer readings and sends the average for smoother result
angleSum = angleSum + angleInt;
count++;
if (count >= 100) {
angleInt = angleSum / 100;
angleSum = 0;
count = 0;
// Some more smoothing of acceleromter reading - sends the new angle only if it differes from the previous one by +-2
if (angleInt > lastAngle + 2 || angleInt < lastAngle - 2) {
Serial.println(angleInt);
String angleString = String(angleInt);
//sends the angle value with start marker "s" and end marker "e"
HC12.print("s" + angleString + "e");
delay(10);
lastAngle = angleInt;
angleSum = 0;
count = 0;
}
}Code language: Arduino (arduino)// Reads the incoming angle
while (HC12.available()) { // If HC-12 has data
incomingByte = HC12.read(); // Store each icoming byte from HC-12
delay(5);
// Reads the data between the start "s" and end marker "e"
if (start == true) {
if (incomingByte != 'e') {
readBuffer += char(incomingByte); // Add each byte to ReadBuffer string variable
}
else {
start = false;
}
}
// Checks whether the received message statrs with the start marker "s"
else if ( incomingByte == 's') {
start = true; // If true start reading the message
}
}Code language: Arduino (arduino)
Manufacturing process
- Mastering Wireless Communication Range: How Power, Data Rate, and Interference Shape Connectivity
- u-blox LEA‑6H 02 GPS Module: Arduino & Python Integration Guide
- Python 3 to Arduino UNO: Easy Command Control and LED Demo
- Arduino Due Project Kit: TFT, GPS, RTC, Sensors, Bluetooth & Joystick – Full Component List
- Build an Arduino Range Finder and Digital Level – Easy Step‑by‑Step Guide
- Wirelessly Control Your Arduino Robot Car with HC-05 Bluetooth, NRF24L01, and HC-12 Transceiver Modules
- Master Arduino Bluetooth: HC‑05 Module Tutorial for Smartphone & PC Control
- Mastering I2C Communication with Arduino: A Practical Tutorial
- PIR Motion Sensor: Working Principles & Arduino Integration Guide
- HC-12 Serial Communication Module: Setup, Features & Remote Data Transfer