


Build an Arduino Range Finder and Digital Level – Easy Step‑by‑Step Guide
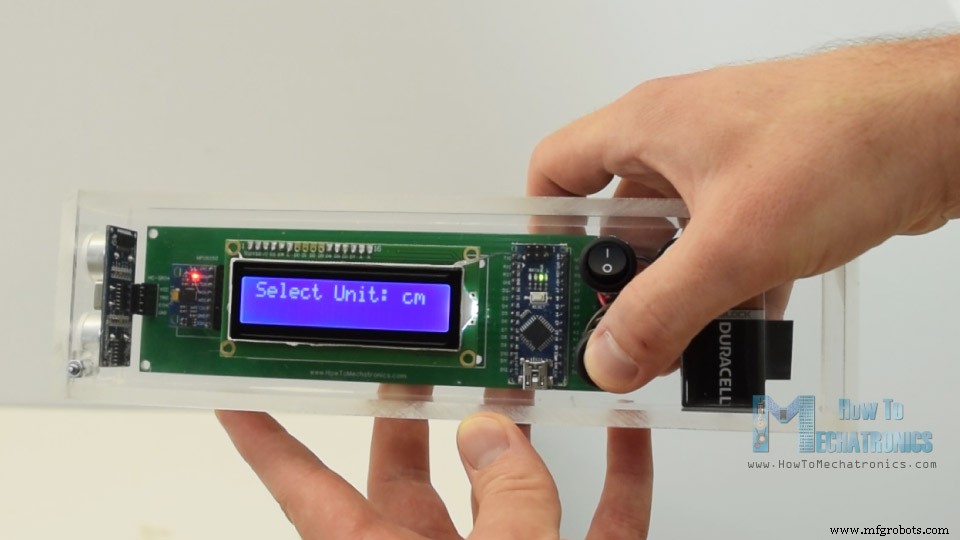
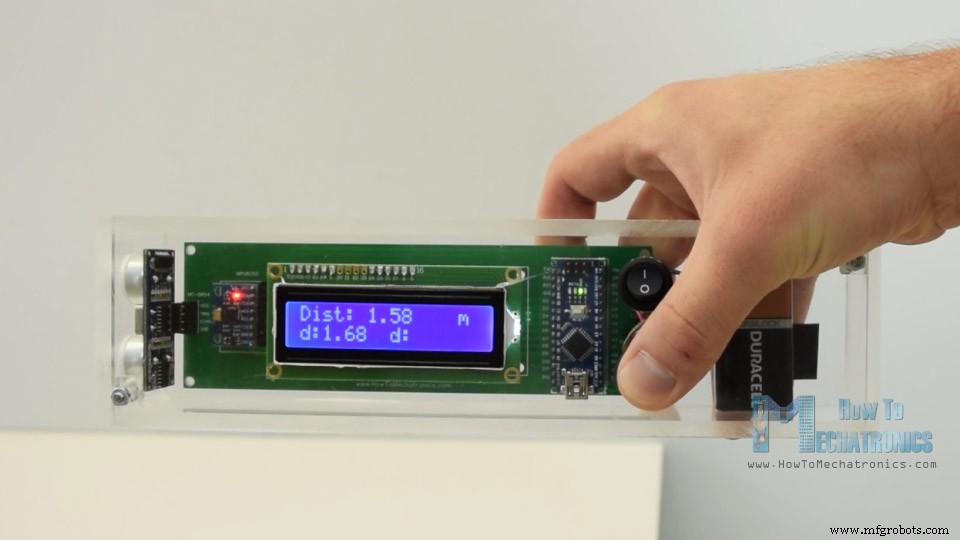
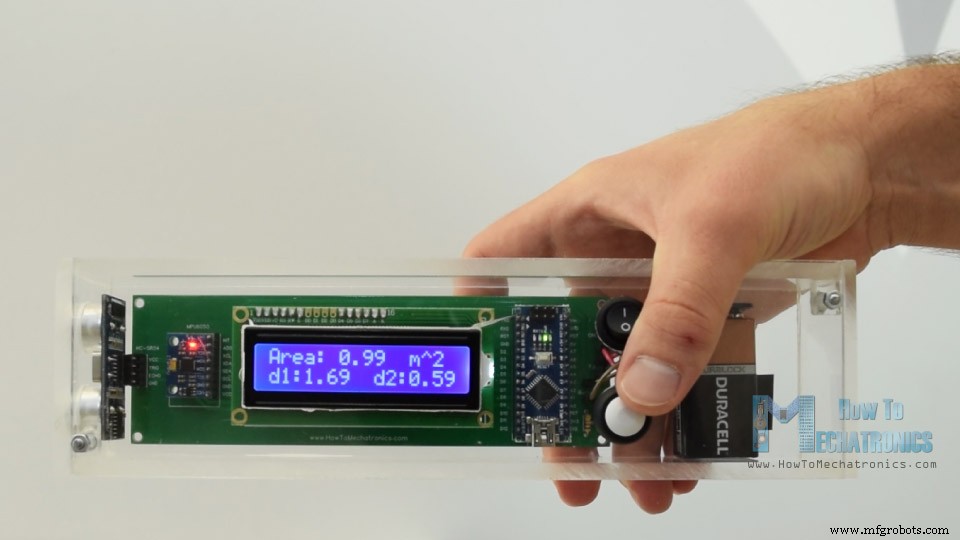
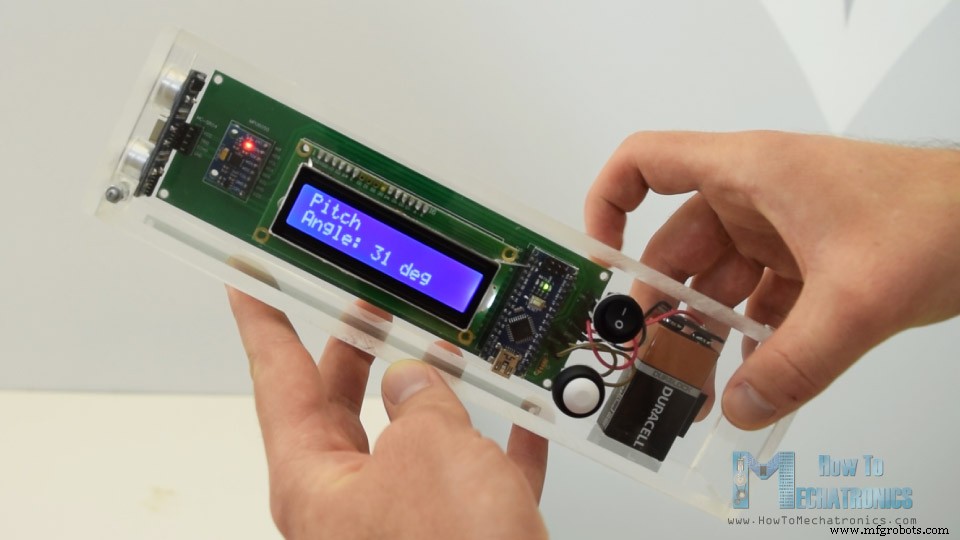
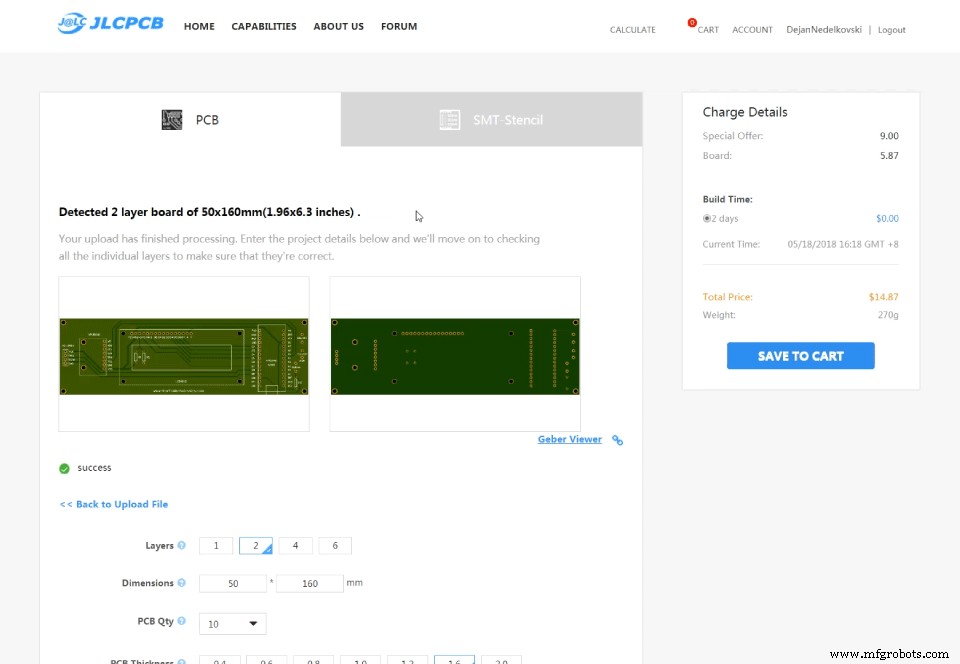
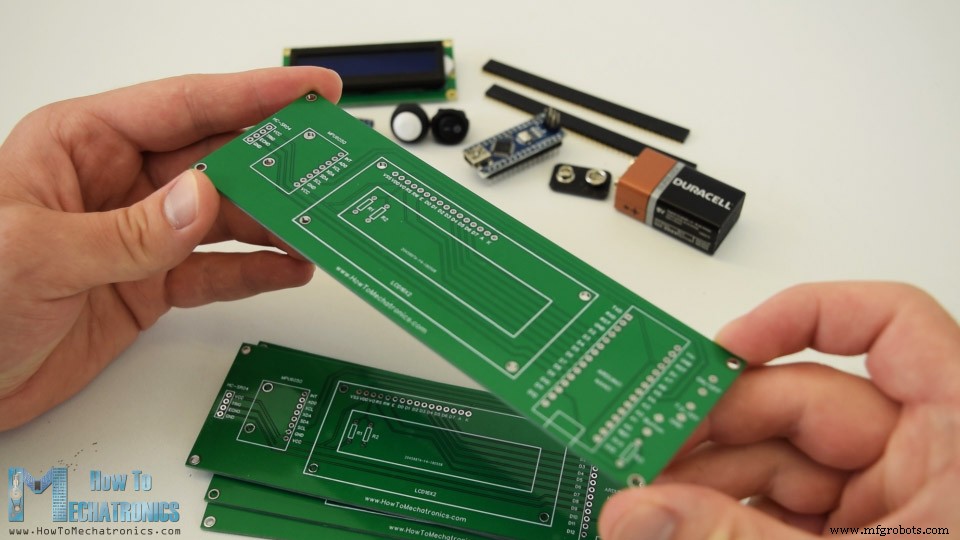
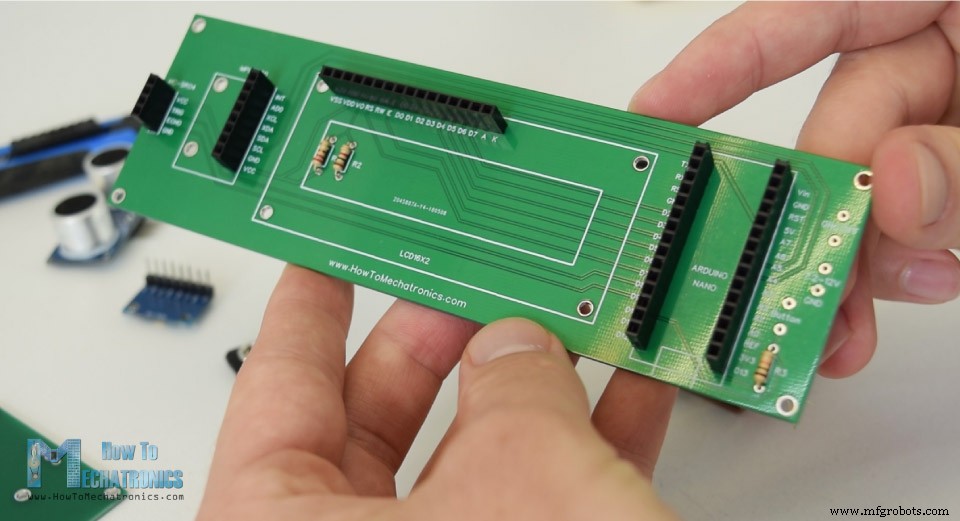
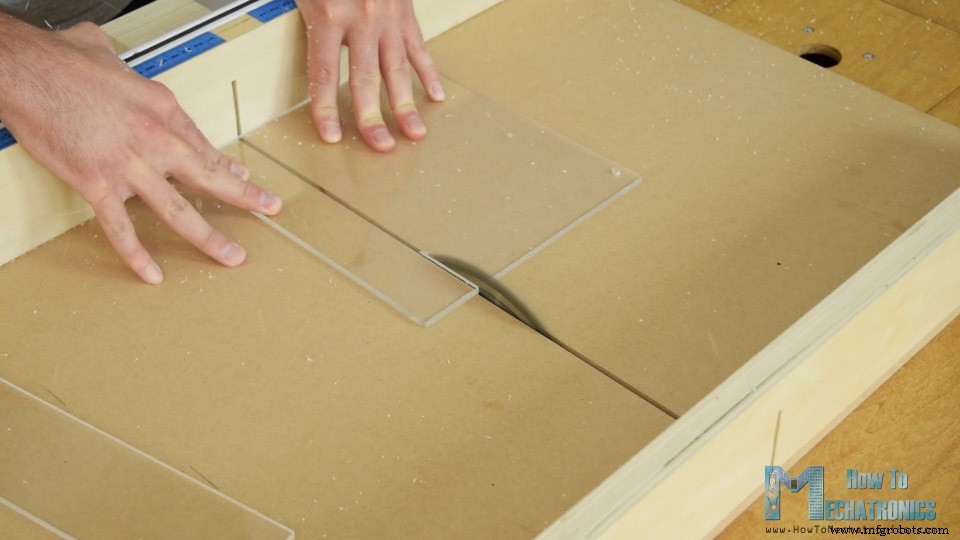
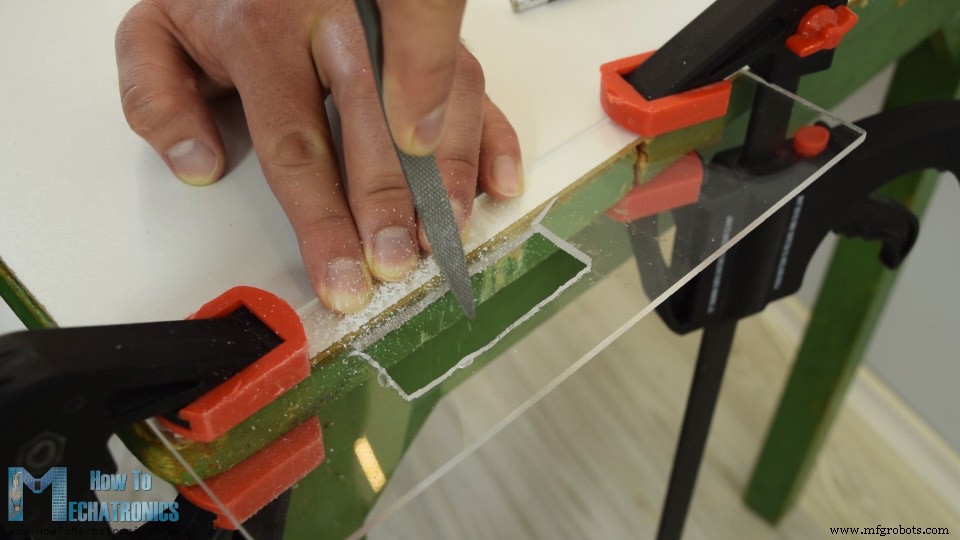
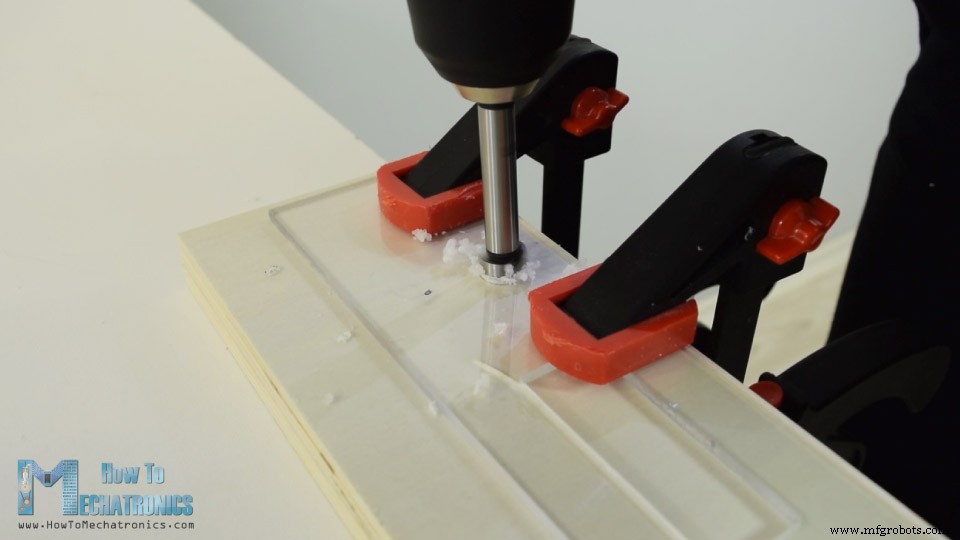
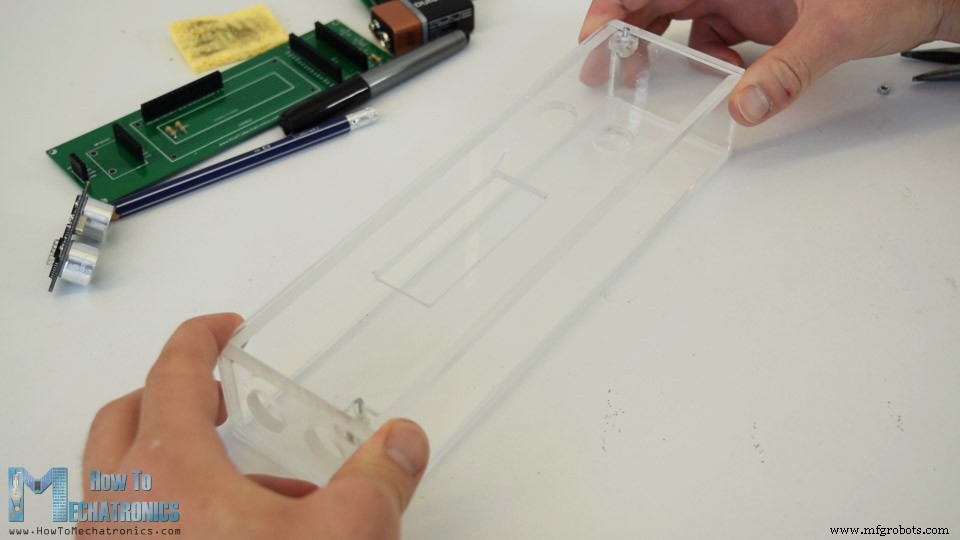
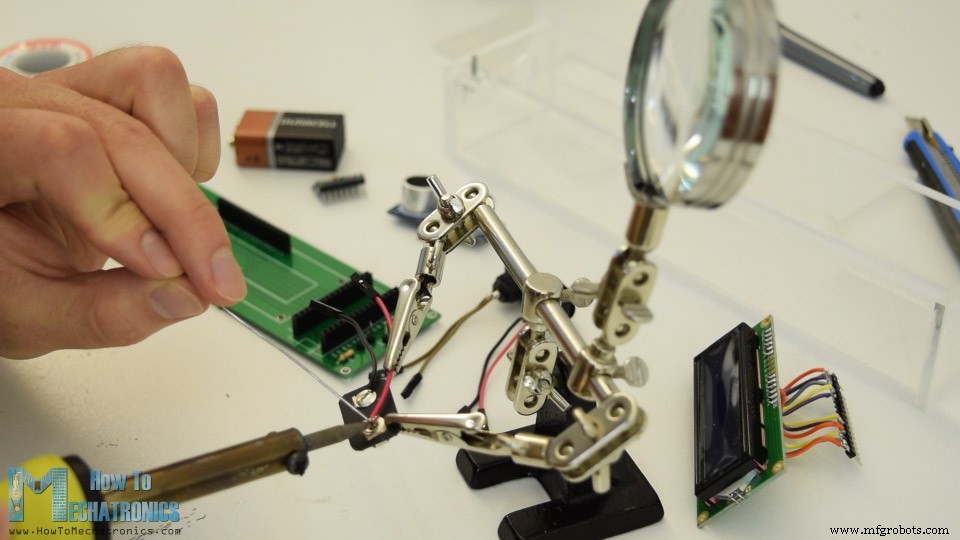
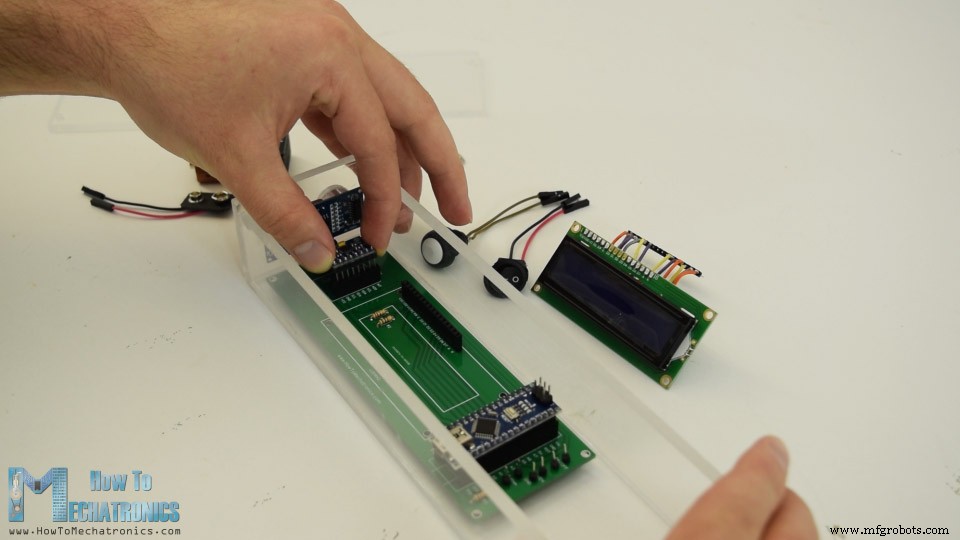
In this tutorial we will learn how to make an Arduino range measurer and a digital spirit level. You can watch the following video or read the written tutorial below. The device features an ultrasonic sensor for measuring the distance to the nearest object, an accelerometer for measuring the angle with respect to the ground, an LCD display for showing the results and a custom designed PCB on which all components are connected. We can operate the device with just a single button. Once we power the device we need to select the unit of measurement. By pressing the button we can toggle through the units, and if we press and hold the button for a while we will get into the first program. Here we can measure the distance and also have the ability to store the last two measurements. For getting into the second program, again we have to press and hold the button for a while. In this program we can measure a square area by taking two perpendicular distance measurements. The next program is the digital spirit level and here we can measure the angle with respect to the ground. Using the button we can toggle between the two axes or we can measure either the Pitch or the Roll. Here’s the circuit schematic of this Arduino project. Note that I already have detailed tutorials on how each of these modules work, and you can check them on the following links: Ultrasonic sensor tutorial, LCD tutorial, MEMS accelerometer tutorial. You can get the components needed for this project from the links below: According to the circuit schematic we need to design the custom PCB and I did that using the EasyEDA free online circuit design software. Once we finished the design here, we can simply export the Gerber file which is used for manufacturing the PCB. You can check the EasyEDA project files of this project here. Then we can order our PCB from JLCPCB, which is actually the sponsor of this project. Here we can simply drag and drop the Gerber file. Once uploaded we can review our PCB in the Gerber viewer. If everything is all right then we can go on, select the properties that we want for our PCB, and then we can order our PCB at a reasonable price. Note that if it’s your first order from JLCPCB, you can get up to 10 PCBs for only $2. Nevertheless, after several days the PCBs have arrived. The quality of the PCBs is great and everything is exactly the same as in the design. Ok, now we can start assembling the electronics for this project. I started by soldering pin headers on the PCB. In this way we can easily connect and disconnect the components when needed. Then I inserted and soldered the three resistors. Two of them are for the voltage divider for the contrast of LCD. The 1k resistor should be placed at R1 and the 220 ohms at R2. The third one is a pull-up resistor for the button. Next I moved on with making the case for the device. I decided to use transparent acrylic because I wanted the beauty of all electronics components to be visible. I had some 5mm tick acrylic from an old project, and I used a circular for cutting it to size. Then I had to make an opening for the LCD on the top side of the case, which is actually 4mm tick because it will fit better with the LCD. So first I made a two hole with a drill and then inserted a hacksaw through them. Using the hacksaw I roughly made the opening and then using a rasp I made fine straight lines so that the LCD can tightly fit. Then using a forstner bit I made the openings for the power switch, the control button and the ultrasonic sensor. Once I had all pieces ready I used a 5 minutes epoxy to assembly to case. As for the top, I inserted and glued two bolts through which the top panel can be inserted and secured using some nuts on top of it. The case is now ready and so I continued with soldering pin headers to the LCD so I can easily attach it to the PCB. I also soldered pin headers or jump wires to the power switch, the button and the battery connector. Finaly, I had everything ready to assembly the device. I started with inserting the ultrasonic sensor on the PCB, and then through the holes on the side panel. Next was the Arduino board, the accelerometer module as well as the battery connector. On the top panel, I secured the LCD, the power switch and the button, and then connected them to the PCB. Lastly I inserted the 9V battery to the connector and secured the top panel with the nuts. And that’s it, the Arduino range measurer project is done but what’s left in this video is to explain how the program works, so let’s take a look at the Arduino code. As the code is a bit longer, for better understanding, I will post the source code of the program in sections with description for each section. And at the end of this article I will post the complete source code. So first we need to include the Wire.h library for the I2C communication of the accelerometer, as well as the LiquidCrystal.h library for controlling the LCD. Then we need to define the LCD, the I2C address of the MPU6050 accelerometer module, the ultrasonic sensor pins, as well as some variables needed for the program below. In the setup section we need to initialize both the I2C interface of the accelerometer and the liquid crystal display, as well as define the pin modes for the ultrasonic sensor trigger and echo pins, and the button pin. In the main loop section we have a switch statements through which we can toggle between the different programs of our device. In the first, or case number 0, we select the unit of measurement. Using the lcd.print() function we print the text on the LCD and using the if statements we toggle through the four unit of measurements. We should note here that the unitSelect variable takes action in the getDistance() cunstom function, where it actually tells to which unit we should convert the basic cm unit that we are getting from the ultrasonic sensor. In order to selecting the unit of measurement and also get in the first program of the device we just have to hold the press button longer than half a second. In case number 1 or in the distance measuring program first we get the distance to the nearest object using the getDistance() custom function. Let’s see how this function works. Here using the trigger pin we tell sensor to generate an ultrasonic sound wave. Then using the echo pin and the pulseIn() function we measure the duration the wave traveled from the sensor to the object and back. Considering the speed of sound and the travel time we can easily calculate the distance. So we print the measured distance along with some text on the LCD and using the “if” statements, if we press the button, we print or save last two measurements. Next is the program for calculating area in which we are using similar methods. We need to take two perpendicular measurements and simply multiply them in order to get the area of the square that they form. The last case, is the angle measuring program. Here we need to read the accelerometer data which is actually the strength of the Earth’s gravitational field in three different axes, X,Y, and Z. The value of each axis is stored in 2 registers, so we need to read total of 6 registers and combine them in order to get the right value. Once we have the X,Y and Z values of the accelerometer we can calculate the Pitch angle, or rotation around the Y-axis, as well as the Roll angle, or rotation around the X-axis, using the the two equations. You can find more details about these equations on Freescale Semiconductor application note, Tilt Sensing Using a Three-Axis Accelerometer. So after that we print the values along with some text on the LCD, and by pressing the button we change what we show on the LCD, whether the Pitch or the Roll angle. Here’s the complete source code for this Arduino range measurer and spirit level project : So that would be all, I hope you enjoyed this Arduino project and learned something new. Feel free to ask any question in the comments section below.Overview
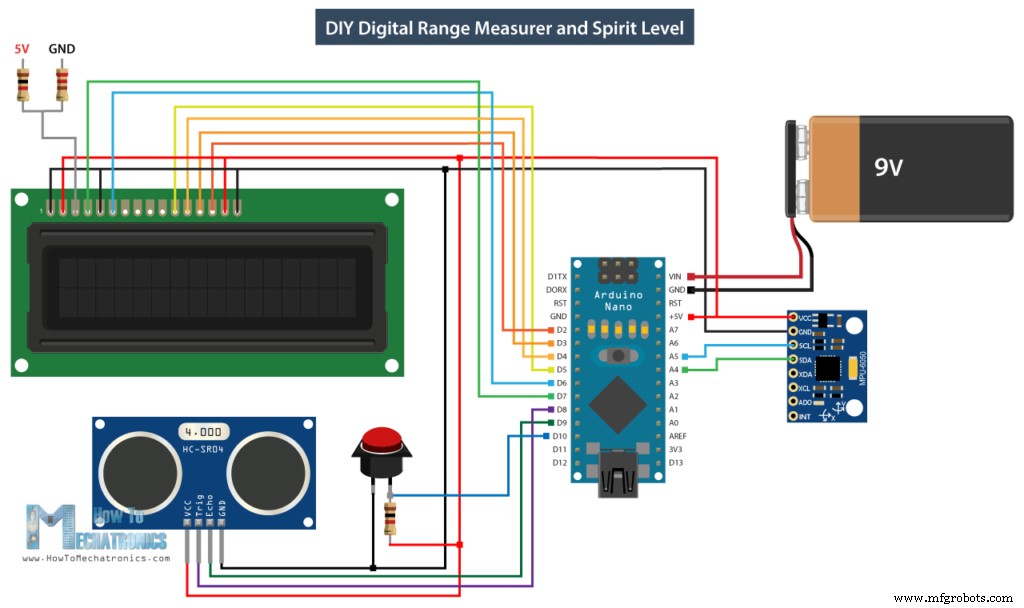
Arduino Range Measurer Circuit Schematic
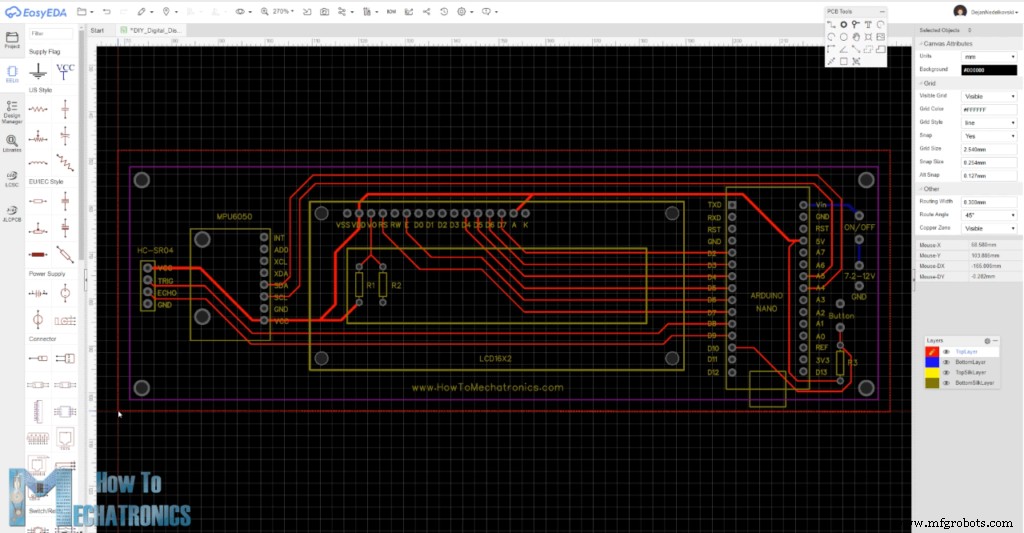
Custom design PCB
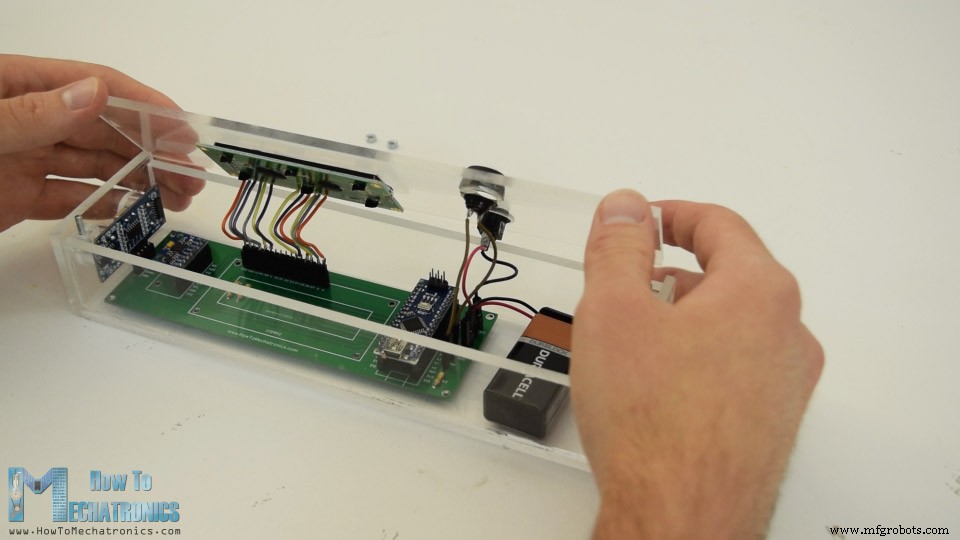
Assembling the Device
Arduino Range Measurer and Digital Spirit Level Source Code
#include<Wire.h> // I2C communication library
#include <LiquidCrystal.h> // includes the LiquidCrystal Library

LiquidCrystal lcd(7, 6, 5, 4, 3, 2); // Creates an LCD object. Parameters: (rs, enable, d4, d5, d6, d7)
const int MPU = 0x68; // I2C address of the MPU6050 accelerometer

#define trigPin 8
#define echoPin 9
#define selectButton 10

int16_t AcX, AcY, AcZ;
long duration;
float distance;
int program = 0;
float d = 0;
float d1 = 0;
float d2 = 0;
float area = 0;
int axis = 0;
int angle = 0;
int unitSelect = 0;
String unit = "cm";Code language: Arduino (arduino)void setup() {
// Initialize interface to the MPU6050
Wire.begin();
Wire.beginTransmission(MPU);
Wire.write(0x6B);
Wire.write(0);
Wire.endTransmission(true);
lcd.begin(16, 2); // Initializes the interface to the LCD screen
pinMode(trigPin, OUTPUT);
pinMode(echoPin, INPUT);
pinMode(selectButton, INPUT_PULLUP);
}Code language: Arduino (arduino)switch (program) { // Switch between different programs
case 0: // Select unit of measurement
lcd.setCursor(0, 0); // Sets the location at which subsequent text written to the LCD will be displayed
lcd.print("Select Unit: ");
lcd.setCursor(13, 0);
lcd.print(unit);
lcd.print(" ");
delay(10);
// If button is pressed - change unit
if (digitalRead(selectButton) == 0) {
if (unitSelect == 0) {
unit = "in";
unitSelect = 1;
}
else if (unitSelect == 1) {
unit = "m";
unitSelect = 2;
}
else if (unitSelect == 2) {
unit = "ft";
unitSelect = 3;
}
else if (unitSelect == 3) {
unit = "cm";
unitSelect = 0;
}
// If button is held longer then half a second - change program
        delay(500);
        if (digitalRead(selectButton) == 0) {
          program = 1;
          lcd.clear();
          delay(500);
        }
      }
break;Code language: Arduino (arduino)/ Converting the units
if (unitSelect == 1) {
distance = distance; // cm to cm
unit = "cm";
}
else if (unitSelect == 2) {
distance = distance * 0.393701; // cm to in
unit = "in";
}
else if (unitSelect == 3) {
distance = distance * 0.01; // cm to m
unit = "m";
}
else if (unitSelect == 0) {
distance = distance * 0.0328; // cm to ft
unit = "ft";
}Code language: Arduino (arduino)// If button is held longer then half a second - change program
delay(500);
if (digitalRead(selectButton) == 0) {
program = 1;
lcd.clear();
delay(500);
}
}
break;Code language: Arduino (arduino)case 1: // Distance measuring program
distance = getDistance(); // Distance to the nearest object
lcd.setCursor(0, 0);
lcd.print("Dist: ");
lcd.print(distance); // Prints the distance value from the sensor
lcd.print(" ");
lcd.setCursor(14, 0);
lcd.print(unit);
delay(10);
lcd.setCursor(0, 1);
lcd.print("d:");
lcd.setCursor(8, 1);
lcd.print("d:");
delay(200);
// Save distance 1
if (digitalRead(selectButton) == 0) {
if (d == 0) {
lcd.setCursor(0, 1);
lcd.print("d: ");
lcd.setCursor(2, 1);
lcd.print(distance);
d = 1;
delay(100);
}
// Save distance 2
else if (d == 1) {
lcd.setCursor(8, 1);
lcd.print("d: ");
lcd.setCursor(10, 1);
lcd.print(distance);
d = 0;
delay(100);
}
// If button is held longer then half sencond change program
delay(500);
if (digitalRead(selectButton) == 0) {
program = 2;
d = 0;
lcd.clear();
delay(500);
}
}
break;Code language: Arduino (arduino)//===== getDistance - Custom Function
float getDistance() {
// Clears the trigPin
digitalWrite(trigPin, LOW);
// Sets the trigPin on HIGH state for 10 micro seconds
digitalWrite(trigPin, HIGH);
delayMicroseconds(10);
digitalWrite(trigPin, LOW);
// Reads the echoPin, returns the sound wave travel time in microseconds
duration = pulseIn(echoPin, HIGH);
// Calculating the distance
distance = duration * 0.034 / 2; // distance in cm
// Converting the units
if (unitSelect == 1) {
distance = distance; // cm to cm
unit = "cm";
}
else if (unitSelect == 2) {
distance = distance * 0.393701; // cm to in
unit = "in";
}
else if (unitSelect == 3) {
distance = distance * 0.01; // cm to m
unit = "m";
}
else if (unitSelect == 0) {
distance = distance * 0.0328; // cm to ft
unit = "ft";
}
return distance;
}Code language: Arduino (arduino)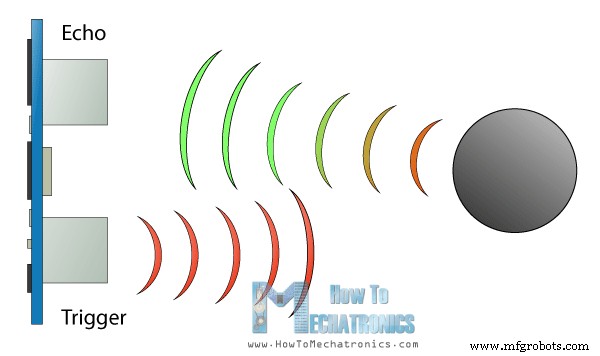
case 2: // Area measuring program
distance = getDistance();
lcd.setCursor(0, 0);
lcd.print("Area: ");
lcd.print(area); // Prints the calculated area from the two measurements
lcd.setCursor(12, 0);
lcd.print(unit); // Prints the selected unit and the square sign below
lcd.print("^2");
delay(200);
if ( d == 0) {
lcd.setCursor(0, 1);
lcd.print("d1: ");
lcd.setCursor(3, 1);
lcd.print(distance);
delay(200);
}
else if (d == 1) {
lcd.setCursor(9, 1);
lcd.print("d2: ");
lcd.setCursor(12, 1);
lcd.print(distance);
delay(200);
}
else if (d == 2) {
lcd.setCursor(6, 0);
lcd.print(area);
delay(200);
}
// Save distance 1
if (digitalRead(selectButton) == 0) {
if (d == 0) {
lcd.setCursor(0, 1);
lcd.print("d1: ");
lcd.setCursor(3, 1);
lcd.print(distance);
d = 1;
d1 = distance;
delay(100);
}
// Save distance 2
else if (d == 1) {
lcd.setCursor(9, 1);
lcd.print("d2: ");
lcd.setCursor(12, 1);
lcd.print(distance);
d = 2;
d2 = distance;
area = d1 * d2; // Calculate the area
delay(100);
}
else if (d == 2) {
lcd.clear();
d = 0;
area = 0;
delay(100);
}
// If button is held longer then half sencond change program
delay(500);
if (digitalRead(selectButton) == 0) {
program = 3;
d = 0;
lcd.clear();
delay(500);
}
}
break;Code language: Arduino (arduino)case 3: // Angle measuring program
// Read the accelerometer data
Wire.beginTransmission(MPU);
Wire.write(0x3B); // Start with register 0x3B (ACCEL_XOUT_H)
Wire.endTransmission(false);
Wire.requestFrom(MPU, 6, true); // Read 6 registers total, each axis value is stored in 2 registers
AcX = Wire.read() << 8 | Wire.read(); // X-axis value
AcY = Wire.read() << 8 | Wire.read(); // Y-axis value
AcZ = Wire.read() << 8 | Wire.read(); // Z-axis value
if ( axis == 0) {
// Calculating the Pitch angle (rotation around Y-axis)
angle = atan(-1 * AcX / sqrt(pow(AcY, 2) + pow(AcZ, 2))) * 180 / PI;
lcd.setCursor(0, 0);
lcd.print("Pitch");
}
else if (axis == 1) {
// Calculating the Roll angle (rotation around X-axis)
angle = atan(-1 * AcY / sqrt(pow(AcX, 2) + pow(AcZ, 2))) * 180 / PI;
lcd.setCursor(0, 0);
lcd.print("Roll ");
}
lcd.setCursor(0, 1);
lcd.print("Angle: ");
lcd.print(abs(angle));
lcd.print(" ");
lcd.setCursor(10, 1);
lcd.print("deg");
delay(200);
// Change axis
if (digitalRead(selectButton) == 0) {
if (axis == 0) {
axis = 1;
delay(100);
}
// Save distance 2
else if (axis == 1) {
axis = 0;
delay(100);
}
// If button is held longer then half sencond change program
delay(500);
if (digitalRead(selectButton) == 0) {
program = 0;
lcd.clear();
delay(500);
}
}
break;Code language: Arduino (arduino)/*
DIY Digital Range Measurer and Spirit Level
by Dejan Nedelkovski,
www.HowToMechatronics.com
*/
#include<Wire.h> // I2C communication library
#include <LiquidCrystal.h> // includes the LiquidCrystal Library
LiquidCrystal lcd(7, 6, 5, 4, 3, 2); // Creates an LCD object. Parameters: (rs, enable, d4, d5, d6, d7)
const int MPU = 0x68; // I2C address of the MPU6050 accelerometer
#define trigPin 8
#define echoPin 9
#define selectButton 10
int16_t AcX, AcY, AcZ;
long duration;
float distance;
int program = 0;
float d = 0;
float d1 = 0;
float d2 = 0;
float area = 0;
int axis = 0;
int angle = 0;
int unitSelect = 0;
String unit = "cm";
void setup() {
// Initialize interface to the MPU6050
Wire.begin();
Wire.beginTransmission(MPU);
Wire.write(0x6B);
Wire.write(0);
Wire.endTransmission(true);
lcd.begin(16, 2); // Initializes the interface to the LCD screen
pinMode(trigPin, OUTPUT);
pinMode(echoPin, INPUT);
pinMode(selectButton, INPUT_PULLUP);
}
void loop() {
switch (program) { // Switch between different programs
case 0: // Select unit of measurement
lcd.setCursor(0, 0); // Sets the location at which subsequent text written to the LCD will be displayed
lcd.print("Select Unit: ");
lcd.setCursor(13, 0);
lcd.print(unit);
lcd.print(" ");
delay(10);
// If button is pressed - change unit
if (digitalRead(selectButton) == 0) {
if (unitSelect == 0) {
unit = "in";
unitSelect = 1;
}
else if (unitSelect == 1) {
unit = "m";
unitSelect = 2;
}
else if (unitSelect == 2) {
unit = "ft";
unitSelect = 3;
}
else if (unitSelect == 3) {
unit = "cm";
unitSelect = 0;
}
// If button is held longer then half a second - change program
delay(500);
if (digitalRead(selectButton) == 0) {
program = 1;
lcd.clear();
delay(500);
}
}
break;
case 1: // Distance measuring program
distance = getDistance(); // Distance to the nearest object
lcd.setCursor(0, 0);
lcd.print("Dist: ");
lcd.print(distance); // Prints the distance value from the sensor
lcd.print(" ");
lcd.setCursor(14, 0);
lcd.print(unit);
delay(10);
lcd.setCursor(0, 1);
lcd.print("d:");
lcd.setCursor(8, 1);
lcd.print("d:");
delay(200);
// Save distance 1
if (digitalRead(selectButton) == 0) {
if (d == 0) {
lcd.setCursor(0, 1);
lcd.print("d: ");
lcd.setCursor(2, 1);
lcd.print(distance);
d = 1;
delay(100);
}
// Save distance 2
else if (d == 1) {
lcd.setCursor(8, 1);
lcd.print("d: ");
lcd.setCursor(10, 1);
lcd.print(distance);
d = 0;
delay(100);
}
// If button is held longer then half sencond change program
delay(500);
if (digitalRead(selectButton) == 0) {
program = 2;
d = 0;
lcd.clear();
delay(500);
}
}
break;
case 2: // Area measuring program
distance = getDistance();
lcd.setCursor(0, 0);
lcd.print("Area: ");
lcd.print(area); // Prints the calculated area from the two measurements
lcd.setCursor(12, 0);
lcd.print(unit); // Prints the selected unit and the square sign below
lcd.print("^2");
delay(200);
if ( d == 0) {
lcd.setCursor(0, 1);
lcd.print("d1: ");
lcd.setCursor(3, 1);
lcd.print(distance);
delay(200);
}
else if (d == 1) {
lcd.setCursor(9, 1);
lcd.print("d2: ");
lcd.setCursor(12, 1);
lcd.print(distance);
delay(200);
}
else if (d == 2) {
lcd.setCursor(6, 0);
lcd.print(area);
delay(200);
}
// Save distance 1
if (digitalRead(selectButton) == 0) {
if (d == 0) {
lcd.setCursor(0, 1);
lcd.print("d1: ");
lcd.setCursor(3, 1);
lcd.print(distance);
d = 1;
d1 = distance;
delay(100);
}
// Save distance 2
else if (d == 1) {
lcd.setCursor(9, 1);
lcd.print("d2: ");
lcd.setCursor(12, 1);
lcd.print(distance);
d = 2;
d2 = distance;
area = d1 * d2; // Calculate the area
delay(100);
}
else if (d == 2) {
lcd.clear();
d = 0;
area = 0;
delay(100);
}
// If button is held longer then half sencond change program
delay(500);
if (digitalRead(selectButton) == 0) {
program = 3;
d = 0;
lcd.clear();
delay(500);
}
}
break;
case 3: // Angle measuring program
// Read the accelerometer data
Wire.beginTransmission(MPU);
Wire.write(0x3B); // Start with register 0x3B (ACCEL_XOUT_H)
Wire.endTransmission(false);
Wire.requestFrom(MPU, 6, true); // Read 6 registers total, each axis value is stored in 2 registers
AcX = Wire.read() << 8 | Wire.read(); // X-axis value
AcY = Wire.read() << 8 | Wire.read(); // Y-axis value
AcZ = Wire.read() << 8 | Wire.read(); // Z-axis value
if ( axis == 0) {
// Calculating the Pitch angle (rotation around Y-axis)
angle = atan(-1 * AcX / sqrt(pow(AcY, 2) + pow(AcZ, 2))) * 180 / PI;
lcd.setCursor(0, 0);
lcd.print("Pitch");
}
else if (axis == 1) {
// Calculating the Roll angle (rotation around X-axis)
angle = atan(-1 * AcY / sqrt(pow(AcX, 2) + pow(AcZ, 2))) * 180 / PI;
lcd.setCursor(0, 0);
lcd.print("Roll ");
}
lcd.setCursor(0, 1);
lcd.print("Angle: ");
lcd.print(abs(angle));
lcd.print(" ");
lcd.setCursor(10, 1);
lcd.print("deg");
delay(200);
// Change axis
if (digitalRead(selectButton) == 0) {
if (axis == 0) {
axis = 1;
delay(100);
}
// Save distance 2
else if (axis == 1) {
axis = 0;
delay(100);
}
// If button is held longer then half sencond change program
delay(500);
if (digitalRead(selectButton) == 0) {
program = 0;
lcd.clear();
delay(500);
}
}
break;
}
}
//===== getDistance - Custom Function
float getDistance() {
  // Clears the trigPin
  digitalWrite(trigPin, LOW);
  // Sets the trigPin on HIGH state for 10 micro seconds
  digitalWrite(trigPin, HIGH);
  delayMicroseconds(10);
  digitalWrite(trigPin, LOW);
  // Reads the echoPin, returns the sound wave travel time in microseconds
  duration = pulseIn(echoPin, HIGH);
  // Calculating the distance
  distance = duration * 0.034 / 2; // distance in cm

  // Converting the units
  if (unitSelect == 1) {
    distance = distance; // cm to cm
    unit = "cm";
  }
  else if (unitSelect == 2) {
    distance = distance *  0.393701; // cm to in
    unit = "in";
  }
  else if (unitSelect == 3) {
    distance = distance * 0.01; // cm to m
    unit = "m";
  }
  else if (unitSelect == 0) {
    distance = distance * 0.0328; // cm to ft
    unit = "ft";
  }
  return distance;
}Code language: Arduino (arduino)
Manufacturing process
- Build Your Own Arduino Tamagotchi: A Digital Pet DIY Project
- Arduino Tic Tac Toe with MAX7219 LED Matrix and Cardboard Enclosure
- Build a DIY Voltmeter with Arduino and Nokia 5110 Display – Step‑by‑Step Guide
- Gesture‑Controlled PC with Arduino and Python – Hands‑Free Operation
- 128x64 LCD Smart Clock with Analog/Digital Time & Temperature – Arduino Nano + DS3231 RTC
- Build a Reliable Arduino-Based Wireless Weather Station
- Build an Arduino Range Finder and Digital Level – Easy Step‑by‑Step Guide
- Build Reliable Long‑Range Arduino Networks with the HC‑12 Module
- Build an Arduino Security & Alarm System – Step-by-Step Tutorial
- DIY Arduino Touch‑Screen MP3 Player & Alarm Clock – Step‑by‑Step Guide