


DIY Arduino Touch‑Screen MP3 Player & Alarm Clock – Step‑by‑Step Guide
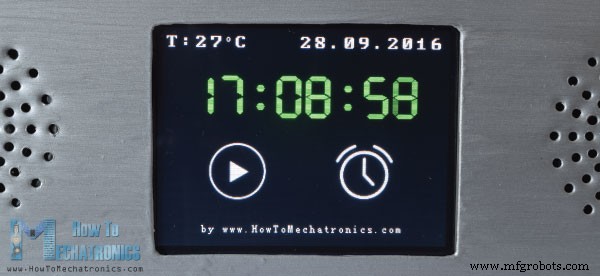
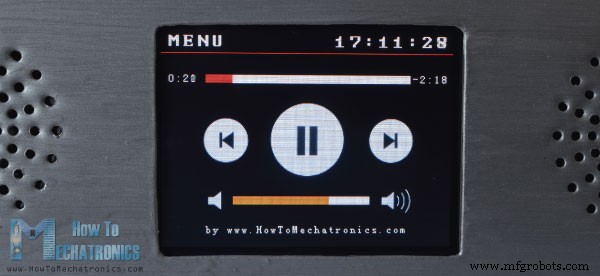
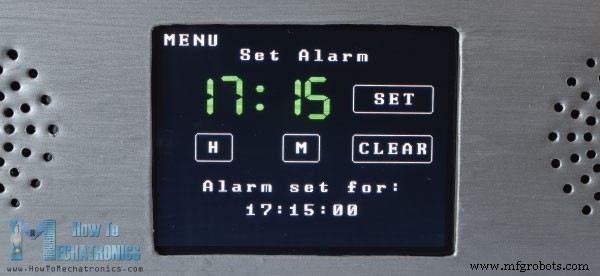
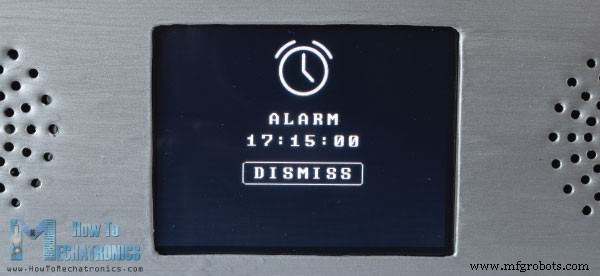
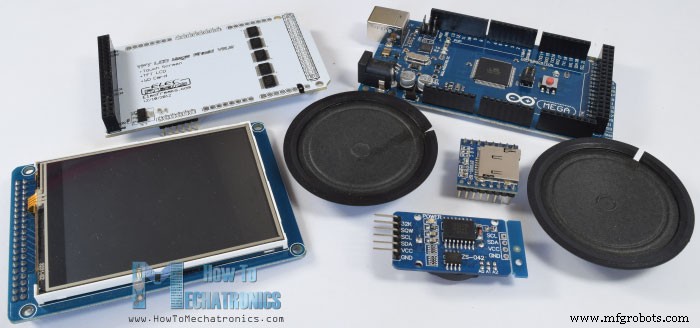
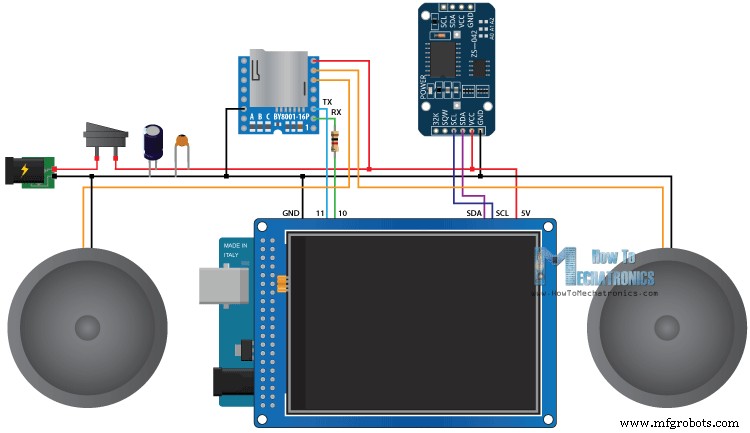
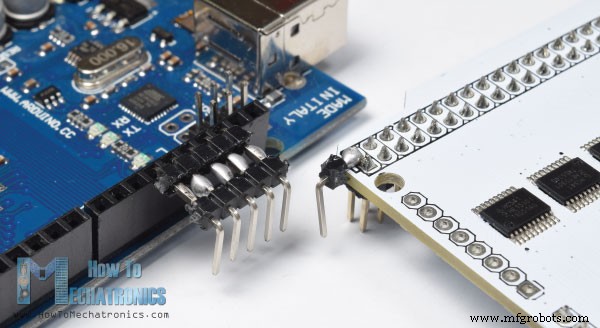
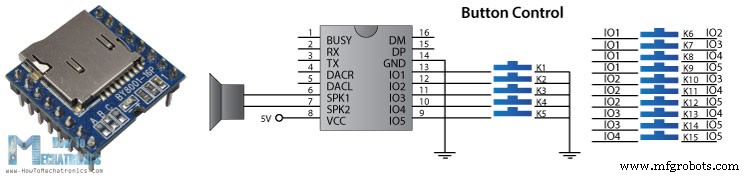
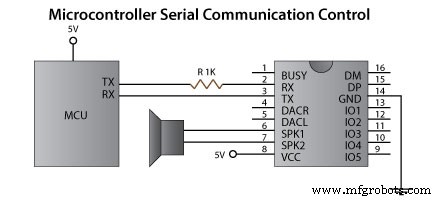
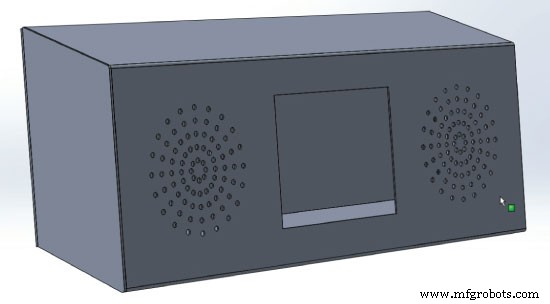
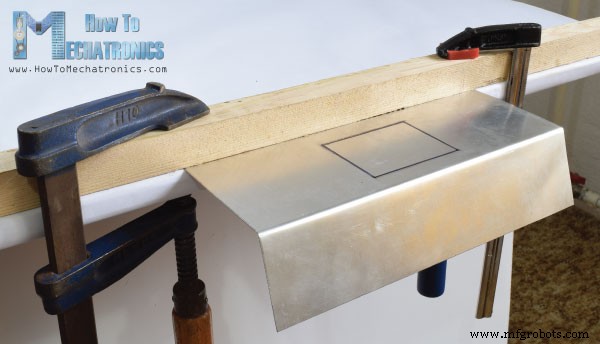
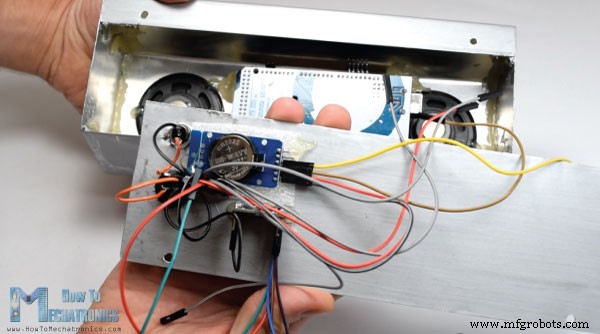
In this project I will show you how you can make an Arduino Touch Screen MP3 Music Player and Alarm Clock. You can watch the following video or read the written tutorial below. The home screen features a big clock, date and temperature information, as well as, two buttons for the Music Player and the Alarm Clock. If we enter the Music Player we can start playing the music by pressing the big “Play” button in the middle of the screen. Right beside it, there are two more buttons, for playing the previous or the next song. Above these buttons there is the song progress bar, and at the bottom of the screen we have a volume bar and two buttons for decreasing and increasing the volume. In the upper right corner there is a clock and on the left side is the “Menu” button which brings us back to the home screen. On the other hand, if we enter the Alarm Clock we can set an alarm by using the two buttons for setting the hours and the minutes. When the alarm will be activated, a song will start playing at a higher volume, and it will keep playing until we press the “Dismiss” button. Now let’s take a look how this device works. It uses an Arduino Mega board and a 3.2” TFT touch screen with a suitable shield for connecting the screen with the Arduino Board. For playing the music, it uses the BY8001 MP3 Player module and for the alarm clock it uses the DS3231 Real Time Clock module. You can get the components needed for this Arduino Project from the links below: Here’s the circuit schematics of this project: We can note here that the TFT shield is blocking the free pins of the Arduino board so we need to make a custom-made pin headers which we will be able to insert them between the shield and the Arduino. Also note that for powering the Arduino we need to solder additional pin header to the 5 V pin on the shield, as the shield already uses all Arduino VCC pins. Once we connect everything together we can proceed with programing the Arduino. However, before we continue I would to suggest you to check my previous detailed tutorials for the TFT touch screen and the DS3231 Real Time Clock module. And as for the MP3 Player module I will give it a quick explanation here in this article. The BY8001-16P is a MP3 module which works with MicroSD cards and supports MP3 and WAV audio format files. The module has a built-in 3W power amplifier and can directly drive a single 3W speaker. The MP3 Player module can be button controlled using the 5 input pins or using a microcontroller via the serial communication. Note here that the serial port pins of the module work at 3.3V so the RX pin of the module needs to be connected through a 1K resistor to the Arduino TX pin. Also note the 3 ports A, B and C which are used for selecting the control modes. For controlling the module using a microcontroller the 3 resistors at these pads need to be removed. The pins number 6 and 7 can be used for directly connecting low power speakers or the pins number 4 and 5 if using external amplifier. As for the Arduino part the easiest way is to use the BY8001 library which can be downloaded from GitHub. If we open some of its demo examples we can see how it works. So after initializing the module in the setup section, we can use any of the custom-made functions for controlling the module. Now we are ready to take a look at the code of this Arduino Touch Screen MP3 Screen Music Player and Alarm Clock. As the code is a bit longer, for better understanding, I will post the source code of the program in sections with description for each section. And at the end of this article I will post the complete source code. So, first we need to include the libraries for the TFT touch screen, the BY8001-16P MP3 Player and the DS3231 Real Time Clock module, as well as, the library for the serial communication. Then we have to create the appropriate objects and define some variables needed for the program. We can note here the defining of the bitmaps. Some of the buttons of the program are actually images which are converted into bitmaps using the ImageConverter565 tool which comes with the TFT library. So, these “.c” files needs to be included in the directory of the code file so that they load when launching the sketch. Here you can download these images and “.c” files. In the setup section after initializing the objects, we call drawHomeScreen() custom function which draws all the graphics of the home screen. Also here we set the initial values of some of the variables, like the playStatus, currentTemp and Date, the initial value of the volume and so on. Next is the loop section. The first if statement is true as we have set the currentPage variable to be 0 which indicates that we are on the home screen. Here with the next if statement we check whether we have a change in the clock and this happens each second. Now as we are using the seven segment font of the TFT libraries, which doesn’t support any character except numbers, we have to extract only the numbers from the string that is coming with the getTimeStr() function for reading the clock from the DS3231 RTC module. So using the substring() function we get the hours, the minutes and seconds into separate variables and print them each time a changed has happened in the seconds, the minutes or the hours. Next, using the myTouch.dataAvailable() function we check whether we have touched the screen and also check whether it’s the Music Player or the Alarm button. So if that’s the Music Player button, first we call the drawFrame() custom function which draws a red circle around the button indicating that the button has been pressed. Also this custom function has a while loop which hold the program stacked until we release the button. Right after that, we set the currentPage variable to 1, clear the screen and call the drawMusicPlayerScreen() custom function which draws all the graphics of the Music Player screen. Similar, if we press the Alarm button we, we set the currentPage variable to 2 and clear the screen. Next, let’s see what happens in the Music Player screen. Here we are constantly checking whether we have touched the screen. If we touch the Play button and the current playStatus variable is 0, we will call the mp3.playTrackFromFolder() function which will start playing the first song from the MicroSD card. At the same time, we call the drawPauseButton() custom function which draws the Pause button and set the playStatus variable to 2. Using the next two if statements, depending on the playStatues variable, we toggle between playing and pausing the song. In similar way, for each pressed button we call the appropriate functions for playing the previous or the next track, decrease or increase the volume, as well as the “Menu” button which brings us back to the home screen. The next if statement is used for updating the track progress bar. So if the music is playing we call the trackPlayTime() custom function which using some of the Music Player library functions, like the mp3.getElapsedTrackPlaybackTime(), calculates and prints the elapsed and remained time as well as the track progress bar graphics. Using the printClock() custom function we print the clock in the upper right corner. Next is the Alarm Clock screen. Here first we draw all the graphics, the clock, the text and the buttons and also set the variable alarmNotSet to be true so that we can enter the next while loop. Here using the two buttons, H and M, we set the alarm and once we click the “Set” button the value of the alarm is stored into the alarmString variable. Note here that we need to adjust this string to have the same form as the string that we get from the getTimeString() function. In this way we will be able to compare them and activate the alarm when the clock will reach that same value or time. If we press the clear button we will clear the alarmString and if we press the menu button it will get us out of the while loop and send back to the home screen. For activating the alarm, we check whether the alarm has been set and if the alarm matches with the clock, the first song on the MicroSD card will start playing at a higher volume. Also we will draw all the graphics together with the “Dismiss” button and set the alarmOn variable to true. This will get us into the next while loop which will enable to song to keep playing until we press the “Dismiss” button. So that’s how the code works and you can find the complete source code at the bottom of the article. Using Solidworks I made the design and here’s how it looks. You can download this model so you can take the measurements here: For this project I choose to use Aluminum sheet metal which I cut it to size using a multi tool. Then on the edge of my desk and with the help of some clamps and laths I bent the sheet metal. As for the speakers, I printed a circular pattern, attached it to place and using a drill I made all of the holes. After that I cut the sides to the appropriate form and secured them to the previously bent sheet metal using a glue gun. At the end I painted the sheet metal box and it was ready for the electronics components to be attached. Again, using a glue gun I secured all of the components, connected everything together and secured the back lid of the device using two bolts. That’s all, feel free to ask any question in the comments section below. Here’s the complete source code of the device: Feel free to ask any question in the comments section below and don’t forget to check out my collection of Arduino Projects.Overview
How It Works
Circuit Schematics
BY8001-16P MP3 Player Module
Source code
#include <UTFT.h>
#include <URTouch.h>
#include <SoftwareSerial.h>
#include <BY8001.h>
#include <DS3231.h>

//==== Creating Objects
UTFT     myGLCD(SSD1289, 38, 39, 40, 41); //Parameters should be adjusted to your Display/Schield model
URTouch  myTouch( 6, 5, 4, 3, 2);


SoftwareSerial mp3Serial(11, 10);  // RX, TX
BY8001 mp3;  // creating an instance of class BY8001 and call it 'mp3'

DS3231  rtc(SDA, SCL);

//==== Defining Fonts
extern uint8_t SmallFont[];
extern uint8_t BigFont[];
extern uint8_t SevenSegNumFont[];

extern unsigned int MusicPlayerButton[0x1040];
extern unsigned int AlarmButton[0x1040];
extern unsigned int ButtonPlay[0x1AE9];
extern unsigned int ButtonPause[0x1AE9];
extern unsigned int PreviousButton[0x9C4];
extern unsigned int NextButton[0x9C4];
extern unsigned int VolumeDown[0x170];
extern unsigned int VolumeUp[0x3B8];

int x, y; // Variables for the coordinates where the display has been pressed
char currentPage, playStatus;
int iV = 15;
int trackNum = 1;
int b = 16;
int aHours = 0;
int aMinutes = 0;
boolean alarmNotSet = true;
String alarmString = "";
float currentTemperature, temperature;
static word totalTime, elapsedTime, playback, minutes, seconds, lastSeconds, minutesR, secondsR;
String currentClock, currentHours, currentMinutes, currentSeconds, currentDate;
String timeString, hoursString, minutesString, secondsString, hoursS, minutesS, secondsS, dateS;Code language: Arduino (arduino)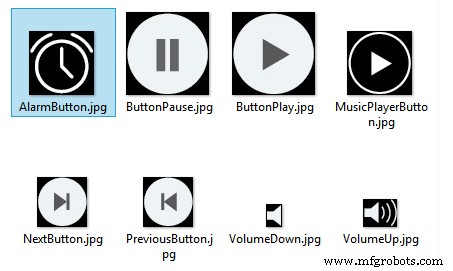
void setup() {
  // Initiate display
  myGLCD.InitLCD();
  myGLCD.clrScr();
  myTouch.InitTouch();
  myTouch.setPrecision(PREC_MEDIUM);

  // Initialize the rtc object
  rtc.begin();

  // Music
  Serial.begin(9600);  // set serial monitor baud rate to Arduino IDE
  mp3Serial.begin(9600);  // BY8001 set to 9600 baud (required)
  mp3.setup(mp3Serial); // tell BY8001 library which serial port to use.
  delay(800);  // allow time for BY8001 cold boot; may adjust depending on flash storage size

  drawHomeScreen();  // Draws the Home Screen
  currentPage = '0'; // Indicates that we are at Home Screen
  playStatus = '0';

  mp3.setVolume(15);
  delay(100);
  currentTemperature = rtc.getTemp();
  currentDate = rtc.getDateStr();
  currentClock = rtc.getTimeStr();
  timeString = rtc.getTimeStr();
  currentHours = timeString.substring(0, 2);
  currentMinutes = timeString.substring(3, 5);
  currentSeconds = timeString.substring(6, 8);
}Code language: Arduino (arduino)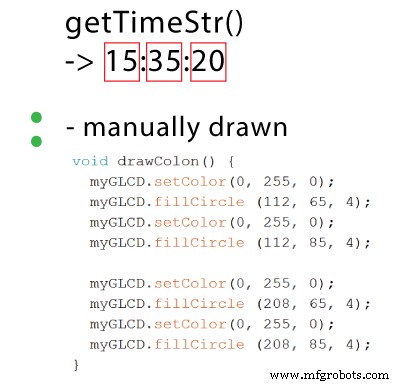
As for the date and temperature, similar, we check whether there is a change compared to the previous state.void loop() {
// Homes Screen
if (currentPage == '0') {
// Checks for change of the clock
if ( currentClock != rtc.getTimeStr()) {
timeString = rtc.getTimeStr();
hoursS = timeString.substring(0, 2);
minutesS = timeString.substring(3, 5);
secondsS = timeString.substring(6, 8);
myGLCD.setFont(SevenSegNumFont);
myGLCD.setColor(0, 255, 0);
myGLCD.print(secondsS, 224, 50);
if ( currentMinutes != minutesS ) {
myGLCD.print(minutesS, 128, 50);
currentMinutes = minutesS;
}
if ( currentHours != hoursS ) {
myGLCD.print(hoursS, 32, 50);
currentHours = hoursS;
}
// Checks for change of the date
dateS = rtc.getDateStr();
delay(10);
if ( currentDate != dateS){
myGLCD.setColor(255, 255, 255); // Sets color to white
myGLCD.setFont(BigFont); // Sets font to big
myGLCD.print(rtc.getDateStr(), 153, 7);
}
// Checks for change of the temperature
temperature = rtc.getTemp();
delay(10);
if ( currentTemperature != temperature ){
myGLCD.setColor(255, 255, 255); // Sets color to white
myGLCD.setFont(BigFont); // Sets font to big
myGLCD.printNumI(temperature, 39, 7);
currentTemperature = temperature;
}
delay(10);
currentClock = rtc.getTimeStr();
}Code language: Arduino (arduino)// Checks whether the screen has been touched
if (myTouch.dataAvailable()) {
myTouch.read();
x = myTouch.getX(); // X coordinate where the screen has been pressed
y = myTouch.getY(); // Y coordinates where the screen has been pressed
// If we press the Music Player Button
if ((x >= 55) && (x <= 120) && (y >= 125) && (y <= 190)) {
drawFrame(87, 157, 33);
currentPage = '1';
myGLCD.clrScr();
delay(100);
drawMusicPlayerScreen();
delay(100);
}
// If we press the Alarm Button
if ((x >= 195) && (x <= 260) && (y >= 125) && (y <= 190)) {
drawFrame(227, 160, 29);
currentPage = '2';
myGLCD.clrScr();
}
}Code language: Arduino (arduino)// Music Player Screen
if (currentPage == '1') {
if (myTouch.dataAvailable()) {
myTouch.read();
x = myTouch.getX(); // X coordinate where the screen has been pressed
y = myTouch.getY(); // Y coordinates where the screen has been pressed
// If we press the Play Button
if ((x >= 116) && (x <= 204) && (y >= 77) && (y <= 165)) {
if (playStatus == '0') {
drawFrame(159, 121, 42);
drawPauseButton();
mp3.playTrackFromFolder(00, 001);
delay(100);
playStatus = '2';
return;
}
if (playStatus == '1') {
drawFrame(159, 121, 42);
drawPauseButton();
mp3.play();
delay(100);
playStatus = '2';
return;
}
if (playStatus == '2') {
drawFrame(159, 121, 42);
drawPlayButton();
mp3.pause();
delay(100);
playStatus = '1';
return;
}
}Code language: Arduino (arduino)// If we press the Previous Button
if ((x >= 45) && (x <= 95) && (y >= 97) && (y <= 147)) {
drawFrame(70, 121, 26);
mp3.previousTrack();
delay(100);
drawTrackBar();
}
// If we press the Next Button
if ((x >= 227) && (x <= 277) && (y >= 97) && (y <= 147)) {
drawFrame(252, 122, 26);
mp3.nextTrack();
delay(100);
drawTrackBar();
}
// If we press the VolumeDown Button
if ((x >= 35) && (x <= 75) && (y >= 165) && (y <= 209)) {
drawUnderline(45, 205, 65, 205);
if (iV >= 0 & iV <= 30) {
iV--;
drawVolume(iV);
}
mp3.decreaseVolume();
delay(100);
}
// If we press the VolumeUp Button
if ((x >= 230) && (x <= 280) && (y >= 165) && (y <= 209)) {
drawUnderline(235, 205, 275, 205);
if (iV >= 0 & iV <= 30) {
iV++;
drawVolume(iV);
}
mp3.increaseVolume();
delay(100);
}
// If we press the MENU Button
if ((x >= 0) && (x <= 75) && (y >= 0) && (y <= 30)) {
myGLCD.clrScr();
drawHomeScreen(); // Draws the Home Screen
currentPage = '0';
return;
}Code language: Arduino (arduino)// Updates the track bar
if (playStatus == '1' || playStatus == '2') {
trackPlayTime();
}
// Updates the track bar
void trackPlayTime() {
totalTime = mp3.getTotalTrackPlaybackTime();
delay(10);
elapsedTime = mp3.getElapsedTrackPlaybackTime();
delay(10);
minutes = (int)elapsedTime / 60;
seconds = (((float)elapsedTime / 60) - minutes) * 60;
playback = totalTime - elapsedTime;
minutesR = (int)playback / 60;
secondsR = (((float)playback / 60) - minutesR) * 60;
myGLCD.setFont(SmallFont);
myGLCD.setColor(255, 255, 255);
myGLCD.printNumI(minutes, 8, 48);
myGLCD.print(":", 16, 48);
myGLCD.printNumI((int)seconds, 24, 48, 2, '0');
myGLCD.print("-", 276, 48);
myGLCD.printNumI(minutesR, 284, 48);
myGLCD.print(":", 292, 48);
myGLCD.printNumI((int)secondsR, 300, 48, 2, '0');
int trackBarX = map(elapsedTime, 0, totalTime, 0, 224);
myGLCD.setColor(255, 0, 0);
myGLCD.fillRect (48, 50, 48 + trackBarX, 50 + 8);
if (totalTime == elapsedTime) {
mp3.nextTrack();
delay(30);
myGLCD.setColor(255, 255, 255);
myGLCD.fillRect (48, 50, 48 + 224, 50 + 8);
}
}Code language: Arduino (arduino)// Alarm Clock Screen
if (currentPage == '2') {
myGLCD.setFont(BigFont);
myGLCD.setColor(255, 255, 255);
myGLCD.print("MENU", 5, 5);
myGLCD.print("Set Alarm", CENTER, 20);
// Draws a colon between the hours and the minutes
myGLCD.setColor(0, 255, 0);
myGLCD.fillCircle (112, 65, 4);
myGLCD.setColor(0, 255, 0);
myGLCD.fillCircle (112, 85, 4);
myGLCD.setFont(SevenSegNumFont);
myGLCD.setColor(0, 255, 0);
myGLCD.printNumI(aHours, 32, 50, 2, '0');
myGLCD.printNumI(aMinutes, 128, 50, 2, '0');
myGLCD.setColor(255, 255, 255);
myGLCD.drawRoundRect (42, 115, 82, 145);
myGLCD.drawRoundRect (138, 115, 178, 145);
myGLCD.setFont(BigFont);
myGLCD.print("H", 54, 122);
myGLCD.print("M", 150, 122);
myGLCD.drawRoundRect (215, 60, 303, 90);
myGLCD.print("SET", 236, 67);
myGLCD.drawRoundRect (215, 115, 303, 145);
myGLCD.print("CLEAR", 220, 122);
alarmNotSet = true;
while (alarmNotSet){
if (myTouch.dataAvailable()) {
myTouch.read();
x = myTouch.getX(); // X coordinate where the screen has been pressed
y = myTouch.getY(); // Y coordinates where the screen has been pressed
//Set hours button
if ((x >= 42) && (x <= 82) && (y >= 115) && (y <= 145)) {
drawRectFrame(42, 115, 82, 145);
aHours++;
if(aHours >=24){
aHours = 0;
}
myGLCD.setFont(SevenSegNumFont);
myGLCD.setColor(0, 255, 0);
myGLCD.printNumI(aHours, 32, 50, 2, '0');
}
// Set minutes buttons
if ((x >= 138) && (x <= 178) && (y >= 115) && (y <= 145)) {
drawRectFrame(138, 115, 178, 145);
aMinutes++;
if(aMinutes >=60){
aMinutes = 0;
}
myGLCD.setFont(SevenSegNumFont);
myGLCD.setColor(0, 255, 0);
myGLCD.printNumI(aMinutes, 128, 50, 2, '0');
}
// Set alarm button
if ((x >= 215) && (x <= 303) && (y >= 60) && (y <= 80)) {
drawRectFrame(215, 60, 303, 90);
if (aHours < 10 && aMinutes < 10){
alarmString = "0"+(String)aHours + ":" + "0"+ (String)aMinutes + ":" + "00";
}
else if (aHours < 10 && aMinutes > 9){
alarmString = "0"+(String)aHours + ":" + (String)aMinutes + ":" + "00";
}
else if (aHours > 9 && aMinutes < 10){
alarmString = (String)aHours + ":" + "0"+ (String)aMinutes + ":" + "00";
}
else {
alarmString = (String)aHours + ":" + (String)aMinutes + ":" + "00";
}
myGLCD.setFont(BigFont);
myGLCD.print("Alarm set for:", CENTER, 165);
myGLCD.print(alarmString, CENTER, 191);
}
// Clear alarm button
if ((x >= 215) && (x <= 303) && (y >= 115) && (y <= 145)) {
drawRectFrame(215, 115, 303, 145);
alarmString="";
myGLCD.setColor(0, 0, 0);
myGLCD.fillRect(45, 165, 275, 210);
}
// If we press the MENU Button
if ((x >= 0) && (x <= 75) && (y >= 0) && (y <= 30)) {
alarmNotSet = false;
currentPage = '0';
myGLCD.clrScr();
drawHomeScreen(); // Draws the Home Screen
}
}
}
}Code language: Arduino (arduino)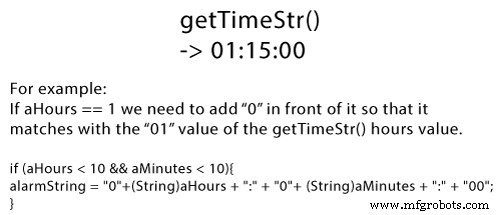
// Alarm activation
if (alarmNotSet == false) {
if (alarmString == rtc.getTimeStr()){
myGLCD.clrScr();
mp3.setVolume(25);
mp3.playTrackByIndexNumber(1);
delay(100);
myGLCD.setFont(BigFont);
myGLCD.setColor(255, 255, 255);
myGLCD.print("ALARM", CENTER, 90);
myGLCD.drawBitmap (127, 10, 65, 64, AlarmButton);
myGLCD.print(alarmString, CENTER, 114);
myGLCD.drawRoundRect (94, 146, 226, 170);
myGLCD.print("DISMISS", CENTER, 150);
boolean alarmOn = true;
while (alarmOn){
if (myTouch.dataAvailable()) {
myTouch.read();
x = myTouch.getX(); // X coordinate where the screen has been pressed
y = myTouch.getY(); // Y coordinates where the screen has been pressed
// Stop alarm button
if ((x >= 94) && (x <= 226) && (y >= 146) && (y <= 170)) {
drawRectFrame(94, 146, 226, 170);
alarmOn = false;
alarmString="";
myGLCD.clrScr();
mp3.stopPlayback();
delay(100);
currentPage = '0';
playStatus = '0';
mp3.setVolume(15);
drawHomeScreen();
}
}
}
}
}Code language: Arduino (arduino)Building the device

/*
* Arduino Touch Screen MP3 Music Player and Alarm Clock
*
* Crated by Dejan Nedelkovski,
* www.HowToMechatronics.com
*
* UFTF, URTouch and DS3231 libraries made by Henning Karlsen which can be found and downloaded from his website, www.rinkydinkelectronics.com.
* BY8001 MP3 Player Library made by borland of Arduino forum, Released in public domain. Dowload link: https://github.com/r0ndL/BY8001
*/
#include <UTFT.h>
#include <URTouch.h>
#include <SoftwareSerial.h>
#include <BY8001.h>
#include <DS3231.h>
//==== Creating Objects
UTFT myGLCD(SSD1289, 38, 39, 40, 41); //Parameters should be adjusted to your Display/Schield model
URTouch myTouch( 6, 5, 4, 3, 2);
SoftwareSerial mp3Serial(11, 10); // RX, TX
BY8001 mp3; // creating an instance of class BY8001 and call it 'mp3'
DS3231 rtc(SDA, SCL);
//==== Defining Fonts
extern uint8_t SmallFont[];
extern uint8_t BigFont[];
extern uint8_t SevenSegNumFont[];
extern unsigned int MusicPlayerButton[0x1040];
extern unsigned int AlarmButton[0x1040];
extern unsigned int ButtonPlay[0x1AE9];
extern unsigned int ButtonPause[0x1AE9];
extern unsigned int PreviousButton[0x9C4];
extern unsigned int NextButton[0x9C4];
extern unsigned int VolumeDown[0x170];
extern unsigned int VolumeUp[0x3B8];
int x, y; // Variables for the coordinates where the display has been pressed
char currentPage, playStatus;
int iV = 15;
int trackNum = 1;
int b = 16;
int aHours = 0;
int aMinutes = 0;
boolean alarmNotSet = true;
String alarmString = "";
float currentTemperature, temperature;
static word totalTime, elapsedTime, playback, minutes, seconds, lastSeconds, minutesR, secondsR;
String currentClock, currentHours, currentMinutes, currentSeconds, currentDate;
String timeString, hoursString, minutesString, secondsString, hoursS, minutesS, secondsS, dateS;
void setup() {
// Initiate display
myGLCD.InitLCD();
myGLCD.clrScr();
myTouch.InitTouch();
myTouch.setPrecision(PREC_MEDIUM);
// Initialize the rtc object
rtc.begin();
// Music
Serial.begin(9600); // set serial monitor baud rate to Arduino IDE
mp3Serial.begin(9600); // BY8001 set to 9600 baud (required)
mp3.setup(mp3Serial); // tell BY8001 library which serial port to use.
delay(800); // allow time for BY8001 cold boot; may adjust depending on flash storage size
drawHomeScreen(); // Draws the Home Screen
currentPage = '0'; // Indicates that we are at Home Screen
playStatus = '0';
mp3.setVolume(15);
delay(100);
currentTemperature = rtc.getTemp();
currentDate = rtc.getDateStr();
currentClock = rtc.getTimeStr();
timeString = rtc.getTimeStr();
currentHours = timeString.substring(0, 2);
currentMinutes = timeString.substring(3, 5);
currentSeconds = timeString.substring(6, 8);
}
void loop() {
// Homes Screen
if (currentPage == '0') {
// Checks for change of the clock
if ( currentClock != rtc.getTimeStr()) {
timeString = rtc.getTimeStr();
hoursS = timeString.substring(0, 2);
minutesS = timeString.substring(3, 5);
secondsS = timeString.substring(6, 8);
myGLCD.setFont(SevenSegNumFont);
myGLCD.setColor(0, 255, 0);
myGLCD.print(secondsS, 224, 50);
if ( currentMinutes != minutesS ) {
myGLCD.print(minutesS, 128, 50);
currentMinutes = minutesS;
}
if ( currentHours != hoursS ) {
myGLCD.print(hoursS, 32, 50);
currentHours = hoursS;
}
// Checks for change of the date
dateS = rtc.getDateStr();
delay(10);
if ( currentDate != dateS){
myGLCD.setColor(255, 255, 255); // Sets color to white
myGLCD.setFont(BigFont); // Sets font to big
myGLCD.print(rtc.getDateStr(), 153, 7);
}
// Checks for change of the temperature
temperature = rtc.getTemp();
delay(10);
if ( currentTemperature != temperature ){
myGLCD.setColor(255, 255, 255); // Sets color to white
myGLCD.setFont(BigFont); // Sets font to big
myGLCD.printNumI(temperature, 39, 7);
currentTemperature = temperature;
}
delay(10);
currentClock = rtc.getTimeStr();
}
// Checks whether the screen has been touched
if (myTouch.dataAvailable()) {
myTouch.read();
x = myTouch.getX(); // X coordinate where the screen has been pressed
y = myTouch.getY(); // Y coordinates where the screen has been pressed
// If we press the Music Player Button
if ((x >= 55) && (x <= 120) && (y >= 125) && (y <= 190)) {
drawFrame(87, 157, 33);
currentPage = '1';
myGLCD.clrScr();
delay(100);
drawMusicPlayerScreen();
delay(100);
}
// If we press the Alarm Button
if ((x >= 195) && (x <= 260) && (y >= 125) && (y <= 190)) {
drawFrame(227, 160, 29);
currentPage = '2';
myGLCD.clrScr();
}
}
}
// Music Player Screen
if (currentPage == '1') {
if (myTouch.dataAvailable()) {
myTouch.read();
x = myTouch.getX(); // X coordinate where the screen has been pressed
y = myTouch.getY(); // Y coordinates where the screen has been pressed
// If we press the Play Button
if ((x >= 116) && (x <= 204) && (y >= 77) && (y <= 165)) {
if (playStatus == '0') {
drawFrame(159, 121, 42);
drawPauseButton();
mp3.playTrackFromFolder(00, 001);
delay(100);
playStatus = '2';
return;
}
if (playStatus == '1') {
drawFrame(159, 121, 42);
drawPauseButton();
mp3.play();
delay(100);
playStatus = '2';
return;
}
if (playStatus == '2') {
drawFrame(159, 121, 42);
drawPlayButton();
mp3.pause();
delay(100);
playStatus = '1';
return;
}
}
// If we press the Previous Button
if ((x >= 45) && (x <= 95) && (y >= 97) && (y <= 147)) {
drawFrame(70, 121, 26);
mp3.previousTrack();
delay(100);
drawTrackBar();
}
// If we press the Next Button
if ((x >= 227) && (x <= 277) && (y >= 97) && (y <= 147)) {
drawFrame(252, 122, 26);
mp3.nextTrack();
delay(100);
drawTrackBar();
}
// If we press the VolumeDown Button
if ((x >= 35) && (x <= 75) && (y >= 165) && (y <= 209)) {
drawUnderline(45, 205, 65, 205);
if (iV >= 0 & iV <= 30) {
iV--;
drawVolume(iV);
}
mp3.decreaseVolume();
delay(100);
}
// If we press the VolumeUp Button
if ((x >= 230) && (x <= 280) && (y >= 165) && (y <= 209)) {
drawUnderline(235, 205, 275, 205);
if (iV >= 0 & iV <= 30) {
iV++;
drawVolume(iV);
}
mp3.increaseVolume();
delay(100);
}
// If we press the MENU Button
if ((x >= 0) && (x <= 75) && (y >= 0) && (y <= 30)) {
myGLCD.clrScr();
drawHomeScreen(); // Draws the Home Screen
currentPage = '0';
return;
}
}
// Updates the track bar
    if (playStatus == '1' || playStatus == '2') {
      trackPlayTime();
    }
// Printing the clock in the upper right corner
myGLCD.setFont(BigFont);
myGLCD.setColor(255, 255, 255);
printClock(187, 5);
}
// Alarm Clock Screen
if (currentPage == '2') {
myGLCD.setFont(BigFont);
myGLCD.setColor(255, 255, 255);
myGLCD.print("MENU", 5, 5);
myGLCD.print("Set Alarm", CENTER, 20);
// Draws a colon between the hours and the minutes
myGLCD.setColor(0, 255, 0);
myGLCD.fillCircle (112, 65, 4);
myGLCD.setColor(0, 255, 0);
myGLCD.fillCircle (112, 85, 4);
myGLCD.setFont(SevenSegNumFont);
myGLCD.setColor(0, 255, 0);
myGLCD.printNumI(aHours, 32, 50, 2, '0');
myGLCD.printNumI(aMinutes, 128, 50, 2, '0');
myGLCD.setColor(255, 255, 255);
myGLCD.drawRoundRect (42, 115, 82, 145);
myGLCD.drawRoundRect (138, 115, 178, 145);
myGLCD.setFont(BigFont);
myGLCD.print("H", 54, 122);
myGLCD.print("M", 150, 122);
myGLCD.drawRoundRect (215, 60, 303, 90);
myGLCD.print("SET", 236, 67);
myGLCD.drawRoundRect (215, 115, 303, 145);
myGLCD.print("CLEAR", 220, 122);
alarmNotSet = true;
while (alarmNotSet){
if (myTouch.dataAvailable()) {
myTouch.read();
x = myTouch.getX(); // X coordinate where the screen has been pressed
y = myTouch.getY(); // Y coordinates where the screen has been pressed
//Set hours button
if ((x >= 42) && (x <= 82) && (y >= 115) && (y <= 145)) {
drawRectFrame(42, 115, 82, 145);
aHours++;
if(aHours >=24){
aHours = 0;
}
myGLCD.setFont(SevenSegNumFont);
myGLCD.setColor(0, 255, 0);
myGLCD.printNumI(aHours, 32, 50, 2, '0');
}
// Set minutes buttons
if ((x >= 138) && (x <= 178) && (y >= 115) && (y <= 145)) {
drawRectFrame(138, 115, 178, 145);
aMinutes++;
if(aMinutes >=60){
aMinutes = 0;
}
myGLCD.setFont(SevenSegNumFont);
myGLCD.setColor(0, 255, 0);
myGLCD.printNumI(aMinutes, 128, 50, 2, '0');
}
// Set alarm button
if ((x >= 215) && (x <= 303) && (y >= 60) && (y <= 80)) {
drawRectFrame(215, 60, 303, 90);
if (aHours < 10 && aMinutes < 10){
alarmString = "0"+(String)aHours + ":" + "0"+ (String)aMinutes + ":" + "00";
}
else if (aHours < 10 && aMinutes > 9){
alarmString = "0"+(String)aHours + ":" + (String)aMinutes + ":" + "00";
}
else if (aHours > 9 && aMinutes < 10){
alarmString = (String)aHours + ":" + "0"+ (String)aMinutes + ":" + "00";
}
else {
alarmString = (String)aHours + ":" + (String)aMinutes + ":" + "00";
}
myGLCD.setFont(BigFont);
myGLCD.print("Alarm set for:", CENTER, 165);
myGLCD.print(alarmString, CENTER, 191);
}
// Clear alarm button
if ((x >= 215) && (x <= 303) && (y >= 115) && (y <= 145)) {
drawRectFrame(215, 115, 303, 145);
alarmString="";
myGLCD.setColor(0, 0, 0);
myGLCD.fillRect(45, 165, 275, 210);
}
// If we press the MENU Button
if ((x >= 0) && (x <= 75) && (y >= 0) && (y <= 30)) {
alarmNotSet = false;
currentPage = '0';
myGLCD.clrScr();
drawHomeScreen(); // Draws the Home Screen
}
}
}
}
// Alarm activation
if (alarmNotSet == false) {
if (alarmString == rtc.getTimeStr()){
myGLCD.clrScr();
mp3.setVolume(25);
mp3.playTrackByIndexNumber(1);
delay(100);
myGLCD.setFont(BigFont);
myGLCD.setColor(255, 255, 255);
myGLCD.print("ALARM", CENTER, 90);
myGLCD.drawBitmap (127, 10, 65, 64, AlarmButton);
myGLCD.print(alarmString, CENTER, 114);
myGLCD.drawRoundRect (94, 146, 226, 170);
myGLCD.print("DISMISS", CENTER, 150);
boolean alarmOn = true;
while (alarmOn){
if (myTouch.dataAvailable()) {
myTouch.read();
x = myTouch.getX(); // X coordinate where the screen has been pressed
y = myTouch.getY(); // Y coordinates where the screen has been pressed
// Stop alarm button
if ((x >= 94) && (x <= 226) && (y >= 146) && (y <= 170)) {
drawRectFrame(94, 146, 226, 170);
alarmOn = false;
alarmString="";
myGLCD.clrScr();
mp3.stopPlayback();
delay(100);
currentPage = '0';
playStatus = '0';
mp3.setVolume(15);
drawHomeScreen();
}
}
}
}
}
}
void drawHomeScreen() {
myGLCD.setBackColor(0, 0, 0); // Sets the background color of the area where the text will be printed to black
myGLCD.setColor(255, 255, 255); // Sets color to white
myGLCD.setFont(BigFont); // Sets font to big
myGLCD.print(rtc.getDateStr(), 153, 7);
myGLCD.print("T:", 7, 7);
myGLCD.printNumI(rtc.getTemp(), 39, 7);
myGLCD.print("C", 82, 7);
myGLCD.setFont(SmallFont);
myGLCD.print("o", 74, 5);
if (alarmString == "" ) {
myGLCD.setColor(255, 255, 255);
myGLCD.print("by www.HowToMechatronics.com", CENTER, 215);
}
else {
myGLCD.setColor(255, 255, 255);
myGLCD.print("Alarm set for: ", 68, 215);
myGLCD.print(alarmString, 188, 215);
}
drawMusicPlayerButton();
drawAlarmButton();
drawHomeClock();
}
void drawMusicPlayerScreen() {
// Title
myGLCD.setBackColor(0, 0, 0); // Sets the background color of the area where the text will be printed to black
myGLCD.setColor(255, 255, 255); // Sets color to white
myGLCD.setFont(BigFont); // Sets font to big
myGLCD.print("MENU", 5, 5); // Prints the string on the screen
myGLCD.setColor(255, 0, 0); // Sets color to red
myGLCD.drawLine(0, 26, 319, 26); // Draws the red line
myGLCD.setColor(255, 255, 255); // Sets color to white
myGLCD.setFont(SmallFont); // Sets font to big
myGLCD.print("by www.HowToMechatronics.com", CENTER, 215); // Prints the string on the screen
// Volume Bar
myGLCD.setColor(255, 255, 255);
myGLCD.fillRect (78, 184, 78 + 150, 184 + 8);
myGLCD.setColor(240, 196, 30);
myGLCD.fillRect (78, 184, 78 + 75, 184 + 8);
// Track Bar
myGLCD.setColor(255, 255, 255);
myGLCD.fillRect (48, 50, 48 + 224, 50 + 8);
myGLCD.setFont(SmallFont);
myGLCD.setColor(255, 255, 255);
myGLCD.print("0:00", 8, 48);
myGLCD.print("-0:00", 276, 48);
drawPlayButton();
if (playStatus == '2') {
drawPauseButton();
}
drawPreviousButton();
drawNextButton();
drawVolumeDown();
drawVolumeUp();
}
void drawMusicPlayerButton() {
myGLCD.drawBitmap (55, 125, 65, 64, MusicPlayerButton);
}
void drawAlarmButton() {
myGLCD.drawBitmap (195, 125, 65, 64, AlarmButton);
}
void drawPlayButton() {
myGLCD.drawBitmap (118, 79, 83, 83, ButtonPlay);
}
void drawPauseButton() {
myGLCD.drawBitmap (118, 79, 83, 83, ButtonPause);
}
void drawNextButton() {
myGLCD.drawBitmap (227, 97, 50, 50, NextButton);
}
void drawPreviousButton() {
myGLCD.drawBitmap (45, 97, 50, 50, PreviousButton);
}
void drawVolumeDown() {
myGLCD.drawBitmap (50, 177, 16, 23, VolumeDown);
}
void drawVolumeUp() {
myGLCD.drawBitmap (241, 175, 34, 28, VolumeUp);
}
// check for if Mp3 Player is stopped
bool checkFor_mp3IsStopped() {
if (mp3Serial.available() > 0) {
if (mp3.getPlaybackStatus() == 0) {
return true;
}
}
else return false;
}
// Highlights the button when pressed
void drawFrame(int x, int y, int r) {
myGLCD.setColor(255, 0, 0);
myGLCD.drawCircle (x, y, r);
while (myTouch.dataAvailable())
myTouch.read();
myGLCD.setColor(0, 0, 0);
myGLCD.drawCircle (x, y, r);
}
void drawRectFrame(int x1, int y1, int x2, int y2) {
myGLCD.setColor(255, 0, 0);
myGLCD.drawRoundRect (x1, y1, x2, y2);
while (myTouch.dataAvailable())
myTouch.read();
myGLCD.setColor(255, 255, 255);
myGLCD.drawRoundRect (x1, y1, x2, y2);
}
void drawUnderline(int x1, int y1, int x2, int y2) {
myGLCD.setColor(255, 0, 0);
myGLCD.drawLine (x1, y1, x2, y2);
while (myTouch.dataAvailable())
myTouch.read();
myGLCD.setColor(0, 0, 0);
myGLCD.drawLine (x1, y1, x2, y2);
}
// Sound bar
void drawVolume(int x) {
myGLCD.setColor(255, 255, 255);
myGLCD.fillRect (78 + 5 * x, 184, 78 + 150, 184 + 8);
myGLCD.setColor(240, 196, 30);
myGLCD.fillRect (78, 184, 78 + 5 * x, 184 + 8);
}
// Clears the track bar
void drawTrackBar() {
myGLCD.setColor(255, 255, 255);
myGLCD.fillRect (48, 50, 48 + 224, 50 + 8);
}
// Updates the track bar
void trackPlayTime() {
totalTime = mp3.getTotalTrackPlaybackTime();
delay(10);
elapsedTime = mp3.getElapsedTrackPlaybackTime();
delay(10);
minutes = (int)elapsedTime / 60;
seconds = (((float)elapsedTime / 60) - minutes) * 60;
playback = totalTime - elapsedTime;
minutesR = (int)playback / 60;
secondsR = (((float)playback / 60) - minutesR) * 60;
myGLCD.setFont(SmallFont);
myGLCD.setColor(255, 255, 255);
myGLCD.printNumI(minutes, 8, 48);
myGLCD.print(":", 16, 48);
myGLCD.printNumI((int)seconds, 24, 48, 2, '0');
myGLCD.print("-", 276, 48);
myGLCD.printNumI(minutesR, 284, 48);
myGLCD.print(":", 292, 48);
myGLCD.printNumI((int)secondsR, 300, 48, 2, '0');
int trackBarX = map(elapsedTime, 0, totalTime, 0, 224);
myGLCD.setColor(255, 0, 0);
myGLCD.fillRect (48, 50, 48 + trackBarX, 50 + 8);
if (totalTime == elapsedTime) {
mp3.nextTrack();
delay(30);
myGLCD.setColor(255, 255, 255);
myGLCD.fillRect (48, 50, 48 + 224, 50 + 8);
}
}
void printClock(int x, int y) {
if ( currentClock != rtc.getTimeStr()) {
myGLCD.print(rtc.getTimeStr(), x, y);
currentClock = rtc.getTimeStr();
}
}
void drawColon() {
myGLCD.setColor(0, 255, 0);
myGLCD.fillCircle (112, 65, 4);
myGLCD.setColor(0, 255, 0);
myGLCD.fillCircle (112, 85, 4);
myGLCD.setColor(0, 255, 0);
myGLCD.fillCircle (208, 65, 4);
myGLCD.setColor(0, 255, 0);
myGLCD.fillCircle (208, 85, 4);
}
void drawHomeClock() {
timeString = rtc.getTimeStr();
currentHours = timeString.substring(0, 2);
currentMinutes = timeString.substring(3, 5);
currentSeconds = timeString.substring(6, 8);
myGLCD.setFont(SevenSegNumFont);
myGLCD.setColor(0, 255, 0);
myGLCD.print(currentSeconds, 224, 50);
myGLCD.print(currentMinutes, 128, 50);
myGLCD.print(currentHours, 32, 50);
drawColon();
}Code language: Arduino (arduino)
Manufacturing process
- Build a Custom LED Master Clock with Alarm – Viewable from 12 Meters
- Arduino Temperature Monitor & Real-Time Clock Using a 3.2” TFT Display
- TM1637 Digital Clock with Time Setup & Alarm – Arduino Nano Prototype
- Arduino Tic Tac Toe with MAX7219 LED Matrix and Cardboard Enclosure
- eDOT: Precision Arduino Clock & Weather Station with Built‑In IR Remote
- Create Musical Tones with Arduino: A Step‑by‑Step Guide
- Build a Reliable Alarm Clock with DS1302 RTC and Arduino UNO
- Mastering Arduino with DS3231 RTC: Step‑by‑Step Tutorial
- Arduino TFT LCD Touch Screen Tutorial – Step‑by‑Step Guide
- Build an Arduino Security & Alarm System – Step-by-Step Tutorial