


Build an Arduino Color Sorter: Simple Guide with TCS3200 & Servos
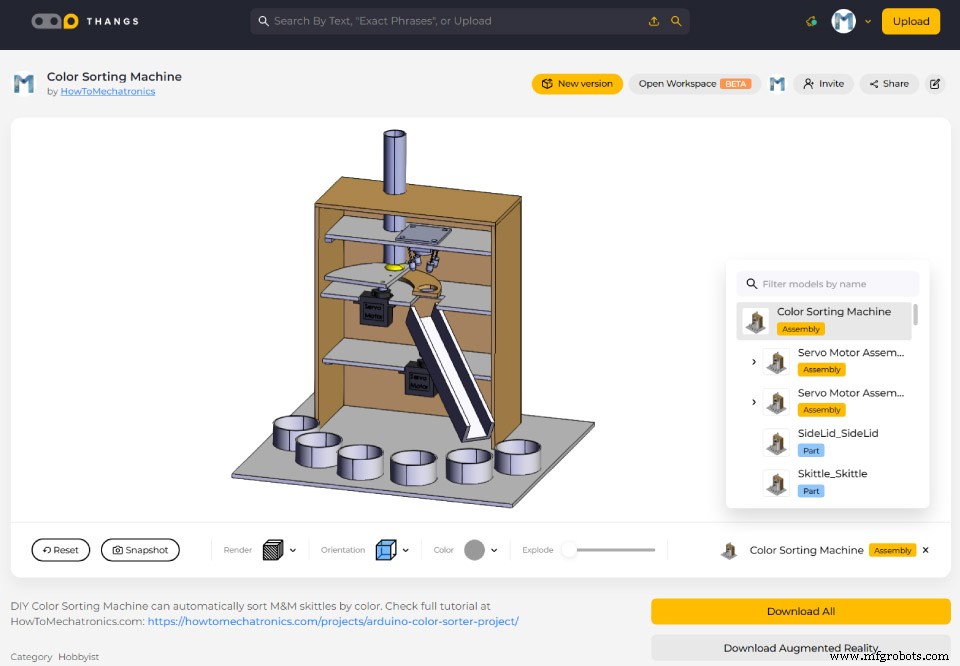
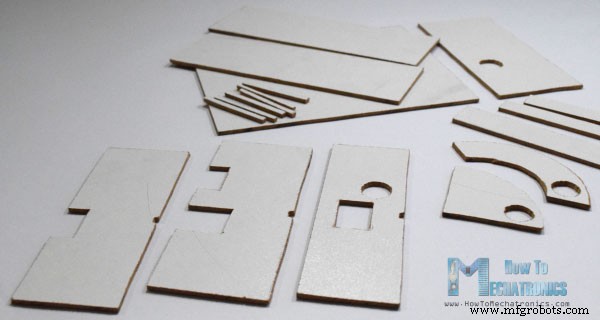
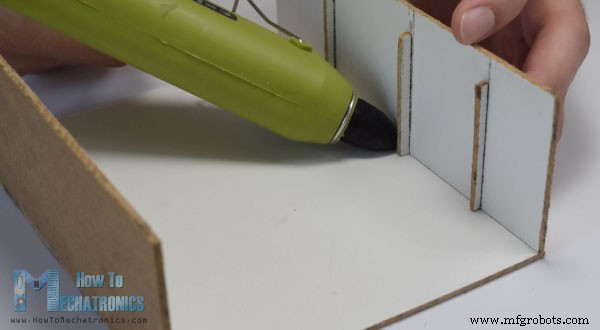
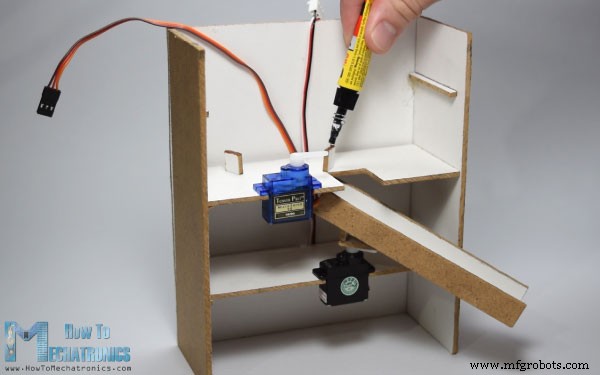
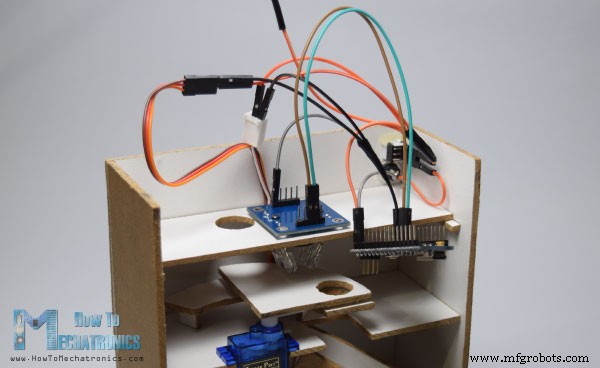
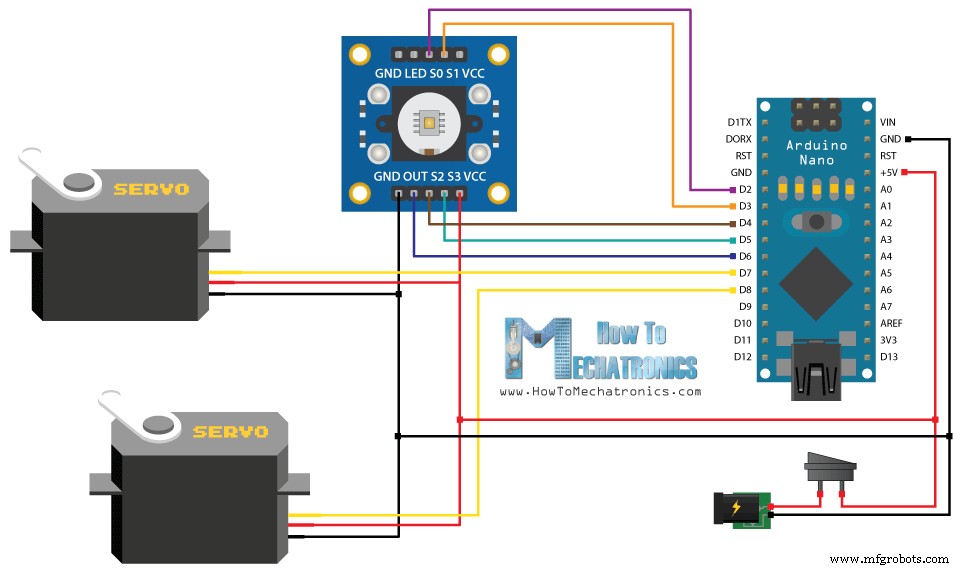
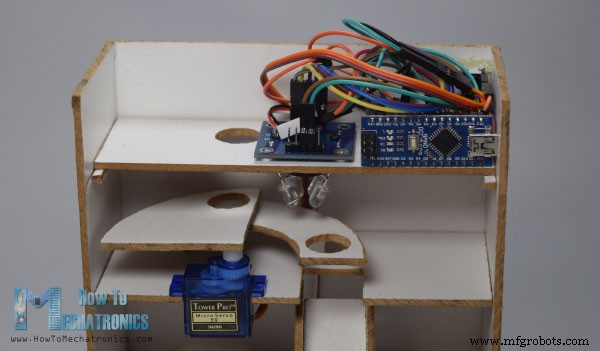
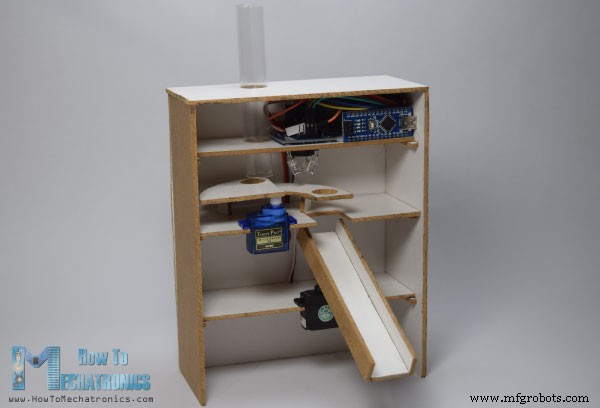
In this article I will show you how you can make an Arduino Color Sorter. You can watch the following video or read the written article below. All we need for this Arduino project is one color sensor (TCS3200) and two hobbyist servo motors, which makes this project quite simple but yet very fun to build it. In the first place, using the Solidworks 3D modeling software I made the design of the color sorter and here’s its working principle: Here you can download the 3D model, as well as, the drawings with all dimensions needed for building this Arduino project. You can find and download this 3D model, as well as explore it in your browser on Thangs. Download the assembly 3D model at Thangs. The following drawings can be used for laser cutting all the parts for the case: The material that I used for this project is a 3 mm tick fiberboard. I redraw the parts on the fiberboard according to the drawings and using a small hand saw cut all the parts to size. Once I got all the parts ready, I started assembling them. First I assembled the outer parts using a glue gun. Then using all-purpose glue I glued the two servo motors on their platforms and attached them to the assembly. After that again using a glue I attached the guide rail on the bottom servo motor as well as the support and the platform needed for the top servo motor. Next, I inserted a switch and a power jack for powering the Arduino with a 5V adapter and on the third platform I inserted the color sensor. I connected the components together according to the following circuit schematics. You can get the components needed for this Arduino Project from links below: At this point, first we need to program the Arduino and then finish the assembly. Here’s the Arduino Code: Description of the code: So, we need to include the “Servo.h” library, define the pins to which the color sensor will be connected, create the servo objects and declare some variables needed for the program. In the setup section we need to define the pins as Outputs and Inputs, set the frequency-scaling for the color sensor, define the servo pins and start the serial communication for printing the results of the color read on the serial monitor. In the loop section, our program starts with moving the top servo motor to the position of the skittle charger. Note that this value of 115 suits to my parts and my servo motor, so you should adjust this value as well as the following values for the servo motors according to your build. Next using the “for” loop we will rotate and bring the skittle to the position of the color sensor. We are using a “for” loop so that we can control the speed of the rotation by changing the delay time in loop. Next, after half a second delay, using the custom made function, readColor() we will read the color of the skittle. Here’s the code of the custom function. Using the four control pins and the frequency output pin of the color sensor we read color of the skittle. The sensor reads 3 different values for each skittle, Red, Green and Blue and according to these values we tell what the actual color is. For more details how the TCS3200 color sensor works you can check my previous detailed tutorial about it. Here are the RGB values that I got from the sensor for each skittle. Note that these values can vary because the sensors isn’t always accurate. Therefore, using these “if” statements we allow the sensor an error of around +-5 of the tested value for the particular color. So for example if we have a Red skittle, the first “if” statement will be true and the variable “color” will get the value 1. So that’s what the readColor() custom function does and after that using a “switch-case” statement we rotate the bottom servo to the particular position. At the end we further rotate the top servo motor until the skittle drops into the guide rail and again send it back to the initial position so that the process can repeated. After uploading the code I secured the Arduino Board using a glue gun. Then using a transparent plastic bottle I made the charger and together with the top part glued it to assembly and finished the project. Feel free to ask any question in the comments section below.Design

Building the Arduino Color Sorter
Arduino Color Sorter Source Code
/*     Arduino Project - Color Sorting Machine
 *
 *  by Dejan Nedelkovski, www.HowToMechatronics.com
 *
 */
#include <Servo.h>

#define S0 2
#define S1 3
#define S2 4
#define S3 5
#define sensorOut 6

Servo topServo;
Servo bottomServo;

int frequency = 0;
int color=0;

void setup() {
  pinMode(S0, OUTPUT);
  pinMode(S1, OUTPUT);
  pinMode(S2, OUTPUT);
  pinMode(S3, OUTPUT);
  pinMode(sensorOut, INPUT);

  // Setting frequency-scaling to 20%
  digitalWrite(S0, HIGH);
  digitalWrite(S1, LOW);

  topServo.attach(7);
  bottomServo.attach(8);

  Serial.begin(9600);
}

void loop() {

  topServo.write(115);
  delay(500);

  for(int i = 115; i > 65; i--) {
    topServo.write(i);
    delay(2);
  }
  delay(500);

  color = readColor();
  delay(10);

  switch (color) {
    case 1:
    bottomServo.write(50);
    break;

    case 2:
    bottomServo.write(75);
    break;

    case 3:
    bottomServo.write(100);
    break;

    case 4:
    bottomServo.write(125);
    break;

    case 5:
    bottomServo.write(150);
    break;

    case 6:
    bottomServo.write(175);
    break;

    case 0:
    break;
  }
  delay(300);

  for(int i = 65; i > 29; i--) {
    topServo.write(i);
    delay(2);
  }
  delay(200);

  for(int i = 29; i < 115; i++) {
    topServo.write(i);
    delay(2);
  }
  color=0;
}

// Custom Function - readColor()
int readColor() {
  // Setting red filtered photodiodes to be read
  digitalWrite(S2, LOW);
  digitalWrite(S3, LOW);
  // Reading the output frequency
  frequency = pulseIn(sensorOut, LOW);
  int R = frequency;
  // Printing the value on the serial monitor
  Serial.print("R= ");//printing name
  Serial.print(frequency);//printing RED color frequency
  Serial.print("  ");
  delay(50);

  // Setting Green filtered photodiodes to be read
  digitalWrite(S2, HIGH);
  digitalWrite(S3, HIGH);
  // Reading the output frequency
  frequency = pulseIn(sensorOut, LOW);
  int G = frequency;
  // Printing the value on the serial monitor
  Serial.print("G= ");//printing name
  Serial.print(frequency);//printing RED color frequency
  Serial.print("  ");
  delay(50);

  // Setting Blue filtered photodiodes to be read
  digitalWrite(S2, LOW);
  digitalWrite(S3, HIGH);
  // Reading the output frequency
  frequency = pulseIn(sensorOut, LOW);
  int B = frequency;
  // Printing the value on the serial monitor
  Serial.print("B= ");//printing name
  Serial.print(frequency);//printing RED color frequency
  Serial.println("  ");
  delay(50);

  if(R<45 & R>32 & G<65 & G>55){
    color = 1; // Red
  }
  if(G<55 & G>43 & B<47 &B>35){
    color = 2; // Orange
  }
  if(R<53 & R>40 & G<53 & G>40){
    color = 3; // Green
  }
  if(R<38 & R>24 & G<44 & G>30){
    color = 4; // Yellow
  }
  if(R<56 & R>46 & G<65 & G>55){
    color = 5; // Brown
  }
  if (G<58 & G>45 & B<40 &B>26){
    color = 6; // Blue
  }
  return color;
}Code language: Arduino (arduino)
Finishing the Design
Manufacturing process
- Arduino Tic Tac Toe with MAX7219 LED Matrix and Cardboard Enclosure
- Build a Reliable Arduino Countdown Timer with SparkFun 7‑Segment Display
- Build Your Own RC Porsche Car with Arduino: A Step‑by‑Step Guide
- Build an Arduino RGB Color Mixer – Step‑by‑Step Tutorial
- Energize Your New Year with Dynamic Musical LED Lights
- Master Solo Drone Servo Control with Arduino: Easy Setup & Sweep Tutorial
- Detecting Object Colors with Arduino Nano and TCS3200 Sensor
- Bluetooth‑Controlled Servo Motor with Arduino Uno & HC‑05
- Arduino-Powered Indoor Garden: Smart, Automated Plant Care
- Build an Arduino Radar System with Ultrasonic Sensor & Servo – Step‑by‑Step Guide