


Build an Arduino Security & Alarm System – Step-by-Step Tutorial
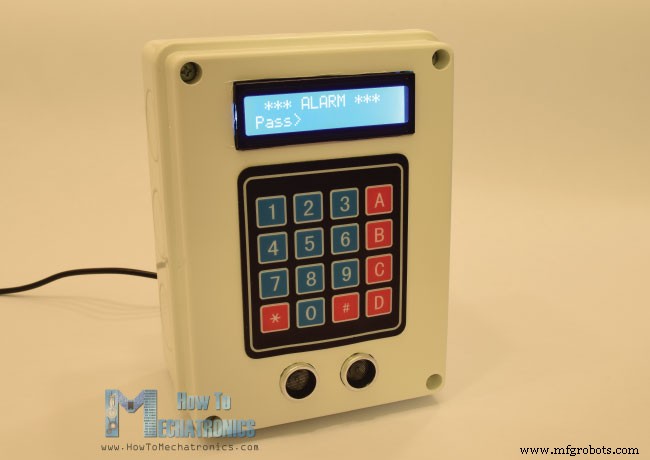
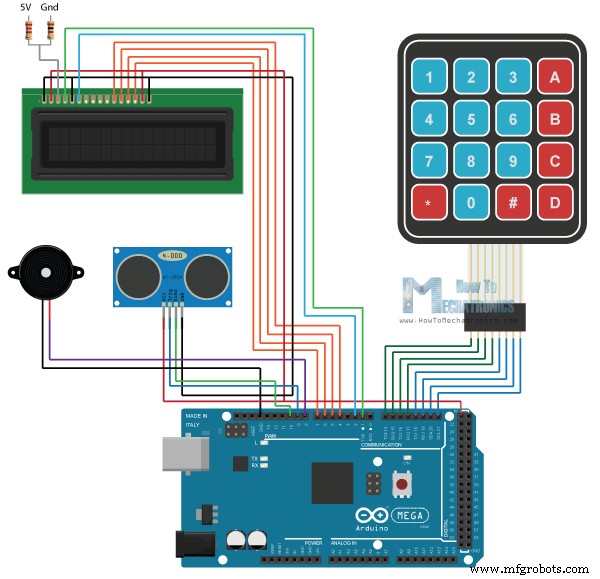
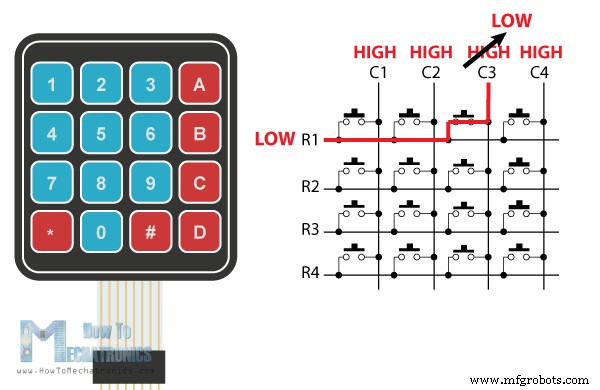
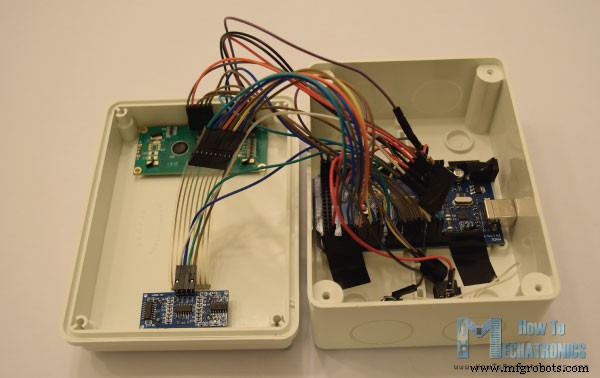
In this project we will learn how to make an Arduino Security and Alarm System. You can watch the following video or read the written tutorial below. The alarm activates in 10 seconds after pressing the A button. For detecting objects it uses an ultrasonic sensor, and once the alarm detect something a buzzer starts emitting a sound. In order to stop the alarm we need to insert a 4 digits password. The preset password is 1234 but we also have the possibility to change it. By pressing the B button we enter the password change menu where first we need to enter the current password in order to continue and then enter the new 4 digits password. Once the password is changed, the next time we activate the alarm, we will only be able to stop the alarm by entering the new password. If we enter a wrong password we will get a message that we need to try again. Now let’s see the required components for this project. Obviously, we need an Arduino board, an ultrasonic sensor, an LCD display, a buzzer and a 4×4 keypad. You can get the components needed for this Arduino Project from the links below: Here’s the circuit schematics. So for the buzzer we need just a single pin but one with PWM support. The 4×4 keypad has 8 pins, 4 of them are for the rows and 4 of them for the columns of the keypad. Each button is actually a push button switch which makes a short between one row and column when pressed. So, for example, if we set the row 1 line low, and all column lines high, when we will press, for example, the button 3, due to the short between the two lines, the column 3 line will drop to low so in such a case we can register that the button 3 has been pressed. As for the other two components on this project, the ultrasonic sensor and the LCD display, you can check my previous detailed tutorials on how to connect and use them. Next let’s see the Arduino code. As the code is a bit longer, for better understanding, I will post the source code of the program in sections with description for each section. And at the end of this article I will post the complete source code. So we need to include the standard LiquidCrystal library for the LCD and the Keypad library which needs to be additionally installed. Then we need to define the buzzer and the ultrasonic sensor’s pins, define some variables needed for the program, define the keys of the keypad, as well as create the two objects for the keypad and the LCD. In the setup section, we just need to initialize the LCD and define the pin modes for the buzzer and the ultrasonic sensor. In the loop section, first we check whether the alarm is activated or not. So if the alarm is not activated, on the LCD we will have the home screen of the program which offers two options, A for activating the alarm and B for changing the password. Then using the myKeypad.getKey() function we read which button from the keypad has been pressed and if that’s the button A, the buzzer will produce a 200 milliseconds sound and the activateAlarm variable will become true. In that case on the LCD we will print the message “Alarm will be activated in”, and using a while loop we will make a countdown of 9 seconds before the alarm is activated. Then the message “Alarm Activated” will appear and we will measure the initial distance from our alarm device to the objects opposite of it. So the next step is that the ultrasonic sensor will constantly check whether the currently measured distance is smaller than the initial distance, corrected by a value of 10 cms, and if that’s true it means an object has appeared in front of the sensor and the alarm will be activated. The tune() function will activate the buzzer and the enterPassword() custom function will be called. This custom function will print a message that the alarm is activated and that we need to enter a password in order to stop the alarm. So using the next while loop we are constantly checking whether we have pressed a button on the keypad, and each button press is added to the tempPassword variable. If we enter more than 4 digits or press the sharp button the previously entered digits will be cleared so we can type them again from begin. On the other hand, if we press the asterisk button, we will check whether the currently entered password is the same as the originally set password. If that’s true the alarm will be deactivated, the buzzer will stop producing sound and we will get back to the home screen. But if we entered password was wrong the message “Wrong! Try Again!” will appear and we will have to try to enter the correct password again. For changing the password we use a similar method. Here first we need to enter the current password in order to be able to set a new password. For finishing the project I used a plastic electrical box in which I fitted all of the components and contacted them together. That’s all, I hope you enjoyed this project and feel free to ask any question in the comments section below.Overview
Required Components

Arduino Alarm System Circuit Schematics
Arduino Alarm System Source Code
#include <LiquidCrystal.h> // includes the LiquidCrystal Library
#include <Keypad.h>

#define buzzer 8
#define trigPin 9
#define echoPin 10

long duration;
int distance, initialDistance, currentDistance, i;
int screenOffMsg =0;
String password="1234";
String tempPassword;
boolean activated = false; // State of the alarm
boolean isActivated;
boolean activateAlarm = false;
boolean alarmActivated = false;
boolean enteredPassword; // State of the entered password to stop the alarm
boolean passChangeMode = false;
boolean passChanged = false;

const byte ROWS = 4; //four rows
const byte COLS = 4; //four columns
char keypressed;
//define the cymbols on the buttons of the keypads
char keyMap[ROWS][COLS] = {
  {'1','2','3','A'},
  {'4','5','6','B'},
  {'7','8','9','C'},
  {'*','0','#','D'}
};
byte rowPins[ROWS] = {14, 15, 16, 17}; //Row pinouts of the keypad
byte colPins[COLS] = {18, 19, 20, 21}; //Column pinouts of the keypad

Keypad myKeypad = Keypad( makeKeymap(keyMap), rowPins, colPins, ROWS, COLS);
LiquidCrystal lcd(1, 2, 4, 5, 6, 7); // Creates an LC object. Parameters: (rs, enable, d4, d5, d6, d7)

void setup() {
  lcd.begin(16,2);
  pinMode(buzzer, OUTPUT); // Set buzzer as an output
  pinMode(trigPin, OUTPUT); // Sets the trigPin as an Output
  pinMode(echoPin, INPUT); // Sets the echoPin as an Input
}Code language: Arduino (arduino)if (!alarmActivated) {
if (screenOffMsg == 0 ){
lcd.clear();
lcd.setCursor(0,0);
lcd.print("A - Activate");
lcd.setCursor(0,1);
lcd.print("B - Change Pass");
screenOffMsg = 1;
}
keypressed = myKeypad.getKey();
if (keypressed =='A'){ //If A is pressed, activate the alarm
tone(buzzer, 1000, 200);
activateAlarm = true;
}Code language: Arduino (arduino)if (activateAlarm) {
lcd.clear();
lcd.setCursor(0,0);
lcd.print("Alarm will be");
lcd.setCursor(0,1);
lcd.print("activated in");
int countdown = 9; // 9 seconds count down before activating the alarm
while (countdown != 0) {
lcd.setCursor(13,1);
lcd.print(countdown);
countdown--;
tone(buzzer, 700, 100);
delay(1000);
}
lcd.clear();
lcd.setCursor(0,0);
lcd.print("Alarm Activated!");
initialDistance = getDistance();
activateAlarm = false;
alarmActivated = true;
}Code language: Arduino (arduino)if (alarmActivated == true){
currentDistance = getDistance() + 10;
if ( currentDistance < initialDistance) {
tone(buzzer, 1000); // Send 1KHz sound signal
lcd.clear();
enterPassword();
}
}Code language: Arduino (arduino)void enterPassword() {
int k=5;
tempPassword = "";
activated = true;
lcd.clear();
lcd.setCursor(0,0);
lcd.print(" *** ALARM *** ");
lcd.setCursor(0,1);
lcd.print("Pass>");
while(activated) {
keypressed = myKeypad.getKey();
if (keypressed != NO_KEY){
if (keypressed == '0' || keypressed == '1' || keypressed == '2' || keypressed == '3' ||
keypressed == '4' || keypressed == '5' || keypressed == '6' || keypressed == '7' ||
keypressed == '8' || keypressed == '9' ) {
tempPassword += keypressed;
lcd.setCursor(k,1);
lcd.print("*");
k++;
}
}
if (k > 9 || keypressed == '#') {
tempPassword = "";
k=5;
lcd.clear();
lcd.setCursor(0,0);
lcd.print(" *** ALARM *** ");
lcd.setCursor(0,1);
lcd.print("Pass>");
}
if ( keypressed == '*') {
if ( tempPassword == password ) {
activated = false;
alarmActivated = false;
noTone(buzzer);
screenOffMsg = 0;
}
else if (tempPassword != password) {
lcd.setCursor(0,1);
lcd.print("Wrong! Try Again");
delay(2000);
lcd.clear();
lcd.setCursor(0,0);
lcd.print(" *** ALARM *** ");
lcd.setCursor(0,1);
lcd.print("Pass>");
}
}
}
}Code language: Arduino (arduino)else if (keypressed =='B') {
lcd.clear();
int i=1;
tone(buzzer, 2000, 100);
tempPassword = "";
lcd.setCursor(0,0);
lcd.print("Current Password");
lcd.setCursor(0,1);
lcd.print(">");
passChangeMode = true;
passChanged = true;
while(passChanged) {
keypressed = myKeypad.getKey();
if (keypressed != NO_KEY){
if (keypressed == '0' || keypressed == '1' || keypressed == '2' || keypressed == '3' ||
keypressed == '4' || keypressed == '5' || keypressed == '6' || keypressed == '7' ||
keypressed == '8' || keypressed == '9' ) {
tempPassword += keypressed;
lcd.setCursor(i,1);
lcd.print("*");
i++;
tone(buzzer, 2000, 100);
}
}
if (i > 5 || keypressed == '#') {
tempPassword = "";
i=1;
lcd.clear();
lcd.setCursor(0,0);
lcd.print("Current Password");
lcd.setCursor(0,1);
lcd.print(">");
}
if ( keypressed == '*') {
i=1;
tone(buzzer, 2000, 100);
if (password == tempPassword) {
tempPassword="";
lcd.clear();
lcd.setCursor(0,0);
lcd.print("Set New Password");
lcd.setCursor(0,1);
lcd.print(">");
while(passChangeMode) {
keypressed = myKeypad.getKey();
if (keypressed != NO_KEY){
if (keypressed == '0' || keypressed == '1' || keypressed == '2' || keypressed == '3' ||
keypressed == '4' || keypressed == '5' || keypressed == '6' || keypressed == '7' ||
keypressed == '8' || keypressed == '9' ) {
tempPassword += keypressed;
lcd.setCursor(i,1);
lcd.print("*");
i++;
tone(buzzer, 2000, 100);
}
}
if (i > 5 || keypressed == '#') {
tempPassword = "";
i=1;
tone(buzzer, 2000, 100);
lcd.clear();
lcd.setCursor(0,0);
lcd.print("Set New Password");
lcd.setCursor(0,1);
lcd.print(">");
}
if ( keypressed == '*') {
i=1;
tone(buzzer, 2000, 100);
password = tempPassword;
passChangeMode = false;
passChanged = false;
screenOffMsg = 0;
}
}
}
}
}
}Code language: Arduino (arduino)Here’s the complete source code of the Arduino Alarm System:
/*
* Arduino Security and Alarm System
*
* by Dejan Nedelkovski,
* www.HowToMechatronics.com
*
*/

#include <LiquidCrystal.h> // includes the LiquidCrystal Library
#include <Keypad.h>

#define buzzer 8
#define trigPin 9
#define echoPin 10

long duration;
int distance, initialDistance, currentDistance, i;
int screenOffMsg =0;
String password="1234";
String tempPassword;
boolean activated = false; // State of the alarm
boolean isActivated;
boolean activateAlarm = false;
boolean alarmActivated = false;
boolean enteredPassword; // State of the entered password to stop the alarm
boolean passChangeMode = false;
boolean passChanged = false;

const byte ROWS = 4; //four rows
const byte COLS = 4; //four columns
char keypressed;
//define the cymbols on the buttons of the keypads
char keyMap[ROWS][COLS] = {
  {'1','2','3','A'},
  {'4','5','6','B'},
  {'7','8','9','C'},
  {'*','0','#','D'}
};
byte rowPins[ROWS] = {14, 15, 16, 17}; //Row pinouts of the keypad
byte colPins[COLS] = {18, 19, 20, 21}; //Column pinouts of the keypad

Keypad myKeypad = Keypad( makeKeymap(keyMap), rowPins, colPins, ROWS, COLS);
LiquidCrystal lcd(1, 2, 4, 5, 6, 7); // Creates an LC object. Parameters: (rs, enable, d4, d5, d6, d7)

void setup() {
  lcd.begin(16,2);
  pinMode(buzzer, OUTPUT); // Set buzzer as an output
  pinMode(trigPin, OUTPUT); // Sets the trigPin as an Output
  pinMode(echoPin, INPUT); // Sets the echoPin as an Input
}

void loop() {
  if (activateAlarm) {
    lcd.clear();
    lcd.setCursor(0,0);
    lcd.print("Alarm will be");
    lcd.setCursor(0,1);
    lcd.print("activated in");

    int countdown = 9; // 9 seconds count down before activating the alarm
    while (countdown != 0) {
      lcd.setCursor(13,1);
      lcd.print(countdown);
      countdown--;
      tone(buzzer, 700, 100);
      delay(1000);
    }
    lcd.clear();
    lcd.setCursor(0,0);
    lcd.print("Alarm Activated!");
    initialDistance = getDistance();
    activateAlarm = false;
    alarmActivated = true;
  }

  if (alarmActivated == true){
      currentDistance = getDistance() + 10;
      if ( currentDistance < initialDistance) {
        tone(buzzer, 1000); // Send 1KHz sound signal
        lcd.clear();
        enterPassword();
      }
    }

  if (!alarmActivated) {
    if (screenOffMsg == 0 ){
      lcd.clear();
      lcd.setCursor(0,0);
      lcd.print("A - Activate");
      lcd.setCursor(0,1);
      lcd.print("B - Change Pass");
      screenOffMsg = 1;
    }
    keypressed = myKeypad.getKey();
     if (keypressed =='A'){        //If A is pressed, activate the alarm
      tone(buzzer, 1000, 200);
      activateAlarm = true;
    }
    else if (keypressed =='B') {
      lcd.clear();
      int i=1;
      tone(buzzer, 2000, 100);
      tempPassword = "";
      lcd.setCursor(0,0);
      lcd.print("Current Password");
      lcd.setCursor(0,1);
      lcd.print(">");
      passChangeMode = true;
      passChanged = true;
      while(passChanged) {
      keypressed = myKeypad.getKey();
      if (keypressed != NO_KEY){
        if (keypressed == '0' || keypressed == '1' || keypressed == '2' || keypressed == '3' ||
            keypressed == '4' || keypressed == '5' || keypressed == '6' || keypressed == '7' ||
            keypressed == '8' || keypressed == '9' ) {
         tempPassword += keypressed;
         lcd.setCursor(i,1);
         lcd.print("*");
         i++;
         tone(buzzer, 2000, 100);
        }
      }
      if (i > 5 || keypressed == '#') {
        tempPassword = "";
        i=1;
        lcd.clear();
        lcd.setCursor(0,0);
        lcd.print("Current Password");
        lcd.setCursor(0,1);
        lcd.print(">");
      }
      if ( keypressed == '*') {
        i=1;
        tone(buzzer, 2000, 100);
        if (password == tempPassword) {
          tempPassword="";
          lcd.clear();
          lcd.setCursor(0,0);
          lcd.print("Set New Password");
          lcd.setCursor(0,1);
          lcd.print(">");
          while(passChangeMode) {
            keypressed = myKeypad.getKey();
            if (keypressed != NO_KEY){
              if (keypressed == '0' || keypressed == '1' || keypressed == '2' || keypressed == '3' ||
                  keypressed == '4' || keypressed == '5' || keypressed == '6' || keypressed == '7' ||
                  keypressed == '8' || keypressed == '9' ) {
                tempPassword += keypressed;
                lcd.setCursor(i,1);
                lcd.print("*");
                i++;
                tone(buzzer, 2000, 100);
              }
            }
            if (i > 5 || keypressed == '#') {
              tempPassword = "";
              i=1;
              tone(buzzer, 2000, 100);
              lcd.clear();
              lcd.setCursor(0,0);
              lcd.print("Set New Password");
              lcd.setCursor(0,1);
              lcd.print(">");
            }
            if ( keypressed == '*') {
              i=1;
              tone(buzzer, 2000, 100);
              password = tempPassword;
              passChangeMode = false;
              passChanged = false;
              screenOffMsg = 0;
            }
          }
        }
      }
    }
   }
 }
}

void enterPassword() {
  int k=5;
  tempPassword = "";
  activated = true;
  lcd.clear();
  lcd.setCursor(0,0);
  lcd.print(" *** ALARM *** ");
  lcd.setCursor(0,1);
  lcd.print("Pass>");
      while(activated) {
      keypressed = myKeypad.getKey();
      if (keypressed != NO_KEY){
        if (keypressed == '0' || keypressed == '1' || keypressed == '2' || keypressed == '3' ||
            keypressed == '4' || keypressed == '5' || keypressed == '6' || keypressed == '7' ||
            keypressed == '8' || keypressed == '9' ) {
          tempPassword += keypressed;
          lcd.setCursor(k,1);
          lcd.print("*");
          k++;
        }
      }
      if (k > 9 || keypressed == '#') {
        tempPassword = "";
        k=5;
        lcd.clear();
        lcd.setCursor(0,0);
        lcd.print(" *** ALARM *** ");
        lcd.setCursor(0,1);
        lcd.print("Pass>");
      }
      if ( keypressed == '*') {
        if ( tempPassword == password ) {
          activated = false;
          alarmActivated = false;
          noTone(buzzer);
          screenOffMsg = 0;
        }
        else if (tempPassword != password) {
          lcd.setCursor(0,1);
          lcd.print("Wrong! Try Again");
          delay(2000);
          lcd.clear();
          lcd.setCursor(0,0);
          lcd.print(" *** ALARM *** ");
          lcd.setCursor(0,1);
          lcd.print("Pass>");
        }
      }
    }
}
// Custom function for the Ultrasonic sensor
long getDistance(){
  //int i=10;

  //while( i<=10 ) {
  // Clears the trigPin
  digitalWrite(trigPin, LOW);
  delayMicroseconds(2);

  // Sets the trigPin on HIGH state for 10 micro seconds
  digitalWrite(trigPin, HIGH);
  delayMicroseconds(10);
  digitalWrite(trigPin, LOW);

  // Reads the echoPin, returns the sound wave travel time in microseconds
  duration = pulseIn(echoPin, HIGH);

  // Calculating the distance
  distance = duration*0.034/2;
  //sumDistance += distance;
  //}
  //int averageDistance= sumDistance/10;
  return distance;

}
Code language: Arduino (arduino)
Final Touch
Manufacturing process
- Reliable Arduino-Based RFID Attendance System Powered by Python
- SERENA: A Custom Arduino Mega 2560 Alarm System with TFT LCD Touchscreen
- Evaluating Alarm System Security with Arduino and RF Modules
- Arduino Tic Tac Toe with MAX7219 LED Matrix and Cardboard Enclosure
- Build a DIY Voltmeter with Arduino and Nokia 5110 Display – Step‑by‑Step Guide
- Build a Reliable Arduino Countdown Timer with SparkFun 7‑Segment Display
- Real-Time RFID Attendance System Powered by Arduino & Google Sheets
- Arduino-Powered Security System: Smart Motion Detection & Alert
- Bolt IoT: Advanced Humidity & Temperature Monitoring with DHT11 and Arduino
- DIY Arduino Touch‑Screen MP3 Player & Alarm Clock – Step‑by‑Step Guide