


Arduino TFT LCD Touch Screen Tutorial – Step‑by‑Step Guide
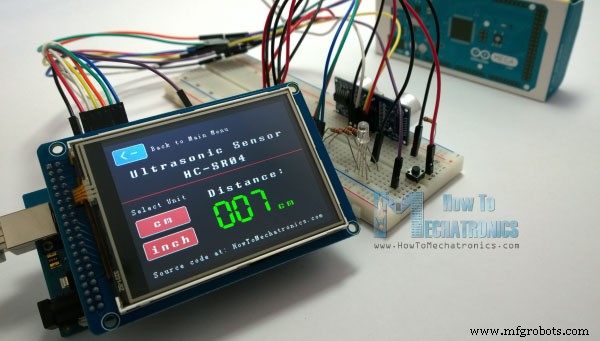
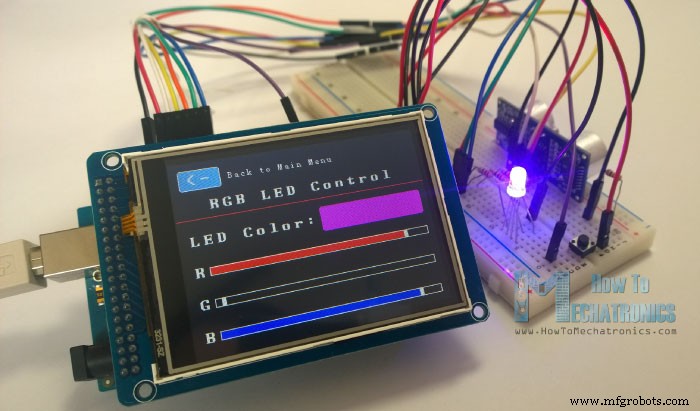
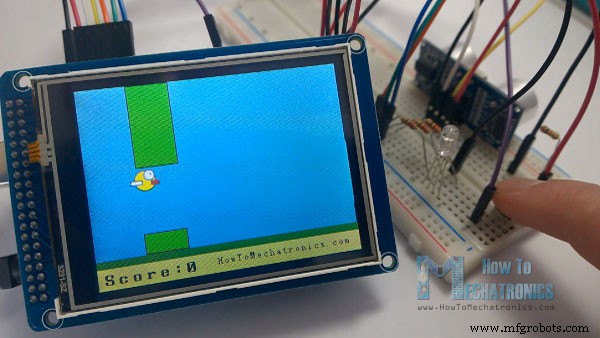
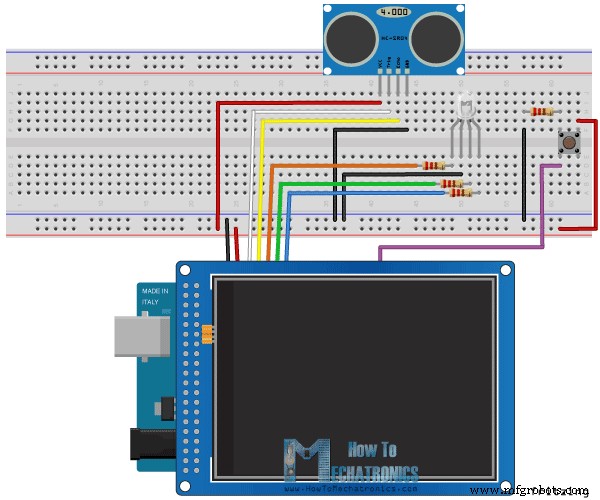
In this Arduino touch screen tutorial we will learn how to use TFT LCD Touch Screen with Arduino. You can watch the following video or read the written tutorial below. For this tutorial I composed three examples. The first example is distance measurement using ultrasonic sensor. The output from the sensor, or the distance is printed on the screen and using the touch screen we can select the units, either centimeters or inches. The next example is controlling an RGB LED using these three RGB sliders. For example if we start to slide the blue slider, the LED will light up in blue and increase the light as we would go to the maximum value. So the sliders can move from 0 to 255 and with their combination we can set any color to the RGB LED, but just keep in mind that the LED cannot represent the colors that much accurate. The third example is a game. Actually it’s a replica of the popular Flappy Bird game for smartphones. We can play the game using the push button or even using the touch screen itself. Now we will go through each of these examples and step by step explain the codes behind them. As an example I am using a 3.2” TFT Touch Screen in a combination with a TFT LCD Arduino Mega Shield. We need a shield because the TFT Touch screen works at 3.3V and the Arduino Mega outputs are 5 V. For the first example I have the HC-SR04 ultrasonic sensor, then for the second example an RGB LED with three resistors and a push button for the game example. Also I had to make a custom made pin header like this, by soldering pin headers and bend on of them so I could insert them in between the Arduino Board and the TFT Shield. You can get these components from any of the sites below: Here’s the circuit schematic. We will use the GND pin, the digital pins from 8 to 13, as well as the pin number 14. As the 5V pins are already used by the TFT Screen I will use the pin number 13 as VCC, by setting it right away high in the setup section of code. As the code is a bit longer and for better understanding I will post the source code of the program in sections with description for each section. And at the end of this article I will post the complete source code. I will use the UTFT and URTouch libraries made by Henning Karlsen. Here I would like to say thanks to him for the incredible work he has done. The libraries enable really easy use of the TFT Screens, and they work with many different TFT screens sizes, shields and controllers. You can download these libraries from his website, RinkyDinkElectronics.com and also find a lot of demo examples and detailed documentation of how to use them. After we include the libraries we need to create UTFT and URTouch objects. The parameters of these objects depends on the model of the TFT Screen and Shield and these details can be also found in the documentation of the libraries. Next we need to define the fonts that are coming with the libraries and also define some variables needed for the program. In the setup section we need to initiate the screen and the touch, define the pin modes for the connected sensor, the led and the button, and initially call the drawHomeSreen() custom function, which will draw the home screen of the program. So now I will explain how we can make the home screen of the program. With the setBackColor() function we need to set the background color of the text, black one in our case. Then we need to set the color to white, set the big font and using the print() function, we will print the string “Arduino TFT Tutorial” at the center of the screen and 10 pixels down the Y – Axis of the screen. Next we will set the color to red and draw the red line below the text. After that we need to set the color back to white, and print the two other strings, “by HowToMechatronics.com” using the small font and “Select Example” using the big font. Next is the distance sensor button. First we need to set the color and then using the fillRoundRect() function we will draw the rounded rectangle. Then we will set the color back to white and using the drawRoundRect() function we will draw another rounded rectangle on top of the previous one, but this one will be without a fill so the overall appearance of the button looks like it has a frame. On top of the button we will print the text using the big font and the same background color as the fill of the button. The same procedure goes for the two other buttons. Now we need to make the buttons functional so that when we press them they would send us to the appropriate example. In the setup section we set the character ‘0’ to the currentPage variable, which will indicate that we are at the home screen. So if that’s true, and if we press on the screen this if statement would become true and using these lines here we will get the X and Y coordinates where the screen has been pressed. If that’s the area that covers the first button we will call the drawDistanceSensor() custom function which will activate the distance sensor example. Also we will set the character ‘1’ to the variable currentPage which will indicate that we are at the first example. The drawFrame() custom function is used for highlighting the button when it’s pressed. The same procedure goes for the two other buttons. So the drawDistanceSensor() custom function needs to be called only once when the button is pressed in order to draw all the graphics of this example in similar way as we described for the home screen. However, the getDistance() custom function needs to be called repeatedly in order to print the latest results of the distance measured by the sensor. Here’s that function which uses the ultrasonic sensor to calculate the distance and print the values with SevenSegNum font in green color, either in centimeters or inches. If you need more details how the ultrasonic sensor works you can check my particular tutorial for that. Back in the loop section we can see what happens when we press the select unit buttons as well as the back button. Ok next is the RGB LED Control example. If we press the second button, the drawLedControl() custom function will be called only once for drawing the graphic of that example and the setLedColor() custom function will be repeatedly called. In this function we use the touch screen to set the values of the 3 sliders from 0 to 255. With the if statements we confine the area of each slider and get the X value of the slider. So the values of the X coordinate of each slider are from 38 to 310 pixels and we need to map these values into values from 0 to 255 which will be used as a PWM signal for lighting up the LED. If you need more details how the RGB LED works you can check my particular tutorial for that. The rest of the code in this custom function is for drawing the sliders. Back in the loop section we only have the back button which also turns off the LED when pressed. Next is the Arduino Game Example but I will leave that one for my next tutorial so that we can better understand it as it’s a bit more complex. In order the code to work and compile you will have to include an addition “.c” file in the same directory with the Arduino sketch. This file is for the third game example and it’s a bitmap of the bird. For more details how this part of the code work you can check my particular tutorial. Here you can download that file: Here’s the complete source code of the program:Overview
Parts needed for this Arduino Touch Screen

Arduino Touch Screen Code
#include <UTFT.h>
#include <URTouch.h>

//==== Creating Objects
UTFT    myGLCD(SSD1289,38,39,40,41); //Parameters should be adjusted to your Display/Schield model
URTouch  myTouch( 6, 5, 4, 3, 2);

//==== Defining Variables
extern uint8_t SmallFont[];
extern uint8_t BigFont[];
extern uint8_t SevenSegNumFont[];

extern unsigned int bird01[0x41A];

int x, y;

char currentPage, selectedUnit;

//Ultrasonic Sensor
const int VCC = 13;
const int trigPin = 11;
const int echoPin = 12;

long duration;
int distanceInch, distanceCm;

// RGB LEDs
const int redLed = 10;
const int greenLed = 9;
const int blueLed = 8;
int xR=38;
int xG=38;
int xB=38;

// Floppy Bird
int xP = 319;
int yP = 100;
int yB = 30;
int fallRateInt = 0;
float fallRate =0;
int score=0;
const int button = 14;
int buttonState = 0;

void setup() {
// Initial setup
  myGLCD.InitLCD();
  myGLCD.clrScr();
  myTouch.InitTouch();
  myTouch.setPrecision(PREC_MEDIUM);

  // Defining Pin Modes
  pinMode(VCC, OUTPUT); // VCC
  pinMode(trigPin, OUTPUT); // Sets the trigPin as an Output
  pinMode(echoPin, INPUT); // Sets the echoPin as an Input
  pinMode(redLed, OUTPUT);
  pinMode(greenLed, OUTPUT);
  pinMode(blueLed, OUTPUT);
  pinMode(button, INPUT);
  digitalWrite(VCC, HIGH); // +5V - Pin 13 as VCC

  drawHomeScreen();  // Draws the Home Screen
  currentPage = '0'; // Indicates that we are at Home Screen
  selectedUnit = '0'; // Indicates the selected unit for the first example, cms or inches
}Code language: Arduino (arduino)// drawHomeScreen - Custom Function
void drawHomeScreen() {
// Title
myGLCD.setBackColor(0,0,0); // Sets the background color of the area where the text will be printed to black
myGLCD.setColor(255, 255, 255); // Sets color to white
myGLCD.setFont(BigFont); // Sets font to big
myGLCD.print("Arduino TFT Tutorial", CENTER, 10); // Prints the string on the screen
myGLCD.setColor(255, 0, 0); // Sets color to red
myGLCD.drawLine(0,32,319,32); // Draws the red line
myGLCD.setColor(255, 255, 255); // Sets color to white
myGLCD.setFont(SmallFont); // Sets the font to small
myGLCD.print("by HowToMechatronics.com", CENTER, 41); // Prints the string
myGLCD.setFont(BigFont);
myGLCD.print("Select Example", CENTER, 64);
// Button - Distance Sensor
myGLCD.setColor(16, 167, 103); // Sets green color
myGLCD.fillRoundRect (35, 90, 285, 130); // Draws filled rounded rectangle
myGLCD.setColor(255, 255, 255); // Sets color to white
myGLCD.drawRoundRect (35, 90, 285, 130); // Draws rounded rectangle without a fill, so the overall appearance of the button looks like it has a frame
myGLCD.setFont(BigFont); // Sets the font to big
myGLCD.setBackColor(16, 167, 103); // Sets the background color of the area where the text will be printed to green, same as the button
myGLCD.print("DISTANCE SENSOR", CENTER, 102); // Prints the string
// Button - RGB LED Control
myGLCD.setColor(16, 167, 103);
myGLCD.fillRoundRect (35, 140, 285, 180);
myGLCD.setColor(255, 255, 255);
myGLCD.drawRoundRect (35, 140, 285, 180);
myGLCD.setFont(BigFont);
myGLCD.setBackColor(16, 167, 103);
myGLCD.print("RGB LED CONTROL", CENTER, 152);
// Button - Birduino
myGLCD.setColor(16, 167, 103);
myGLCD.fillRoundRect (35, 190, 285, 230);
myGLCD.setColor(255, 255, 255);
myGLCD.drawRoundRect (35, 190, 285, 230);
myGLCD.setFont(BigFont);
myGLCD.setBackColor(16, 167, 103);
myGLCD.print("BIRDUINO GAME", CENTER, 202);
}Code language: Arduino (arduino)//========== The loop section ========
void loop() {
// Home Screen
if (currentPage == '0') {
if (myTouch.dataAvailable()) {
myTouch.read();
x=myTouch.getX(); // X coordinate where the screen has been pressed
y=myTouch.getY(); // Y coordinates where the screen has been pressed
// If we press the Distance Sensor Button
if ((x>=35) && (x<=285) && (y>=90) && (y<=130)) {
drawFrame(35, 90, 285, 130); // Custom Function -Highlighs the buttons when it's pressed
currentPage = '1'; // Indicates that we are the first example
myGLCD.clrScr(); // Clears the screen
drawDistanceSensor(); // It is called only once, because in the next iteration of the loop, this above if statement will be false so this funtion won't be called. This function will draw the graphics of the first example.
}
// If we press the RGB LED Control Button
if ((x>=35) && (x<=285) && (y>=140) && (y<=180)) {
drawFrame(35, 140, 285, 180);
currentPage = '2';
myGLCD.clrScr();
drawLedControl();
}
// If we press the Birduino Game Button
if ((x>=35) && (x<=285) && (y>=190) && (y<=230)) {
drawFrame(35, 190, 285, 230);
currentPage = '3';
myGLCD.clrScr();
myGLCD.setColor(114, 198, 206);
myGLCD.fillRect(0,0,319,239);
drawGround();
drawPilars(xP,yP);
drawBird(30);
delay(1000);
}
}
}
// Distance Sensor Example
if (currentPage == '1') {
getDistance(); // Gets distance from the sensor and this function is repeatedly called while we are at the first example in order to print the lasest results from the distance sensor
if (myTouch.dataAvailable()) {
myTouch.read();
x=myTouch.getX();
y=myTouch.getY();
// If we press the Centimeters Button
if ((x>=10) && (x<=135) &&(y>=90) && (y<=163)) {
selectedUnit = '0';
}
// If we press the Inches Button
if ((x>=10) && (x<=135) &&(y>=173) && (y<=201)) {
selectedUnit = '1';
}
// If we press the Back Button
if ((x>=10) && (x<=60) &&(y>=10) && (y<=36)) {
drawFrame(10, 10, 60, 36);
currentPage = '0'; // Indicates we are at home screen
myGLCD.clrScr();
drawHomeScreen(); // Draws the home screen
}
}
}
// RGB LED Control
if (currentPage == '2') {
setLedColor();
if (myTouch.dataAvailable()) {
myTouch.read();
x=myTouch.getX();
y=myTouch.getY();
//Back button
if ((x>=10) && (x<=60) &&(y>=10) && (y<=36)) {
drawFrame(10, 10, 60, 36);
currentPage = '0';
myGLCD.clrScr();
drawHomeScreen();
// Turns the LED off
analogWrite(redLed, 0);
analogWrite(greenLed, 0);
analogWrite(blueLed, 0);
}
}
}
//==== This section of the code, for the game example, is explained in my next tutorial
// Birduino Game
if (currentPage == '3') {
//delay(1);
xP=xP-3;
drawPilars(xP, yP);
yB+=fallRateInt;
fallRate=fallRate+0.4;
fallRateInt= int(fallRate);
if (yB>=220) {
yB=220;
}
if(yB>=180 || yB<=0){
restartGame();
}
if((xP<=85) && (xP>=30) && (yB<=yP-2)){
restartGame();
}
if((xP<=85) && (xP>=30) && (yB>=yP+60)){
restartGame();
}
drawBird(yB);
if (xP<=-51){
xP=319;
yP = rand() % 100+20;
score++;
}
if (myTouch.dataAvailable()) {
myTouch.read();
x=myTouch.getX();
y=myTouch.getY();
if ((x>=0) && (x<=319) &&(y>=50) && (y<=239)) {
fallRate=-5;
}
}
buttonState = digitalRead(button);
if (buttonState == HIGH) {
fallRate=-5;
}
}
if (myTouch.dataAvailable()) {
myTouch.read();
x=myTouch.getX();
y=myTouch.getY();
if ((x>=10) && (x<=60) &&(y>=10) && (y<=36)) {
drawFrame(10, 10, 60, 36);
currentPage = '0';
myGLCD.clrScr();
drawHomeScreen();
analogWrite(redLed, 0);
analogWrite(greenLed, 0);
analogWrite(blueLed, 0);
}
}
}Code language: Arduino (arduino)//===== getDistance() - Custom Function
void getDistance() {
// Clears the trigPin
digitalWrite(trigPin, LOW);
delayMicroseconds(2);
// Sets the trigPin on HIGH state for 10 micro seconds
digitalWrite(trigPin, HIGH);
delayMicroseconds(10);
digitalWrite(trigPin, LOW);
// Reads the echoPin, returns the sound wave travel time in microseconds
duration = pulseIn(echoPin, HIGH);
// Calculating the distance
distanceCm= duration*0.034/2;
distanceInch= distanceCm/2.53;
// Prints the distance in centimeters
if (selectedUnit == '0' && distanceCm <=400) {
myGLCD.setFont(SevenSegNumFont);
myGLCD.setColor(0, 255, 0);
myGLCD.setBackColor(0, 0, 0);
myGLCD.printNumI(distanceCm,130, 145, 3,'0');
myGLCD.setFont(BigFont);
myGLCD.print("cm ", 235, 178);
}
// Prints the distance in inches
if (selectedUnit == '1' && distanceCm <=160) {
myGLCD.setFont(SevenSegNumFont);
myGLCD.setColor(0, 255, 0);
myGLCD.setBackColor(0, 0, 0);
myGLCD.printNumI(distanceInch,130, 145, 3,'0');
myGLCD.setFont(BigFont);
myGLCD.print("inch", 235, 178);
}
delay(10);
}Code language: Arduino (arduino)//============= setLedColor() - Custom Funtion
void setLedColor() {
if (myTouch.dataAvailable()) {
myTouch.read();
x=myTouch.getX();
y=myTouch.getY();
// Area of the Red color slider
if( (y>=130) && (y<=156)) {
xR=x; // Stores the X value where the screen has been pressed in to variable xR
if (xR<=38) { // Confines the area of the slider to be above 38 pixels
xR=38;
}
if (xR>=303){ /// Confines the area of the slider to be under 310 pixels
xR=303;
}
}
// Area of the Green color slider
if( (y>=170) && (y<=196)) {
xG=x;
if (xG<=38) {
xG=38;
}
if (xG>=303){
xG=303;
}
}
// Area of the Blue color slider
if( (y>=210) && (y<=236)) {
xB=x;
if (xB<=38) {
xB=38;
}
if (xB>=303){
xB=303;
}
}
}
// Maps the values of the X - Axis from 38 to 0 and 310 to 255, because we need values from 0 to 255 for turning on the led
int xRC = map(xR,38,310,0,255);
int xGC = map(xG,38,310,0,255);
int xBC = map(xB,38,310,0,255);
// Sends PWM signal to the pins of the led
analogWrite(redLed, xRC);
analogWrite(greenLed, xGC);
analogWrite(blueLed, xBC);
// Draws a rectangle with the latest color combination
myGLCD.setColor(xRC, xGC, xBC);
myGLCD.fillRoundRect(175, 87, 310, 119);
// Draws the positioners
myGLCD.setColor(255, 255, 255);
myGLCD.fillRect(xR,139,(xR+4),147); // Positioner
myGLCD.setColor(xRC, 0, 0);
myGLCD.fillRect(31, 139, (xR-1), 147);
myGLCD.setColor(0, 0, 0);
myGLCD.fillRect((xR+5), 139, 309, 147);
myGLCD.setColor(255, 255, 255);
myGLCD.fillRect(xG,179,(xG+4),187);
myGLCD.setColor(0, xGC, 0);
myGLCD.fillRect(31, 179, (xG-1), 187);
myGLCD.setColor(0, 0, 0);
myGLCD.fillRect((xG+5), 179, 309, 187);
myGLCD.setColor(255, 255, 255);
myGLCD.fillRect(xB,219,(xB+4),227);
myGLCD.setColor(0, 0, xBC);
myGLCD.fillRect(31, 219, (xB-1), 227);
myGLCD.setColor(0, 0, 0);
myGLCD.fillRect((xB+5), 219, 309, 227);
}Code language: Arduino (arduino)Complete source code of program
Arduino TFT Tutorial Files
1 file(s) 6.07 KB
Download
/*  Arduino TFT Tutorial
 *  Program made by Dejan Nedelkovski,
 *  www.HowToMechatronics.com
 */

/*  This program uses the UTFT and URTouch libraries
 *  made by Henning Karlsen.
 *  You can find and download them at:
 *  www.RinkyDinkElectronics.com
 */

#include <UTFT.h>
#include <URTouch.h>

//==== Creating Objects
UTFT    myGLCD(SSD1289,38,39,40,41); //Parameters should be adjusted to your Display/Schield model
URTouch  myTouch( 6, 5, 4, 3, 2);

//==== Defining Variables
extern uint8_t SmallFont[];
extern uint8_t BigFont[];
extern uint8_t SevenSegNumFont[];

extern unsigned int bird01[0x41A];

int x, y;

char currentPage, selectedUnit;

//Ultrasonic Sensor
const int VCC = 13;
const int trigPin = 11;
const int echoPin = 12;

long duration;
int distanceInch, distanceCm;

// RGB LEDs
const int redLed = 10;
const int greenLed = 9;
const int blueLed = 8;
int xR=38;
int xG=38;
int xB=38;

// Floppy Bird
int xP = 319;
int yP = 100;
int yB = 30;
int fallRateInt = 0;
float fallRate =0;
int score=0;
const int button = 14;
int buttonState = 0;

void setup() {
// Initial setup
  myGLCD.InitLCD();
  myGLCD.clrScr();
  myTouch.InitTouch();
  myTouch.setPrecision(PREC_MEDIUM);

  // Defining Pin Modes
  pinMode(VCC, OUTPUT); // VCC
  pinMode(trigPin, OUTPUT); // Sets the trigPin as an Output
  pinMode(echoPin, INPUT); // Sets the echoPin as an Input
  pinMode(redLed, OUTPUT);
  pinMode(greenLed, OUTPUT);
  pinMode(blueLed, OUTPUT);
  pinMode(button, INPUT);
  digitalWrite(VCC, HIGH); // +5V - Pin 13 as VCC

  drawHomeScreen();  // Draws the Home Screen
  currentPage = '0'; // Indicates that we are at Home Screen
  selectedUnit = '0'; // Indicates the selected unit for the first example, cms or inches
}

void loop() {
  // Home Screen
  if (currentPage == '0') {
    if (myTouch.dataAvailable()) {
      myTouch.read();
      x=myTouch.getX(); // X coordinate where the screen has been pressed
      y=myTouch.getY(); // Y coordinates where the screen has been pressed
      // If we press the Distance Sensor Button
      if ((x>=35) && (x<=285) && (y>=90) && (y<=130)) {
        drawFrame(35, 90, 285, 130); // Custom Function -Highlighs the buttons when it's pressed
        currentPage = '1'; // Indicates that we are the first example
        myGLCD.clrScr(); // Clears the screen
        drawDistanceSensor(); // It is called only once, because in the next iteration of the loop, this above if statement will be false so this funtion won't be called. This function will draw the graphics of the first example.
      }
      // If we press the RGB LED Control Button
      if ((x>=35) && (x<=285) && (y>=140) && (y<=180)) {
        drawFrame(35, 140, 285, 180);
        currentPage = '2';
        myGLCD.clrScr();
        drawLedControl();
      }
      // If we press the Birduino Game Button
      if ((x>=35) && (x<=285) && (y>=190) && (y<=230)) {
        drawFrame(35, 190, 285, 230);
        currentPage = '3';
        myGLCD.clrScr();
        myGLCD.setColor(114, 198, 206);
        myGLCD.fillRect(0,0,319,239);
        drawGround();
        drawPilars(xP,yP);
        drawBird(30);
        delay(1000);
      }
    }
  }
  // Distance Sensor Example
  if (currentPage == '1') {
      getDistance(); // Gets distance from the sensor and this function is repeatedly called while we are at the first example in order to print the lasest results from the distance sensor
      if (myTouch.dataAvailable()) {
        myTouch.read();
        x=myTouch.getX();
        y=myTouch.getY();

        // If we press the Centimeters Button
        if ((x>=10) && (x<=135) &&(y>=90) && (y<=163)) {
          selectedUnit = '0';
        }
        // If we press the Inches Button
        if ((x>=10) && (x<=135) &&(y>=173) && (y<=201)) {
          selectedUnit = '1';
        }
        // If we press the Back Button
        if ((x>=10) && (x<=60) &&(y>=10) && (y<=36)) {
          drawFrame(10, 10, 60, 36);
          currentPage = '0'; // Indicates we are at home screen
          myGLCD.clrScr();
          drawHomeScreen(); // Draws the home screen
        }
      }
  }

  // RGB LED Control
  if (currentPage == '2') {
    setLedColor();
    if (myTouch.dataAvailable()) {
        myTouch.read();
        x=myTouch.getX();
        y=myTouch.getY();

        //Back button
        if ((x>=10) && (x<=60) &&(y>=10) && (y<=36)) {
          drawFrame(10, 10, 60, 36);
          currentPage = '0';
          myGLCD.clrScr();
          drawHomeScreen();
          // Turns the LED off
          analogWrite(redLed, 0);
          analogWrite(greenLed, 0);
          analogWrite(blueLed, 0);
        }
    }
  }
//==== This section of the code, for the game example, is explained in my next tutorial
  // Birduino Game
  if (currentPage == '3') {
    //delay(1);
    xP=xP-3;
    drawPilars(xP, yP);

    yB+=fallRateInt;
    fallRate=fallRate+0.4;
    fallRateInt= int(fallRate);
    if (yB>=220) {
      yB=220;
    }
    if(yB>=180 || yB<=0){
      restartGame();
    }
    if((xP<=85) && (xP>=30) && (yB<=yP-2)){
      restartGame();
    }
    if((xP<=85) && (xP>=30) && (yB>=yP+60)){
      restartGame();
    }
    drawBird(yB);

    if (xP<=-51){
      xP=319;
      yP = rand() % 100+20;
      score++;
    }
    if (myTouch.dataAvailable()) {
        myTouch.read();
        x=myTouch.getX();
        y=myTouch.getY();
        if ((x>=0) && (x<=319) &&(y>=50) && (y<=239)) {
          fallRate=-5;
        }
    }
    buttonState = digitalRead(button);
    if (buttonState == HIGH) {
      fallRate=-5;
      }
  }
    if (myTouch.dataAvailable()) {
        myTouch.read();
        x=myTouch.getX();
        y=myTouch.getY();
        if ((x>=10) && (x<=60) &&(y>=10) && (y<=36)) {
          drawFrame(10, 10, 60, 36);
          currentPage = '0';
          myGLCD.clrScr();
          drawHomeScreen();
          analogWrite(redLed, 0);
          analogWrite(greenLed, 0);
          analogWrite(blueLed, 0);
        }
    }
}

// ====== Custom Funtions ======
// drawHomeScreen - Custom Function
void drawHomeScreen() {
  // Title
  myGLCD.setBackColor(0,0,0); // Sets the background color of the area where the text will be printed to black
  myGLCD.setColor(255, 255, 255); // Sets color to white
  myGLCD.setFont(BigFont); // Sets font to big
  myGLCD.print("Arduino TFT Tutorial", CENTER, 10); // Prints the string on the screen
  myGLCD.setColor(255, 0, 0); // Sets color to red
  myGLCD.drawLine(0,32,319,32); // Draws the red line
  myGLCD.setColor(255, 255, 255); // Sets color to white
  myGLCD.setFont(SmallFont); // Sets the font to small
  myGLCD.print("by HowToMechatronics.com", CENTER, 41); // Prints the string
  myGLCD.setFont(BigFont);
  myGLCD.print("Select Example", CENTER, 64);

  // Button - Distance Sensor
  myGLCD.setColor(16, 167, 103); // Sets green color
  myGLCD.fillRoundRect (35, 90, 285, 130); // Draws filled rounded rectangle
  myGLCD.setColor(255, 255, 255); // Sets color to white
  myGLCD.drawRoundRect (35, 90, 285, 130); // Draws rounded rectangle without a fill, so the overall appearance of the button looks like it has a frame
  myGLCD.setFont(BigFont); // Sets the font to big
  myGLCD.setBackColor(16, 167, 103); // Sets the background color of the area where the text will be printed to green, same as the button
  myGLCD.print("DISTANCE SENSOR", CENTER, 102); // Prints the string

  // Button - RGB LED Control
  myGLCD.setColor(16, 167, 103);
  myGLCD.fillRoundRect (35, 140, 285, 180);
  myGLCD.setColor(255, 255, 255);
  myGLCD.drawRoundRect (35, 140, 285, 180);
  myGLCD.setFont(BigFont);
  myGLCD.setBackColor(16, 167, 103);
  myGLCD.print("RGB LED CONTROL", CENTER, 152);

  // Button - Birduino
  myGLCD.setColor(16, 167, 103);
  myGLCD.fillRoundRect (35, 190, 285, 230);
  myGLCD.setColor(255, 255, 255);
  myGLCD.drawRoundRect (35, 190, 285, 230);
  myGLCD.setFont(BigFont);
  myGLCD.setBackColor(16, 167, 103);
  myGLCD.print("BIRDUINO GAME", CENTER, 202);
}

// Highlights the button when pressed
void drawFrame(int x1, int y1, int x2, int y2) {
  myGLCD.setColor(255, 0, 0);
  myGLCD.drawRoundRect (x1, y1, x2, y2);
  while (myTouch.dataAvailable())
    myTouch.read();
    myGLCD.setColor(255, 255, 255);
    myGLCD.drawRoundRect (x1, y1, x2, y2);
}
//====================================================
void drawDistanceSensor() {
  myGLCD.setColor(100, 155, 203);
  myGLCD.fillRoundRect (10, 10, 60, 36);
  myGLCD.setColor(255, 255, 255);
  myGLCD.drawRoundRect (10, 10, 60, 36);
  myGLCD.setFont(BigFont);
  myGLCD.setBackColor(100, 155, 203);
  myGLCD.print("<-", 18, 15);
  myGLCD.setBackColor(0, 0, 0);
  myGLCD.setFont(SmallFont);
  myGLCD.print("Back to Main Menu", 70, 18);
  myGLCD.setFont(BigFont);
  myGLCD.print("Ultrasonic Sensor", CENTER, 50);
  myGLCD.print("HC-SR04", CENTER, 76);
  myGLCD.setColor(255, 0, 0);
  myGLCD.drawLine(0,100,319,100);
  myGLCD.setBackColor(0, 0, 0);
  myGLCD.setColor(255, 255, 255);
  myGLCD.setFont(SmallFont);
  myGLCD.print("Select Unit", 10, 114);
  myGLCD.setFont(BigFont);
  myGLCD.print("Distance:", 130, 120);
  myGLCD.setColor(223, 77, 55);
  myGLCD.fillRoundRect (10, 135, 90, 163);
  myGLCD.setColor(225, 255, 255);
  myGLCD.drawRoundRect (10, 135, 90, 163);
  myGLCD.setBackColor(223, 77, 55);
  myGLCD.setColor(255, 255, 255);
  myGLCD.print("cm", 33, 140);
  myGLCD.setColor(223, 77, 55);
  myGLCD.fillRoundRect (10, 173, 90, 201);
  myGLCD.setColor(255, 255, 255);
  myGLCD.drawRoundRect (10, 173, 90, 201);
  myGLCD.setBackColor(223, 77, 55);
  myGLCD.setColor(255, 255, 255);
  myGLCD.print("inch", 17, 180);
  myGLCD.setBackColor(0, 0, 0);
  myGLCD.setFont(SmallFont);
  myGLCD.print("Source code at: HowToMechatronics.com", CENTER, 220);
}
//====================================================
//===== getDistance - Custom Function
void getDistance() {
  // Clears the trigPin
  digitalWrite(trigPin, LOW);
  delayMicroseconds(2);
  // Sets the trigPin on HIGH state for 10 micro seconds
  digitalWrite(trigPin, HIGH);
  delayMicroseconds(10);
  digitalWrite(trigPin, LOW);
  // Reads the echoPin, returns the sound wave travel time in microseconds
  duration = pulseIn(echoPin, HIGH);
  // Calculating the distance
  distanceCm= duration*0.034/2;
  distanceInch= distanceCm/2.53;
  // Prints the distance in centimeters
  if (selectedUnit == '0' && distanceCm <=400) {
    myGLCD.setFont(SevenSegNumFont);
    myGLCD.setColor(0, 255, 0);
    myGLCD.setBackColor(0, 0, 0);
    myGLCD.printNumI(distanceCm,130, 145, 3,'0');
    myGLCD.setFont(BigFont);
    myGLCD.print("cm  ", 235, 178);

  }
  // Prints the distance in inches
  if (selectedUnit == '1' && distanceCm <=160) {
    myGLCD.setFont(SevenSegNumFont);
    myGLCD.setColor(0, 255, 0);
    myGLCD.setBackColor(0, 0, 0);
    myGLCD.printNumI(distanceInch,130, 145, 3,'0');
    myGLCD.setFont(BigFont);
    myGLCD.print("inch", 235, 178);
  }
  delay(10);
}
//====================================================
void drawLedControl() {
  myGLCD.setColor(100, 155, 203);
  myGLCD.fillRoundRect (10, 10, 60, 36);
  myGLCD.setColor(255, 255, 255);
  myGLCD.drawRoundRect (10, 10, 60, 36);
  myGLCD.setFont(BigFont);
  myGLCD.setBackColor(100, 155, 203);
  myGLCD.print("<-", 18, 15);
  myGLCD.setBackColor(0, 0, 0);
  myGLCD.setFont(SmallFont);
  myGLCD.print("Back to Main Menu", 70, 18);
  myGLCD.setFont(BigFont);
  myGLCD.print("RGB LED Control", CENTER, 50);
  myGLCD.print("LED Color:", 10, 95);
  myGLCD.print("R", 10, 135);
  myGLCD.print("G", 10, 175);
  myGLCD.print("B", 10, 215);
  myGLCD.setColor(255, 0, 0);
  myGLCD.drawLine(0,75,319,75);
  myGLCD.setColor(255, 255, 255);
  myGLCD.drawRect(30, 138, 310, 148); // R - Slider
  myGLCD.drawRect(30, 178, 310, 188);
  myGLCD.drawRect(30, 218, 310, 228);
}
//====================================================
//============= setLedColor() - Custom Funtion
void setLedColor() {
  if (myTouch.dataAvailable()) {
    myTouch.read();
    x=myTouch.getX();
    y=myTouch.getY();
    // Area of the Red color slider
    if( (y>=130) && (y<=156)) {
      xR=x; // Stores the X value where the screen has been pressed in to variable xR
      if (xR<=38) { // Confines the area of the slider to be above 38 pixels
        xR=38;
      }
      if (xR>=303){ /// Confines the area of the slider to be under 310 pixels
        xR=303;
      }
    }
    // Area of the Green color slider
    if( (y>=170) && (y<=196)) {
      xG=x;
      if (xG<=38) {
        xG=38;
      }
      if (xG>=303){
        xG=303;
      }
    }
    // Area of the Blue color slider
    if( (y>=210) && (y<=236)) {
      xB=x;
      if (xB<=38) {
        xB=38;
      }
      if (xB>=303){
        xB=303;
      }
    }
  }
  // Maps the values of the X - Axis from 38 to 0 and 310 to 255, because we need values from 0 to 255 for turning on the led
  int xRC = map(xR,38,310,0,255);
  int xGC = map(xG,38,310,0,255);
  int xBC = map(xB,38,310,0,255);

  // Sends PWM signal to the pins of the led
  analogWrite(redLed, xRC);
  analogWrite(greenLed, xGC);
  analogWrite(blueLed, xBC);

  // Draws a rectangle with the latest color combination
  myGLCD.setColor(xRC, xGC, xBC);
  myGLCD.fillRoundRect(175, 87, 310, 119);

  // Draws the positioners
  myGLCD.setColor(255, 255, 255);
  myGLCD.fillRect(xR,139,(xR+4),147); // Positioner
  myGLCD.setColor(xRC, 0, 0);
  myGLCD.fillRect(31, 139, (xR-1), 147);
  myGLCD.setColor(0, 0, 0);
  myGLCD.fillRect((xR+5), 139, 309, 147);

  myGLCD.setColor(255, 255, 255);
  myGLCD.fillRect(xG,179,(xG+4),187);
  myGLCD.setColor(0, xGC, 0);
  myGLCD.fillRect(31, 179, (xG-1), 187);
  myGLCD.setColor(0, 0, 0);
  myGLCD.fillRect((xG+5), 179, 309, 187);


  myGLCD.setColor(255, 255, 255);
  myGLCD.fillRect(xB,219,(xB+4),227);
  myGLCD.setColor(0, 0, xBC);
  myGLCD.fillRect(31, 219, (xB-1), 227);
  myGLCD.setColor(0, 0, 0);
  myGLCD.fillRect((xB+5), 219, 309, 227);
}
//====================================================
void drawGround() {
  myGLCD.setColor(221,216,148);
  myGLCD.fillRect(0, 215, 319, 239);
  myGLCD.setColor(47,175,68);
  myGLCD.fillRect(0, 205, 319, 214);
  myGLCD.setColor(0, 0, 0);
  myGLCD.setBackColor(221, 216, 148);
  myGLCD.setFont(BigFont);
  myGLCD.print("Score:",5,220);
  myGLCD.setFont(SmallFont);
  myGLCD.print("HowToMechatronics.com", 140, 220);
}
void drawPilars(int x, int y) {

    if (x>=270){
      myGLCD.setColor(0, 200, 20);
      myGLCD.fillRect(318, 0, x, y-1);
      myGLCD.setColor(0, 0, 0);
      myGLCD.drawRect(319, 0, x-1, y);

      myGLCD.setColor(0, 200, 20);
      myGLCD.fillRect(318, y+81, x, 203);
      myGLCD.setColor(0, 0, 0);
      myGLCD.drawRect(319, y+80, x-1, 204);
    }
    else if( x<=268) {
    myGLCD.setColor(114, 198, 206);
    myGLCD.fillRect(x+51, 0, x+53, y);
    myGLCD.setColor(0, 200, 20);
    myGLCD.fillRect(x+49, 1, x+1, y-1);
    myGLCD.setColor(0, 0, 0);
    myGLCD.drawRect(x+50, 0, x, y);
    myGLCD.setColor(114, 198, 206);
    myGLCD.fillRect(x-1, 0, x-3, y);

    myGLCD.setColor(114, 198, 206);
    myGLCD.fillRect(x+51, y+80, x+53, 204);
    myGLCD.setColor(0, 200, 20);
    myGLCD.fillRect(x+49, y+81, x+1, 203);
    myGLCD.setColor(0, 0, 0);
    myGLCD.drawRect(x+50, y+80, x, 204);
    myGLCD.setColor(114, 198, 206);
    myGLCD.fillRect(x-1, y+80, x-3, 204);
  }
  myGLCD.setColor(0, 0, 0);
  myGLCD.setBackColor(221, 216, 148);
  myGLCD.setFont(BigFont);
  myGLCD.printNumI(score, 100, 220);
}
//====================================================
void drawBird(int y) {
  if(y<=219) {
    myGLCD.drawBitmap (50, y, 35, 30, bird01);
    myGLCD.setColor(114, 198, 206);
    myGLCD.fillRoundRect(50,y,85,y-6);
    myGLCD.fillRoundRect(50,y+30,85,y+36);
  }
  else if(y>=200) {
    myGLCD.drawBitmap (50, 200, 35, 30, bird01);
    myGLCD.setColor(114, 198, 206);
    myGLCD.fillRoundRect(50,200,85,200-6);
    myGLCD.fillRoundRect(50,200+30,85,200+36);
  }
}
void gameOver() {
  myGLCD.clrScr();
  myGLCD.setColor(255, 255, 255);
  myGLCD.setBackColor(0, 0, 0);
  myGLCD.setFont(BigFont);
  myGLCD.print("GAME OVER", CENTER, 40);
  myGLCD.print("Score:", 100, 80);
  myGLCD.printNumI(score,200, 80);
  myGLCD.print("Restarting...", CENTER, 120);
  myGLCD.setFont(SevenSegNumFont);
  myGLCD.printNumI(2,CENTER, 150);
  delay(1000);
  myGLCD.printNumI(1,CENTER, 150);
  delay(1000);
  myGLCD.setColor(114, 198, 206);
  myGLCD.fillRect(0,0,319,239);
  drawBird(30);
  drawGround();
  delay(1000);
}
//====================================================
void restartGame() {
  delay(1000);
  gameOver();
  xP=319;
  yB=30;
  fallRate=0;
  score=0;
}
Code language: Arduino (arduino)
Manufacturing process
- Create a Secure Arduino RFID Lock – Step‑by‑Step Guide
- How to Display Images on a 1.17‑inch TFT LCD with Arduino UNO
- Display BMP Images from SD Card on Arduino 2.4″ TFT LCD Shield
- Resolving Touchscreen Issues on the 2.4″ TFT LCD Shield for Arduino
- Build a Reliable Arduino Weather Station with DHT Sensors
- Arduino Nano Fingerprint Sensor Project – Step‑by‑Step Tutorial
- Build an Arduino Tic‑Tac‑Toe Game on a Touchscreen: A Step‑by‑Step Tutorial
- Complete Arduino 16×2 LCD Tutorial: Connect, Program, and Display Data
- Master Arduino & MATLAB Integration: Step‑by‑Step Serial Communication Tutorial
- Arduino Tutorial 06: Connecting Arduino to Processing via Serial Communication