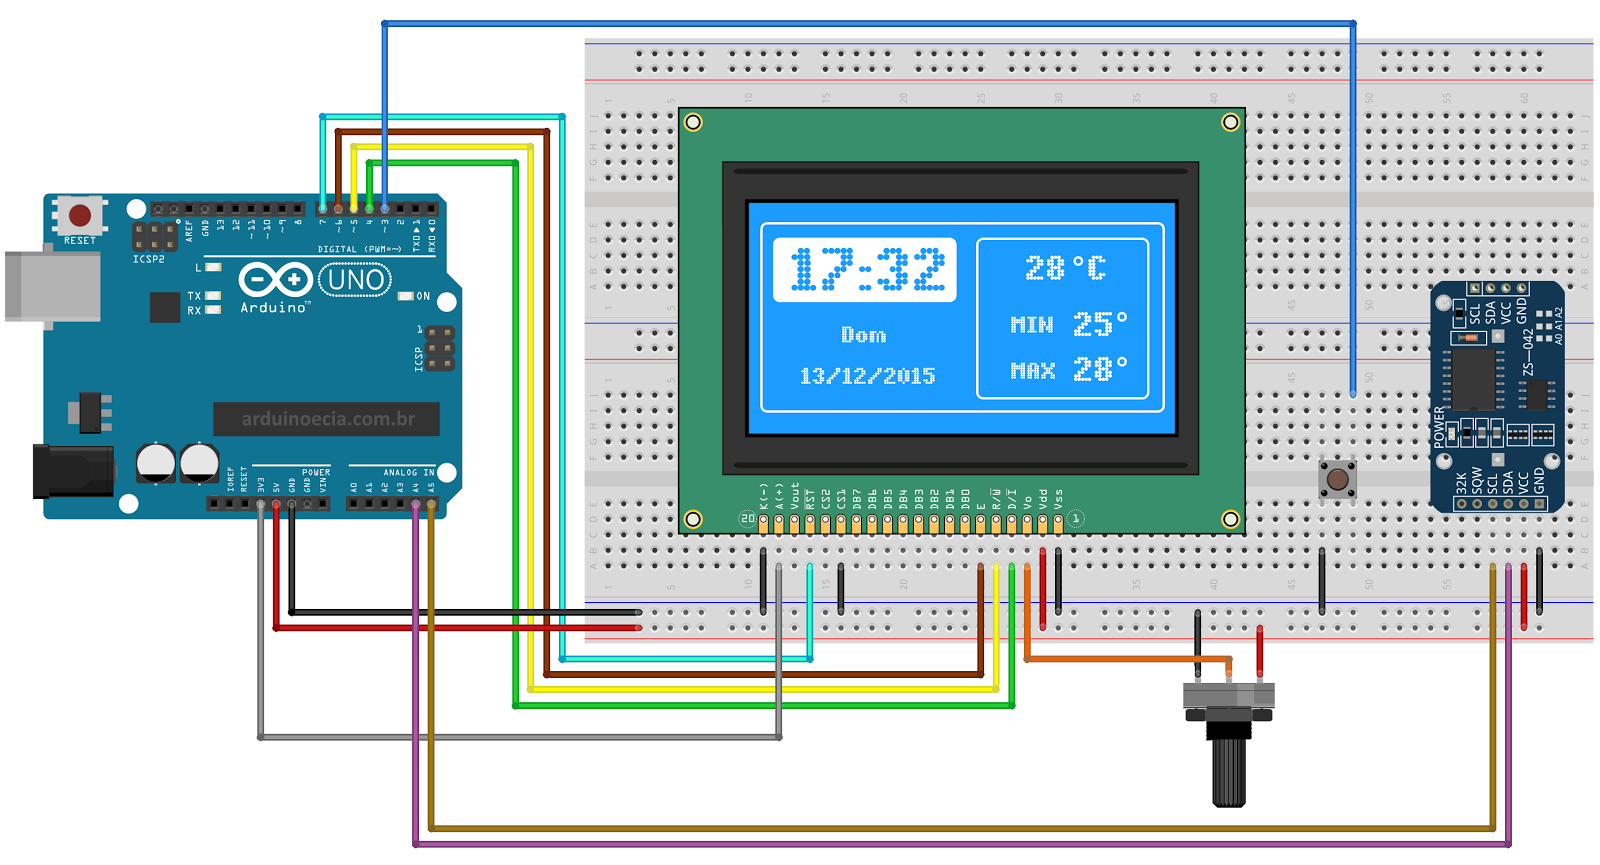
On arduinoecia web page is presented Arduino clock with 128x64 LCD graphic display, a potentiometer for adjusting the display contrast, the DS3231 RTC module and a push button. The RTC module is connected to the Arduino on the A4 (SDA) and A5 (SCL) pins. The button is connected to digital pin 3, with the Arduino's internal pull-up resistor enabled via software.The program uses some libraries that you will have to install before compiling. Unzip the libraries and place them inside the LIBRARIES folder of the Arduino IDE.
Program have two screens: the first one ( screen_1 ), shows the analog clock, the digital clock, as well as the current date and temperature.
The second screen ( screen_2 ) shows the digital clock, day of the week, date and current temperature information, minimum temperature and maximum temperature. The screens are selected by pressing the push button, connected to the digital pin 3.
To set the date and time of the RTC DS3231 module, use the serial monitor and enter the information in year, month, day, hour, minute, second format.
If you typed the information correctly, the message " " will be displayed.
Code
code
libraries
codeArduino
//Programa: Display LCD 128x64 e RTC DS3231
//Autor: Arduino e Cia

#include <U8glib.h>
#include <DS3232RTC.h>
#include <Streaming.h>
#include <Time.h>
#include <Wire.h>

//A linha abaixo define as conexoes do display e deve ser
//ajustada conforme o modelo utilizado
U8GLIB_ST7920_128X64_1X u8g(6, 5, 4 , 7); //Enable, RW, RS, RESET

int X2 = 0;
int Y2 = 0;
int X3 = 0;
int Y3 = 0;
float angulo = 0;
int posicao = 0;
int posicaoh = 0;
int temperatura =0;
int min_temp = 500;
int max_temp = -500;

int ScreenWith = 128;
int ScreenWithC = 96;
int ScreenHeight = 64;
int ScreenHeightC = 32;
#define botao 3

int estado_botao = 0;

char* dia_da_semana[]={
  "Sun", "Mon", "Tue", "Wed", "Thu", "Fri", "Sat"};

void tela_1()
{
  u8g.drawRFrame(0, 0, 128, 64, 3);
  //Mostra temperatura
  u8g.setPrintPos(20, 30);
  u8g.print(temperatura);
  u8g.drawStr( 42, 30, "C");
  u8g.drawCircle(37, 34, 2);
  mostra_relogio_digital();
  //Mostra relogio analogico
  fundo_relogio();
  //Atualiza Ponteiro de horas
  desenha_ponteiro(hour()-1, 12.0, 10);
  //Atualiza Ponteiro de minutos
  desenha_ponteiro(minute()-5, 60.0, 19);
  //Atualiza Ponteiro de segundos
  desenha_ponteiro(second()-5, 60, 21);
}

void tela_2()
{
  u8g.drawRFrame(0, 0, 128, 64, 3);
  u8g.drawRFrame(68, 4, 55, 56, 2);
  mostra_relogio_digital();
  u8g.setFont(u8g_font_5x8);
  u8g.drawStr( 78, 35, "MIN");
  u8g.drawStr( 78, 53, "MAX");
  u8g.setFont(u8g_font_6x13);
  u8g.setPrintPos(25, 41);
  u8g.print(dia_da_semana[(weekday()-1)]);
  //Mostra temperatura atual
  u8g.setPrintPos(83, 19);
  u8g.print(temperatura);
  u8g.drawStr( 105, 19, "C");
  u8g.drawCircle(100, 12, 2);
  //Mostra temperatura minima
  u8g.setPrintPos(98, 36);
  u8g.print(min_temp);
  u8g.drawCircle(113, 29, 2);
  //Mostra temperatura maxima
  u8g.setPrintPos(98, 54);
  u8g.print(max_temp);
  u8g.drawCircle(113, 47, 2);
}

void desenha_ponteiro(float valor, float rotacao, int Radius)
{
  angulo = valor * 2.0 * 3.1415 / rotacao - 1,5707;
  X2 = ScreenWithC + Radius * cos(angulo);
  Y2 = ScreenHeightC + Radius * sin(angulo);
  u8g.drawLine(ScreenWithC, ScreenHeightC, X2, Y2);
}

void fundo_relogio()
{
  u8g.drawCircle(ScreenWithC, ScreenHeightC, 27);
  u8g.drawCircle(ScreenWithC, ScreenHeightC, 1);
  u8g.setFont(u8g_font_6x13);
  u8g.setFontPosTop();
  u8g.drawStr(90, 9, "12");
  u8g.drawStr(114, 25, "3");
  u8g.drawStr(94, 44, "6");
  u8g.drawStr(74, 25, "9");

  for(int traco_minuto = 0; traco_minuto<12; traco_minuto++)
  {
    //Desenha linhas relogio analogico
    angulo = traco_minuto / 12.0 * 2 * 3.1415;
    X2 = ScreenWithC + 25 * cos(angulo);
    Y2 = ScreenHeightC + 25 * sin(angulo);
    X3 = ScreenWithC + 25 * cos(angulo);
    Y3 = ScreenHeightC + 25 * sin(angulo);
    u8g.drawLine(X2, Y2, X3, Y3);
  }
}

void mostra_relogio_digital()
{
  //Mostra a data
  u8g.setFont(u8g_font_5x8);
  u8g.setPrintPos(8, 55);
  u8g.print(day());
  u8g.drawStr( 19, 55, "/");
  u8g.setPrintPos(24, 55);
  u8g.print(month());
  u8g.drawStr( 35, 55, "/");
  u8g.setPrintPos(41, 55);
  u8g.print(year());
  //Mostra hora e minutos
  u8g.drawRBox(3, 4, 62, 21,2);
  u8g.setColorIndex(0);
  u8g.setFont(u8g_font_fub17);
  u8g.drawStr(29,21,":");
  //Acerta a posicao do digito caso a hora
  //seja menor do que 10
  if (hour() < 10)
  {
    u8g.drawStr(3,23,"0");
    posicaoh = 16;
  }
  else posicaoh = 3;
  u8g.setPrintPos(posicaoh, 23);
  u8g.print(hour());
  //Acerta a posicao do digito caso o minuto
  //seja menor do que 10
  if (minute() < 10)
  {
    u8g.drawStr(38,23,"0");
    posicao = 51;
  }
  else posicao = 38;
  u8g.setPrintPos(posicao ,23);
  u8g.print(minute());
  u8g.setColorIndex(1);
}

void setup()
{
  pinMode(3, INPUT_PULLUP);
  Serial.begin(9600);
  if ( u8g.getMode() == U8G_MODE_R3G3B2 )
    u8g.setColorIndex(255);     // white
  else if ( u8g.getMode() == U8G_MODE_GRAY2BIT )
    u8g.setColorIndex(3);         // max intensity
  else if ( u8g.getMode() == U8G_MODE_BW )
    u8g.setColorIndex(1);         // pixel on
  setSyncProvider(RTC.get);
  Serial << F("RTC Sync");
  if (timeStatus() != timeSet) Serial << F(" FAIL!");
  Serial << endl;
}

void loop()
{
  temperatura = RTC.temperature() / 4.;
  if (temperatura >= max_temp)
  {
    max_temp = temperatura;
  }
  if (temperatura <= min_temp)
  {
    min_temp = temperatura;
  }
  static time_t tLast;
  time_t t;
  tmElements_t tm;

  //Verifica se foi setado um novo horario
  //Formato: ano, mes, dia, hora, minuto, segundo
  if (Serial.available() >= 12) {
    int y = Serial.parseInt();
    if (y >= 100 && y < 1000)
      Serial<<F("Erro: Ano deve ter dois ou quatro digitos!") <<endl;
    else {
      if (y >= 1000)
        tm.Year = CalendarYrToTm(y);
      else    //(y < 100)
      tm.Year = y2kYearToTm(y);
      tm.Month = Serial.parseInt();
      tm.Day = Serial.parseInt();
      tm.Hour = Serial.parseInt();
      tm.Minute = Serial.parseInt();
      tm.Second = Serial.parseInt();
      t = makeTime(tm);
      RTC.set(t);
      setTime(t);
      Serial << F("Horario modificado para: ");
      printDateTime(t);
      Serial << endl;
      while (Serial.available() > 0) Serial.read();
    }
  }
  t = now();
  if (t != tLast) {
    tLast = t;
    printDateTime(t);
    Serial << endl;
  }

  //Verifica se o botao foi pressionado
  boolean valor_botao = digitalRead(3);
  if (valor_botao != 1)
  {
    while(digitalRead(3) != 1)
    {
      delay(100);
    }
    // Inverte o estado
    estado_botao = !estado_botao;
  }

  //picture loop
  u8g.firstPage();
  do {
    if (estado_botao == 0)
    {
      tela_1();
    }
    if (estado_botao == 1)
    {
      tela_2();
    }
  }
  while( u8g.nextPage() );
  delay(10);
}

//Mostra data e hora na serial
void printDateTime(time_t t)
{
  printI00(day(t), 0);
  Serial << monthShortStr(month(t)) << _DEC(year(t));
  Serial << ' ';
  printI00(hour(t), ':');
  printI00(minute(t), ':');
  printI00(second(t), ' ');
}

//Correcao para imprimir "00" ao inves de "0" caso
//o valor seja menor do que 10
void printI00(int val, char delim)
{
  if (val < 10) Serial << '0';
  Serial << _DEC(val);
  if (delim > 0) Serial << delim;
  return;
}