


Master Serial Communication with Arduino – Step-by-Step Video Guide
Welcome to the fifth Arduino Tutorial from our Arduino Tutorial Series. In this tutorial we will learn how the Serial Communication works and make few examples of it for better understanding. This is a Step by Step Video Tutorial which is easy to be followed. Also, below the video you can find what Parts do we need for this tutorial and the Source Codes of the Examples in the video. Components needed for this Arduino Tutorial
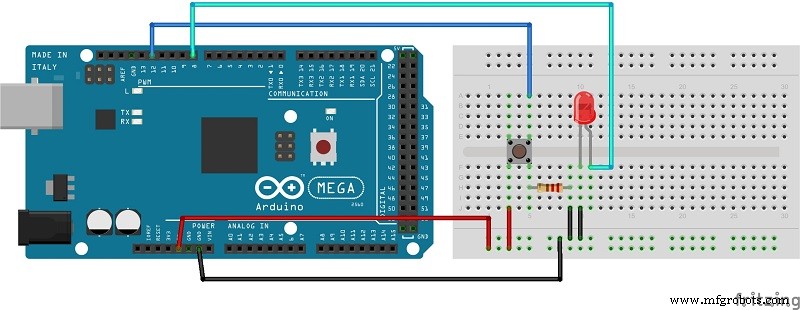
Circuit schematic
Source Code
int led = 13;
int button = 12;

void setup() {
pinMode(led, OUTPUT);
pinMode(button, INPUT);
Serial.begin(9600);
}

void loop(){
if(Serial.available() > 0) {
char ledState = Serial.read();
if(ledState == '1'){
digitalWrite(led, HIGH);
}
if(ledState == '0'){
digitalWrite(led, LOW);
}
}
int buttonState = digitalRead(button);
if ( buttonState == HIGH){
Serial.println("Button is pressed");
delay(500);
}
}Code language: Arduino (arduino)
Manufacturing process
- Create a Secure Arduino RFID Lock – Step‑by‑Step Guide
- Python 3 to Arduino UNO: Easy Command Control and LED Demo
- Arduino Nano Fingerprint Sensor Project – Step‑by‑Step Tutorial
- Mastering I2C Communication with Arduino: A Practical Tutorial
- Master Arduino & MATLAB Integration: Step‑by‑Step Serial Communication Tutorial
- Arduino Tutorial 06: Connecting Arduino to Processing via Serial Communication
- Mastering Arduino Analog Inputs: A Step‑by‑Step Video Guide
- Master DC & Servo Motor Control with Arduino – Step-by-Step Tutorial
- Arduino Beginner Tutorial 01: Get Started with Your First Project
- Arduino Serial Communication: Mastering UART Basics and Troubleshooting