


Arduino Serial Communication: Mastering UART Basics and Troubleshooting
Arduino Serial: Serial Communication by Arduino
Background of Serial Communication:
When microcontroller or microprocessor need to communicate with the outer world, then they provide data in the form of 8 bits packets, so if one system needs to communicate with the other one, then total 8 wires cable is used and it is not a always a practical solution because the signal will distort when travel to the long distance. it is also expensive because of the high cost of the bundle of 8 wires this protocol is named as parallel communication after this the need of the new protocol is awakened and then designer introduce a new protocol which is named as serial protocol it used only 3 wires to transmit all the data of 8 line. Also Read: Arduino Programming: What is Arduino and How to Program it?Serial protocol:
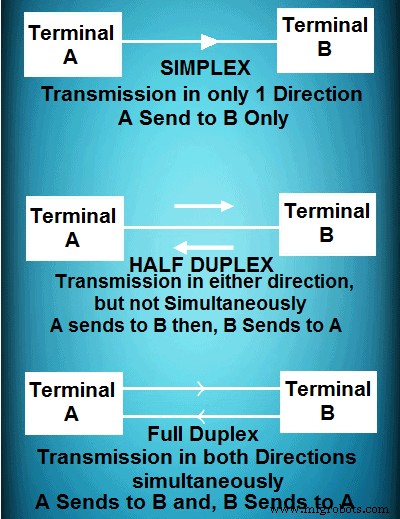
In serial protocol, 8 bits data is converted to the serial stream of bits by the parallel in serial out shift register. In the receiving side, it is converted to parallel 8 bits data by serial in parallel out shift register. Serial data communication uses 2 methods synchronous and asynchronous. Synchronous method transfer block of data at the time while asynchronous transfer byte by byte. Mostly asynchronous mode of operation used in serial communication.There are three types of communication systems in serial communication
- Simplex ( only transmit data )
- Half duplex (Can transmit or receive data, but not simultaneously)
- Full Duplex (can transmit and receive data at the same time)
Programming Arduino for serial Communication:
Arduino has built in library to use Rs232 protocol, so we don’t need to write the whole protocol and take care about the credibility of the data because RS232 library will take care of it.Have look at the most important functions used in Rs232 communication. Serial.begin(x)
Note: X is the baud rate, different devices have different requirement of baud rate mostly 9600 is used as a baud rate it define how fast data will sent or received. This function comes in void Setup(). Serial.available()
This function checks whether serial data is available to receive or not if the return of this function is 0 its mean no serial data available to fetch and if it returns 1 its mean serial data available. Serial.read()
This function reads the data available in the buffer by default when you send data then its data type is char and when you read it will read its decimal value, for example you are sending 1 it will be read as 49 which is the decimal equivalent of char 1. Serial.println(x)
This function prints the data available in the x variable in the serial window of aurdinu IDE and sends it to the port. Serial.flush()
This function will flush out all the garbage values in the serial buffers.
Example of serial port programming in Arduino:
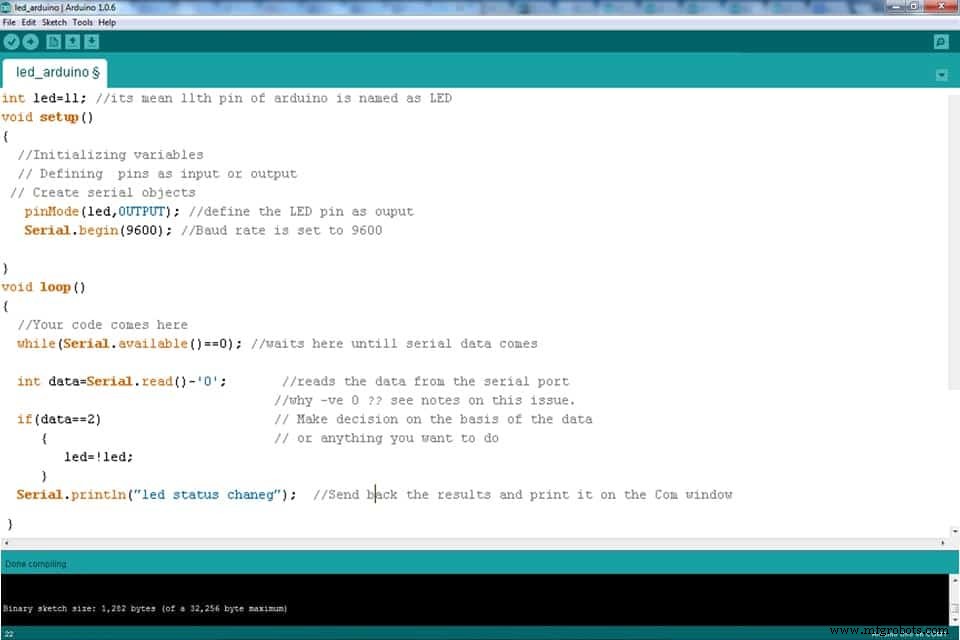 Run this program and change it for your understanding and practice.
Stay connected for more upcoming tutorials.
You Might Also Read:
- How to Program PIC18 Microcontroller. Step by Step Tutorial.
- MAX232: Construction, Operation, Types and Application.
- 10+ Design & Simulation Tools for Electrical/Electronics Engineers Online.
- 15 Must Have Android Apps for Electrical & Electronics Engineers & Students.
- Clap Switch Circuit Electronic Project Using 555 Timer.
- How to find The value of Burnt Resistor ( By three handy Methods ).
Mastering PWM in Arduino: Comprehensive Guide & Key Functions
Master PCB Design: Step‑by‑Step Guide with Pictorial Illustrations
Industrial Technology
- Understanding Data Flow: From Simplex to Full‑Duplex Communication
- Optical Data Communication: Harnessing Light for High‑Bandwidth, Interference‑Free Transmission
- Arduino-based Wireless Magnetic Data Transfer with Infineon 3D Sensor
- Facilitating Deaf-Blind Communication Using 1Sheeld and Arduino
- Arduino UNO & WiFi Shield: Real-Time Temperature Display on the Web via Serial
- Python 3 to Arduino UNO: Easy Command Control and LED Demo
- Mastering I2C Communication with Arduino: A Practical Tutorial
- Master Serial Communication with Arduino – Step-by-Step Video Guide
- HC-12 Serial Communication Module: Setup, Features & Remote Data Transfer
- Straton Tutorial 2: Mastering MMS Communication in IEC 61850