


Arduino-based Wireless Magnetic Data Transfer with Infineon 3D Sensor
Components and supplies
 |
| × | 1 | |||
 |
| × | 1 | |||
| × | 1 | ||||
| × | 1 | ||||
 |
| × | 1 |
Apps and online services
 |
| |||
|
About this project
If you want to send data wirelessly, you have a plethora of options to choose from. From WiFi to BLE to LoRa radio, there's one for every occasion. However, if you want a solution that does not use radio waves, then this is the project for you!
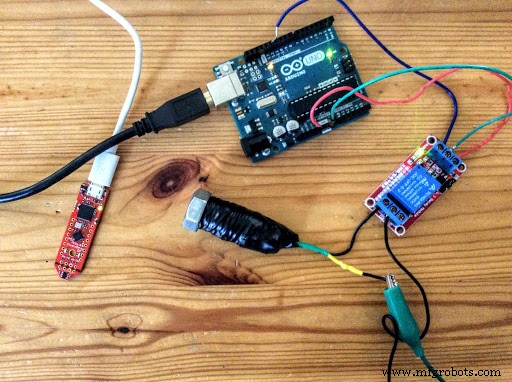
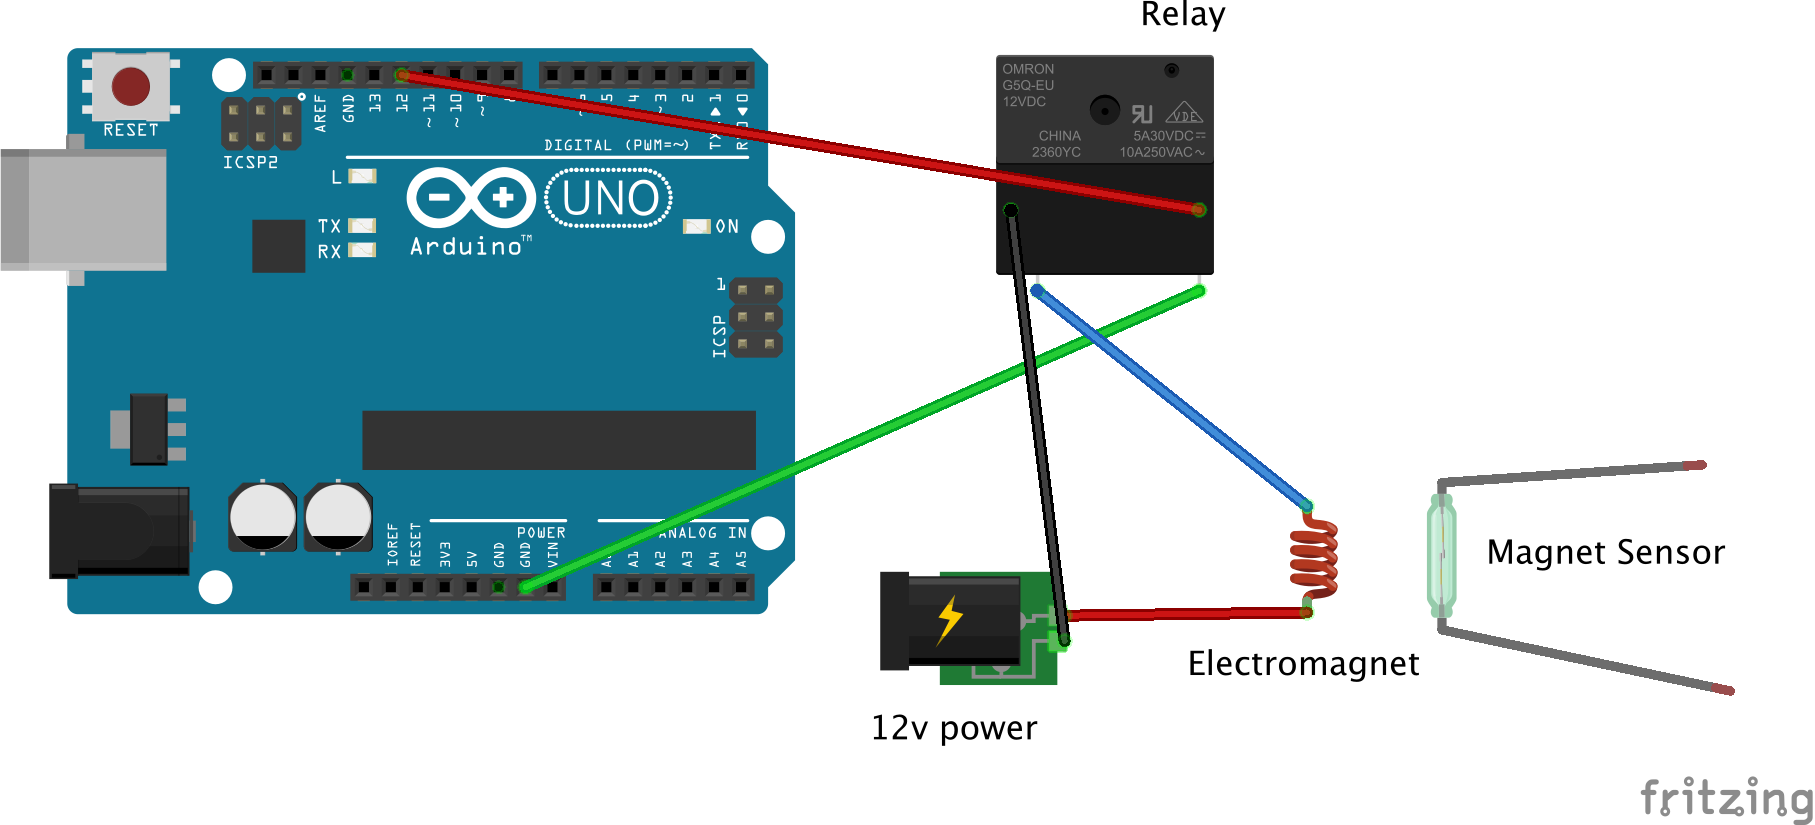
Step 1: Wire the ArduinoWire up the Arduino according to this schematic.

The input pin on the relay or relay module goes to pin 12 on the Arduino.
The electromagnet and the electromagnet power supply connects to the normally open contacts on the relay or relay module.
Open up the Arduino IDE. If you don't have it, download it here. Copy/paste this code into the IDE, or download the code file here. Plug your Arduino into your computer, and make sure you have the correct board/port selected.
Tools > Board > Arduino/Genuino Uno
Tools > Port
Compile and upload the code.
int incomingByte = 0;   // for incoming serial data
int data = 0;
void setup() {
       Serial.begin(9600); // opens serial port, sets data rate to 9600 bps
       pinMode(12, OUTPUT);
       Serial.println("Starting...");
       Serial.println("Send a string of binary digits");
}
// main section
void loop() {
       // send data only when you receive data:
       if (Serial.available() > 0) {
               // read the incoming byte:
               incomingByte = Serial.read();
               data = 1;
               if (incomingByte == 48) { // if it recevies a 0
                 digitalWrite(12, LOW); //turn off the magnet
                 Serial.print("0");
                 delay(100);
               }else if (incomingByte == 49) { //if it recieves a 1
                 digitalWrite(12, HIGH); //turn on the magnet
                 Serial.print("1");
                 delay(100);
               }else{
                 Serial.print("?");
               }
       //clean things up
       }else{
         if (data == 1){
           digitalWrite(12, LOW);
           Serial.println("");
           data = 0;
         }
       }
}
After the code successfully compiles and uploads, open up the Serial Monitor. Now, if you send a string of 1's and 0's, then you should hear your relay clicking.
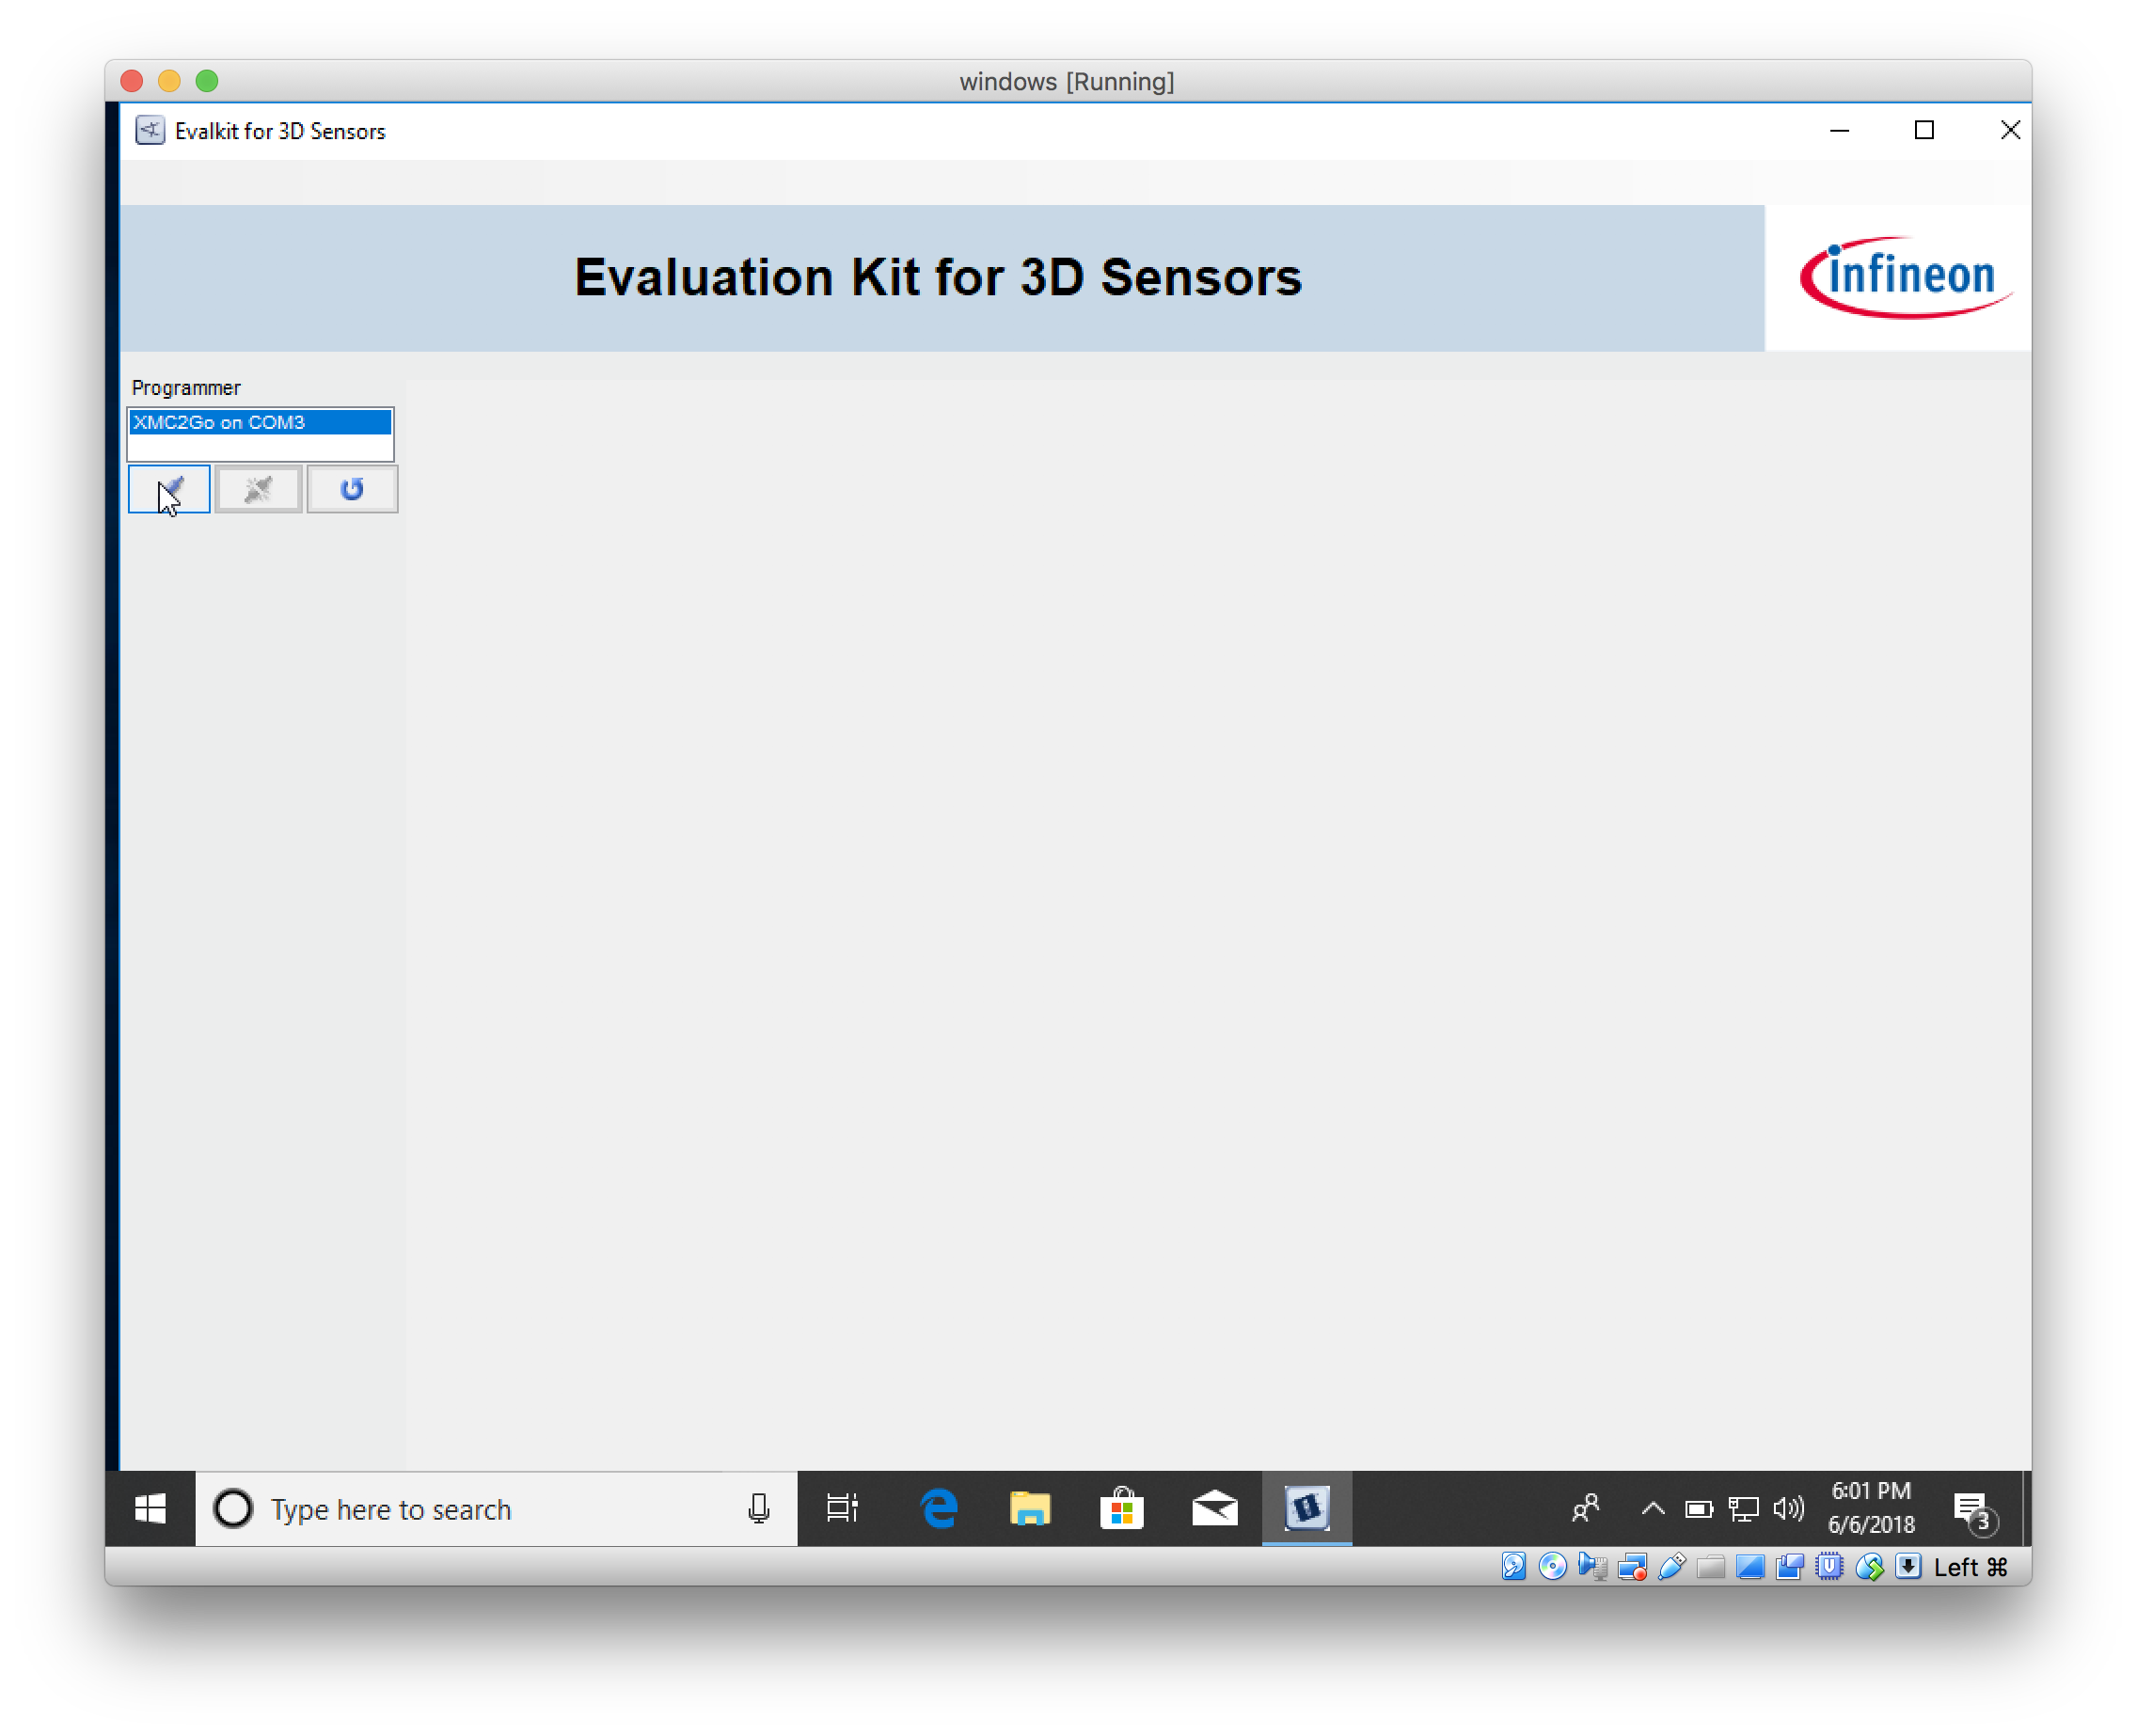
Step 3: Install the GUIInstall the GUI for the 2GO 3D Magnetic Sensor here. Scroll to the bottom and find where it says "Free Download". Then download the GUI zip file. Follow the instructions to complete the installation. Besides the GUI, they will also install a USB driver.
Keep in mind that the software will only work on Windows, so if you are on a Mac, like me, then get a Windows computer or run a Windows virtual machine.
Step 4: Test the Setup!Connect the 2GO sensor to your computer. Open up the GUI. Link it, then select "Fast Mode". You should start seeing sensor data immediately.
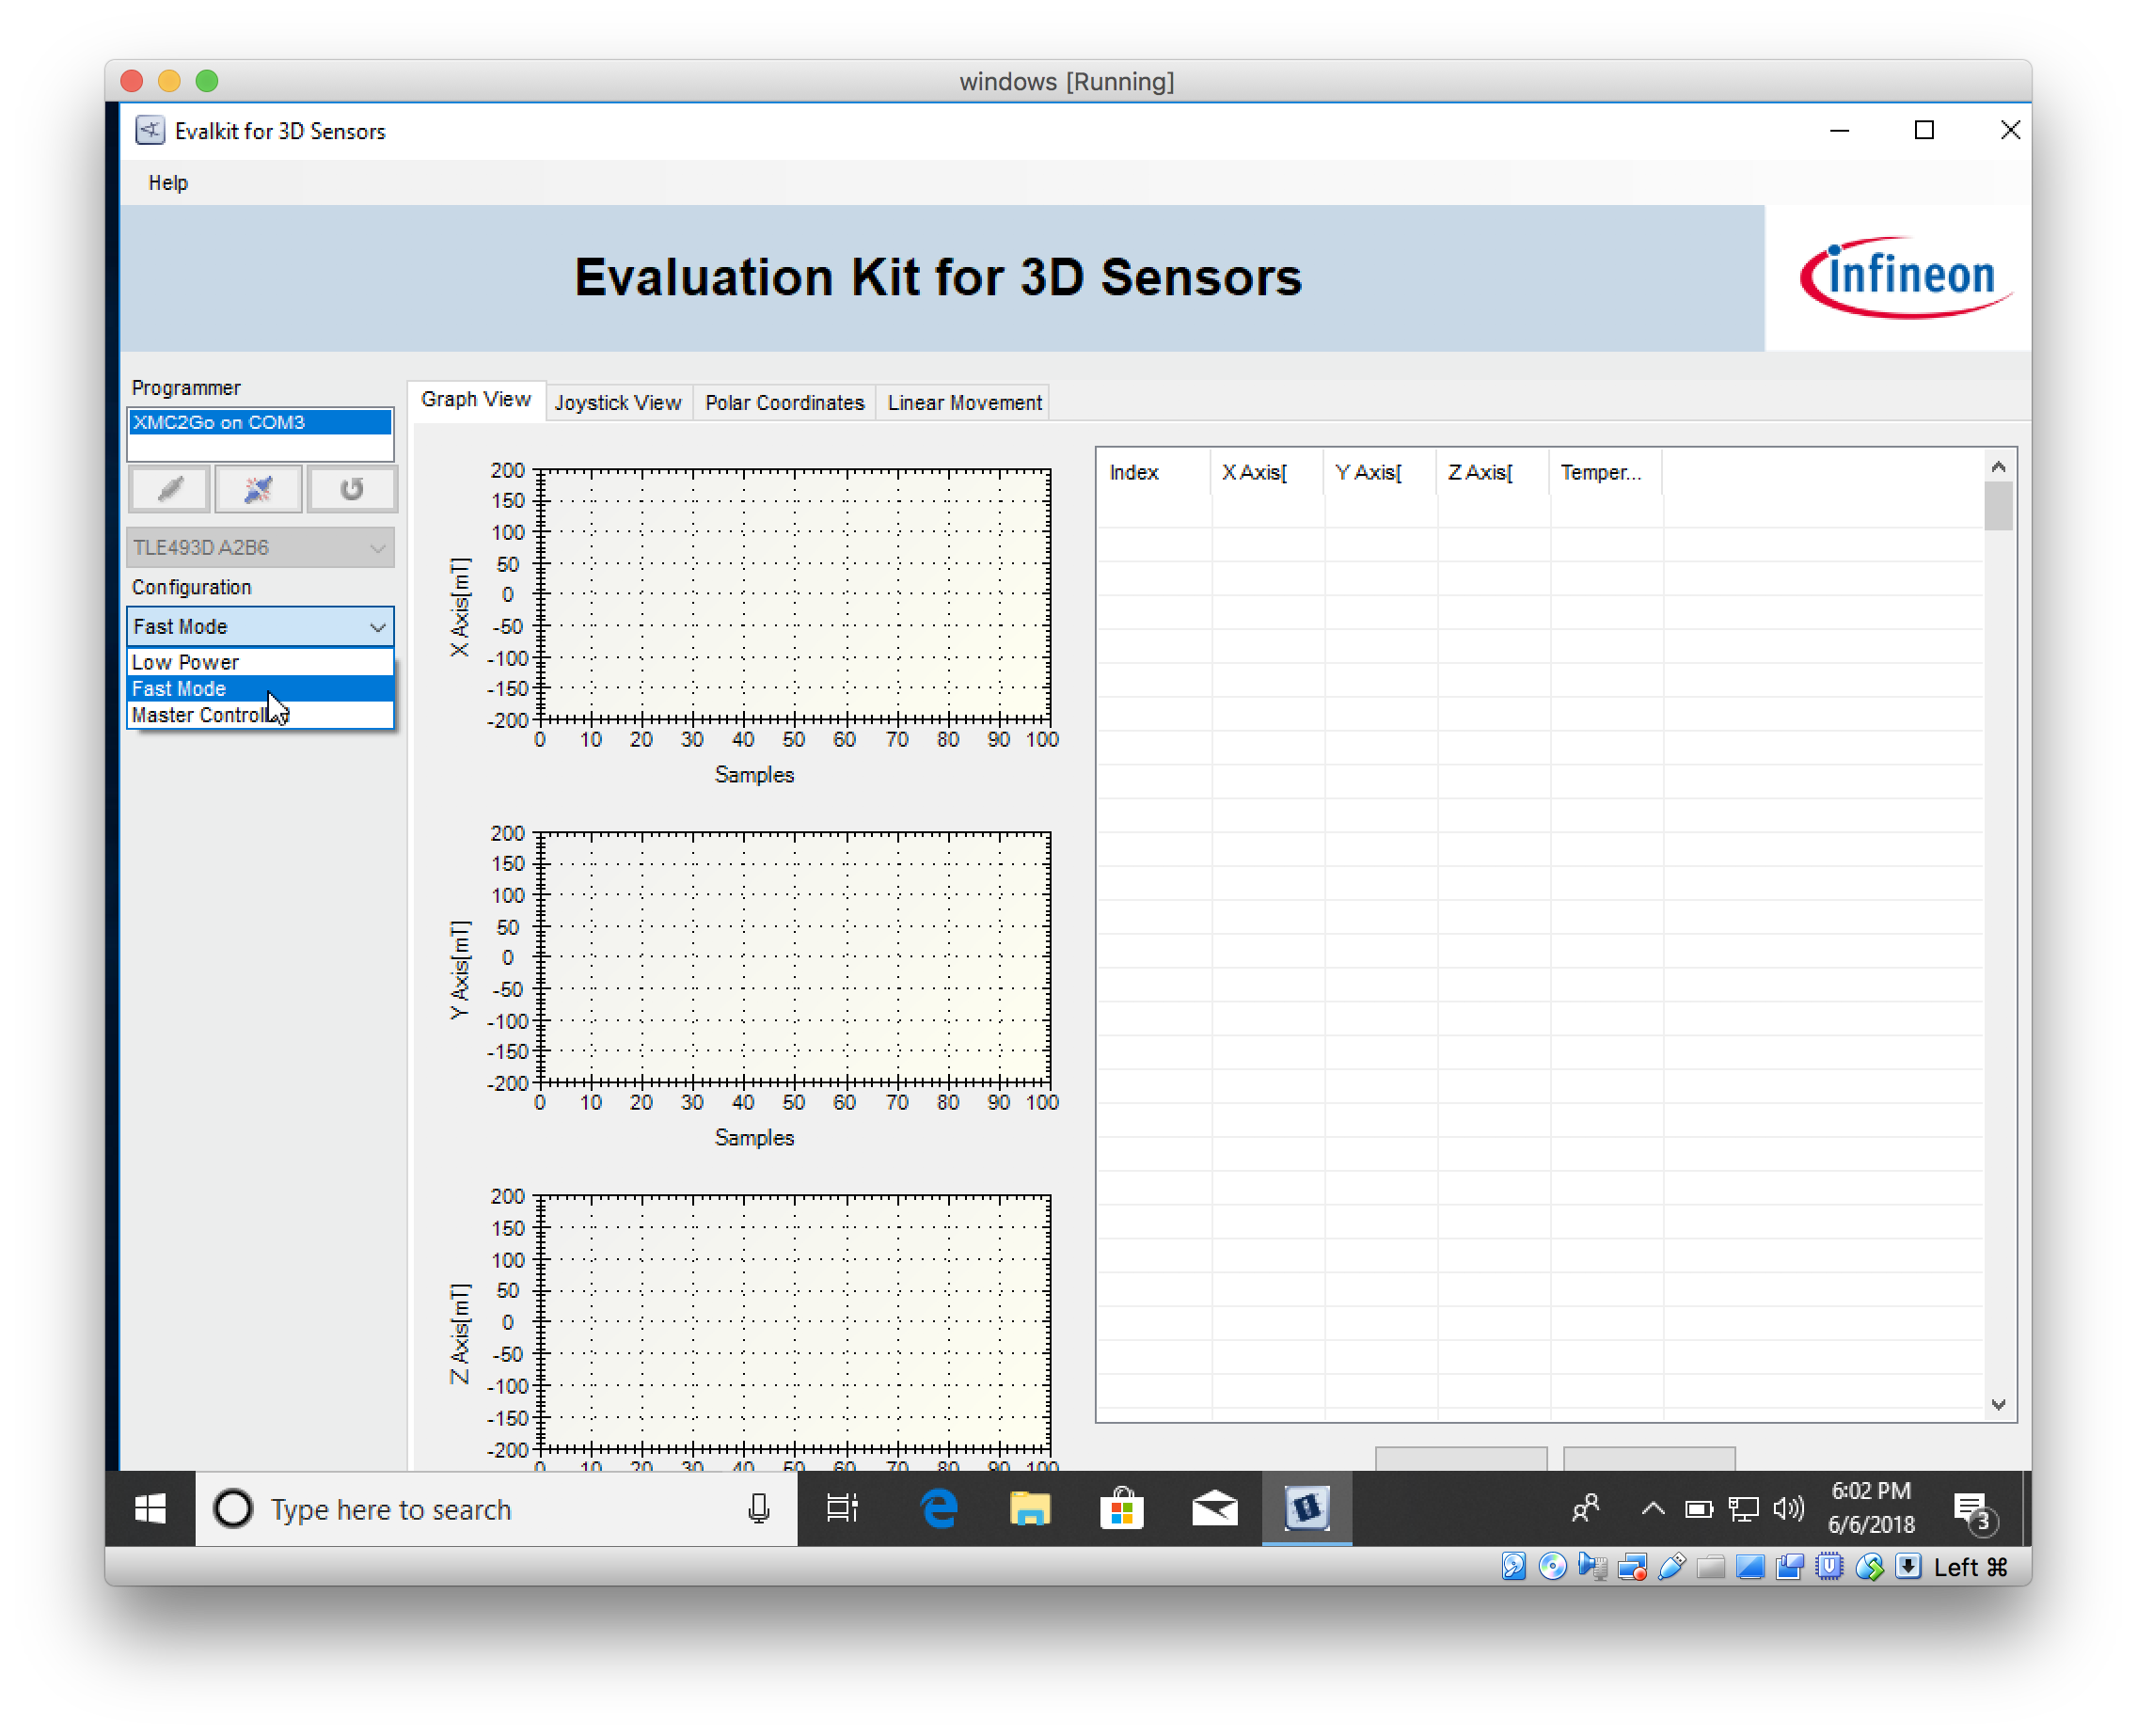
On the Arduino side of things, open up the Serial Monitor. Power the electromagnet, then send some 1's and 0's in the Serial Monitor. The relay should start clicking and you should see little pulses in the sensor GUI.
You now have a working project, but let's make it do something!
Step 5: Configure the IDETo program the 2GO with the Arduino IDE, you will need to add it as a board first. In the IDE, go to File > Preferences > Additional Boards Manager URLs and paste in this link:
https://github.com/Infineon/Assets/releases/download/current/package_infineon_index.json
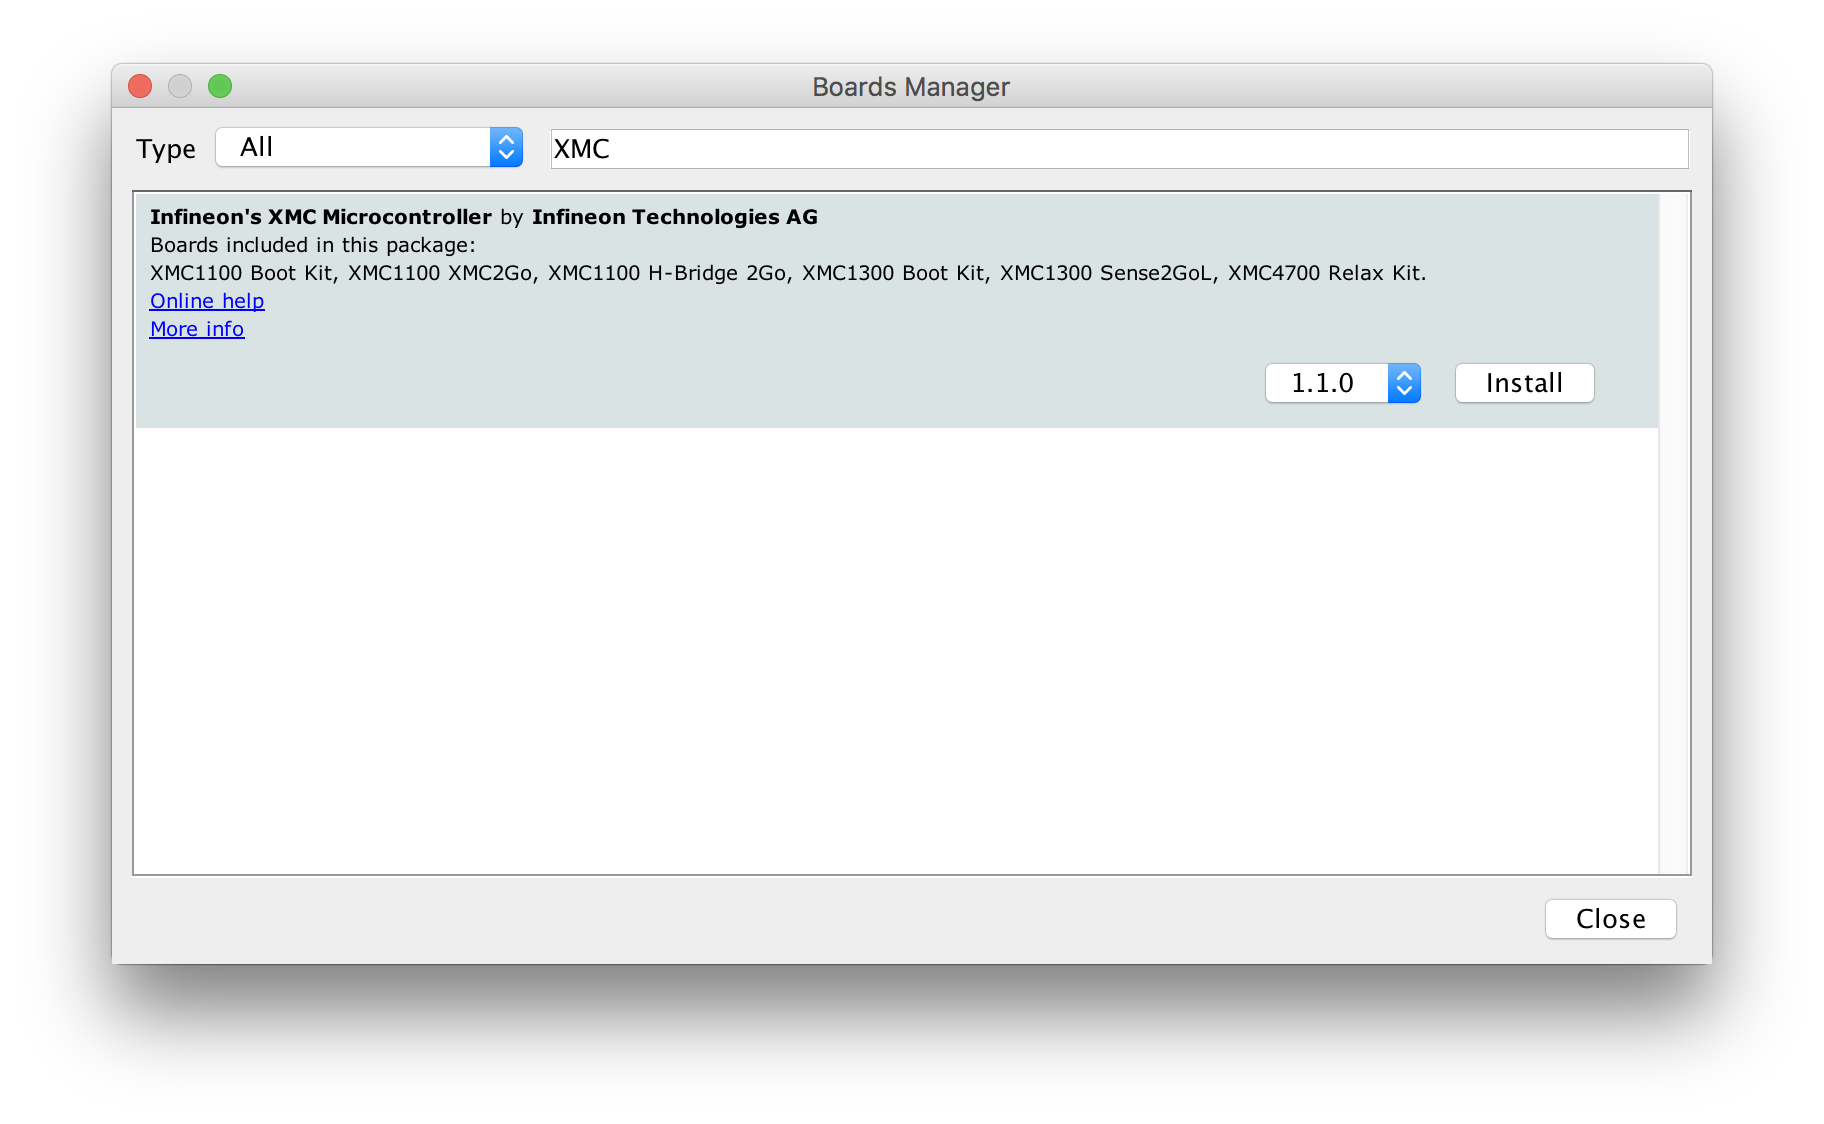
Then, go to Tools > Board > Boards Manager and search for 'XMC'. Click on it and then click Install.
You will also need to add the library to access the sensor. Go to Infineon's Github page and download the.zip file. Then, go to Sketch > Include Library > Add.ZIP Library...
Select the.zip file you downloaded earlier and click Choose.
Now, if you go to Sketch > Include Library and scroll down, you should see the TLE493D_W2B6 Library.
Step 6: Program the 2GOCopy/paste the code into the IDE, or download the 3D_Sensor sketch here.
You can adjust the sensitivity in the 'sens' constant depending on if you have magnets nearby. To increase the sensitivity, decrease the 'sens' constant.
// set stuff up
#include <Tle493d_w2b6.h>
Tle493d_w2b6 mag3DSensor = Tle493d_w2b6();
// adjust sensitivity
const int sens = 1;
void setup() {
 // more setup
 mag3DSensor.begin();
 mag3DSensor.enableTemp();
 pinMode(LED_BUILTIN, OUTPUT);
}
void loop() {
 // get sensor info
 mag3DSensor.updateData();
  //check if there's a magnet
  if (abs(mag3DSensor.getX()) > sens || abs(mag3DSensor.getY()) > sens || abs(mag3DSensor.getZ()) > sens ) {
   //turn on the light
   digitalWrite(LED_BUILTIN, HIGH);
 } else {
   //turn off the light
   digitalWrite(LED_BUILTIN, LOW);
 }
 // don't spam, kids
 delay(50);
}
Place your electromagnet somewhere near the sensor. Connect the 2GO to power and the Arduino to your computer. Open up the Serial Monitor and send some 1's and 0's. The LED on the 2GO should light up and blink depending on what you sent. If it doesn't light up, try putting the electromagnet closer to the sensor. If that doesn't work, try adjusting the sensitivity. If it lights up but doesn't turn off, adjust the sensitivity. Also try unplugging it and plugging it back in.
Congrats! You're all done!
Going FurtherThis project is fairly simple and can be built on with other features. Add a button to the Arduino for a completely headless setup. Try connecting other things, like speakers. Wouldn't it be cool to stream music with a magnet? The possibilities are endless!
Code
Code
https://github.com/tctree333/Arduino-3D-SensorSchematics
Manufacturing process
- Transitioning to Wireless SCADA: Proven Methods, Key Differences, and Reliable Tech Options
- Spark Microsystems Introduces UWB Transceivers for Ultra‑Low Power, Low‑Latency IoT
- USB‑BLE Wireless MIDI Adapters – Seamless Connectivity for Musicians
- Smart Wireless Light Switch Controller: Arduino‑Based Remote Switch Manipulator
- Wireless Arduino Programming Shield with HC-05 Bluetooth – No USB Needed
- Affordable Arduino Data Glasses for Multimeter Readings
- Arduino Wireless Weather Station: DIY Portable Weather Monitoring Kit
- Build a Reliable Arduino-Based Wireless Weather Station
- Arduino Data Logging with SD Card & DS3231 RTC – Step‑by‑Step Tutorial
- Arduino Serial Communication: Mastering UART Basics and Troubleshooting