


Arduino UNO & WiFi Shield: Real-Time Temperature Display on the Web via Serial
Components and supplies
 |
| × | 1 | |||
 |
| × | 1 | |||
| × | 1 | ||||
| × | 1 |
About this project
Just by using Serial.println(temperature), we can send temperature via web. Using a built-in Web Serial Plotter, we can visualize temperature on web WITHOUT web programming.
If you are a beginner, you can learn about wifi and sensor in Arduino - Wifi and Arduino - DS18B20 temperature sensor tutorials
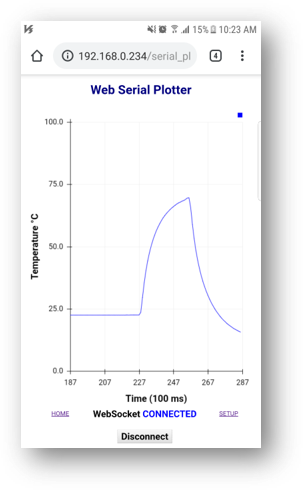
Demonstration.
How It Works- Arduino read temperature value from sensor and send it via Serial
- Access Web Serial Plotter from a browser on mobile phone or PC
- Temperature is automatically forwarded to Web.
- Web visualizes temperature on Web
- By default, Web Serial Plotter works as the same as Serial Plotter on Arduino IDE. We need to customize it to add X-axis title, Y-axis title, temperature range and the number of the displayed data samples as well. This can be done via a setting page.
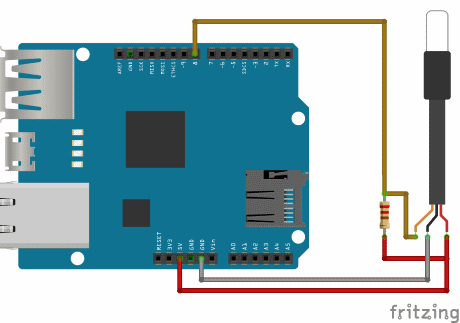
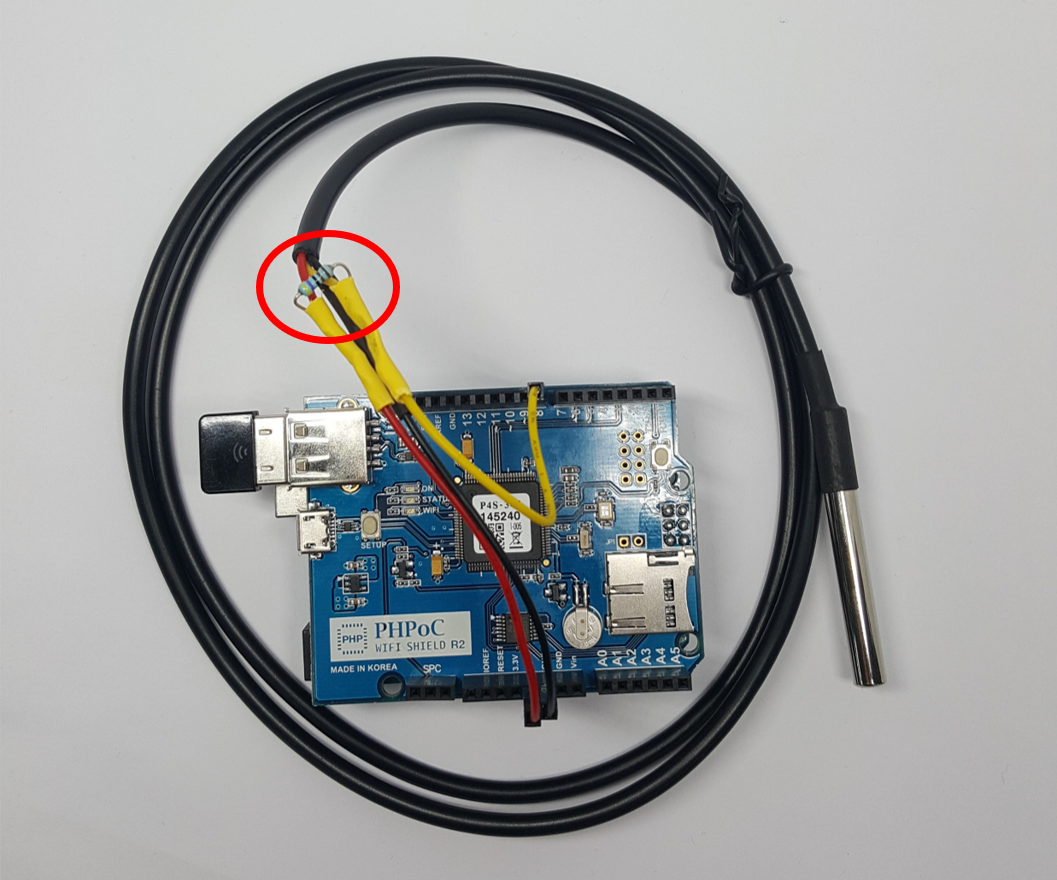
1. Wiring
- Stack PHPoC Wifi Shield 2 or PHPoC Shield 2 on Arduino
- Wiring like images in Schematic part
2. Compile and Upload Arduino Code
See code in "Arduino Code - Short Sampling Period"
3. Customize Web Serial Plotter
- Access Web Serial Plotter by typing IP address of PHPoC WiFi Shield
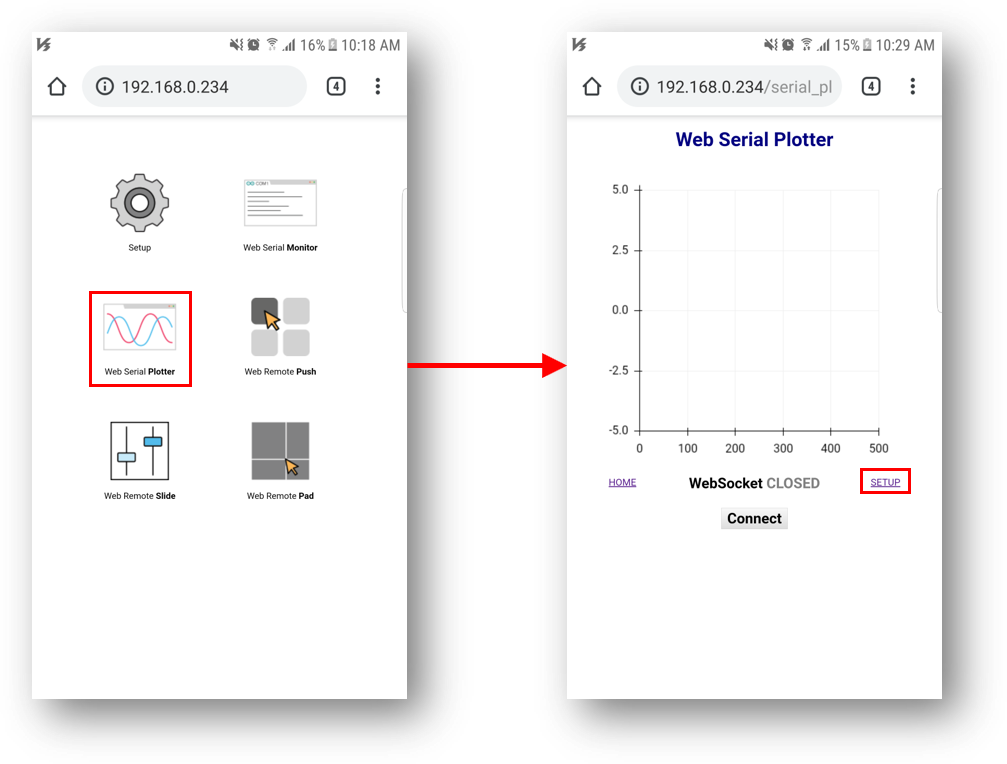
- Click "Setup" link to customization page
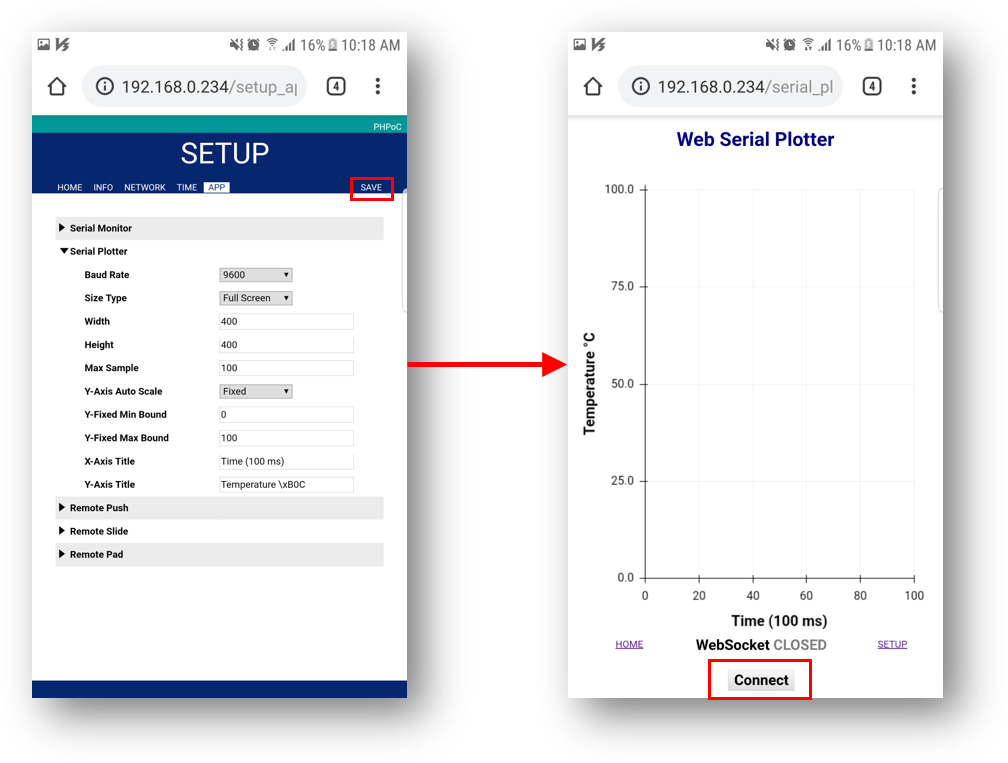
- Customize parameters as above and Save
4. Result
- Click connect button to see the result
If temperature is sampling in small interval (e.g seconds), We just need to print temperature value to Serial because we can wait to see the graph.
What happen if we want to monitor temperature daily or hourly? We can NOT wait to see all graph.
Solution: we store the number of the last sampling temperatures on Arduino and print it frequently.
For example, We want to see temperature display on graph with during 100 hours. The unit is hour. We need to read data from sensor every hour, store it in an circle queue (queue length is 100). Every second, we print out all 100 sample data. Therefore, we can see graph of temperature during the last 100 hours without waiting for 100 hours.
You can see code in "Arduino Code - Long Sampling Period"
The Best Arduino Starter Kit for BeginnerSee The Best Arduino Kit for Beginners
Code
- Arduino Code - Short Sampling Period
- Arduino Code - Long Sampling Period (daily, hourly...)
Arduino Code - Short Sampling PeriodArduino
#include <OneWire.h>
#include <DallasTemperature.h>
#include <Phpoc.h>
#define SAMPLE_INTERVAL 1000 // in ms

// Data wire is plugged into port 8 on the Arduino
OneWire oneWire(8);
DallasTemperature sensors(&oneWire);

unsigned long lastSampleTime;

void setup() {
	Serial.begin(9600);
	while(!Serial)
		;

	sensors.begin();
	Phpoc.begin();

	lastSampleTime = millis();
}

void loop() {
	if((millis() - lastSampleTime) > SAMPLE_INTERVAL) {
		sensors.requestTemperatures();
		float temp = sensors.getTempCByIndex(0);

		Serial.println(temp);

		lastSampleTime = millis();
	}
}
Arduino Code - Long Sampling Period (daily, hourly...)Arduino
#include <OneWire.h>
#include <DallasTemperature.h>
#include <Phpoc.h>
#define UPDATE_INTERVAL 1000 // in ms
#define SAMPLE_INTERVAL 60*60*1000 // 1 hour

// Data wire is plugged into port 8 on the Arduino
OneWire oneWire(8);
DallasTemperature sensors(&oneWire);

unsigned long lastSampleTime;
unsigned long lastUpdateTime;

float temps[100];
int index;

void setup() {
	Serial.begin(9600);
	while(!Serial)
		;

	sensors.begin();
	Phpoc.begin();

	lastSampleTime = millis();
	lastUpdateTime = millis();
	index = 0;
}

void loop() {
	if((millis() - lastSampleTime) > SAMPLE_INTERVAL) {
		sensors.requestTemperatures();
		float temp = sensors.getTempCByIndex(0);

		temps[index] = temp;

		index = (index + 1) % 100;

		lastSampleTime = millis();
	}

	if((millis() - lastUpdateTime) > UPDATE_INTERVAL) {
		for(int i = 0; i < 100; i++) {
			Serial.println(temps[(index - i + 100)%100]);
		}

		lastUpdateTime = millis();
	}
}
Schematics
1. Stack PHPoC Wifi Shield 2 or PHPoC Shield 2 on Arduino2. Wiring like below image
Manufacturing process
- Secure Your Arduino with Web Pattern Unlock – Easy Setup & Remote Control
- Arduino Web-Driven XY Plotter with Stepper Motor Controller
- Smartphone-Based Temperature Monitoring System with Arduino and Bluetooth
- Arduino Web Oscilloscope with Advanced Triggering – 6 Channels, Customizable Settings
- Arduino Web-Controlled Light Bulb: Step-by-Step Guide
- Hysteresis-Based Arduino Temperature Control System
- Arduino UNO Web-Enabled Servo Control with PHPoC WiFi Shield
- Remote Control of a 6‑DOF Arduino Robot Arm via Web Interface
- Master Serial Communication with Arduino – Step-by-Step Video Guide
- Arduino Serial Communication: Mastering UART Basics and Troubleshooting